Managing General Settings
The General Settings section in PAM360 enables administrators to enforce and implement essential configurations to enhance security, streamline operations, ensure compliance, and improve user experience. Through this section, administrators can configure and manage global settings that impact key aspects of PAM360, such as password management, resource creation, session management, user notifications, and high availability, among others. These configurations allow administrators to tailor PAM360 to align with their organization’s security policies and operational requirements, ensuring the system is optimized for their specific needs.
To configure general settings in PAM360, navigate to Admin >> Customization >> General Settings. On the General Settings page, you will find various settings organized into multiple sections. Click on each link to view the detailed configuration options.
- Password Retrieval
- Password Reset
- Resource / Password Creation
- Resource Group Management
- Remote Session Management
- Notifications
- User Management
- High Availability
- Personal Passwords
- Usage Statistics Collection
- SDK Settings
- Miscellaneous
1. Password Retrieval
This section contains several settings that enhance security and usability for password management. Through this section, you can configure and modify settings related to viewing and retrieving passwords, auto logon capabilities, password history visibility, and clipboard management, among others.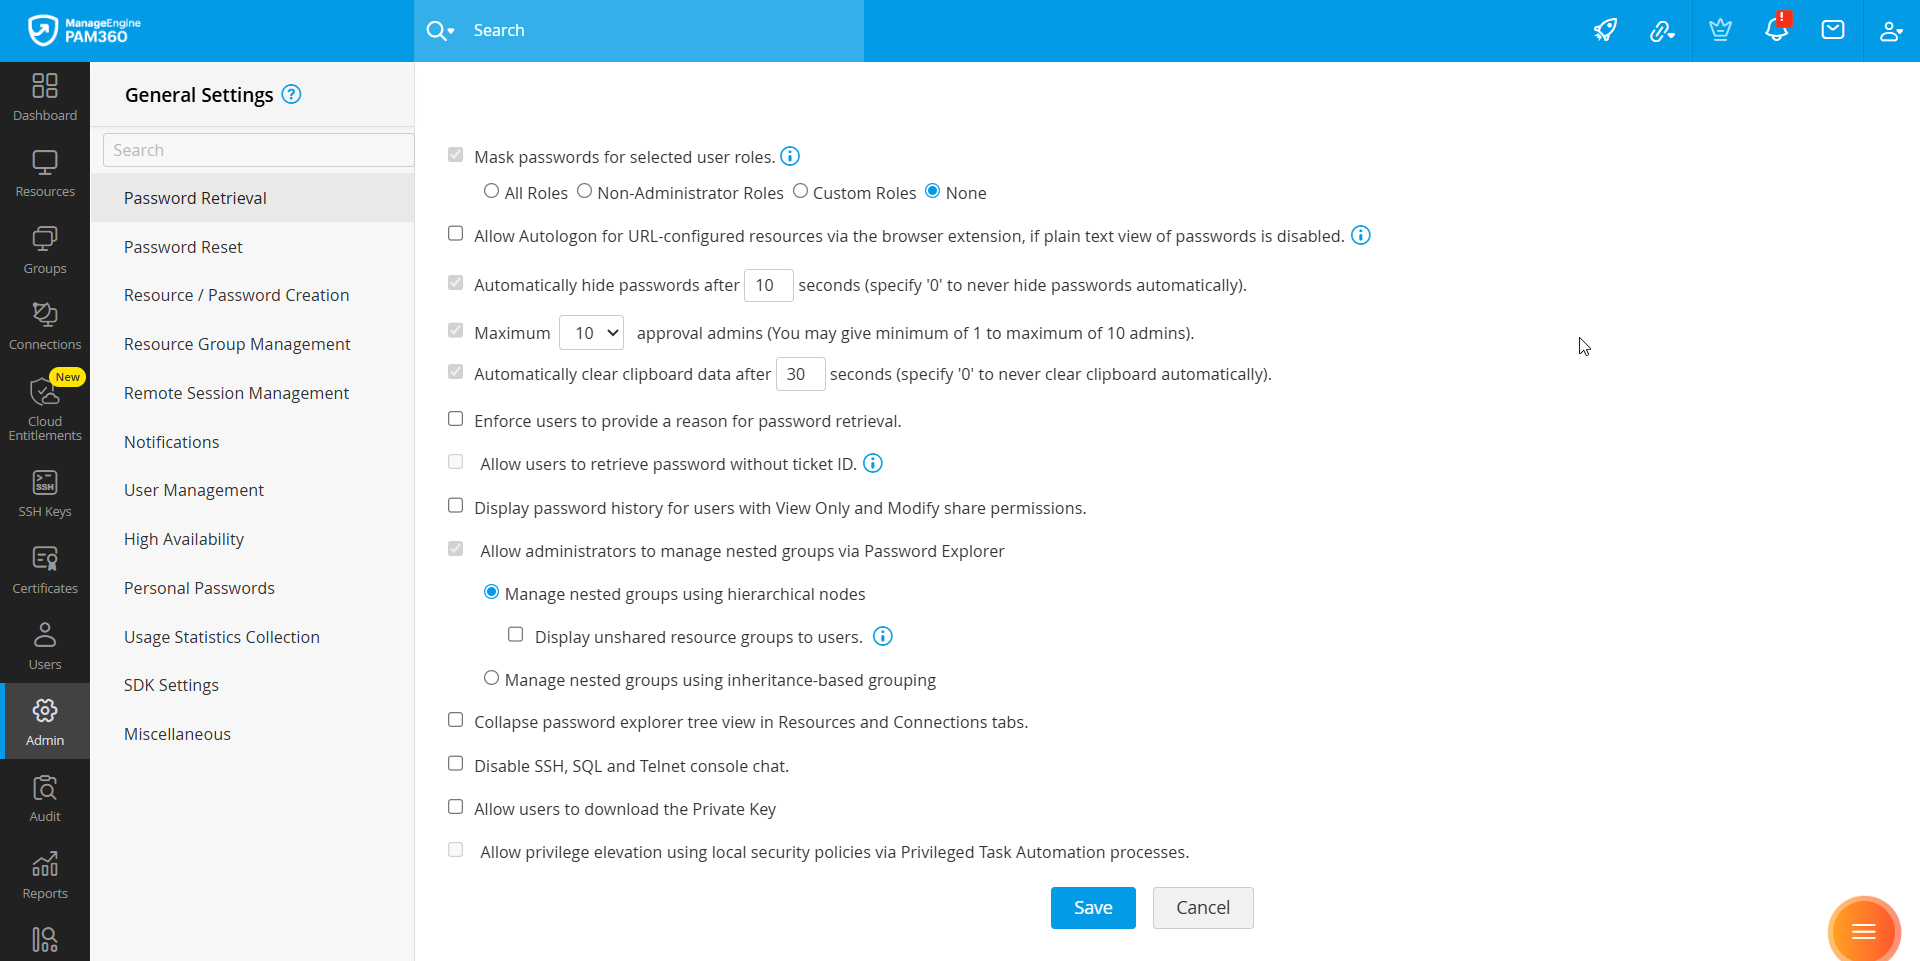
To view and manage all global settings related to password retrieval, select Password Retrieval from the left pane. The available options include:
- Allow plain text view of passwords, if auto logon is configured - Enable this option to allow the users to view the passwords of shared resources in plain text when auto logon is configured. If this option is disabled, users cannot retrieve the passwords directly, however they can still launch remote sessions through auto logon. This restriction applies only to Password Users, Password Auditors, and custom user roles with equivalent privileges.
Additional Detail
From build 7410 onwards, this setting has been renamed to Mask passwords for selected user roles, allowing administrators to control password visibility based on user roles. You can choose to mask passwords for All Roles, Non-Administrative Roles (i.e., roles without administrative privileges), or Custom Roles. To allow all users to view passwords, select None.
- Allow Autologon for URL-configured resources via the browser extension, if plain text view of passwords is disabled - Enable this option to allow users to log in to websites and web applications without manually entering credentials, even when passwords are masked. Ensure that appropriate client-side browser and endpoint security controls are enforced before enabling this setting.
- Automatically hide passwords after 10 seconds (specify '0' to never hide passwords automatically) - By default, passwords in PAM360 are displayed as a string of hash symbols. When clicked, they appear in plain text for 10 seconds. You can change the display duration by entering a specific value (in seconds) in the Automatically hide passwords after X seconds field. Entering 0 will keep the passwords in plain text indefinitely until you click to hide them.
- Maximum X approval admins (You may give minimum of 1 to maximum of 10 admins) - Select the maximum number of administrators (between 1 and 10) required to approve password request for resources configured with the Password Access Control Workflow setup. This number is displayed during the access control configuration in the Enforce approval by at least (__) administrators option under Miscellaneous Settings. For example, entering 7 in this field will enable the selection of up to 7 administrators to approve the password request when configuring the access control workflow for a resource.
- Automatically clear clipboard data after 30 seconds (specify '0' to never clear clipboard automatically) - PAM360 uses the clipboard utility of browsers to copy passwords. By default, copied passwords are accessible for 30 seconds. You can adjust this duration by specifying the number of seconds after which the clipboard should be cleared, making the copied password unavailable. If you enter the value as 0 in this field, the clipboard will not be cleared automatically.
- Enforce users to provide a reason for password retrieval - Enable this option to mandate users to provide a reason for requesting password access. This reason is recorded in the audit logs.
- Allow users to retrieve password without ticket ID - If the PAM360 installation in your environment is integrated with Enterprise Ticketing Systems to validate password access requests, then by default, users will be prompted to provide a valid ticket ID while requesting password access. Enable this option to allow users to retrieve passwords without providing a ticket ID.
- Display password history for users with View Only and Modify share permissions - Password History (available under Account Actions) shows the previously used passwords for a particular account and the details about who modified it. Enable this option to allow users with View Only and Modify share permissions to view the password history details
- Allow all admin users to manipulate the entire explorer tree - Enable this option to create an organization-wide Password Explorer Tree structure for resource groups under a root node. When enabled:
- Any user with administrator privilege can create/edit the Password Explorer tree structure for resource groups.
- Users with Administrator and Password Administrator privileges can add their resource groups to the Password Explorer tree, providing visibility to all the end-users within their environment.
- If this option is disabled, users can only view and modify their portion of the tree with the resources that are shared with them.
- If the Show unshared resource groups to all admins option is enabled, resource groups owned by all the administrators will be visible to other administrators. However, these groups will remain disabled if they are not shared with them. If this option is disabled, only the shared resource groups will be visible to the administrators.
Additional Detail
The Password Explorer tree is accessible only to users with Administrator, Privileged Administrator, Password Administrator, and Password User roles, or to custom user roles with similar privileges.
- Collapse password explorer tree view in Resources and Connections tabs - By default, the nodes of the password explorer tree are shown in expanded form. Enable this option to collapse the explorer tree view.
- Disable SSH, SQL and Telnet console chat - By default, the console chat option is enabled for SSH, SQL, and Telnet remote sessions launched via PAM360. Select this option to disable this feature.
- Allow users to download the private key - Enable this option to allow users to download the private key associated with an account shared with them. Explore this link for more details about associating an SSH key with an account.
2. Password Reset
The Password Reset section contains global settings related to password reset operations performed in PAM360. To view and manage all global settings related to password reset, select Password Reset fro ft pane.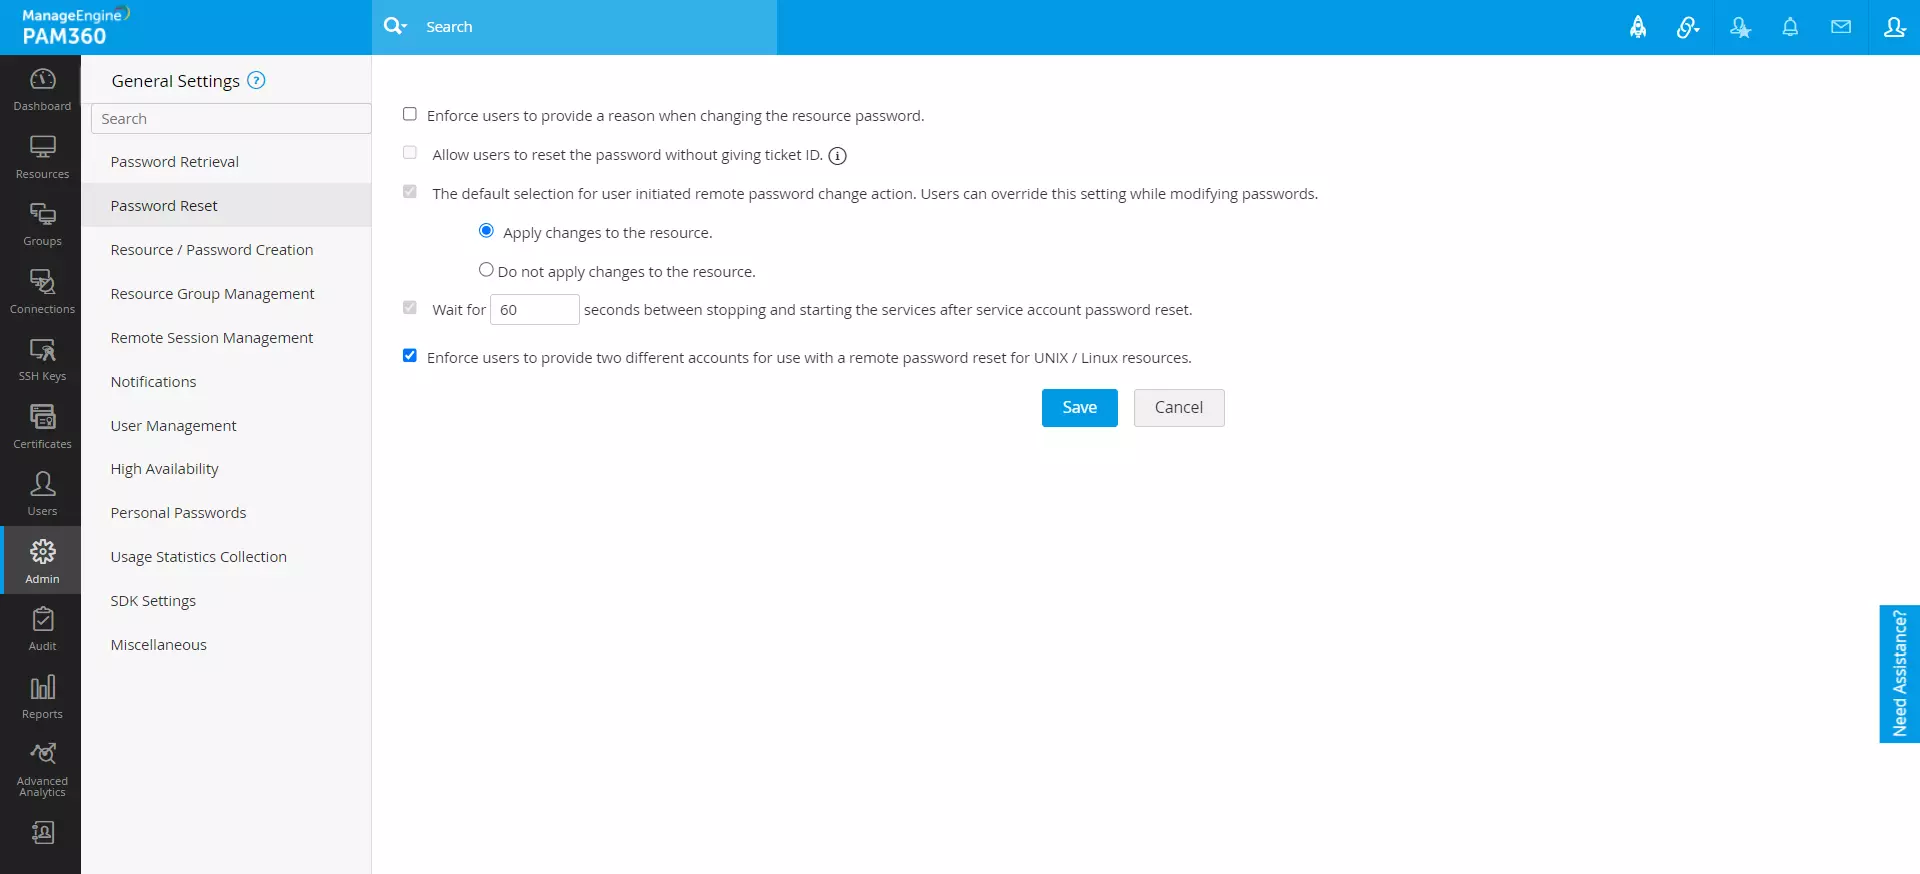
- Enforce users to provide a reason when changing the resource password - Enable this option to mandate users to provide a reason while attempting to change a resource password. This reason is recorded in the audit logs,
- Allow users to reset the password without giving ticket ID - If the PAM360 installation in your environment is integrated with Enterprise Ticketing Systems to validate resource password resets, then by default, users will be prompted to provide a valid ticket ID while attempting to reset the password of a resource. Enable this option to allow users to reset passwords without providing a ticket ID.
- The default selection for user-initiated remote password change action. Users can override this setting while modifying passwords - When you change the password of a resource in the PAM360 console, the password changes are applied to the remote resource immediately. Therefore, the Apply changes to the resource option is enabled by default. If you prefer not to change the password in the remote resource automatically, select the Do not apply changes to the resource option. Note that the resource types supporting remote synchronization of passwords are Windows, Windows Domain, and Linux.
- Wait for X seconds between stopping and starting the services after service account password reset - You can configure PAM360 to wait for a specified time (in seconds) between stopping and restarting services after the service account password reset. This option is useful when the service account password reset is enabled for a Windows Domain account and the corresponding domain account password is changed.
- Enforce users to provide two different accounts for use with a remote password reset for UNIX / Linux resources - Enable this option to mandate users to provide two different accounts to reset the passwords of Unix/Linux resources remotely. If this option is disabled, users can execute remote password resets with just one account. Explore this link to learn more about remote password resets.
3. Resource / Password Creation
To view and manage all global settings related to resource and password creation in PAM360, select Resource / Password Creation from the left pane.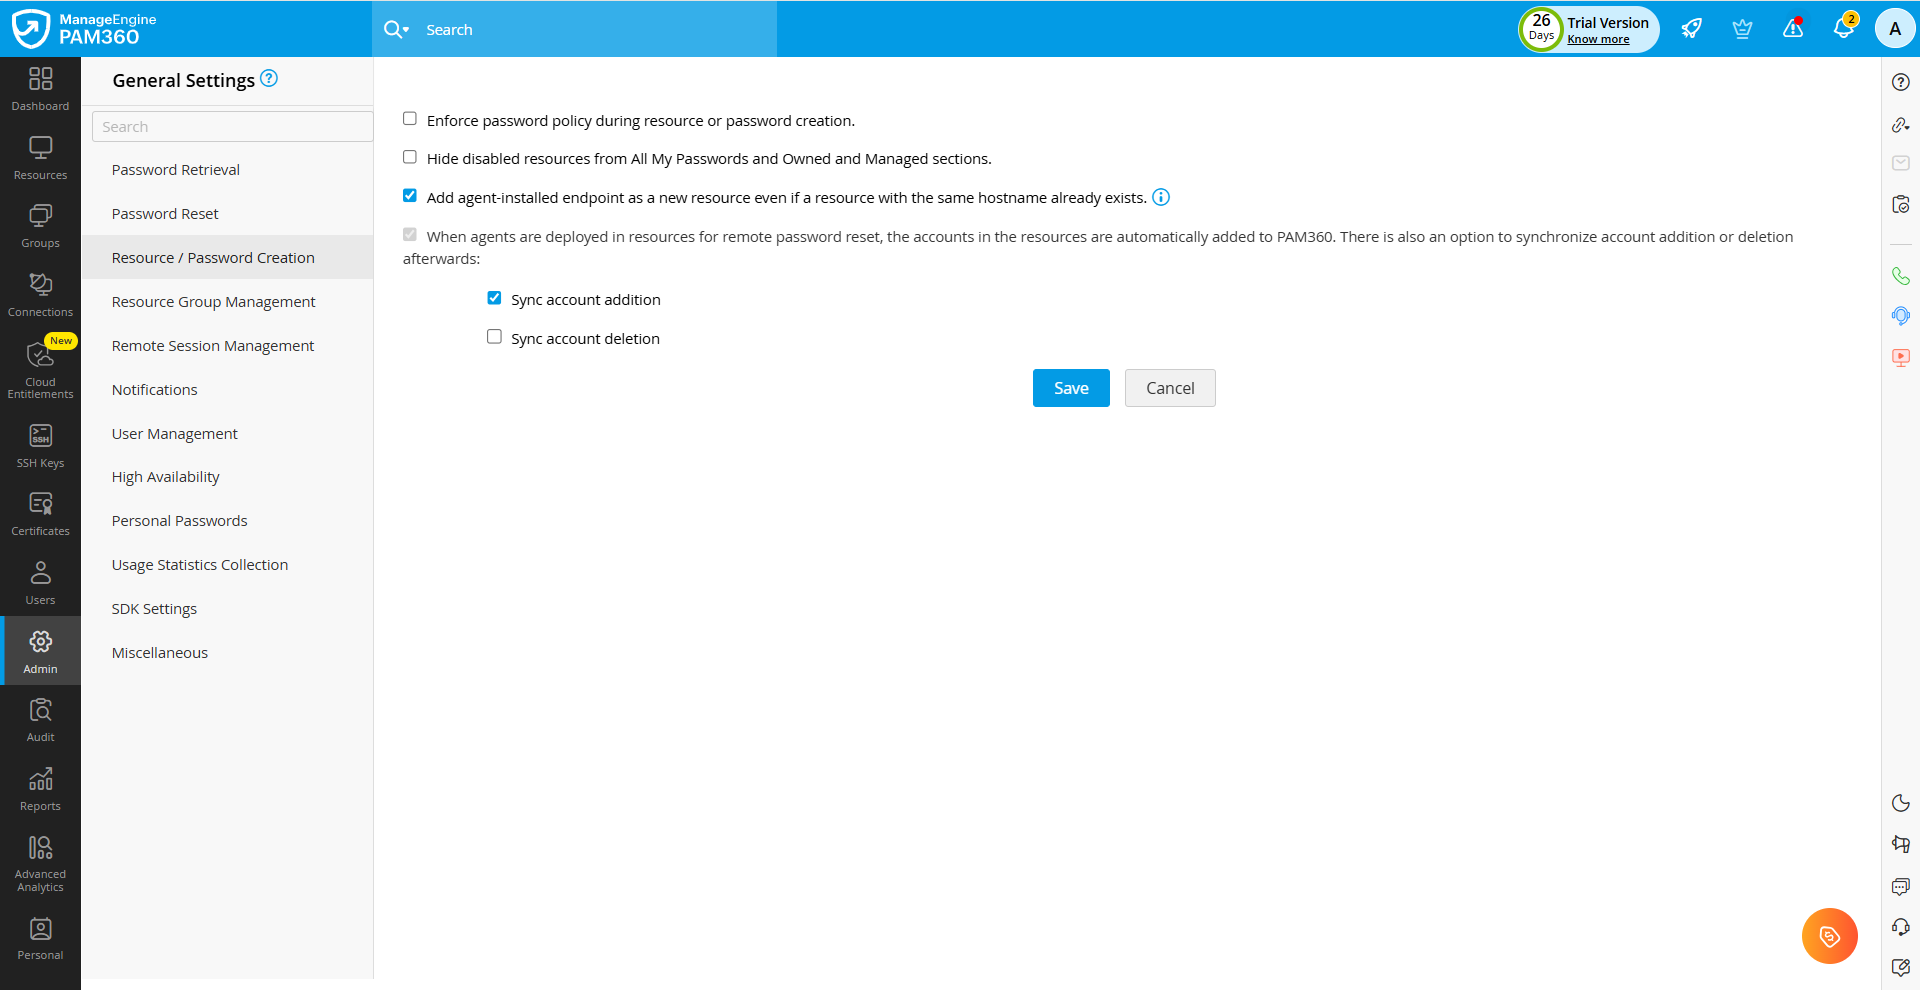
- Enforce password policy during resource or password creation - By default, password policies in PAM360 are enforced only during password resets. Enable this option to check password policy compliance while adding resources or accounts. Once enabled, you can add a resource or account only if the password complies with the password policy defined in PAM360.
- Add agent-installed endpoint as a new resource even if a resource with the same hostname already exists - When enabled, PAM360 adds the agent-installed endpoint as a new resource and associates it with the corresponding agent. When disabled, PAM360 maps the agent-installed endpoint to an existing resource if the endpoint’s hostname matches the resource name.
- Hide disabled resources from All My Passwords and Owned and Managed sections - Enable this option to hide all the disabled resources within your PAM360 environment from All My Passwords and Owned and Managed sections on the Resources tab.
- When agents are deployed in remote resources to execute remote password resets, the accounts in the resource are added automatically to the PAM360 server. Additionally, you can enable synchronization for account additions or deletions.
- Sync account addition - Enable this option to automatically add new accounts to your PAM360 server whenever they are added to the remote resources.
- Sync account deletion - Enable this option to automatically delete accounts from your PAM360 server whenever they are deleted from the remote resources.
4. Resource Group Management
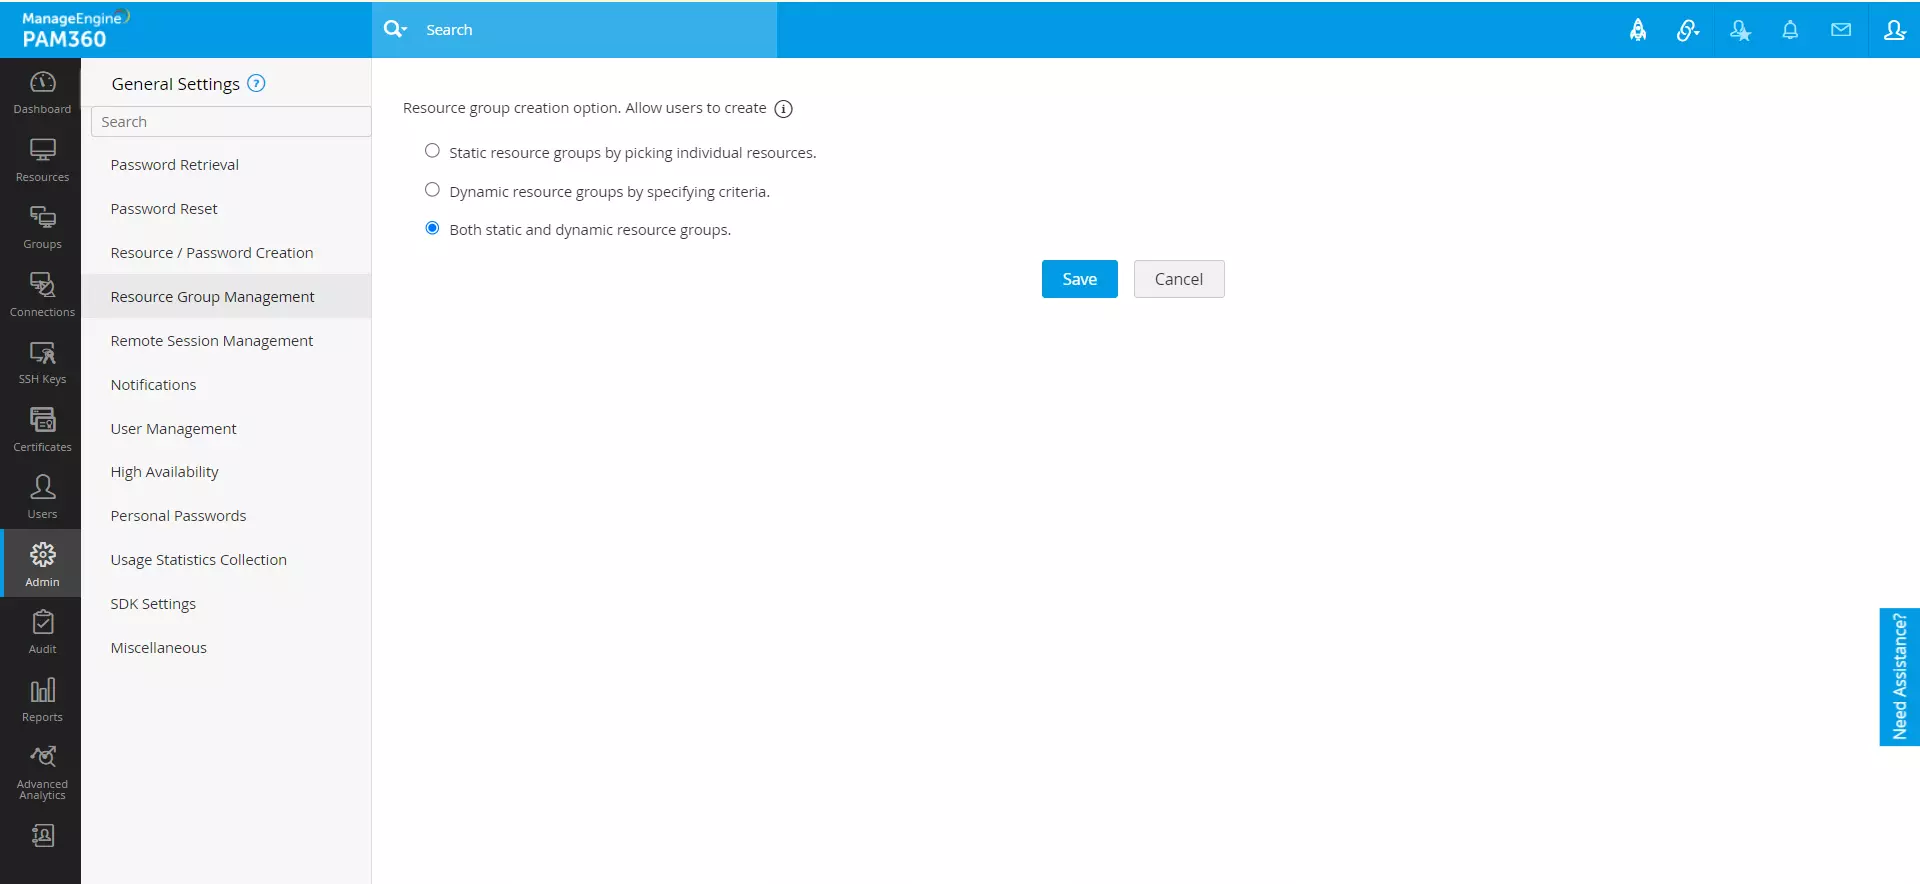
PAM360 offers flexibility in managing how resource groups are created, allowing for efficient organization and management of resources. To view and manage all global settings related to resource group management in PAM360, select Resource Group Management from the left pane. The available options include:
- Resource group creation option. Allow users to create:
- Static resource groups by picking individual resources - To allow users to create resource groups manually by adding individual resources.
- Dynamic resource groups by specifying criteria - To allow users to create resource groups by defining criteria.
- Both static and dynamic resource groups - To allow users to create static and dynamic groups.
5. Remote Session Management
From the Remote Session Management section, you can enforce a default remote session keyboard language for all the PAM360 users. This language will apply to all the RDP remote sessions initiated by the users via the PAM360 environment. Failure to configure the keyboard language will result in default language settings being applied. However, users can opt for their keyboard language for the remote session by accessing the Remote Session Settings option under the My Profile icon.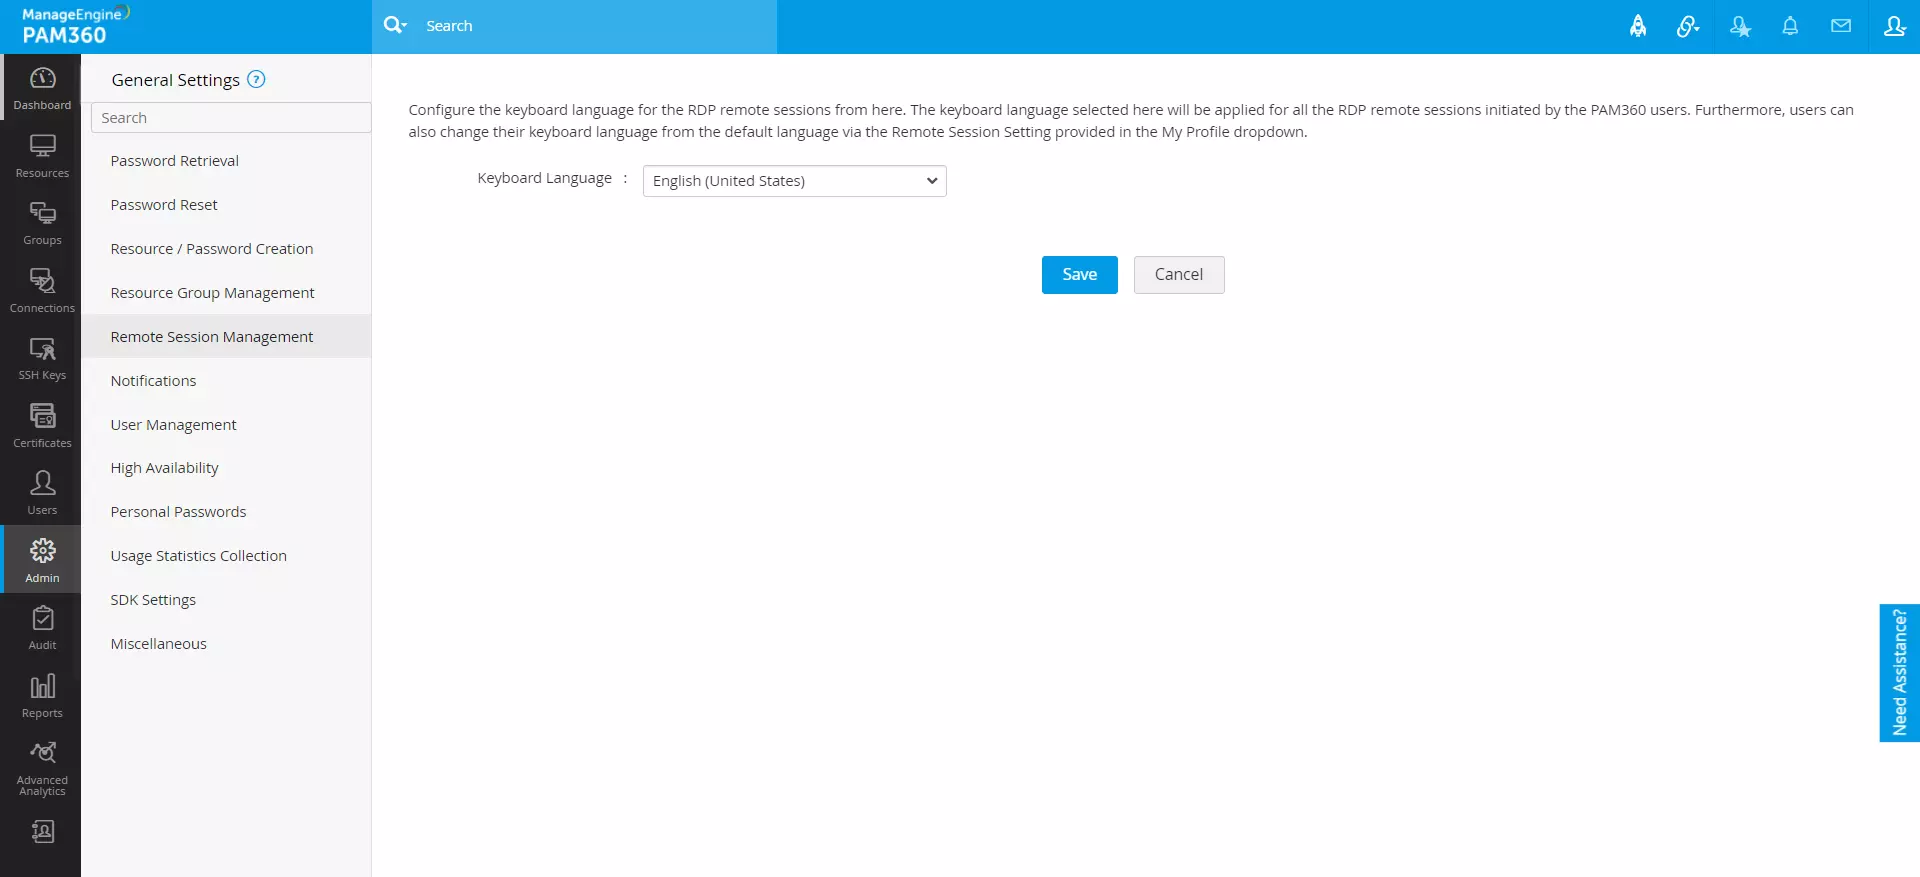
Additional Detail
The keyboard language configured will only apply to the remote sessions initiated after configuration.
6. Notifications
To view and manage all global settings related to notifications in PAM360, select Notifications from the left pane. Through this section, administrators can configure how users are informed about changes in access permissions, license expiry, and API key expiry. The available options include: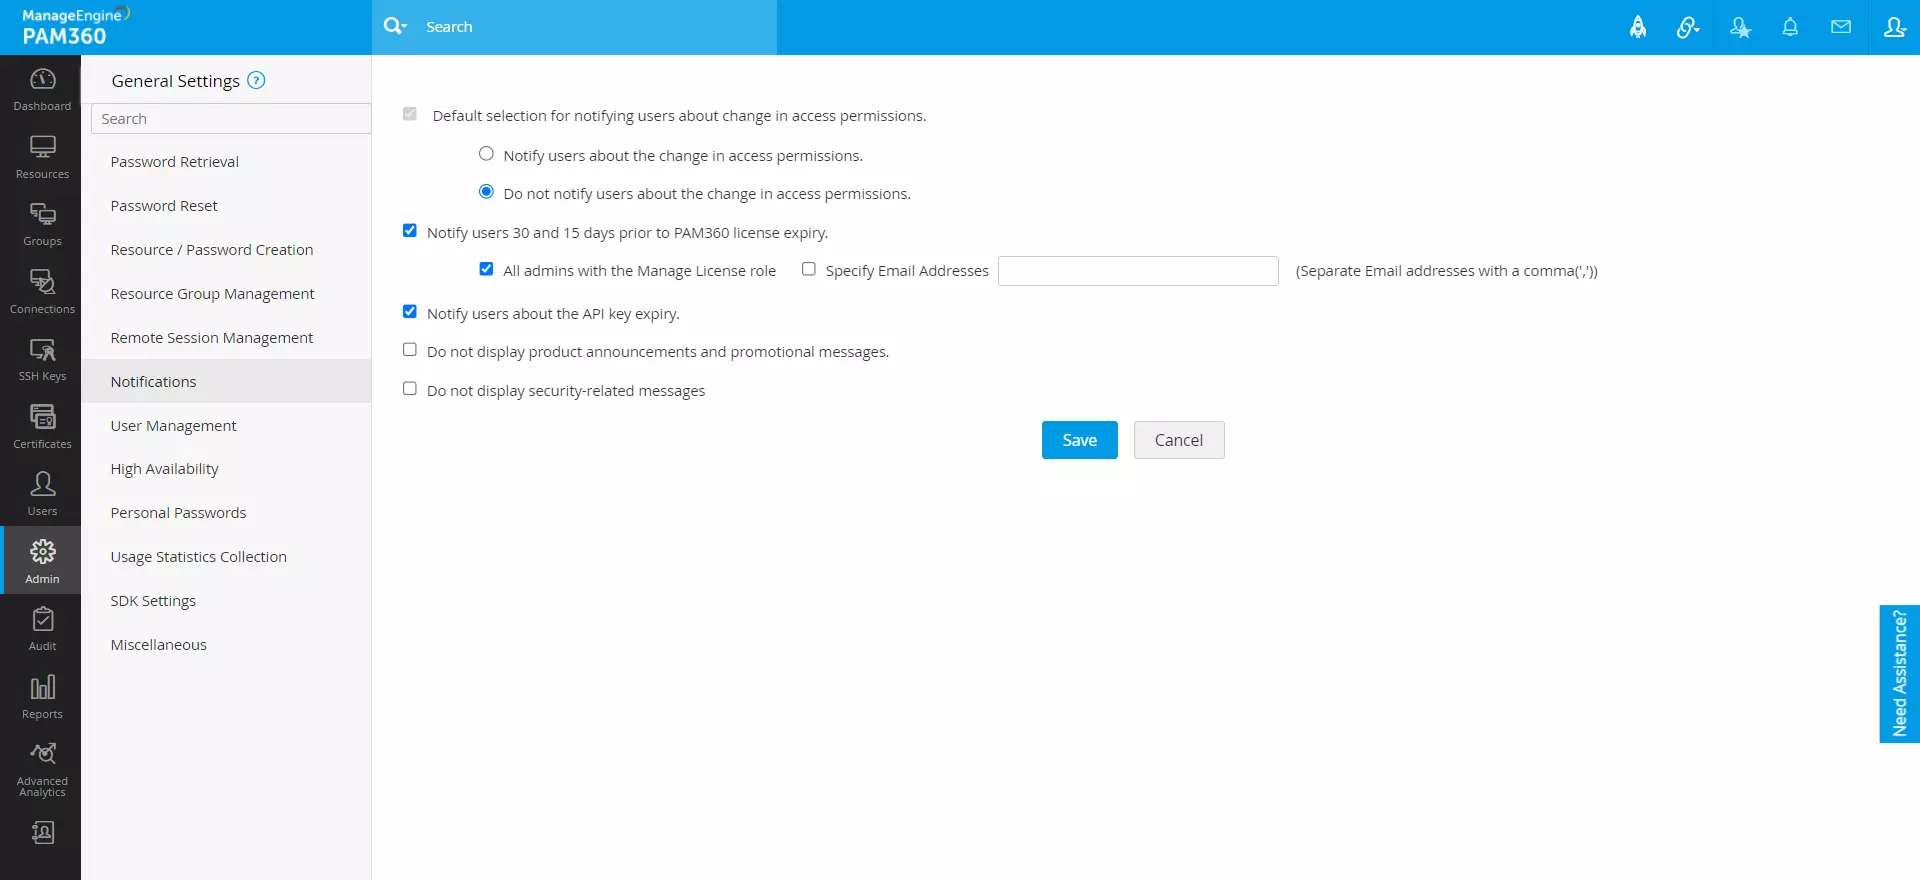
- Default selection for notifying users about change in access permissions - Choose one of the following options.
- Notify users about the change in access permissions - Select this option to notify users whenever their access permissions are modified.
- Do not notify users about the change in access permissions - Select this option if you prefer not to notify users regarding changes to their access permissions.
Additional Detail
Administrators can override this setting while modifying access permissions.
- Notify users 30 and 15 days prior to PAM360 license expiry - Enable this option to notify users 30 and 15 days before the PAM360 license expiry. Choose one of the following options.
- All admins with the Manage License role - To notify all the administrators with the Manage License privilege.
- Specify Email Addresses - To notify specific users about the license expiry. Enter the mail address in the given field. You can specify multiple email addresses in the comma-separated format.
- Notify users about the API key expiry - Enable this option to send notifications to users about the expiration of their API key, generated during the API user creation. Once enabled, notifications are sent based on the following schedule:
- One notification seven days before the API key expiry.
- One notification on the day of the API key expiry.
- Daily notifications after the API key expiry.
Explore this link for more details about adding API users to PAM360.
- Do not display product announcements and promotional messages - Enable this option to hide promotional in-product banners or messages to the users.
- Do not display security-related messages - Enable this option to hide any security-related messages to the users.
7. User Management
To view and manage all global settings related to user management in PAM360, select User Management from the left pane. This section allows administrators to configure various user-related settings, including language preferences, authentication methods, session timeouts, TFA reset options, and email notifications. Additionally, it provides options for enabling features such as password caching for offline access and fingerprint authentication for the mobile version. The available options include: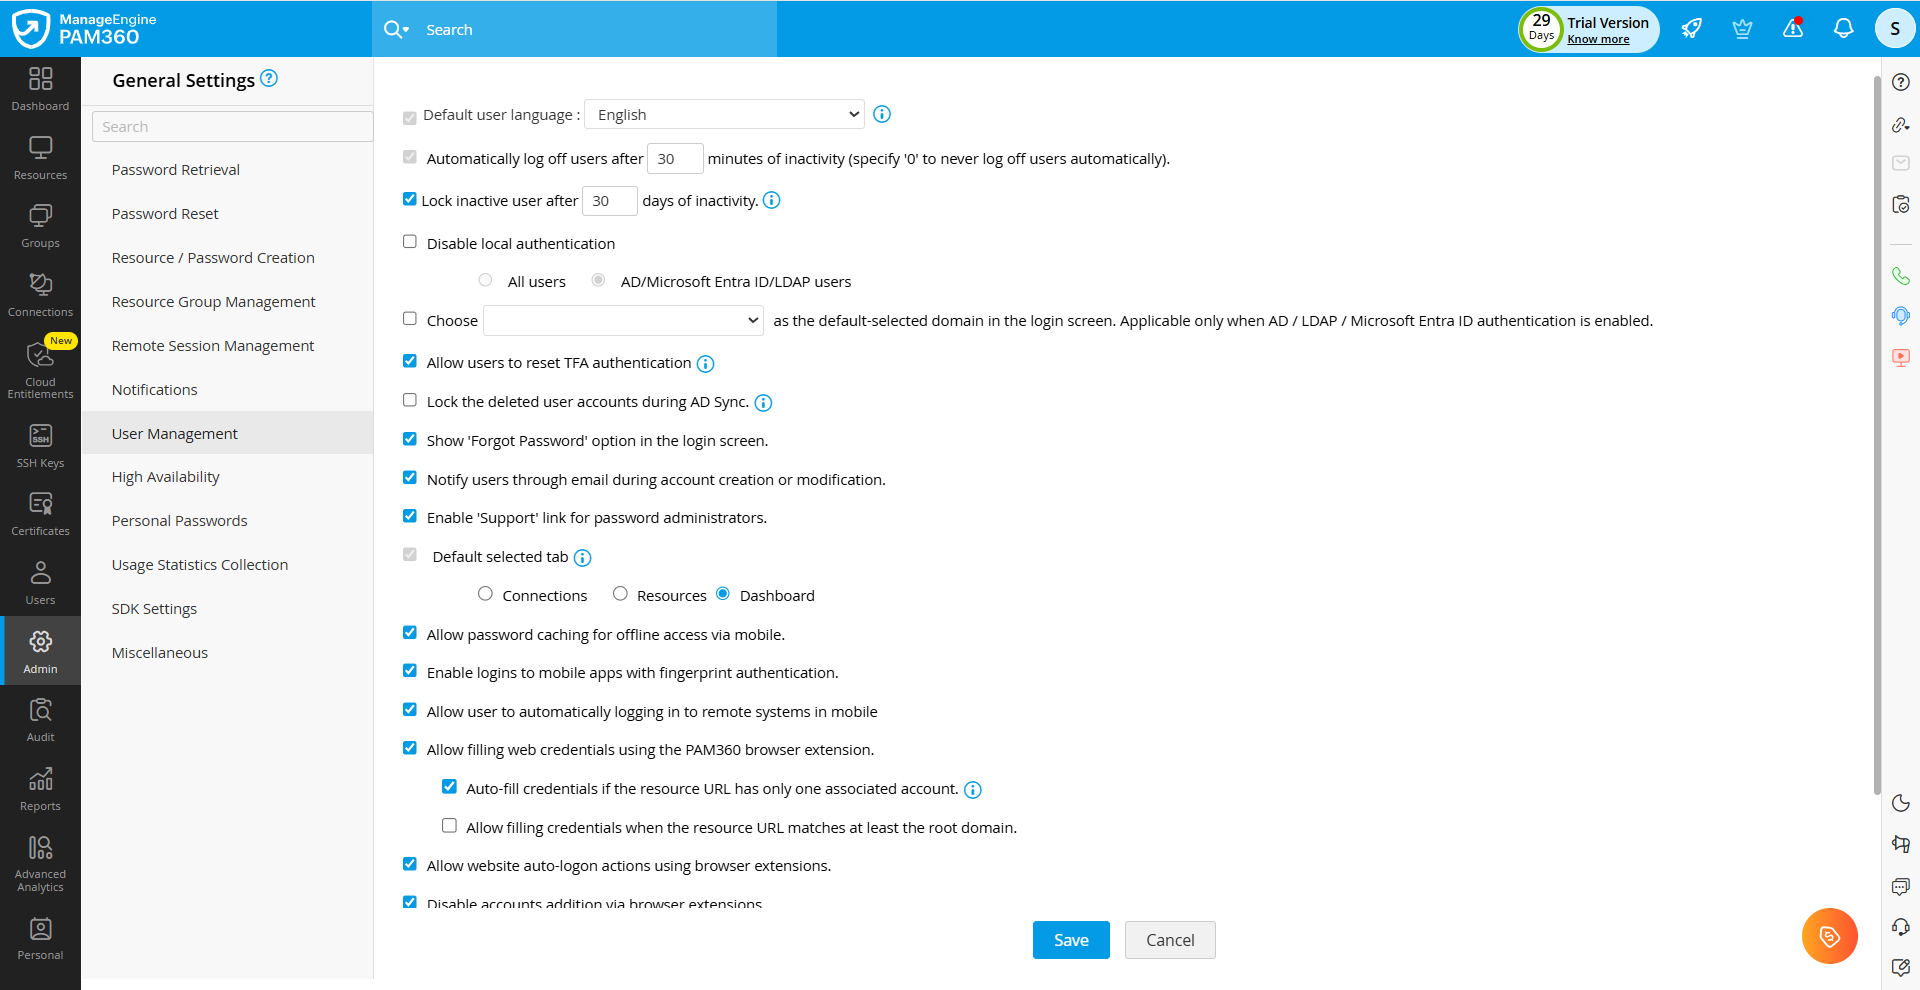
- Default user language - Choose a default user language for the web interface from the provided dropdown menu.
- Automatically log off users after X minutes of inactivity - Enter a specific duration (in minutes) to log off inactive user sessions automatically. By default, sessions are logged out after 30 minutes of inactivity. Enable the Enforce this as a maximum time limit also for users logged in through browser extension option to apply this restriction to users logged in through browser extensions. To disable auto log off for inactive user sessions, set this value to '0'.
- Disable local authentication - PAM360 supports LDAP, AD/Microsoft Entra ID, and local authentication methods. Enable this option to prevent users from using local authentication to log into PAM360. Choose one of the following:
- Lock inactive user after X days of inactivity - Enable this option to lock inactive users who have not logged in for a specific number of days. Specify the duration (in days) in the given field.To unlock a user, navigate to Users >> More Actions >> Lock Users. In the Lock Users window that appears, use the toggle switch next to the desired user to unlock their account.
Additional Detail
When enabled, the users who have not logged in for the specified number of days will be automatically locked out of PAM360. The inactivity period is calculated from the day the option is enabled, and you can set the maximum inactivity period to 90 days.
- Choose default-selected domain in the login screen - If you have users imported from multiple domains within your environment, all the available domains are listed on the PAM360 login screen. Use this option to set the frequently used domain as the default on the login screen for user convenience. This option is applicable only when AD/LDAP/Microsoft Entra ID authentication is enabled.
- Allow users to reset TFA authentication - Enable this option to allow users to reset their Two-Factor Authentication (TFA) settings. This is applicable only on supported authenticators such as Google Authenticator, Microsoft Authenticator, Okta Verify, Yubikey, Zoho OneAuth Authenticator, and Oracle Mobile Authenticator.
- Lock the deleted user accounts during AD sync - Enable this option to lock deleted users from being discovered during AD synchronization.
- Show 'Forgot Password' option in the login screen - By default, the Forgot Password option is enabled for all users using PAM360's local authentication, allowing them to reset their passwords. Disable this setting to remove the Forgot Password option from the login screen.
- Notify users through email during account creation or modification - Users receive email notifications whenever their account is added or modified in PAM360. Disable this option to stop these email notifications.
- Enable 'Support' link for password administrators - Enable this option to display the 'Support Link' for password administrators within your environment, allowing them to contact the support team for assistance.
- Default selected tab - Select the default tab (Connections, Resources, or Dashboard) to be displayed to users upon logging into their PAM360 account. This is a global setting applied to all users. Note that any user-specific settings configured from the Users tab will take precedence.
- Allow password caching for offline access via mobile - Enable this option to allow PAM360 mobile users to save password cache in their mobile application for offline access.
- Enable logins to mobile apps with fingerprint authentication - Enable this option to allow users to log into the PAM360 mobile application using fingerprint authentication.
- Allow user to automatically logging in to remote systems in mobile - Enable this option to allow users to log into remote systems through the mobile application.
- Allow website auto-fill actions using browser extensions - Enable this option to allow the auto-filling of login credentials for saved website accounts through the PAM360 browser extension.
- Allow website auto-logon actions using browser extensions - Enable this option to allow users to connect to remote resources through the auto-logon feature using the PAM360 browser extension.
- Disable accounts addition via browser extensions - Enable this option to prevent users from adding accounts to resources through the PAM360 browser extension.
- Enable smart login for users - Enable this option to allow users to log into their PAM360 account using the smart login feature. By default, the login page will display the password-based login option.
- Enable discovery in client organization - Enable this option to allow every client organization to discover accounts and resources using the Discovery option in PAM360.
- Use 'Organization Name' in Organization drop-down list - Enable this option to display the Organization Name in the drop-down list. The display name will be visible when hovered over the drop-down list.
- Mandate Hostname Validation in user creation for API access - Enable this option to mandate hostname validation for API access while creating a user.
8. High Availability
To configure periodic status check for High Availability in PAM360, select High Availability from the left pane and specify the number of minutes for the periodic status check in the Check High Availability Status Every X Minutes option. Explore this link for more details about High Availability.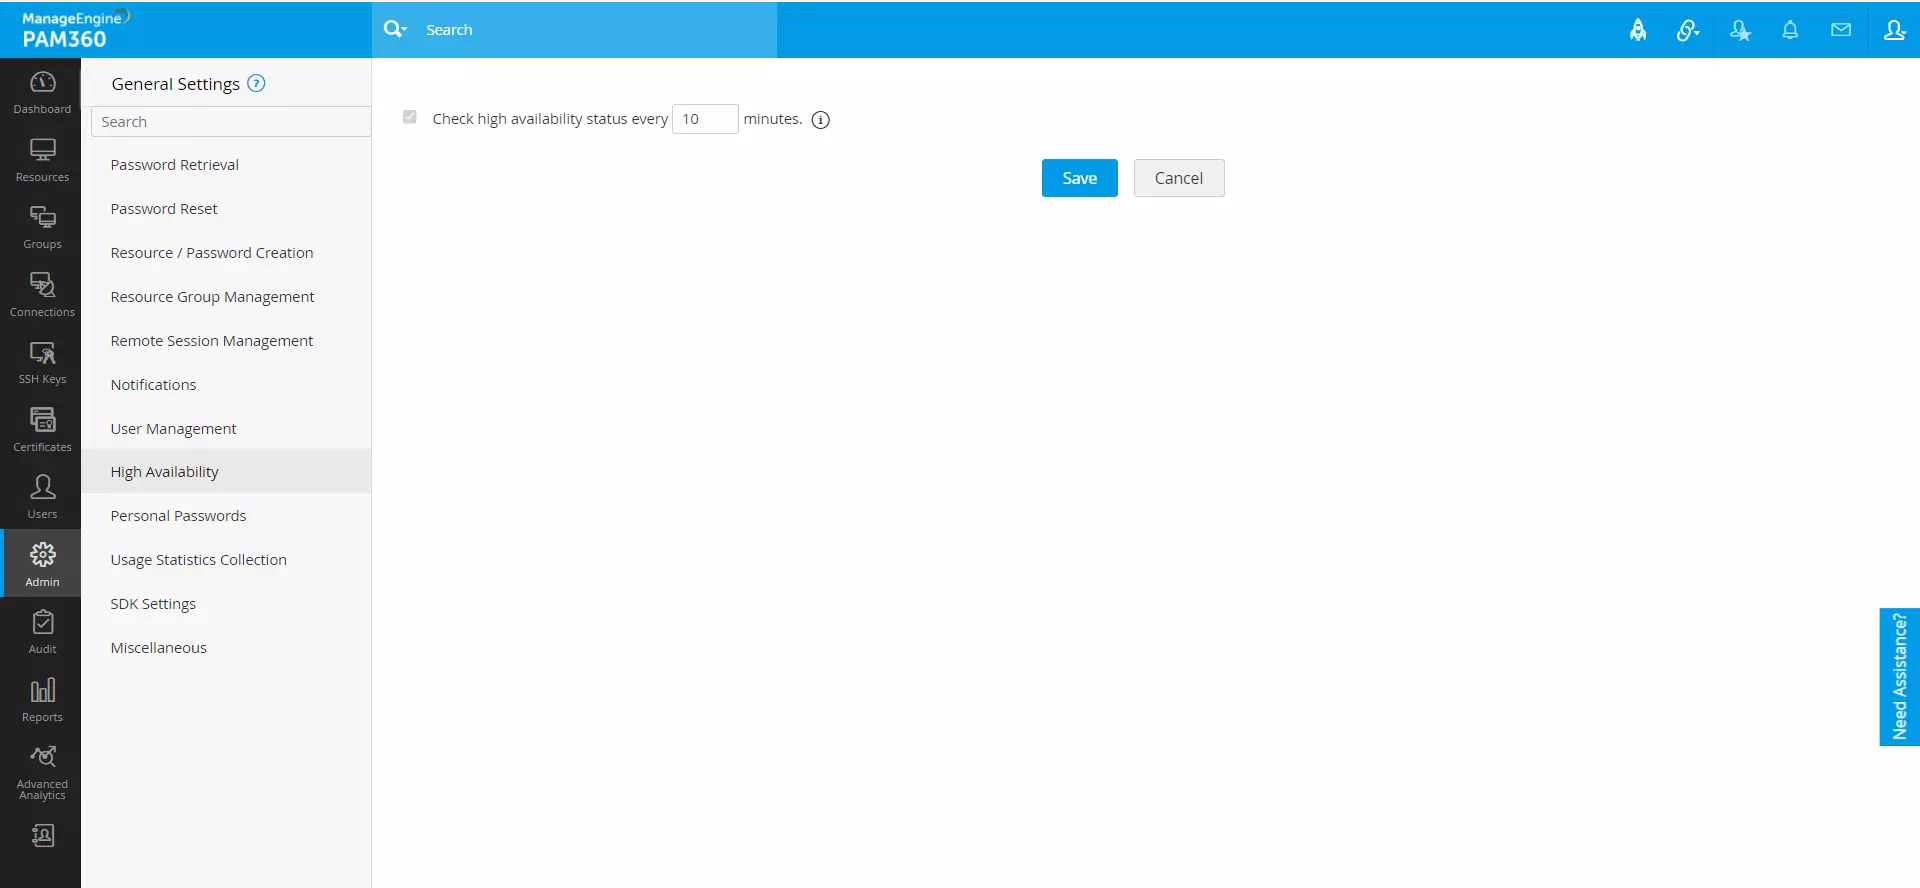
9. Personal Passwords
PAM360 allows users to save and manage their personal sensitive information such as credit card PINs, bank account credentials, business contacts, etc. To view and manage all global settings related to personal password management in PAM360, select personal passwords from the left pane. This section allows administrators to configure various settings related to the personal passwords tab. The available options include: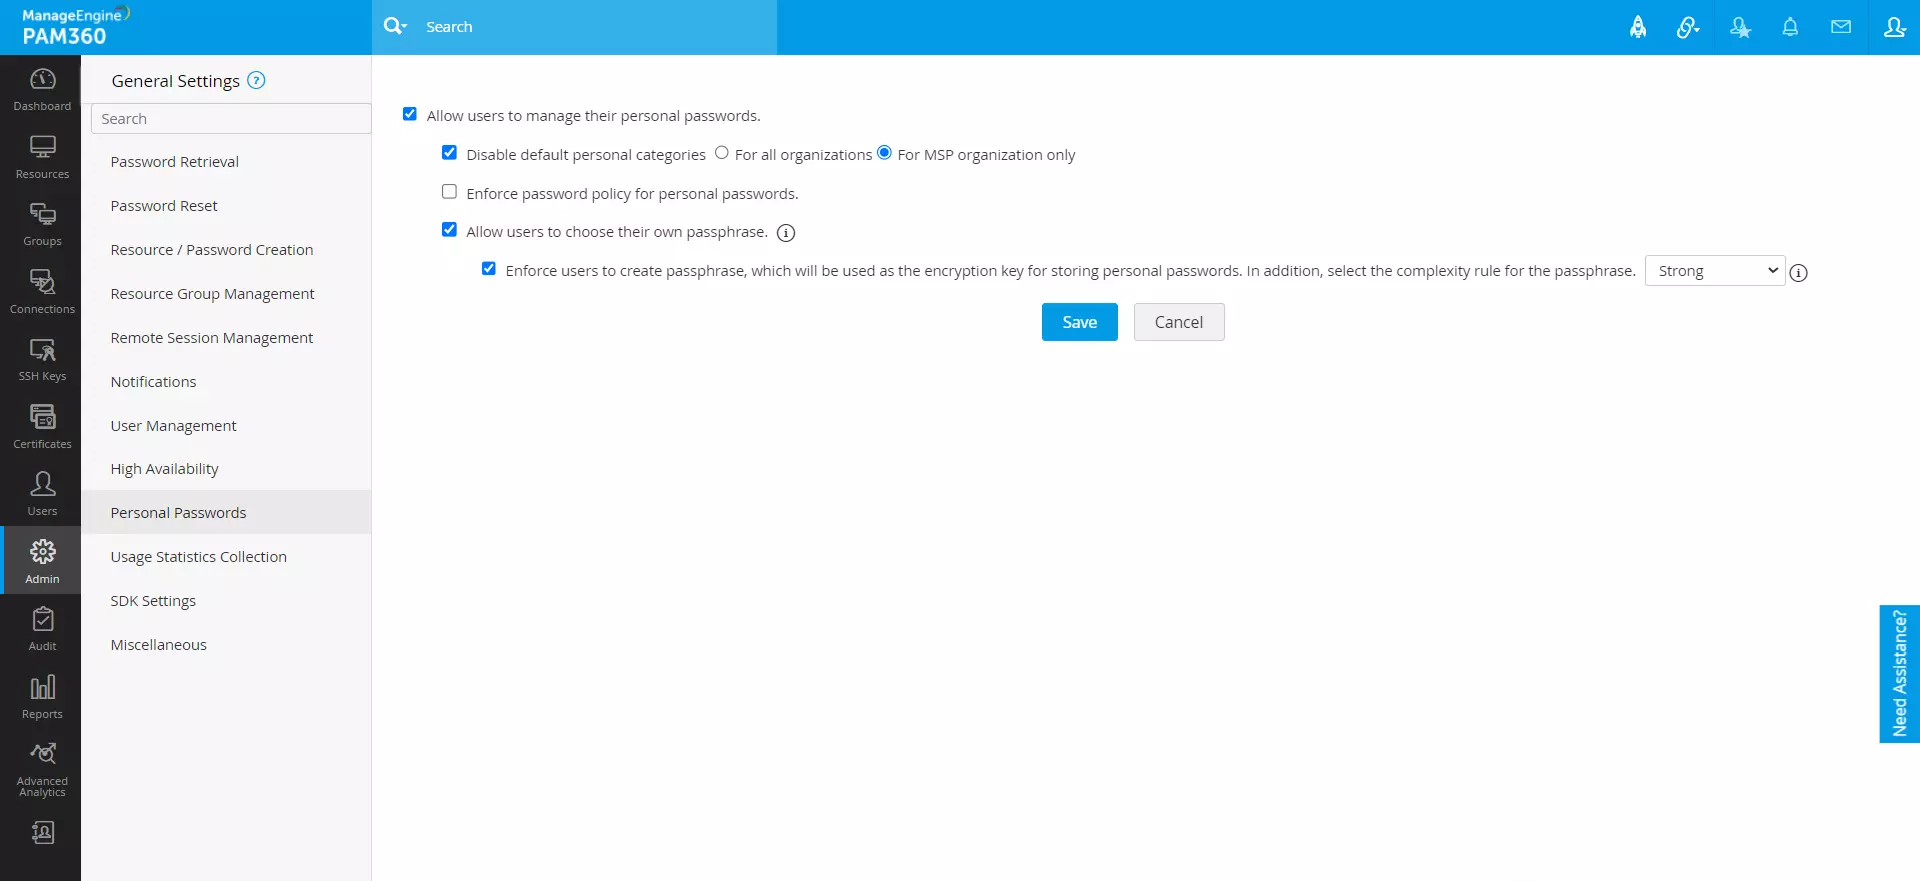
- Allow users to manage their personal passwords - Enable this option to allow users to manage their sensitive personal information through the Personal tab in PAM360. By default, this option is enabled. De-select this option to disable the Personal tab for all users.
- Disable default personal categories - Enable this option to disable default categories on the Personal tab. You can choose to disable this feature for all organizations or MSP organization only. By default, this feature is disabled for MSP organizations only.
- Enforce password policy for personal passwords - Enable this option to apply the password policy selected for accounts stored in PAM360 for personal passwords. Disable this option to allow users to set personal passwords without any complexity restrictions.
- Allow users to choose their own passphrase - By default, PAM360 prompts users to set up a passphrase for the Personal tab, which cannot be changed once set.
- Enforce users to create passphrase, which will be used as the encryption key for storing personal passwords. In addition, select the complexity rule for the passphrase - Enable this option to enforce password complexity rules for personal passphrases set by the users. You can choose between the following options: Low, Medium, Strong, Offline Password File. To create a custom password policy for personal passwords, navigate to Admin >> Password Management >> Password Policies. If the chosen enterprise policy is no longer available, the default password policy will be selected automatically for passphrase complexity. If you do not want to enforce passphrase complexity, select [-None-] from the drop-down menu. Disable this option if you do not wish to enforce passphrase complexity for personal passphrases.
10. Usage Statistics Collection
You can send product usage information to ManageEngine as a feedback mechanism to help us improve the product. According to the product End-User License Agreement (EULA), the collected data includes license details, system configuration of the PAM360 installation, and usage statistics of various features. To manage this setting, select Usage Statistics Collection from the left pane and modify the Enable usage statistics collection option based on your preference. This option is enabled by default, and you can uncheck the option if you prefer not to share usage data.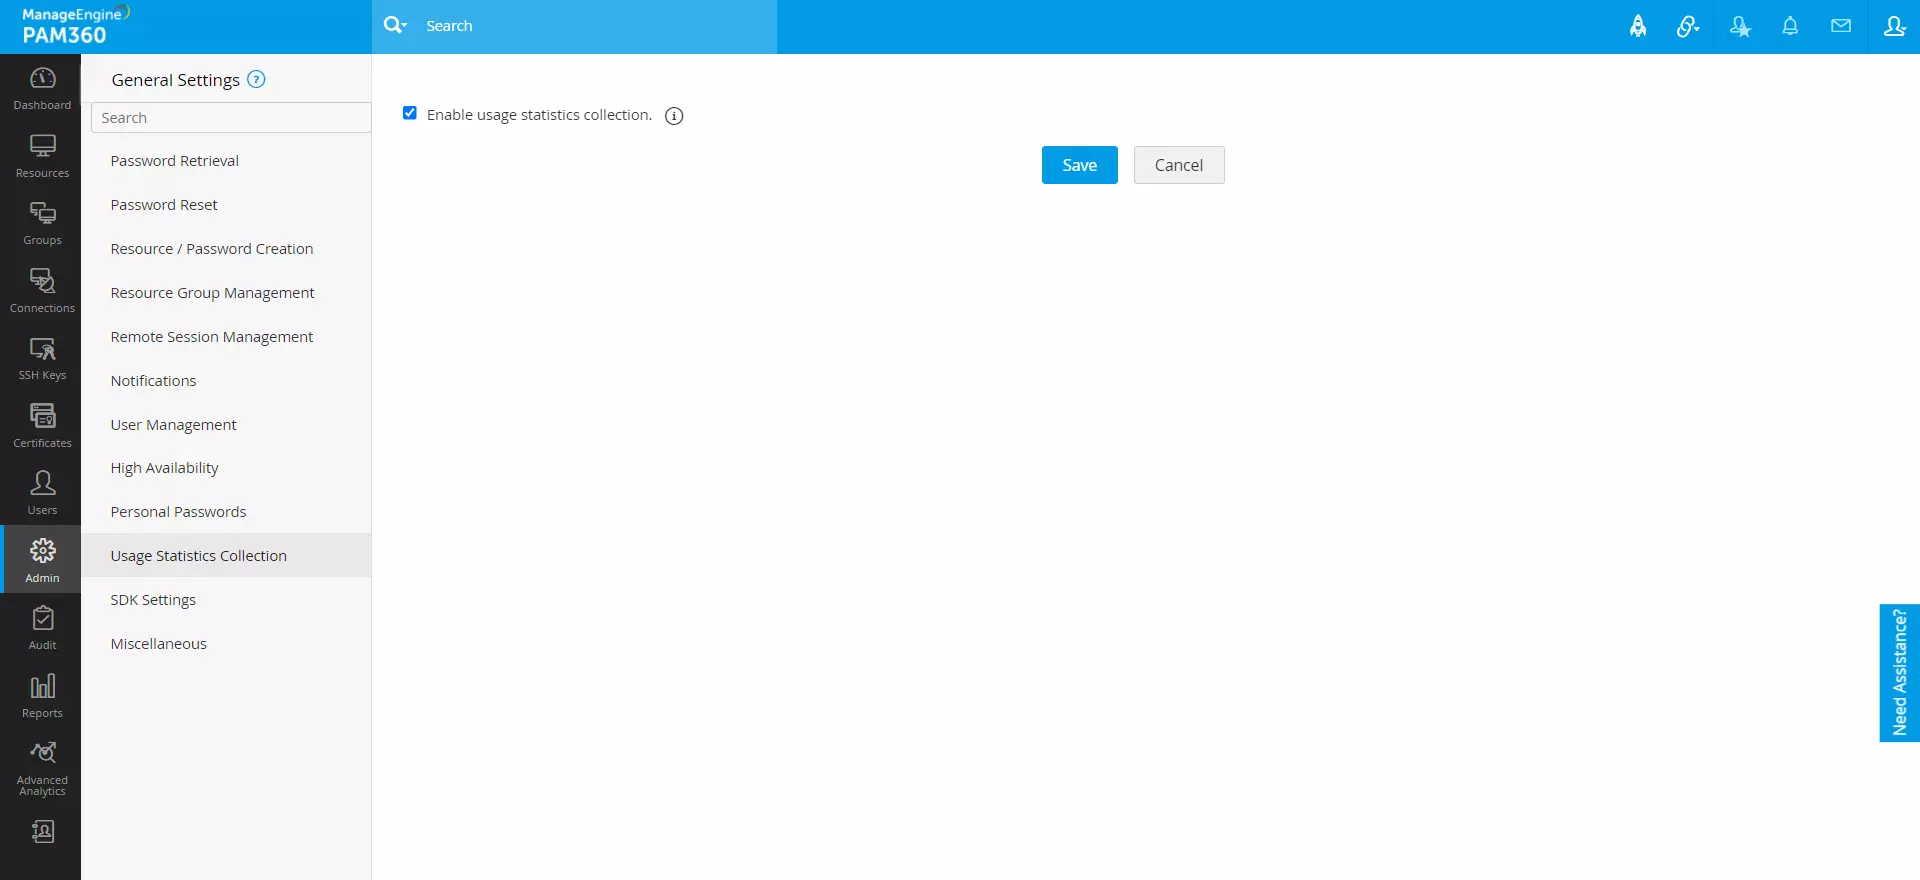
11. SDK Settings
Disable SDK application access for all users - Select this option to disable SDK application access for all users.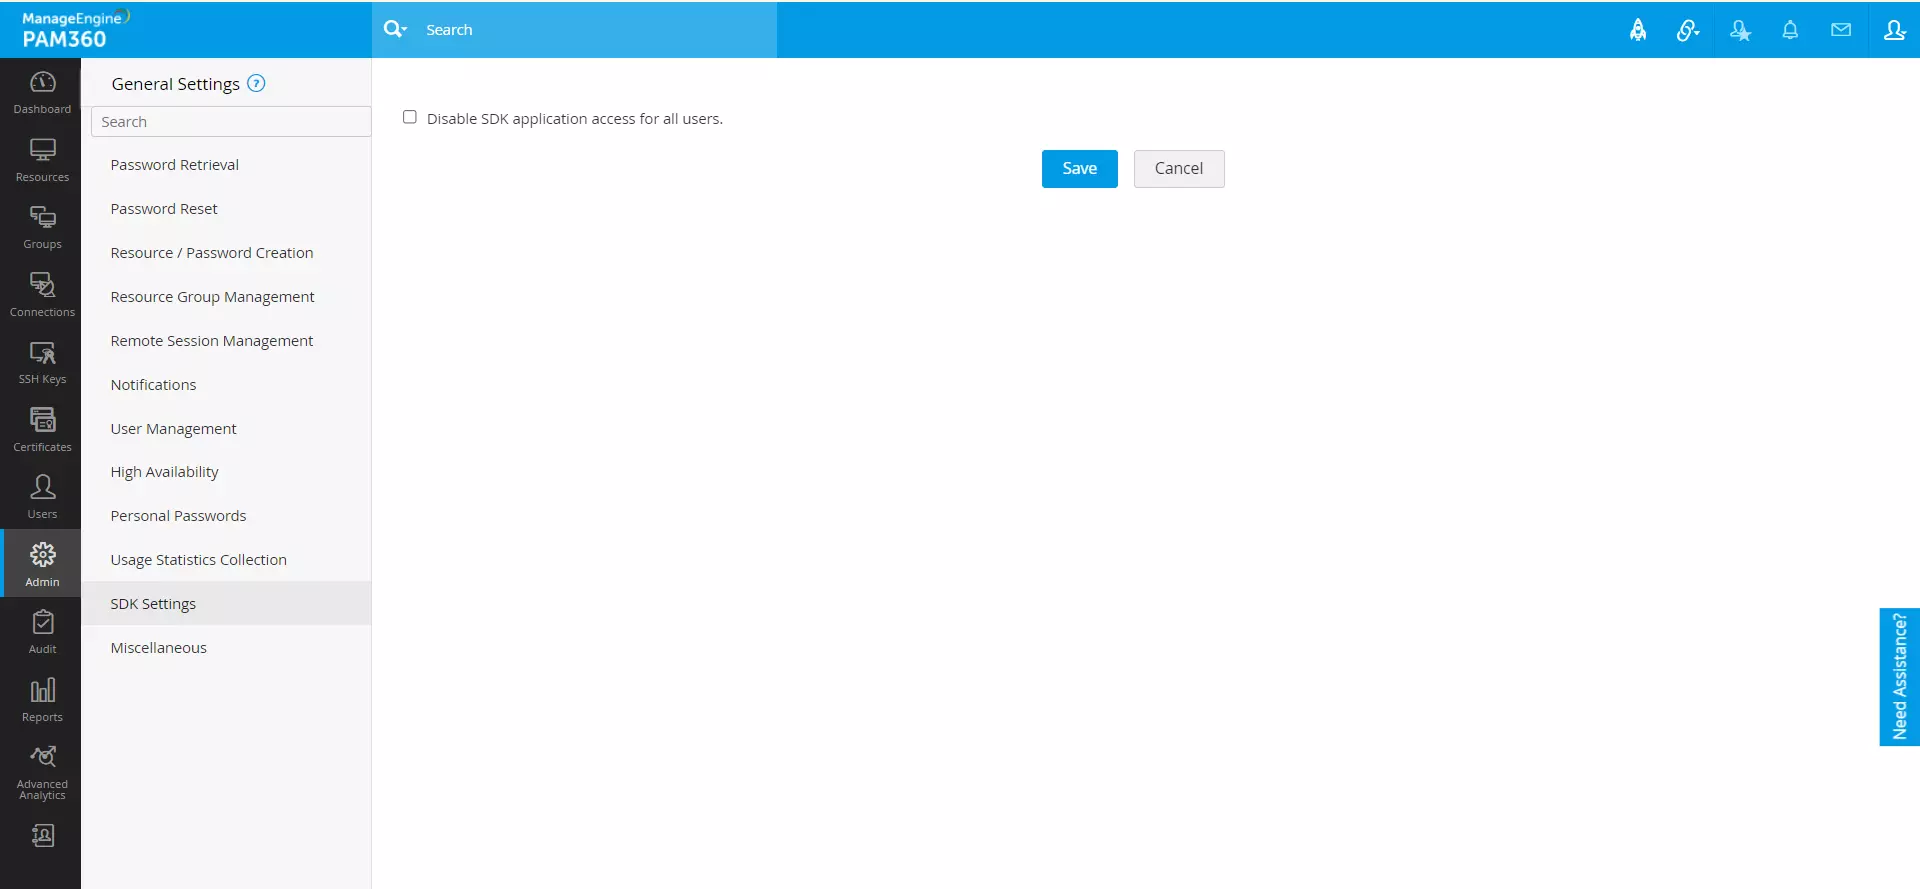
12. Miscellaneous
Through this section, manage optional customizations to modify the user experience based on your preferences. Select Miscellaneous from the left pane, where the following options are available: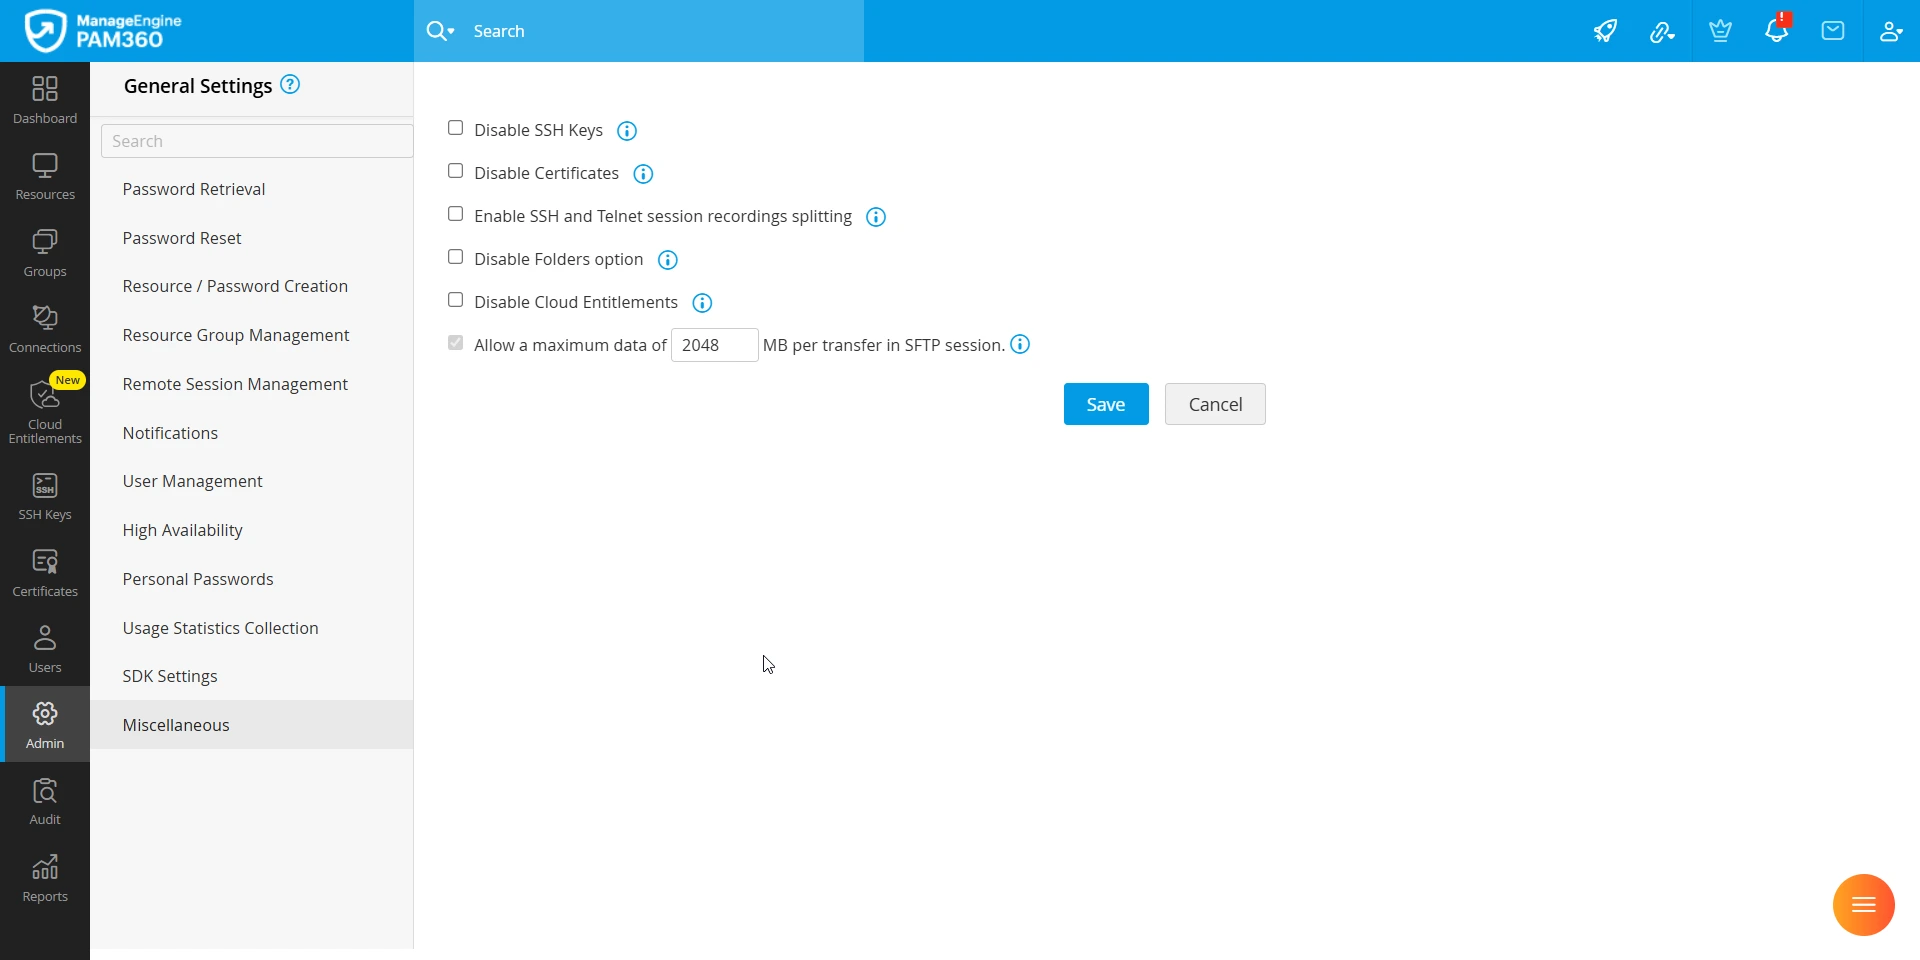
- Disable SSH Keys - Select this option to disable the SSH Keys tab and all the SSH-key based functions for all users within your environment.
- Disable Certificates - Select this option to disable the Certificates tab and all the SSL-certificates based functions for all users within your environment.
- Enable SSH and Telnet session recordings splitting - Enable this option to split large session recording files from Legacy SSH and Telnet remote sessions into multiple smaller files and save them individually in your local storage. Explore this link to learn about session splitting in detail
- Disable Folders option - Select this option to disable the Folders function for all the PAM360 users. You can modify this option anytime.
- Disable Cloud Entitlements - Choose the option to disable Cloud Entitlements to hide the Cloud Entitlements tab from view for all administrators in PAM360. Please note that this action does not permanently remove the feature; administrators with the necessary permissions to access general settings can re-enable it at any time.
- Allow a maximum data of 2048 MB per transfer in SFTP session - Specify the maximum data transfer limit in SFTP session per transfer. By default, the maximum file transfer limit is set to 2048 MB. However, you can set the range from 50 MB to 10240 MB as your data transfer limit as needed in the data field.