Relationship Map
Relationship Map is uniquely designed to provide the ability to understand the dependencies between the CIs. The relationships between the CIs are discovered automatically while populating the CIs into the CMDB by Importing Users from Active Directory or from LDAP, performing a Windows Domain Scan or a Network Scan. If your CIs are recorded in a CSV file, then Importing CIs from CSV is an appropriate option. You can also manually add relationships between the CIs from the Relationship Map.
Using the Relationship Map, you can analyze the impact caused by the CI on a business service, and identify the root cause of the impact, thus establishing appropriate measures to gradually eliminate the perpetual issues faced by your organization.
This section has the following contents,
From CI List View
From CI Details Page
Quick Create - Relationship
Viewing Relationship Attributes
Viewing CI Details
Adding Relationships
Accessing the Relationship Map
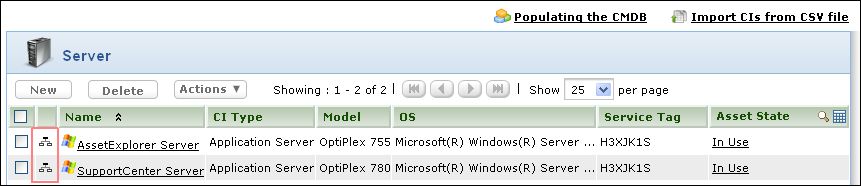
In ManageEngine AssetExplorer, all the CIs are represented with a Relationship Map ![]() icon
to have a quick view of the relationships
between the CIs. You can find this relationship map icon in the CI List
View and in the CI details page.
icon
to have a quick view of the relationships
between the CIs. You can find this relationship map icon in the CI List
View and in the CI details page.
From CI List View
Click CMDB tab in the header pane.
Select the CI Type from the Configuration Items block to view the list of CIs. Else, select All CIs link to view all the CIs irrespective of the CI Type.
To launch the relationship map in a new window, click the Relationship Map icon
 beside the CI in the CI List View.
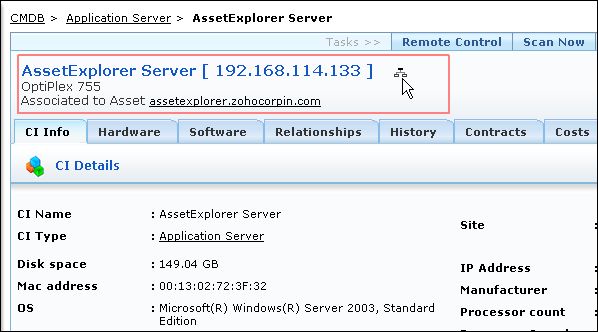
From CI Details page
Click CMDB tab in the header pane.
Select the CI Type from the Configuration Items block. Else, select All CIs link to view all the CIs irrespective of the CI Type.
Click the CI Name link to view the CI details.
In the CI details page, click the Relationship Map icon
to launch the Relationship Map in a new window.
From the Relationship Map, you can perform the following operations;
Create relationships instantly using the Quick Create Relationship option
View Relationship attributes configured for the CIs
View CI details of the CIs
Add Relationships between the CIs.

Quick Create - Relationship
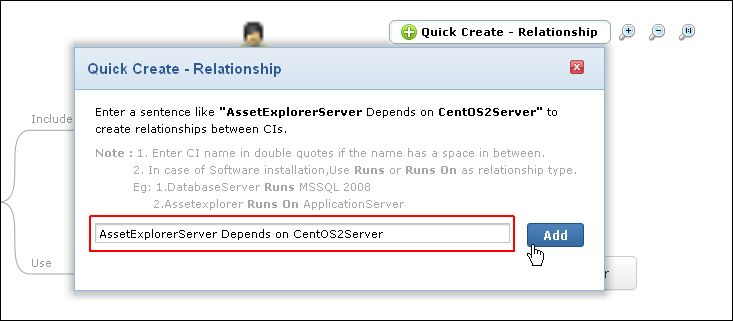
The Quick Create - Relationship is an instant means to create relationships between the CIs. You can create relationships for the existing CIs in the relationship map or create dependencies between other CIs using this option.
In order to create a relationship using the Quick Create - Relationship option, three piece of information is required.
The CI for which the relationship is created.
The Relationship Type, denoting the interdependencies between the CIs.
The dependent CI.
Say for example, enter a sentence like AssetExplorerServer Depends on CentOS2Server. Here, AssetExplorerServer forms the first piece of information, Depends on is the relationship type and CentOS2Server forms the dependent CI.
If the CI name has a space in between, specify the name in double quotes like, "ManagegEngine AssetExplorerServer" Depends on CentOS2Server.
Note: To denote installed softwares, use the relationship "Runs::Runs on".
To create relationships using the Quick Create - Relationship option,
Select the Quick - Create Relationship button in the Relationship Map. The Quick - Create Relationship dialog pops-up.
Enter a sentence with the CIs and the relationship type. Example, AssetExplorerServer Depends on CentOS2Server.
Click Add. The CI dependencies are added in the Relationship Map.
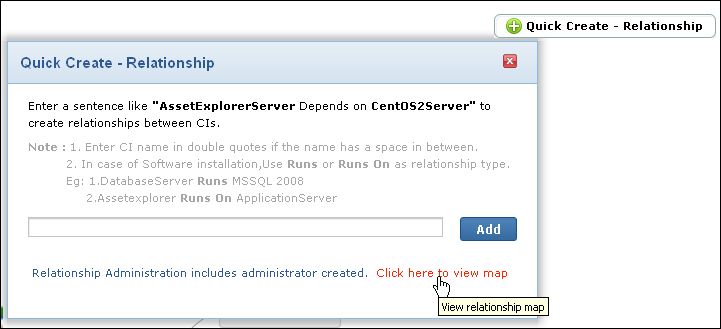
For dependencies added between two CIs that are not present in the Relationship Map, select Click here to view map link to view the relationship map between those CIs.
In case of conflict between CIs with similar CI names, such as "Administration"
and "Administrator", the Quick Create - Relationship option
provides the list of CIs, from where, you can choose the appropriate CI.
To ease your selection process, choose the CI Type from the drop-down.
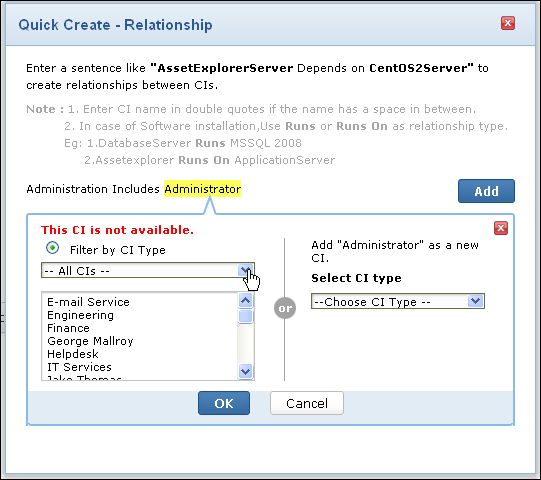
You can also create relationships between CIs that are unavailable in your CMDB. Say, for instance, if Administrator is unavailable in your CMDB, then you can add Administrator as a new CI by selecting the CI Type from the drop-down. Click OK to view the CI in the relationship map.
Viewing Relationship Attributes
Relationship Attributes provide additional information on the relationship between the CIs. Say, for instance, if a server runs a software application, then details such as the Installation Path, Version, Installed On and so on can be configured as relationship attributes.
The Relationship Attributes are configured while setting the default Relationships for a CI Type. To view these relationship attributes on the relationship map, move the mouse pointer over the CI.
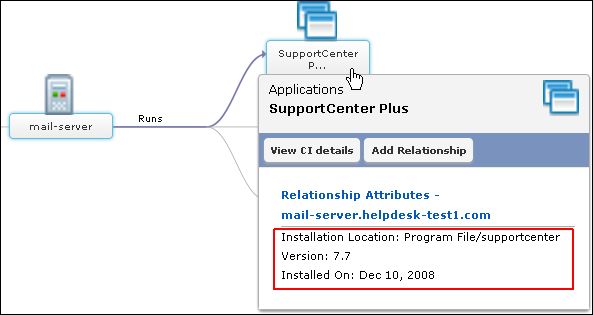
Note: The Relationship Attributes can be viewed only if the attributes are configured for the relationship.
Viewing CI Details
While viewing the Relationship Map, you can also view the details of a CI. To view the CI details,
Move the mouse pointer over the CI.
Click View CI details button. The CI details pops-up.
Add Relationship
To add relationships from the relationship map, click Add Relationship button. The Add relationship window pops up. Adding relationships from the relationship map is similar to the method discussed in Adding Relationships from the Relationship tab.