Mail Server Settings
In order to fetch and send mails from the application, you need to configure the Mail Server Settings. You need to set both the Incoming and Outgoing mail server settings to send and receive mails without any problems.
To configure mail server settings,
-
Click on the Admin tab in the header pane to open the configuration wizard page.
-
Click Mail Server Settings under the Main Settings block.
If you have enabled multi tenancy through Business Unit, click Global Settings tab - > Mail Server Settings under Organization Settings block. The Mail Server Settings page opens to view the Incoming, Outgoing and Spam Filter tabs.
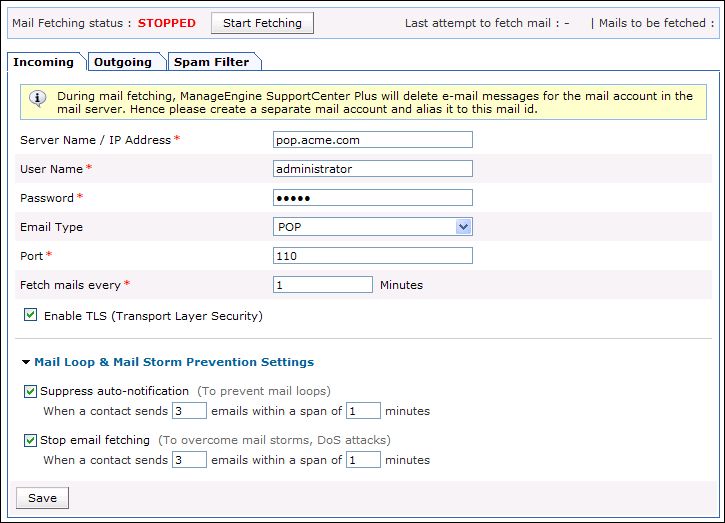
Incoming Mail Settings
-
Click on Incoming tab.
-
Specify the Server Name / IP Address from where the mails needs to be fetched.
-
Specify the Login credentials to the server in the User Name and Password fields.
-
Select the type of Email that needs to be fetched into the application from Email Type drop down. Say, POP, IMAP, POP3S, IMAPS.
-
The default Port for the email type is pre-filled.
-
You can schedule the time in minutes to fetch the mails in Fetch mails every field.
-
If you require, you can enable Transport Layer Security by selecting the check box beside Enable TLS.
-
You can Suppress Auto Notification and prevent Email Storming from contacts by halting the mail looping and mail fetching into the application.Specify the number of mails and the time span after which the mail fetching and the looping should be stopped.
-
Click Save. The configurations will be saved and SupportCenter Plus will try to establish connection with the mail server. Click Start Fetching button, to start the mail fetching.
Once the mail fetching starts, the Save button is disabled. So, if you wish to change any of the settings, then you need to stop mail fetching, make the changes, Save and then restart the mail fetching.
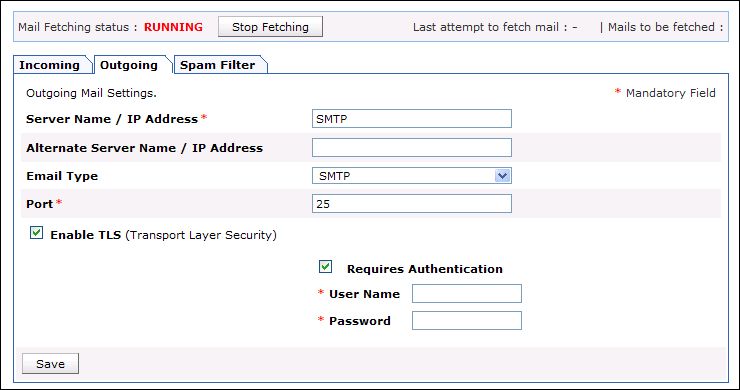
Outgoing Mail Settings
-
Click on the Outgoing tab.
-
Specify the Server Name / IP Address of theOutgoing Mail Server through which the mails are sent to the external world.
-
Specify the backup server name which will take over the main server in case of server crash in Alternate Server Name / IP Address field.
-
Select the type of Email that needs to be fetched into the application from Email Type drop down. Say, SMTP, SMTPS.
-
The default Port for the email type is pre-filled.
-
If authentication is required for outgoing mails server, enable Required Authentication and enter the specific credentials in User Name and Password fields.
-
Click Save.
Spam Filter
You can mark all your junk mails into Spam by defining filter criteria for the mails. Once you set a criteria say, "Subject contains Out of Office or Spam", then mails matching this criteria will be dropped and no new request will be created out of them.
To configure Spam Filter,
-
Click on the Spam Filter tab.
-
Define a rule by selecting a Criteria and Conditions from the respective drop down. Say, " Sender contains ".
-
Specify the filter content in the given text field by clicking the choose button. Say, the criteria is SENDER and condition is CONTAINS then the content can be xyx@acme.com.
-
Click Add to Rules button.
-
You can add more than one rule and select Match all of the following (AND) or Match any of the following (OR) radio button to match the rule.
-
Save the details.