Adding New Solution
The solutions module is a knowledge base with resolutions for various problems encountered by your help desk team. You can also document useful information while resolving an issue and save in the knowledge base. The solutions can be grouped under various topics to organize and locate the solutions easily. You can also notify users before the solution expiry through email notifications.
Adding new solutions
The new solution form can be accessed by two ways in SupportCenter Plus application.
-
Add New drop down.
-
Solutions tab
Add New drop down
The Add New drop down is a quick navigator to instantly access the New Solution form from the home page.
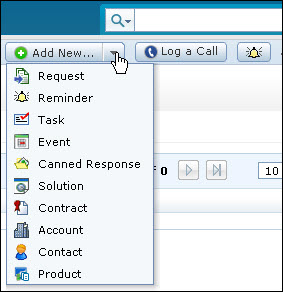
To configure the New Solution, go to Step 3 in Solution tab.
Solution Tab
-
Click on the Solutions tab in the header pane to open the solutions list view page.
-
Click on New Solution button.
-
From the New Solution form, specify the Title of the solution. The subject can be a summary of the complete solution in one line that will exactly tell what the solution is all about. This field is mandatory.
-
The list of available topics and sub-topics is listed under Topics drop down. You can group this solution to a topic by selecting the Topic from the drop down. This field is mandatory. You can even create a new topic and group this solution by clicking on Create New Topic link.
-
Specify the complete solution in the Contents text field. This field is also mandatory.
-
If there are any Additional Solution details (configured under Admin -> Helpdesk Customizer -> Solution Additional Fields) then enter the same in the respective fields.
-
If the solution requires any additional files to support the article, then you can attach the same by clicking Attach file link.
-
You can specify Keywords which will help in improving the search capability by provide accurate search result. While entering multiple keywords, separate them with comma.
-
Select Never from Expires on drop down if the solution does not expire. If you would like specify the expiry date of the solution, select specific date option from the drop down and select the date using the calendar icon  .
.
-
You can notify users before the solution expires by selecting Enable Solution Expiry Notification check box. Select the users to be notified by clicking on the  button.
-
Specify the days before which the user has to be notified of the solution expiry in the Notify before field.
-
Select Publish this solution in Customer Portal also check box to make this solution available in the customer portal.
-
Click Add. If you do not wish to add the solution then click Cancel.
-
If you have permission to approve the solution while creating, the Add and Approve button appears. Click this button to add and approve the solution.