SSL certificates for ManageEngine AppCreator
- Introduction
- Steps to install SSL in ManageEngine AppCreator
- Install a .P7b Certificate
- Commands to install certificates of some common vendors
Introduction
Enterprises secure both internal and external communication between clients and servers using digital certificates. These certificates provide authentication and help protect the data that’s exchanged between the client and the server machines.
ManageEngine AppCreator can run as a HTTPS service. But it requires a SSL (Secure Socket Layer) Certificate signed by a valid Certificate Authority (CA). By default, on first time start-up, it creates a self-signed certificate. This self-signed certificate will not be trusted by the user browsers. Thus, while connecting to AppCreator, you need to manually verify the certificate information and the hostname of AppCreator server carefully and should force the browser to accept the certificate.
For trial purposes, ManageEngine AppCreator comes bundled with a self-signed certificate. This certificate is usable, but sufficiently secure.
Note:
- We strongly recommend that you use a valid SSL certificate obtained from a trusted Certificate Authority (CA), especially before moving to the production stage.
- If you've hosted AppCreator on a local domain, you can still use the self-signed certificate generated from your organization-based customized CA. This self certification cannot be trusted until the same is deployed in every client server. This vouches for a secured connection that is valid inside your organization,
- Risks involved in self-signed certificate
- Security alert in mobile when connecting to self-signed hosts
Risks involved in a self-signed certificate
Though the self-signed certificate is usable, a valid SSL obtained from a trusted CA is a must-have security measure. Below are the potential risks of continuing to use the self-signed certificate:
- If you've hosted AppCreator on a public domain, this self-signed certificate cannot prevent attackers from impersonating application users and stealing information like user credentials and session cookies. A valid SSL certificate obtained from a trusted Certificate Authority (CA) such as Let's Encrypt will prevent probable attacks.
- Advising your employees to ignore this warning can encourage dangerous public browsing behavior. Employees accustomed to ignoring warnings on internal sites may be inclined to ignore warnings on public sites as well, leaving them, and your organization, vulnerable to malware and other threats.
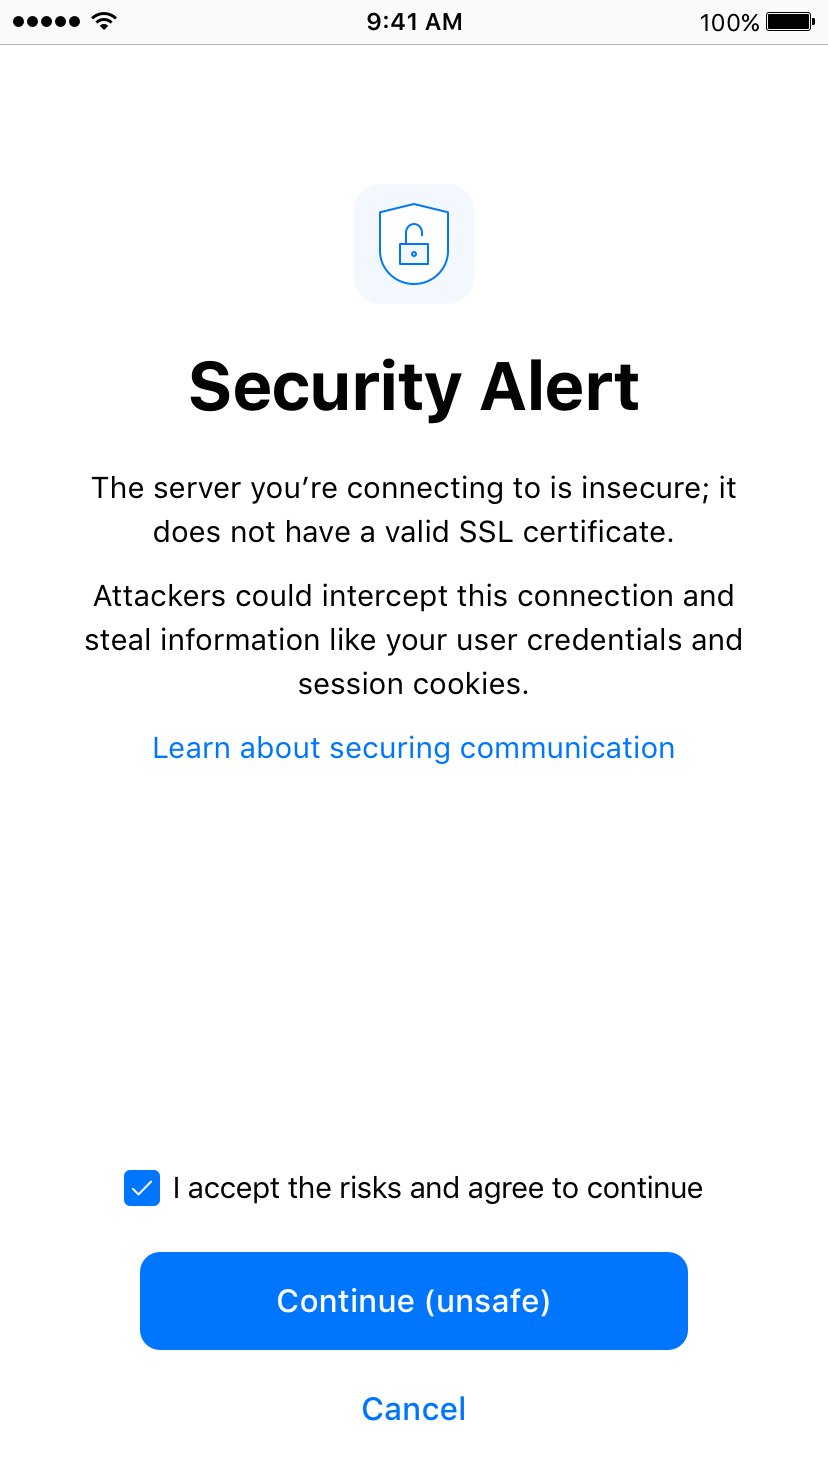
Security alert in mobile app when connecting to self-signed hosts
For trial purposes, ManageEngine AppCreator is bundled with a self-signed certificate. Though usable, this certificate is not secure enough. Until you use a valid SSL certificate issued by a trusted Certificate Authority (CA), end users will see a security alert when accessing the AppCreator host via mobile apps.
- If you're an end user:
- And you're seeing this alert while using our Android or iOS app, you can notify your IT administrator about this.
- You need to be aware that there are potential security risks while accessing an insecure server. Attackers could intercept your connection to the server and steal your information like passwords, credit card details, and other credentials.
- If you're the admin:
- If you've hosted AppCreator on a public domain, this self-signed certificate cannot prevent attackers from impersonating application users and steal information like user credentials and session cookies.
- Advising your employees to ignore this warning can encourage dangerous public browsing behavior. Employees accustomed to ignoring warnings on internal sites may be inclined to ignore warnings on public sites as well, leaving them, and your organization, vulnerable to malware and other threats.
- Solution: Use a valid SSL certificate—obtained from a trusted CA to prevent this warning from appearing. We recommend that you do so especially before moving to the production stage.
Steps to install SSL in ManageEngine AppCreator
The steps involved in configuring ManageEngine AppCreator to use the SSL are as given below.
Step 1: Create a Keystore file
Step 2: Create .CSR (Certificate Signing Request) file
Step 3: Install your SSL Certificate
Step 4: Configuring the Server
Step 1: Create a Keystore file
Before requesting for a certificate from a CA, you need to create tomcat specific ".keystore" file and ".csr" file. The .keystore file and .csr filewill include information provided by the individual who creates the .keystore and .csr files.
To create the .keystore file follow the below steps,
Open the Command Prompt.
- From the location <installation directory> \ jre \ bin execute the command.
keytool -genkey -alias <your_alias_name> or [Domain Name] -keyalg RSA -keystore sas.keystore

- If your vendor requires a CSR of size 2048 please use the command given below.
keytool -genkey -alias <your_alias_name> or [Domain Name] -keyalg RSA -keysize 2048 -keystore sas.keystore

- You will then be prompted to choose a password for your keystore.NOTE: Please note that the Password should not contain $ symbol.
- When it asks for first and last name, this is NOT your first and last name, but rather it is your Fully Qualified Domain Name for the site you are securing.

- If you are ordering a Wildcard Certificate this must begin with the * character.

- On entering the required information, confirm that the information is correct by entering 'y' or 'yes' when prompted.
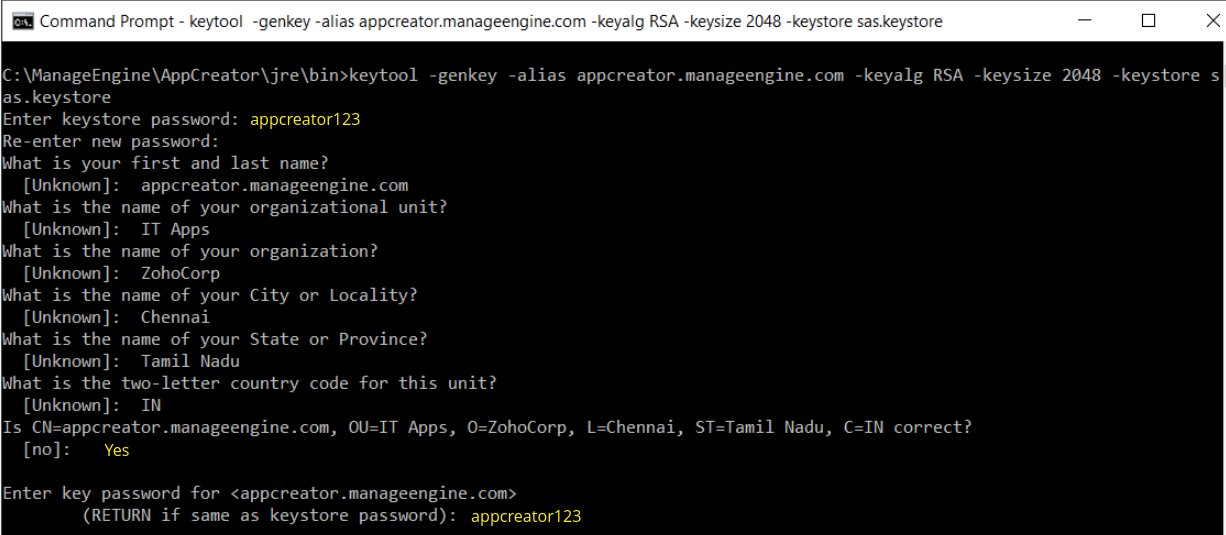
- At the end of executing the above command, you will be prompted to enter keystore password. Try giving the password same as your key password. Make sure to remember the password you choose.
- Your keystore file named sas.keystore is now created in your current working directory.
Step 2: Creating .CSR (Certificate Signing Request) file
The .CSR (Certificate Signing Request) file is temporary and should be submitted to a CA to receive CA-Signed Certificate files.
Please follow the steps given below to create the CSR file.
Open the Command Prompt
From the location <installation directory> \ jre \ bin execute the below command.
keytool -certreq -alias <your_alias_name> -file key.csr -keystore sas.keystore
In the above command <your_alias_name> is the alias name provided when creating the keystore, key.csr is the name of the CSR file that will be created after the command is executed.

Step 3: Install your SSL Certificate
Download the Certificate files received from the CA via e-mail to the directory where your keystore (sas.keystore) was saved during the CSR creation process. The certificates must be installed to this exact keystore. If you try to install it to a different keystore it will not work.
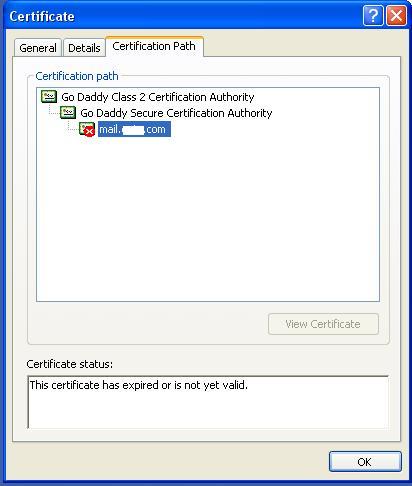
The certificates you had downloaded must be installed to your keystore in the correct order for your certificate to be trusted. If the certificates are not installed in the correct order, then the certificate will not authenticate properly. To find the correct order, double click on the domain certificate and then go to ‘Certification Path’.
These certificates are usually in the format .cer or .crt. If your certificate is with the extension.p7b please follow the instructions given in Installing a .P7b Certificate to export the certs to a .cer or .crt format.
Looking at the above certification path we can infer that we need to import two other certificates before the domain certificate. First is the Root, next the Intermediate and finally the Domain Certificate. Some CAs may also use another certificate called Cross Intermediate. These certificates can be downloaded from the Vendor’s website.
Installing the Root Certificate file
Each time you install a certificate to your keystore you will be prompted for the keystore password, which you chose while generating your CSR. Type the following command to install the Root certificate file:
keytool -import -trustcacerts -alias root -file <File_Name>.crt -keystore sas.keystore
You will get a confirmation stating that the "Certificate was added to keystore".

Install the Intermediate Certificates and Cross Intermediate Certificates (if any).
Follow the instructions provided by the CA.
keytool -import -trustcacerts —alias intermediate -file <File_Name>.crt -keystore sas.keystore
keytool -import -trustcacerts —alias cross -file <File_Name>.crt -keystore sas.keystore
You will get a confirmation stating that the "Certificate was added to keystore".

Install the Primary or the Domain Certificate file
Type the following command to install the Primary certificate file:
keytool -import -trustcacerts -alias <your_alias_name or [Domain Name]> -file your_domain_name.crt -keystore sas.keystore
Please note that <your_alias_name or [Domain Name]> should be replaced with the alias name provided when creating the keystore (as discussed in Step 1). This time you will get a different confirmation stating that the "Certificate reply was installed in keystore”.

If you want to trust the certificate, then choose y or yes. Your Certificates are now installed to your keystore file (sas.keystore).
Step 4: Configuring the Server
Copy the sas.keystore file from <AppCreator_Home>\jre\bin to <AppCreator_Home>\conf
- Then, update the name of the keystore and the password, you gave in Step 1, while generating sas.keystore in the file server.xml present under <AppCreator_Home>\conf

Restart the service ManageEngine AppCreator for the changes to take effect.
Install a .P7b Certificate
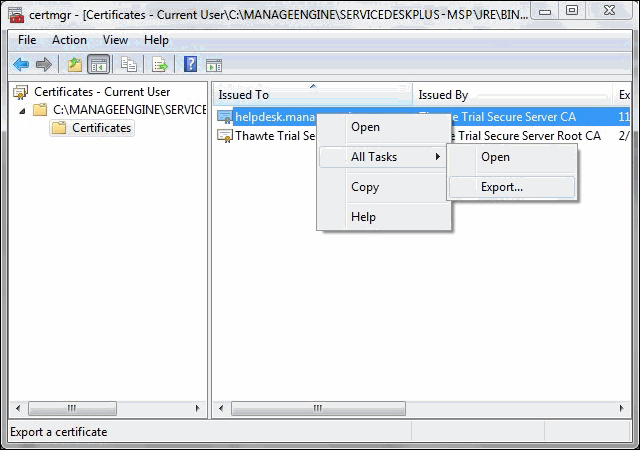
Some CA will provide the certificates with an extension .p7b. In such a case you can double click on this file to open a console which will list all the required certificates. You can export these certificates to Base-64 encoded X.509 (.cer) files. (Please refer to the Screenshots given below).
These certs can then be installed onto the keystore file using the instructions given in Step 3.
To export the certificate,
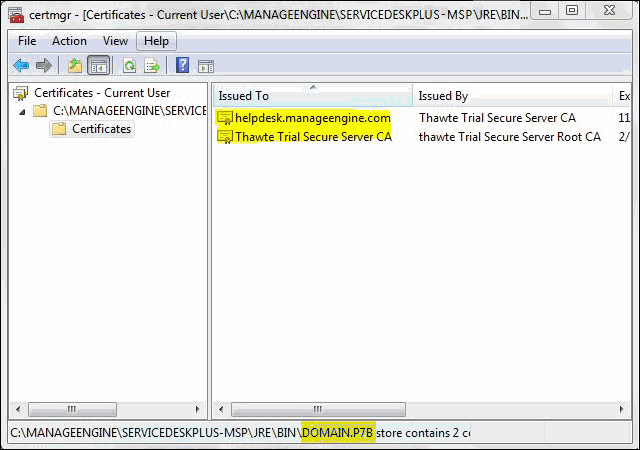
- Go to [ManageEngine AppCreator Home] \ jre \ bin \ domain.P7B.
- Right click on the certificate and select All Tasks -> Export option.
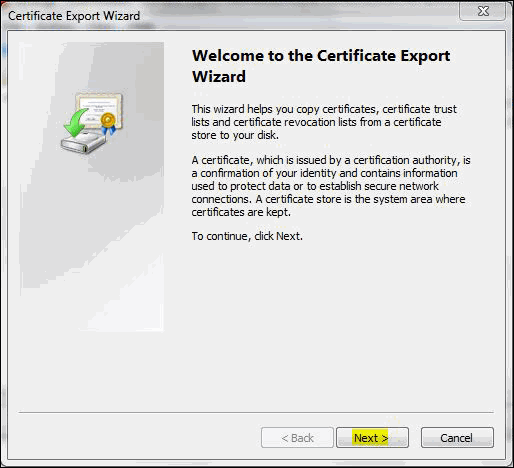
- The Certificate Export Wizard dialog pops up. Click Next button to proceed.
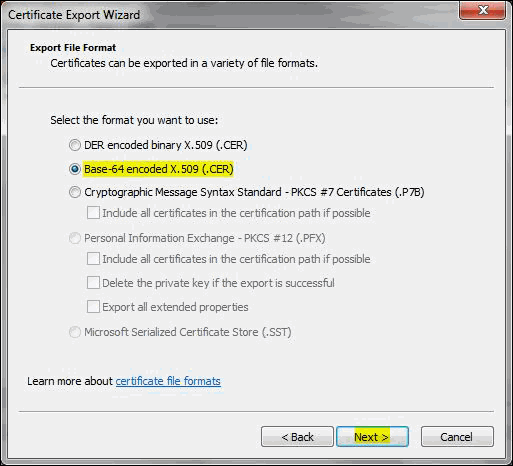
- Select the export file format as Base-64 encoded X.509 (.cer). Click Next.
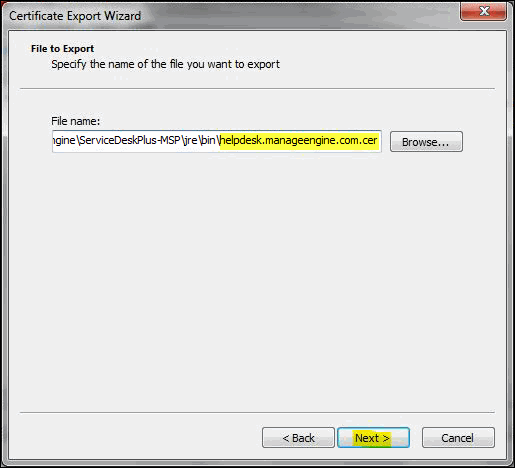
- Specify the name of the file you want to export.Click Next.
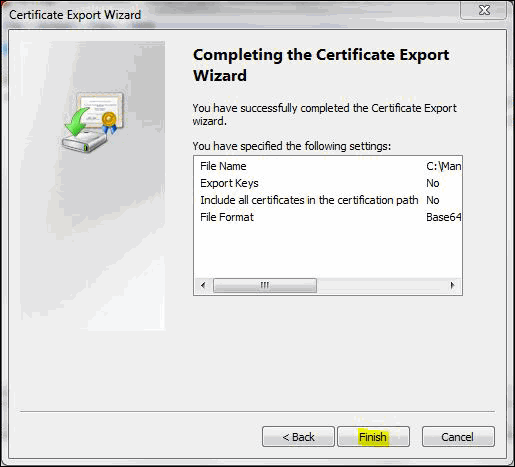
- The certificate export wizard is completed successfully. You can check for the settings you have specified. Click Finish.
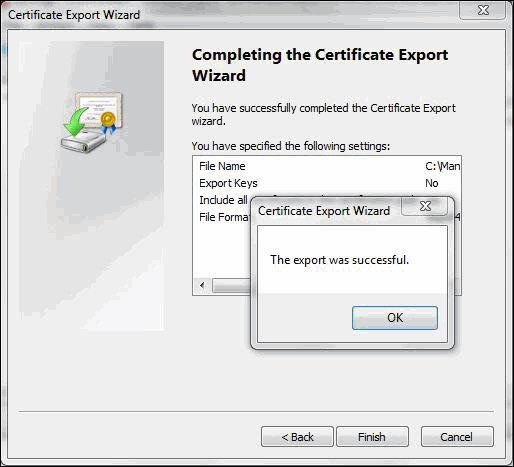
- A success message appears in a dialog box. Click OK.
Commands to install certificates of some common vendors
Please find below the commands you need to use to install certificates of some common vendors.
GoDaddy
If your CA is "GoDaddy", then the steps to follow will be:
keytool -import -alias root -keystore <Keystore_Name>.keystore -trustcacerts -file gd_bundle.crt
keytool -import -alias cross -keystore <Keystore_Name>.keystore -trustcacerts -file gd_cross_intermediate.crt
keytool -import -alias intermediate -keystore <Keystore_Name>.keystore -trustcacerts -file gd_intermediate.crt
keytool -import -alias <Alias Specified when creating the Keystore> -keystore <Keystore_Name>.keystore -trustcacerts -file <CertificateName>.crt
Verisign
If your CA is "Verisign", then the steps to follow will be:
keytool -import -alias intermediateCA -keystore <Keystore_Name>.keystore -trustcacerts -file <your_intermediate_certificate_name>.cer
keytool -import -alias <Alias Specified when creating the Keystore> -keystore < Keystore_Name>.keystore -trustcacerts -file <CertificateName>.cer
Comodo
If your CA is "Comodo", then the steps to follow will be:
keytool -import -trustcacerts -alias root -file AddTrustExternalCARoot.crt -keystore <Keystore_Name>.keystore
keytool -import -trustcacerts -alias addtrust -file UTNAddTrustServerCA.crt -keystore <Keystore_Name>.keystore
keytool -import -trustcacerts -alias ComodoUTNServer -file ComodoUTNServerCA.crt -keystore <Keystore_Name>.keystore
keytool -import -trustcacerts -alias essentialSSL -file essentialSSLCA.crt -keystore <Keystore_Name>.keystore
keytool -import -trustcacerts -alias <Alias Specified when creating the Keystore> -file <Certificate-Name>.crt -keystore <Keystore_Name>.keystore