Export data from reports
Exporting records help you obtain or download the records in your report into a specific format for a purpose outside of the ManagaEngine AppCreator environment. AppCreator enables you to export your reports in a few simple steps so that you can access them offline and email them to your colleagues who are non-ManageEngine users. You can perform export operations across all the three platforms supported by AppCreator — web, mobile and tablet. AppCreator also enables you to secure the exported file with a password. As a precautionary measure to safeguard yourself from unknown security threats, it is recommended that you protect your exported files with a strong password.
Salient Features
- You can export the data in the reports that you create using ManageEngine AppCreator.
- You can export your reports from the following places:
- reports in the live mode of your AppCreator application
- reports embedded inside your AppCreator pages
- published reports
- reports in the customer portal
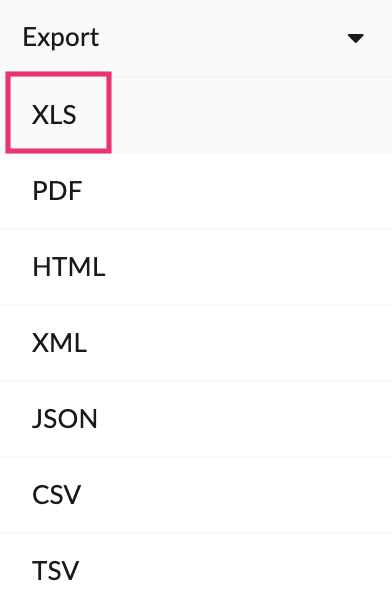
- You can export them in various file formats such as XLS, PDF, HTML, XML, JSON, CSV, and TSV.
- You can customize the data that you wish to export and also set passwords for sensitive data. Learn more
- After exporting, you can access them offline and email the reports to your users.
In this help page, you can get to know about the following:
- Password protection for exported files
- Hiding columns while exporting files
- Steps to export records (XLS, XML, JSON, CSV, and TSV formats)
- Steps to export records a PDF file
- Steps to export records as an HTML file
- Mobile and tablet implementation
- Limitations
Password protection
Passwords provide the first line of defense against unauthorized access to your personal information. The stronger your password, the more protected your data will be from hackers and malicious attacks. A strong password contains a mix of letters (upper and lower case), numbers, and symbols, and no ties to your personal information. Password protection enables you to protect your data by assigning it a strong password. Other users cannot read, change, or delete your data without knowing the password. To know how to enable password protection for your exported files, click here.
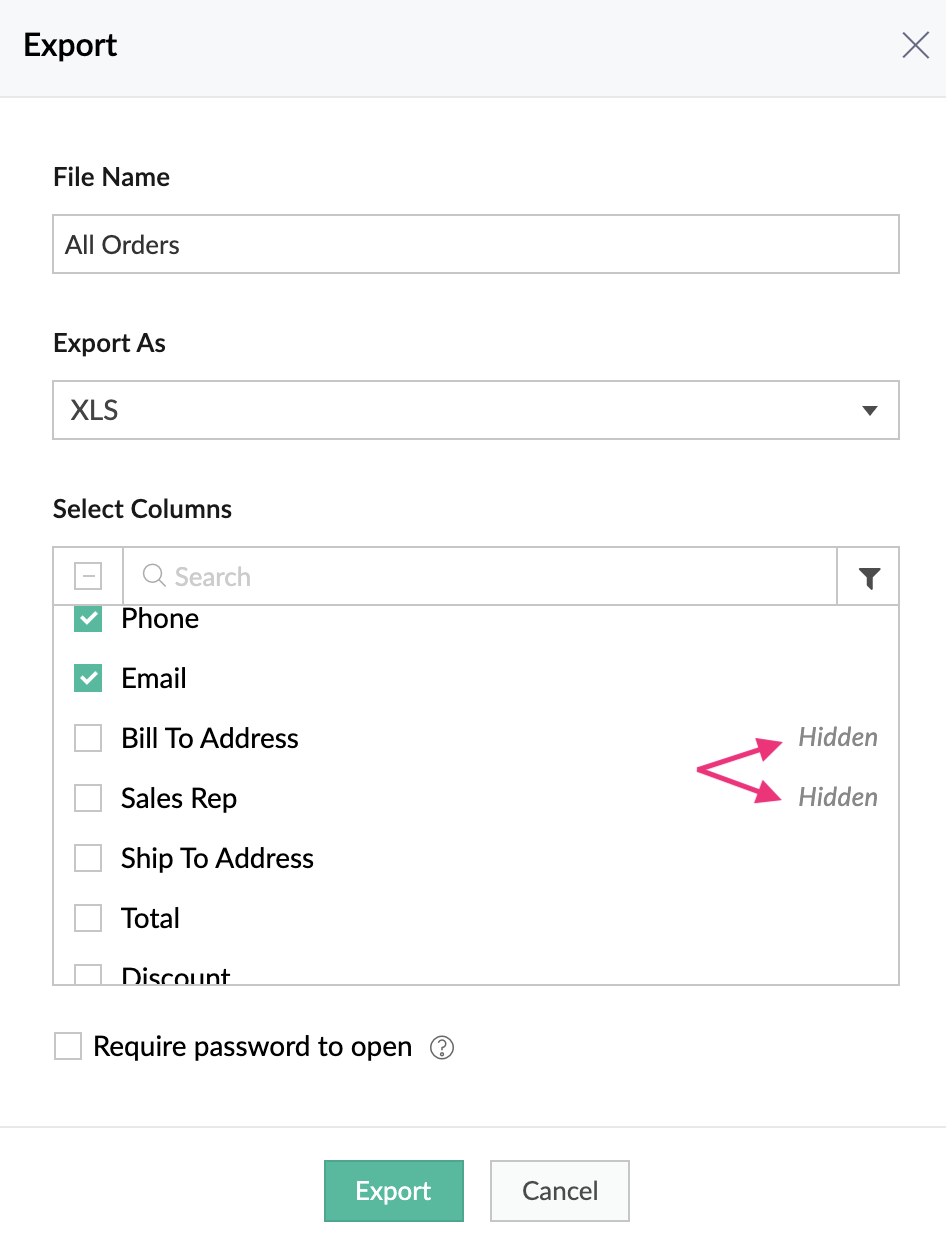
Hide columns
Hiding a column prevents the viewer from being able to view certain columns that you deem unnecessary. When you have hidden columns in your report, they will be displayed with a hidden tag in the columns listed in the Export popup.
Note:
- By default, hidden columns will be unchecked in the column listing. You can check them whenever required.
- When you export reports with hidden columns, the exported file will not contain the hidden columns and their values.
Steps to export records (XLS, XML, JSON, CSV, and TSV formats)
- Navigate to the live mode of your app.
- Click on the hamburger icon at the top right corner of your screen and click Export.
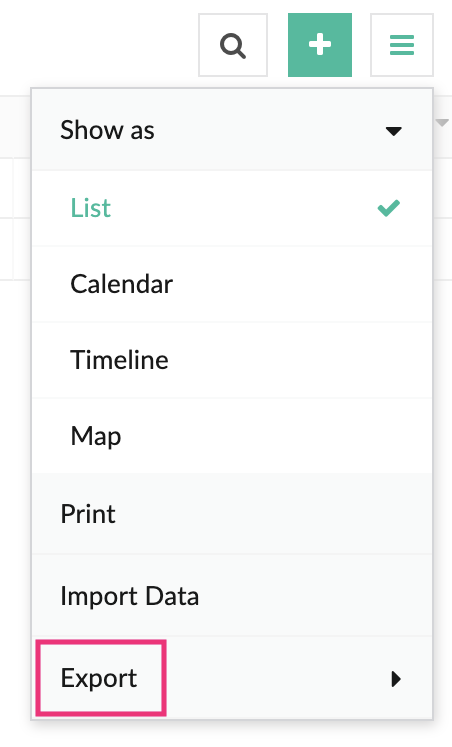
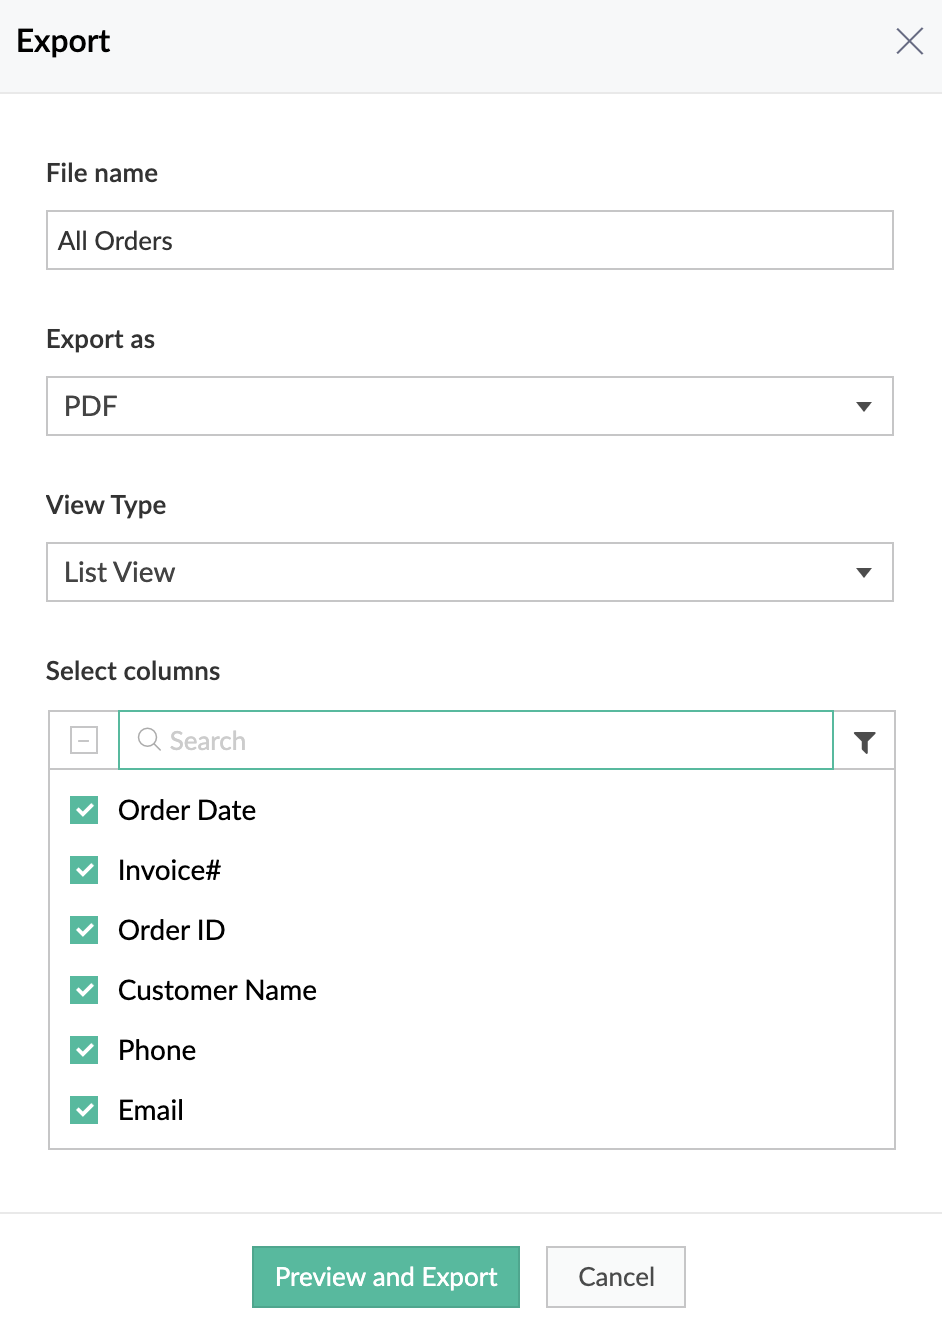
- Select the required format to export the records.
- In the Export popup, you can do the following:
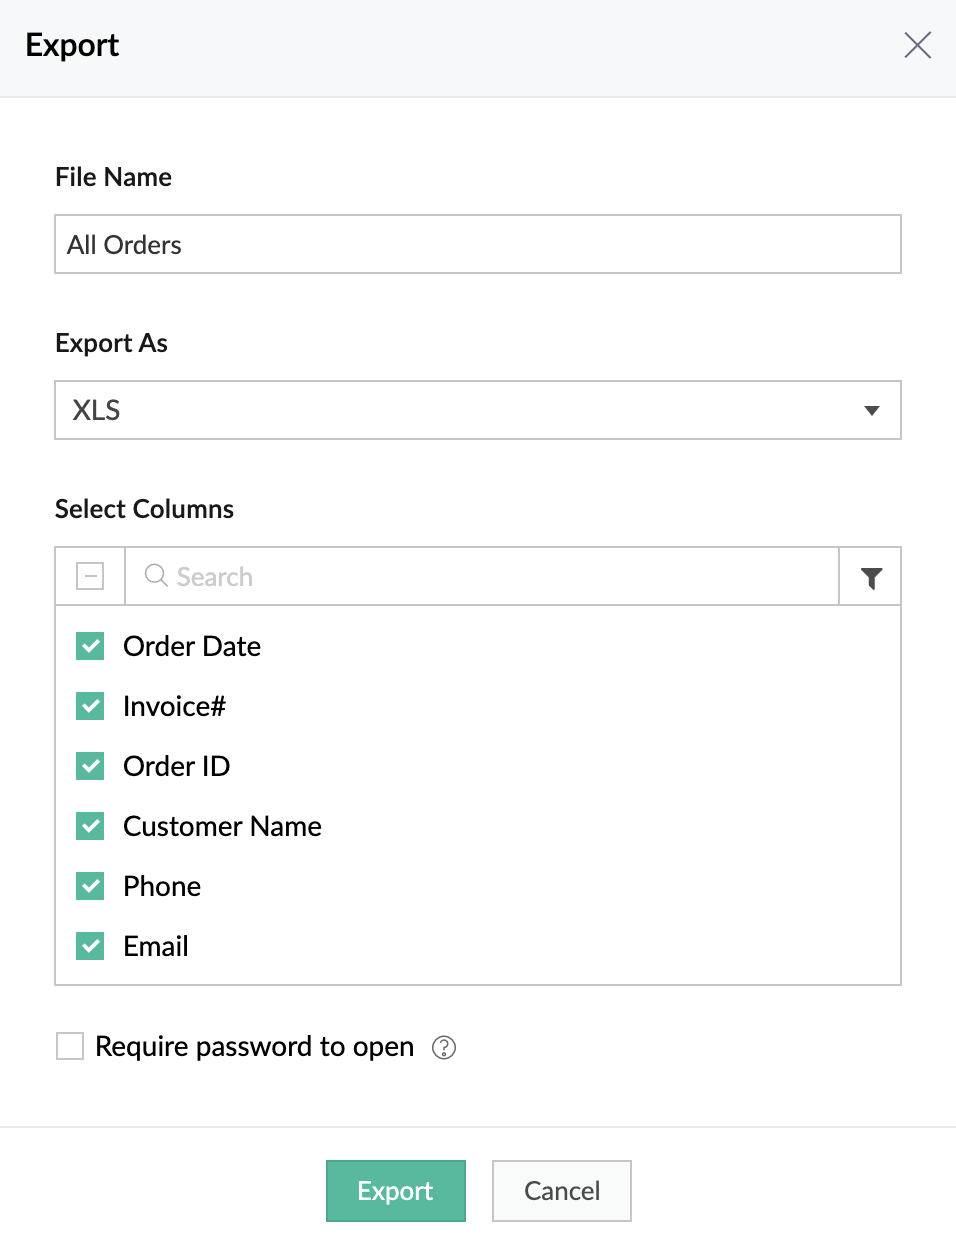
- Edit the file name and change the export type as required.
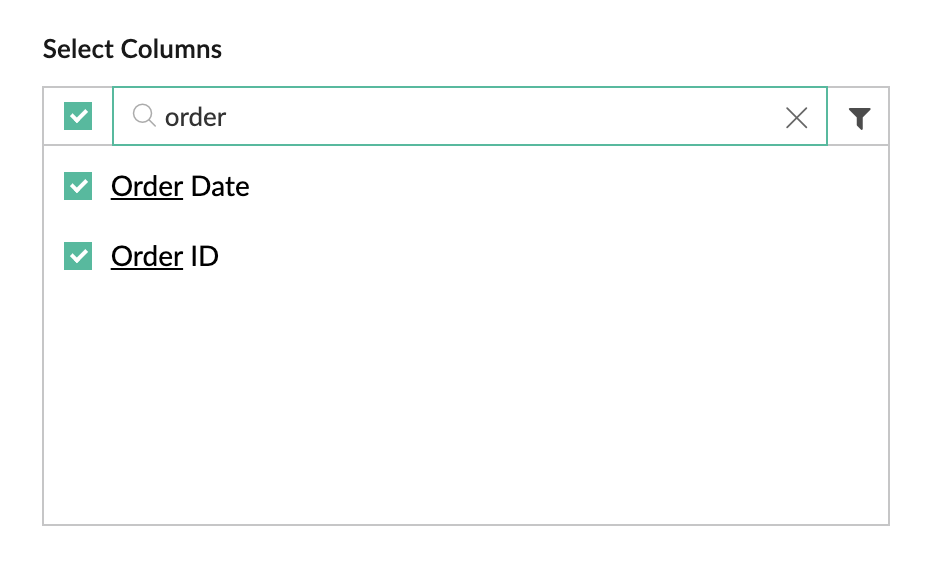
- You can either select all columns by clicking the minus (-) icon at the topmost column or individually select the required fields.
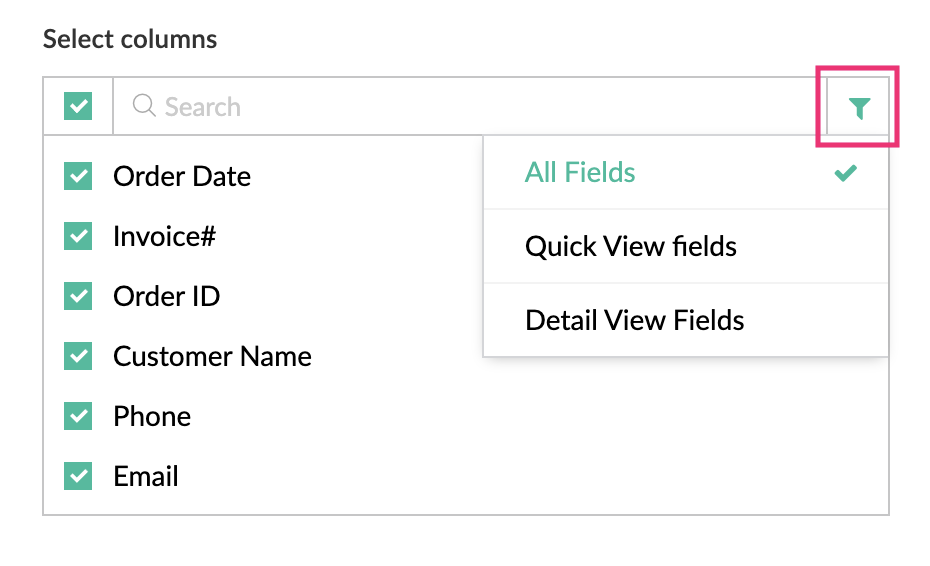
- Click the filter icon at the top-right of the popup to select columns based on view types — Quick View and Detail View. You can also select the All Fields option from here.
Note:
- When you select either Quick View fields or Detail View fields, only the fields corresponding to the chosen view will be displayed in the field column listing. You can unselect fields not required in the chosen view.
- When you choose the All Fields option, fields in both the views (Quick View and Detail View) will be displayed. You can select or unselect fields in the field column listing.
- You can also search the required column (field) name in the search bar at the top and select them.
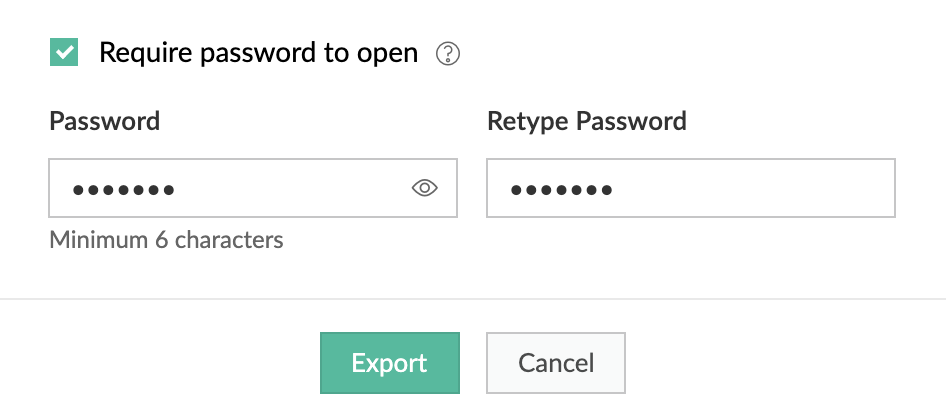
- To secure your data outside of AppCreator, you can enable password protection for the exported files. Select the checkbox beside Require password to open and specify a strong password.Note: A strong password contains a mix of letters (upper and lower case), numbers, and symbols, no ties to your personal information, and no dictionary words. We strongly recommend you to use password protection for records that store sensitive PII (Personally identifiable information) and ePHI (Electronic protected health information) data.
- Click Export. Your file will be downloaded in the chosen format.
- You need to type in your password before opening your exported file (if password protection is enabled).
Steps to export records as a PDF
- Navigate to the live mode of your app.
- Click on the hamburger icon at the top right corner of your screen and click Export.
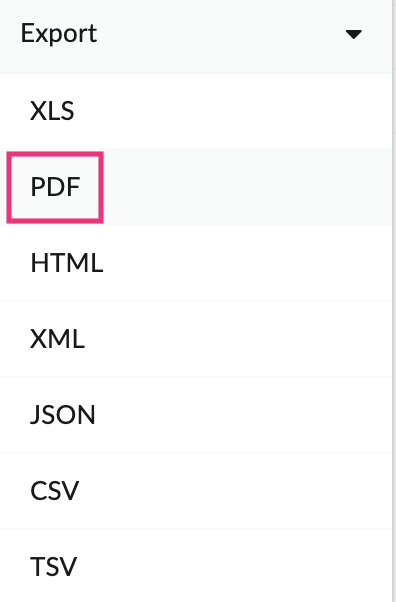
- Select the PDF option under the Export as dropdown.
- In the Export popup, you can do the following:
- Edit the file name and select the view type as required:
- List view: The records will be exported in a table-like format as shown in the current view, where the field labels are in the header row and the records are listed in the subsequent rows similar to the Quick view in reports.
- Summary view: The records will be exported in a layout that enables you to see the detailed view of the record in a linear manner. You will be able to see all the fields and their congruent as label and value pairs. If you select the Summary view option, proceed to step 8 (you will not be able to select the required columns in this option).Note: If you have configured a record template for your report and when the summary view option is selected, then the record template will be exported as the detailed (summary) view of each record in your report.
- You can either select all columns by clicking the minus (-) icon at the topmost column or individually select the required fields.
- Click the filter icon at the top-right of the popup to select columns based on view types — Quick View and Detail View. You can also select the All Fields option from here.
- You can also search the required column (field) name in the search bar at the top and select them.
- Once you have made the required changes, click the Preview and Export button. The Export Settings preview will open.Note: The page setup options chosen in your record template will be pre-filled in the Export Settings tab.
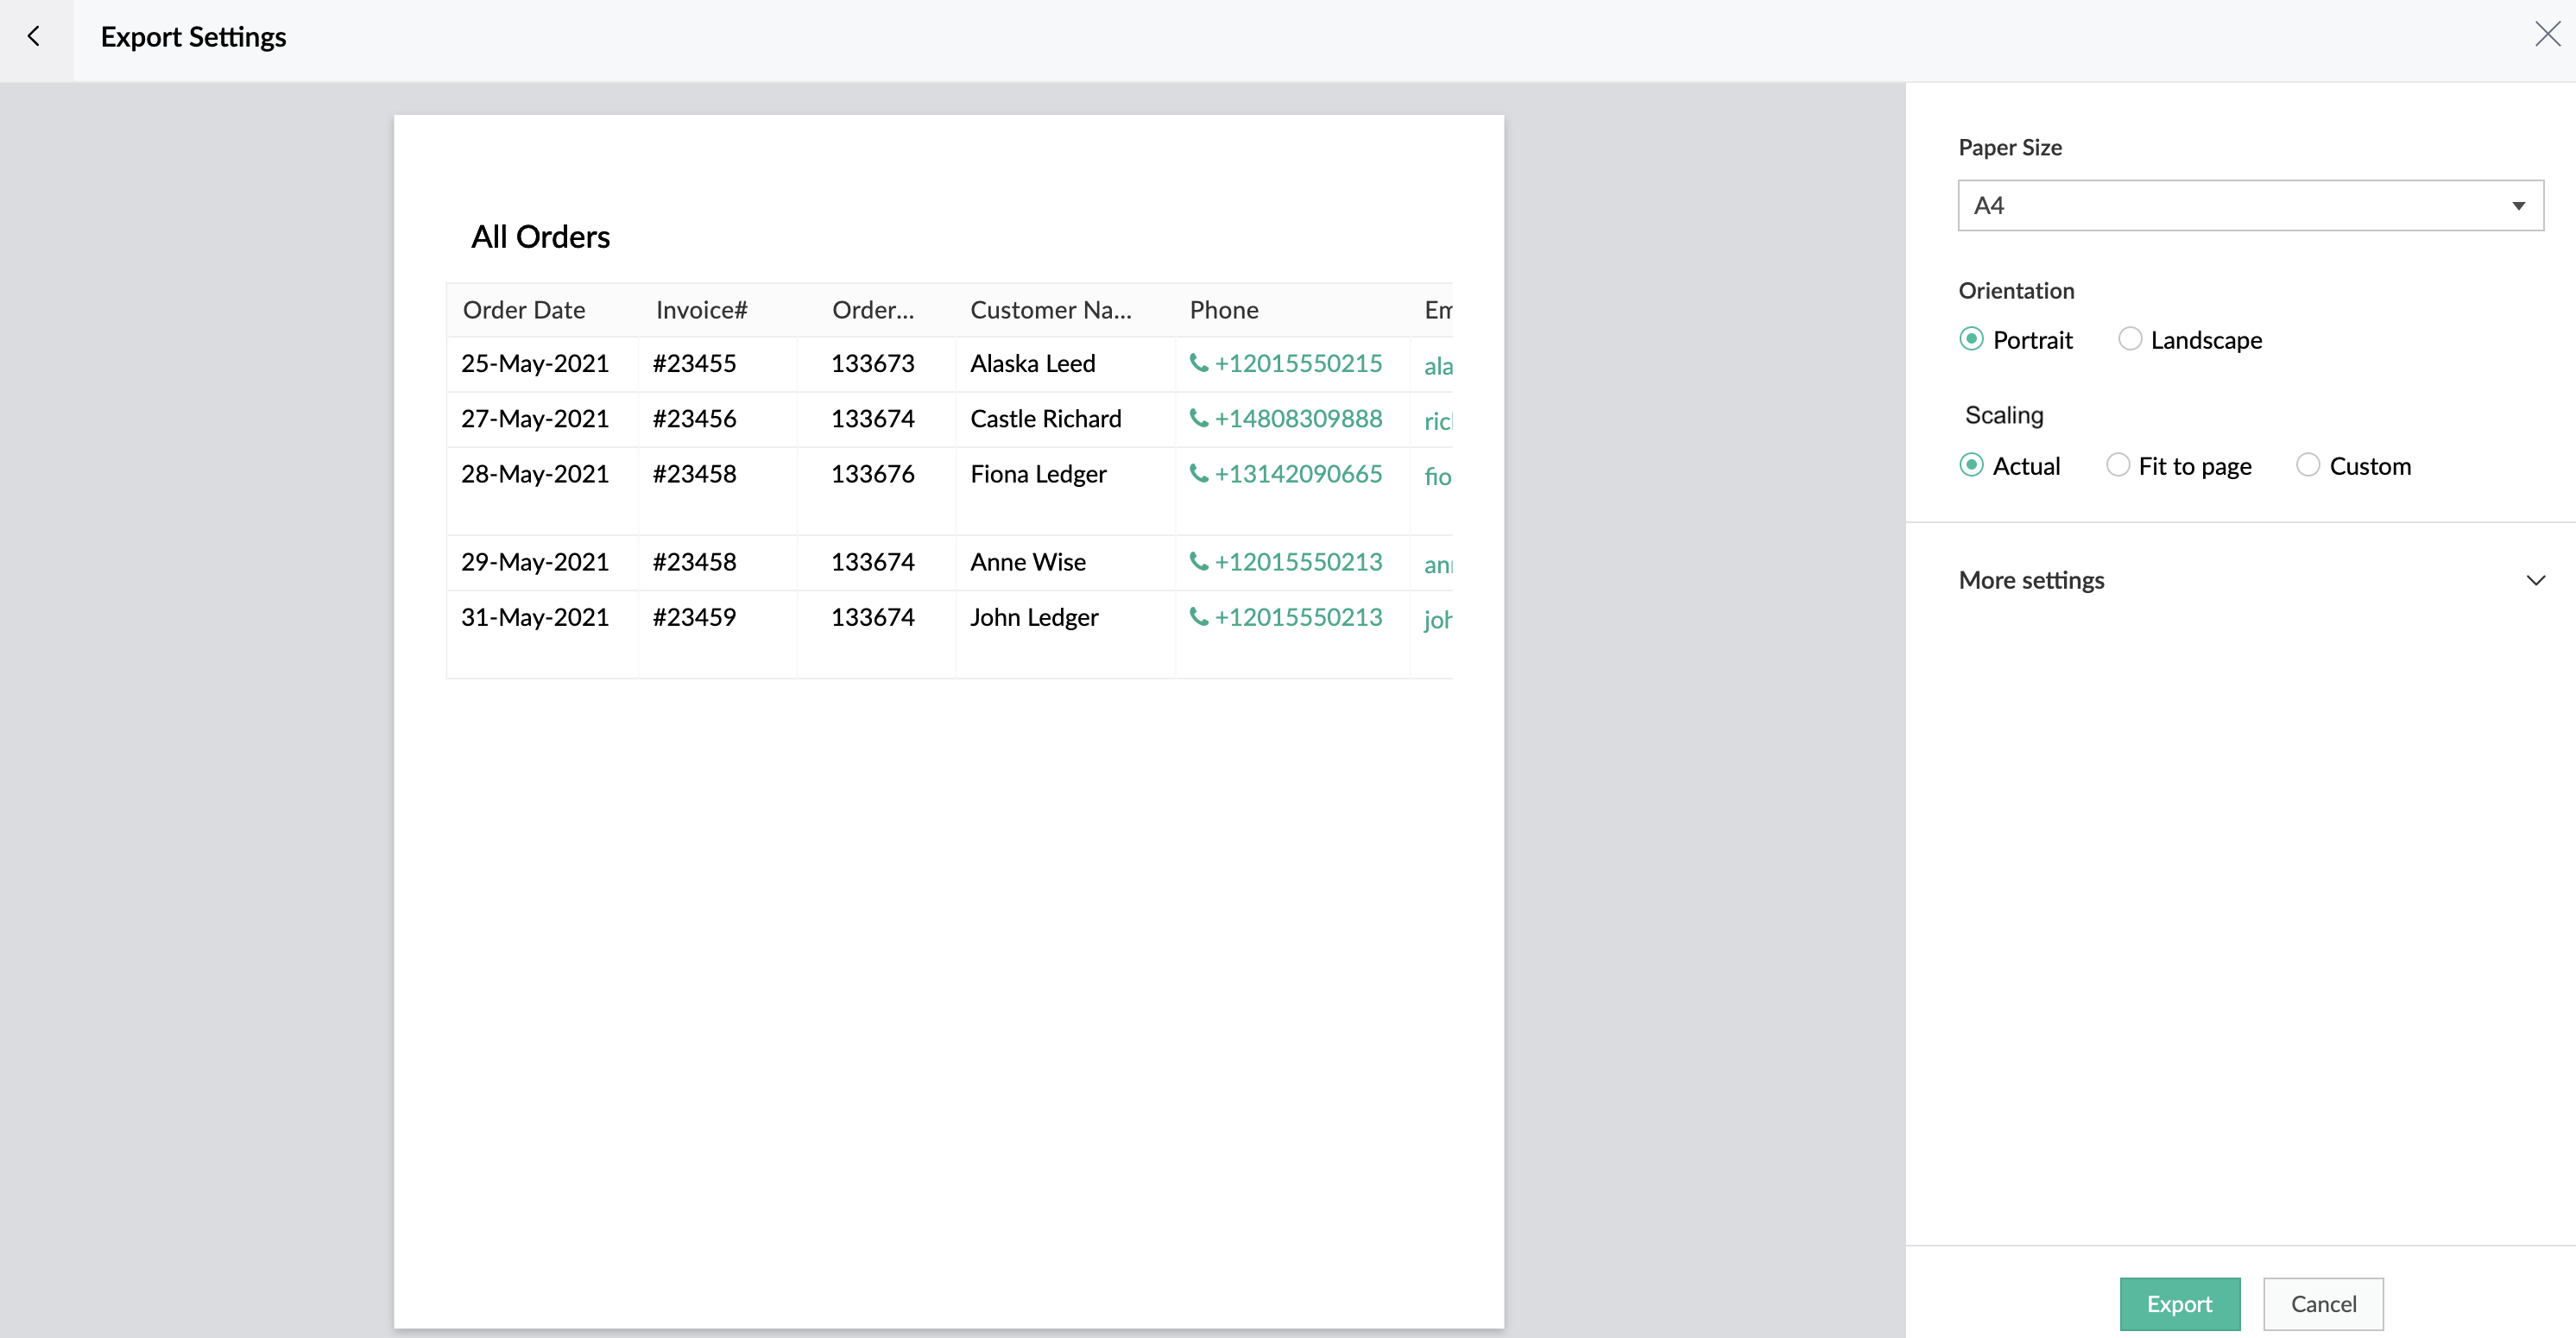
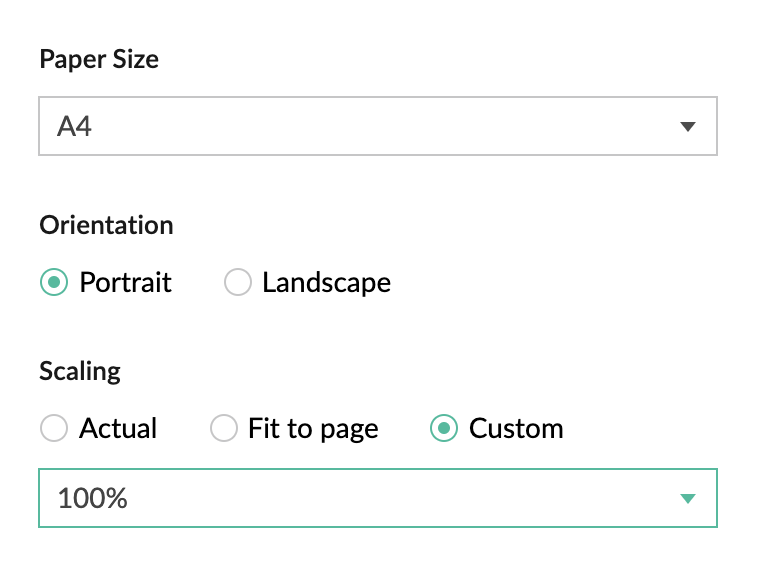
- Select the paper size and orientation (Portrait or Landscape) as required.
- Choose the required scaling:
- Actual width - This option will print the columns/field-value pairs with their actual width in live mode onto the selected paper size. There might be instances where some columns might be cut off after export.
- Fit to page width - This option will shrink all columns to the selected paper size. In case you have chosen Detail view, this option will not display any visible changes since there will be only two columns (records are shown as label and value pairs in Detail View).
- If the Custom option is chosen, you must select the required scaling value (%). This option helps to zoom out the entire report and print all the columns with proper readable width onto the selected paper size.
- Click the arrow beside More settings to specify the following:
- Margin: Specify the margin values for all four corners — top, right, bottom, and left.
- Header: Specify the fields (report name, date and time, and page number) to be displayed in the left, center, and right sides of your PDF file in the header. The report name can be customized to suit your requirements.
- Footer: Specify the fields (report name, date and time, and page number) to be displayed in the left, center, and right sides of your PDF file in the footer. The report name can be customized to suit your requirements.
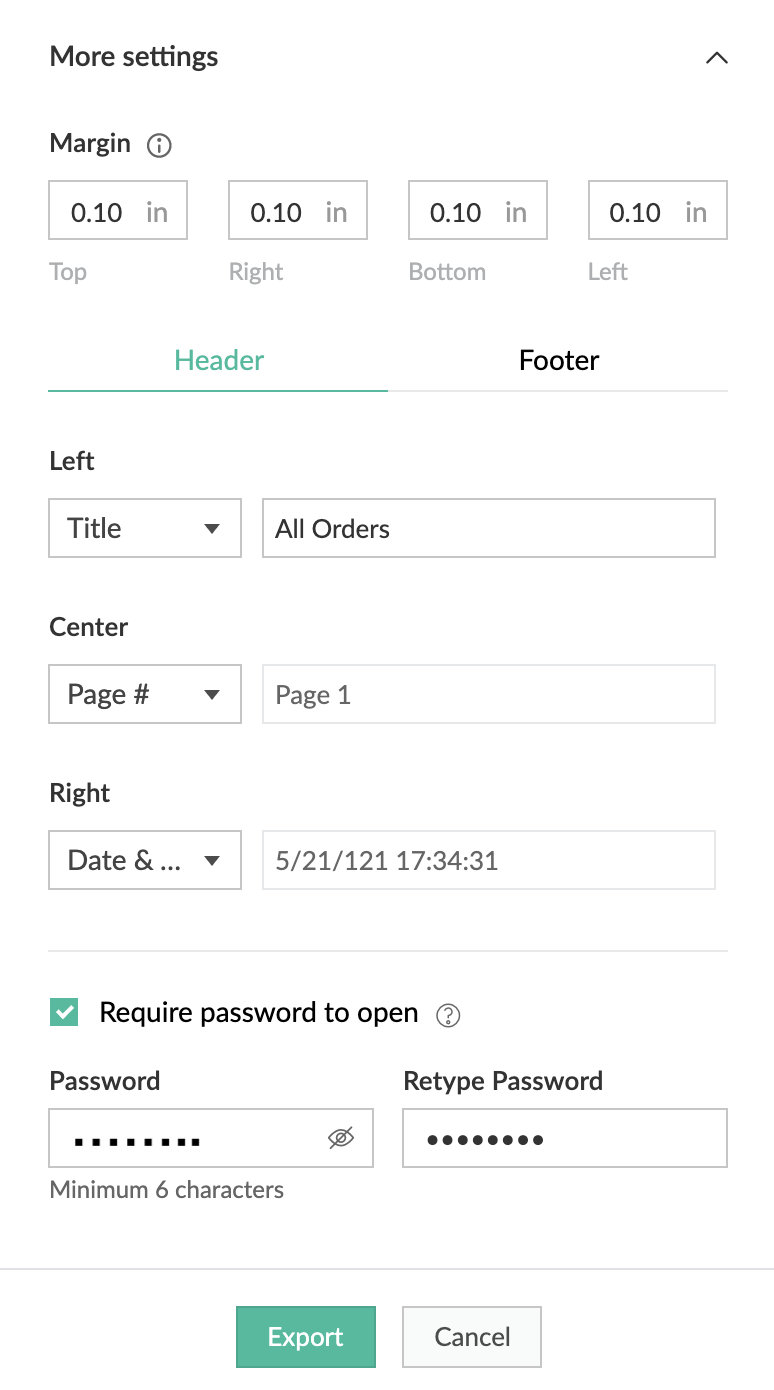
- To secure your data outside of AppCreator, you can enable password protection for the exported files. Select the checkbox beside Require password to open and specify a strong password.Note: A strong password contains a mix of letters (upper and lower case), numbers, and symbols, no ties to your personal information, and no dictionary words. We strongly recommend you to use password protection for records that store sensitive PII (Personally identifiable information) and ePHI (Electronic protected health information) data.
- Click Export. Your file will be downloaded in the chosen format.
- You need to type in your password before opening your exported file (if password protection is enabled).
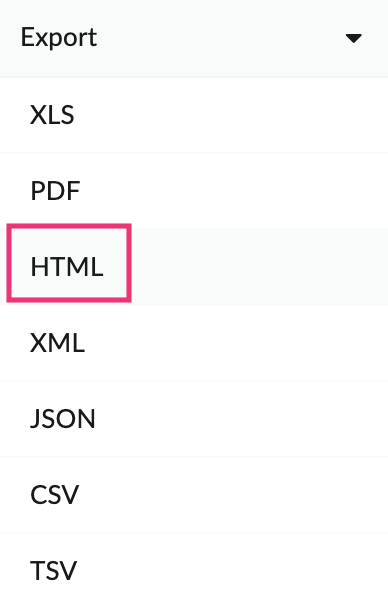
Steps to export records as an HTML file
- Navigate to the live mode of your app.
- Click on the hamburger icon at the top right corner of your screen and click Export.
- Select the HTML option under the Export as dropdown.
- In the Export popup, you can do the following:
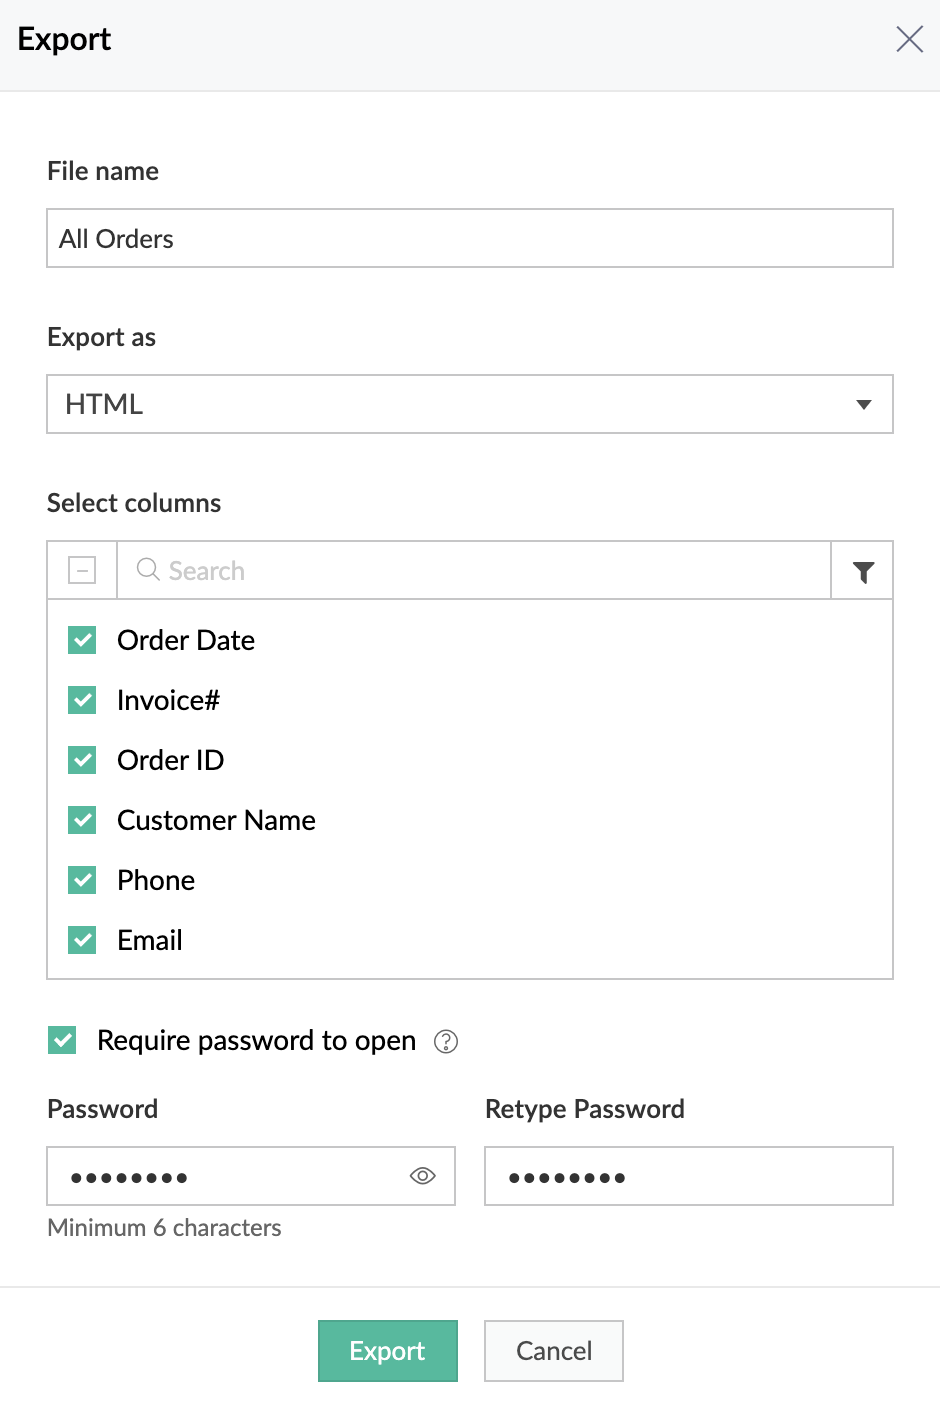
- Edit the file name as required.
- You can either select all columns by clicking the minus (-) icon at the topmost column or individually select the required fields.
- Click the filter icon at the top-right of the popup to select columns based on view types — Quick View and Detail View. You can also select the All Fields option from here.
- You can also search the required column (field) name in the search bar at the top and select them.
- To secure your data outside of AppCreator, you can enable password protection for the exported files. Select the checkbox beside Require password to open and specify a strong password.Note: A strong password contains a mix of letters (upper and lower case), numbers, and symbols, no ties to your personal information, and no dictionary words. We strongly recommend you to use password protection for records that store sensitive PII (Personally identifiable information) and ePHI (Electronic protected health information) data.
- Click Export. Your file will be downloaded in the chosen format.
- You need to type in your password before opening your exported file (if password protection is enabled).
Limitations
The following limitations are applicable to all report types.
- Only those users with export permissions will be able to export the report data.
- Custom actions configured in your reports will not be exported.
- There's a 12 MB limit on PDFs in the following scenario: When the report is exported as PDF and the data’s size exceeds 12 MB, the operation will fail and a 0 MB sized file will be downloaded instead.
- In HTML file export, media fields will not be exported. Also, in order to prevent the building UI from impacting the performance, you will be limited to export 50,000 records.
- In XLS file export, as per the spreadsheet row limitation, you can export up to 65535 records.