Reports

Last updated on:

Overview

The Scheduled Detection Reports in the Manage Rules module enables administrators to generate automatically and export reports for rule-based detections at regular intervals. You can create schedules, define frequency, select rules, choose export formats, and configure notifications.

These reports offer visibility into detection trends over a specified time range, helping you monitor anomalies, meet compliance requirements, and perform in-depth security analysis.

Additionally, the Session Activity Reports allow you to track user and device sessions across your network. These reports focus on audit-oriented insights such as login durations, session times, and VPN access details, rather than security detections.

Scheduled detection reports (via the Manage Rules module)

Provides logs detected for a particular rule over a specified period of time.

  1. You can access these reports by clicking on the Scheduled Detection Reports option in the Manage Rules module as highlighted below.
    Scheduled reports in the manage rules module
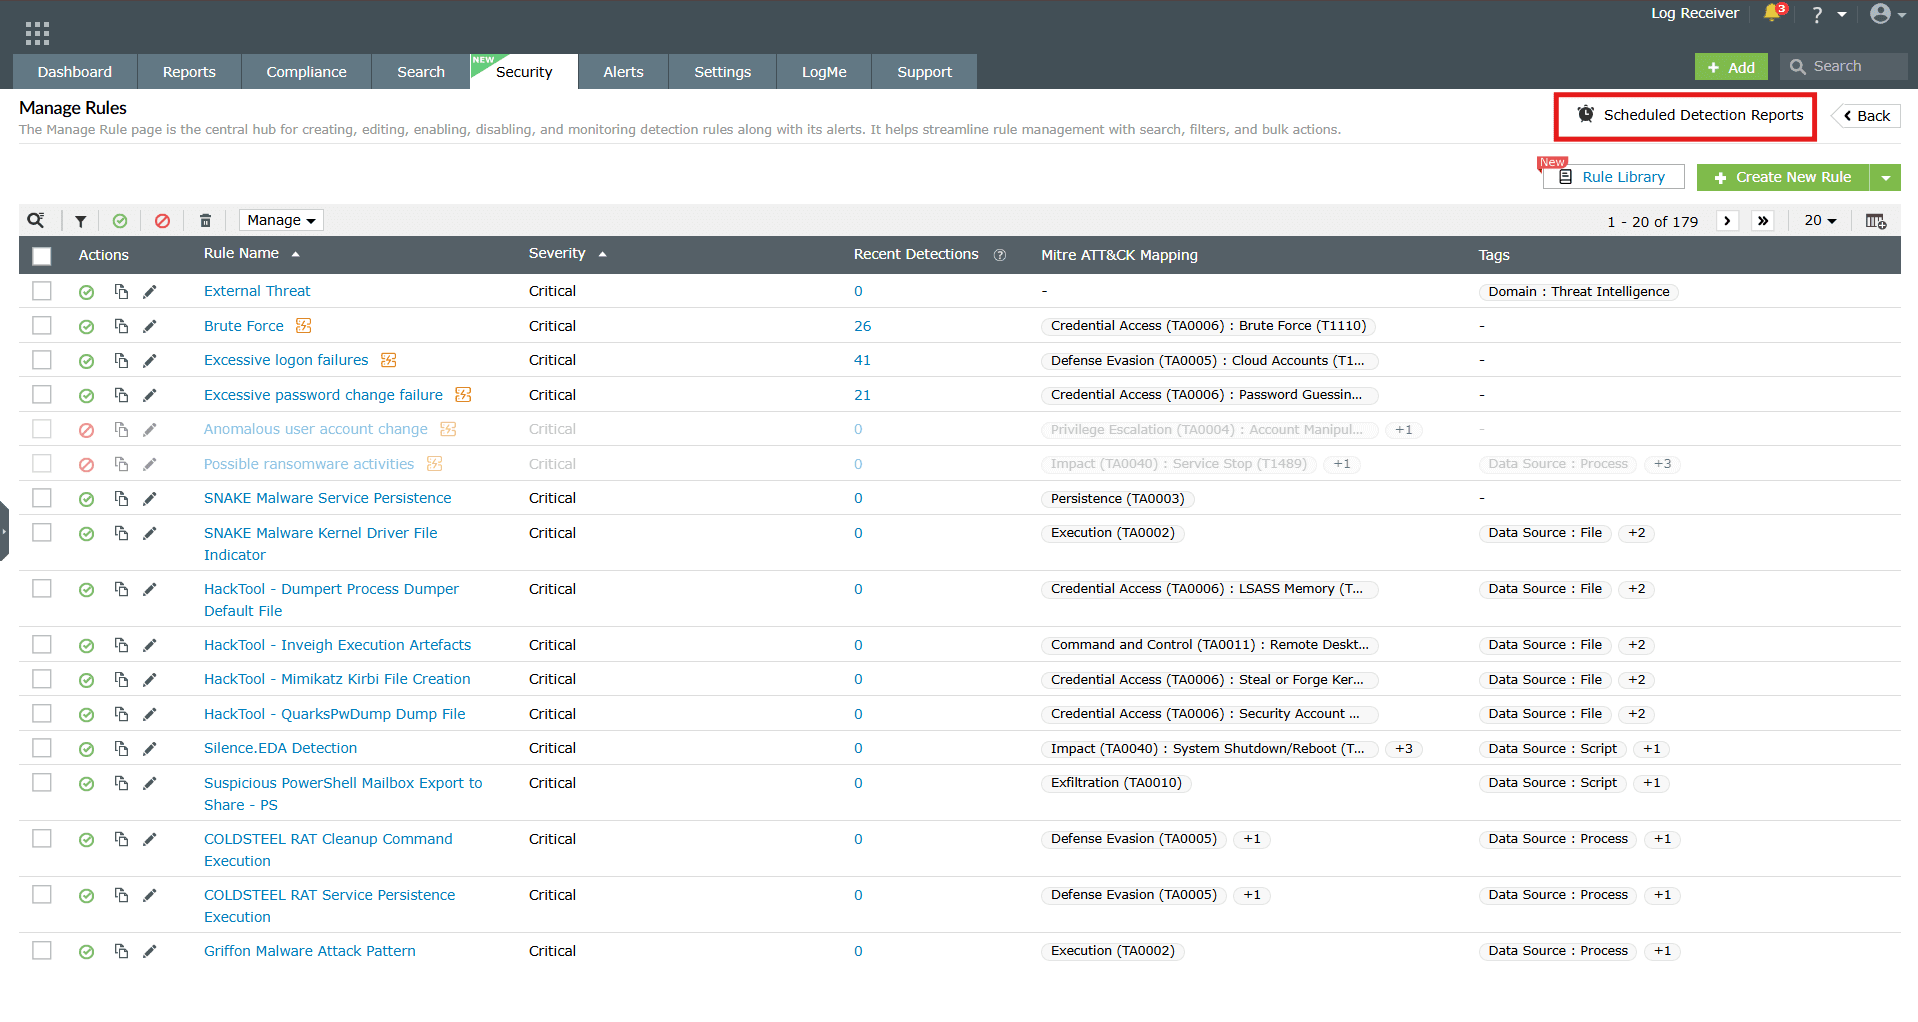
    Image 1: Scheduled reports in the manage rules module
  2. You will be taken to the Scheduled Reports module.

To create a new schedule for the report(s)

  1. Click on the Create New Schedule button as highlighted below.
    Create scheduled reports in the manage rules module
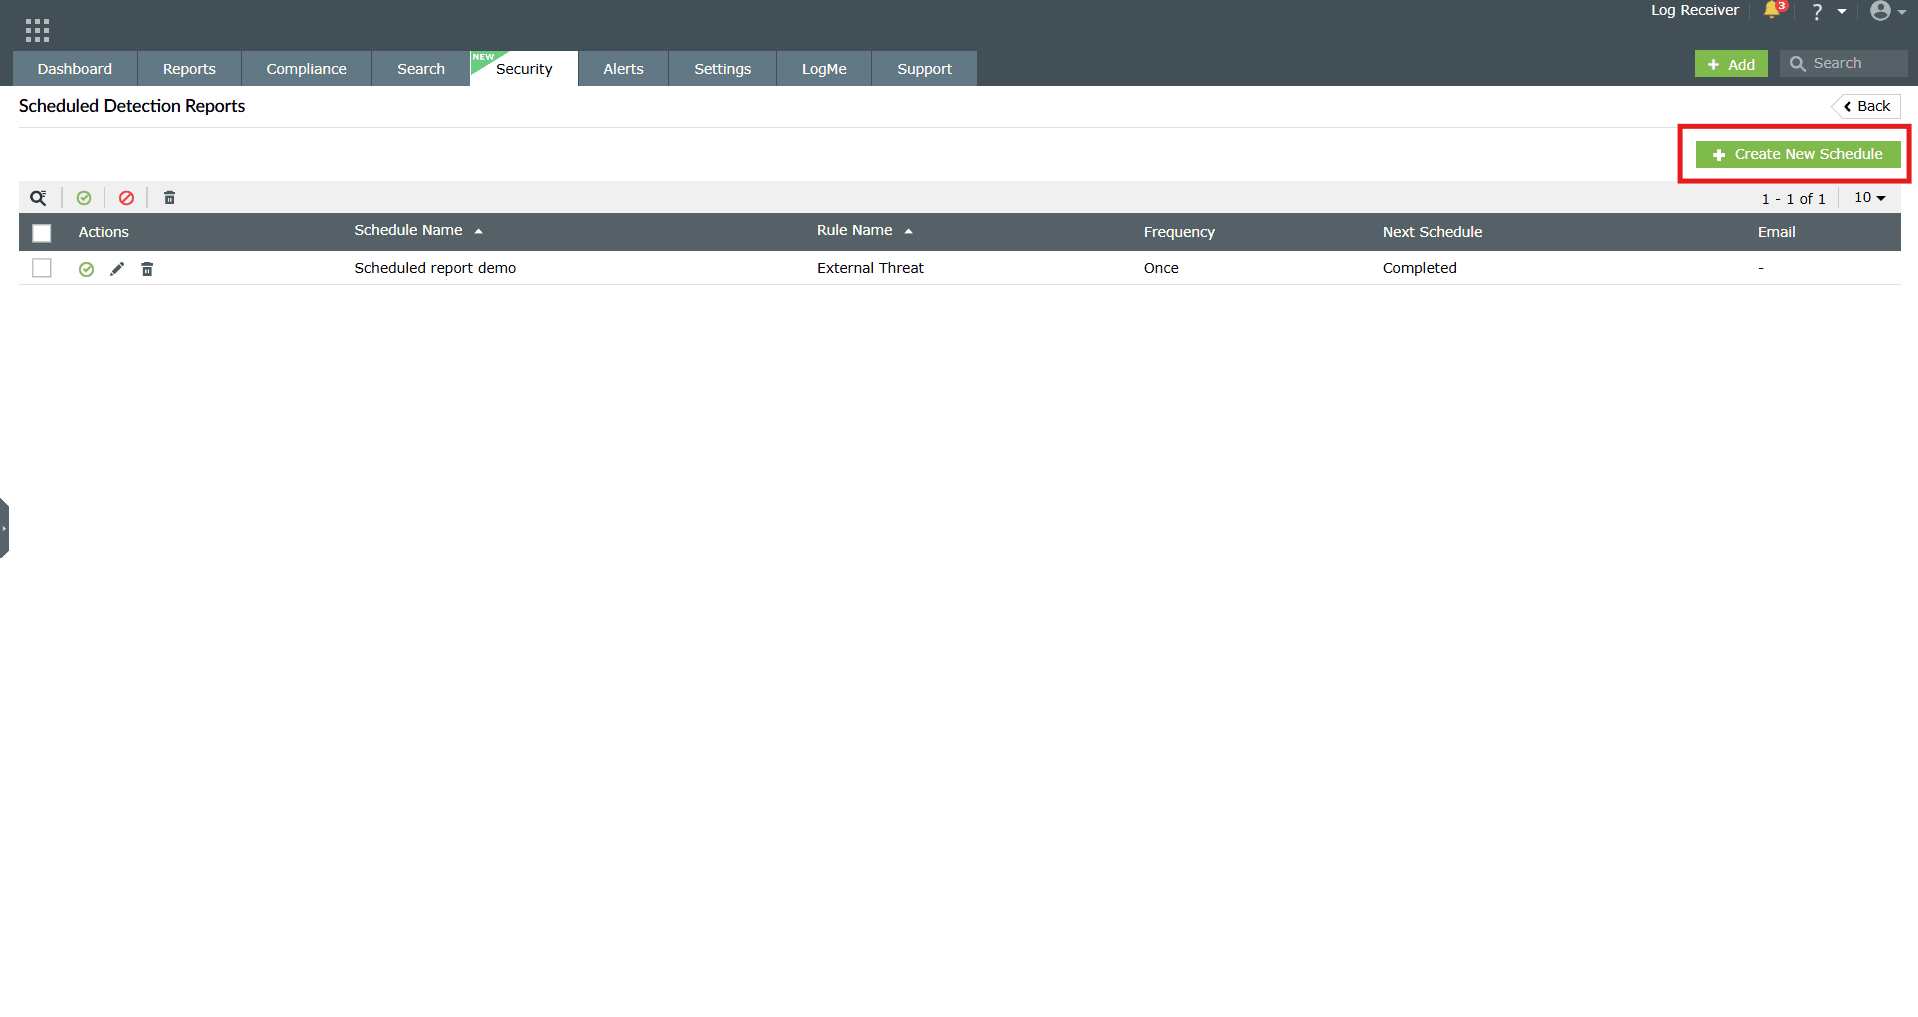
    Image 2: Create scheduled reports in the manage rules module
  2. You will be taken to the Create Schedule module.
    Create scheduled reports in the manage rules module
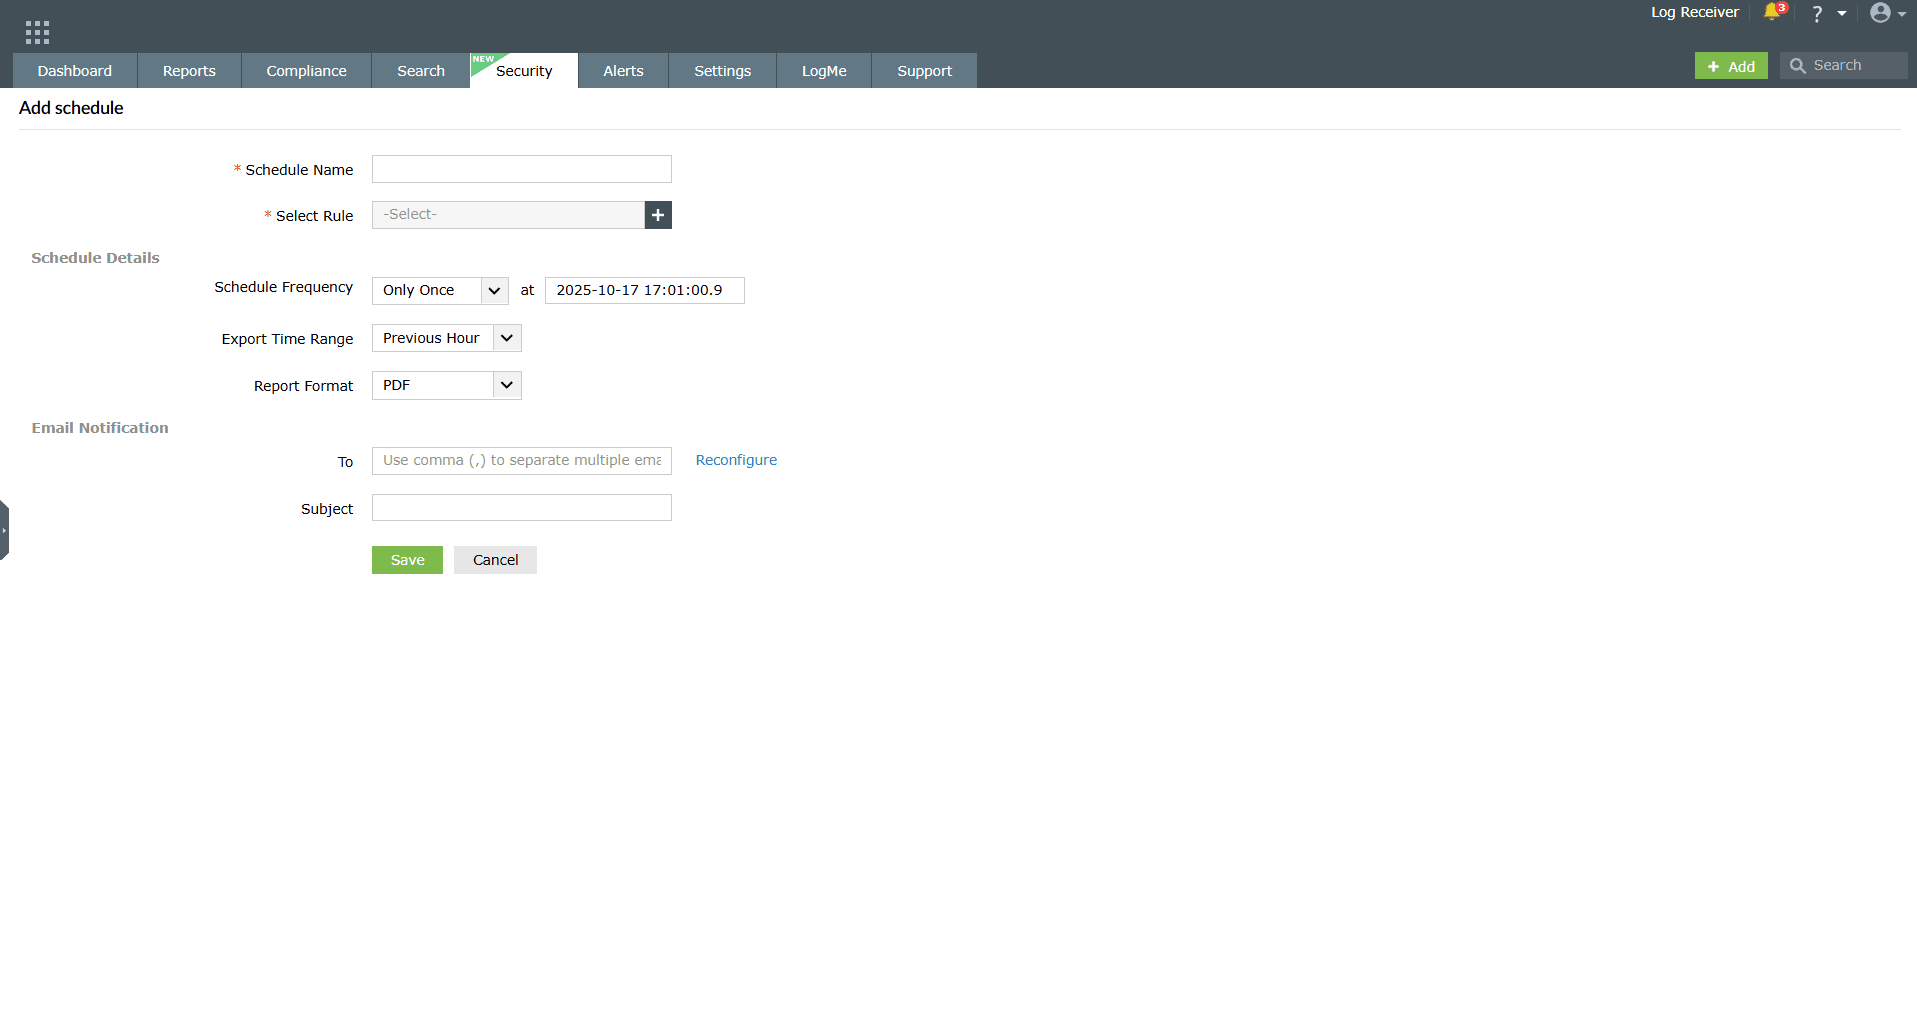
    Image 3: Create scheduled reports in the manage rules module
    • Schedule Details
      • Schedule Name: Assign a unique name to the schedule.
      • Schedule Frequency: Define how often the schedule should run (hourly, daily, weekly, or monthly).
      • Export Time Range: Specify the time range of data to include (e.g., last 24 hours, last 7 days, or custom).
      • Report Format: Choose the preferred format for the exported report (PDF, CSV, XLS).
    • Notification
      • Select Template: Pick a predefined report template or customize one.
    • Rule Details
      • Select Rule: Choose the anomaly rule(s) you want to associate with the schedule. Reports and alerts generated will be based on the selected rules.
    Create scheduled reports in the manage rules module
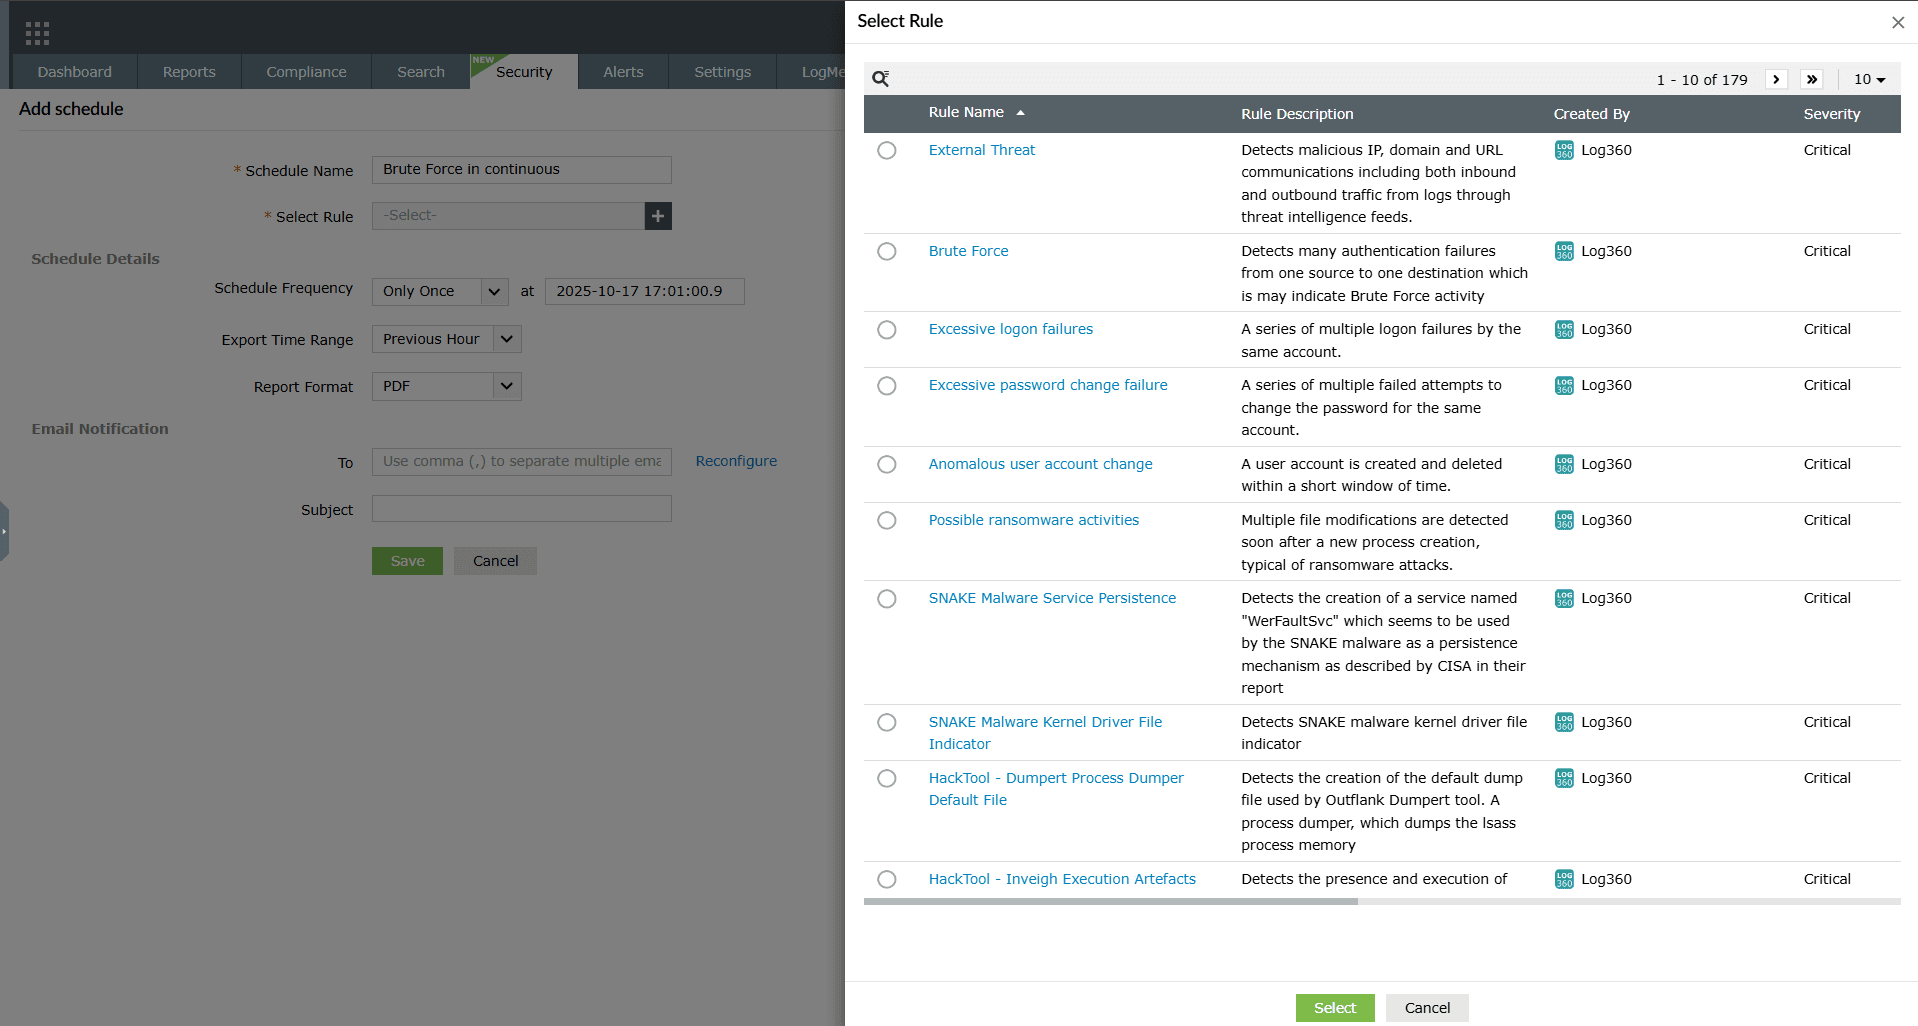
    Image 4: Create scheduled reports in the manage rules module
  3. Click on Save after making all the required configurations. Upon successful completion of action, the below pop-up appears.
    Create scheduled reports in the manage rules module

To enable/disable a schedule for report(s)

Enabling a schedule

  1. Click on the currently disabled icon Disable under the Actions column to enable the schedule.
  2. As soon as you perform this action, the icon indicates that the schedule is now enabled Enable and the below pop-up message appears briefly.
    Create scheduled reports in the manage rules module

Disabling a schedule

  1. Click on the currently enabled icon Enable under the Actions column to disable the schedule.
  2. As soon as you perform this action, the icon indicates that the schedule is now disabled Disable and the below pop-up message appears briefly.
    Create scheduled reports in the manage rules module

To edit a schedule for report(s)

  1. In the Scheduled Reports module, click on the edit Edit icon under the Actions column.
  2. The Edit Scheduled Reports module appears on the screen.
  3. Make the necessary edits and click on the Update button. Upon successful completion of action, the below pop-up appears.
    Create scheduled reports in the manage rules module

To delete a schedule for report(s)

  1. In the Scheduled Reports module, click on the delete Delete icon under the Actions column.
  2. A Delete Schedule pop-up appears to confirm the action. Click on Yes.
    Delete scheduled reports in the manage rules module
  3. Upon successful completion of action, the below pop-up appears.
    Delete scheduled reports in the manage rules module

session-activity

NOTE This section is applicable only for Log360 and EventLog Analyzer.

The product processes log data across your network and provides reports on session activity of your network devices and users. You can access these reports via the Reports tab.

NOTE The Session Activity report serves as an audit report that tracks user activities, rather than a security report focused on threat detection.

Session activity rules

You can either use the predefined rules present for each of the individual reports module to generate reports on session activity or you can build your own rules with individual actions.

NOTE
  • Device-level and user-level delegations are not supported for session activity rules.
  • Session activity data follows the same retention period as detection rules and is retained for 90 days by default.

Predefined activity rules

There are a total of 15 predefined rules for session activity monitoring. These rules are spread across different report categories, all accessible from their respective modules separately.

Below is the complete list of all the session activity monitoring rules available.

Report Name Description Group Name
Unix Sessions Session created on Unix machines Unix Sessions
Interactive Sessions Session created on Windows machine interactively. Windows Sessions
Cisco VPN Sessions Session created via Cisco VPN. VPN Sessions
Fortinet VPN Sessions Session created via Fortinet VPN. VPN Sessions
Remote Interactive Sessions Session created on Windows machine remotely. Windows Sessions
Sonicwall VPN Sessions Session created via Sonicwall VPN. VPN Sessions
PMP Sessions Remote interactive session created with Password Manager Pro. Windows Sessions
Huawei VPN Sessions Session created via Huawei VPN. VPN Sessions
H3C VPN Sessions Session created via H3C VPN. VPN Sessions
Meraki VPN Sessions Session created via Meraki VPN. VPN Sessions
Sophos VPN Sessions Session created via Sophos VPN. VPN Sessions
Barracuda VPN Sessions Session created via Barracuda VPN. VPN Sessions
WatchGuard VPN Sessions Session created via WatchGuard VPN. VPN Sessions
PaloAlto VPN Sessions Session created via PaloAlto VPN. VPN Sessions
CheckPoint VPN Sessions Session created via CheckPoint VPN. VPN Sessions

Create custom activity rules

  1. To open the activity rule builder, navigate to the Reports tab and click on Manage Reports as highlighted below.
    Delete scheduled reports in the manage rules module
    Image: Manage reports button in the reports tab
  2. The Add Custom Report option will be displayed on the screen. Click on the drop-down of the button as highlighted below.
    Delete scheduled reports in the manage rules module
    Image: Add custom report option in the reports tab
  3. Click on Session Activity Report option.
    Delete scheduled reports in the manage rules module
    Image: Session activity report option in the drop-down
  4. You will be taken to the session activity rule creation module as shown below.
    Delete scheduled reports in the manage rules module
    Image: Creating a custom session activity rule
  5. Select the individual actions that make up the rule, from the categorized list of actions on the left of the screen.
    Delete scheduled reports in the manage rules module
    Image: Building a custom session activity rule
    • You can also search for actions using the search bar on top of the list.
    • You can drag and drop the actions to rearrange their order, or delete the action by clicking on the delete icon Delete on its right.
    • To detect repetition of the same action within a particular time interval, tick the Threshold Limit check box and enter the number of occurrences and time interval.
  6. For each action, specify the time interval within which it is to be followed by the next action, under the Followed by within field. You can specify the time interval in seconds or minutes by using the provided dropdown.
  7. To configure advanced options for any of the selected actions, click on Filters on the top right corner of the action.
  8. The first rule starts the session and the last rule ends the session. The duration of the session is the time-interval between the first and the last rule.

Advanced options

Each action in an activity rule corresponds to a log. Logs contain various fields, and each field has a specific value. With advanced options (present under the Filters on the right of the action), you can provide filter criteria for each field of the log/action and specify a threshold limit on the minimum number of repetitions of the action.

Advanced options
  1. You can select a filter field from the dropdown list provided. The fields provided in the dropdown may vary based on the action selected.
  2. You can add criteria for each action by clicking on the add button Add. Similarly, you can delete a criteria for an action by clicking on the delete button Delete.
  3. You can select the comparison type as equals, not equals, contains, starts with, ends with, link to, or is constant, from the dropdown provided.
    NOTE When you provide more than one value for an equals comparison, the set of values provided are treated as a list of possible values and the action is accepted if any one value from the list is true. The same holds true for the contains, starts with, and ends with comparisons.
    • When you provide more than one not equals comparison, the set of values provided needs to hold true for the action to be accepted.
      • Link to:
        • The Link to comparison type is used to check the value of the selected field against the value of a field in another action (belonging to the same rule or the primary action of the other rule).
        • For instance, if the field Device type of Action 1 is linked to Action 2's Device type value, then Action 1 would get triggered only if the value of both the linked fields are the same.
        • When you choose link to, the add icon appears at the end of the filter. Clicking on the icon will present a new tab.
          NOTE At least one field of the starting rule should be linked to a field in the ending rule.
          Advanced options
        • Click the check box corresponding to the field of the second action against which you want to compare the value of the previous action.
        • Click on the OK button to complete linking the two actions.
      • Is constant:
        • The is constant option is used to treat the specific field as constant.
        • By selecting this option, a set of repeated actions are accepted by the rule only if this field's value remains constant throughout all the iterations.
        • For instance, if the Target User field is kept as constant, then the action gets triggered only when the value of this field remains constant in all the iterations.
        • The action doesn't get triggered if the event is generated with different values.

Activity monitoring reports

EventLog Analyzer's Activity Monitoring Reports provide information on Windows, Unix and VPN Sessions. The reports provide details such as Device name, Username, Start Time, End Time, Status, and Duration.

Viewing session activity reports

NOTE Reports for a session activity can be viewed only when the report for that particular session activity rule is not hidden.

You can view the predefined session activity reports as below:

  • Interactive Sessions, Remote Interactive Sessions, and PMP Sessions for Windows machines.
  • Unix Session Reports to provide you all details about all the Unix sessions.
  • VPN Session reports such as Cisco VPN Sessions, Fortinet VPN Sessions, Sonicwall VPN Sessions, Huawei VPN Sessions, H3C VPN Sessions, Meraki VPN Sessions, PaloAlto VPN sessions, and WatchGuard VPN sessions for the respective VPN devices.
NOTE Custom session activity reports are also displayed under the custom reports section, if any.
  1. Navigate to the Reports tab and choose the event category- for example, Network devices → VPN sessions. Below is the report for the predefined session activity rule.
    Advanced options
    Image: Viewing predefined session activity reports
  2. You can view the reports for the custom created session activity rules as well via the report categories.
    Advanced options
    Image: Windows remote interactive session activity report
    • You can view the session activity reports for Windows, Unix, and VPN Sessions based on users and devices in the form of User-based View and Device-based View, in addition to the Default View.
    • In the User-based view, you can analyze the weekly login and logout activities of a particular user.
    • You can hover your mouse pointer over a generated user-based report in the table to find the Weekly Login View option.
      Advanced options
      Image: Weekly login view of a user
    • Clicking on this tab displays a timeline graph for every day of the week in which you can view a particular user's active session duration, login time, and logout time for any given day.
      Advanced options
      Image: Weekly login view data in user-based reports
    • This view also provides the number of hours the user was active per day and for the entire week.
    • The Weekly Login View report is available only for all system-generated reports.
    • The calendar widget allows you to select the time period for which you want to review the session activity for the selected devices/users.
    • You can also schedule an activity monitoring report.
    • The activity monitoring report can be exported in the PDF and CSV formats, by clicking on the Export as option.
    • To know export details of a particular session, you can click on the View History icon add.
    • Hover over the Status value of any specific session in the report table to view the View History option. Click it to see detailed information about the selected session.
      Advanced options
      Image: View history option for a specific session activity
    • This tab displays all the details as given below:
      Advanced options
      Image: Viewing history of a specific session activity
    • This page contains the Configure Fields and Advanced View tabs.
      • The Configure Fields tab allows you to view similar logs generated in a session by extracting logs that have the same field value (Domain, Device Name, Logon ID, and Username). You can choose the field by which you want to retrieve logs by clicking on the desired options from the drop-down box.
      • By clicking on the Advanced View tab, you can drill down and view the raw logs of that session.

Manage session activity rules

  1. Navigate to the Reports tab and click on the Manage Reports button.
    Advanced options
    Image: Manage reports button in the reports tab
  2. Click on the Manage Session Activity Reports icon as highlighted below.
    Advanced options
    Image: Manage session activity reports icon
  3. Upon clicking the icon the Manage Session Activity Reports pane slides open.
    Advanced options
    Image: Manage session activity reports pane
  4. From here you can manage- activate, deactivate, delete, edit, copy session activity rules, or show/hide reports for a rule.
NOTE Predefined session activity rules can only be either viewed or copied. They cannot be edited or deleted.

Activate/deactivate session activity rule(s)

Activating a rule

  1. Click on the disabled icon disable present in the ribbon above the rules list. Or, hover your mouse pointer over the status of the currently active rule. The option to deactivate becomes visible. Click on it.
    Advanced options
  2. As soon as you perform this action, the icon indicates that the rule is now enabled enable and the below pop-up message appears briefly.
    Advanced options

Deactivating a rule

  1. Click on the enabled icon enable present in the ribbon above the rules list.
  2. As soon as you perform this action, the icon indicates that the rule is now disabled disable and the below pop-up message appears briefly.
    Advanced options

Bulk activate/deactivate session activity rules

  1. Click on the empty checkbox(es) in the first column in order to select the respective rules.
  2. Click on the Activate/deactivate icons in the ribbon above the rules list.
  3. Upon successful completion of the action, the below pop-up appears.

When activated:

Advanced options

When deactivated:

Advanced options

Copy a session activity rule

NOTE The copied rule can be edited only after it is created and will remain disabled by default.
  1. Click on the copy icon copy that becomes visible when you hover the mouse pointer over a rule.
  2. You will be taken to the editing window of that particular session activity rule.
  3. Make the necessary changes in the field values in order to customize the copied rule and click on Update.
    Advanced options
    Image: Copying a session activity rule
  4. Upon successful completion of the action, the below pop-up appears.
    Advanced options

Edit a rule

  1. Click on the edit icon edit that becomes visible when you hover the mouse pointer over a rule.
  2. You will be taken to the editing window of that particular session activity rule.
  3. Make the necessary changes in the field values in order to customize the copied rule and click on Update.
    Advanced options
    Image: Editing a session activity rule
  4. Upon successful completion of the action, the below pop-up appears.
    Advanced options

Delete rule(s)

  1. Click on the empty checkbox(es) in the first column in order to select the respective session activity rules.
  2. Then click on the Delete icon delete in the ribbon above the rules list.
  3. Upon successful completion of the action, the below pop-up appears.
    Advanced options

Bulk delete session activity rules

  1. Click on the empty checkbox(es) in the first column in order to select the respective rules.
  2. Then click on the Delete icon delete in the ribbon above the rules list.
  3. Upon successful completion of the action, the below pop-up appears.
    Advanced options

Show/hide reports for a session activity rule

  1. Scroll to the right over the list of the session activity rules to view the Show/Hide Report column.
    Advanced options
    Image: Show/hide reports for a session activity rule
  2. Click on the toggle to turn the toggle on toggle / off toggle to show/hide the report respectively, for a specific session activity rule.

Read also

This document explained how to schedule detection reports, configure report details and notifications, and manage actions like enabling, disabling, editing, or deleting schedules. To learn more about related functionalities, refer to the below help documents: