Securing Office 365 Access with Microsoft Entra ID & MDM
In the modern enterprise landscape, securing corporate resources by ensuring that only authorized and compliant devices have access is crucial. Microsoft Entra ID (formerly Azure Active Directory) and MDM provide a comprehensive solution for enforcing device compliance and securing access to Office 365 applications. There are two key methods to achieve this:
- Ensuring Device Compliance through Microsoft Entra: This method applies to Windows devices and involves configuring compliance policies in Entra ID and implementing conditional access. For detailed steps on marking devices as compliant in Entra, refer to this guide.
- Implementing Certificate-Based Authentication for Enhanced Security: This method applies to multiple platforms, including iOS, Android, macOS, and Windows. It adds an extra layer of security without altering the existing login setup. This guide will walk you through the prerequisites, explain the architecture behind certificatebased authentication, and outline the steps needed to secure Office 365 applications.
Pre-requisites:
Before configuring your environment, ensure that the following requirements are met:
Public Key Infrastructure (PKI):A functional PKI setup is essential. This can be an Active Directory Certificate Services (ADCS) environment with the Network Device Enrollment Service (NDES) role or a comparable third-party PKI solution. This infrastructure is required for issuing and managing client certificates. Visit our Managing Certificates with Internal PKI guide for detailed information.
Administrative Access in Microsoft Entra: Only users with administrative rights in the Microsoft Entra ID portal can configure certificate-based authentication settings. A minimum of a P1 license is required.
How does it work?
Only devices that are compliant and actively managed in MDM can be configured with conditional access using certificates for Office 365 apps. By compliant we mean the devices which follow the policies and restrictions applied to it by the organisation it belongs to. First the certificate based authentication should be configured in the Entra ID(formerly Azure AD) portal. When a managed device tries to access any Office 365 apps like Microsoft word, it will use the client certificate pushed by the MDM for authentication.
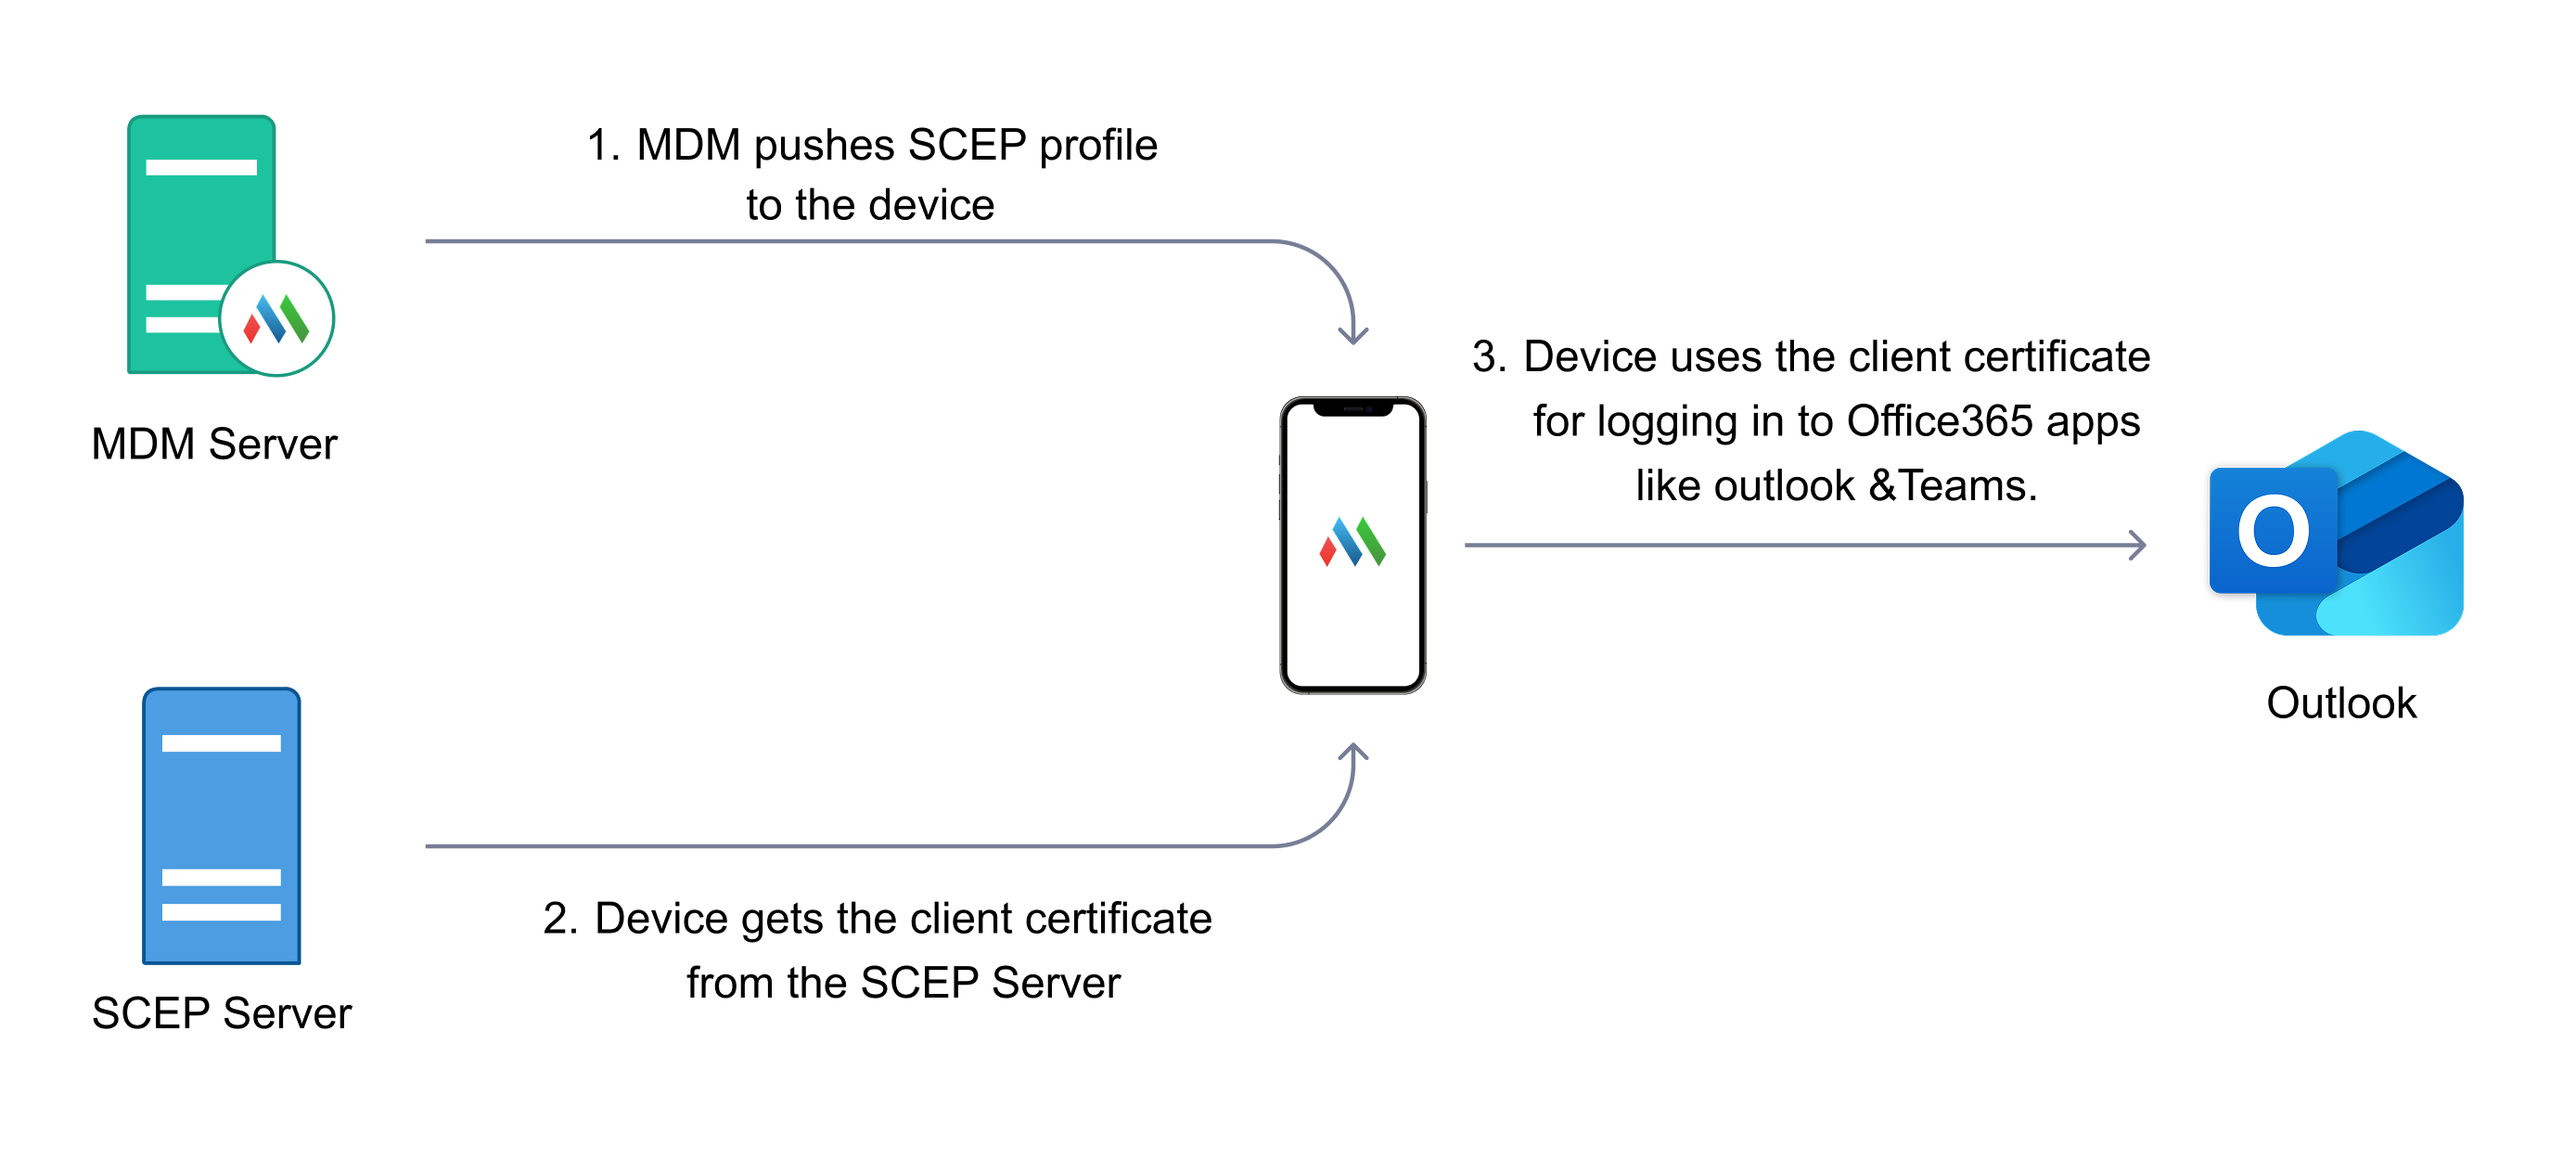
Certificate-based authentication within Microsoft Entra ID is integral to enforcing device compliance. When a device is enrolled and a Simple Certificate Enrollment Protocol (SCEP) policy is applied, the device receives a certificate that includes user-specific information. This certificate is used during the initial authentication when accessing Office 365 applications.
The authentication workflow operates as follows:
- When a user tries to log in to an Office 365 application, the system verifies whether a valid certificate exists.
- Microsoft Entra ID then authenticates the certificate, which includes both user and device identification details.
Implementation Steps
- Configuring Certificate-Based Authentication in Microsoft Entra ID: The first step is setting up certificate-based authentication in the Microsoft Entra ID portal, ensuring that devices are authenticated using certificates rather than passwords. You can find detailed instructions in the official Microsoft documentation.
Steps for Configuration in Azure:- Create a Pilot Group for Testing:
- Log in to the Azure Portal using an account with Global Administrator or Security Administrator privileges.
- Navigate to Microsoft Entra ID > Groups.
- Create a new pilot group by selecting "New Group."
- Add a pilot user to the group and save.
- Add a Certification Authority:
- In the Azure portal, go to Microsoft Entra ID > Security > Certification Authorities
- Upload the Certificate Authority (CA) certificate. This certificate must be from the issuer that will issue client certificates to devices through SCEP.
- Enable Certificate-Based Authentication as Multi-Factor Authentication (MFA):
- In the Azure portal, go to Microsoft Entra ID > Security > Authentication Methods.
- Enable certificate-based authentication as a second factor and click "Configure."
- Select the pilot group created earlier.
- Under the "Configure" tab, adjust the MFA settings according to your organization’s requirements. Ensure that the CA issuing the client certificates is included under the certificate issuer.
- Configure user-based parameters according to your certificate template. The recommended template includes the User Principal Name (UPN) in the RFC822Name or Principal Name.
- Review the settings with your security team before moving to production.
- Create an Authentication Strength Policy:
- Go to Microsoft Entra ID > Security > Authentication Methods > Conditional Access > Authentication Strengths.
- Create a new authentication strength policy and name it.
- Enable certificate-based authentication as the only multifactor authentication.
- Select the CA issuer from the drop-down list (uploaded in the previous step).
- Save the authentication strength policy.
- Configure a Conditional Access Policy:
- Navigate to Microsoft Entra ID > Security > Conditional Access > Policies.
- Create a new policy and give it a name.
- Under "Users and Groups," select the pilot group created earlier.
- Under "Cloud Apps," include Office 365.
- Customize the conditions based on your requirements and filter the policy based on device platforms if needed.
- In the "Access Controls" section, select "Grant" and choose "Require Authentication Strength."
- Select the authentication strength policy created earlier and save the conditional access policy.
- Create a Pilot Group for Testing:
- Integrate the Certificate Authority (CA) and SCEP Profile in MDM: Once certificate-based authentication is configured, the next step is to integrate your Certificate Authority (CA) with MDM. This process requires setting up the SCEP template, which facilitates certificate issuance to enrolled devices. To ensure accurate user identification, the User Principal Name (UPN) must be included in either the certificate’s Subject or Subject Alternative Name fields. To complete this integration, In the MDM console, navigate to the Certificate Management section, and follow the provided steps to add your CA server and configure the SCEP template.
- Distribute the SCEP Profile to Devices: With the SCEP profile properly configured, the next phase involves deploying it to enrolled devices to ensure they obtain the required certificates for authentication. To distribute the profile, access the MDM portal and navigate to Device Management > Groups & Devices. Select the relevant target group(s), then choose Actions > Associate Profile and assign the appropriate SCEP profile. Before full deployment, validate the profile on a single test device to confirm functionality. Once verified, proceed with a broader rollout by applying the profile to the necessary device groups within MDM for seamless certificate distribution.
By following the above steps, you can ensure that only compliant, enrolled devices have access to Office 365 applications within your organization. This approach not only enhances security but also streamlines the user experience by leveraging certificate-based authentication.
FAQ
Q: Can I test the Conditional Access Policy in MDM without a Microsoft Entra ID P1 (premium) license?
A: No. Configuring and testing Conditional Access policies requires an active Microsoft Entra ID P1 license. This licensing tier is mandatory, as the Conditional Access feature set is not available in lower-tier (Free or Microsoft 365 Apps) plans. To proceed, please ensure that the users who will be configuring or being targeted by the Conditional Access policy are assigned a Microsoft Entra ID P1 (or higher) license in your tenant. Once the required licensing is in place, you can follow the steps outlined in this guide to configure Conditional Access for Office 365 access through MDM. For more details on licensing requirements, refer to the official Microsoft documentation.