OpManager's REST API gives you programmatic access to your network monitoring data: device status, alarms, availability, performance metrics, and more. Use it to pull data into external dashboards, push updates from or into third-party tools, or build automated workflows that act on what OpManager sees across your infrastructure.
This page covers everything you need to get started: prerequisites, authentication, a step-by-step walkthrough, API key management, and troubleshooting.
To learn about ingesting data from external sources into OpManager instead, see the data ingestion guide (PDF).
Prerequisites
Before making an API call, make sure you have:
- Access to an OpManager instance, including its URL/hostname and port.
- A user account with REST API access enabled.
- A valid API key to authenticate your requests. To learn how to generate and manage API keys, see API Key Management.
Authenticate using OpManager's API key
Every API request must include your API key. Send it as a request header, not as a URL parameter, this is the recommended and, for some endpoints, the only supported method.
Sample configuration with header: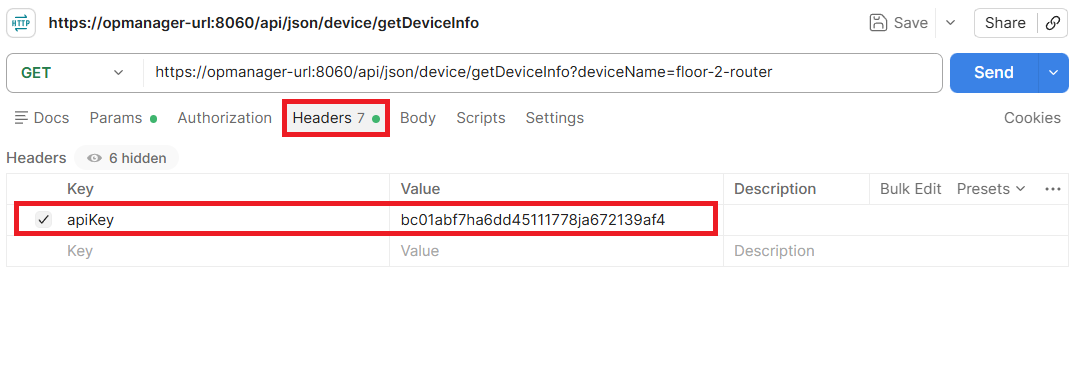
Making your first API call
This walkthrough uses getDeviceAssociatedMonitors, an API that returns all monitors linked to a device, along with their last-polled values and status.
Step 1: Create a new request
In Postman, click New and select HTTP Request. Set the method to GET.
Step 2: Enter the API URL
For example, to call the getDeviceAssociatedMonitors API, enter the following in the URL field:
https://<OpManager-host>:<port>/api/json/device/getDeviceAssociatedMonitors
Replace <OpManager-host> with your server's IP address or hostname, and <port> with the port OpManager runs on. The default port is 8060. If you're working from the same machine OpManager is installed on, use localhost:8060.
Step 3: Add your API key as a header
Go to the Headers tab and add:
- Key:
apiKey(case-sensitive) - Value: your API key (copied from Quick Links -> API Key Management)
Step 4: Add required parameters
Go to the Params tab and add the required parameters for the API.
- Mandatory parameters must be included for the API call to work; optional parameters can be used to filter or refine the response.
- For each API, the parameter table on the respective API reference page lists all parameters along with their description, data type, and whether they are mandatory.
Step 5: Send the request
Click Send. A successful call returns HTTP 200 with a JSON response. Compare it against the sample response on the API's reference page to confirm it matches what you expect.
Troubleshooting
If the request fails, refer to the table below.
| Issue | Likely Cause |
|---|---|
| 401 Unauthorized | Missing or invalid apiKey, or the key was sent as a parameter on an endpoint that requires the header. |
| 404 Not Found | Incorrect endpoint path or base URL/port. |
| Connection refused / timeout | OpManager server unreachable, wrong port, or blocked by a firewall. |
| Empty or null response | REST API access not enabled for the user account. |
How to enable REST API access and generate an API key
API key generation and management varies by OpManager version. To check your version, click the User icon at the top right of the OpManager web client and refer to the relevant section below.
API Key Management for versions 12.8.721 and above
Enable REST API access
- By default, only admin users have REST API access to generate the API key.
- To enable rest API access to new users, go to User Management -> Select the User role you want to give access to, and enable the API Access toggle.
- Users can generate rest API access by following the below steps:
Accessing API Key Management
For version 12.8.721 and above, the API Key Management feature has been updated with a dedicated management interface.
API Key Management can be accessed via Quick Links -> API Key Management. This opens the API Key Management page, which lists all existing API keys along with their Name, API Key, Description, Status, API Key Type, Created By, Expires On, and Access toggle.
Generating an API key
Click the Generate API key button on the top right of the API Key Management page. Fill in the following details:
- Name - A label for the API key.
- Description - A brief description of its purpose.
- Expiry Date - Check the box to set an expiry date; leave unchecked for a key that never expires.
- API Key Type - Choose between Custom or MCP.
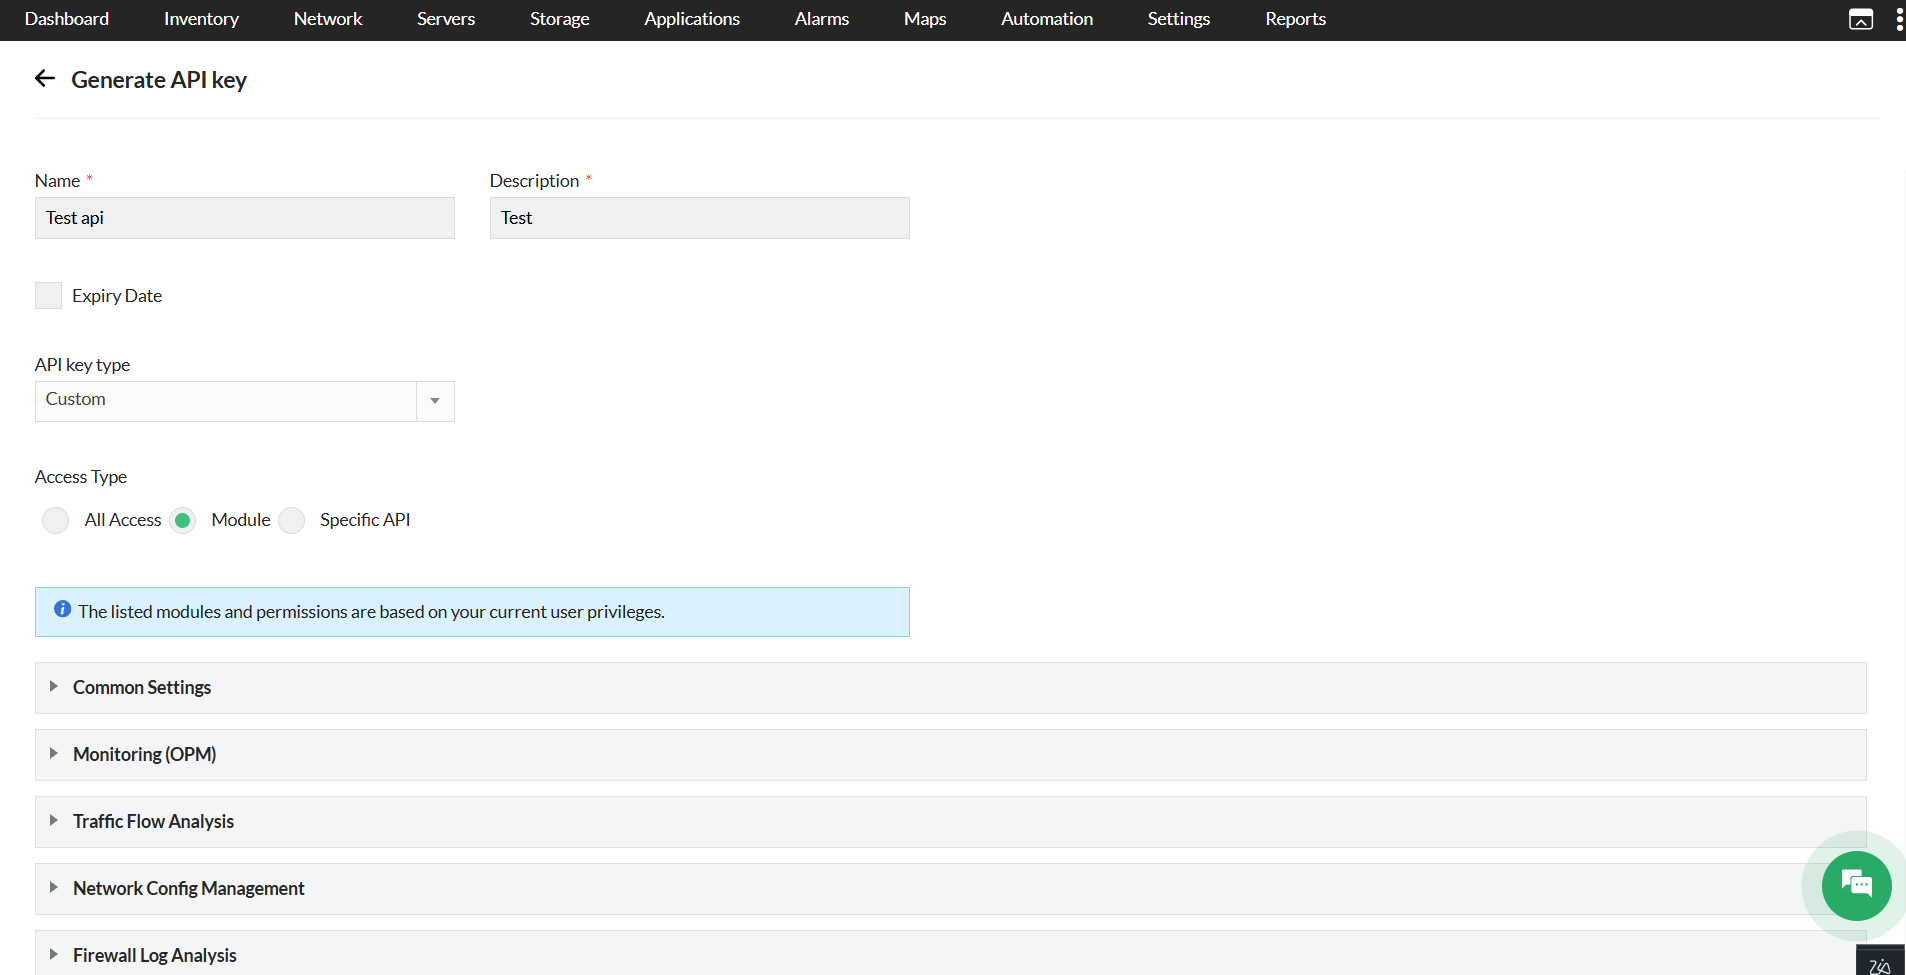
- Access Type - Select one of the following:
- All Access - Grants access to all APIs available to the user. Choose Module or Specific API to limit access.
- Module - Restricts access based on selected modules. Modules are grouped by category (e.g., Common Settings). Permission levels can be set individually for each module:
- Read/Write - Allows both read and write operations on the module.
- Read - Allows read-only access to the module.
- No Access - Blocks all access to the module. This is the default for all modules.
The listed modules and permissions are based on your current user privileges.
- Specific API - Restricts the key to individually selected API endpoints. A searchable list of available API endpoints is displayed (e.g.,
v1/ncmsettings/getSysLogBlockedHosts,v1/nfadevice/getNFAV2TabList). You can search for specific endpoints or use Select All to include all available APIs.
Note: The selected APIs will be accessible only if they are permitted for your user privileges.
Managing existing keys
From the API Key Management listing page, each key can be:
- Enabled or disabled using the Access toggle.
- Regenerated using the refresh icon in the Actions Column.
- Deleted using the delete icon.
Note: Regenerating a key immediately invalidates the old one. Any scripts or integrations using the old key will need to be updated with the new key. Super admins can view the created key list and can delete or revoke keys, but cannot regenerate them.
API key management for versions below 12.8.721
From version 12.7.131, the option to enable/disable REST API access has been added.
- REST API access will be disabled by default for new users created under User Management. An administrator with complete access to all the modules and devices will be able to edit the user under User Management and provide REST API access if required.
- If REST API access has been enabled, the REST API menu under Quick Links will display the REST API key, and external REST API calls will be allowed only if the REST API access has been enabled for the user.
- If REST API access has been disabled, the REST API menu under Quick Links will display "Contact the administrator user".
Note:
Enterprise edition user sync: The REST API access will not be synced for users from Central to Probe servers. The synced users in Probes will not have permanent REST API access. For users created in the Probe server, the REST API access can be updated as required.
TFA: If Two-Factor Authentication has been configured, TFA OTP validation is mandatory to enable REST API access.
Regenerate an API key: To regenerate an API key, go to Settings > Basic Settings > REST API in the OpManager web client and click Regenerate Key. Note that regenerating the key invalidates the old one.