- Related Products
- AD360
- Log360
- ADAudit Plus
- ADSelfService Plus
- EventLog Analyzer
- Exchange Reporter Plus

Help Document
Single Sign On Authentication
NTLM authentication
ADManager Plus uses Jespa for NTMLv2 SSO authentication. In builds 7162 and above, the Jespa JAR file has to be downloaded and added to ADManager Plus' lib folder before enabling NTMLv2 SSO. To do this,
- Download the latest Jespa JAR file.
- Extract the downloaded ZIP file and move the JAR files to <Installation Directory>/ManageEngine/ADManager Plus/lib and restart ADManager Plus.
Note: If you're running build 7161 or older and have NTLMv2 SSO enabled, you can continue using this feature without any changes.
To enable single sign-on to ADManager Plus based on domains, follow the steps listed below:
- Click the Delegation tab.
- In the left pane, under Configuration, click Logon Settings.
- Navigate to the Single Sign On tab and mark the Enable Single-Sign On with Active Directory checkbox.
- Select the domains that you wish to enable single-sign on from the Select Domains drop-down box.
- Click Save Settings.
To modify existing single sign-on settings,
- Click Delegationtab.
- Select Single Sign On under Configuration in the left navigation section.
- Click the edit icon in the status column against the domain that you wish to modify the settings.
- Enter the Computer Name and Password in the respective fields.
- Click on the Create this computer account in the domain check-box to create a computer with the entered credentials if it is already not present in the domain.
- If the message Error in creating computer account appears, then the DNS Servers and DNS Site can be entered manually.
- Click Save.
To identify the DNS Server IP address:
- Open Command Prompt from a machine belonging to the domain that you have selected.
- Type ipconfig /all and press enter.
- Use the first IP address displayed under DNS Server.
To identify the DNS Site:
- Open Active Directory Sites and Services in Active Directory.
- Expand the Sites and identify the Site in which the Domain Controller configured under the selected domain appear.
- Use the Site name for DNS Site.
Troubleshooting steps for SSO:
Trusted sites are the sites with which NTLM authentication can occur seamlessly. If SSO has failed, then the most probable cause is that the ADManager Plus URL isn't a part of your browser's trusted sites. Kindly add the ADManager Plus URL in the trusted sites list. Follow the steps given below:
- Internet Explorer
- Google Chrome
- Mozilla Firefox
- It is recommended that you close all browser sessions after adding the URL to the trusted sites list for the changes to take effect.
- Google Chrome and Internet Explorer use the same internet settings. Changing the settings either in Internet Explorer or in Chrome will enable NTLM SSO in both browsers. It is again recommended to close both the browser sessions for the changes to be enabled.
Internet Explorer:
- Open Internet Explorer and click the Tools button.
- Click Internet options.
- In the Internet options dialog box that opens, click the Security tab, and then click a security zone (Local intranet, Trusted sites, or Restricted sites).
- Click Sites.
- If you are using IE 11, click on the advanced button and add the ADManager Plus site to the list of intranet site.
- If you are using versions lower than IE 11, add the ADManager Plus site to the list of intranet sites.
- Click Close, and then click OK.
- Close all browser sessions and reopen your browser.
Google Chrome
- Open Chrome and click the Customize and control Google Chrome icon (3 horizontal lines icon on the far right of the Address bar).
- Click Settings, scroll to the bottom and click the Show advanced settings link.
- Under the Network section click Change proxy settings.
- In the Internet Properties dialog box that opens, navigate to the Security tab --> Local Intranet, and then click Sites.
- Click Advanced and add the URL of ADManager Plus in the list of intranet sites.
- Click Close, and then OK.
- Close all browser sessions and reopen your browser.
Mozilla Firefox
- Open Firefox web browser and type about:config in the address bar.
- Click I'll be careful, I promise in the warning window.
- In the Search field, type: network.automatic-ntlm-auth.trusted-uris.
- Double-click the "network.automatic-ntlm-auth.trusted-uris" preference and type the URL of AD360 in the prompt box. If there are sites already listed, type a comma and then the URL of ADManager Plus. Click OK to save the changes.
- Close all browser sessions and reopen your browser.
SAML authentication
Check the Enable Single Sign-on option and then proceed to set up SSO access to ADManager Plus through your different identity providers.
SSO login support in ADManager Plus
To access ADManager Plus from your identity provider, add ADManager Plus as a SAML application in the identity provider's application and configure the settings in ADManager Plus.
Steps to configure ADManager Plus in Okta:
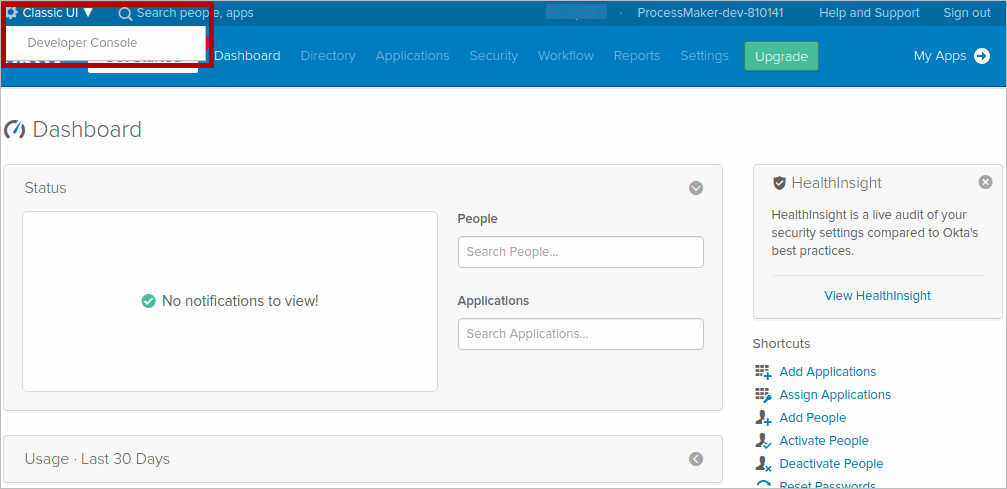
- Log in to the Okta Admin Console and in the top navigation bar, switch to the Classic UI console.
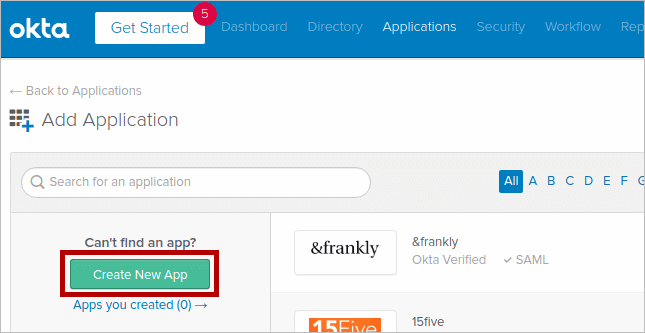
- Navigate to the Applications tab and click Create New App.
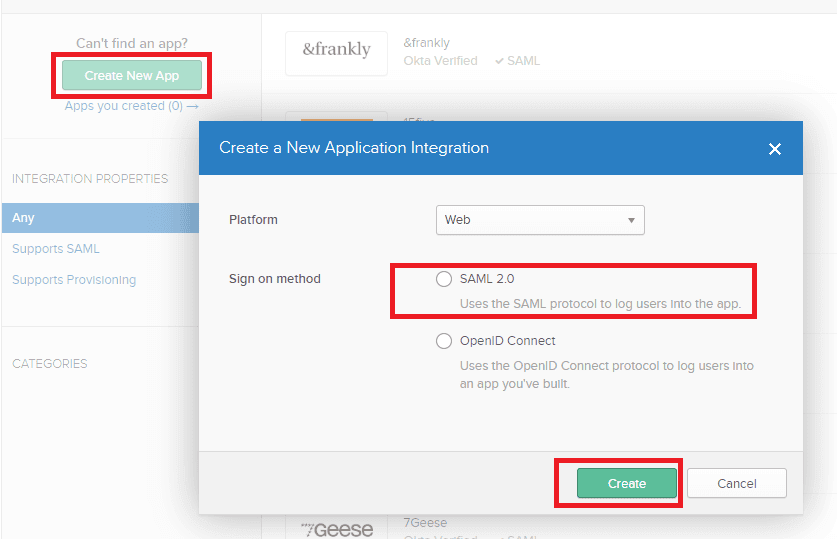
- In the dialog box that opens, select Web in the Platform drop-down and SAML 2.0 as the Sign on method. Click Create.
- In the General Settings tab, provide the application name and logo in the respective fields and click Next.
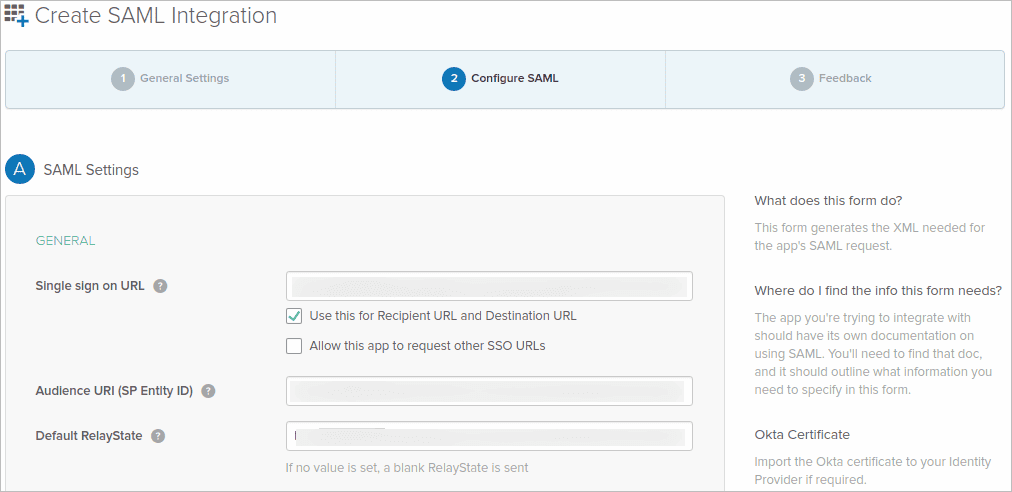
- In the Configure SAML tab, enter the values for the Single sign on URL and Audience URI (SP Entity ID).
- Obtain this from ADManager Plus by navigating to Delegation > Configuration > Single Sign On > SAML Authentication > Okta. In the Service Provider Details section, copy the ACS/Recipient URL and enter this value in Okta's Single sign on URL field.
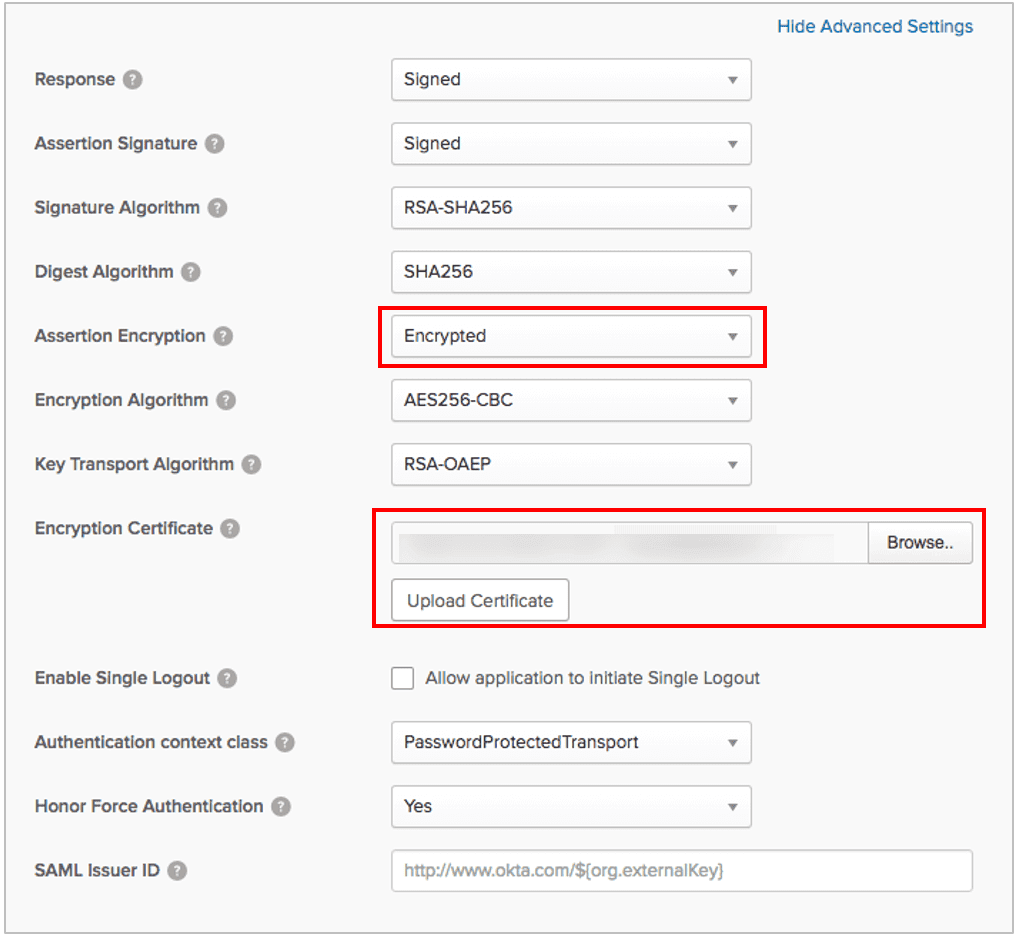
- Now, copy the Issuer URL/Entity ID value and enter this in Okta's Audience URI (SP Entity ID) field. Click Show Advanced Settings to configure the sign out URL and certificates.
- In the Feedback tab, select the applicable field and click Finish.
- The application will be created, and in the Sign on tab under SAML 2.0, you will find the Metadata URL. Open the URL in a new tab and save it as an XML file.
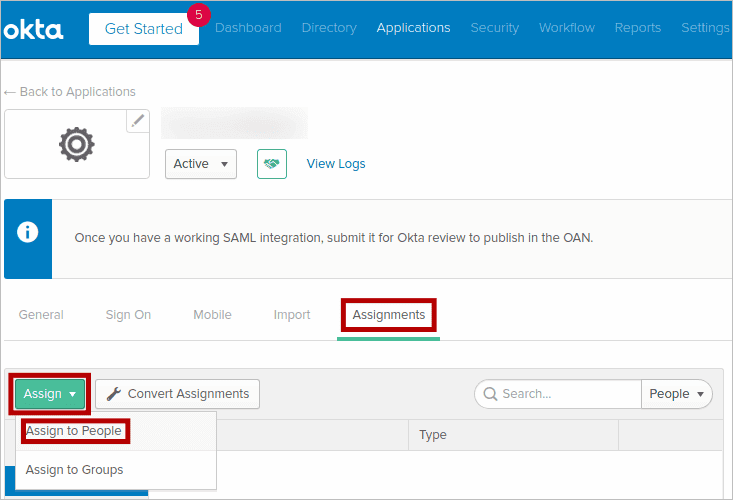
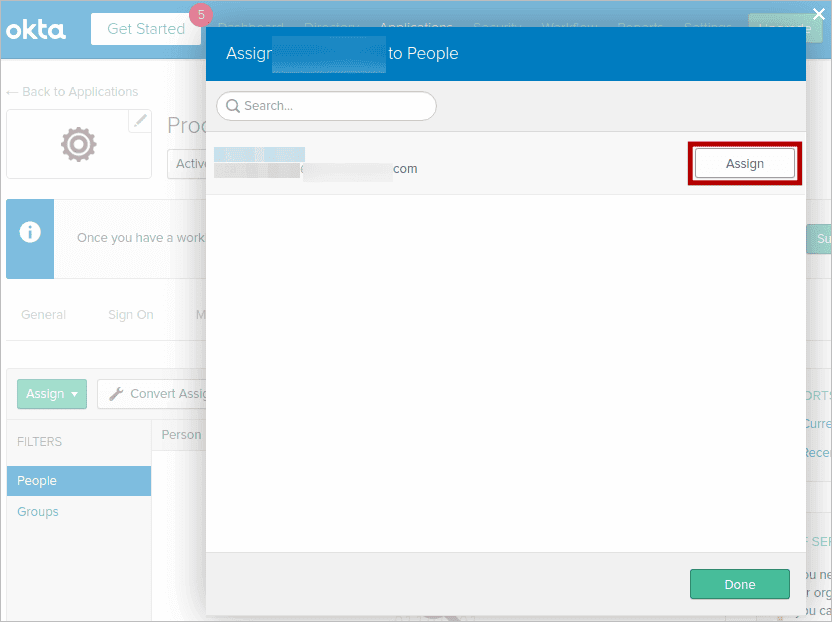
- Click the Assignments tab to assign this to users and groups. After assigning the users, click Done.
Steps to configure Okta in ADManager Plus
- Log in to ADManager Plus.
- Navigate to Delegation > Configuration > Logon Settings > Single Sign On.
- Select Okta from the Identity Provider (Idp) drop-down.
- By default, the Upload Metadata File option is selected in the SAML Config Mode field. Click Browse to upload the metadata XML file that you downloaded from Okta.
- Check the Sign SAML Logout Request and/or Sign SAML Logout Response box, if you require digital signatures fromidentity providers during logouts.
- In the Mapping Attribute Selection, the userPrinicpalName will be selected by default.
- Check the Force SAML Login option if you want users to log in to the product only through SAML SSO.
- Click Save to complete the configuration.
Steps to configure ADManager Plus in OneLogin:
- Log in to the OneLogin portal with admin credentials.
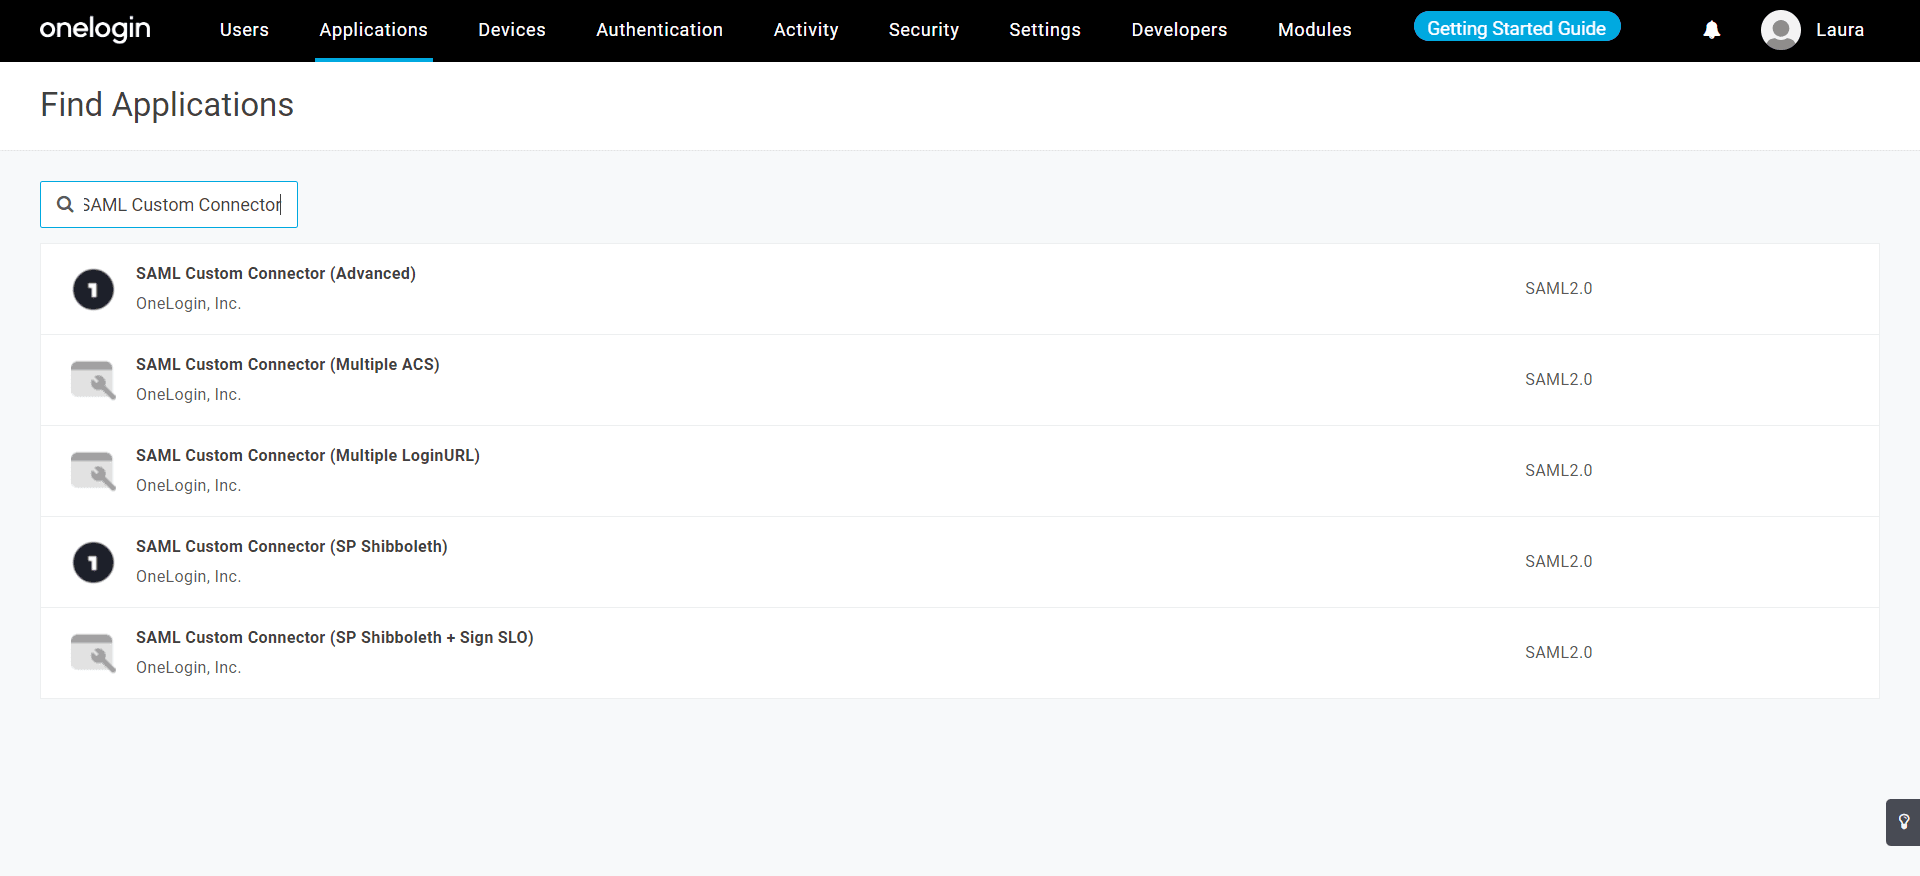
- Navigate to Applications > Add Apps.
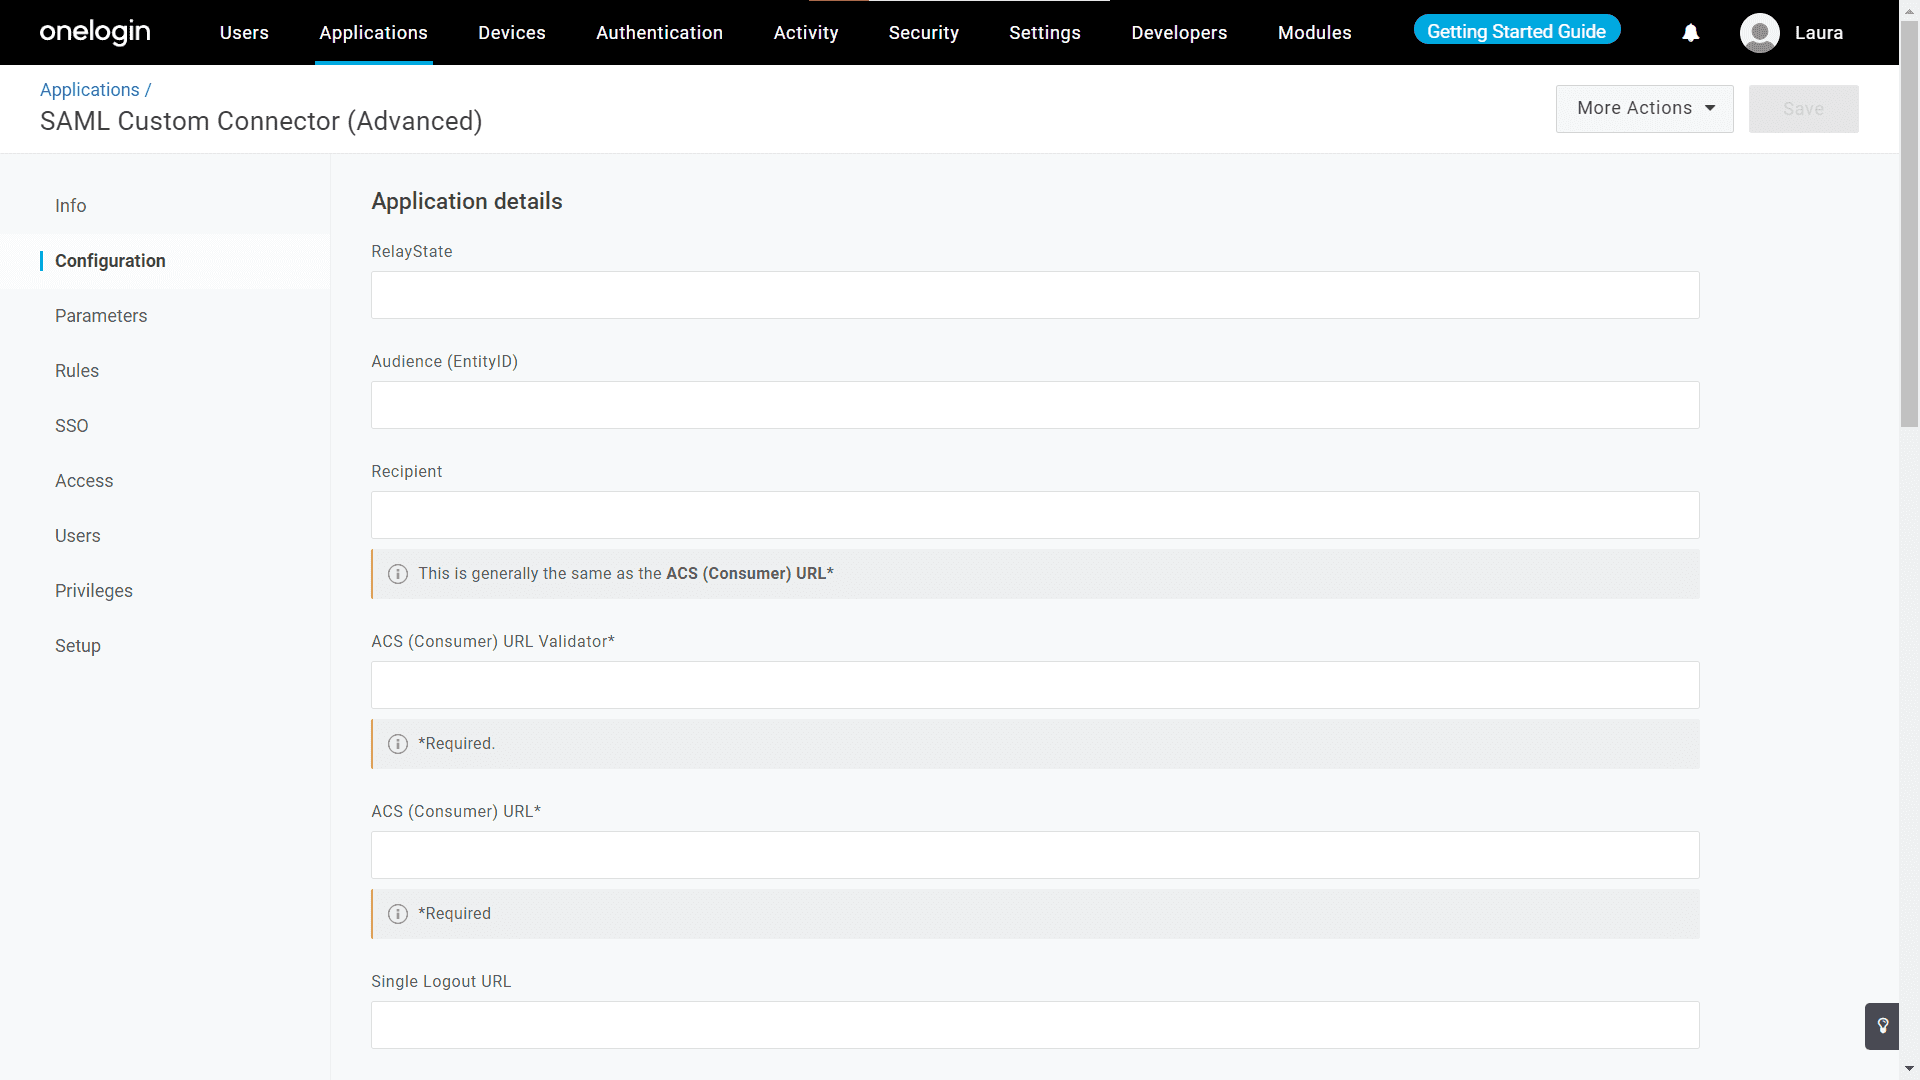
- Search for SAML Custom Connector in the application catalog, and select the SAML Custom Connector (Advanced) option.
- In the Info tab under the Portal section, provide a Display Name and upload the logo images in the respective fields.
- In the Configuration tab, fill in the Recipient, Audience (EntityID), and ACS URL fields.
- Obtain the values for these fields from ADManager Plus under Delegation > Configuration > Logon Settings > Single Sign On > SAML Authentication > Service Provider Details.
- Go to the Users tab and assign the applications to users or groups.
- Click the More Actions drop-down menu and select SAML Metadata to download the metadata file.
- Click Save to complete the configuration. The created app will be shown in Applications > Portal.

Note: Depending on your needs, you can configure additional settings in the Parameters, Rules, Access, and Privileges tabs.
Steps to configure OneLogin in ADManager Plus:
- Log in to ADManager Plus.
- Navigate to Delegation > Configuration > Logon Settings > Single Sign On.
- Select OneLogin from the Identity Provider (Idp) drop-down.
- By default, the Upload Metadata File option is selected in the SAML Config Mode. Click Browse to upload the metadata file that you downloaded from OneLogin.
- Check the Sign SAML Logout Request and Sign SAML Logout Response box, if you require digital signatures from identity providers during logouts.
- In the Mapping Attribute Selection, the userPrinicpalName will be selected by default.
- Check the Force SAML Login option if you want users to log in to the product only through SAML SSO.
- Click Save to complete the configuration.
Steps to configure ADManager Plus in Ping Identity:
- Log in to the Ping Identity Portal as an administrator.
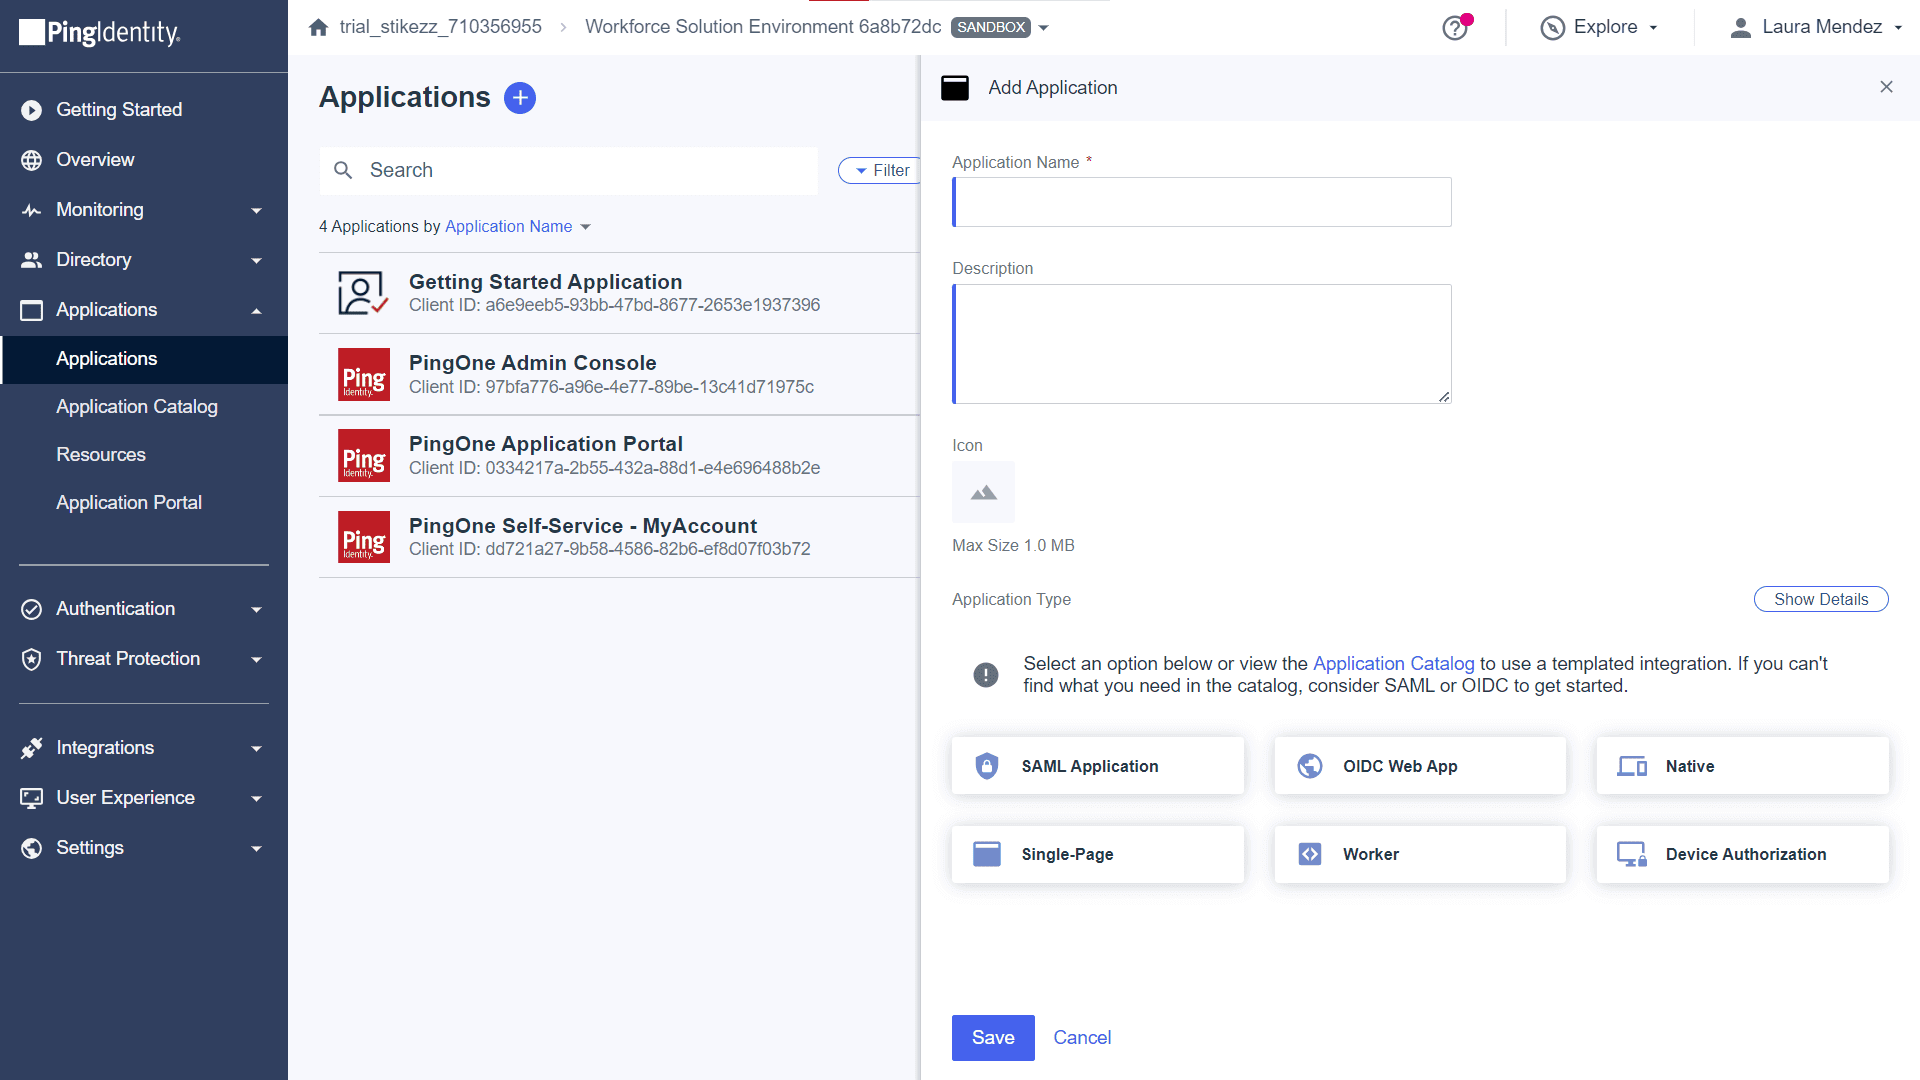
- In the left pane, select Applications and click the plus icon beside Applications to add a new application.
- In the Add Application page that opens, enter the Application Name, Description, and upload the logo Icon.
- Under the Application Type section, select SAML Application and click Configure.
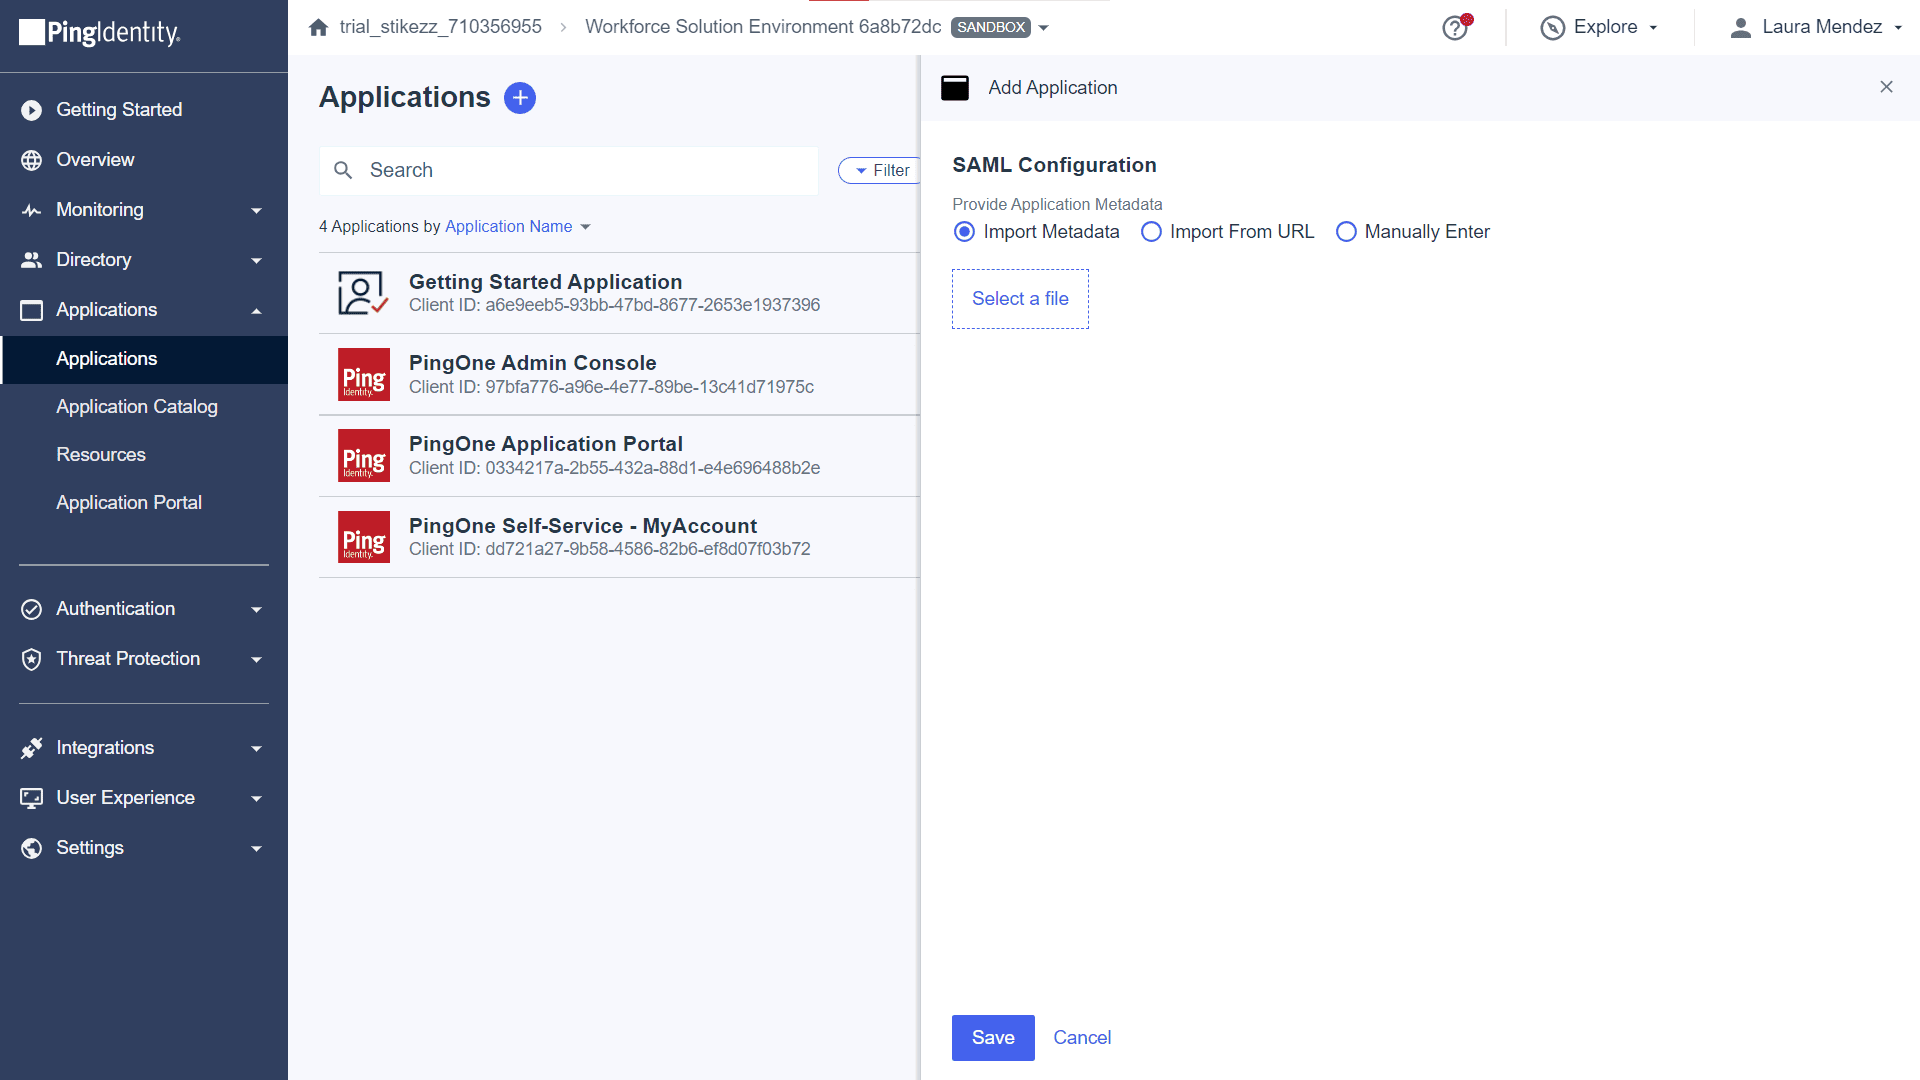
- By default, the Import Metadata option is selected. If you go ahead with this option, then download the metadata file from ADManager Plus by navigating to Delegation > Configuration > Logon Settings > Single Sign On > SAML Authentication > Service Provider Details > Download SP Metadata, and adding it here.
- If you choose the Manually Enter option, then fill in the ACS URLs and Entity ID fields with ADManager Plus's values that can be found under Delegation > Configuration > Logon Settings > Single Sign On > SAML Authentication > Service Provider Details.
- Once done filling in the details, click Save.
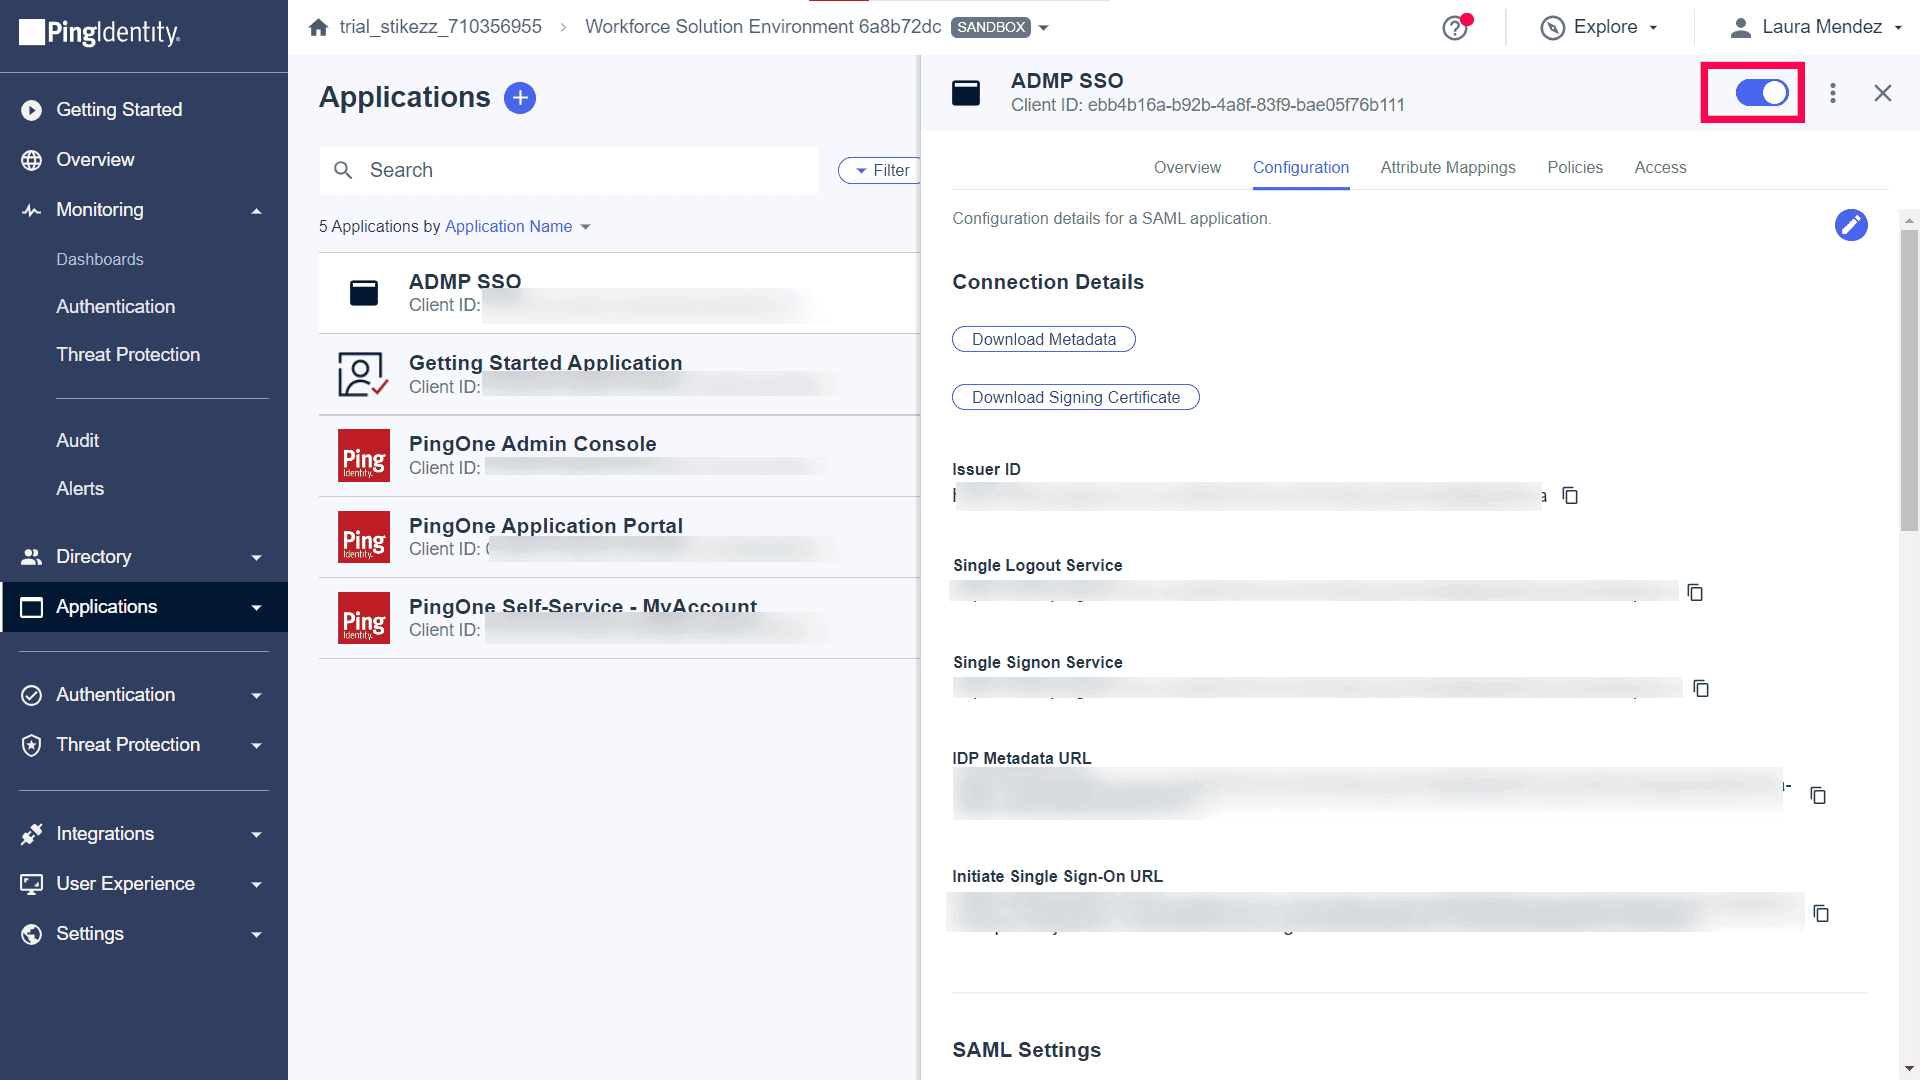
- The application will be published and you will see a window as shown below. Toggle the button on at the top toolbar to enable the application.
- Navigate to the Configuration tab and click Download Metadata. The downloaded XML file will be required when configuring Ping Identity in ADManager Plus.
Note: Depending on your organizational needs, you can configure additional settings in the Attribute Mappings, Policies, and Access tabs.
Steps to configure Ping Identity in ADManager Plus
- Log in to ADManager Plus.
- Navigate to Delegation > Configuration > Logon Settings > Single Sign On.
- Select Ping Identity from the Identity Provider (Idp) drop-down.
- By default, the Upload Metadata File option is selected in the SAML Config Mode. Click Browse to upload the metadata file that you downloaded from Ping Identity.
- Check the Sign SAML Logout Request and Sign SAML Logout Response box if you require digital signatures from identity providers during logouts.
- In the Mapping Attribute Selection, by default the userPrinicpalName is selected.
- Check the Force SAML Login option if you want the users to log in to the product only through SAML SSO.
- Click Save to complete the configuration. The application will be saved.
Steps to configure ADManager Plus in AD FS
- Prerequisites
- Set up relying party trust (ADManager Plus)
- Create LDAP attribute claim rules
- Obtain AD FS metadata file
- Enabling SAML logout option
Prerequisites
To configure AD FS for identity verification in ADManager Plus, you need the following components:
- Install the AD FS server. The detailed steps for installing and configuring AD FS can be found in this Microsoft article.
- An SSL certificate to sign your AD FS login page and the fingerprint for that certificate.
- Relay state must be enabled in AD FS.
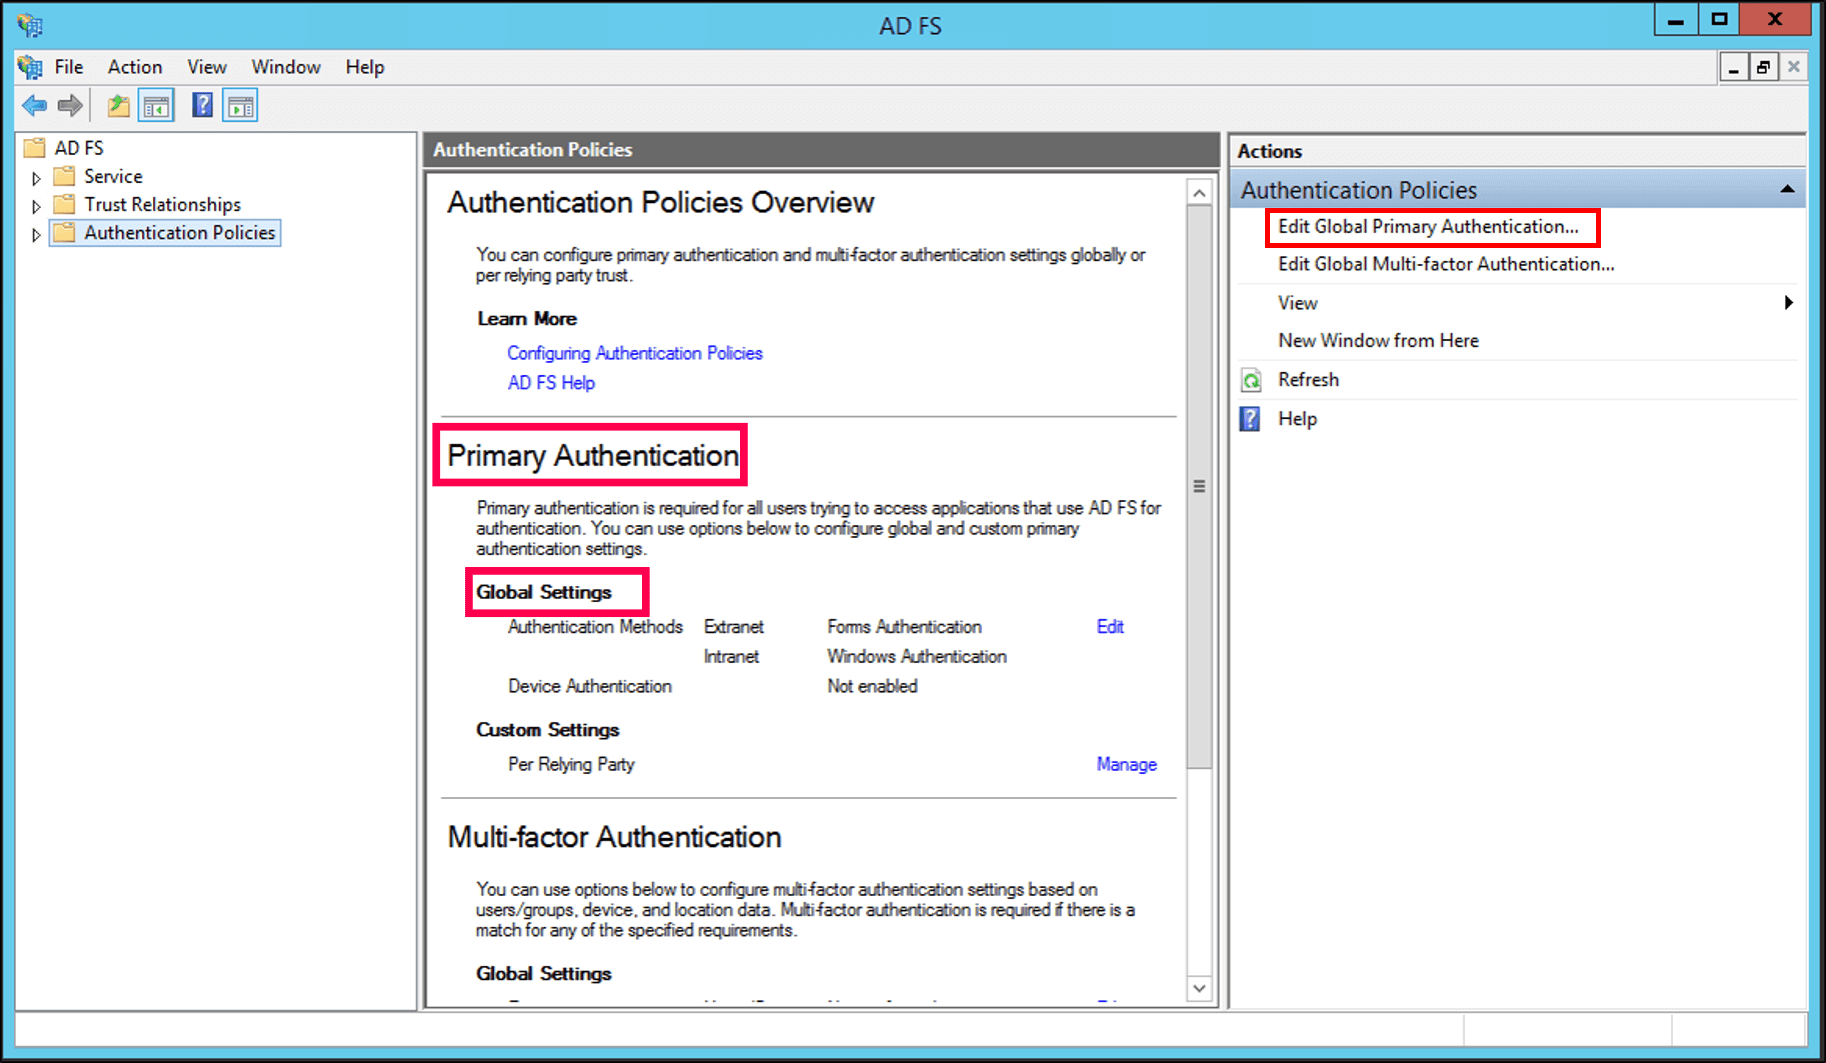
Only the form-based authentication method is configured for both intranet and extranet users trying to access ADManager Plus through AD FS authentication. You can view this setting in Server Manager > Tools > AD FS > AD FS Snap-in > Authentication Policies > Primary Authentication > Global Settings.
Claim Rules and Relying Party Trust
During configuration, you have to add a Relying Party Trust and create Claim Rules. A Relying Party Trust establishes a connection between two applications for authentication purposes by verifying the claims. A claim is an attribute used to identify an entity and establish access, such as the AD attribute userPrincipalName. Claims are generated from claim rules by applying specific conditions to them. In this context, AD FS will trust the relying party (ADManager Plus) and authenticate users based on the claims generated.
Steps to add a Relying Party Trust
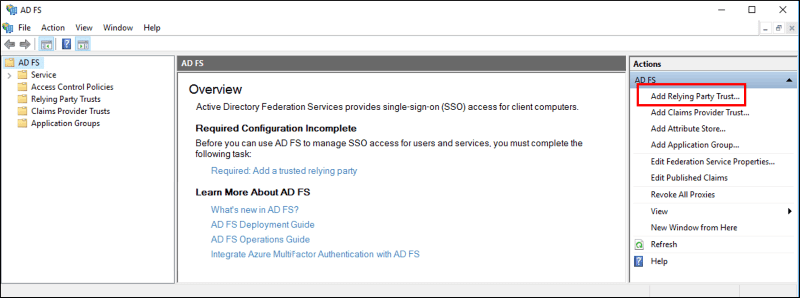
- Log in to your server machine and go to Server Manager > Tools > AD FS.
- In the AD FS snap-in, select Relying Party Trust folder from the left pane.
- In the Action side bar, select Add Relying Party Trust. The Add Relying Party Trust Wizard will open.
- The Claims aware is selected by default. Click the Start button.
- On the Select Data Source page that opens, click Enter data about the relying party manually, and then click Next.
- On the Specify Display Name page, enter a name in the Display name field, fill in a description about the relying party trust in the Notes field, and click Next.
- On the Configure Certificate page, the default settings will be applied. Click Next.
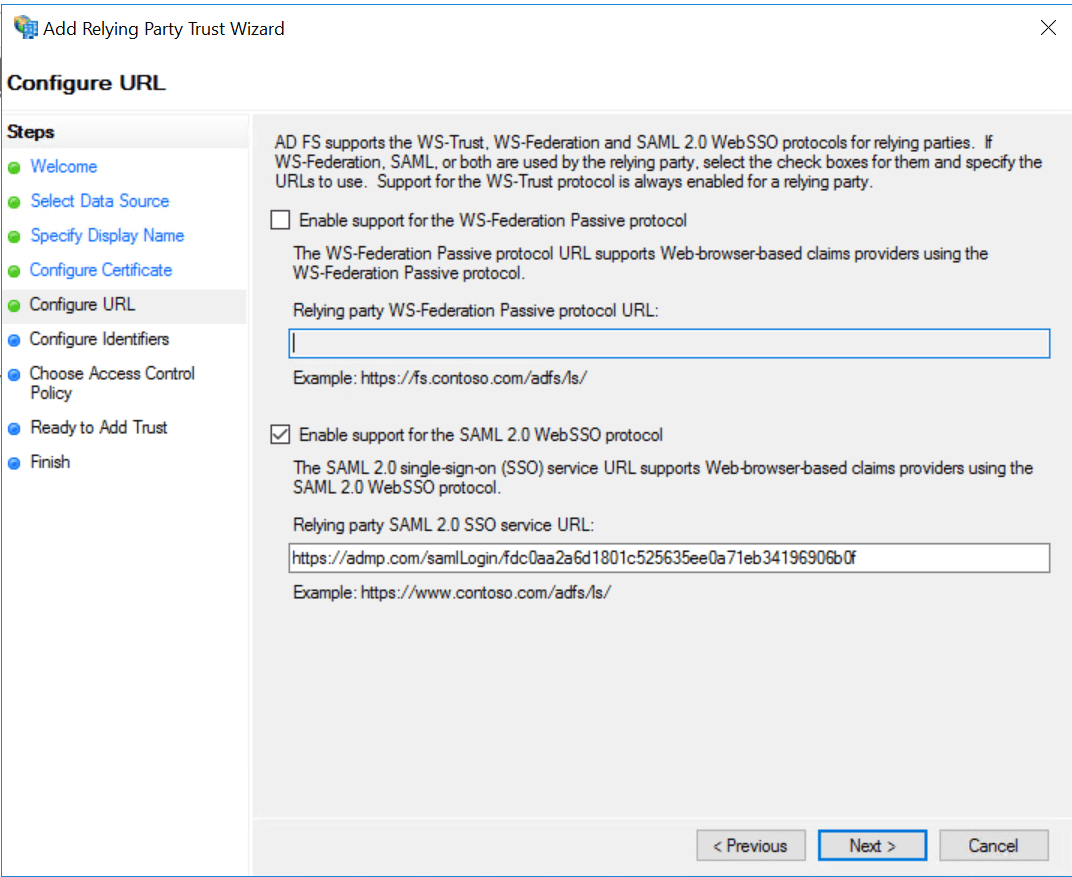
- In the Configure URL page, check the Enable Support for the SAML 2.0 WebSSO protocol box.
- Provide the ACS URL of your ADManager Plus server in the Relying party SAML 2.0 SSO service URL field. It's important to note that there is no trailing slash at the end of the URL.
- For example:
https://admp.com/samlLogin/fdc0aa2a6d1801c525635ee0a71eb34196906b0f
- In the Configure Identifiers page add, https://admp.com/samlLogin/fdc0aa2a6d1801c525635ee0a71eb34196906b0f.
- In the Choose Access Control Policy page specify how the MFA policy has to be applied and click Next. For more information about Access Control Policies, refer to this article.
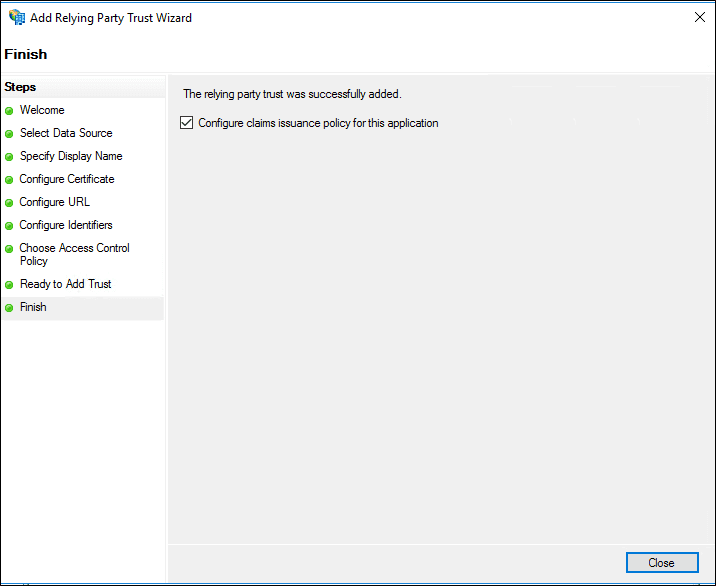
- In the Ready to Add Trust page, review the settings you configured and click Next to save the relying party information.
- In the Finish page, click Close. This will automatically open the Edit Claim Rules dialog box.
Create LDAP attribute claim rules
- Follow the steps given in this article to create LDAP attributes claim rules.
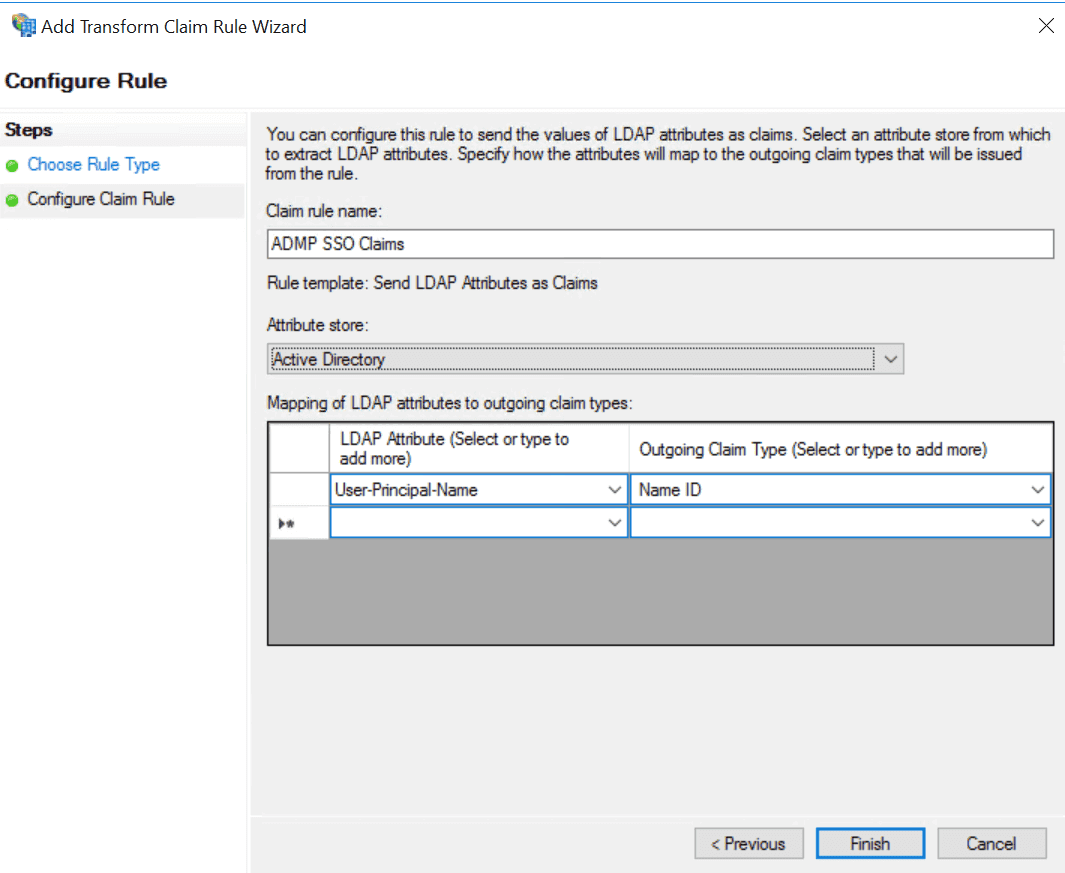
- As shown in the image below:
- Provide a claim rule name.
- Select Active Directory in the Attribute Store drop-down
- Choose LDAP Attribute as User-Principal-Name and Outgoing Claim Type as Name ID.
- Once done, the rule will be created as displayed below.
Note: You can choose multiple LDAP attributes and map them to their corresponding outgoing claim types. For example, you can add LDAP attributes such as the Given Name, Surname, Phone Number, etc.
Obtain AD FS metadata file
After completing the AD FS configuration, download the metadata file by clicking the Identity Provider metadata link. For example:
https://server_name/FederationMetadata/2007-06/FederationMetadata.xml
You will need this file while configuring SAML authentication in ADManager Plus. Please save this file and keep it safe.
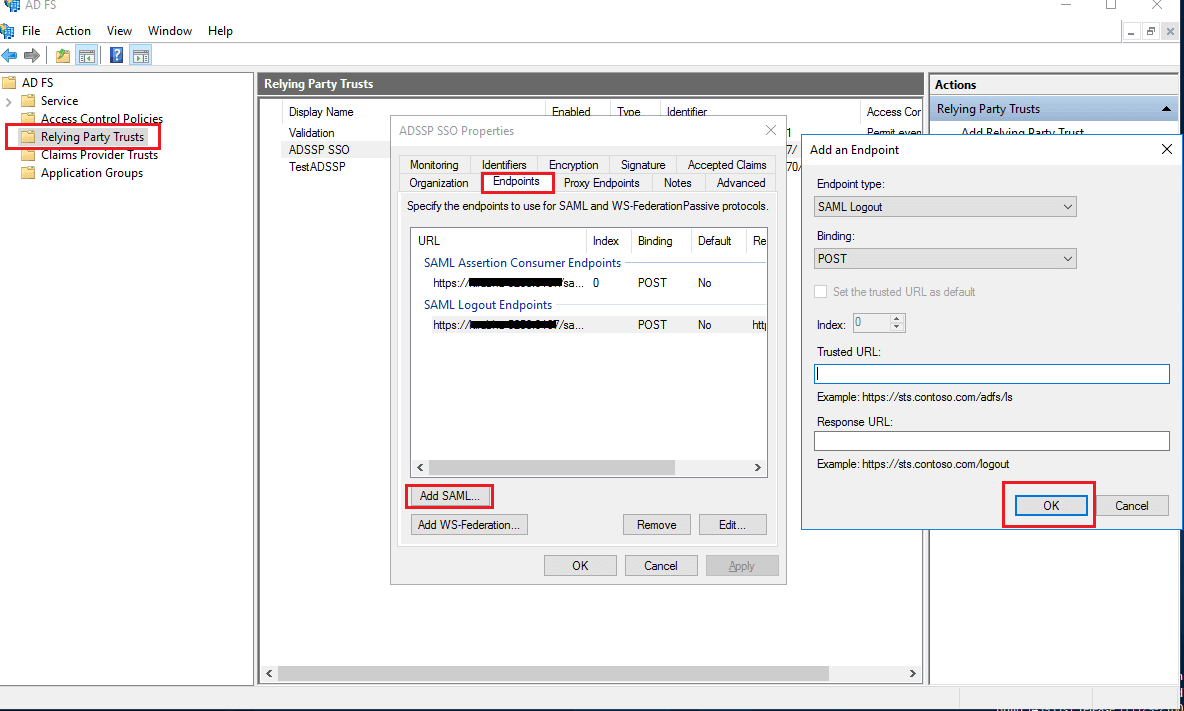
Enabling SAML logout option
- Navigate to the Relaying Party Trusts and find the rule you've created.
- Right-click the selected rule and click Properties.
- In the window that opens, find the Endpoints tab and click the Add SAML button.
- In the Trusted URL, paste the SP Logout URL copied from ADManager Plus.
- In the Signature tab, upload the X.509-certificate in PEM format downloaded from ADManager Plus.
- Click OK.
Note: Copy the SP Logout URL and download the X.509-certificate from ADManager Plus' Delegation tab > Configuration > Logon Settings > SAML 2.0 > Service Provider Details.
Steps to configure AD FS in ADManager Plus:
- Log in to ADManager Plus.
- Navigate to Delegation > Configuration > Logon Settings > Single Sign On.
- Select AD FS from the Identity Provider (Idp) drop-down menu.
- In SAML Config Mode, the Upload Metadata file is selected by default. If you want, you can change that to Manual Configuration and proceed to enter details manually.
- Click Browse file and upload the metadata file of you would have downloaded from AD FS.
- Check the Sign SAML Logout Request and Sign SAML Logout Response box if you require digital signatures from identity providers during logouts.
- In the Mapping Attribute Selection, the userPrinicpalName is selected by default.
- Check the Force SAML Login option if you want users to log in to the product only through SAML SSO.
- Click Save to complete the configuration.
Steps to configure ADManager Plus in Entra ID:
- Log in to the Microsoft Entra admin center portal.
- Select Microsoft Entra ID.
- On the left pane, under the Manage section , select Enterprise applications.
- Click + New application on the top.
- On the Browse Microsoft Entra Gallery page, click + Create your own application. In the pop-up window that opens, provide a name for your application and choose the Integrate any other application you don't find in this gallery (Non-gallery).
- Click Create. Once the application is created, the overview page of the application will be shown.
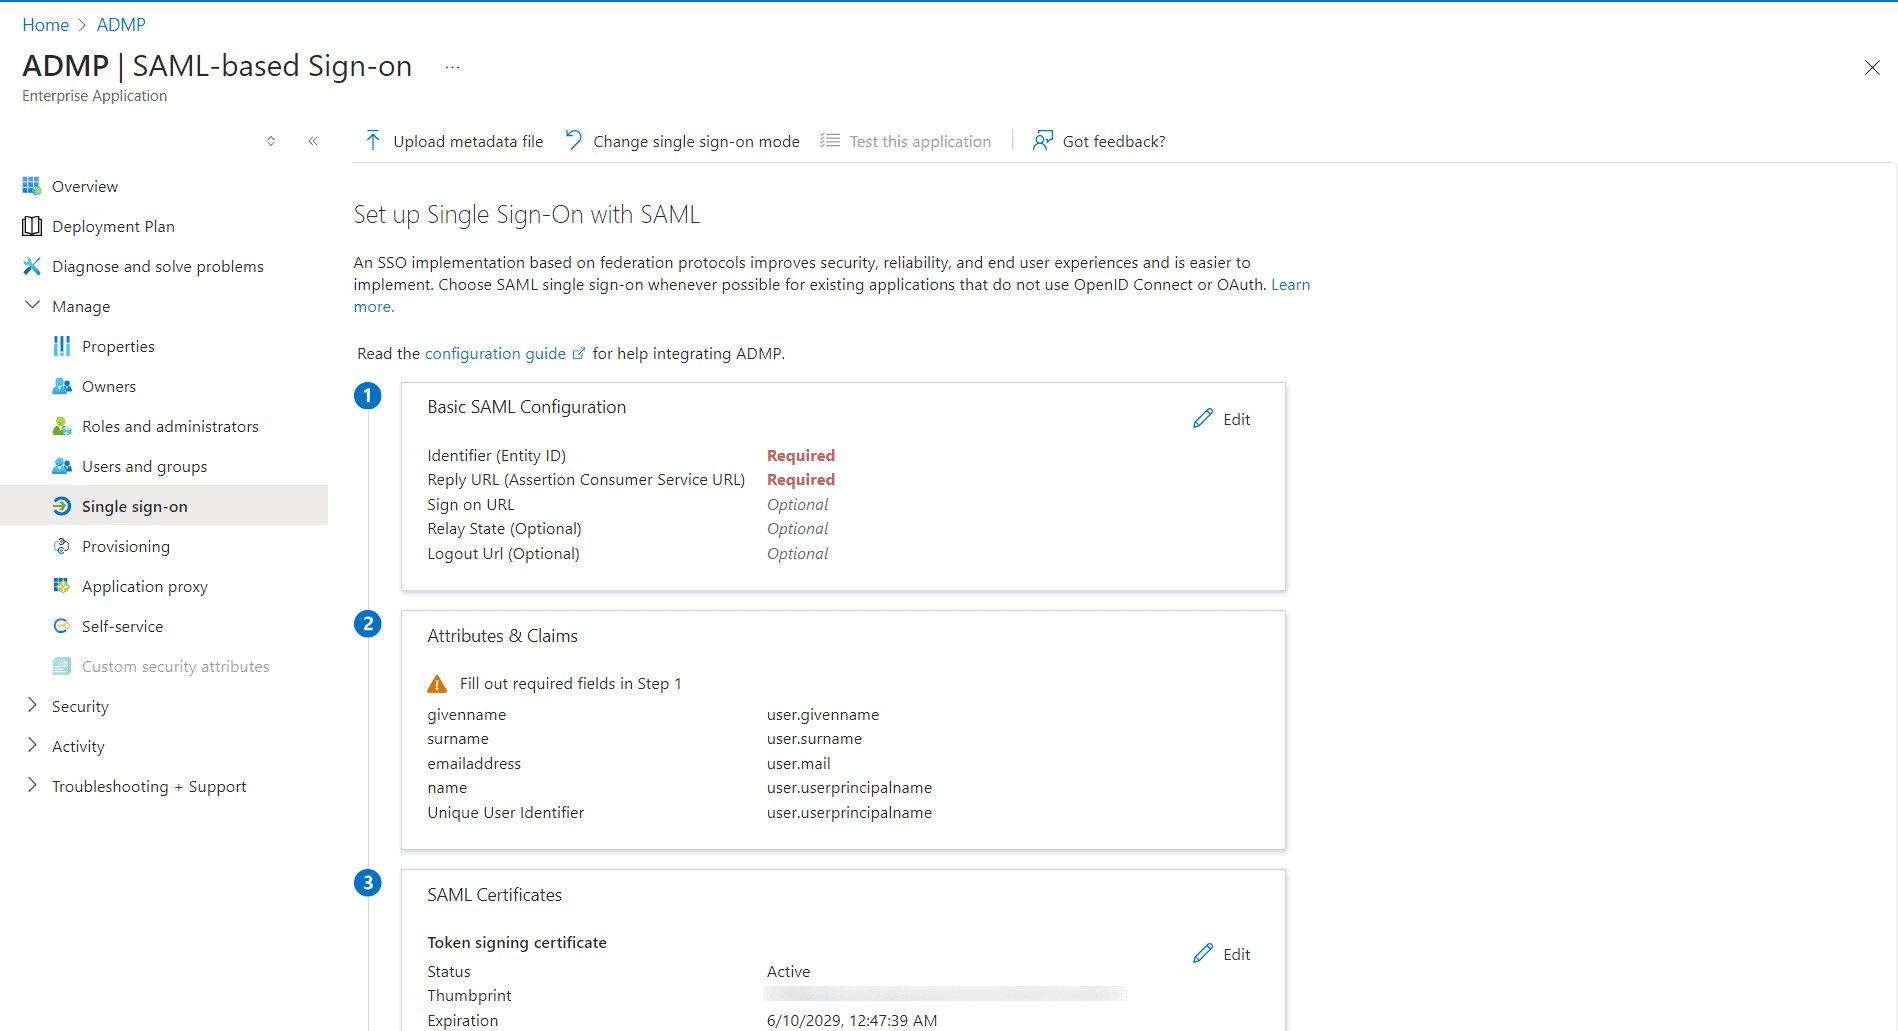
- In the left pane, click Manager > Single sign-on. In the window that opens, click the SAML method for single sign-on.
- In the Set up Single Sign-on page, click Upload metadata file and upload the metadata file. To download this, log in to ADManager Plus and navigate to Delegation > Configuration > Logon Settings > Single Sign On > SAML Authentication > Custom SAML > Download SP Metadata.
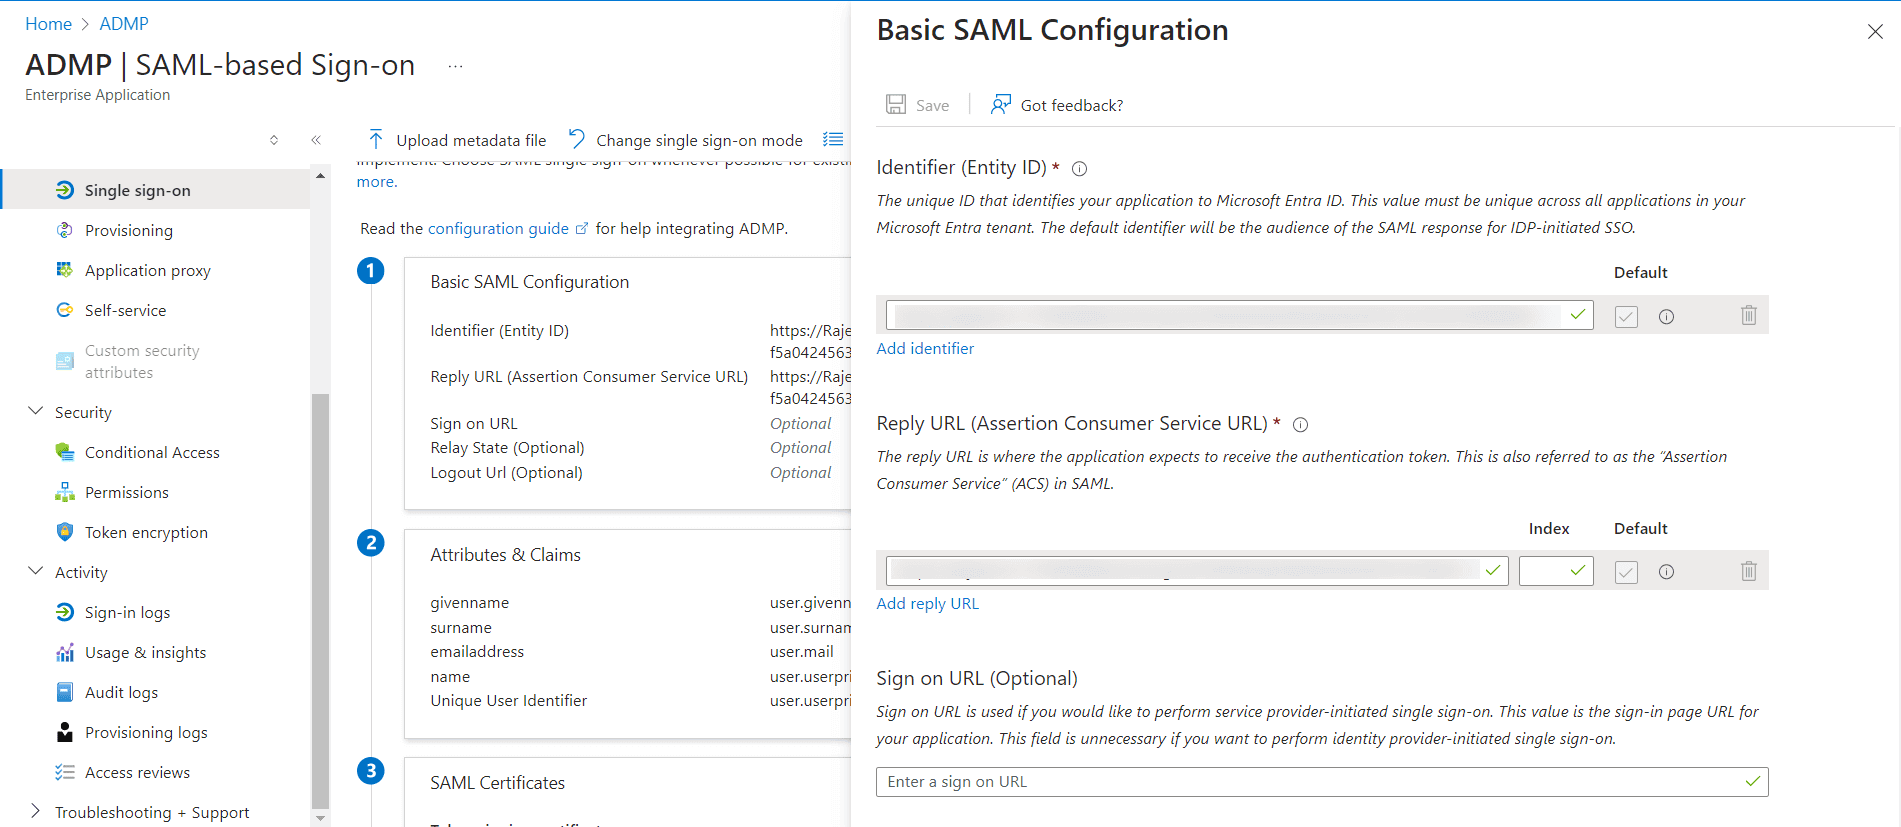
- Now in the Microsoft Entra ID portal, the respective fields in the Basic SAML Configuration window will be auto-filled. Click Save.
- In the SAML certificate section, click the Download link corresponding to the Federation Metadata XML field. This will download the Microsoft Entra ID's metadata file. You'll need this while setting up SSO configuration for Microsoft Entra ID in ADManager Plus.

How to assign users or groups ADManager Plus application in Microsoft Entra ID
- Log in to the Microsoft Entra admin center portal .
- Select Microsoft Entra ID.
- From the left pane, under the Manage section, select Enterprise Applications > All applications.
- From the list of applications, click the newly created ADManager Plus application.
- In the page that opens, under Getting Started, click the Assign Users and Groups tile.
- Click +Add users/group.
- The Add Assignment window will open. Here, click the None Selected link and choose the users and groups for whom you want to assign the application.
- Click Assign. The application will be assigned to the selected users and groups.
Steps to configure Microsoft Entra ID in ADManager Plus:
- Log in to ADManager Plus.
- Navigate to Delegation > Configuration > Logon Settings > Single Sign On.
- Select Custom SAML from the Identity Provider (Idp) drop-down.
- By default, the Upload Metadata File option is selected in the SAML Config Mode. Click Browse to upload the metadata file that you would have downloaded by following this step.
- Check the Sign SAML Logout Request and Sign SAML Logout Response box if you require digital signatures from identity providers during logouts.
- In the Mapping Attribute Selection, the userPrinicpalName is selected by default. If needed, you can change this to mail or sAMAccountName.
- Check the Force SAML Login option if you want users to log in to the product only through SAML SSO.
- Click Save to complete the configuration. The application will be saved.
Note:
If the Impersonate as admin option is not enabled for a technician and the technician hasn't logged in before the Force SAML option is enabled, the technician's details will not be stored in the product. This will not allow the product to confirm the identify of the technician. Therefore, the technician will not be allowed to log in when Force SAML is enabled.
If the Impersonate as admin is enabled, no manual login is required.
You can configure any custom identity provider of your choice to enable single sign-on to access ADManager Plus. To do so, configure ADManager Plus settings in the preferred identity provider by following the steps below.
Steps to configure custom SAML in ADManager Plus
- Log in to ADManager Plus.
- Navigate to Delegation > Configuration > Logon Settings > Single Sign On.
- Select Custom SAML from the Identity Provider (Idp) drop-down menu.
- The Upload Metadata file is selected by default. To enter the details manually, select Manual Configuration.
- Click Browse and upload the metadata file downloaded from the custom identity provider tool.
- Check the Sign SAML Logout Request and Sign SAML Logout Response box if you require digital signatures from identity providers during logouts.
- In the Mapping Attribute Selection, the userPrinicpalName is selected by default. You can change it, if required.
- Check the Force SAML Login option if you want users to log in to the product only through SAML SSO.
- Click Save to complete the configuration.