Reverse Proxy
A reverse proxy is a server that sits between the application and its users. It receives requests from clients, forwards them to the server, and returns the server's responses to the clients as though the responses came from the proxy itself. Because clients only ever communicate with the proxy, the server running the application stays hidden.
When you make ADSelfService Plus available to remote users, exposing the ADSelfService Plus server directly to the internet widens your attack surface. Configuring a reverse proxy removes that exposure. ManageEngine AD360 includes a built-in reverse proxy server, so once ADSelfService Plus is integrated with AD360, you can place AD360 in the DMZ as the public entry point and keep the ADSelfService Plus server in your internal network. External users reach ADSelfService Plus only through AD360, and your firewall needs to permit just the proxy to contact the ADSelfService Plus server, and only on the required port.
Prerequisites
Before you configure a reverse proxy for ADSelfService Plus, make sure the following are in place:
- The Failover and Secure Gateway Services add-on is purchased.
- AD360 is installed, and ADSelfService Plus is integrated with it.
How it works
When a reverse proxy is enabled, AD360 acts as the single point of contact for external users. A request from a client first reaches the AD360 reverse proxy server in the DMZ. AD360 forwards the request to the ADSelfService Plus server in the internal network, receives the response, and returns it to the client. External machines never connect directly to the ADSelfService Plus server, and the details of that server stay hidden from end users. AD360 supports two methods of reverse proxy, and you can enable either one or both.

With a context-based reverse proxy, every integrated component is reached through one shared hostname, protocol, and port, and each component is distinguished by a unique context path appended to the URL. When a request arrives, AD360 reads the context path and routes the request to the matching component server. For example, if ADSelfService Plus is given the context path adssp, external users reach it at a URL such as https://<AD360-hostname>/adssp.
In both methods, the hostname of the AD360 server serves as the hostname for every component server once the reverse proxy is enabled. AD360 generates an access URL for each component, and this is the URL you share with external users.
| Note: In a context-based reverse proxy, if port 443 is configured, port 80 is also configured automatically when it is available. A user who attempts to reach the site on port 80 over HTTP is then redirected to port 443 over HTTPS. |
|---|
Configuration instructions
The reverse proxy server's IP address must first be added to the server.xml file in ADSelfService Plus so the product can identify the real client behind the proxy. The reverse proxy is then configured from the AD360 console. Open AD360, log in as an administrator, and go to Admin > Administration > Reverse Proxy. The Reverse Proxy page has two tabs, Context-Based and Port-Based.
To add the reverse proxy server's IP address to server.xml:
- Open the conf folder in the ADSelfService Plus installation directory. The default path is C:\Program Files\ManageEngine\ADSelfService Plus\conf.
- Open the server.xml file.
- Locate the following section:
<!--Valve className="org.apache.catalina.valves.RemoteIpValve" remoteIpHeader="x-forwarded-for" proxiesHeader="x-forwarded-by" requestAttributesEnabled="true" internalProxies="127\.0\.0\.1|0\:0\:0\:0\:0\:0\:0\:1"/-->- Uncomment the line and set the internalProxies value to the reverse proxy (AD360) server's IP address:
<Valve className="org.apache.catalina.valves.RemoteIpValve" remoteIpHeader="x-forwarded-for" proxiesHeader="x-forwarded-by" requestAttributesEnabled="true" internalProxies="<IP_address>"/>- Save the server.xml file.
| Important: Without this entry, ADSelfService Plus sees every request as originating from the reverse proxy server instead of the actual client. Features that depend on the real client IP address, such as audit reports, IP-based and conditional access rules, and the anti-hacking system, will not work correctly until the entry is added. |
|---|
Enabling a context-based reverse proxy
- On the Reverse Proxy page, click the Context-Based tab.
- Select the Enable Context-Based Reverse Proxy check box.
- In the Select Protocol & Port fields, select the protocol and enter the port number to use for the proxy. The protocol options are HTTP and HTTPS. Confirm that the port number is not already in use by another application.
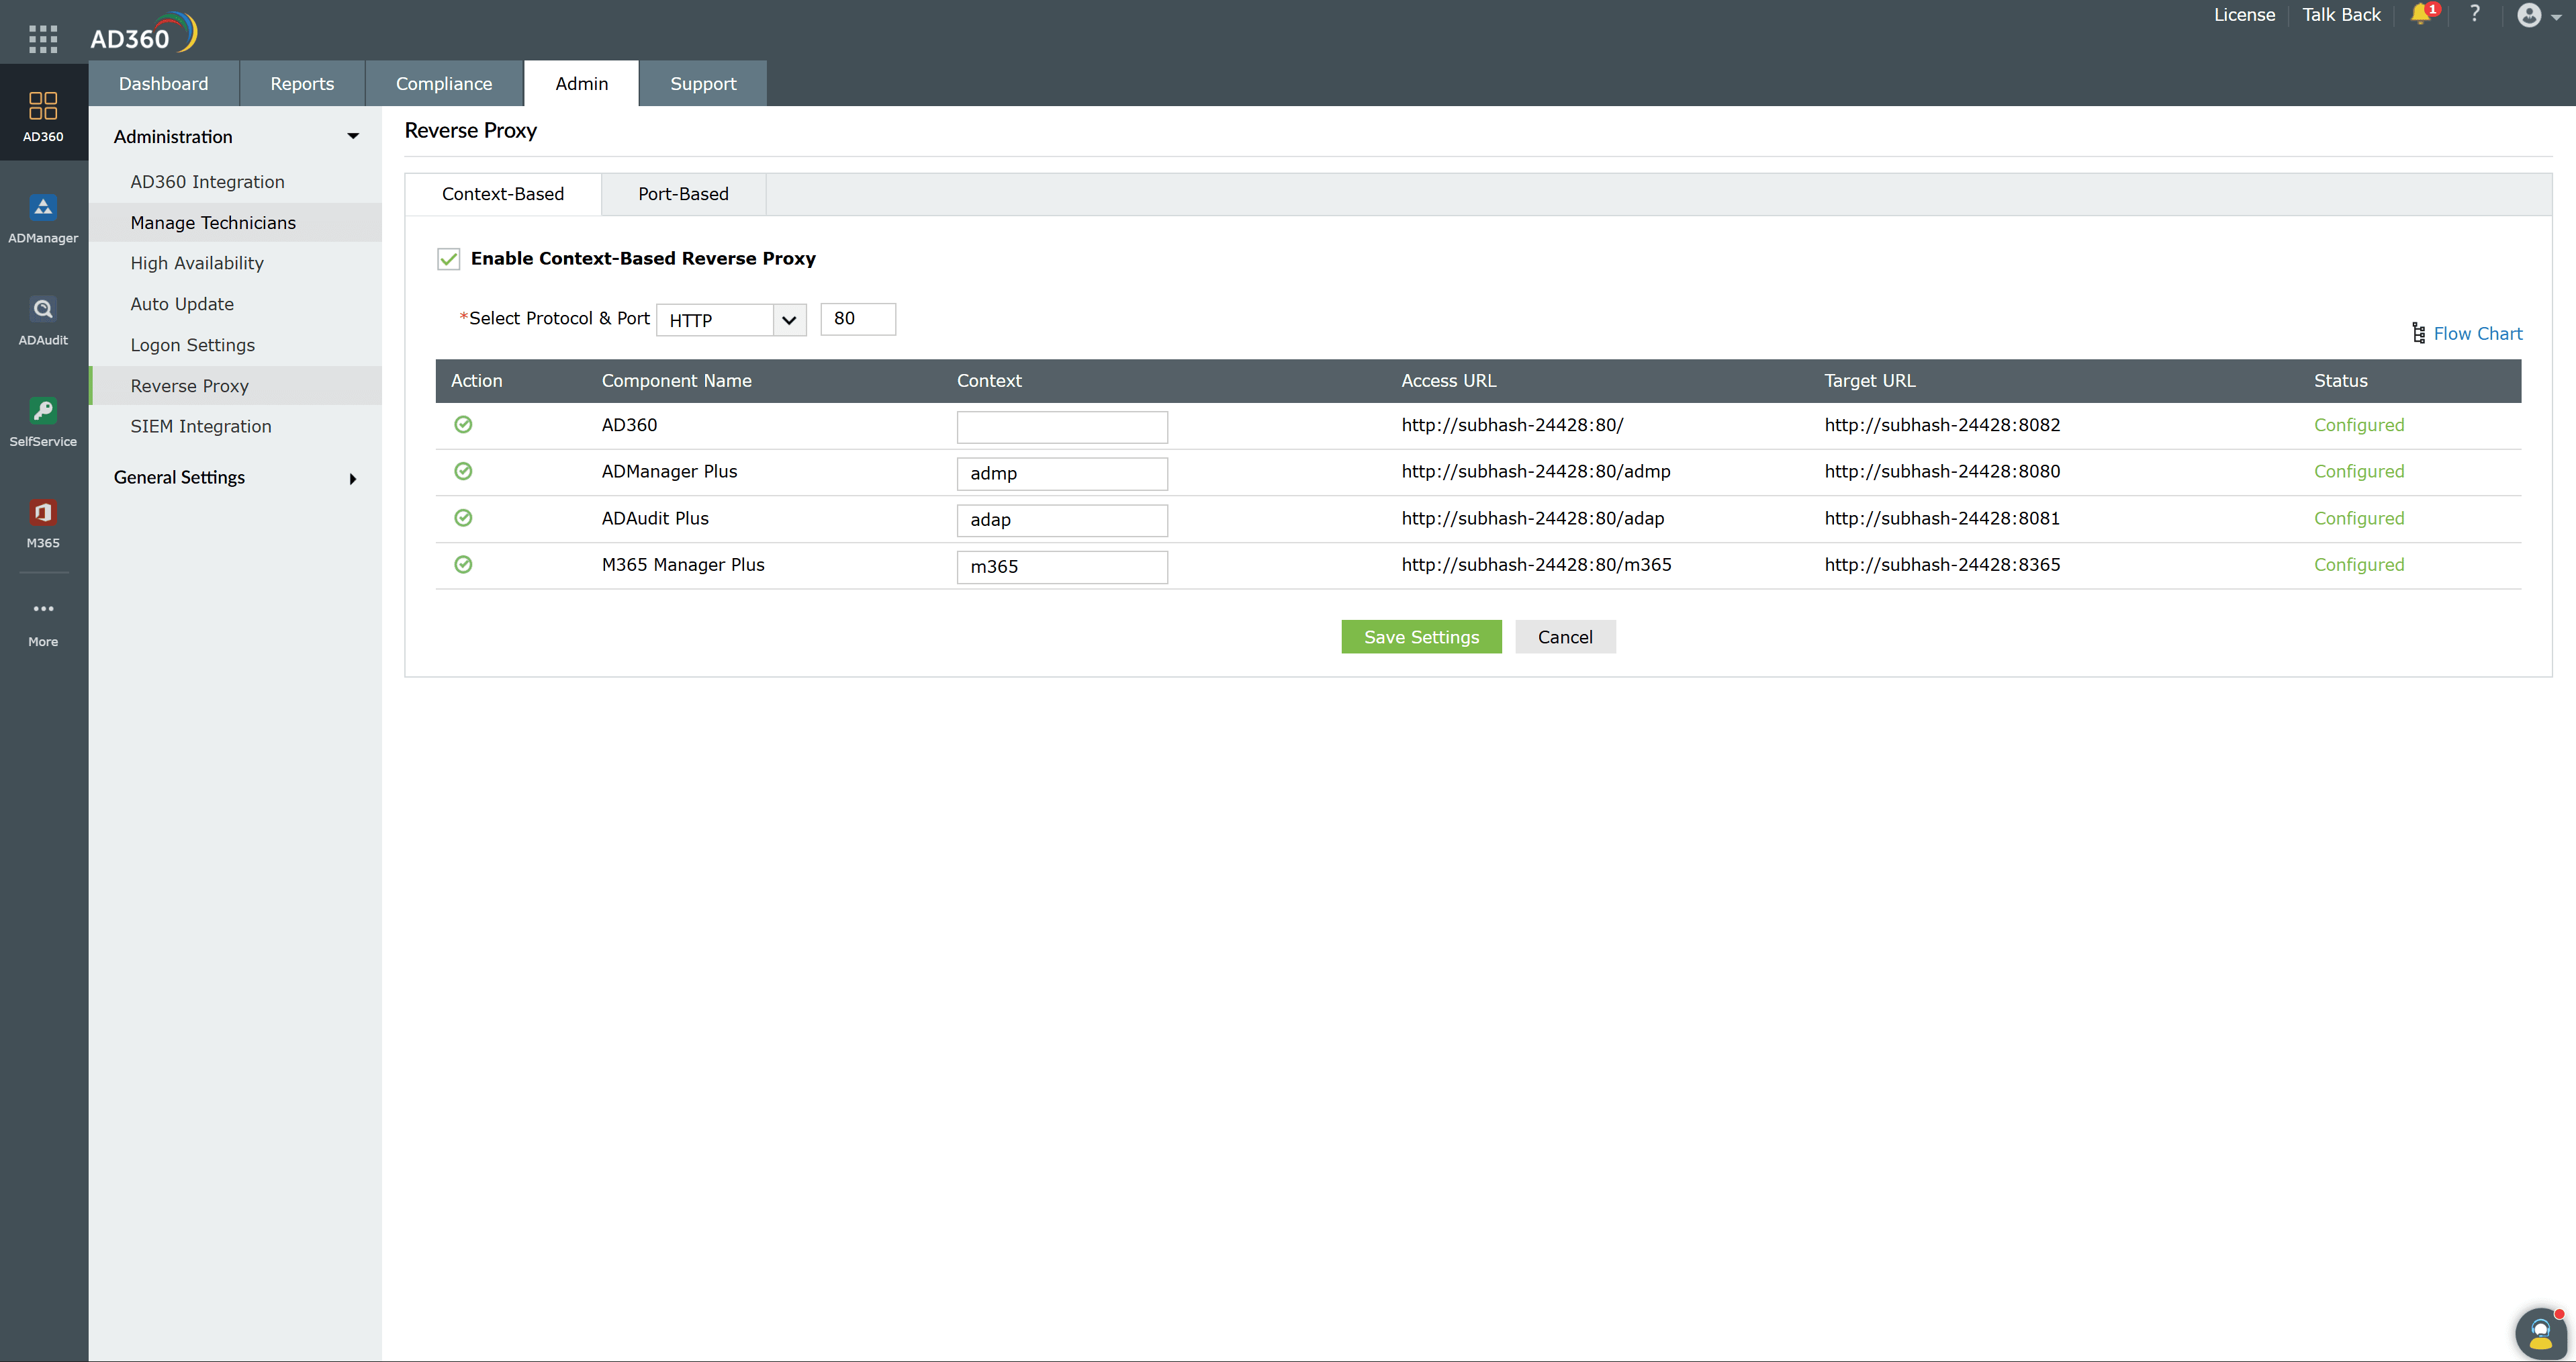
- In the table, find the ADSelfService Plus row and enter a unique value in the Context field. This value becomes the context path in the access URL.
- Note the URL shown in the Access URL column for ADSelfService Plus. This is the URL external users use to reach the product.
- Click Save Settings.
The Status column shows whether the reverse proxy is configured for each component. To discard your changes without applying them, click Cancel.
| Tip: To see a visual summary of how requests flow from external users through AD360 to each component, click Flow Chart on the tab. |
|---|
Enabling a port-based reverse proxy
- On the Reverse Proxy page, click the Port-Based tab.
- Select the Enable Port-Based Reverse Proxy check box.
- In the ADSelfService Plus row, select a protocol in the Protocol field. The options are HTTP and HTTPS. Setting a protocol per component is optional.
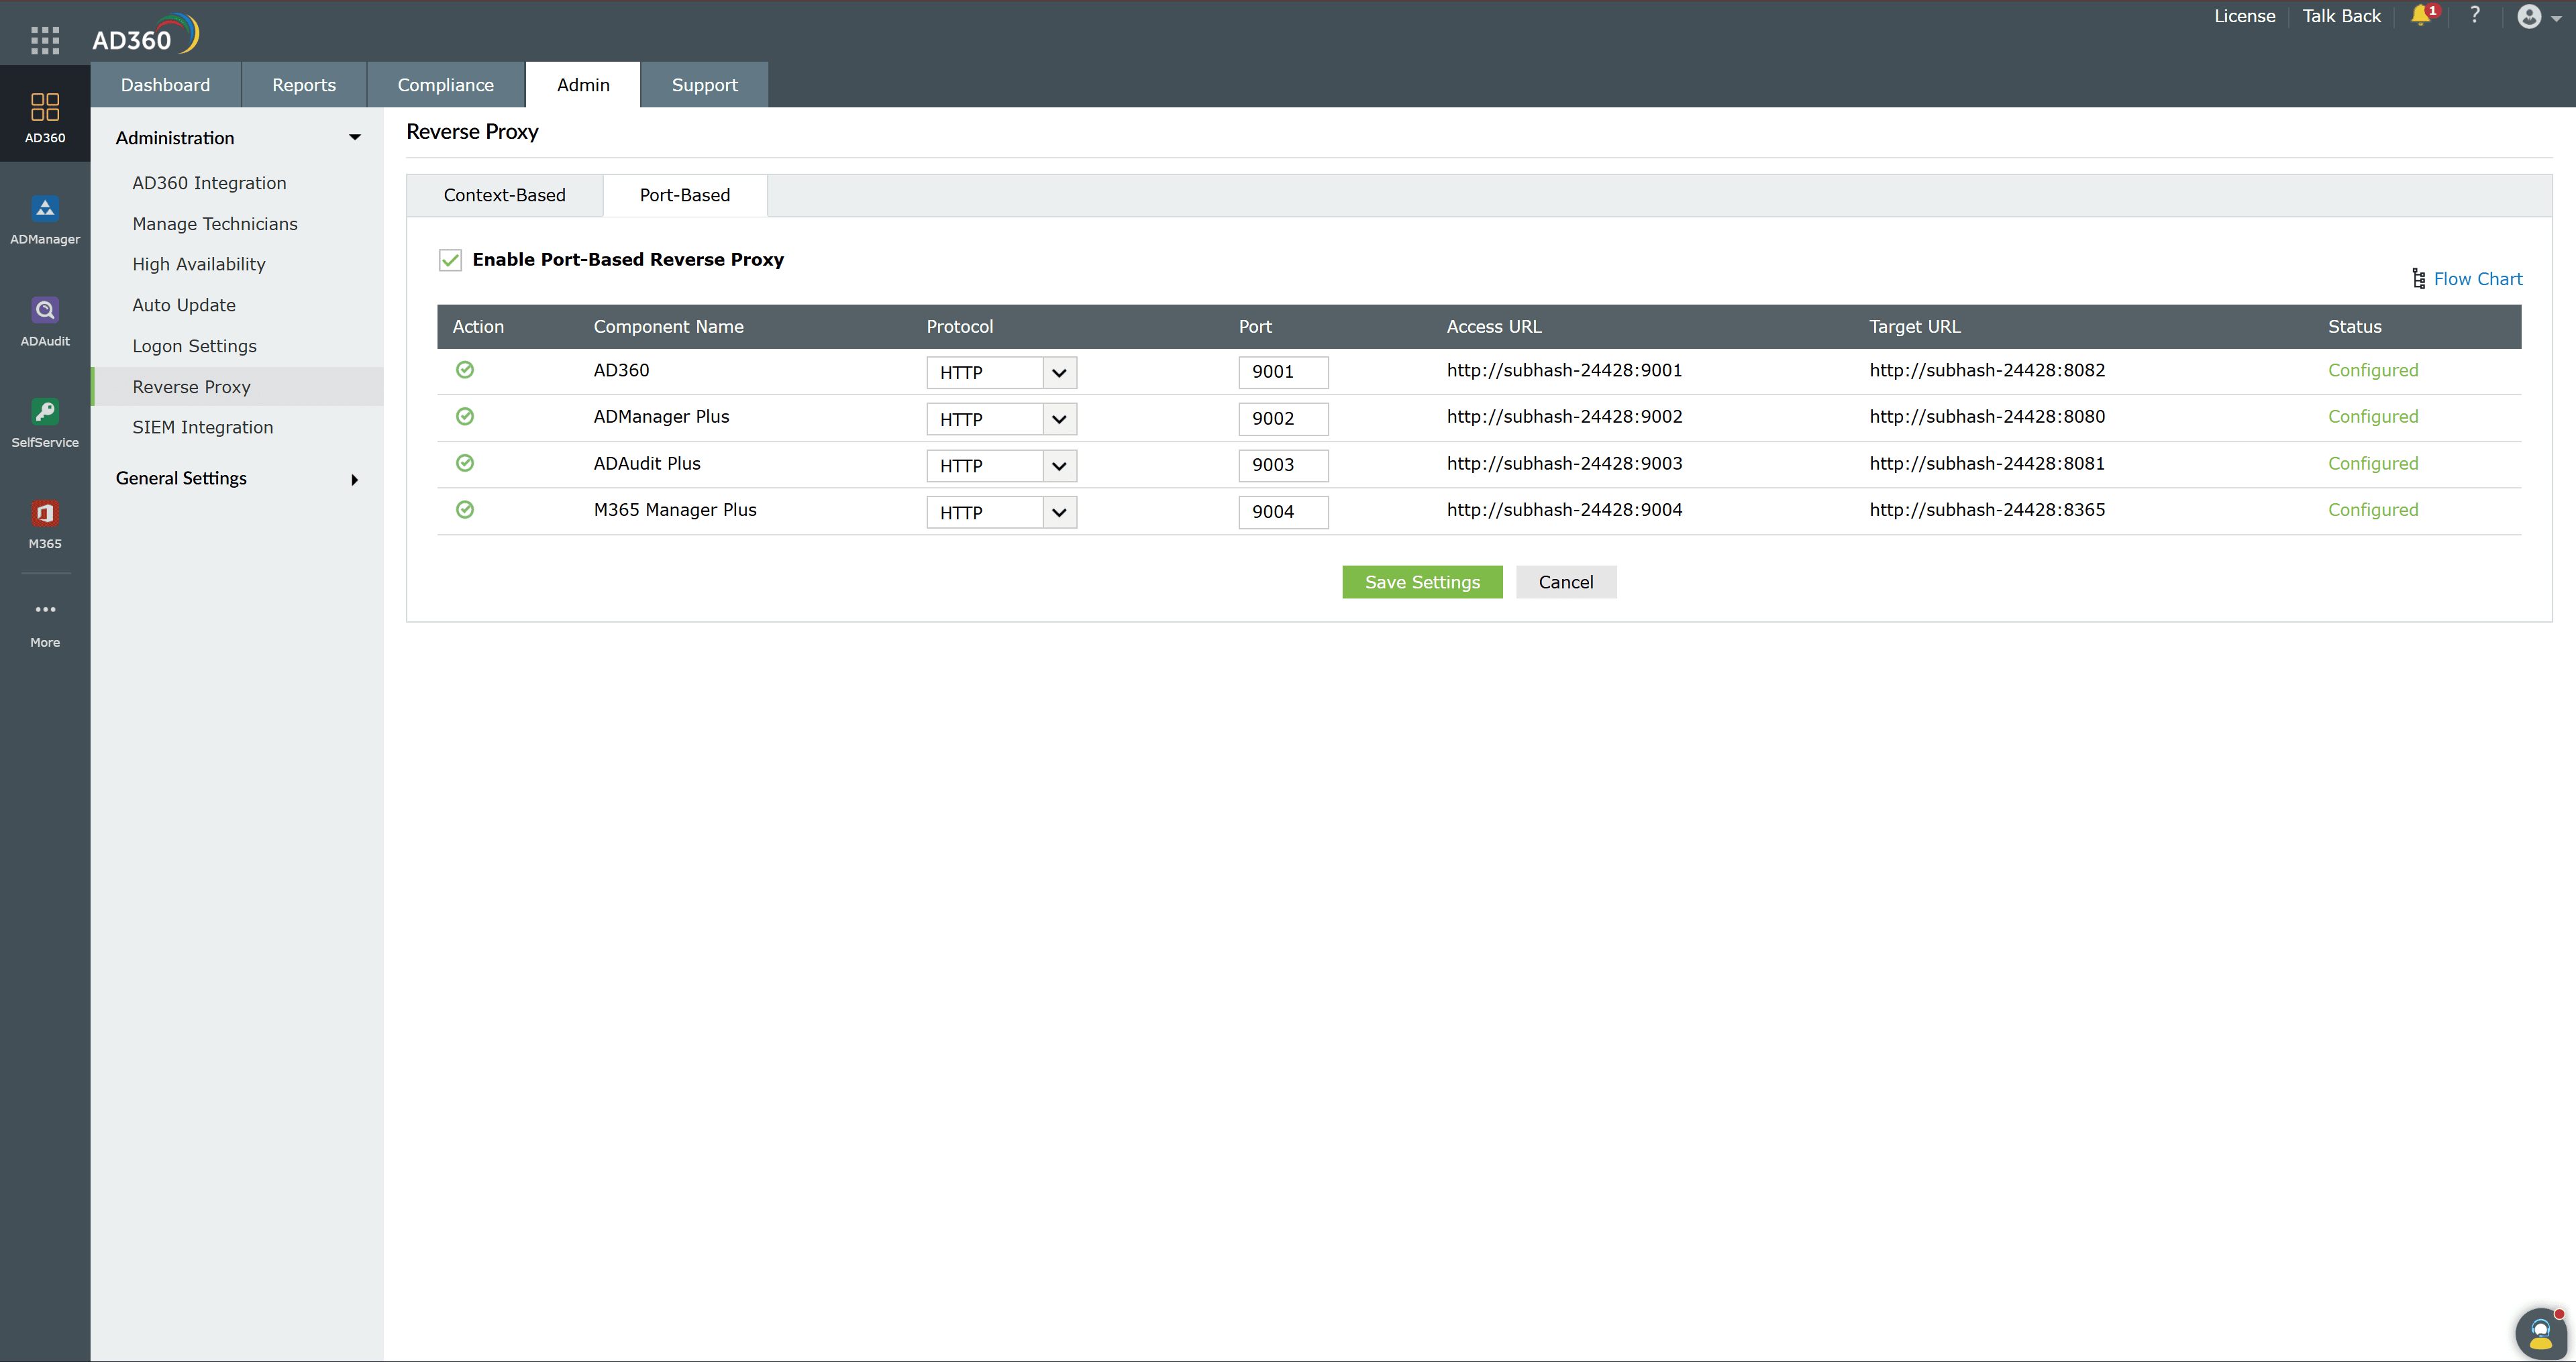
- In the Port field of the ADSelfService Plus row, enter a unique port number. A unique port number is mandatory for each component. Confirm that the port number is not already in use by another application.
- Note the URL shown in the Access URL column for ADSelfService Plus. This is the URL external users use to reach the product.
- Click Save Settings.
Updating the access URL in ADSelfService Plus
After you enable a reverse proxy, update the access URL inside ADSelfService Plus so the product reflects how external users now reach it. In the ADSelfService Plus admin console, go to Admin > Product Settings > Connection and click Configure Access URL.
| Warning: If FIDO passkey authentication is configured, changing the access URL modifies the FIDO relying party identifier. This results in the loss of enrollment data and disenrolls all users. If you plan to use FIDO passkey authentication, enable the reverse proxy and update the access URL first, and configure FIDO passkey authentication afterward. |
|---|
Tips
- Apply an SSL certificate to AD360 and enable an HTTPS connection. This secures the communication between external clients and the reverse proxy server.
- Place the AD360 reverse proxy server in the DMZ and keep the ADSelfService Plus server in the internal network. Configure the firewall to allow only the proxy to reach the ADSelfService Plus server, and only on the required port.
- Record each access URL when you configure the proxy. These URLs are how external users reach ADSelfService Plus and the other components.
- Enable both the context-based and port-based methods only when your network design calls for it. For most deployments, one method is enough.