Auto-enrolling users by importing data from a CSV file
Using this option, you can import a CSV file containing users’ enrollment data into ADSelfService Plus and enroll them automatically. This option allows you to enroll both domain and local users (Windows accounts) if you already have all the necessary enrollment data stored in a CSV file or in an application that can export data as a CSV file. Before importing the enrollment data, make sure to configure the settings for the respective authenticators. To learn more on how to set up the authenticators supported by ADSelfService Plus, click here.
Authenticators for Bulk enrollment
Administrators can enroll users automatically without any user involvement for these authenticators:
- Security Questions and Answers
- Email IDs
- Mobile Numbers
- Custom TOTP - Hardware token
Bulk enrollment into ADSelfService Plus can be done by the admin with minimal user input for the following authenticators:
- Duo Security
- Google Authenticator
- Microsoft Authenticator
- Zoho OneAuth TOTP
- Custom TOTP - Software token
To enroll for Duo Security, please ensure that the users first download the Duo Security authenticator app and enroll with Duo. Admins can then bulk-enroll the users into ADSelfService Plus.
To use TOTP-based software authenticators (Google Authenticator, Microsoft Authenticator, Zoho OneAuth TOTP, and Custom TOTP - Software token), users will need to finish the process by installing the TOTP authenticator apps on their phones and configuring the enrollment settings using the Secret Key. Please find the configuration steps below:
Step 1: Create a unique 16-digit alphanumeric key for each user who is to be enrolled. This will be their secret key in the CSV file.
Step 2: Import the CSV by following these steps to enroll the users into ADSelfService Plus.
Step 3: The admin can send users their respective secret keys via email or other secure ways. Keys will be used while configuring the TOTP authenticator app on users' phones.
Import data formats
The data imported in the CSV file should follow the specified formats for each authenticator as mentioned in the table below.
| Import type | CSV header names | Allowed formats |
|---|---|---|
| Mobile Numbers | mobile | Must contain numbers 0 through 9 |
| Email IDs | Must be a valid email address | |
| Security Questions and Answers | question | Must be a security question, e.g., What is your favorite color? |
| answer | Must be the corresponding answer to the security question, e.g., Yellow | |
| Google Authenticator | googleauth secret key | Must contain letters A-Z or a-z and numbers 2-7 |
| Microsoft Authenticator | microsoftauth secret key | Must contain letters A-Z or a-z and numbers 0-9 |
| Zoho OneAuth TOTP | zohooneauth secret key | Must contain letters A-Z or a-z and numbers 0-9 |
| Duo Security | sAMAccountName | Must be a valid user in AD |
| Custom TOTP - Software Token | customtotp secret key | Must contain letters A-Z or a-z and numbers 0-9 |
| Custom TOTP - Hardware token | customtotp hardware serial number | Must contain letters A-Z or a-z and numbers 0-9 |
| customtotp secret key | Must contain letters A-Z or a-z and numbers 0-9 |
- The length of secret keys must be greater than or equal to 16 and less than or equal to 350.
- The length of serial numbers must be greater than or equal to 4 and less than or equal to 250.
Steps for configuring auto-enrollment via a CSV file
- Log in to the ADSelfService Plus web console as an admin.
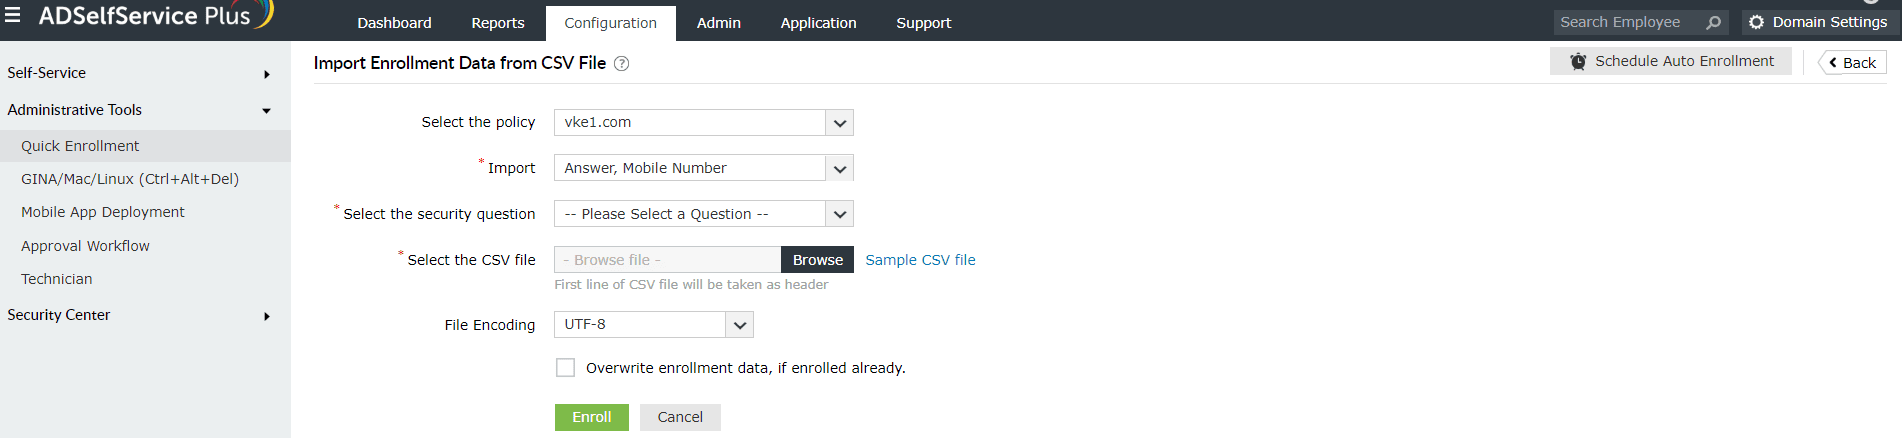
- Navigate to Configuration > Administrative Tools > Quick Enrollment, and click Import Enrollment Data from CSV File.
- Select a policy from the Select Policy drop-down. If you are enrolling local users (users who are not part of AD who have accounts on specific machines), select localusers.domain from the drop-down.
Note:
You can configure OU and group-based policies by going to Configuration > Self-Service > Policy Configuration. Using policies, you can enable forced enrollment for a specific group of domain users.
Ensure that each local user enrolled under localuser.domain has a unique username.
- Select the enrollment data you want to import from the Import drop-down. Please note that each authentication method requires different kinds of enrollment data. Note: If the import data includes Email ID or Mobile Number, ensure that the number of secondary email addresses or secondary mobile numbers does not exceed the allowed limit. You will also need to ensure that the email addresses and mobile numbers are in the permitted formats. Learn more.
- Select the security question if you have chosen to import only the answer.
- Click Choose File, and select the CSV file containing the enrollment data.
- Select the encoding standard supported by the CSV file from the File Encoding drop-down.
- Check the Overwrite enrollment data if enrolled already box if you want to overwrite users’ enrollment data.
- Click Enroll.