Configuring Log Processors
Last updated on:
In this page
Overview
This page covers the prerequisites for deploying Log Processors, how to configure them, and the steps to add both primary and additional Log Processors.
Pre-requisites
Before adding a Log Processor, ensure the following requirements are met:
- At least one Log Processor node of the same version is available and running.
NOTE
If the primary server has multiple network interfaces, follow these steps to select the interface for cluster communication.
- In your account, navigate to Settings tab.
- Under System Settings, select Connection Settings.

Figure 1: Navigating to connection settings - Click Advanced, and in the Bind Address dropdown select the appropriate network interface (IP address) that the new Log Processor will use to connect to the primary server.
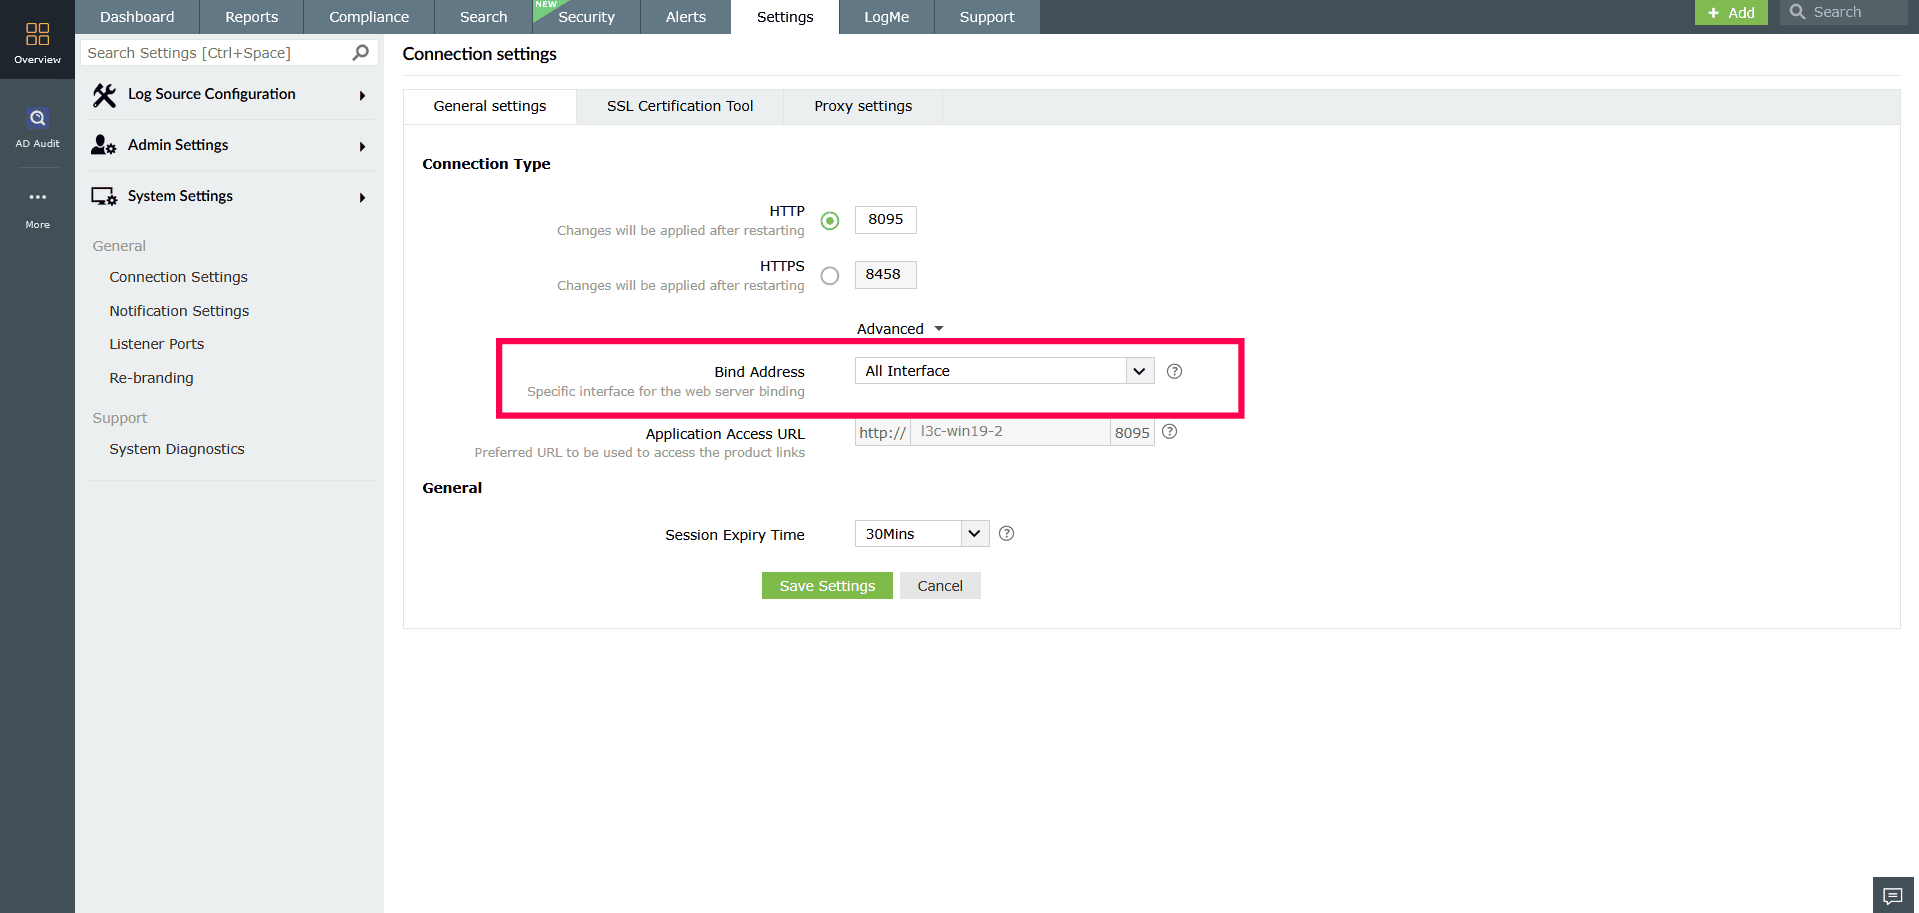
Figure 2: Configuring advanced settings - Click Save Settings.
- Ensure connectivity between nodes is present and each node is resolvable by its hostname.
- A common database is configured.
- Existing archive ZIP files are moved from local storage to the newly configured shared path.
After creating a Log Processor cluster, ensure the following requirements are met:
- To start a Log Processor in a cluster, the minimum number of Processors required to bring the cluster online must be running. The required count is calculated as: Minimum Processors = (Total number of Processors / 2) + 1
NOTE For example, when there are three Log Processors in the deployment, a minimum of two must be running for the cluster to start.
- Available disk space must be greater than 15 GB.
Configuring pre-requisites
- Log in to your account.
- Go to the Settings tab.
- Under Admin Settings, navigate to Enterprise Essentials and select Log Processors.
- Click Add Log Processor.

Figure 3: Adding a Log Processor - In the setup window that appears, click Proceed to begin the configuration.
NOTE
- Review all the steps shown in the pop-up window carefully and ensure they are completed before clicking Proceed.
- Verify that the Server Name, port, and Administrator credentials of the Log360 instance are entered accurately, as these details are mandatory for integrating the log processor with the main processor cluster.
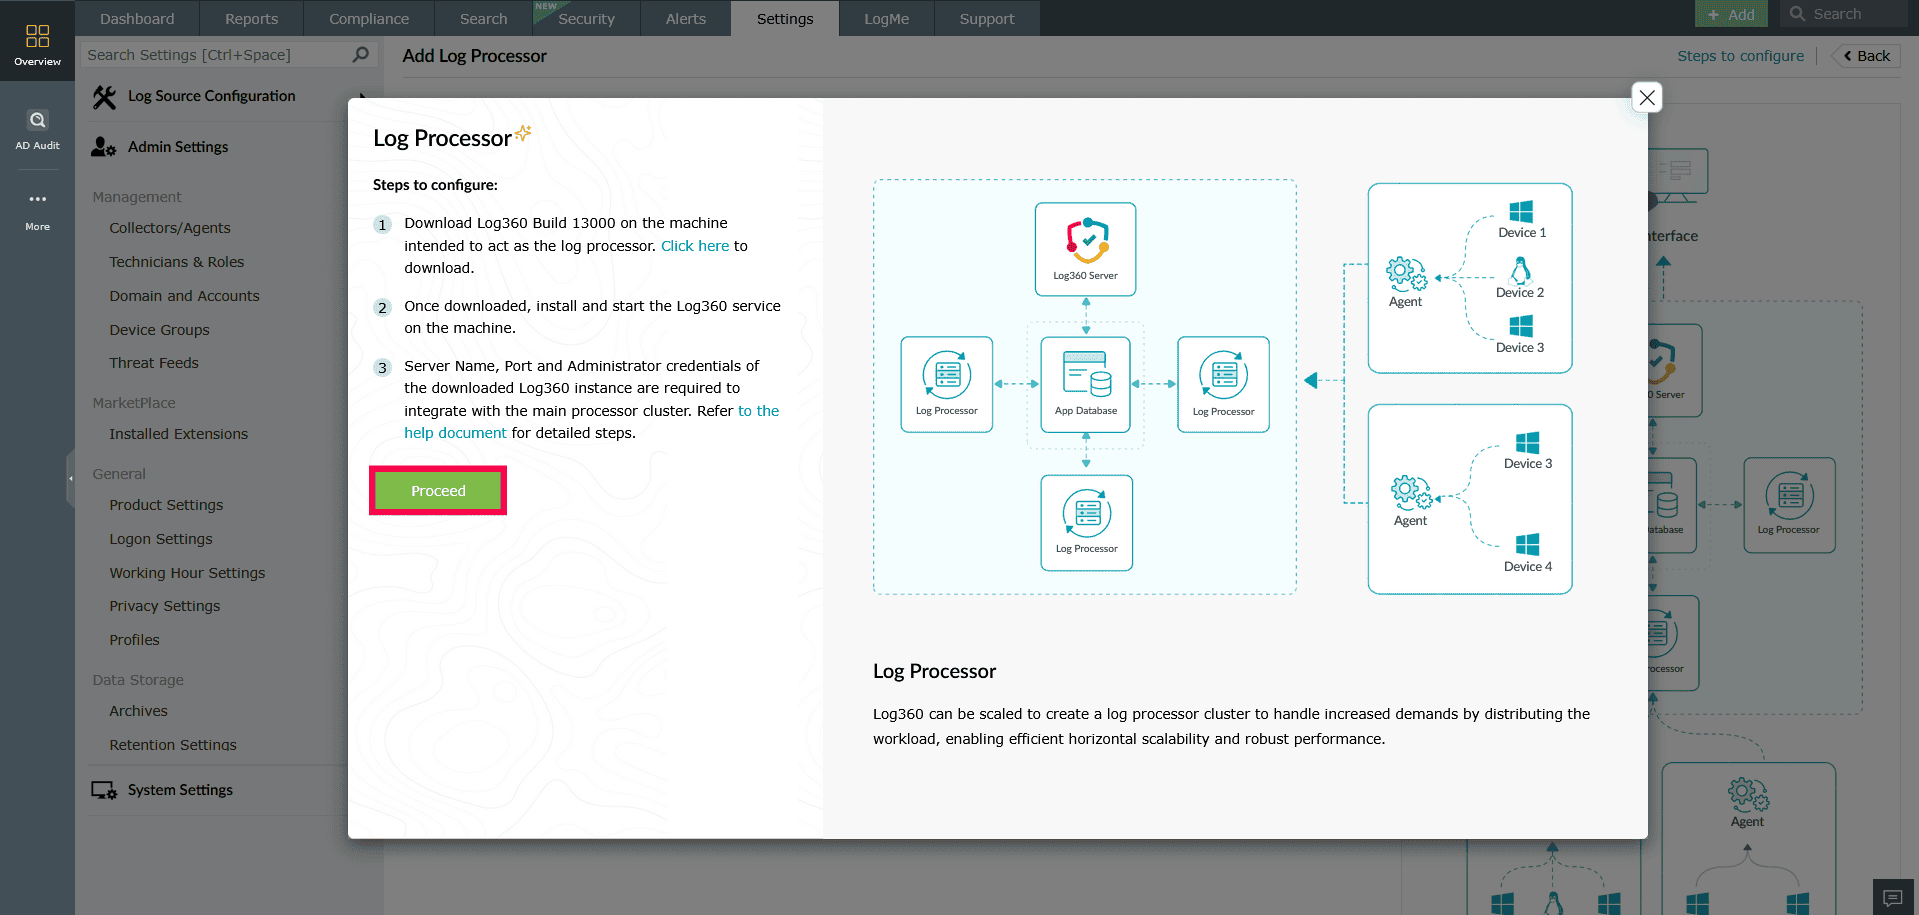
Figure 4: Configuring a Log Processor To proceed with adding a Log Processor, the following prerequisites must be configured:
- A common database must be configured.
NOTE Refer to this help document to configure the common database.
- A shared storage location must be set up for communication across processors.
- Click Configure next to the prerequisite to open the shared storage setup window.
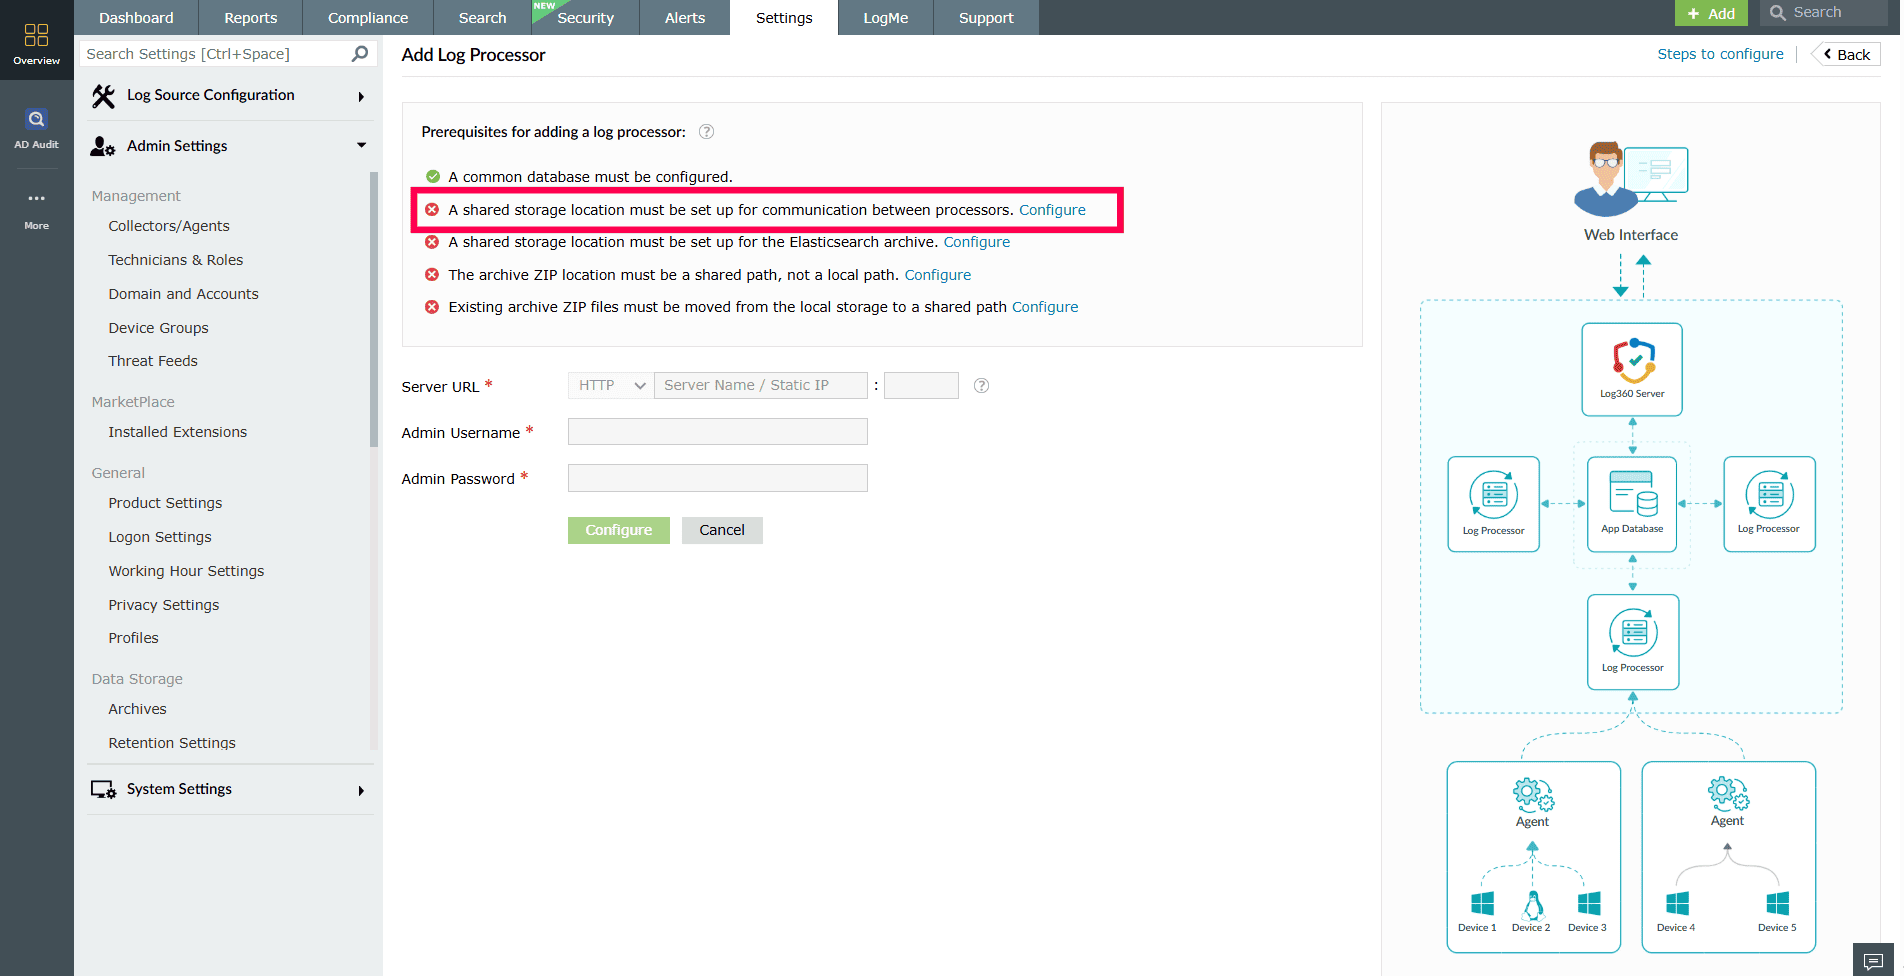
Figure 5: Configuring shared storage location - Enter the shared storage location that is accessible and available to all Log Processors to prevent disruptions in data processing.

Figure 6: Configuring shared storage location - Enter the username and password.
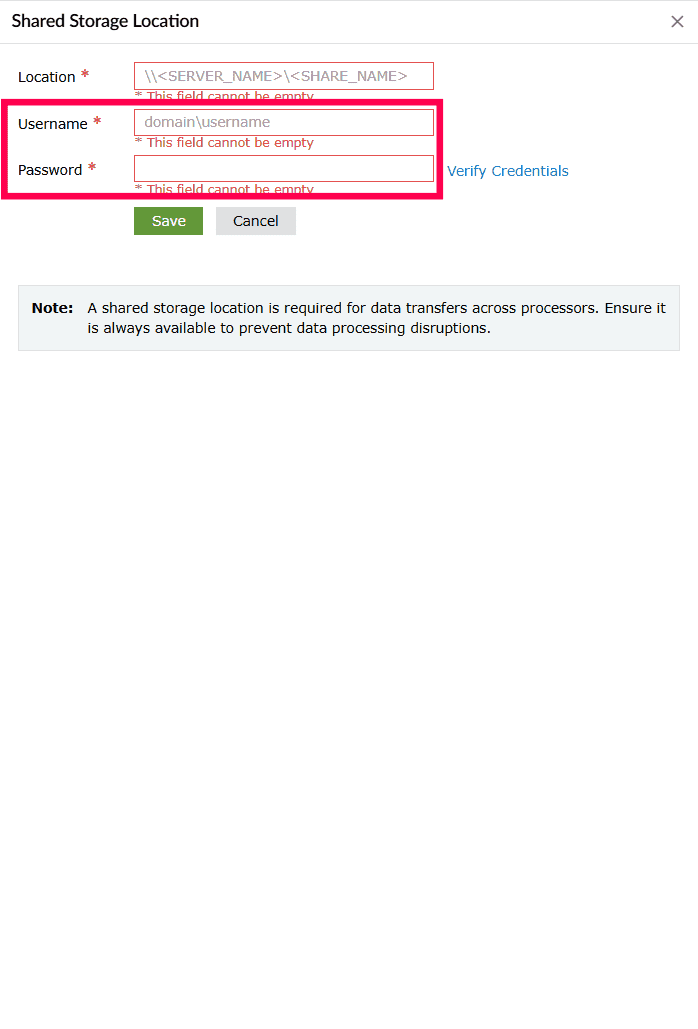
Figure 7: Configuring shared storage location - Click Verify Credentials to validate access.

Figure 8: Configuring shared storage location - Once verified, click Save to complete the configuration.

Figure 9: Configuring shared storage location - After configuration, select Update to modify the shared storage path or credentials.

Figure 10: Updating shared storage path and credentials - Select Update to save the changes.

Figure 11: Updating shared storage path and credentials
- Click Configure next to the prerequisite to open the shared storage setup window.
- A shared storage location must be set up for the Elasticsearch archive.
NOTE The product uses the configured shared storage path to store data that exceeds the Elasticsearch retention period. Ensure the path is accessible to all Log Processors. If the storage is unavailable, it can affect archiving and log retrieval.
For Windows systems:
- Click Configure next to the prerequisite to open the Elasticsearch Archive Data Path window.

Figure 12: Configuring a shared storage location for Elasticsearch Archive - Select the checkbox if existing data has been manually moved to the shared location.
NOTE If you have existing data under <Log360 _HOME >\ES\archive, move that data to the same shared path before configuring. If there's no existing data, you can directly enter a new shared location.
- Enter the location path to the shared archive directory.

Figure 13: Configuring a shared storage location for Elasticsearch Archive - Enter the Username and Password.
- Click Verify Credentials to validate access
- Click Save to complete the configuration.
- After completing the configuration, click Update to modify the shared storage path for the Elasticsearch archive, if needed.
For Linux systems:
- Click Configure next to the prerequisite to open the Elasticsearch Archive Data Path window.
- Select the checkbox if existing data has been manually moved to the shared location.
NOTE If you have existing data under
\ES\archive, move that data to the same shared path before configuring. If there's no existing data, you can directly enter a new shared location. - Enter the location path to the shared archive directory.
- Select the Auth Type from the dropdown menu: NFS or SMB.
- In case of SMB, enter the Username and Password required to access the shared storage.
NOTE In case of NFS, credentials are not required.
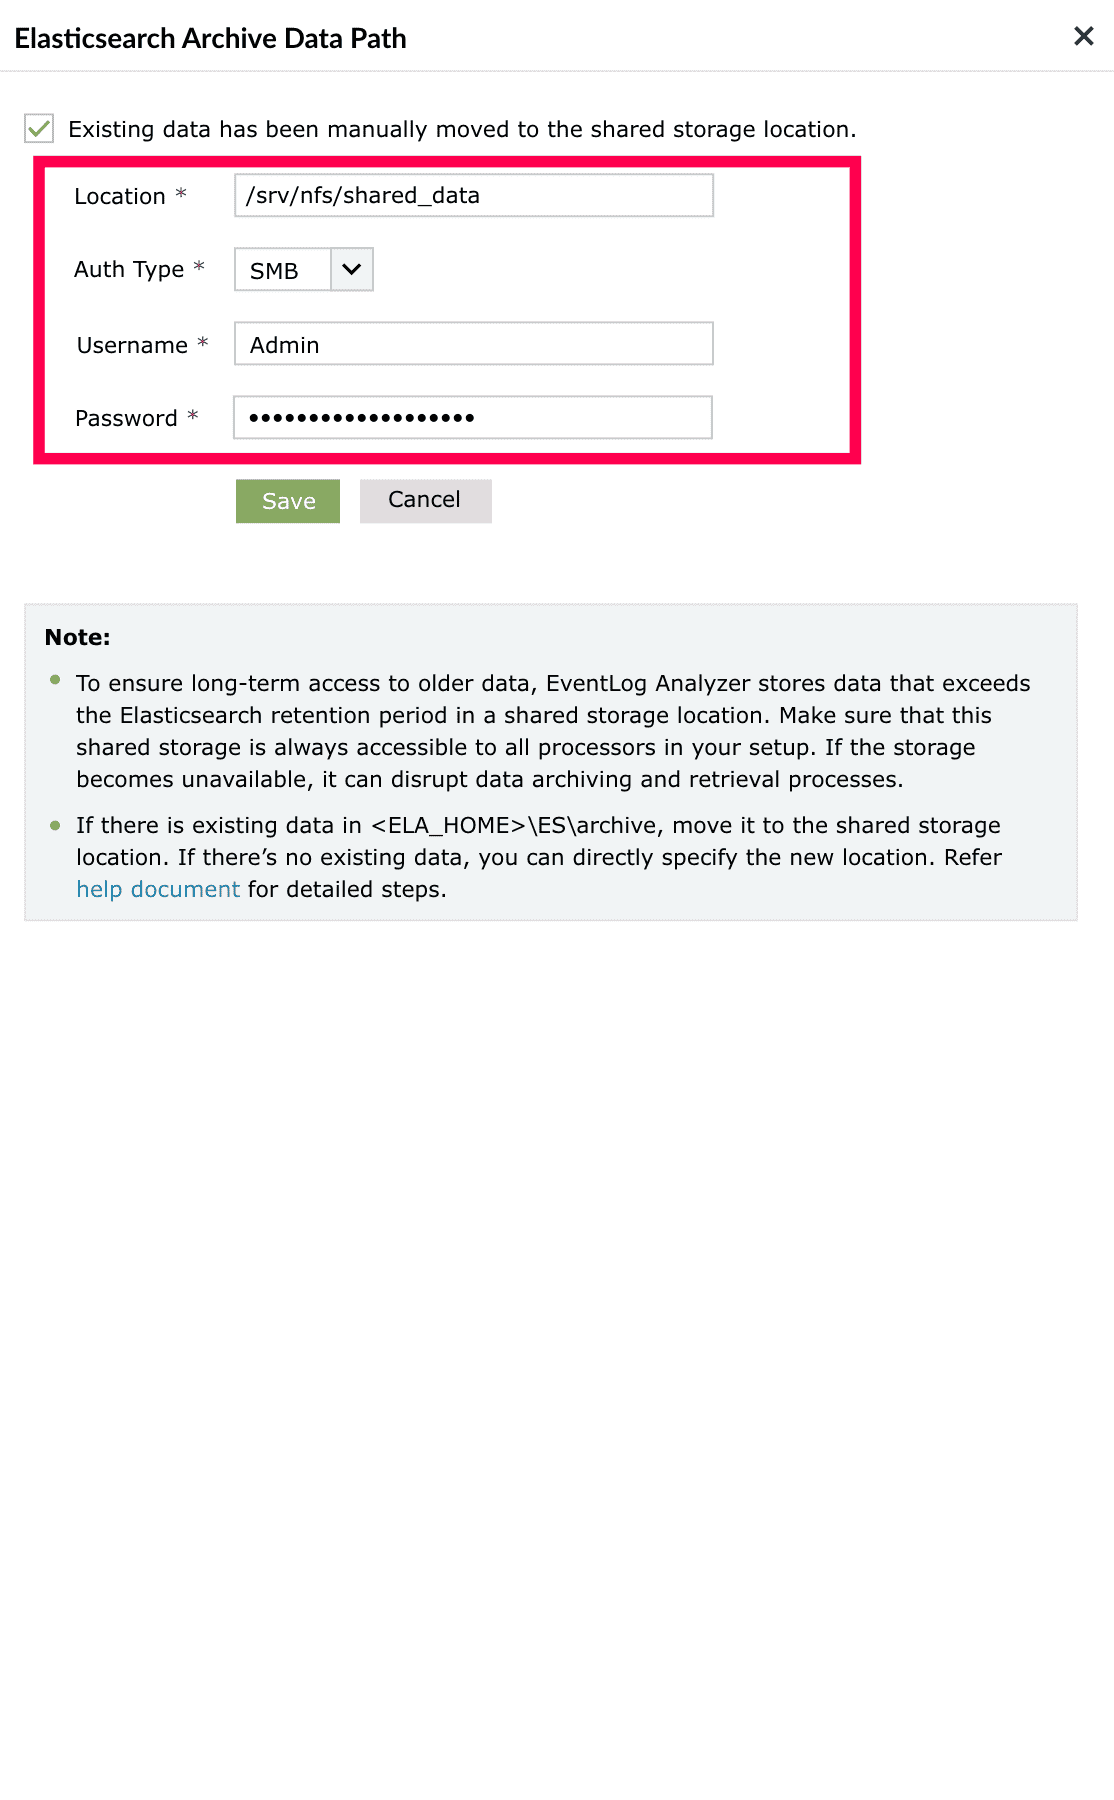
Figure 14: Configuring a shared storage location for Elasticsearch Archive - Click Save to complete the configuration.
- After completing the configuration, click Update to modify the shared storage path for the Elasticsearch archive, if needed.
- Click Configure next to the prerequisite to open the Elasticsearch Archive Data Path window.
- The archive ZIP location must be set to a shared path, not a local one.
NOTE If the archive ZIP location is already configured to a shared path or S3, you can skip the steps below. If not, follow the steps to update the configuration.
- Click Configure next to the prerequisite to open the Archive Settings window.
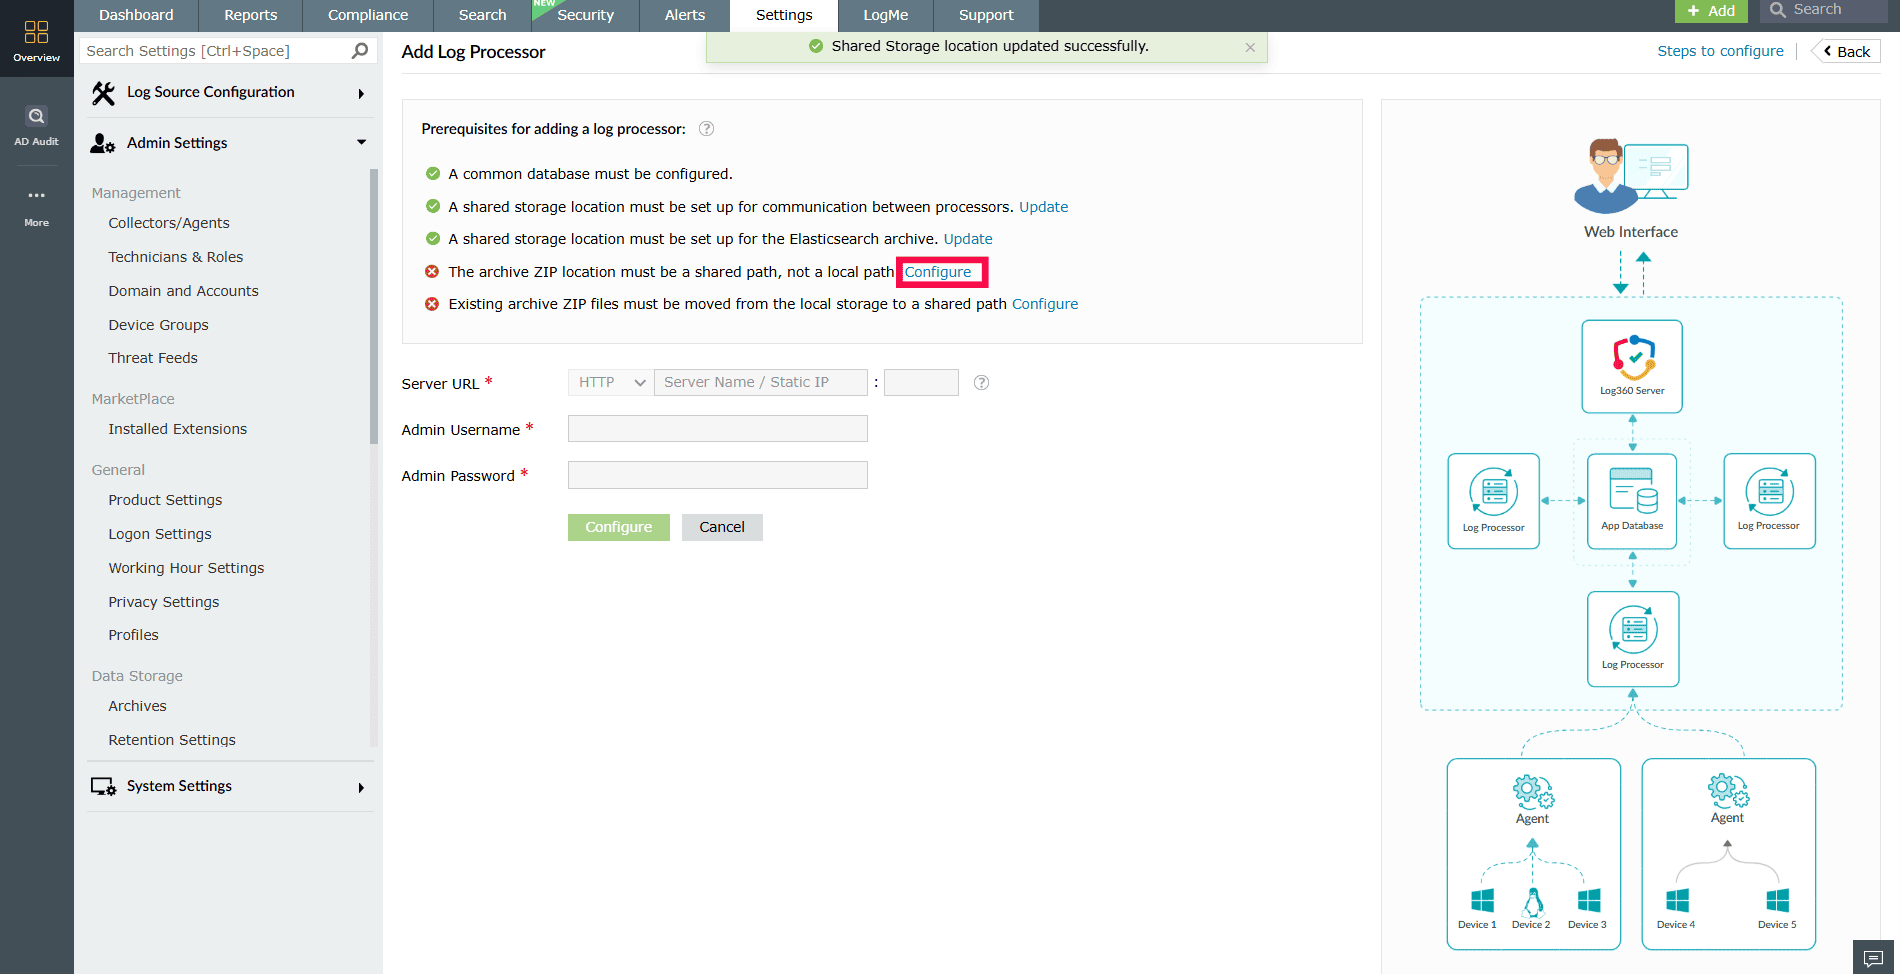
Figure 15: Configuring Archive Settings - Under Archive ZIP Location, choose Shared, and enter the shared network path.
NOTE For each archive policy, the archive ZIP location must be set to a shared path or S3.
- Click Save to apply all configured settings.
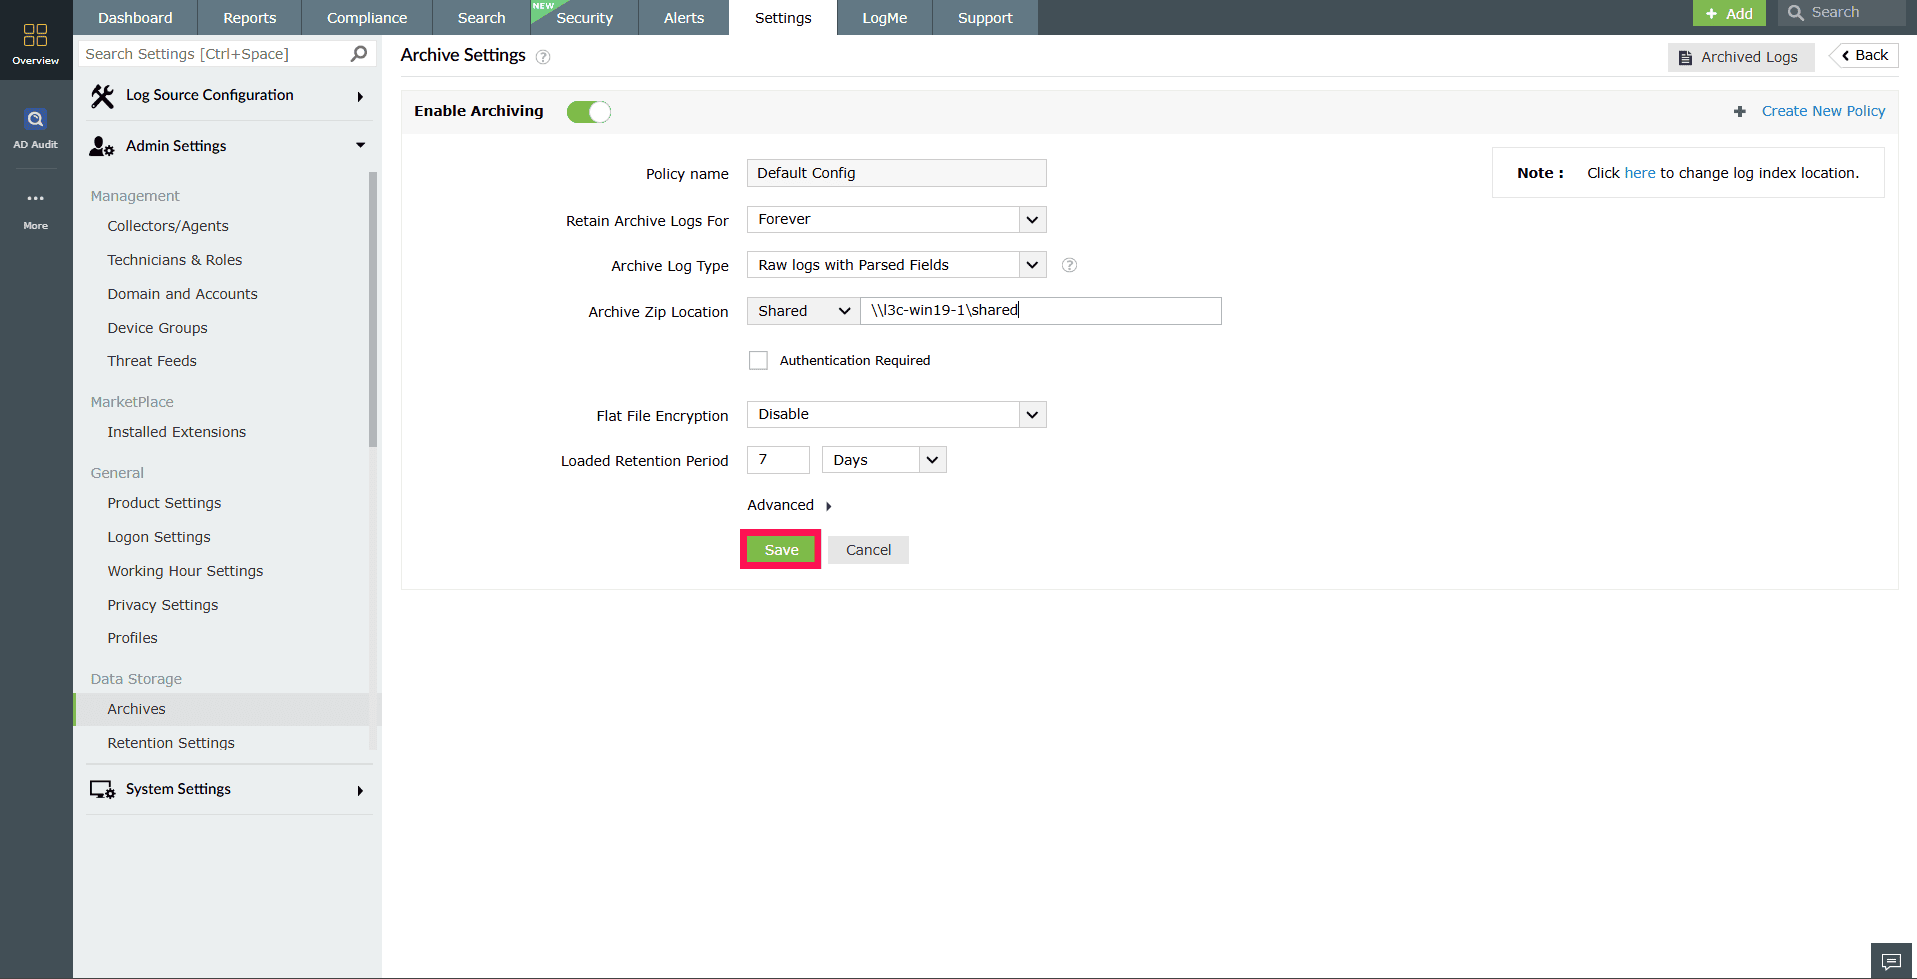
Figure 16: Configuring Archive Settings - After completing the configuration, click Update to modify the shared storage path for the archive ZIP, if needed.
NOTE If local storage was previously used for archiving, any existing archive ZIP files must be moved manually to the configured shared path.
- Click Configure next to the prerequisite to open the Archive Settings window.
- Any existing archive ZIP files must be moved from local storage to the shared path.
- Click Configure next to the prerequisite.
- In the Archive Data - Update Paths window, select the checkbox Existing archives have been manually moved to the shared storage location only if the archive files have been manually transferred to the shared path.

Figure 17: Updating the shared storage path for archive ZIP files - In the Old archive location dropdown, select the previous archive path.
- In the Archives moved location field, enter the shared storage path where the archive files were moved.
NOTE The number of file entries is shown beside the old and new archive paths. Ensure they match to confirm a successful migration.
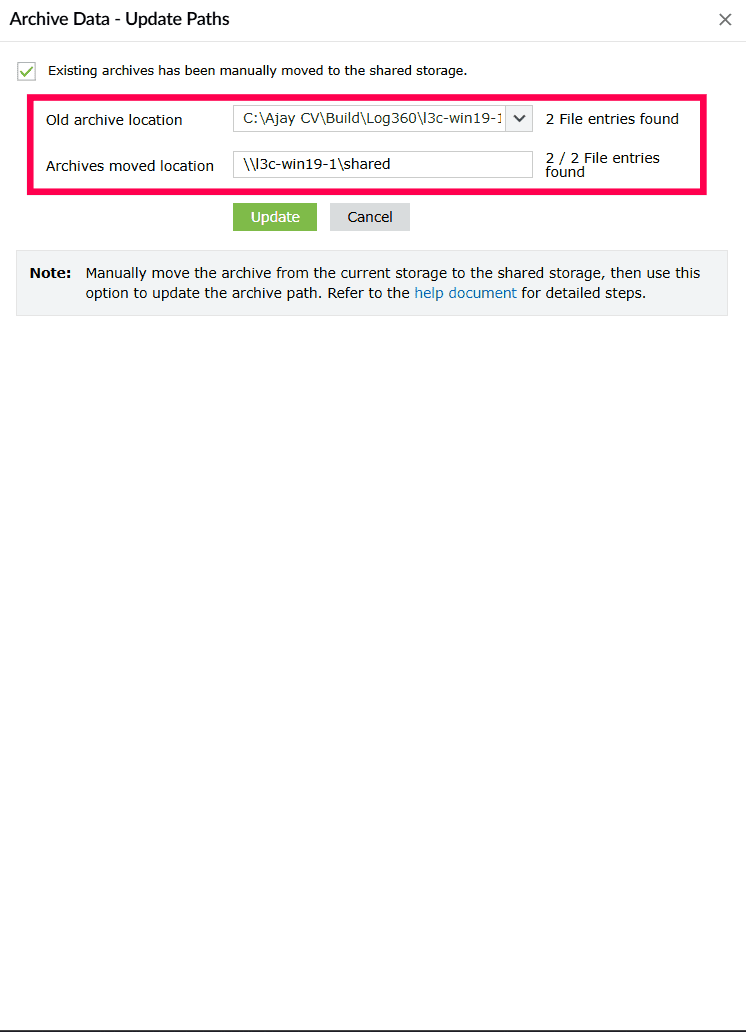
Figure 18: Updating the shared storage path for archive ZIP files - Click Update to apply the changes.
- After completing the configuration, click Update to modify the shared storage path for existing ZIP files, if needed.
Adding a primary processor
Once the prerequisites are configured, follow the steps below to add a new Log Processor:
- In the Add Log Processor window, fill in the following:
- Server URL: Choose the protocol (HTTP/HTTPS), enter the server name, and port.
- Enter the Admin Username and Admin Password for the Log Processor.
- Click Configure to complete the setup.
NOTE The primary Log Processor, usually the first one added cannot be deleted.
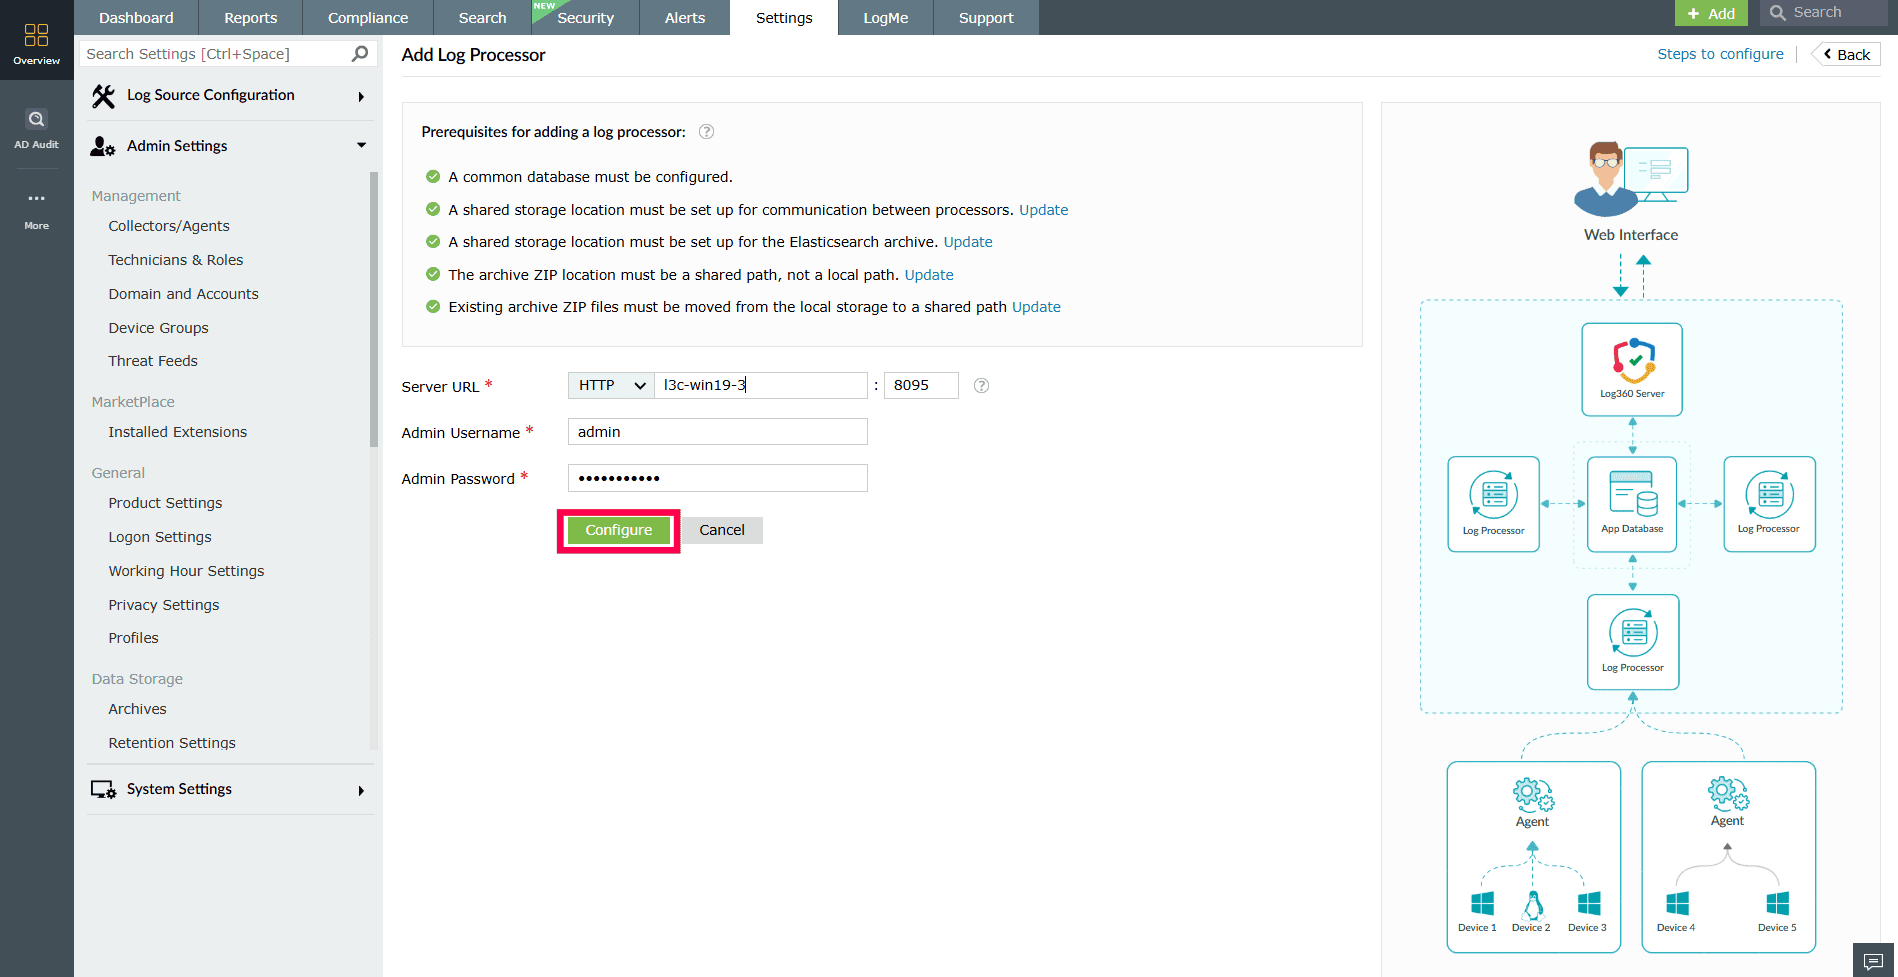
Figure 19: Adding a Log Processor NOTE The Log Processor server will restart automatically and be added to the Log Processor cluster. Once restarted, the Log Processor will be fully configured and ready for log processing.
Adding additional Log Processors
- In your account, go to the Settings tab and select Admin.
- Navigate to Enterprise Essentials and select Log Processor.
- In the top-right corner, click Add Log Processor.
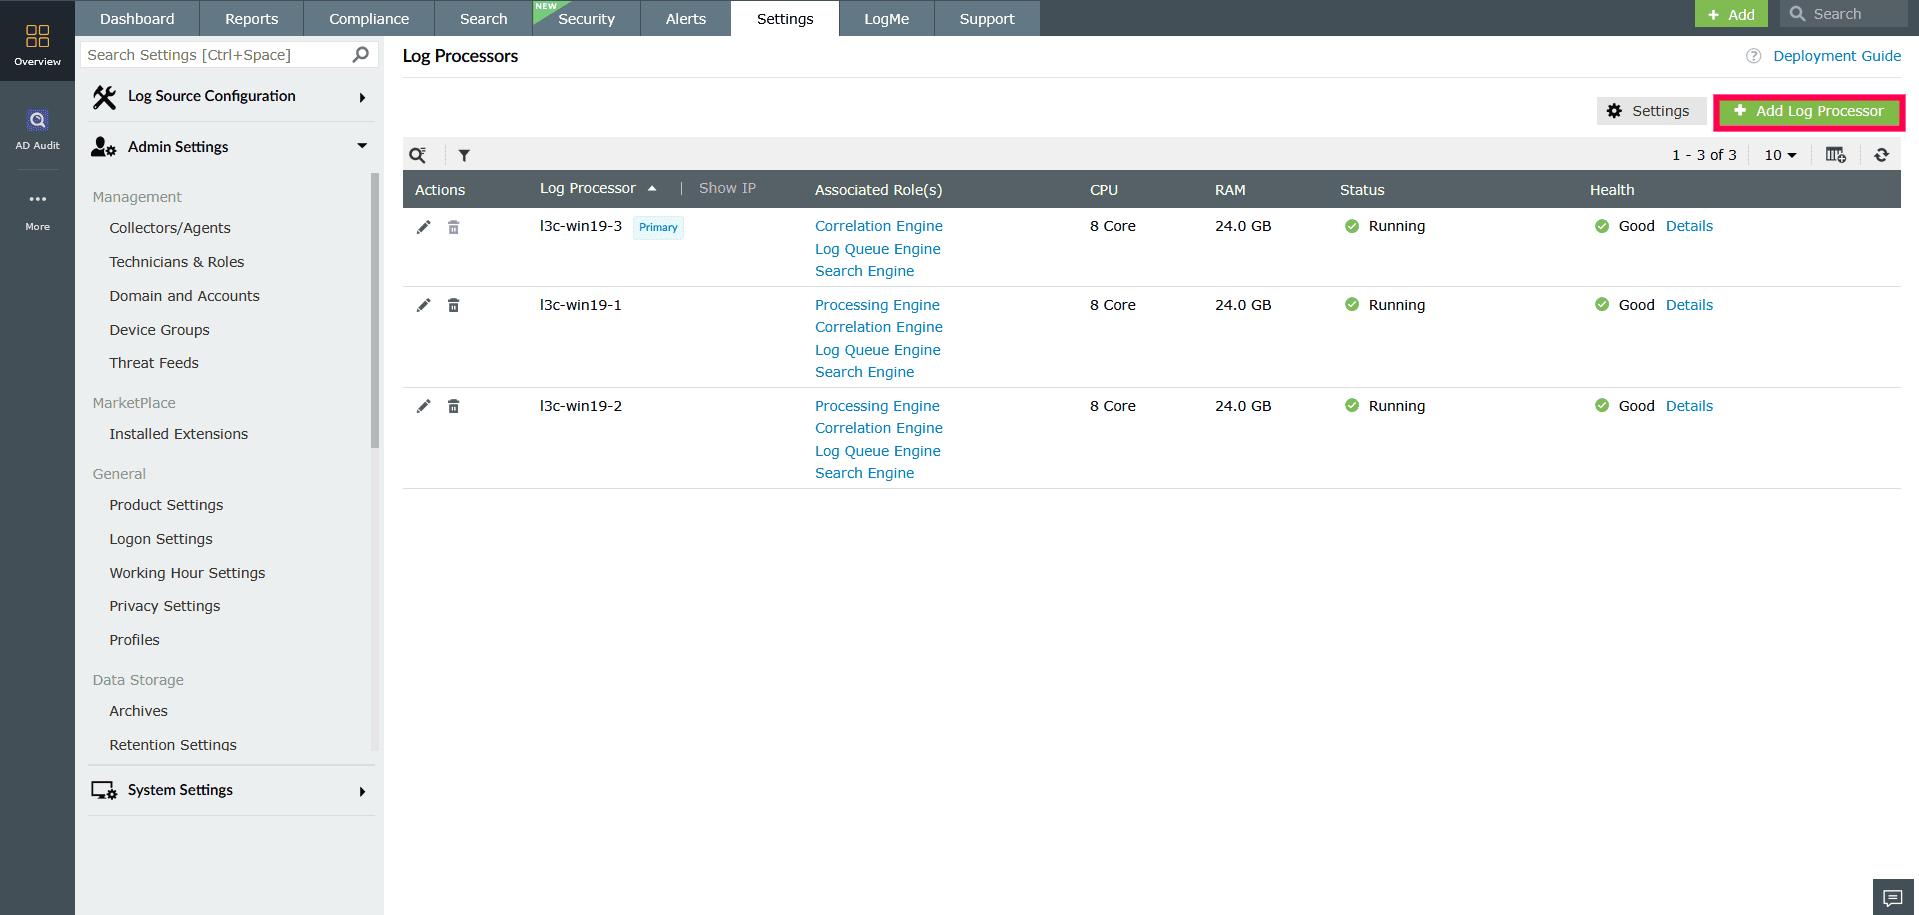
Figure 20: Adding additional Log Processors - In the Add Log Processor window, fill in the following:
- Server URL: Choose the protocol (HTTP/HTTPS), enter the server name, and port.
- Enter the Admin Username and Admin Password for the Log Processor.
- Click the Advanced Settings dropdown for additional configuration options.
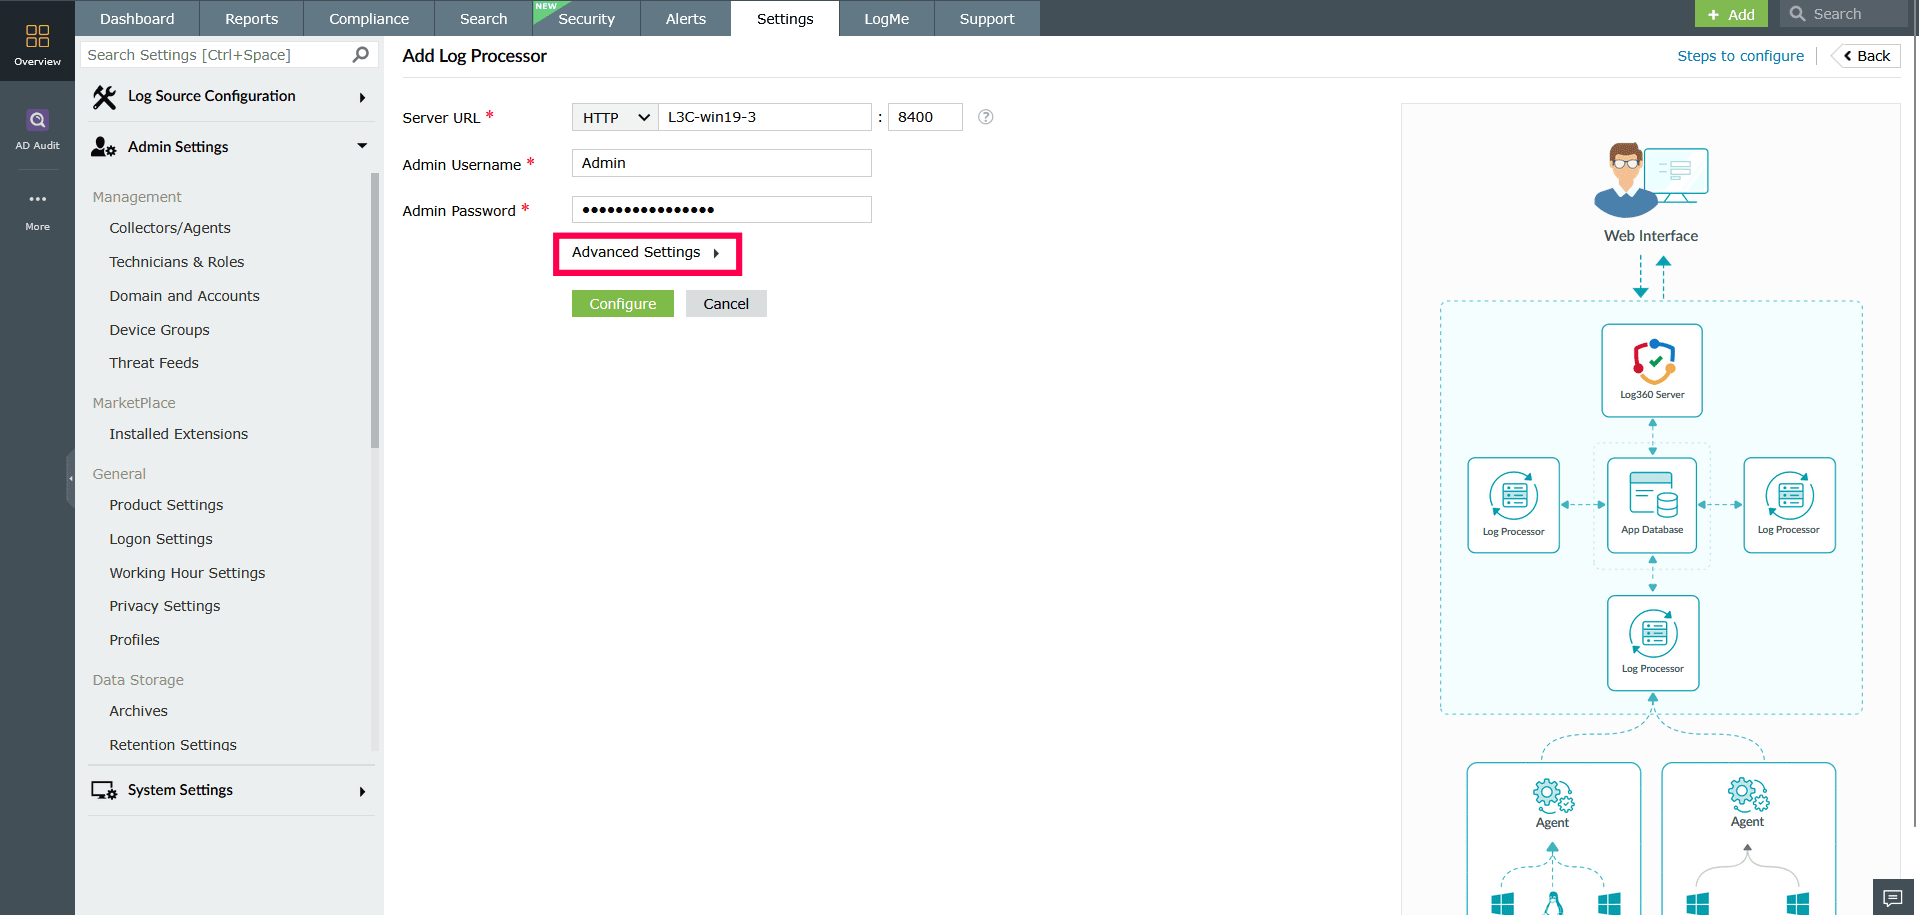
Figure 21: Configuring Advanced Settings NOTE When adding a Log Processor, you can only enable or disable existing roles using the Advanced Settings. Refer to this section to add and manage custom roles.
- In the Associated Roles field, use the drop-down to select the roles you want this Log Processor to handle.
- Default roles include: Processing Engine, Correlation Engine, and Kafka Engine, and more.
- Custom roles include: Log Forwarding, Alerts, and more.
NOTE Only the selected roles will be assigned to the Log Processor.
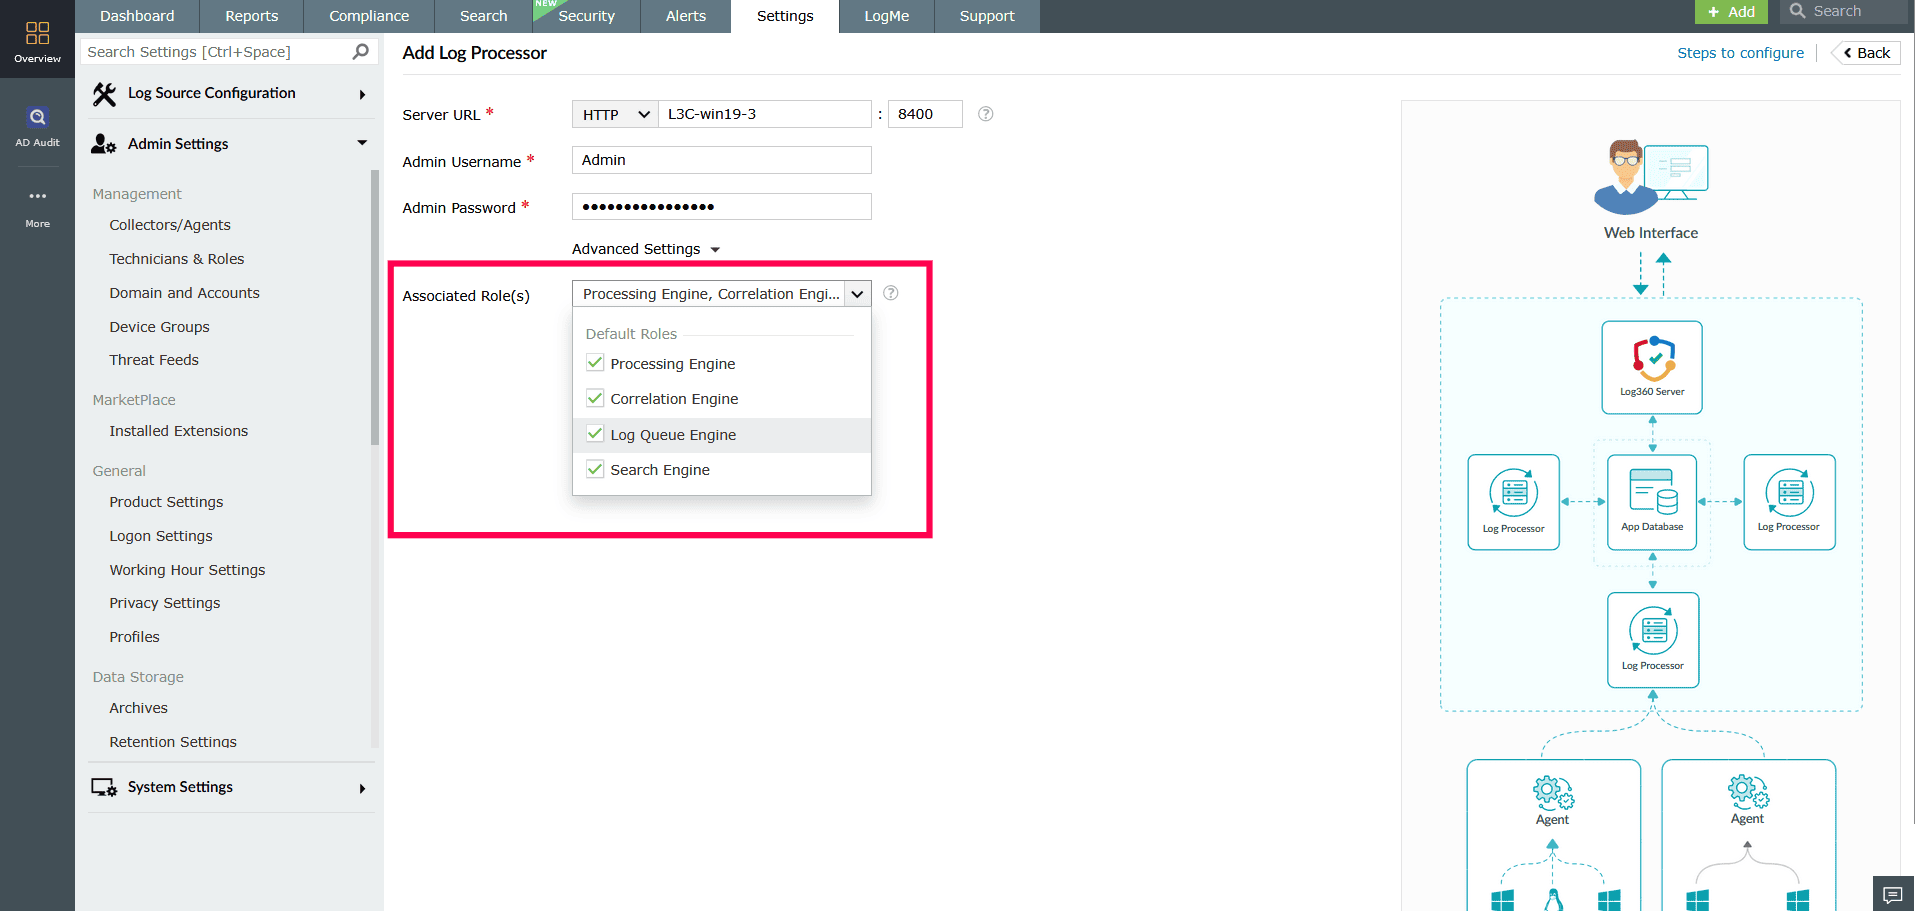
Figure 22: Assigning roles via Advanced Settings - To disable a role, uncheck the box next to the role you wish to disable.

Figure 23: Assigning roles via Advanced Settings - In the confirmation pop-up window that appears, click Disable to confirm.
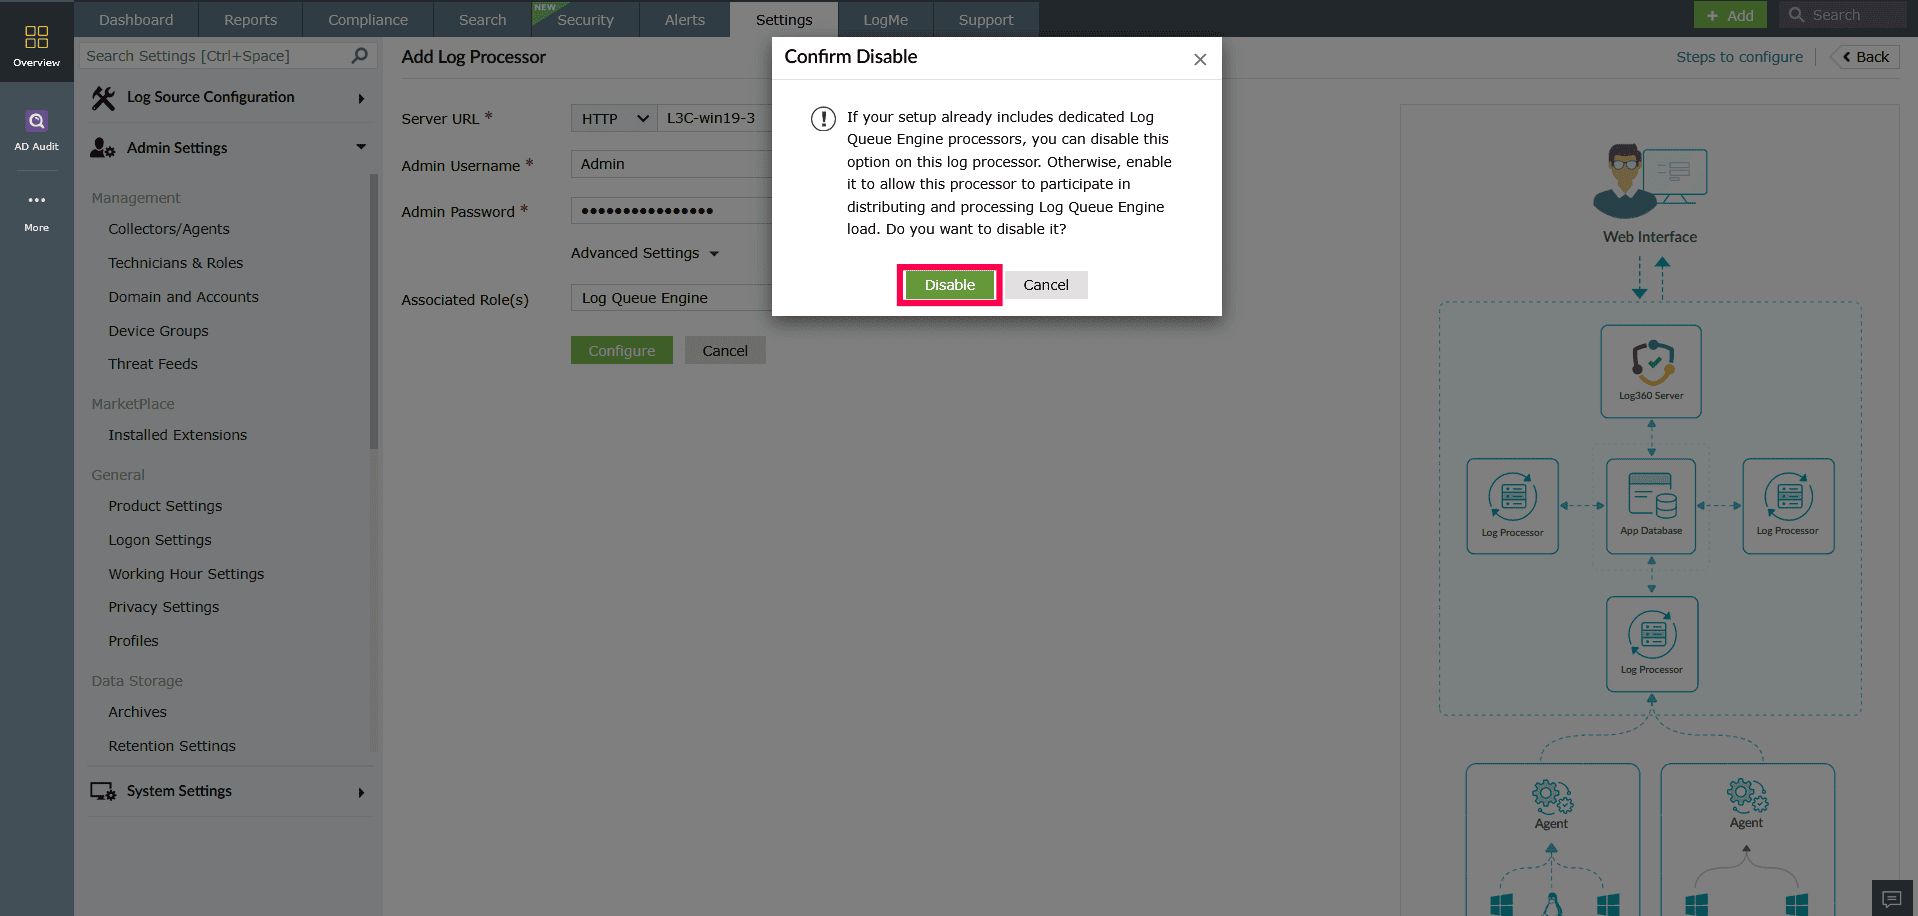
Figure 24: Assigning roles via Advanced Settings - Click Configure to add the Log Processor.
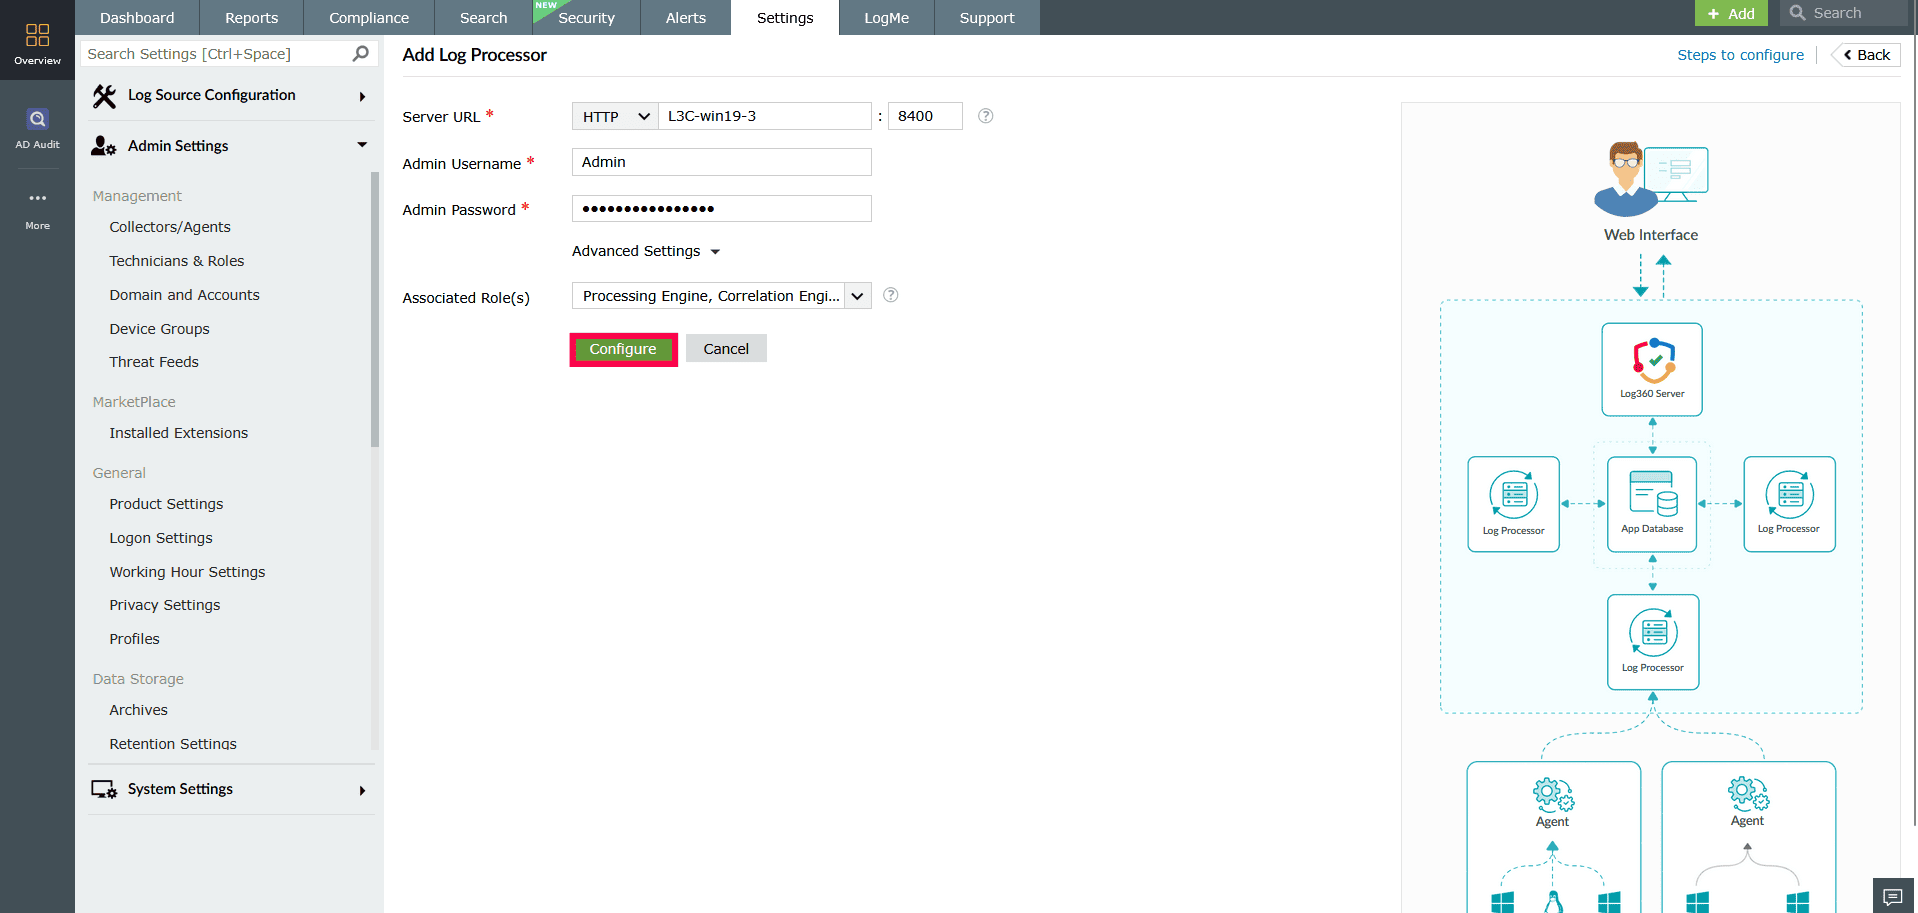
Figure 25: Configuring the Log Processors
Read also:
This document explained how to configure Log Processors. For a complete overview of architecture and management, refer to the following articles: