Custom Output Processor for Custom Monitors
Custom Output Processor enables users to define their own processing logic for handling responses from a device. Instead of being limited to predefined functional expressions, users can write custom scripts to process the collected data according to their specific requirements. Currently, this feature is supported only for Custom SNMP monitors.
- How to add a new custom functional expression?
- Script configuration
- Command line examples
- Script body
- Expected script output format
- How the custom output processor works?
How to add a new Custom Output Processor?
Follow the steps given below to add a new Custom Output Processor,
- Go to Settings → Monitoring → Performance Monitors and click Add Monitor.
- Under the SNMP tab, select the required device name and SNMP OID.
- From the Functional Expression dropdown, scroll down to the end of the list, and select Add Custom Output Processor.
- In the Add Custom Output Processor window, enter the Expression Name and Description.
- In Script details, enter the Command line. OpManager automatically generates a predefined script based on the file extension. You can modify the script or add your own logic, ensuring that it returns output in the expected output format. To learn more about script configuration, click here.
- Click Test Script to validate the script. The OID will be queried, processed using the script, and the output will be displayed.
- Click Save.
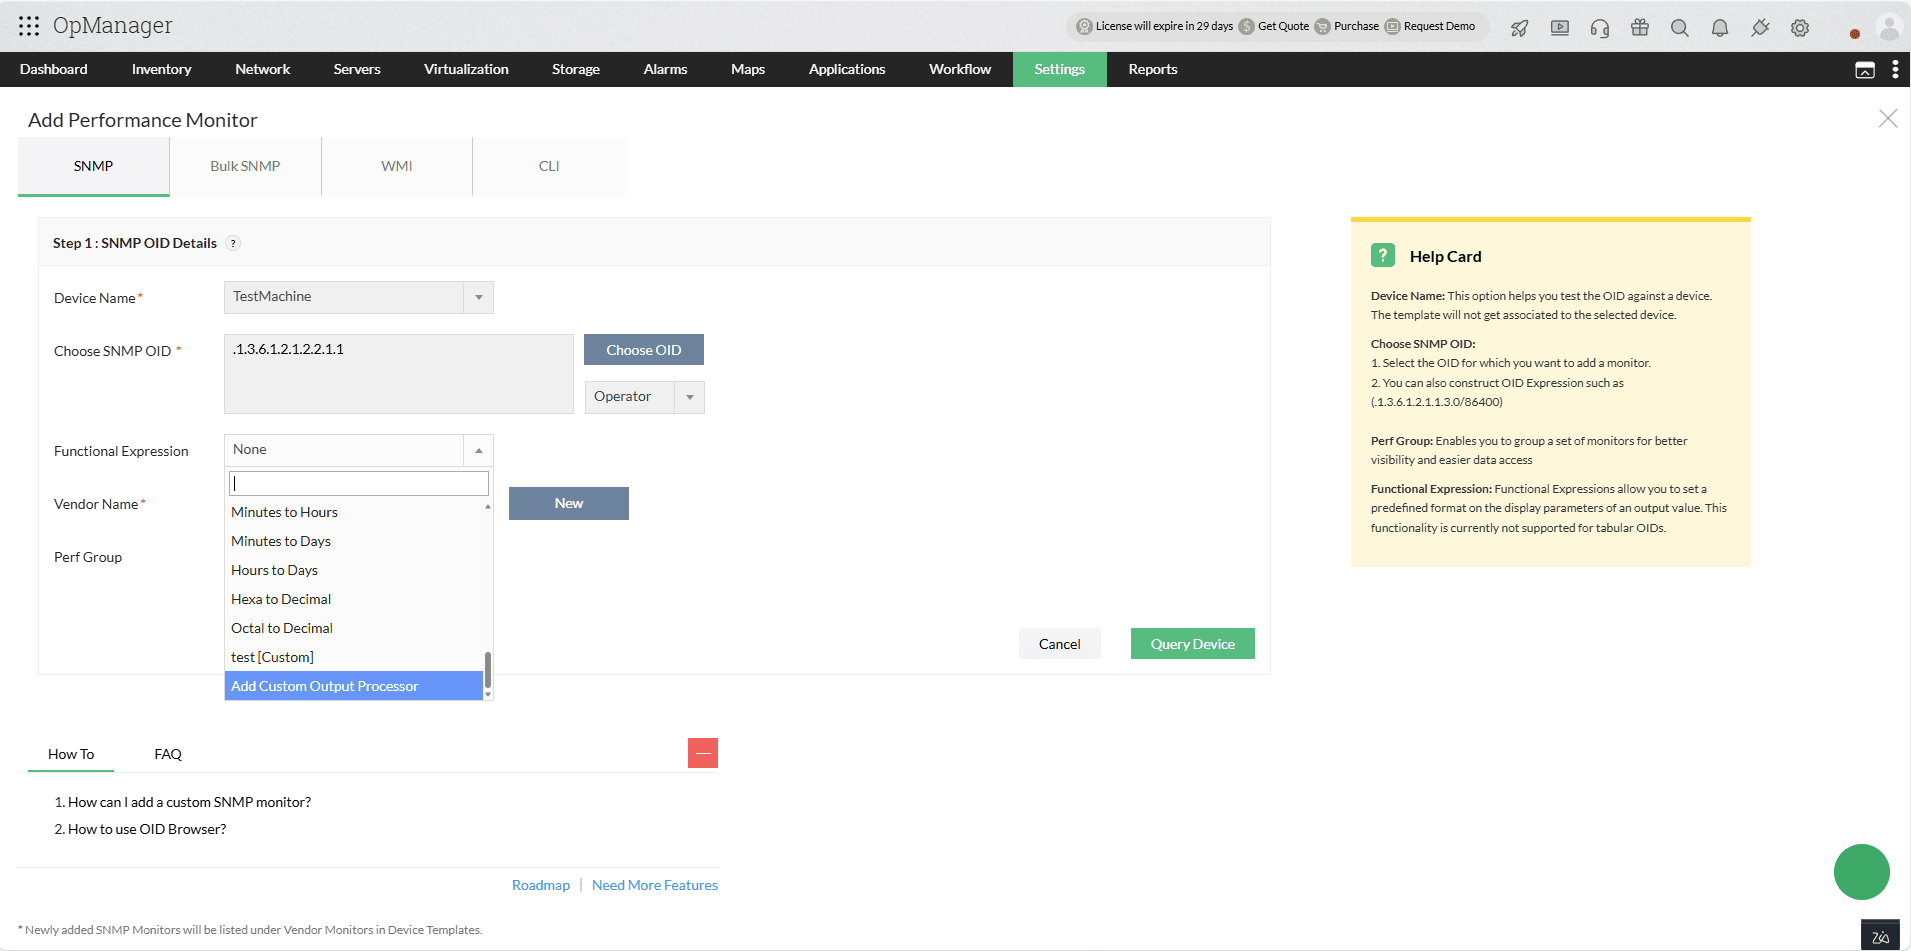
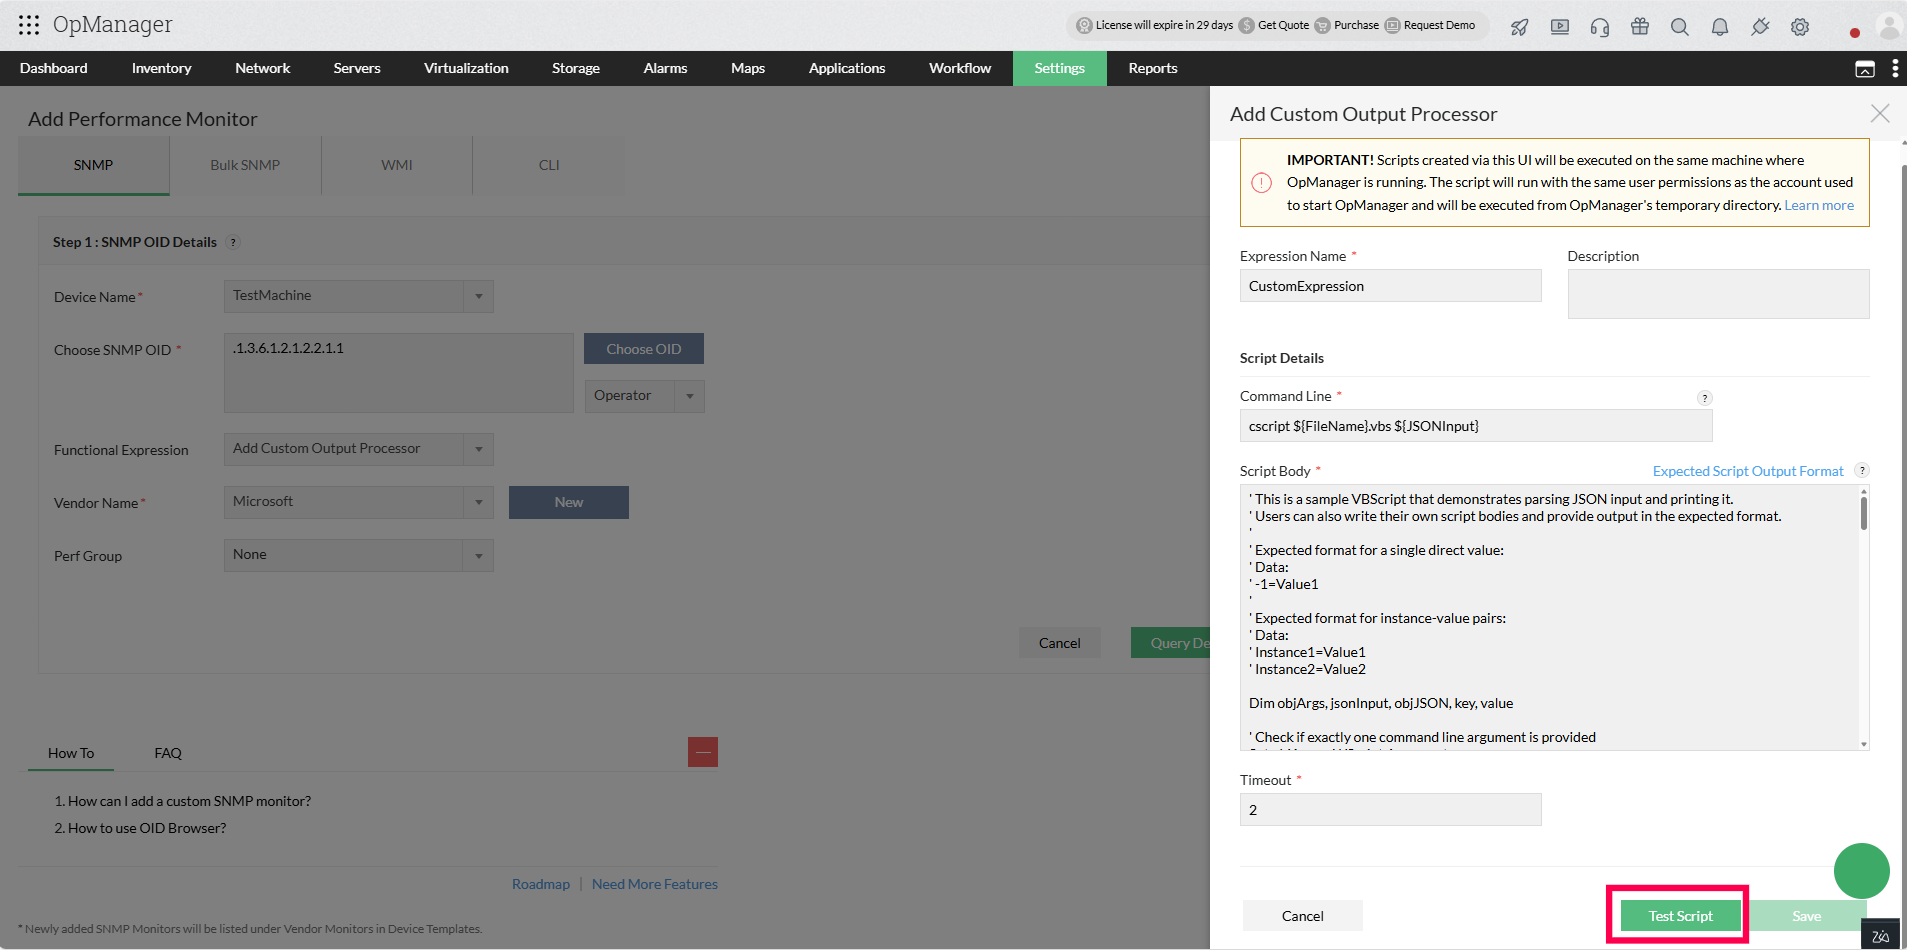
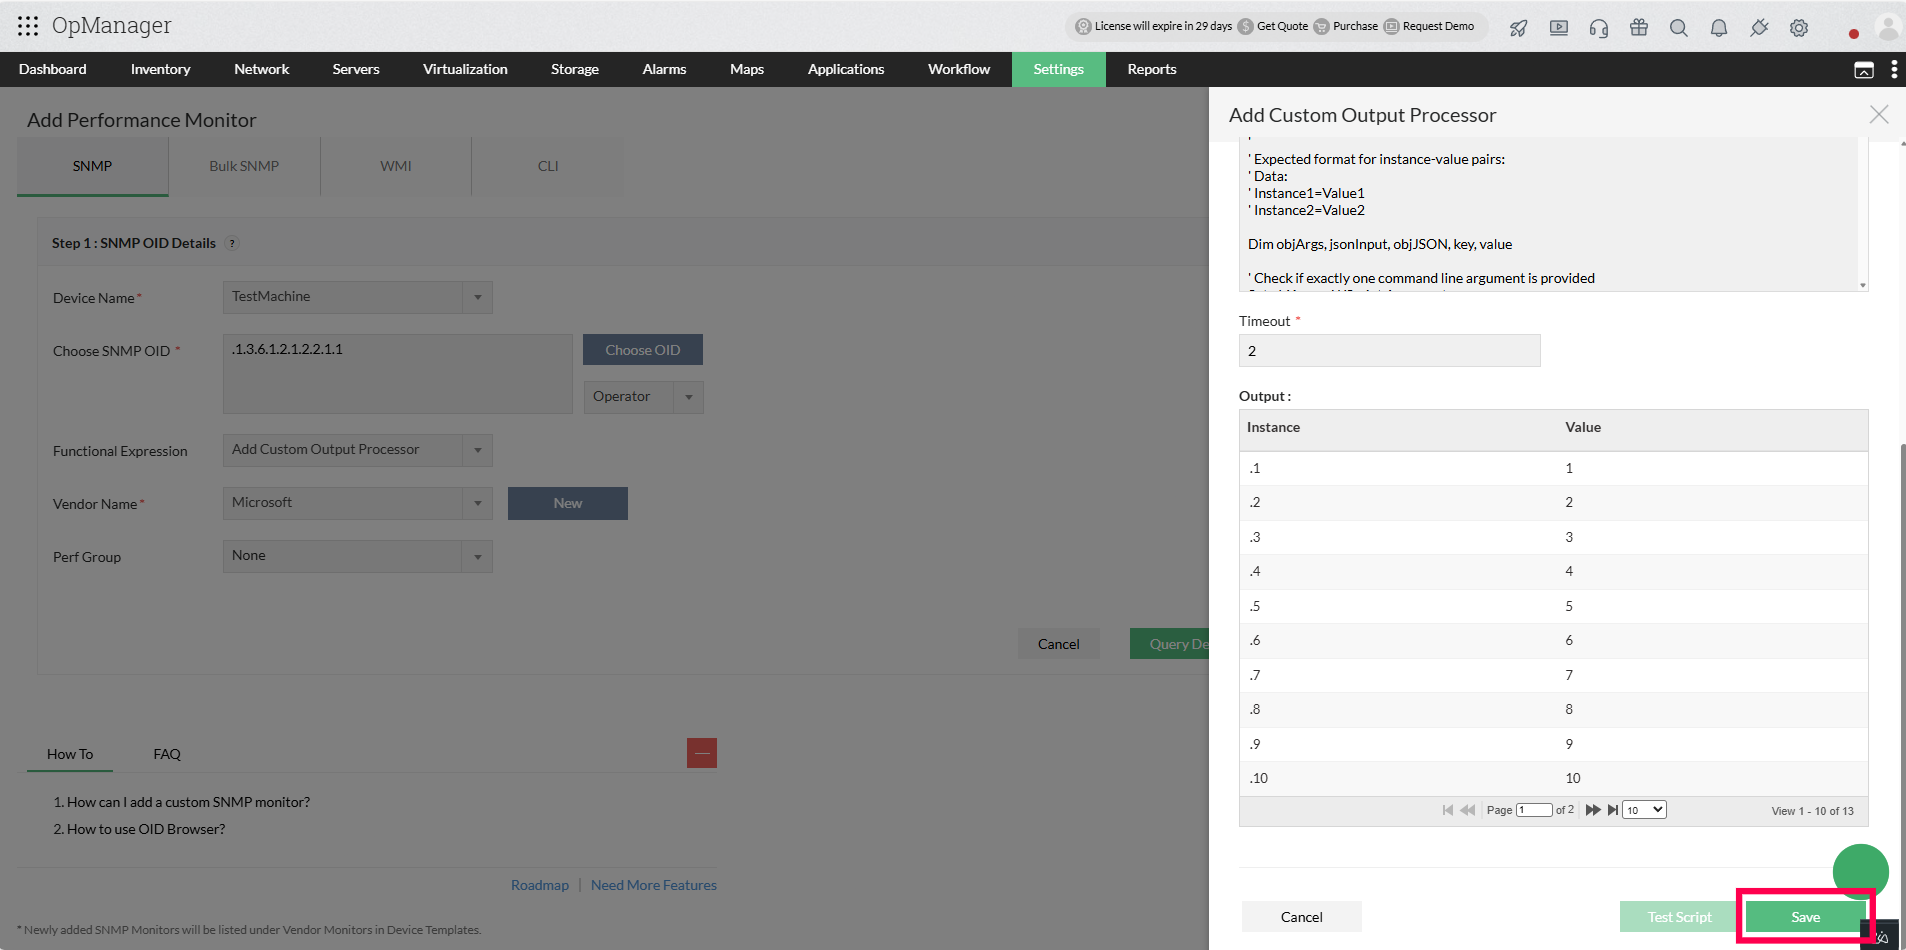
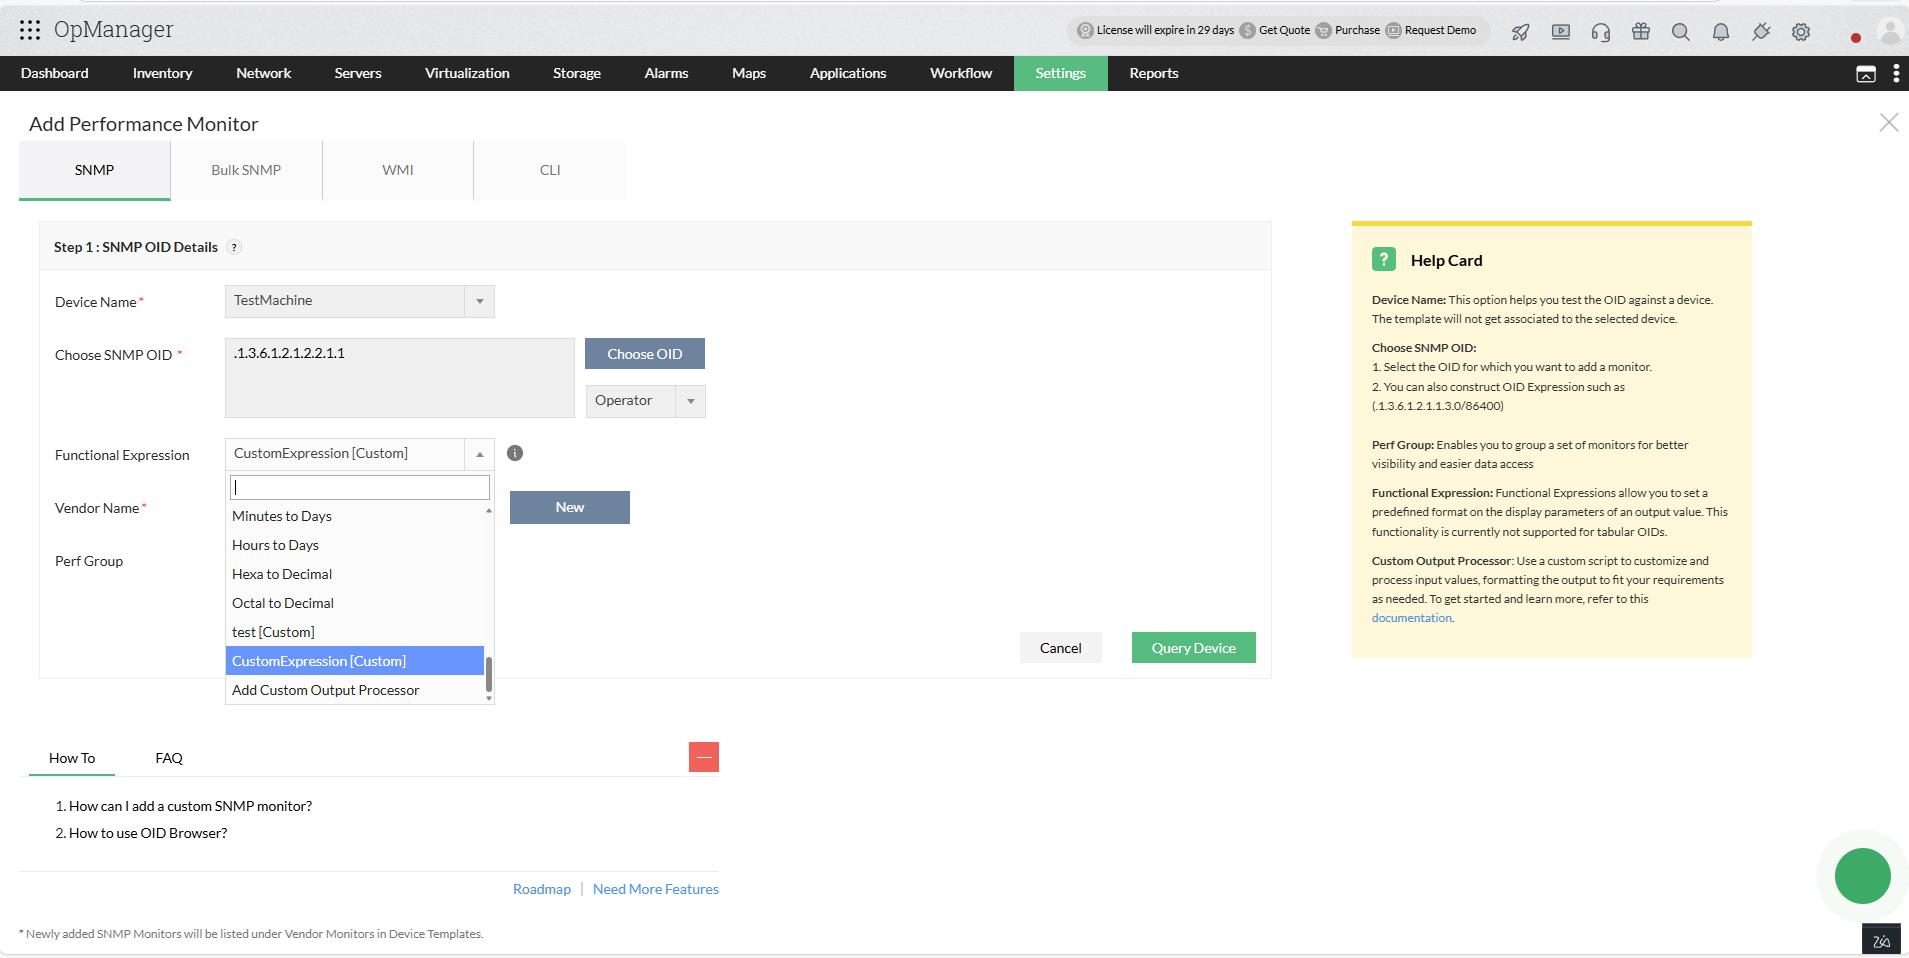
Once saved, the newly created Custom Output Processor will be available under Functional Expression dropdown. Users can select it while creating a custom SNMP monitor to process data using the script.
Script Configuration
Command Line Structure
The script command line consists of two key components:
1. Filename & Extension
Since the script is created at runtime, the filename must be specified in the command line using the dynamic variable ${FileName} (with dot and appropriate extension).
2. JSON Input
The data collected from the device will be passed to the script in JSON format using the dynamic variable ${JSONInput}. To ensure all characters are preserved and the data is transmitted safely, the JSON string is:
- Converted to UTF-8 bytes
- Base64-encoded
- Passed to the script as a command-line argument
Command line examples
Considering the response collected from the device, after converting it into JSON format, the response is {".1":"Value1",".2":"Value2"}. This JSON is then converted into UTF-8 bytes and Base64-encoded, and the encoded value eyIuMSI6IlZhbHVlMSIsIi4yIjoiVmFsdWUyIn0= is passed to the script in place of the ${JSONInput} placeholder.
VBScript example
Command line format:
cscript ${FileName}.vbs ${JSONInput}
During runtime, the arguments will be passed as:
cscript <Test_Func_Expr_1234>.vbs eyIuMSI6IlZhbHVlMSIsIi4yIjoiVmFsdWUyIn0=
PowerShell example
Command line format:
powershell.exe -ExecutionPolicy RemoteSigned -File ${FileName}.ps1 ${JSONInput}
During runtime, the arguments will be passed as:
powershell.exe -File <Test_Func_Expr_1234>.ps1 eyIuMSI6IlZhbHVlMSIsIi4yIjoiVmFsdWUyIn0=
Python example
Command line format:
python ${FileName}.py ${JSONInput}
Perl example
Command line format:
perl ${FileName}.pl ${JSONInput}
Shell example
Command line format:
bash ${FileName}.sh ${JSONInput}
Script Body
The script body contains your user-defined logic for processing the response received from the device.
When you enter a command line in the UI, OpManager automatically provides a predefined script template based on the filename extension. This template includes:
- Logic to decode the JSON input provided via the command line
- JSON input parsing logic
- Basic output formatting
Note that Predefined scripts are generated for the following types:
- PowerShell (.ps1)
- VBScript (.vbs)
- Python (.py)
- Perl (.pl)
- Shell (.sh)
Users can either:
- Modify the template: Update the predefined script template provided by the application with your custom logic
- Write from scratch: Create entirely new content with your own processing logic
Once users have provided the script body, they must test the script before adding it to ensure it works correctly. If Two-Factor Authentication (TFA) is configured for the user's account, they will be prompted to enter the TOTP code before testing the script.
Note:
Before providing the script in the script body, ensure that:
- The script works correctly as a standalone entity
- The script produces output in the expected format
Expected Script Output Format
The script must return output data in a specific format for OpManager to process it correctly. All output must begin with the header Data: followed by key-value pairs in the format instance=value.
Data:

Instance1=Value1

Instance2=Value2

Instance3=Value3
Each line represents a separate instance with its corresponding value. Instance names can be any meaningful identifier that represents your data point.
How the custom output processor works?
The Custom Output Processor workflow follows these steps:
- Data Collection: OpManager collects the data from the monitored target device.
- Script Input: The collected data will be passed to the script as a command-line argument in JSON format, after being converted to UTF-8 bytes and Base64-encoded to ensure all characters are preserved and the complete data is received safely.
- Processing: The script processes the data using custom logic defined by the user.
- Data Output: The script outputs the processed results in the expected format (see Expected Script Output Format section).
- Store Data: The data returned by the script is processed by OpManager and stored in the database, which can be used to plot graphs and generate reports.
Points to Remember
- The script receives a single argument in Base64-encoded UTF-8 JSON format. In the script body, first decode the Base64 string, then convert it to UTF-8, parse the JSON, and validate the data before processing.
- Start the script output exactly with "Data:" followed by one "instance=value" per line.
- Always use clear, unique instance names to avoid conflicts in data processing and reporting.
- Keep the script simple and efficient. It must complete well within the 5-second execution timeout. Avoid sleep statements, heavy loops, interactive prompts, or any operation that may delay execution.
- Test the script locally first using the same Base64 test string passed by OpManager.
- After local testing, validate the script in the OpManager UI using the Test Script option (you may be prompted to enter a TOTP if TFA is enabled).
Note:
- Execution Directory: Scripts are executed from the OpManager temporary directory.
- Runtime Location: Scripts run on the same machine where OpManager is installed.
- Timeout Configuration: The maximum execution timeout is 5 seconds. Ensure the script logic is optimized to complete within this limit.
- Security Considerations: Scripts run with the same permissions as the OpManager service account. Always validate and sanitize inputs, and avoid executing untrusted or unsafe code.
- Supported Data Types:
- Integer: e.g., 42, 100, -5
- Decimal: e.g., 3.14, 99.99, -0.5
- String: e.g., "Active", "Running", "OK"