WinRM for Windows Monitoring
Windows Remote Management (WinRM) is Microsoft's implementation of the WS-Management protocol, a SOAP-based, firewall-friendly protocol that enables remote management of Windows systems. It allows applications such as OpManager to remotely collect monitoring data, execute WMI queries, retrieve performance metrics, and perform administrative operations on Windows devices.
Both WMI and WinRM are supported as data collection methods for Windows device monitoring. While both methods collect the same performance counters and inventory data, they differ in the communication protocol used to access the target device. WinRM is generally the preferred option when:
- DCOM/RPC ports are blocked or restricted by network or security policies.
- A single, well-known port (5985 for HTTP or 5986 for HTTPS) is preferred instead of multiple dynamic RPC ports.
- Simplified firewall configuration.
Before monitoring Windows devices using WinRM, you must configure the WinRM service and create a WinRM listener on the target Windows device. A listener allows the device to accept incoming WinRM requests over either HTTP or HTTPS. This doc includes:
Configuring WinRM on the Windows Device
WinRM Listener Configuration for HTTP
HTTP uses the default WinRM port 5985 and is suitable for trusted internal networks.
1. Start the WinRM service
Open Services (services.msc) and ensure that the Windows Remote Management (WS-Management) service is Running.
2. Enable and configure WinRM
Open Command Prompt as an administrator and execute:
winrm quickconfig
If prompted, type Y to create the default HTTP listener and add the required Windows Firewall exception.
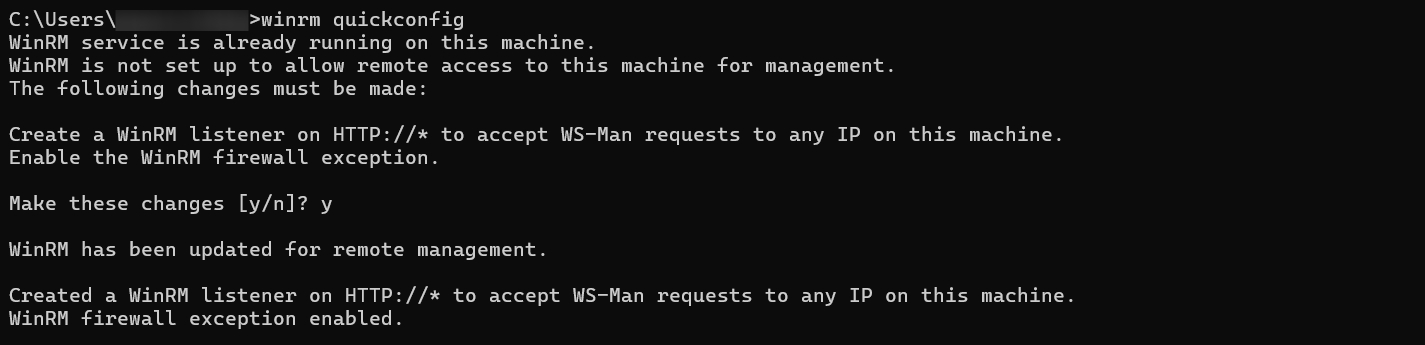
3. Verify that the HTTP listener is created by running the following command:
winrm enumerate winrm/config/listener
You should see an output similar to:
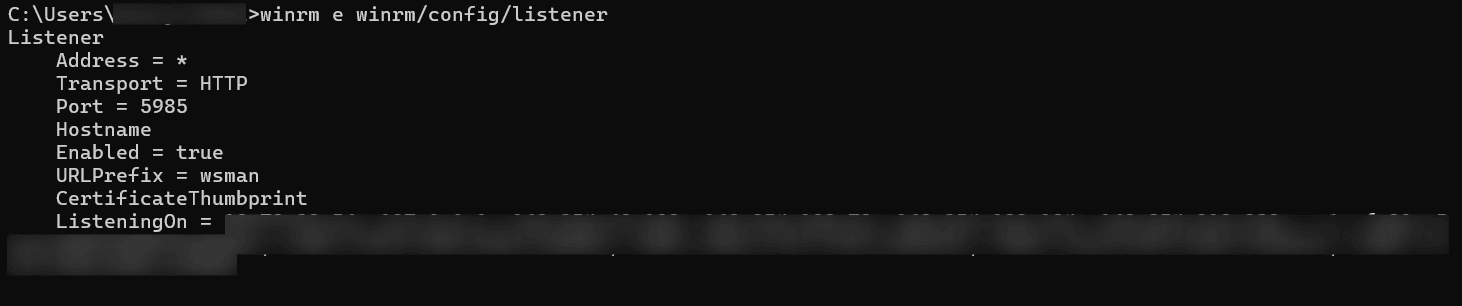
4. Verify the firewall rule.
If winrm quickconfig did not automatically create the firewall rule, allow inbound traffic on port 5985.
- Open Windows Defender Firewall with Advanced Security.
- Navigate to Inbound Rules.
- Enable the existing Windows Remote Management (HTTP-In) rule. If it does not exist, create a new inbound rule to allow TCP port 5985.
WinRM Listener Configuration for HTTPS
WinRM over HTTPS encrypts all communication and is recommended for secure environments.
Prerequisite:
WinRM HTTPS requires a local computer Server Authentication SSL certificate with a Common Name (CN) matching the hostname. The certificate must not be expired, revoked, or self-signed.
1. Install an SSL certificate
Create or obtain a valid SSL certificate signed by a trusted Certification Authority (CA) and import it into the Local Computer → Personal certificate store using the Microsoft Management Console (MMC).
2. Start the WinRM service
Open Services (services.msc) and ensure that the Windows Remote Management (WS-Management) service is Running.
3. Create the HTTPS listener
Open Command Prompt as an administrator and execute:
winrm create winrm/config/listener?Address=*+Transport=HTTPS "@{Hostname='<hostname>';CertificateThumbprint='<ssl certificate thumbprint>';Port='<port number>'}"
Where:
<hostname>— The Common Name (CN) specified in the SSL certificate.<ssl certificate thumbprint>— The thumbprint of the installed SSL certificate.<port number>— The port used for WinRM HTTPS communication (default: 5986).
4. Configure the firewall
Open Windows Defender Firewall with Advanced Security.
Create a new Inbound Rule to allow the TCP port configured for WinRM HTTPS (default: 5986).
5. Verify that the HTTPS listener is created
Run the following command in Command Prompt as an administrator:
winrm enumerate winrm/config/listener
You should see an output similar to:
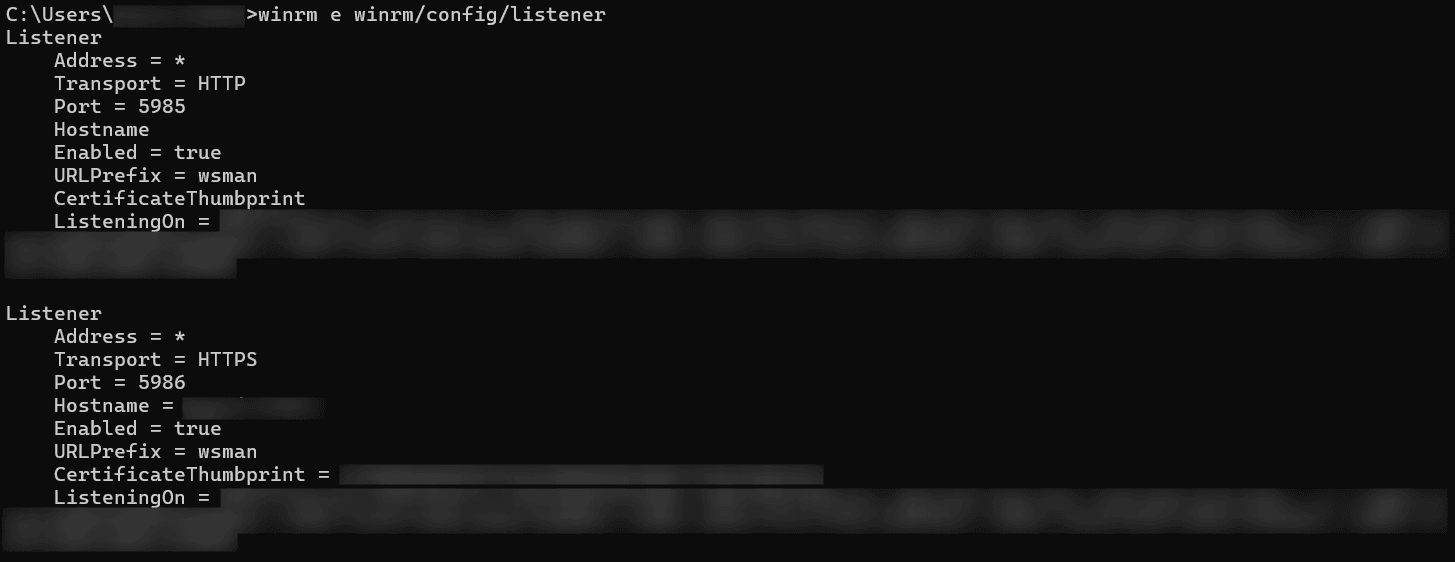
This configuration enables OpManager to establish WinRM connections and remotely collect monitoring data from Windows devices. For secure communication, HTTPS is recommended whenever possible, especially in production environments.
Trusted Hosts
When using WinRM in workgroup environments or when connecting to a remote computer using an IP address instead of a hostname, Kerberos authentication may not be available. In such scenarios, you may need to configure the TrustedHosts list on the OpManager server to allow connections to the target Windows device.
TrustedHosts configuration is generally not required when both the OpManager server and the target Windows device are domain-joined.
Configure TrustedHosts using Group Policy
- Open Group Policy Editor by running gpedit.msc.
- Navigate to Computer Configuration → Administrative Templates → Windows Components → Windows Remote Management (WinRM) → WinRM Client.
- Open the Trusted Hosts policy.
- Select Enabled.
Under TrustedHostsList, specify the DNS name or IP address of the remote Windows devices. Multiple entries should be separated by commas. Wildcards can also be used to trust a group of hosts.
Examples:
server1.domain.com,server2.domain.com,192.168.1.10,*.domain.com,192.168.1.*- Click Apply, and then OK.
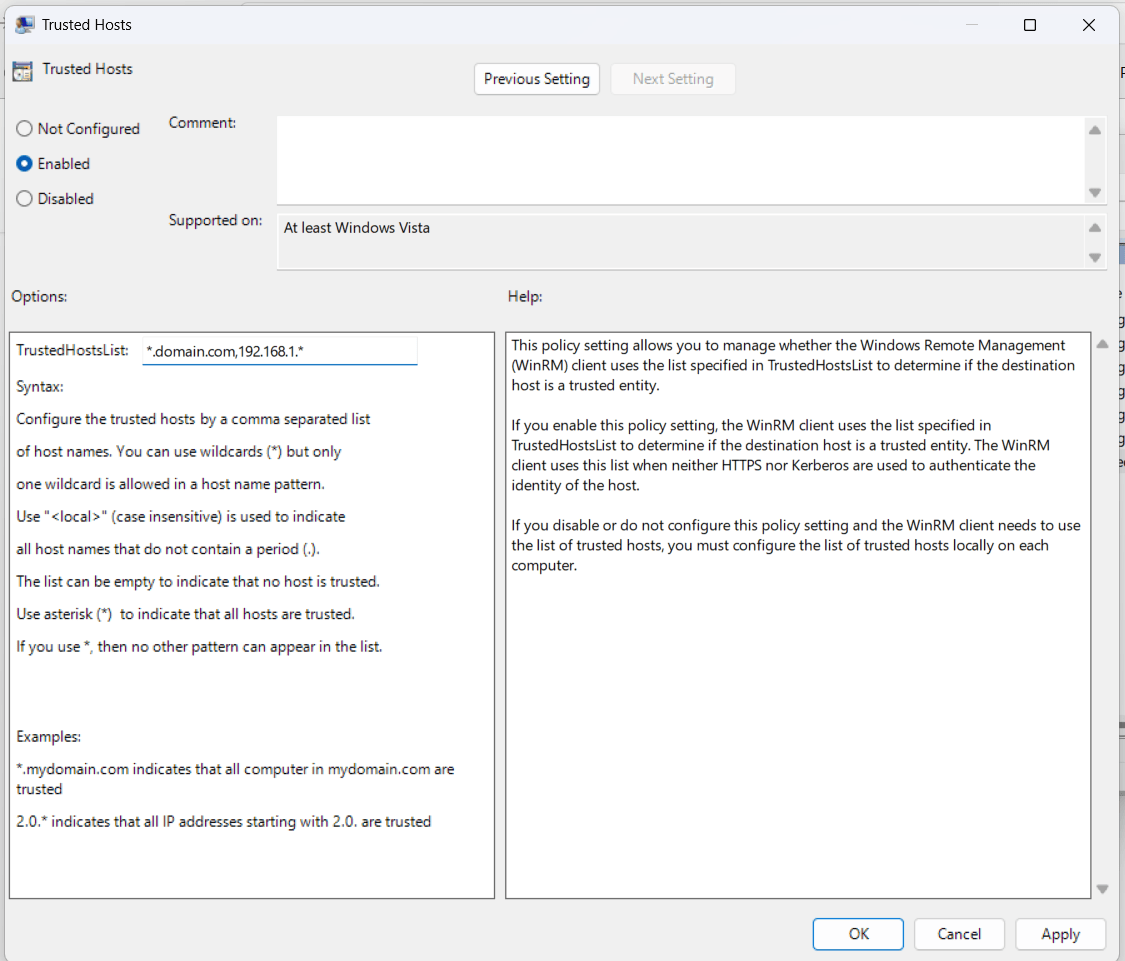
Recommendations:
- Ensure that the TrustedHosts list contains the same value configured in OpManager's Poll Using option (IP address or DNS name).
- Using * to trust all hosts is not recommended for production environments. Specify only the required hostnames or IP addresses whenever possible.
Configuring OpManager to Use WinRM
Verifying WinRM Connectivity from the OpManager Server
Before adding the credential in OpManager, confirm connectivity from the command line.
After configuring WinRM on both the OpManager server and the target Windows device, verify that the OpManager server can successfully communicate with the target system by executing a WMI query using WinRM from the OpManager server.
Open Command Prompt as an administrator on the OpManager server and run the following command:
winrm e wmicimv2/* -dialect:"WQL" -filter:"select * from Win32_OperatingSystem" -r:"<protocol>://<machine IP or DNS>:<port>" -u:"<domain\username>" -p:"<password>"
Where:
<protocol>— The WinRM protocol (http or https).<machine IP or DNS>— The IP address or DNS name of the target Windows device.<port>— The WinRM listener port (default: 5985 for HTTP and 5986 for HTTPS).<domain\username>— The user account with permission to access the target system.<password>— The password for the specified user account.
Example:
winrm e wmicimv2/* -dialect:"WQL" -filter:"select * from Win32_OperatingSystem" -r:"https://testmachine.domain.com:5986" -u:"workgroup\administrator" -p:"password"
If the command executes successfully and returns information from the Win32_OperatingSystem WMI class, the OpManager server can communicate with the target device using WinRM, and the configuration is complete.
Adding a WMI (WinRM) Credential in OpManager
- Navigate to Settings → Discovery → Credentials and click Add Credential.
- Under Credential Type, select Windows/WMI.
- Enter the required Windows credentials.
- Enable the Use WinRM option.
- Select the required Protocol (HTTP or HTTPS) and specify the Port and Timeout values.
- Click Save.
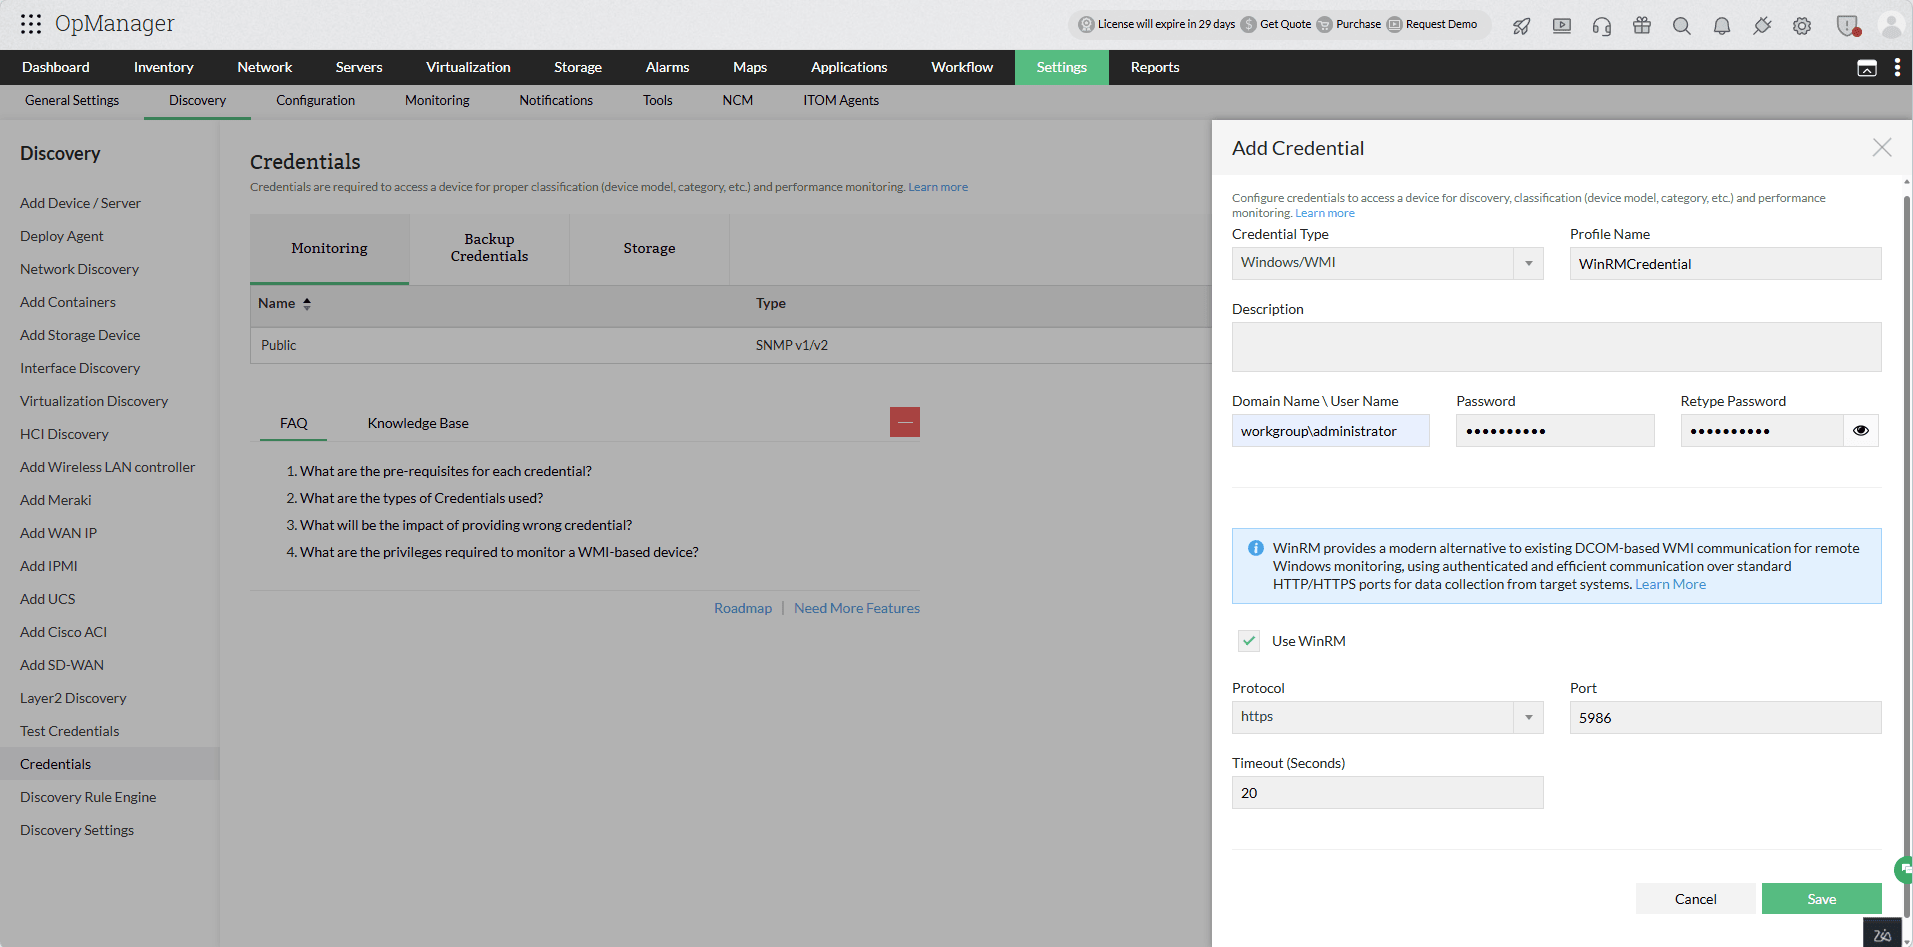
Once saved, this credential can be used to discover and monitor Windows devices through WinRM.
Note:
- Existing Windows/WMI credentials can also be edited to enable or modify WinRM settings.
- Any changes made to an existing credential will be applied to all devices associated with that credential. Therefore, validate the updated credential before saving the changes to avoid data collection failures.