×![]()
×
×![]()
×
×
Restoring the backup file
Restoring from a backup replaces current data with the data from the backup file on your existing server or a new one. This is useful when it needs to be recovered from a problem, and return to a previous state.
Warning
Restoring replaces all current data. Any changes made after the backup date will be lost. If possible, create a backup of your current state before restoring.
Before You Begin
Prerequisites
General Requirements
- The Endpoint Central server must be stopped before restoring
- Have the latest backup file ready and accessible on the server
- Know the backup password (or have the recovery key from the recovery email's)
- The backup must be from the same build version as your current installation
- The backup must be from the same database type, cannot restore across different database types
- Ensure at least twice the size of the backup file in free disk space
- If a Failover Server is configured, stop the secondary server before restoring
Database-Specific Requirements
No additional steps needed. The database is restored automatically.
What needs to be ensured before restoring
- The remote PostgreSQL server must be running and reachable from the Endpoint Central server
- The PostgreSQL major version must match between the backup and the target server (e.g., PG 14.x → PG 14.x)
- The backup must be from a remote PostgreSQL setup — you cannot restore a bundled PostgreSQL backup to a remote setup, or vice versa
Note
Automatic safety backup: Before making any changes, the system automatically takes a backup of the current database. If the restore fails, it will attempt to roll back automatically. Do not delete any temporary files until the restoration process is successful.
What needs to be ensured before restoring
- The SQL Server database must be running and reachable
- The SQL Server service account must have read access to the backup file location
- Required database permissions must be configured — see MSSQL Permissions for setup steps
How to Restore
- Stop the Endpoint Central Service
Open Windows Services and stop the Endpoint Central service. Make sure it is fully stopped before continuing. - Open the Backup Utility
Navigate to Endpoint Central installation folder:<Install Directory>\UEMS_CentralServer\bin
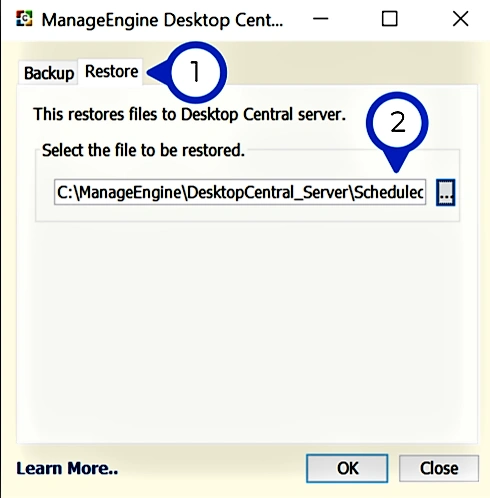
Double-click backuprestore.bat to launch it. - Select the Restore Tab
Click on the Restore tab in the utility window. - Select the Backup File
Browse to find and select the backup file required for restoring. - Enter the Password
If the backup is protected, enter the password or recovery key. - Start the Restore
Click Restore and wait for the process to complete. If there are any errors (version mismatch, database incompatibility, or permission issues), the utility will display the details — review and fix before retrying. - Restart the Service
Start the Endpoint Central service and verify everything is working correctly.
Warning
Failover Server (FOS) setups: After the restore is complete, run
SyncSecondary.bat Restore from the primary server's bin folder to sync the secondary server.Steps to Restore to a New Server
Select your database type to see the full restoration steps:
- Copy the Backup File
Copy the latest backup file to the desktop of the new server. - Download and Install Endpoint Central
Download and install the Endpoint Central EXE from the ManageEngine Archives. The build number of the backup and downloaded EXE must be the same. If you are unable to find your build number, contact Endpoint Central Support. - Stop the Server
Upon completion of the startup, stop the Endpoint Central server. - Open the Backup-Restore Utility
Navigate to the server installation directory, access\bin\and invoke backuprestore.bat. This will open the Backup and Restore window. - Enter the Backup Password
If you have encrypted your backup using a password, the same password needs to be furnished for restoration. - Start the Server
Start the server after restoration of the database.
- Copy the Backup File
Copy the latest backup file to the desktop of the new server. - Download and Install Endpoint Central
Download and install the Endpoint Central EXE from the ManageEngine Archives. The build number of the backup and downloaded EXE must be the same. If you are unable to find your build number, contact Endpoint Central Support. - Verify Remote PostgreSQL Connectivity
Ensure the remote PostgreSQL server is running and reachable from the new EC server on port 5432 (or your custom port). - Stop the Server
Upon completion of the startup, stop the Endpoint Central server. - Delete the Old Database on the Remote PostgreSQL Server
Connect to the remote PostgreSQL server and drop the existing desktopcentral database. Ensure no active connections remain to the database before dropping it. - Run the Database Setup Wizard
Within the server installation directory, navigate to\bin\and execute changeDBserver.bat. - Configure the Remote PostgreSQL Database
Once the Database Setup Wizard is invoked, perform the following:- Select Database Type as Remote PostgreSQL
- Specify the Host Name of the remote PostgreSQL server
- Specify the Port (default: 5432)
- Provide the database username and password
- Ensure that the option for migrating data from existing database is enabled
- Save and Start
Click Save — Endpoint Central server startup will be initiated. - Stop the Server Again
Once the startup completes, stop the Endpoint Central server. - Open the Backup-Restore Utility
Navigate to the server installation directory, access\bin\and invoke backuprestore.bat. This will open the Backup and Restore window. - Enter the Backup Password
If you have encrypted your backup using a password, the same password needs to be furnished for restoration. - Start the Server
Start the server after restoration of the database.
- Copy the Backup File
Copy the latest backup file to the desktop of the new server. - Download and Install Endpoint Central
Download and install the Endpoint Central EXE from the ManageEngine Archives. The build number of the backup and downloaded EXE must be the same. If you are unable to find your build number, contact Endpoint Central Support. - Stop the Server
Upon completion of the startup, stop the Endpoint Central server. - Delete the Old Database
Delete the desktopcentral database from SQL Server. Ensure desktopcentral.mdf and desktopcentral_log.ldf files are deleted from the DATA folder of the SQL Server installation directory. - Run the Database Setup Wizard
Within the server installation directory, navigate to\bin\and execute changeDBserver.bat. - Configure the Database
Once the Database Setup Wizard is invoked, perform the following:- Select Database Type as SQL Server
- Specify the Host Name where SQL Server is installed
- Choose the mode of authentication
- Specify the domain name, user name, and password
- Ensure that the option for migrating data from existing database is enabled
- Save and Start
Click Save — Endpoint Central server startup will be initiated. - Stop the Server Again
Once the startup completes, stop the Endpoint Central server. - Open the Backup-Restore Utility
Navigate to the server installation directory, access\bin\and invoke backuprestore.bat. This will open the Backup and Restore window. - Enter the Backup Password
If you have encrypted your backup using a password, the same password needs to be furnished for restoration. - Verify SQL Server Connectivity
Ensure SQL Server is running and the EC database user has the required permissions. The SQL Server service account must have read access to the backup file location. - Start the Server
Start the server after restoration of the database.
Note
The patch repository and software repository should be reachable from the system where the restoration takes place. Alternatively, execute
changeShareAccess.bat SWRepository=default,PatchStore=default from the command prompt to change to the default location in the new setup.Tip
Version mismatch? If you see an "Endpoint Central Server is not compatible" error, install the exact version that matches the backup, perform the restore, then upgrade to the latest build.
Note
If you are restoring a backup from an older version of Endpoint Central, upgrade to the latest build after the restore is complete.