Network related errors
List of errors addressed in this document:
- The specified network name is no longer available
- The network name cannot be found
- Network Path was not found
- Network location cannot be reached
You might face these issues while performing one of the following processes. Click on the required process and follow the steps mentioned to avoid these network errors.
- Image creator component installation
- Image/Driver repository configuration
- Image creation
- Image deployment
Problem
You may see the following error messages on your screen while installing image creator component during image creation process.
- The specified network name is no longer available
- The network name cannot be found
- Network Path was not found
- Network location cannot be reached
Cause
This error may occur due to the following reasons.
- Windows Defender Firewall and Antivirus blocks
- Domain controller or DNS issue in the network
- Network Connectivity issues
- "File and Printer sharing" settings turned off
- Administrative Share (Admin$) disabled
Resolution
To solve this issue follow the steps mentioned below:
- Step 1 - Windows firewall/antivirus block
- Step 2 - Domain controller or DNS
- Step 3 - Network connectivity
- Step 4 - "File and Printer Sharing" settings
- Step 5 - Administrative Share (Admin$) on the Client Machine
Check Windows Defender Firewall and Antivirus block
Check for Windows Defender Firewall block.
Note: It is recommended to exclude SMB (file and printer sharing) ports 139 and 445 in your firewall to ensure effective file sharing.
Ensure that Windows Defender Firewall does not block the Imaging computer's accessibility within the network, by following the steps given below.
- Go to Control Panel --> System and Security --> Windows Firewall. If it is turned off skip the steps given below.
- If Windows Firewall is turned on in your computer, from the left pane click on Advance settings --> Inbound Rules
- Under Inbound Rules locate the rules "File and Printer sharing (NB-Session-In)" and "File and Printer sharing (SMB-In)".
- Right click on each rule and click on Enable Rule option.
Check for Antivirus block
If you have any Antivirus software installed in the computer where Imaging is available, ensure that your antivirus settings does not block the computer's network share accessibility.
Check for domain controller or DNS issues.
This error occurs when the DNS Server cannot resolve the host name of the Imaging computer. To solve this DNS issue in the network, ensure that the IP address is updated properly in the DNS server. To check if there is an issue with the DNS server mapping, follow the steps given below.
Go to command prompt in the Endpoint Central/OS Deployer server computer and pingthe Imaging computer, using the command given below.
ping <Imaging computer's host name>
- Go to command prompt in the Imaging computer and check the IP address of that computer using ipconfig command.
- Verify if the same IP address is displayed in the Endpoint Central/OS Deployer Server and Imaging computer.
- If the IP addresses are the same on both computers, there is no issue in the DNS server mapping.
If not, execute the following two commands in command prompt of the target computer to solve the DNS issue.
ipconfig /flushdns - This command will flush the DNS cache available on the computer.
ipconfig /registerdns - This command will update the host record in the DNS server.
Check for network connectivity issues.
In the Endpoint Central/OS Deployer server computer, open command prompt and execute the following command to check connectivity using the Imaging computer's host name,
ping <Imaging computer's host name>
If it is not connecting, execute the same command using the IP address,
ping <Imaging computer's IP address>
If you are able to reach the computer using IP address, specify the Imaging computer's IP address while adding computer details.
Turn on the "File and Printer Sharing" settings.
To automatically turn on "File and Printer Sharing" settings in the Imaging computer
- Download this EnableFileSharing.txt file on the Imaging computer.
- Rename it as EnableFileSharing.bat file.
- Run this bat file (as administrator) in the Imaging computer. "File and Printer Sharing" settings will be turned on in the computer automatically.
To manually turn on "File and Printer Sharing" settings in the Imaging computer
If the Imaging computer's OS is below Windows 7, follow the steps mentioned below:
- Select Start --> Control Panel --> Network and Internet Connections
- Click on Network Connection, right click on Local Area Connection and select Properties
- In the connection properties dialog box, select the General tab.
- Select "File and Printer Sharing for Microsoft Networks" and click OK.
- If you do not find this option, click Install button.
- In the network component type, select Service and click Add.
- Select File and Printer Sharing for Microsoft Networks and click OK.
- Click Close to exit the properties dialog
If the Imaging computer's OS is Windows 7 or later, follow the steps mentioned below:
- Select Start-->Control Panel.
- Choose Network and Internet
- Select Network and Sharing Center and choose Change Advanced Sharing Settings
- Under File and Printer Sharing turn on File and Printer Sharing
- Save changes.
Enable the Administrative Share (Admin$) on the Client Machine
You will need to edit the registry to enable the default administrative share in client machine.
For Servers:
- Click Start and select Run.
- Type regedit in the Run prompt and click OK
- Navigate the following in the Registry Hive and edit the REG_DWORD Value as '1'.
- Hive: HKEY_LOCAL_MACHINE
- Key: SYSTEM\CurrentControlSet\Services\LanManServer\Parameters
- Name: AutoShareServer
- Data Type: REG_DWORD Value: 1
Note: If you cannot find the value in the registry under the exact location (i.e. it does not exist) - No need to add new value. A reboot is necessary for this to take effect.
For Windows Server 2008 R2: In case you have a Windows Server 2008 R2 based domain environment you can enable the Admin$ in your client machine using a Start-Up script.
For Workstations:
- Click Start and select Run.
- Type regedit in the Run prompt and click OK.
- Navigate the following in the Registry Hive and edit the REG_DWORD Value as '1'.
- Hive: HKEY_LOCAL_MACHINE
- Key: SYSTEM\CurrentControlSet\Services\LanManServer\Parameters
- Name: AutoShareWks
- Data Type: REG_DWORD
- Value: 1
Note: If you cannot find the value in the registry under the exact location (i.e. it does not exist) - No need to add new value. A reboot is necessary for this to take effect.
Problem
You may see the following error messages on your screen while configuring Image/Driver repositories.
- The specified network name is no longer available
- The network name cannot be found
- Network Path was not found
- Network location cannot be reached
Cause
This error may occur due to the following reasons.
- Windows Defender Firewall and Antivirus blocks
- Domain controller or DNS issue in the network
- Network Connectivity issues
- "File and Printer sharing" settings turned off
- Administrative Share (Admin$) disabled
Resolution
To solve this issue follow the steps mentioned below:
- Step 1: Windows firewall/antivirus block
- Step 2: Domain controller or DNS
- Step 3: Network connectivity
- Step 4: "File and Printer Sharing" settings
- Step 5: Administrative Share (Admin$) on the Client Machine
Check Windows Defender Firewall and Antivirus block
Check for Windows Defender Firewall block.
Note: It is recommended to exclude SMB (file and printer sharing) ports 139 and 445 in your firewall to ensure effective file sharing.
Ensure that Windows Defender Firewall does not block the Image Repository computer's accessibility within the network, by following the steps given below.
- Go to Control Panel --> System and Security --> Windows Firewall. If it is turned off skip the steps given below.
- If Windows Firewall is turned on in your computer, from the left pane click on Advance settings --> Inbound Rules
- Under Inbound Rules locate the rules "File and Printer sharing (NB-Session-In)" and "File and Printer sharing (SMB-In)".
- Right click on each rule and click on Enable Rule option.
Check for Antivirus block
If you have any Antivirus software installed in the computer where Image Repository is available, ensure that your antivirus settings does not block the computer's network share accessibility.
Check for Domain controller or DNS issues.
This error occurs when the DNS Server could not resolve the Image/Driver Repository computer's host name. To solve this DNS issue in the network, ensure that the IP address is updated properly in the DNS server. To check if there is an issue with the DNS server mapping, follow the steps given below.
Go to command prompt in the Endpoint Central/Os Deployer server computer and pingthe computer where the Image/Driver Repository is created using the command given below.
ping <Image/Driver repository computer's host name>
- Go to command prompt in the Image/Driver repository computer and check the IP address of that computer using ipconfig command.
- Verify that the same IP address is displayed in the Endpoint Central/Os Deployer server and Image/Driver repository computer.
- If the IP addresses are the same on both computers, then there is no issue in the DNS server mapping.
If not, execute the following two commands in command prompt of the Image/Driver repository computer to solve the DNS issue.
ipconfig /flushdns - This command will flush the DNS cache available on the computer.
ipconfig /registerdns - This command will update the host record in the DNS server.
Check for the network connectivity issues using ping command.
In the machine where the Endpoint Central/OS Deployer server is installed, open command prompt and execute the following command to check connectivity using the Image/Driver Repository computer's host name,
ping <Image repository machine's host name>
If it is not connecting, execute the same command using the IP address,
ping <Image repository machine's IP address>
If you are able to reach the computer where the Image/Driver repository is available using IP address, specify the computer's IP address to configure the Image/Driver repository.
- If you are able to reach the computer using the command mentioned above, but if the image/driver repository is still not accessible, check if it is shared in the network.
Turn on "File and Printer Sharing" settings.
To automatically turn on "File and Printer Sharing" settings in the computer where the Image/Driver repository is available
- Download this EnableFileSharing.txt file on the computer where the Image/Driver repository is available.
- Rename it as EnableFileSharing.bat file.
- Run this bat file (as administrator) in the computer where the Image repository is located. "File and Printer Sharing" settings will be turned on in the computer automatically.
To manually turn on "File and Printer Sharing" settings in the computer where the Image/Driver repository is available
If the OS version in the computer where the Image/Driver repository is available, is below Windows 7, follow the steps mentioned below:
- Select Start --> Control Panel --> Network and Internet Connections
- Click on Network Connection, right click on Local Area Connection and select Properties
- In the connection properties dialog box, select the General tab.
- Select the "File and Printer Sharing for Microsoft Networks" and click OK.
- If you do not find this option, click Install button.
- In the network component type, select Service and click Add.
- Select File and Printer Sharing for Microsoft Networks and click OK.
- Click Close to exit the properties dialog
If the OS version in the computer where the Image/Driver repository is available, is Windows 7 or later, follow the steps mentioned below:
- Select Start-->Control Panel.
- Choose Network and Internet
- Select Network and Sharing Center and choose Change Advanced Sharing Settings
- Under File and Printer Sharing turn on File and Printer Sharing
- Save changes
Enable the Administrative Share (Admin$) on the Client Machine
You will need to edit the registry to enable the default administrative share in client machine.
For Servers:
- Click Start and select Run.
- Type regedit in the Run prompt and click OK
- Navigate the following in the Registry Hive and edit the REG_DWORD Value as '1'.
- Hive: HKEY_LOCAL_MACHINE
- Key: SYSTEM\CurrentControlSet\Services\LanManServer\Parameters
- Name: AutoShareServer
- Data Type: REG_DWORD Value: 1
Note:If you cannot find the value in the registry under the exact location (i.e. it does not exist) - No need to add new value. A reboot is necessary for this to take effect.
For Windows Server 2008 R2: In case you have a Windows Server 2008 R2 based domain environment you can enable the Admin$ in your client machine using a Start-Up script.
For Workstations:
- Click Start and select Run.
- Type regedit in the Run prompt and click OK.
- Navigate the following in the Registry Hive and edit the REG_DWORD Value as '1'.
- Hive: HKEY_LOCAL_MACHINE
- Key: SYSTEM\CurrentControlSet\Services\LanManServer\Parameters
- Name: AutoShareWks
- Data Type: REG_DWORD
- Value: 1
Note: If you cannot find the value in the registry under the exact location (i.e. it does not exist) - No need to add new value. A reboot is necessary for this to take effect.
Problem
You may see the following error messages on your screen during Image Creation when the Image Creator Component tries to access the Image repository.
- The specified network name is no longer available
- The network name cannot be found
- Network Path was not found
- Network location cannot be reached
Cause
This error may occur due to the following reasons.
- Windows Defender Firewall and Antivirus blocks
- Domain controller or DNS issue in the network
- Network Connectivity issues
- "File and Printer sharing" settings turned off
- Administrative Share (Admin$) disabled
Resolution
To resolve the network error issue follow the steps given below.
- Step 1 - Windows Defender Firewall and Antivirus block
- Step 2 - Domain controller or DNS
- Step 3 - Network connectivity
- Step 4 - "File and Printer Sharing" settings
- Step 5 - Administrative Share (Admin$) on the Client Machine
Check Windows Defender Firewall and Antivirus block
Check for Windows Defender Firewall block.
Note: It is recommended to exclude SMB (file and printer sharing) ports 139 and 445 in your firewall to ensure effective file sharing.
Ensure that Windows Defender Firewall does not block the Image Repository computer's accessibility within the network, by following the steps given below.
- Go to Control Panel --> System and Security --> Windows Firewall. If it is turned off skip the steps given below.
- If Windows Firewall is turned on in your computer, from the left pane click on Advance settings --> Inbound Rules
- Under Inbound Rules locate the rules "File and Printer sharing (NB-Session-In)" and "File and Printer sharing (SMB-In)".
- Right click on each rule and click on Enable Rule option.
Check for Antivirus block
If you have any Antivirus software installed in the computer where Image Repository is available, ensure that your antivirus settings does not block the computer's network share accessibility.
Check for Domain controller or DNS issues.
This error occurs when the DNS Server could not resolve the Image Repository computer's host name. To solve this DNS issue in the network, ensure that the IP address is updated properly in the DNS server. To check if there is an issue with the DNS server mapping, follow the steps given below.
Go to command prompt in the Endpoint Central/Os Deployer server computer and pingthe computer where the Image Repository is created using the command given below.
ping <Image repository computer's host name>
- Go to command prompt in the Image repository computer and check the IP address of that computer using ipconfig command.
- Verify that the same IP address is displayed in the Endpoint Central/Os Deployer server and Image repository computer.
- If the IP addresses are the same on both computers, then there is no issue in the DNS server mapping.
If not, execute the following two commands in command prompt of the Image repository computer to solve the DNS issue.
ipconfig /flushdns - This command will flush the DNS cache available on the computer.
ipconfig /registerdns - This command will update the host record in the DNS server.
Check for the network connectivity issues using ping command.
In the computer where the Imaging is performed, open command prompt and execute the pingcommand to check connectivity using the host name,
ping <Image repository computer's host name>
If it is not connecting, execute the same command using the IP address,
ping <Image repository computer's IP address>
- If the computer is not accessible, check the network connections between the source and the target.
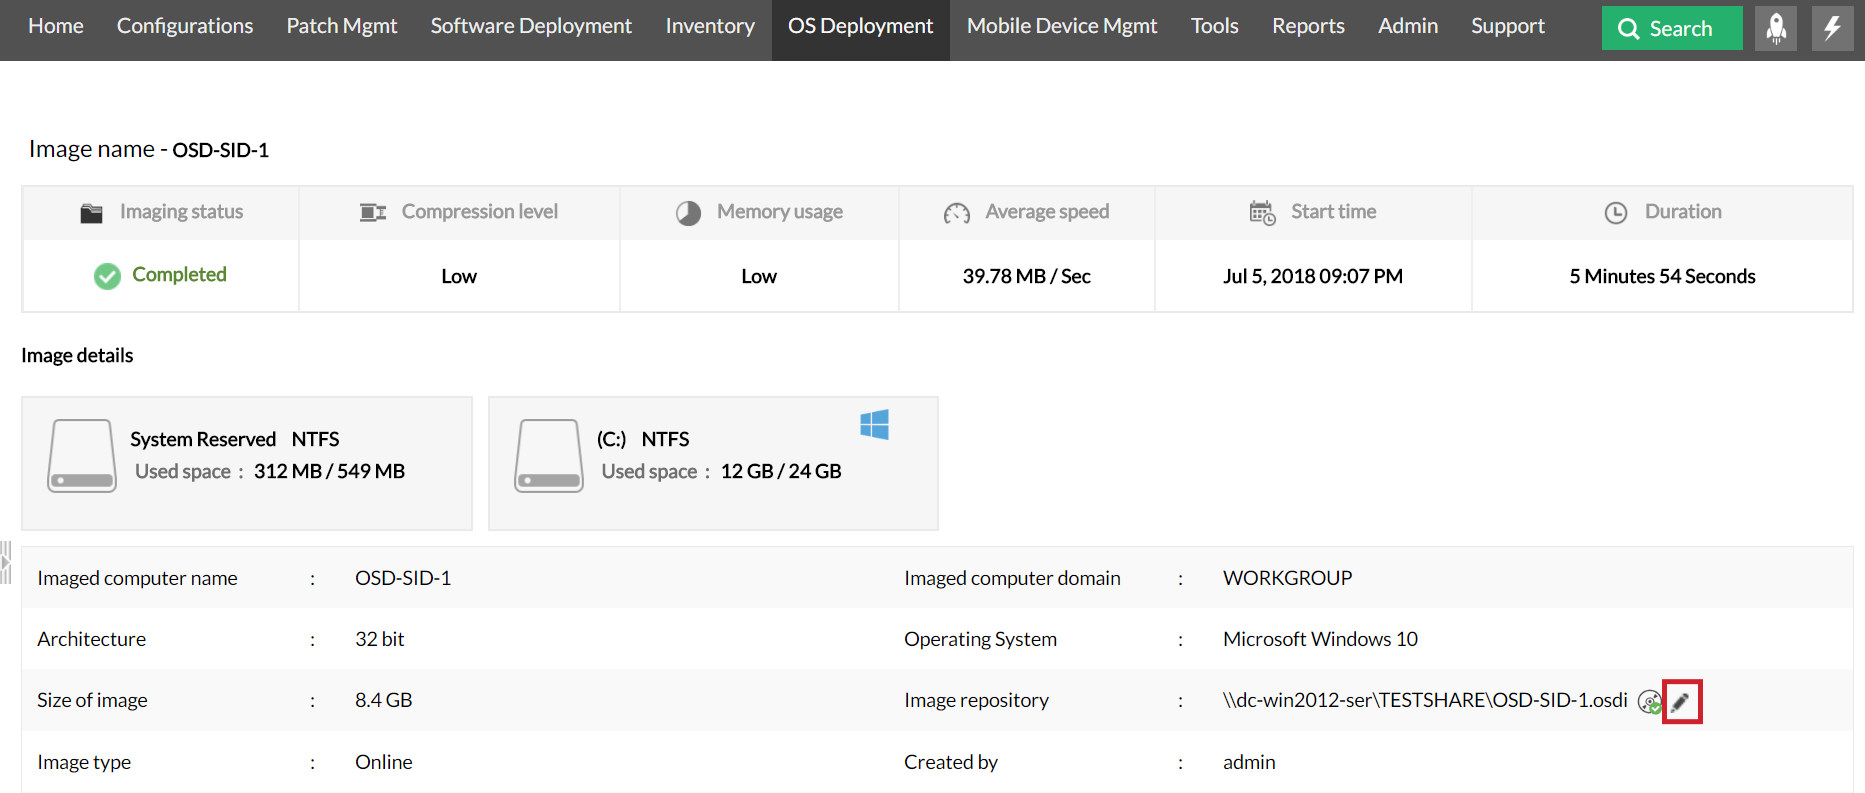
If you are able to reach the computer using IP address, configure the share path using the computer's IP address instead of the computer name.
- Go to Image details under Online Imaging tab.
- Click on the Modify button near Image Repository.
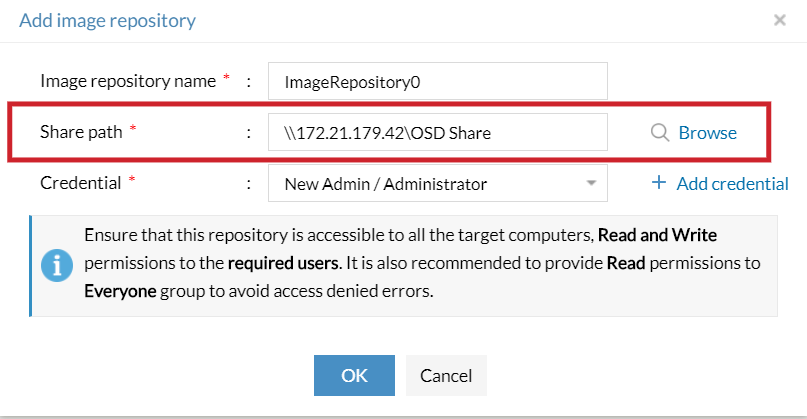
- Click on Add Image Repository option. And create new repository using the IP address.
If the computer is reachable with the ping command and the issue still exists, use the following commands to check if the image repository is accessible from the Imaging computer.
net use \\<Hostname>\<sharefolder> /user:<username> <password>
net use \\<Hostname>\<sharefolder> /user:<Domainname>\<username> <password>
net use \\<Ipaddress>\<sharefolder> /user:\<username> <password>
The net use command is used to check the connectivity of the shared folders.
- If you come across any issue while performing the above mentioned command, the image repository folder is not shared in the network for the specified user. Check if the user has access to the Image Repository folder.
Turn on "File and Printer Sharing" settings.
To automatically turn on "File and Printer Sharing" settings in the Image Repository computer
- Download this EnableFileSharing.txt file in the Image Repository computer.
- Rename it as EnableFileSharing.bat file.
- Run this bat file (as administrator) in the computer where the Image repository is located. "File and Printer Sharing" settings will be turned on in the computer automatically.
To manually turn on "File and Printer Sharing" settings in your computer
If the OS version in the computer where the Image Repository is created, is below Windows 7, follow the steps mentioned below:
- Select Start --> Control Panel --> Network and Internet Connections
- Click on Network Connection, right click on Local Area Connection and select Properties
- In the connection properties dialog box, select the General tab.
- Select the "File and Printer Sharing for Microsoft Networks" and click OK.
- If you do not find this option, click Install button.
- In the network component type, select Service and click Add.
- Select File and Printer Sharing for Microsoft Networks and click OK.
- Click Close to exit the properties dialog
If the OS version in the computer where the Image Repository is created, is Windows 7 or later, follow the steps mentioned below:
- Select Start-->Control Panel.
- Choose Network and Internet
- Select Network and Sharing Center and choose Change Advanced Sharing Settings
- Under File and Printer Sharing turn on File and Printer Sharing
- Save changes
Enable the Administrative Share (Admin$) on the Client Machine
You will need to edit the registry to enable the default administrative share in client machine.
For Servers:
- Click Start and select Run.
- Type regedit in the Run prompt and click OK
- Navigate the following in the Registry Hive and edit the REG_DWORD Value as '1'.
- Hive: HKEY_LOCAL_MACHINE
- Key: SYSTEM\CurrentControlSet\Services\LanManServer\Parameters
- Name: AutoShareServer
- Data Type: REG_DWORD Value: 1
Note:If you cannot find the value in the registry under the exact location (i.e. it does not exist) - No need to add new value. A reboot is necessary for this to take effect.
For Windows Server 2008 R2: In case you have a Windows Server 2008 R2 based domain environment you can enable the Admin$ in your client machine using a Start-Up script.
For Workstations:
- Click Start and select Run.
- Type regedit in the Run prompt and click OK.
- Navigate the following in the Registry Hive and edit the REG_DWORD Value as '1'.
- Hive: HKEY_LOCAL_MACHINE
- Key: SYSTEM\CurrentControlSet\Services\LanManServer\Parameters
- Name: AutoShareWks
- Data Type: REG_DWORD
- Value: 1
Note: If you cannot find the value in the registry under the exact location (i.e. it does not exist) - No need to add new value. A reboot is necessary for this to take effect.
Problem
You may see the following error messages on your screen during Image Deployment when the server tries to access the Image Repository.
- The specified network name is no longer available
- The network name cannot be found
- Network Path was not found
- Network location cannot be reached
Cause
This error may occur due to the following reasons.
- Windows Defender Firewall and Antivirus blocks
- Domain controller or DNS issue in the network
- Network Connectivity issues
- "File and Printer sharing" settings turned off
- Administrative Share (Admin$) disabled
Resolution
To solve this issue follow the steps mentioned below:
- Step 1: Windows firewall/antivirus block
- Step 2: Domain controller or DNS
- Step 3: Network connectivity
- Step 4: "File and Printer Sharing" settings
- Step 5: Administrative Share (Admin$) on the Client Machine
Check Windows Defender Firewall and Antivirus block
Check for Windows Defender Firewall block.
Note: It is recommended to exclude SMB (file and printer sharing) ports 139 and 445 in your firewall to ensure effective file sharing.
Ensure that Windows Defender Firewall does not block the Image Repository computer's accessibility within the network, by following the steps given below.
- Go to Control Panel --> System and Security --> Windows Firewall. If it is turned off skip the steps given below.
- If Windows Firewall is turned on in your computer, from the left pane click on Advance settings --> Inbound Rules
- Under Inbound Rules locate the rules "File and Printer sharing (NB-Session-In)" and "File and Printer sharing (SMB-In)".
- Right click on each rule and click on Enable Rule option.
Check for Antivirus block
If you have any Antivirus software installed in the computer where Image Repository is available, ensure that your antivirus settings does not block the computer's network share accessibility.
Check for Domain controller or DNS issues.
This error occurs when the DNS Server could not resolve the Image Repository computer's host name. To solve this DNS issue in the network, ensure that the IP address is updated properly in the DNS server. To check if there is an issue with the DNS server mapping, follow the steps given below.
Go to command prompt in the Endpoint Central/Os Deployer server computer and pingthe computer where the Image Repository is created using the command given below.
ping <Image repository computer's host name>
- Go to command prompt in the Image repository computer and check the IP address of that computer using ipconfig command.
- Verify that the same IP address is displayed in the Endpoint Central/Os Deployer server and Image repository computer.
- If the IP addresses are same in both the computers, then there is no issue in the DNS server mapping.
If not, execute the following two commands in command prompt of the Image repository computer to solve the DNS issue.
ipconfig /flushdns - This command will flush the DNS cache available in the computer.
ipconfig /registerdns - This command will update the host record in the DNS server.
Check for the network connectivity issues using ping command.
In the machine where you are performing deployment, press Alt+Tab to open command prompt and execute the following command to check connectivity using the host name,
ping <Image Repository machine's host name>
If it is not connecting, execute the same command using the IP address,
ping <Image Repository machine's IP address>
- If you are able to reach the computer using IP address, configure a new Image Repository using the IP address as shown in the below screen captures and perform deployment by booting the system again using winPE.
- If you are able to reach the Image Repository computer using the command mentioned above, but if your Image Repository is still not accessible, check if the Image Repository is shared in the network.
Turn on "File and Printer Sharing" settings.
To automatically turn on "File and Printer Sharing" settings in the Image Repository computer
- Download this EnableFileSharing.txt file in the Image Repository computer.
- Rename it as EnableFileSharing.bat file.
- Run this bat file (as administrator) in the computer where the Image Repository is located. "File and Printer Sharing" settings will be turned on in the computer automatically.
To manually turn on "File and Printer Sharing" settings in the Image Repository computer
If the OS version in the computer where the Image Repository is created, is below Windows 7, follow the steps mentioned below:
- Select Start --> Control Panel --> Network and Internet Connections
- Click on Network Connection, right click on Local Area Connection and select Properties
- In the connection properties dialog box, select the General tab.
- Select the "File and Printer Sharing for Microsoft Networks" and click OK.
- If you do not find this option, click Install button.
- In the network component type, select Service and click Add.
- Select File and Printer Sharing for Microsoft Networks and click OK.
- Click Close to exit the properties dialog
If the OS version in the computer where the Image Repository is created, is Windows 7 or later, follow the steps mentioned below:
- Select Start-->Control Panel.
- Choose Network and Internet
- Select Network and Sharing Center and choose Change Advanced Sharing Settings
- Under File and Printer Sharing turn on File and Printer Sharing
- Save changes
Enable the Administrative Share (Admin$) on the Client Machine
You will need to edit the registry to enable the default administrative share in client machine.
For Servers:
- Click Start and select Run.
- Type regedit in the Run prompt and click OK
- Navigate the following in the Registry Hive and edit the REG_DWORD Value as '1'.
- Hive: HKEY_LOCAL_MACHINE
- Key: SYSTEM\CurrentControlSet\Services\LanManServer\Parameters
- Name: AutoShareServer
- Data Type: REG_DWORD Value: 1
Note:If you cannot find the value in the registry under the exact location (i.e. it does not exist) - No need to add new value. A reboot is necessary for this to take effect.
For Windows Server 2008 R2: In case you have a Windows Server 2008 R2 based domain environment you can enable the Admin$ in your client machine using a Start-Up script.
For Workstations:
- Click Start and select Run.
- Type regedit in the Run prompt and click OK.
- Navigate the following in the Registry Hive and edit the REG_DWORD Value as '1'.
- Hive: HKEY_LOCAL_MACHINE
- Key: SYSTEM\CurrentControlSet\Services\LanManServer\Parameters
- Name: AutoShareWks
- Data Type: REG_DWORD
- Value: 1
Note: If you cannot find the value in the registry under the exact location (i.e. it does not exist) - No need to add new value. A reboot is necessary for this to take effect.
If you still receive the network errors after reaching out to the computer using IP address, contact support osdeployer-support@manageengine.com.
Keywords: Image creator installation, network errors, image creation, image deployment