DHCP Syslog usage in Security Analytics
In NetFlow Analyzer’s Security Analytics, accurate IP-to-hostname mapping is critical for effective asset-based anomaly detection. This is primarily achieved using DHCP Syslogs.
- Why DHCP Syslog is preferred in Security Analytics
- Priority Sequence for IP Mapping
- How to configure DHCP Syslog profile
- How to configure Syslog forwarding based on server type
Why DHCP Syslog is preferred in Security Analytics
Manual mapping is static and limited to known, fixed IP devices. Active Directory is updated periodically and might not reflect real-time changes. Whereas, DHCP Syslog provides real-time, accurate data, making management of assets better.
DHCP Syslog provides dynamic mapping of:
IP Address ↔ MAC Address ↔ Hostname
This mapping is crucial because IP addresses change frequently due to DHCP leasing and a single machine (asset) might use different IPs over time. Hostnames remain consistent, helping to identify the true source regardless of changing IPs. Hence, Security Analytics is asset-based, not IP-based.
Priority Sequence for IP Mapping
To resolve IPs to hostnames, Security Analytics uses the following priority order:
- Manual Mapping
- Used for devices with static IPs
- Always takes priority if the IP exists in this mapping
- DHCP Syslog (Essential for Security Analytics)
- Dynamic mapping is preferred due to accuracy and real-time updates
- Active Directory
- Pulls IP-to-username mappings directly from Active Directory servers, helping correlate network activity with specific users
- DHCP Server Logs
- Parses DHCP server logs to map IP addresses to hostnames based on lease records
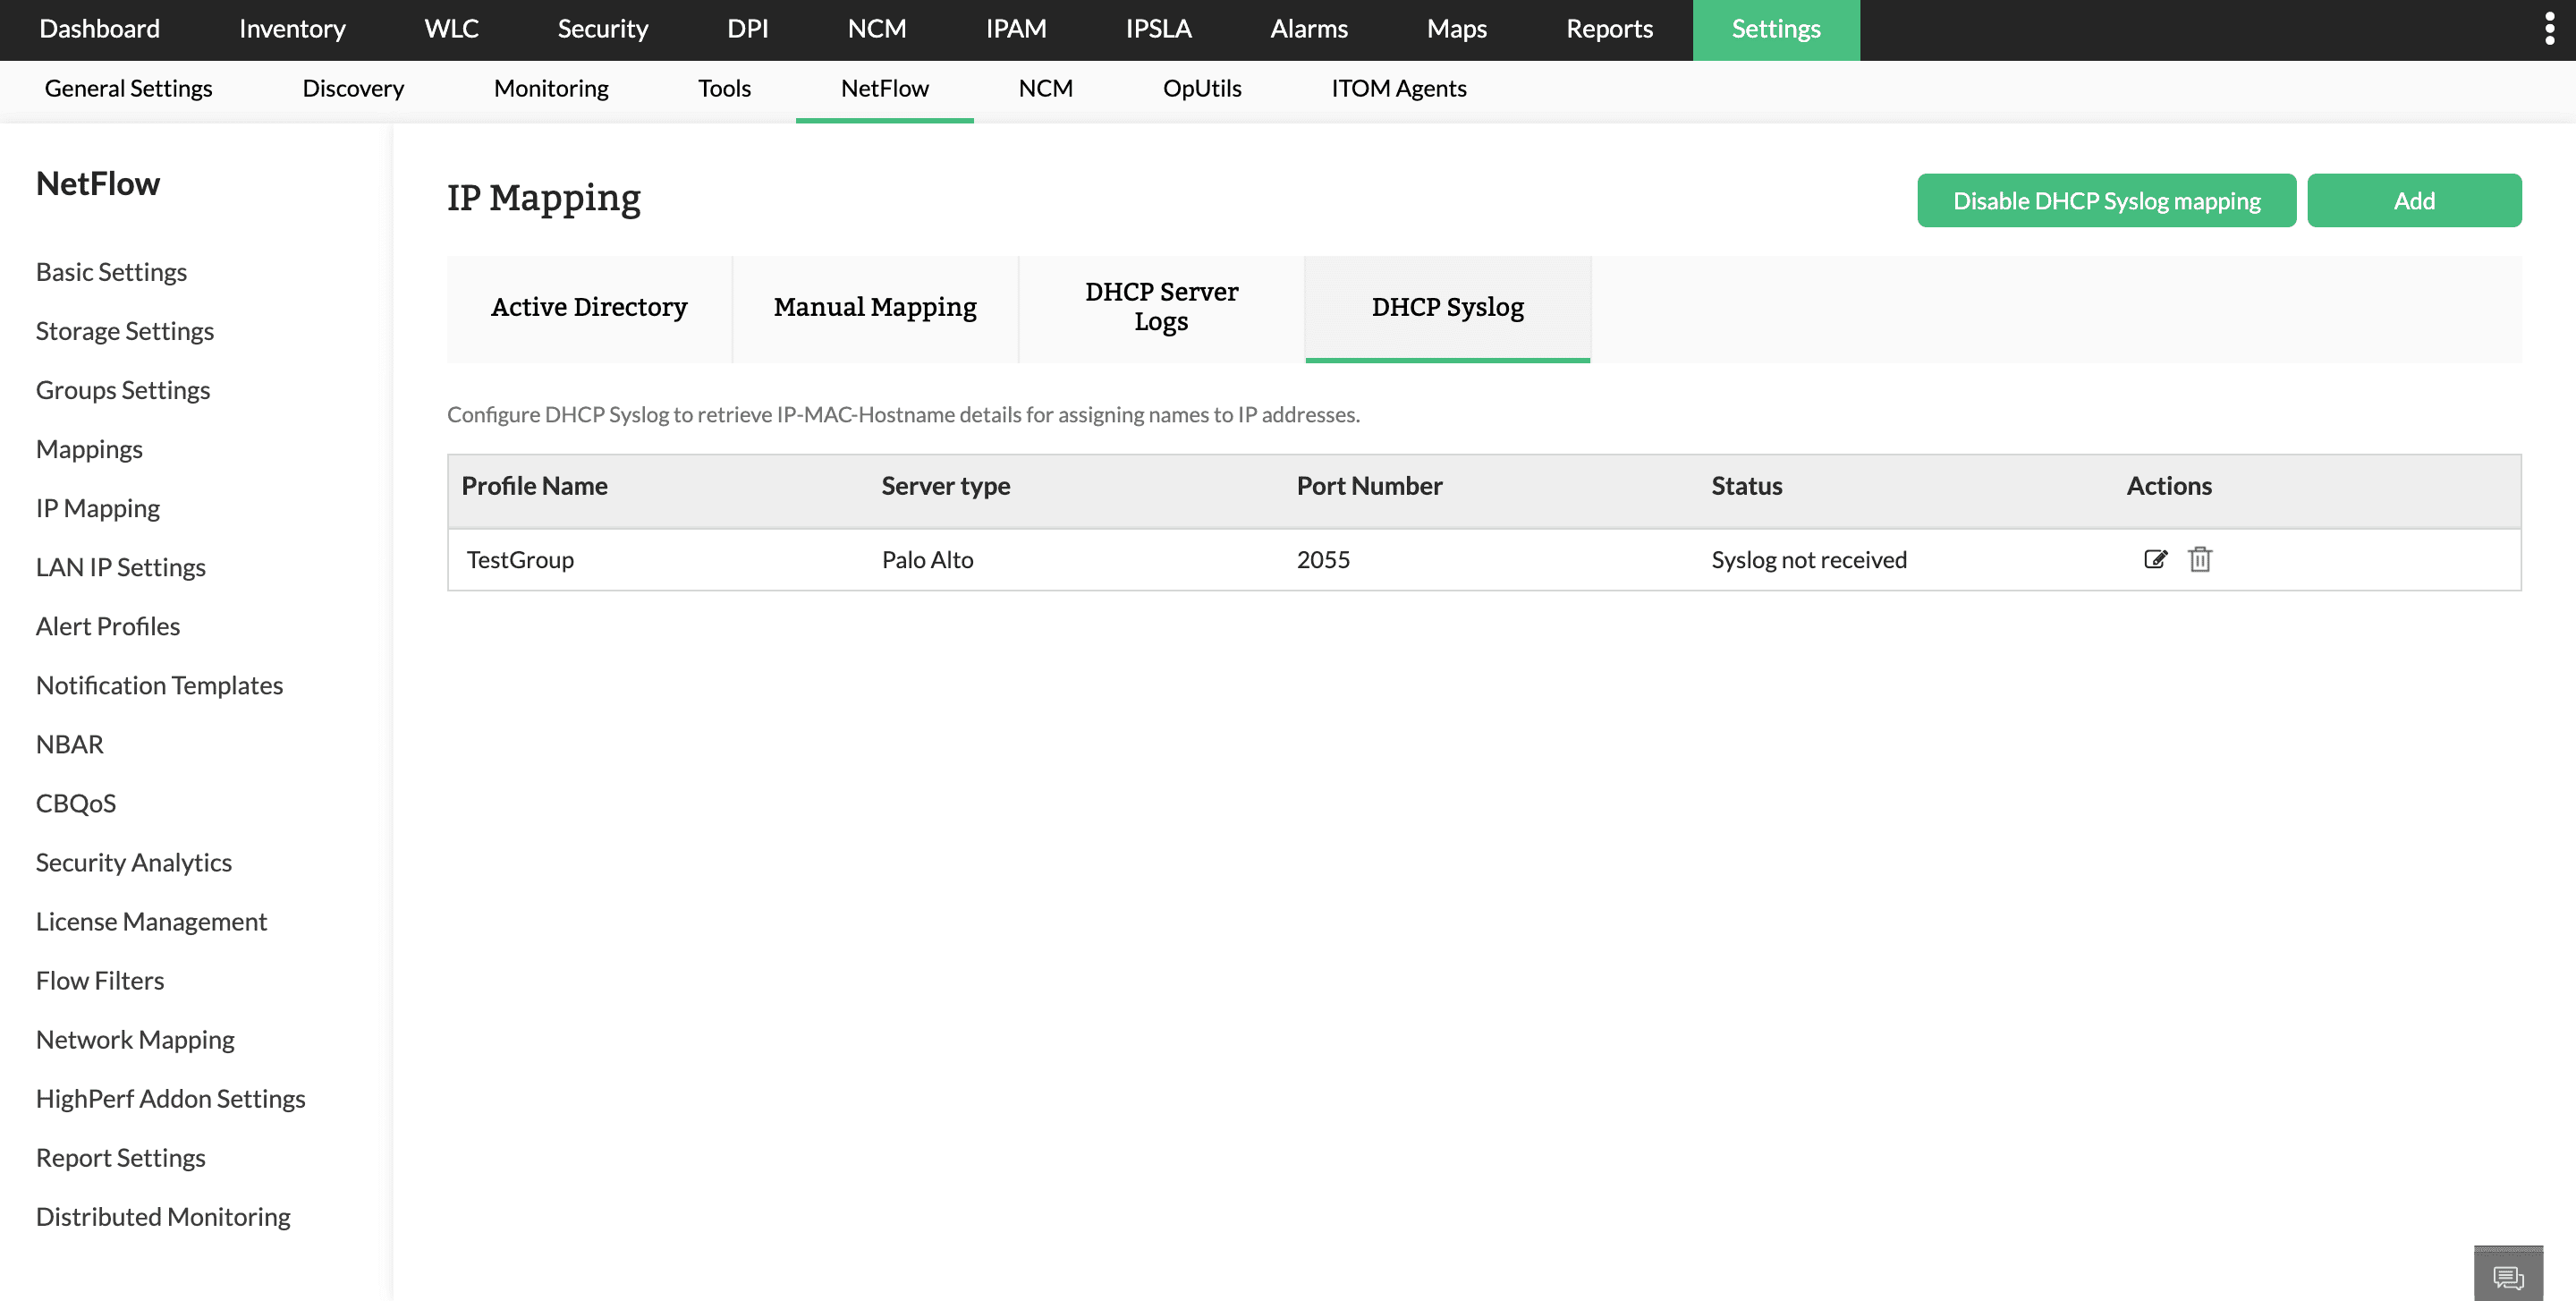
How to configure DHCP Syslog profile
In NetFlow Analyzer, configure the DHCP Syslog profile under IP Mapping.
How to configure DHCP Syslog profile?
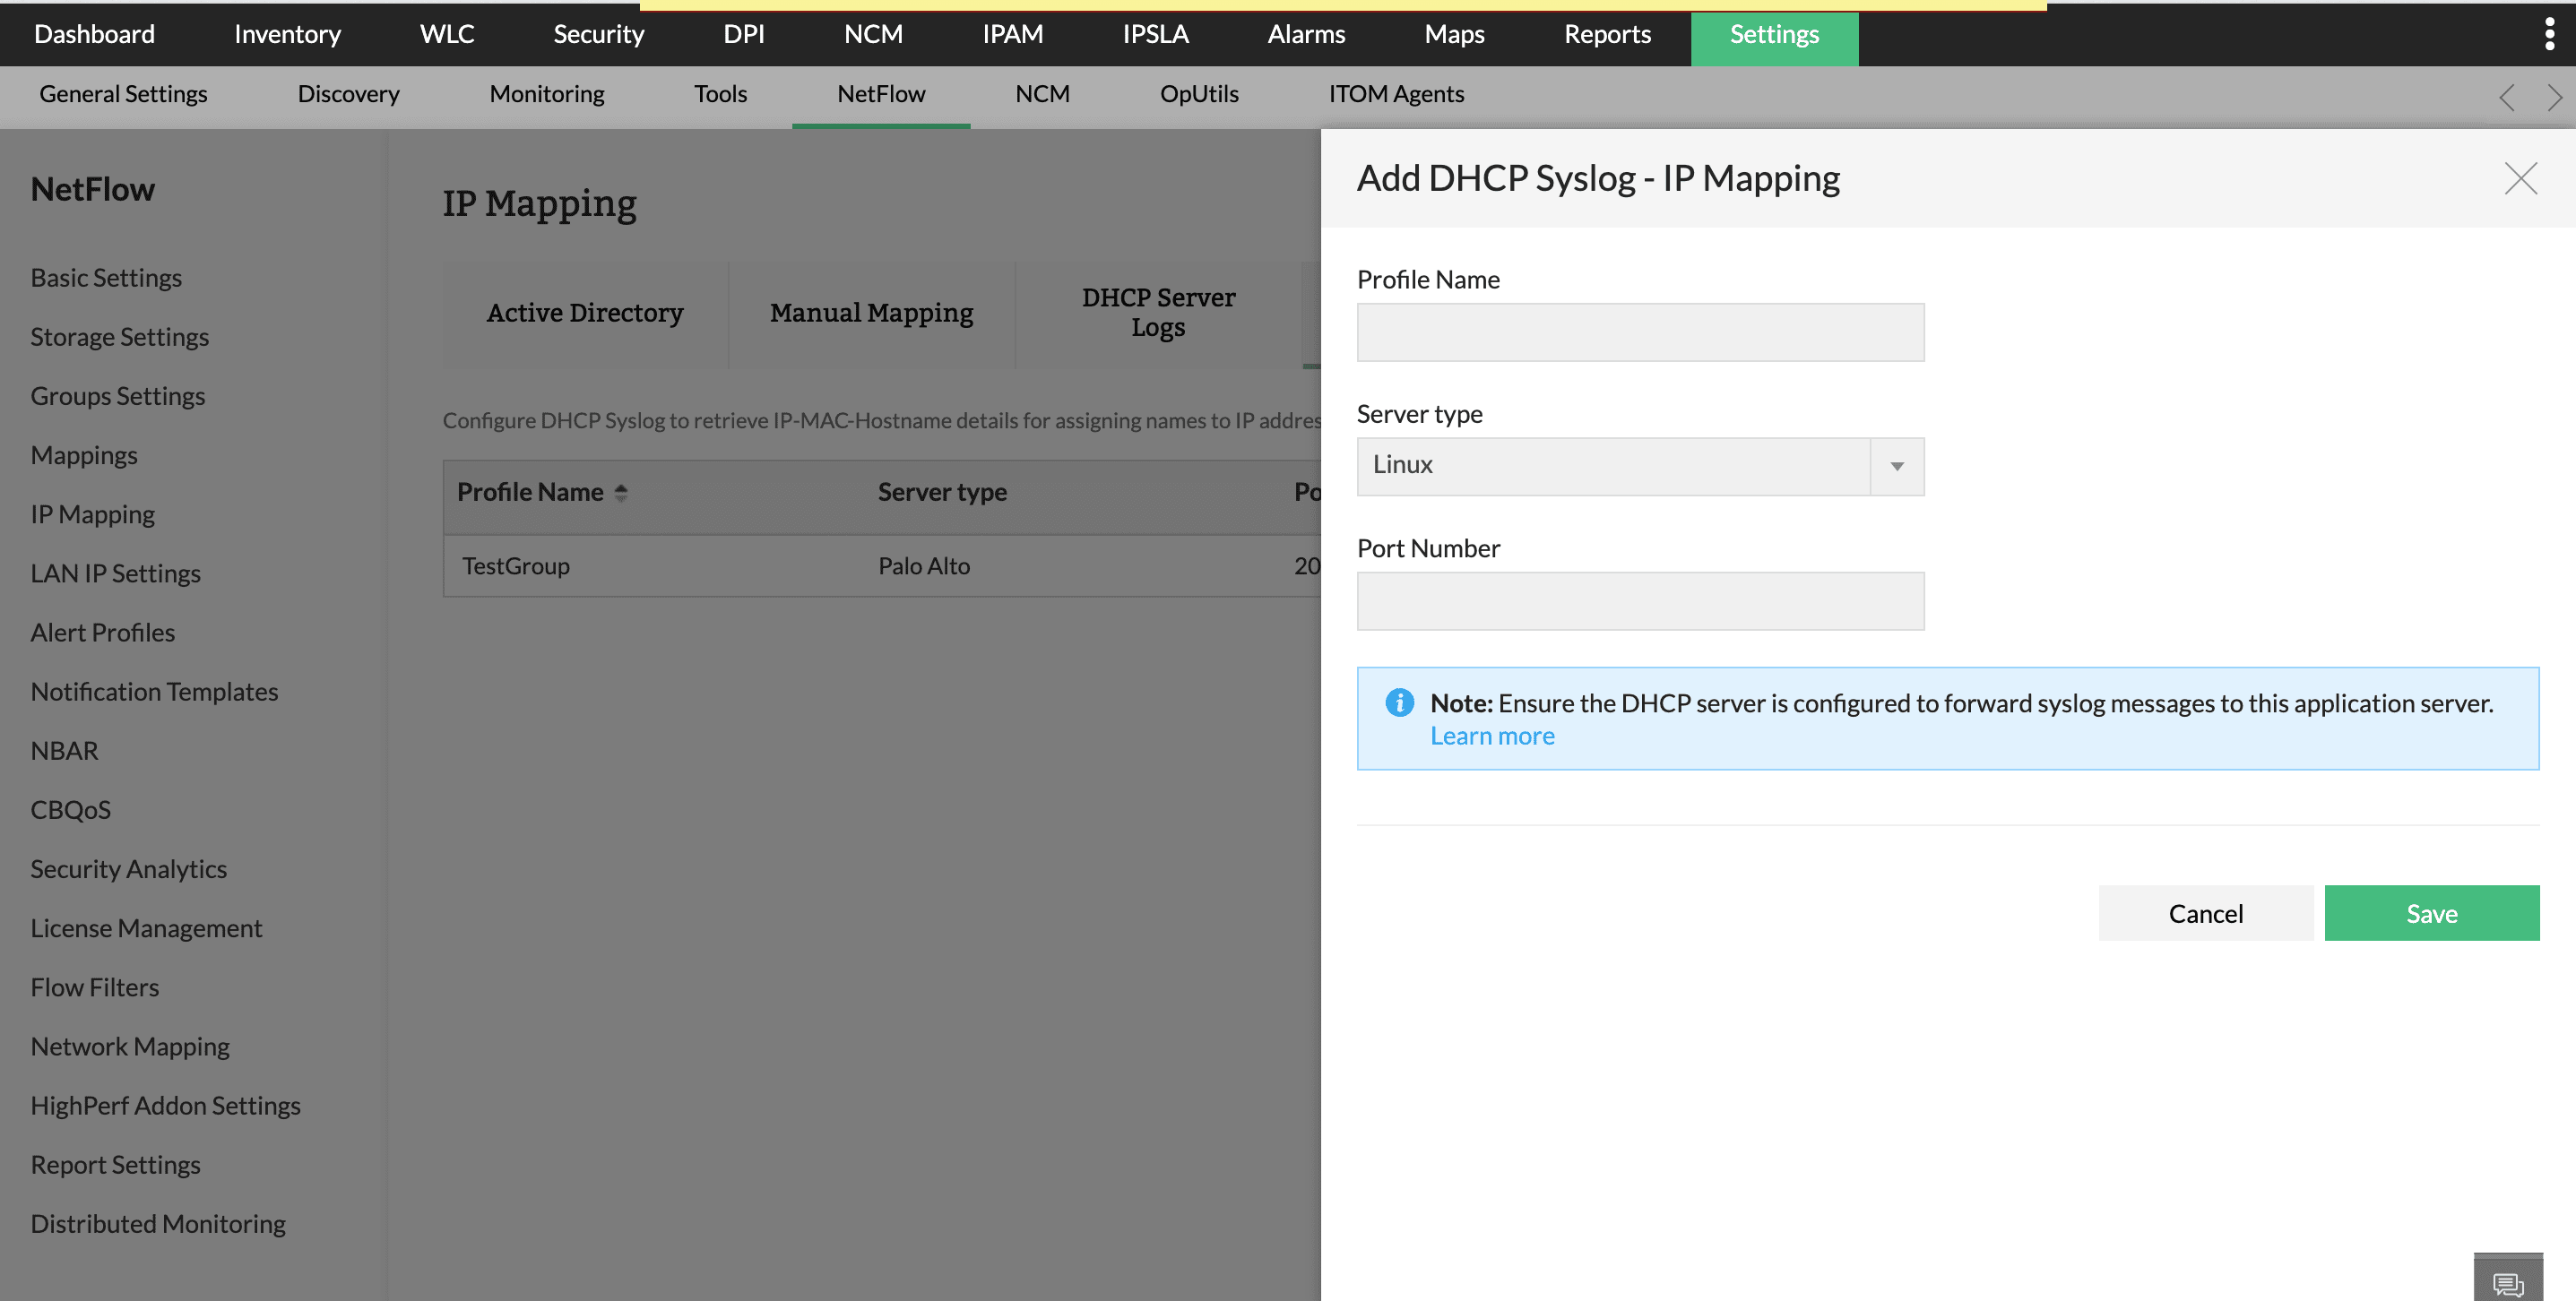
To configure DHCP Syslog in NetFlow Analyzer:
- Go to:
Settings → Netflow→ IP Mapping → DHCP Syslog - Click on "Add Profile" and fill in the following:
- Profile Name: A unique name for this configuration.
- Server Type: Select the DHCP server type from the dropdown (e.g., Windows, Cisco, etc.).
- The server type should match your DHCP server's vendor or platform (e.g., Windows Server DHCP, Cisco, Linux ISC DHCP, etc.).
- NetFlow Analyzer uses this information to correctly parse the format of incoming Syslogs.
- If you're unsure:
- Check the DHCP server’s OS or product type.
- Refer to the DHCP server documentation.
- Alternatively, start with a generic option (if available) and adjust based on parsing success.
- Port Number: Enter the port on which your DHCP server is exporting Syslogs.
- The port number should match the one used by your DHCP server to export Syslogs.
- Most DHCP servers allow you to configure a custom port for Syslog export — commonly used ports include 514 (default).
- Make sure the selected port is:
- Not already in use by another service.
- Open and accessible between the DHCP server and NetFlow Analyzer.
- In NetFlow Analyzer, enter this same port number while creating the DHCP Syslog profile under IP Mapping → DHCP Syslog Configuration.
How to choose server type?
Choosing the correct server type ensures accurate extraction of IP–MAC–Hostname details from Syslog messages.
How to choose port number?
The details of the columns of the table are given below:
- Profile Name: Unique identifier given for the DHCP configuration.
- Server Type: DHCP server vendor or type.
- Port Number: Port used to receive/export Syslogs.
- Status:
- Syslog received: The DHCP Syslog messages are being successfully received by NetFlow Analyzer.
- Syslog not received: The profile is configured, but no DHCP Syslog messages have been received yet.
- Syslog stopped: DHCP Syslog collection has stopped due to one of the following reasons,
a. The flow was sent
b. The configured port was changed
c. The port is occupied by another service
d. The background thread handling the Syslog stopped
e. Other internal issues - Log parsing initiated: DHCP Syslog messages have been received and parsing has begun.
- Log parsed successfully: The received Syslog messages were parsed without errors, and IP-to-hostname mappings were extracted successfully.
- Log parsing failed: Syslog messages were received, but parsing failed due to incorrect format, errors in the message structure, or unsupported log content.
Note:The same port configured in NetFlow Analyzer must be used while exporting DHCP Syslog.
How to configure Syslog forwarding based on server type
Following are the steps to configure syslog forwarding based on your DHCP server type.
Supported DHCP server types include,
- Linux
- Windows
- Palo Alto
- ISC
- Kea
- Cisco Prime
1. Forwarding DHCP Logs from a Linux DHCP Server
- DHCP daemon (dhcpd) generates logs using syslog facilities
- Logs are handed over to rsyslog on the local server
- rsyslog forwards selected logs to a remote log server over UDP
(In this setup, we use the local7 syslog facility for DHCP logs)
Step 1: Configure DHCP to Use local7 Facility
Edit the DHCP configuration file:
/etc/dhcp/dhcpd.conf
Add or update the following line:
log-facility local7;
•log-facility local7 instructs dhcpd to send all DHCP-related logs to the local7 syslog facility
•This allows easy separation of DHCP logs from other system logs
Step 2: Configure rsyslog to Forward DHCP Logs
Edit the rsyslog configuration file:
/etc/rsyslog.conf
(or create a dedicated file under /etc/rsyslog.d/, e.g. dhcp-forward.conf)
Add the following entry:
local7.* @10.XX.XX.XX:1540
•local7.* captures all log levels from the local7 facility
•"@" indicates UDP transport (@@ would indicate TCP)
•10.XX.XX.XX:1540 is a remote log server IP and UDP port
Step 3: (Optional but recommended) Store DHCP Logs Locally
To keep a local copy of DHCP logs, add:
local7.* /var/log/dhcpd.log
Then create the log file and set permissions:
touch /var/log/dhcpd.log
chmod 644 /var/log/dhcpd.log
Step 4: Restart Services
Restart the required services for changes to take effect:
systemctl restart rsyslog
systemctl restart dhcpd
Step 5: Verify Log Forwarding Check local DHCP logs
tail -f /var/log/dhcpd.log
Check rsyslog status
systemctl status rsyslog
Verify on Central Log Server
•Confirm logs are received on UDP port 1540
•Ensure firewall rules allow UDP traffic on this port
Firewall Considerations
Ensure outbound UDP traffic is allowed from the DHCP server:
UDP 1540 → 10.XX.X.XX
If firewall is enabled:
firewall-cmd --add-port=1540/udp --permanent
firewall-cmd --reload
2. Forwarding DHCP logs from a Windows DHCP server
Windows DHCP servers do not natively support sending logs using the syslog protocol. To forward DHCP logs, you must use a third-party syslog forwarding agent. Once it is installed and configured, DHCP logs can be forwarded to NetFlow Analyzer over UDP for IP to hostname correlation and security analysis.
For detailed configuration instructions, and sample third-party NXLog configurations check: https://docs.nxlog.co/integrate/windows-dhcp-server.html
3. Forwarding DHCP logs from a Palo Alto DHCP server
To forward DHCP server logs, from a Palo Alto firewall configured as a DHCP server, you must enable and configure syslog forwarding on the device. Once enabled, the firewall can transmit these logs over UDP to NetFlow Analyzer for further analysis and monitoring.
For step-by-step instructions on forwarding system logs to a syslog server, check this page: https://knowledgebase.paloaltonetworks.com/KCSArticleDetail?id=kA10g000000ClM9CAK
4. Forwarding DHCP logs from an ISC DHCP server
To forward DHCP logs from an ISC DHCP (dhcpd) server via UDP, configure a log collection agent to capture DHCP-server messages from the local syslog service and transmit them to a syslog server.
For detailed configuration examples and sample nxlog.conf segment, refer to the official NXLog guide: https://docs.nxlog.co/integrate/dhcpd.html
5. Forwarding DHCP logs from an ISC Kea DHCP server
To forward DHCP logs from an ISC Kea DHCP server over UDP, you must first configure Kea’s built-in logging settings to write DHCP events to either the system log or a log file.
For detailed instructions on configuring logging within Kea, refer: https://kb.isc.org/docs/kea-logging-configuration
6. Forwarding DHCP Logs from a Cisco Prime DHCP server
The DHCP server component of Cisco Prime Network Registrar (CPNR) generates logs for DHCP operations such as IP address assignments, renewals, releases, and lease expirations.
To forward these logs over UDP to a centralized syslog server, you must configure:
- DHCP logging within CPNR
- Remote syslog forwarding settings
For detailed, step-by-step configuration instructions, refer to the official Cisco documentation: https://www.cisco.com/c/en/us/td/docs/net_mgmt/prime/network_registrar/11-2/dhcp/guide/DHCP_Guide/DHCP_Guide_chapter_01.html#con_1049660
Important Note:
- DHCP Syslog mapping is mandatory and cannot be disabled when Security Analytics is enabled.
- DHCP Syslog cannot be turned off under Basic Settings → IP Resolution as well.
- Ensure that the DHCP Syslog profile is properly configured and that logs are being exported to the same port as specified in the profile.