Billing Rules
The Billing Rules feature lets MSP administrators configure how cloud costs are presented to their customers. Using Billing Rules, an MSP admin can apply a margin, markup, or discount on top of the actual cloud spend for any customer across AWS, Azure, and GCP accounts. The adjusted price is what the customer sees; the MSP admin retains visibility into both the original cost and the adjusted cost at all times.
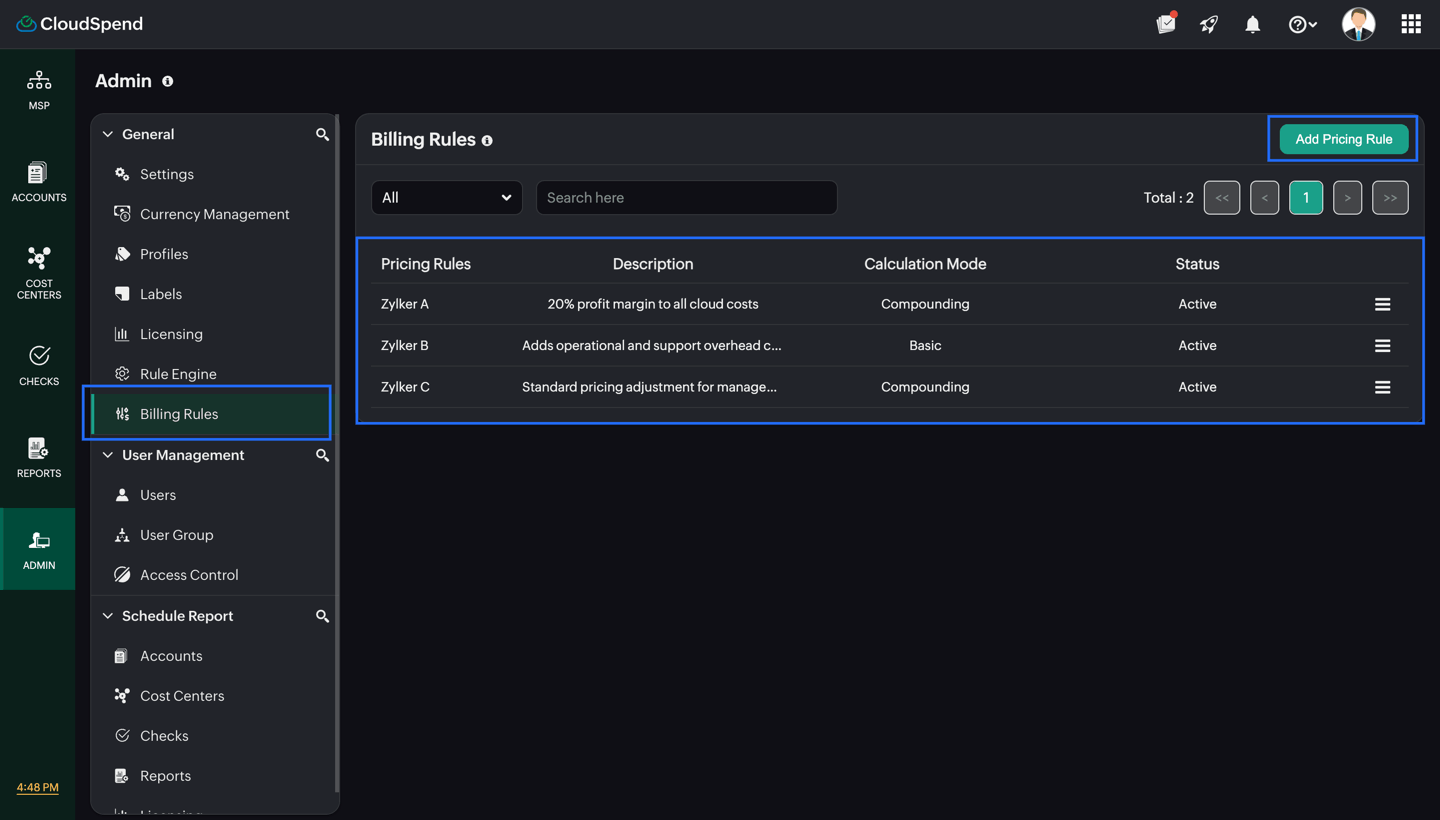
Billing Rules are created through a three-step process: Basic Details, Pricing Rules, and Assign Accounts. Once a billing rule is saved and activated, the Pricing Rules apply to the assigned accounts, and the adjusted cost is reflected in the customer's view across CloudSpend.
Why use this feature?
Cloud resellers and MSPs often have extra costs, like support, tool, procurement, and margin costs, that are not included in raw cloud bills. Without a built-in pricing layer, these adjustments have to be managed outside the platform, which adds manual effort and reduces visibility.
Billing Rules solve this by:
- Letting MSP admins define structured Pricing Rules (margin, markup, or discount) that apply automatically to customer accounts.
- Keeping the original cost visible to the MSP admin at all times, so internal reporting is never compromised.
- Allowing multiple sequential rules per profile so MSPs can model complex pricing structures, such as a margin layer followed by a markup and a closing discount.
- Scoping rules to specific accounts or, optionally, to accounts that carry a particular tag, so the same profile can apply broadly or with precision.
- Enforcing date-bound pricing through Effective From and Effective To settings, so Pricing Rules activate and expire on schedule.
Key concepts
Understanding the following terms is essential before configuring a Billing Rule. These definitions apply specifically to how CloudSpend uses each term.
Pricing Rule
A Pricing Rule is a single configuration that tells CloudSpend how to modify the original cloud cost before presenting it to a customer. Each rule has four settings: a Rule Type (what kind of adjustment), a Cost Type (what cost basis to apply it to), a Value Type (percentage or fixed amount), and a Value (the number).
A profile can have up to three Pricing Rules. When there are multiple rules, they run in the order they were created. The Calculation Mode determines whether each rule feeds into the next (Compounding) or operates independently on the original cost (Basic).
Rule Type
The Rule Type defines how the base cost is adjusted before it is shown to the customer. Margin, markup, and discount are not independent. They are typically used together to build the final price in a step by step manner.
Think of it as a pricing flow. You start with the base cost, add profit, increase it if needed, and then optionally reduce it for specific cases.
- Margin: Defines how much profit you want from the final price. You decide what portion of the final price should be profit, and the system calculates the adjusted cost accordingly. The adjusted cost is simply the price your customer sees after all Pricing Rules are applied. For example, say your base cost is $100 and you set a 50% margin. This means you want half of what the customer pays to be profit. So the system calculates the final price as $200. Out of that $200, $100 is your cost and $100 is your profit.The margin is usually applied first because it sets your baseline profit.
- Markup: This is a simple increase added on top of the current cost. After the margin is applied, a markup can be used to further increase the price. Continuing from the previous example, your cost is now $200 after applying the margin. Now, if you add a 30% markup, you are simply increasing that $200 by 30%. So the price becomes $260.You can think of a markup as adding extra charges for things like support, tools, or operational overhead.
- Discount: A discount reduces the price shown to the customer. After applying the margin and markup, a discount can be used to lower the final cost for specific customers, environments, or agreements.Continuing the same flow, your price is now $260 after the margin and markup. If you apply a 5% discount, the system reduces this amount slightly. So the final price becomes $247.A discount is usually applied at the end when you want to offer flexibility, like giving special price to a customer without changing your overall pricing structure.
How margins, markups, and discounts work together
If you look at the full flow in one go, you start with a base cost of $100. You first apply the margin to make sure you are profitable, which brings it to $200. Then you add a markup to cover additional costs, which increases it to $260. Finally, you apply a small discount, bringing the final customer price to $247.
So in simple terms:
Base cost > Add margin > Add markup > Apply discount > Final customer price
This way, you stay in control of pricing while still having flexibility where needed.
Calculation mode
The calculation mode defines how multiple Pricing Rules are applied when you add more than one Pricing Rule.
There are two modes: Compounding and Basic.
Compounding
In Compounding mode, Pricing Rules are applied in sequence, where each rule builds on the result of the previous one. Instead of applying all rules on the original base cost, the system updates the cost after every Pricing Rule and uses that updated value for the next Pricing Rule. This creates a layered pricing flow, where each rule influences the final outcome.
You can think of it as a step-by-step calculation:
- Rule A adjusts the base cost.
- Rule B applies on the updated cost resulting from Rule A.
- Rule C applies on the updated cost resulting from Rule B.
Because each step depends on the previous one, the final adjusted cost reflects the combined effect of all rules in order. Compounding is useful when you want your pricing to behave in a realistic way, where margin, markup, and discount are applied progressively rather than independently.
Basic
In Basic mode, all Pricing Rules are applied independently. The cost is not updated after each rule. Instead, every rule is calculated separately based on the selected Cost Type, so one rule does not affect how another is calculated.
Think of it like this:
- Rule A is calculated using the selected Cost Type.
- Rule B is calculated using the selected Cost Type.
- Rule C is calculated using the selected Cost Type.
There is no step-by-step calculating. Each rule works in isolation, and the effect of one rule does not carry over to the next.
Because of this, the final result does not reflect a layered pricing flow. Instead, each adjustment is calculated separately based on the chosen Cost Type.
Basic mode is useful when you want simple and consistent calculations, where all adjustments are applied independently without any dependency between rules.
Value type
- Percentage: The rule value is interpreted as a percentage of the cost. This is the most common value type for a Pricing Rule.
- Fixed amount: The rule value is interpreted as an absolute dollar amount added to or subtracted from the cost, regardless of its size.
Cost Type
The Cost Type determines to which cost basis the Pricing Rule applies. All four options are available in the Cost Type drop-down list during the Pricing Rules step.
- Blended Cost: An average cost that combines both on-demand and Reserved Instance rates across all accounts in a consolidated billing family. Blended cost smooths out pricing differences between accounts that use Reserved Instances and those that do not. This Cost Type is applicable for AWS.
- Unblended Cost: The actual cost charged for each line item at the specific rate applicable to that resource, without averaging. An account pays the on-demand rate for on-demand usage and the reserved rate for reserved usage. This Cost Type is applicable for AWS.
- Amortized Usage Cost: Reserved Instance and Savings Plan fees are spread evenly across the commitment period. This gives a consistent monthly view of cost, which is useful for financial planning and accurate cost attribution. This Cost Type is applicable for AWS.
- Actual Cost: The real cost as charged by the cloud provider at the time of the transaction, including any upfront reservation fees in the month they were paid. This is the same as what appears on the raw cloud bill. This Cost Type is applicable for Azure and GCP cloud types.
Note: Cost Type locking in Compounding mode: The Cost Type you choose in Rule 1 is locked for all subsequent rules in the same profile. Rules 2 and 3 cannot have a different Cost Type. This ensures the compounding chain operates on a consistent cost basis.
Rule Type sequencing
When you add a second or third rule to a profile, the available Rule Types are constrained by what has already been applied.
After adding a Margin rule as Rule 1, the options available for Rule 2 are Markup and Discount. After adding a Markup rule as Rule 2, the only option available for Rule 3 is Discount.
This means the valid rule sequence is: Margin, Markup, Discount. Not all three rules are required, but the order cannot be changed once a Rule Type has been selected for Rule 1.
Use cases
Tiered customer pricing based on contract
An MSP manages three customers with different contract terms. Customer A is on a premium plan (20% margin), Customer B is on a standard plan (12% markup), and Customer C is on a pay-as-you-go plan with a 5% discount. The MSP creates three separate billing rules, one per customer and assigns each profile to the corresponding customer's accounts.
Tag-scoped pricing for multi-environment accounts
A customer has production and development accounts under the same AWS organization. The MSP applies a 15% markup to production accounts but applies a 10% discount to development accounts to incentivize lower spend. By configuring tags (for example, environment: production and environment: development ) within the same profile, the MSP applies different effective pricing to each environment without creating separate profiles.
Time-bound promotional discount
An MSP runs a six-month onboarding promotion for a new customer: zero markup for the first three months, then a 10% markup from month four onward. The MSP creates an initial profile with no markup rules and sets Effective To to the end of month three. A second profile with the 10% markup rule is set to start from month four using Effective From, so the transition happens automatically.
Amortized cost billing for Reserved Instance customers
A customer purchased Reserved Instances with upfront payments. The MSP wants billing to reflect a smooth monthly cost rather than a spike in the month of purchase. By selecting Amortized Usage Cost as the Cost Type, the billing rule spreads the reservation fee evenly across the commitment period, making monthly invoices consistent and predictable.
MSP internal margin tracking
The MSP admin uses the Accrued Data view in Licensing to reconcile the month's billings. By switching between Original Cost and Adjusted Cost for each customer, the admin can immediately see the total margin earned per customer without exporting data or running external calculations.
How to configure a Billing Rule
To configure a Billing Rule, go to Admin > General > Billing Rules from your MSP account. Click Add Pricing Rule in the top-right corner of the Billing Rules list page, and complete the steps below:
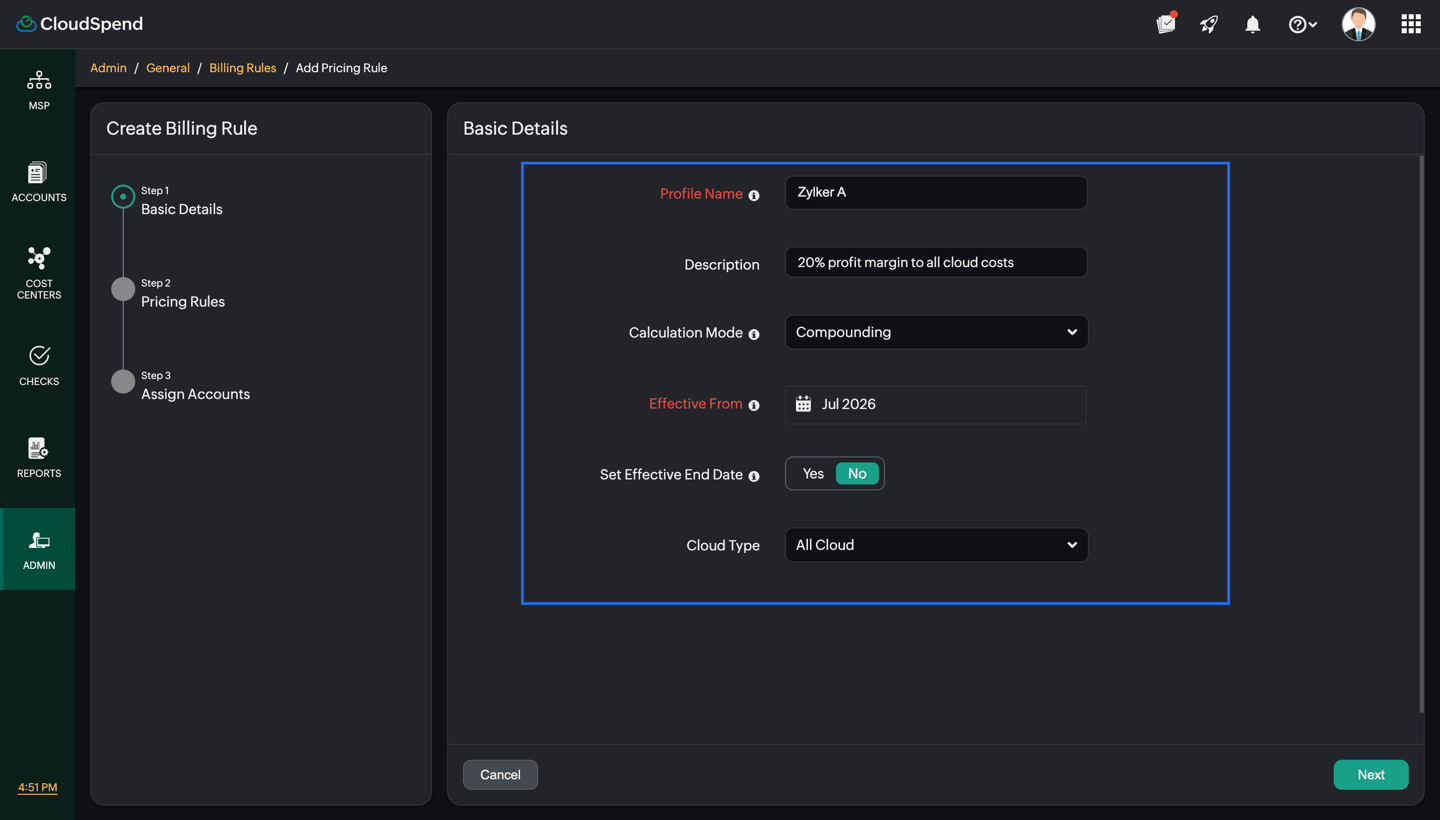
Step 1: Basic Details
- Enter a Profile Name.
- (Optional) Enter a Description.
- In the Calculation Mode drop-down menu, select Compounding or Basic.
- Set the Effective From date using the date picker. This date determines when the Pricing Rules go into effect.
- Set the Set Effective End Date toggle option to No if the profile should apply indefinitely. Toggle it to Yes if you want to define an end date, and select an end date.
- In the Cloud Type drop-down menu, select the cloud provider scope for this profile.
- Click Next.
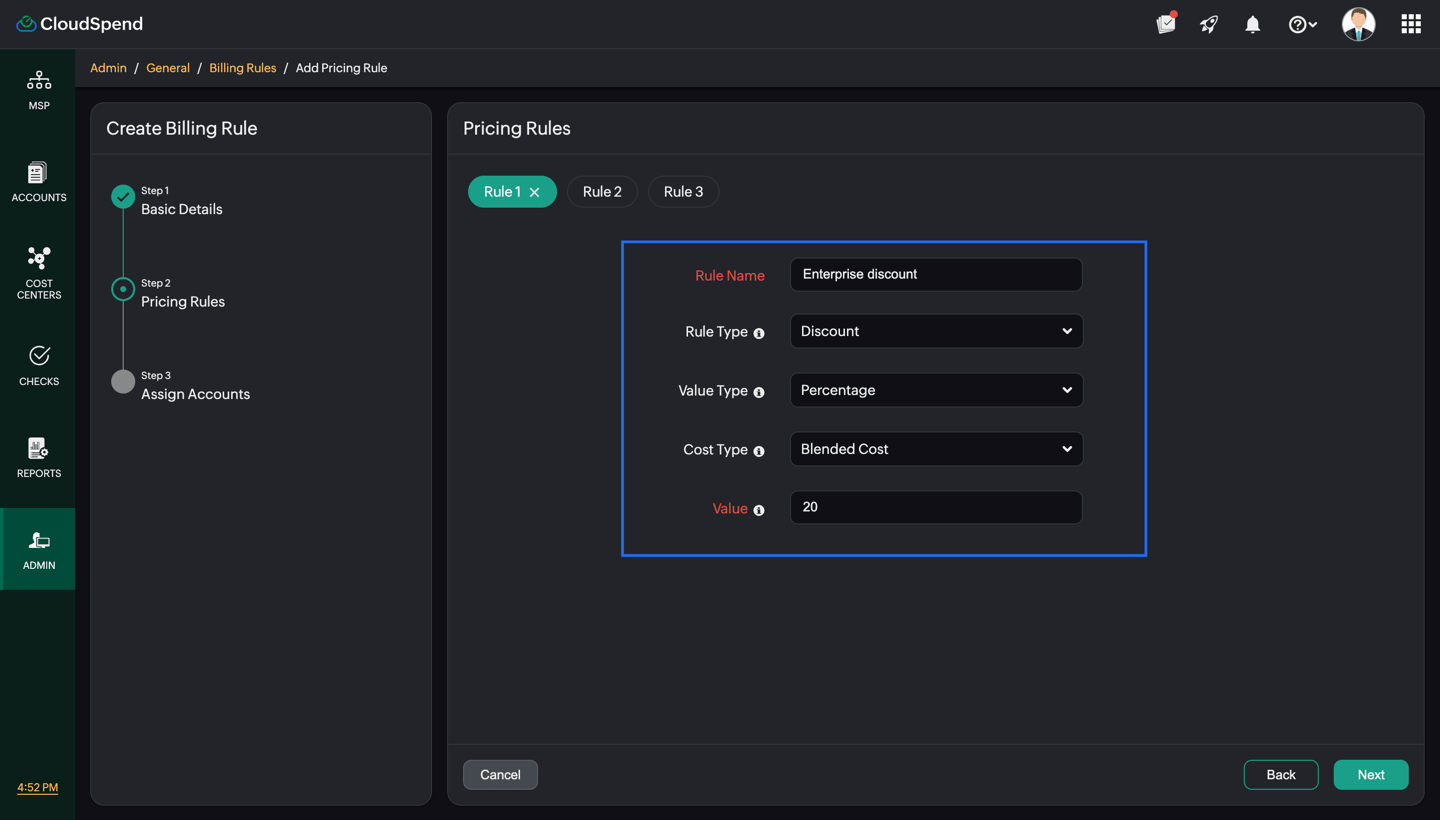
Step 2: Pricing Rules
- Enter a Rule Name.
- In the Rule Type drop-down menu, select Margin, Markup, or Discount.
- In the Value Type drop-down, select Percentage or Fixed Amount.
- In the Cost Type drop-down menu, select Blended Cost, Unblended Cost, Amortized Usage Cost, or Actual Cost.
- Enter the Value (as a numeral).
- To add a second rule, click + Add Rule. A Pricing Rules 2 tab appears. The Rule Type for Rule 2 will be limited to the options that can follow Rule 1 (for example, if Rule 1 is Margin, only Markup and Discount are available for Rule 2). The Cost Type field in Rule 2 and any subsequent rule is locked to the value selected in Rule 1.
- Repeat to add a third rule if needed.
- Click Next.
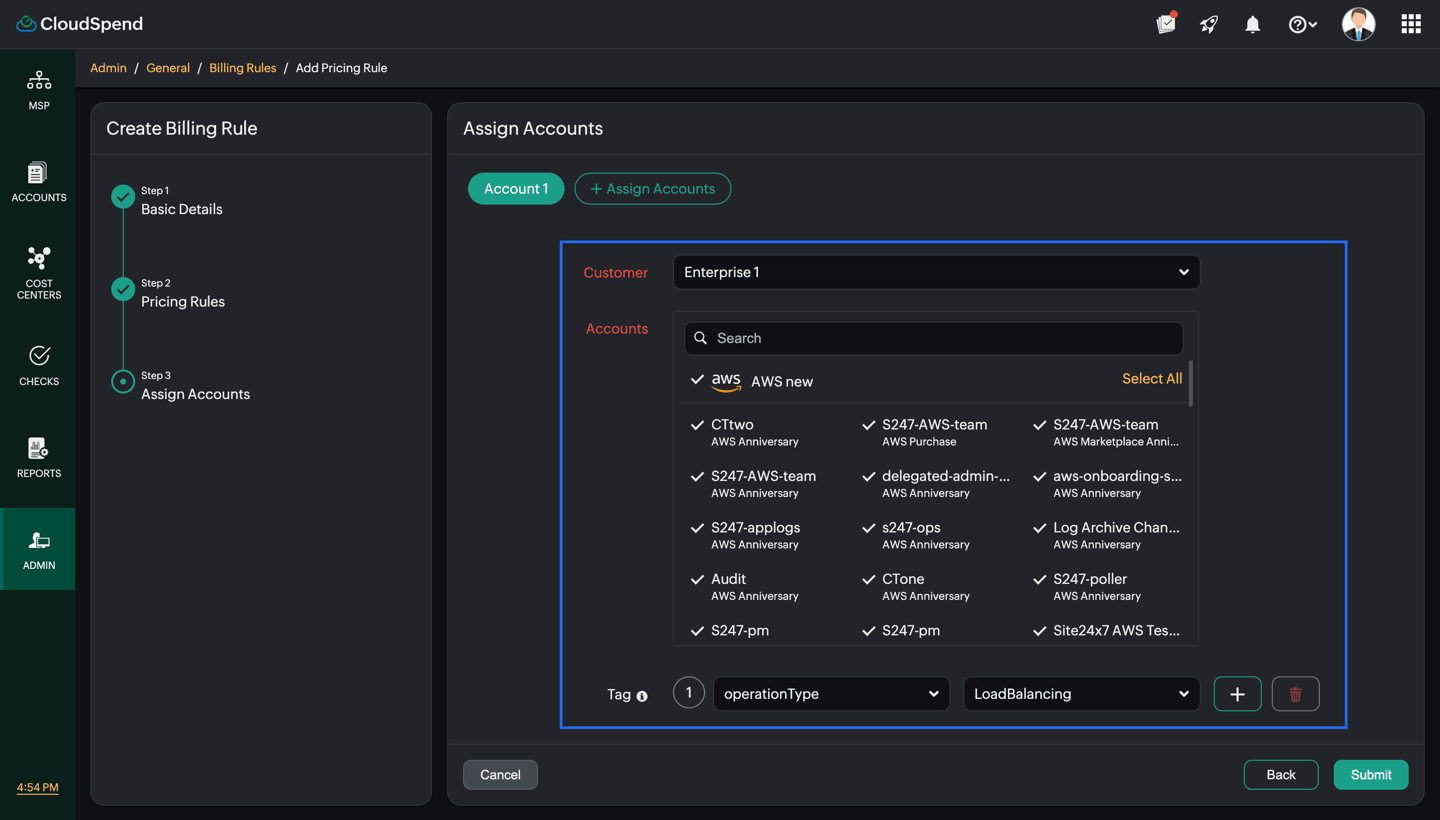
Step 3: Assign Accounts
- Select the Customer to whom this pricing profile applies.
- In the Accounts list, select the required cost accounts and their billed accounts to include. Use Select All next to a cost account to select all billed accounts under that account, or select individual billed accounts by clicking them.
- (Optional) Configure tags. In the Tag field, select a Tag Key from the first drop-down and a Tag Value from the second drop-down. Click + to add additional tag conditions. When tags are specified, the Pricing Rules apply to accounts belonging to the selected customer that also carry the specified tags. This is useful when you want to scope rules to a subset of accounts based on environment or project tags.
- To assign accounts for a second customer under the same profile, click + Assign Accounts and repeat the steps above.
- Click Submit to save and activate the profile.
How pricing is reflected across CloudSpend
Once a profile is submitted, it appears in the Billing Rules page with a status of Active. The Pricing Rules go into effect on the Effective From date.
What the customer sees: When logged in as a customer, all cost figures displayed, such as previous month, current month to date, and forecast, reflect the adjusted cost across CloudSpend. The customer has no access to the original cost.
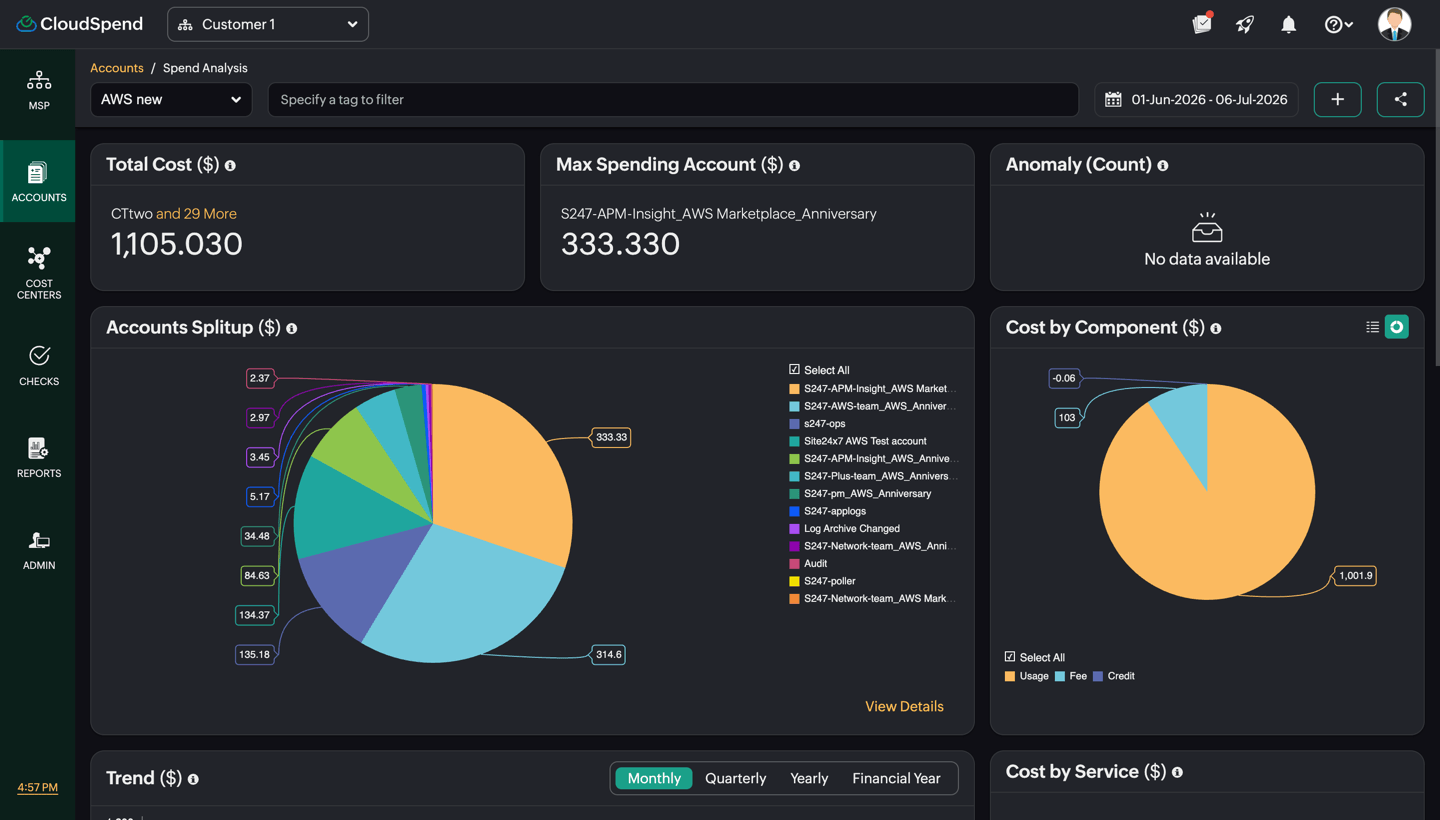
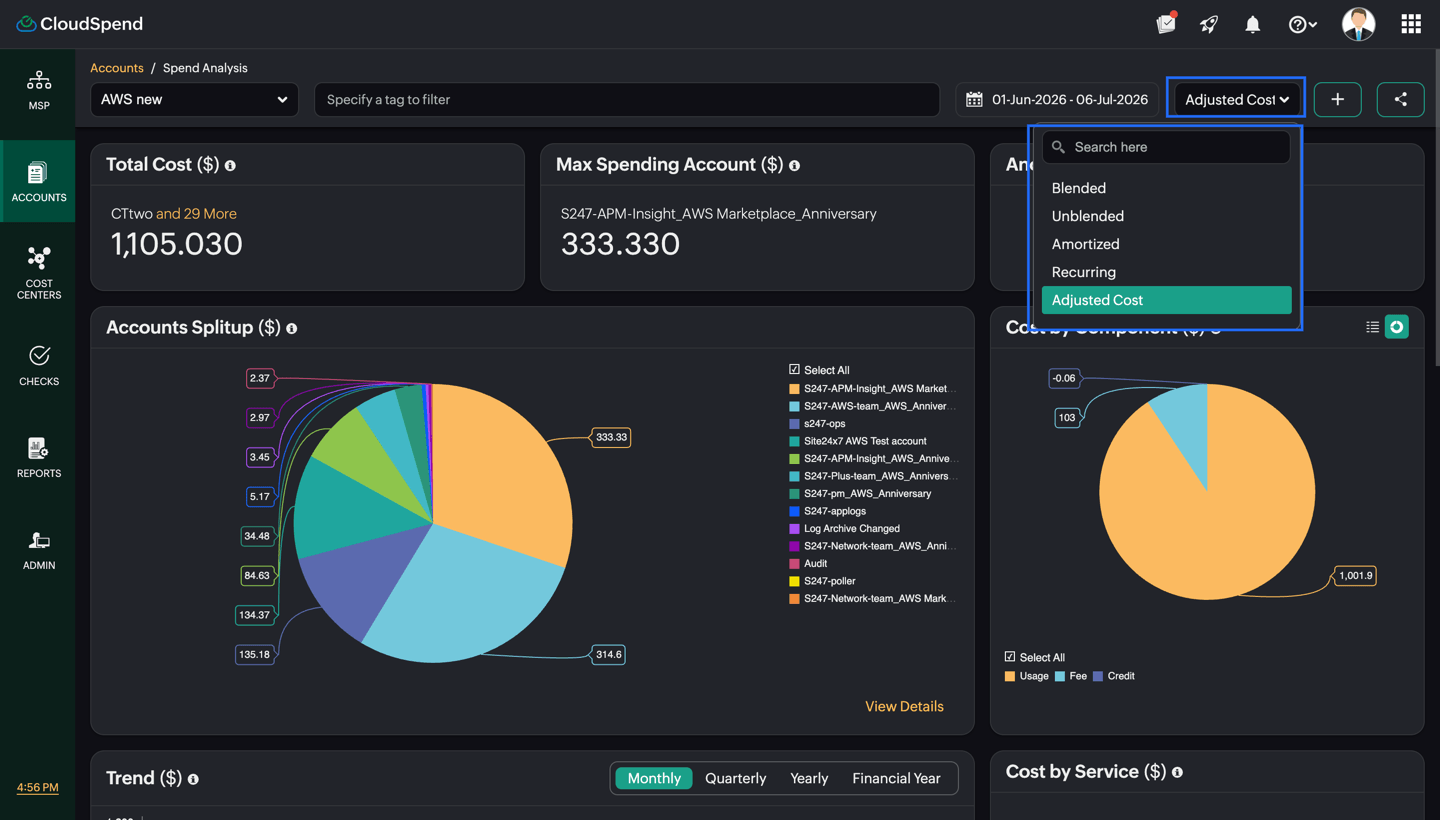
What the MSP admin sees: The MSP admin can switch between the Actual Cost and Adjusted Cost across CloudSpend. Selecting Adjusted Cost shows the customer-facing figures; selecting Actual Cost shows the cloud provider's original charge.
As an MSP admin, you can view the accrued licensing data. This view shows a month-by-month breakdown of the billed cost with two switchable perspectives:
- Original Cost: The unmodified cloud spend for the customer's accounts.
- Adjusted Cost: The cost after the billing rules have been applied.
The difference between these two figures represents the MSP's margin, markup, or net pricing adjustment for that period.
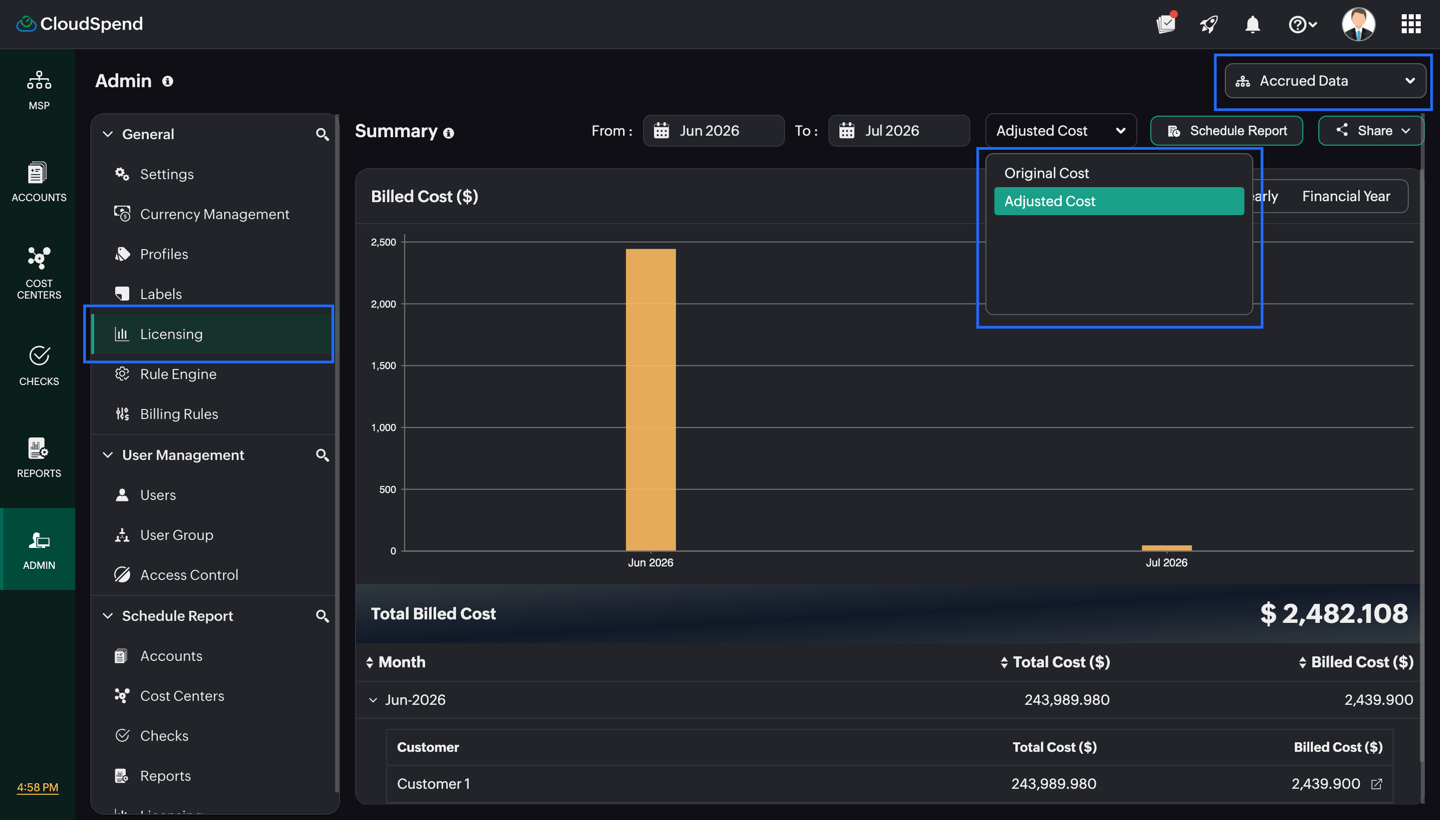
To view the accrued licensing data:
- Navigate to Admin > Licensing.
- Select Accrued Data from the drop-down menu on the top-right of the page.
- Use the Cost Type drop-down (showing Original Cost by default) to switch between Original Cost and Adjusted Cost.
- The summary chart and the Total Billed Cost table update to reflect the selected view.
- Click any month row to expand it and see per-customer breakdowns.
- Click a billing month entry to open the detailed invoice page, which shows details such as Cloud Type, Cost Account, Billing Month, Total Cost, and Billed Cost.
Calculation examples
The following examples use MSP pricing scenarios to illustrate how Billing Rules produce adjusted costs.
Example 1: Single margin rule
An MSP wants to keep a 50% margin on all GCP costs for a customer. Let's say, the base cost here is $1,000. With a 50% margin, the selling price needs to be adjusted so that half of it is margin.
Calculation:
- $1,000 ÷ (1 − 0.50) = $2,000
So the customer sees $2,000, while the MSP admin can still view both the original $1,000 and the adjusted value.
Example 2: Compounding margin + markup
In this case, the MSP applies two rules one after the other. First, a 20% margin, then a 10% markup. Since this is Compounding mode, the second rule builds on the result of the first.
For instance, if the starting cost is $500, after applying the 20% margin, the cost becomes $625.
Calculation :
- $500 ÷ 0.80 = $625
Then a 10% markup is added on top of that. So, it is calculated as:
- $625 × 1.10 = $687.50
So the customer sees $687.50. The difference between this and the original cost, i.e., $187.50, is what the MSP earns.
Example 3: Full three-rule compound (margin + markup + discount)
Here, all three Rule Types are used together. A margin is applied first, then a markup, and finally a small discount is passed back to the customer.
Consider that the base cost starts at $800. After applying a 25% margin, it increases to $1,066.67.
It is calculated as:
- $800 ÷ 0.75 = $1,066.67
Now, a 15% markup is added, taking it to $1,226.67. So, the calculation looks like:
- $1,066.67 × 1.15 = $1,226.67
Finally, a 5% discount is applied, which brings the final price down to $1,165.33. This is calculated as:
- $1,226.67 × 0.95 = $1,165.33
This is the amount the customer sees. Compared to the original cost, the MSP retains $365.33.
Example 4: Fixed amount markup
Here, instead of working with percentages, the MSP simply adds a fixed service fee on top of the cost. Let's say, the base cost is $320.
In this case, the MSP wants to charge an additional $50 as a flat fee, regardless of how much the customer uses.
So rather than scaling with the cost, this fee stays constant every time. This is calculated as:
- $320 + $50 = $370
That means the customer is billed $370 in total.
This approach is useful when the MSP wants to recover a standard service or support cost that doesn’t depend on usage.
Things to note:
- The Effective To is the label for the toggle that enables or disables the Effective To date. When set to No, no end date is applied.
- The Billing Rules feature is only accessible from the MSP Admin section. Customers do not have access to configure or view Billing Rules settings.
- Tags added in the Assign Accounts step are optional. If no tags are specified, the Pricing Rule applies to all accounts selected for that customer assignment.
- When tags are specified, the rule applies to all accounts belonging to the selected customer that carry those tags, not only the accounts explicitly checked in the Accounts list.
- The Calculation Mode (Compounding or Basic ) applies to the entire profile and cannot be changed per rule.
- The Licensing tab will be displayed only for the MSP admin.
- If you configure a Billing Rule for an account, every cost-related detail, such as Spend Analysis, Resource Explorer, and Reports, will be displaying the adjusted cost values.
- If a customer sets up a budget or anomaly for an account with a Billing Rule, all related details are shown only in adjusted cost. If an MSP admin sets it up for the customer, the MSP admin can choose between actual cost and adjusted cost. When adjusted cost is selected, the adjusted cost is shown to the customer. When the actual cost is selected, the actual cost will be shown.