Managing DHCP scopes
What is a DHCP Scope?
A DHCP scope is a fundamental component of the DHCP server, defining a specific range of IP addresses that the server can allocate or lease to devices on a network. in DHCP defined as a pool of IP addresses that a DHCP server can dynamically assign to clients on a particular subnet.
DDI Central supports the following network topological elements that can organize the DHCP scopes in IP network infrastructure:
Subnets
- A subnet represents a basic segment of IP addresses (IPv4 or IPv6) within a network. Defining, a subnet in DDI Central is used to define a range of IP addresses that the DHCP server can assign to clients on a specific network segment.
- Each subnet is defined by a range of IP addresses and a subnet mask, determining the network's address range.
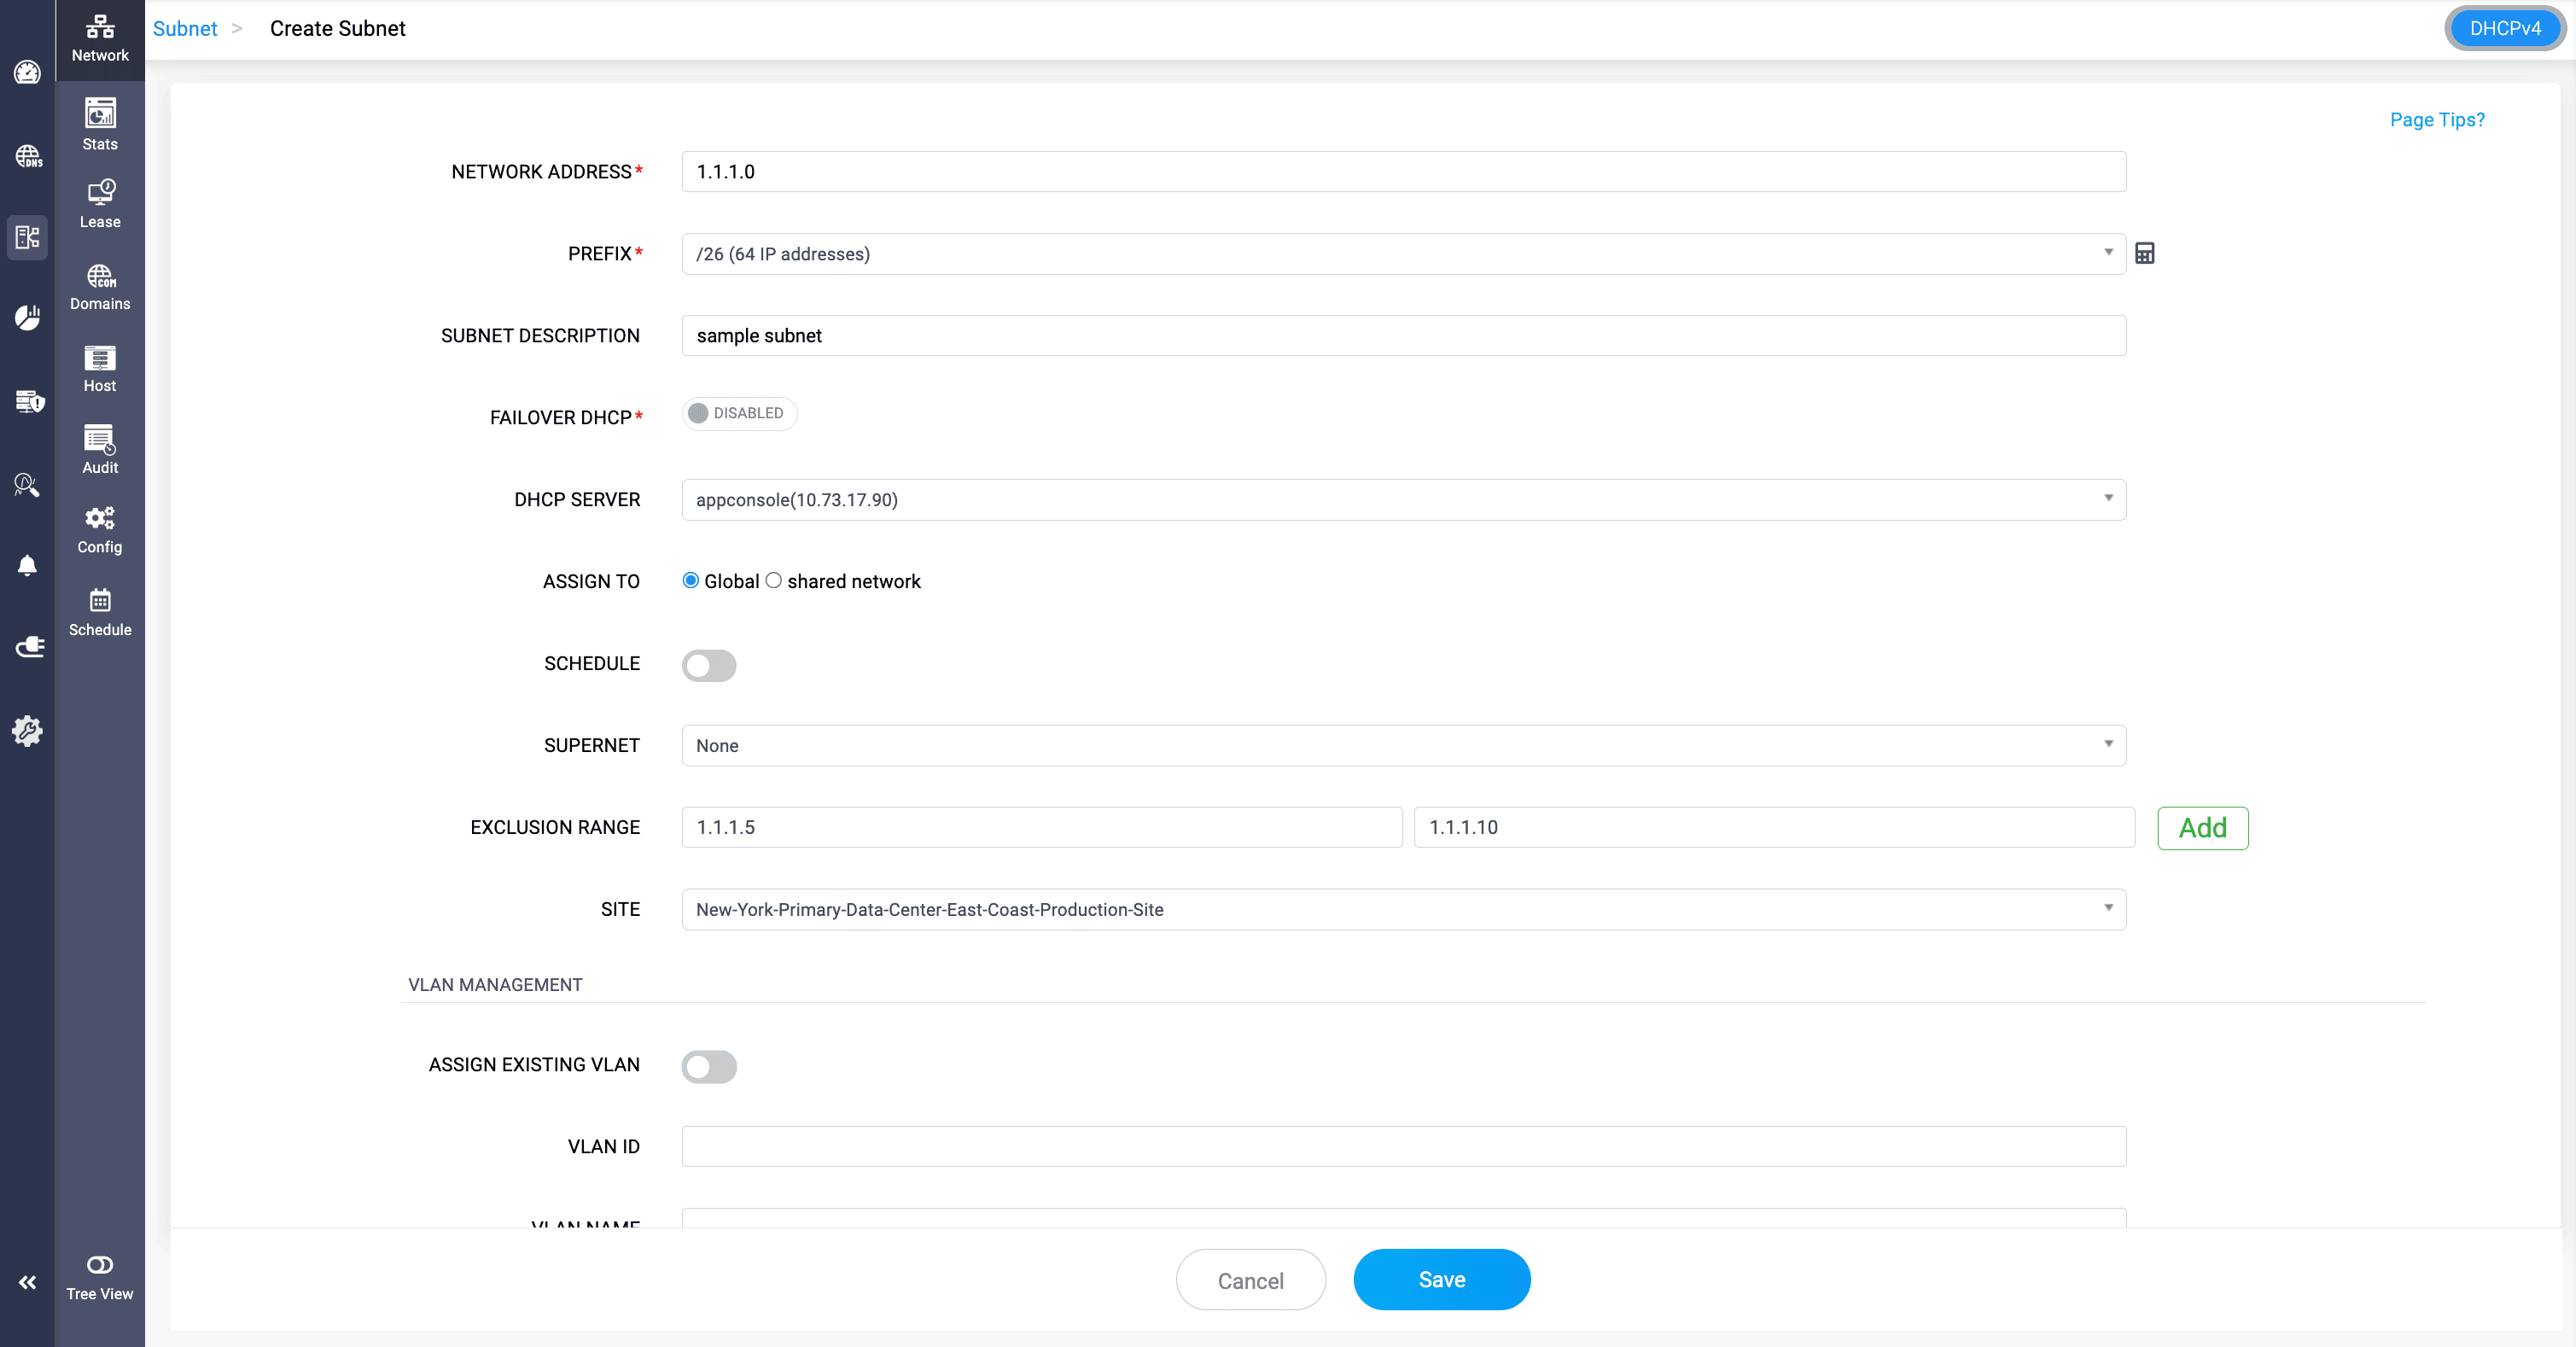
- To create or update a subnet go to DHCP-> Network-> Subnet
- Define a new subnet by providing values for various attributes of the subnet like: Provide the first address of the pool to be associated with the new subnet.
- Provide a suitable description for the subnet to quickly identify its purpose and convey the policy associated with it, for a common understanding of its layout.
Specify the subnet size using an appropriate prefix, which denotes the number of IP addresses that the subnet can accommodate.
Note: The Subnet Calculator in DDI Central helps administrators efficiently plan and allocate IPv4 and IPv6 address spaces. Learn more about the Subnet Calculator Tool.- Enable DHCP failover and select a DHCP server to take over the task of assigning IP addresses for the subnet without any significant downtime.
- Specify the addresses within the defined range that should not be assigned to clients through Exclusion range.
- Assign the necessary DHCP options.
- Click Save.
- Note: DDI Central also offers the option to clear the active subnets currently in lease. Clearing all the leases for a subnet removes it from your database, freeing up memory, but lease records stay intact, enabling IP addresses to revert to their original states as per the lease records after a short interval of 5 minutes.
Creating a DHCPv6 Subnet:
To create a DHCPv6 subnet,
Go to DHCP-> Network. On the Network page, Select the Subnet tab. Now click on the Add Subnet button.
On the Create Subnet page that appears, enter the essential details below:
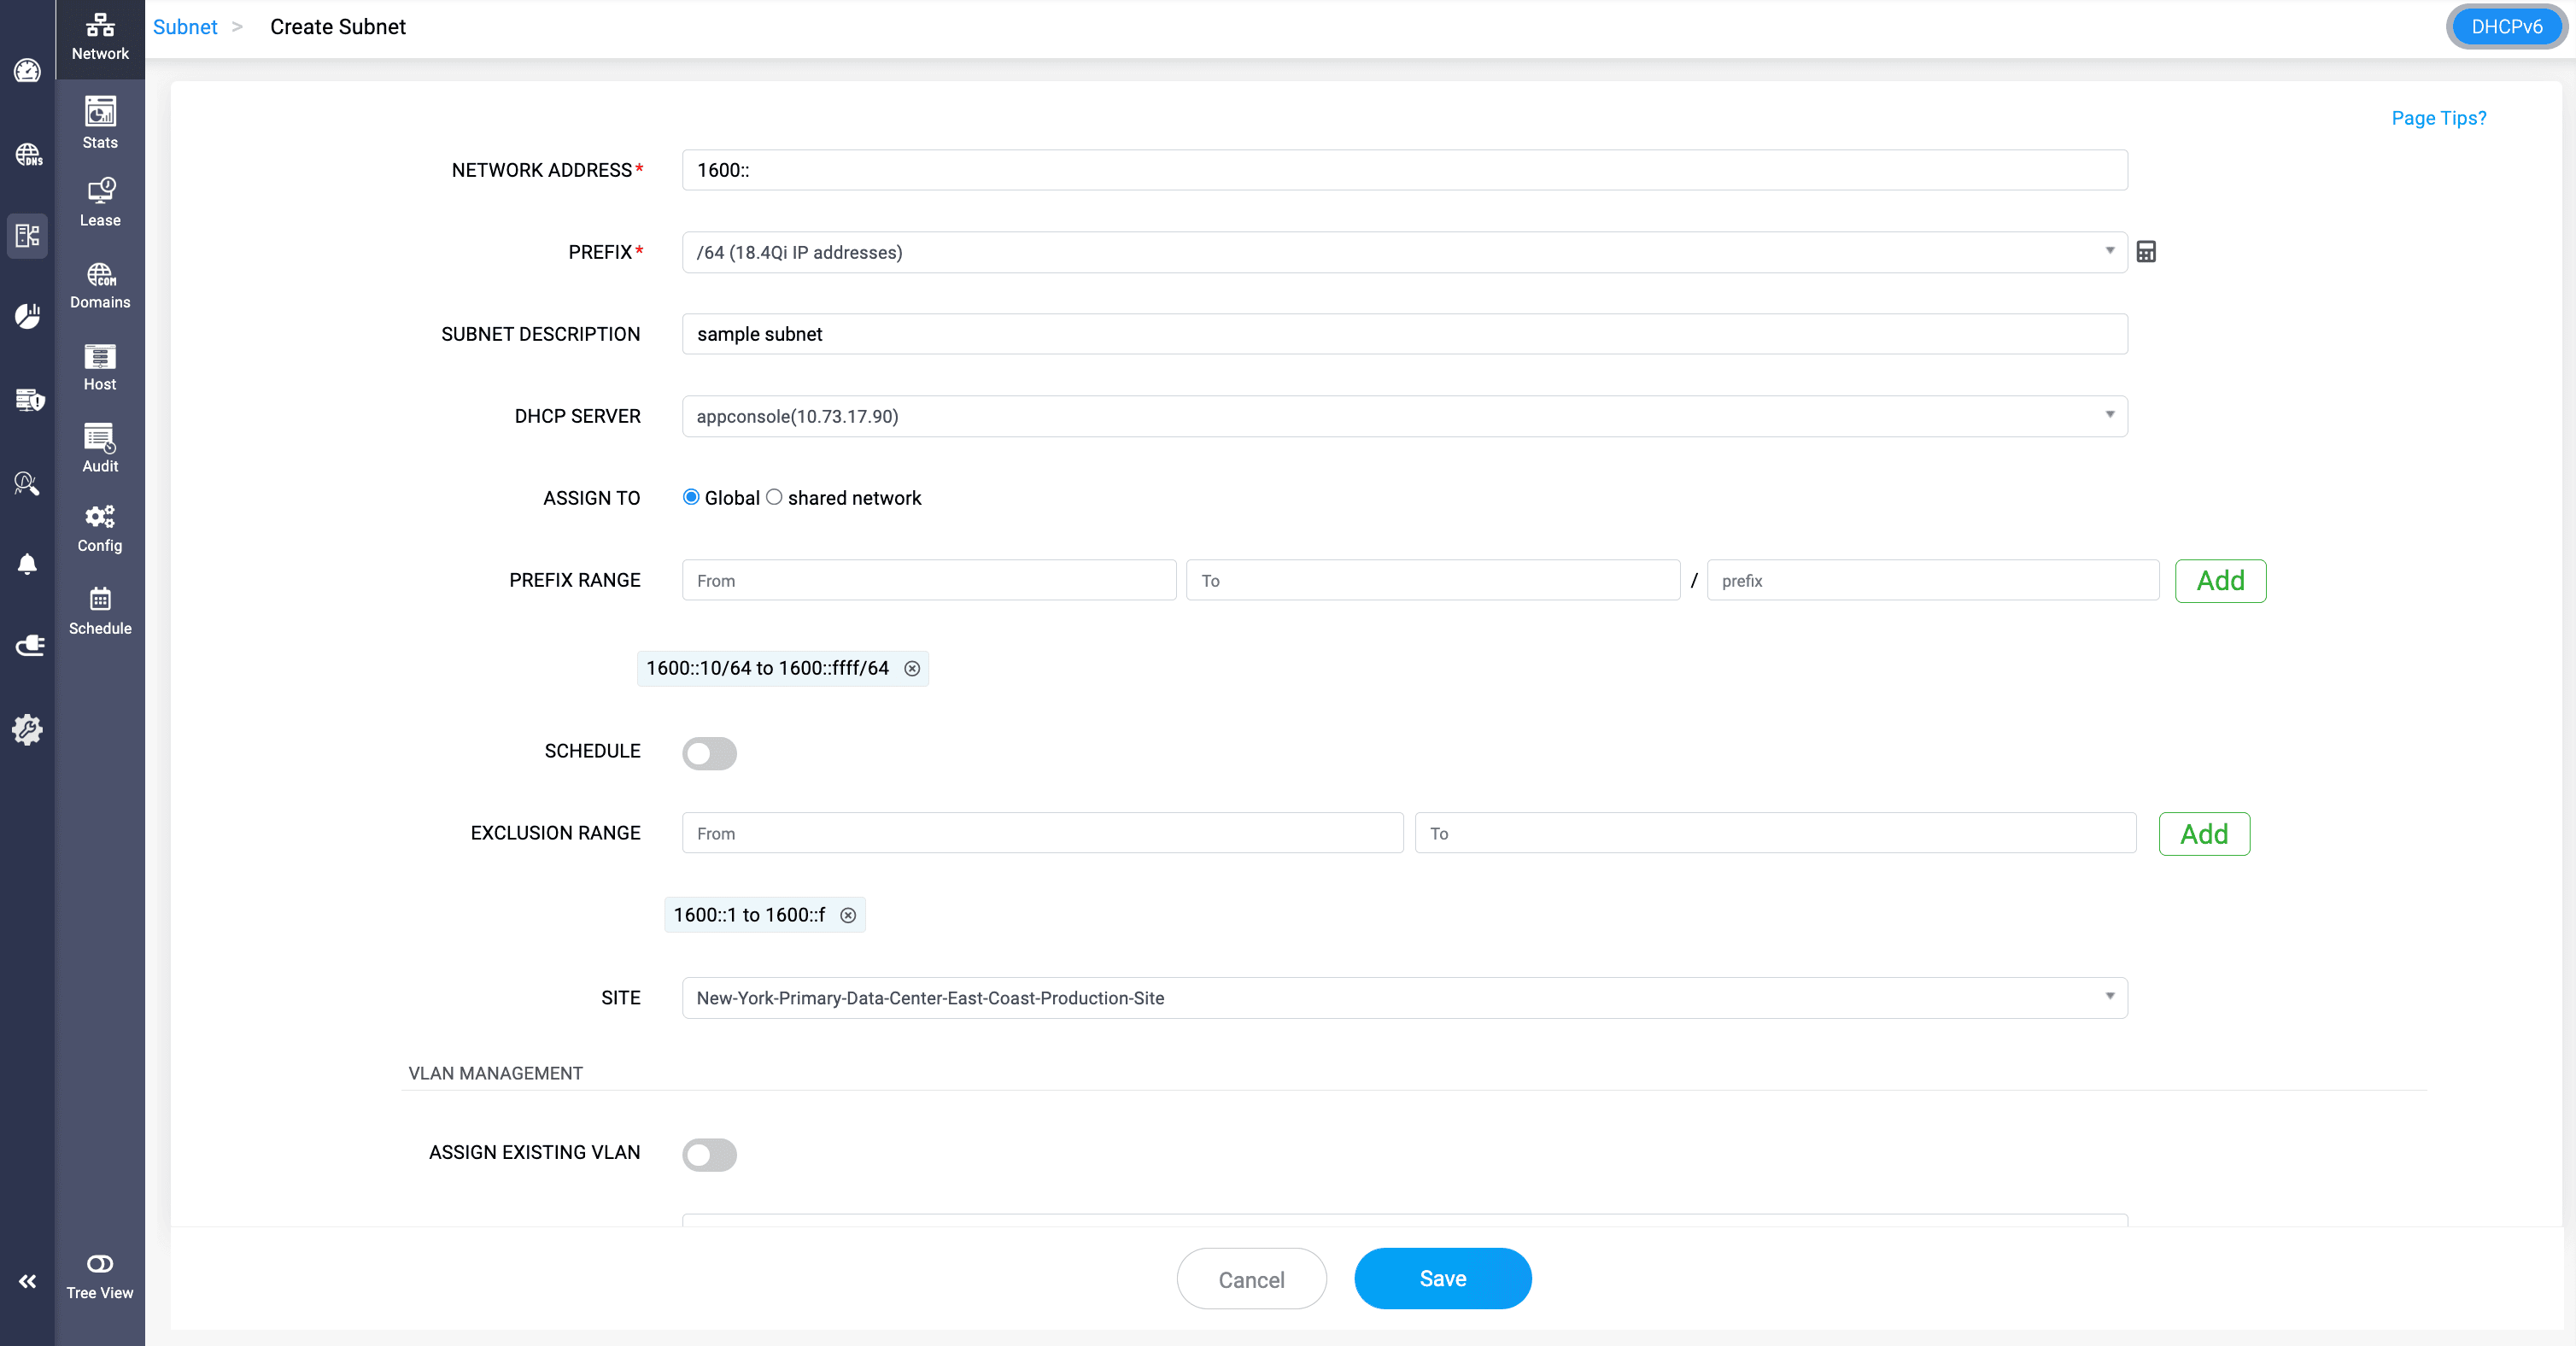
- Network Address*: Specify the base address of the subnet. (e.g., fe00:: for IPv6)
- Prefix*: Denote the size of the subnet. Example: A /64 prefix is standard in IPv6, defining the number of available addresses.
- Subnet Description: Optional field for providing human-readable context or notes about this subnet. Helps with better identification.
- DHCP Server: Select the DHCP server that will manage dynamic IP assignments for this subnet.
- Assign To*: Defines the scope of subnet usage
- Global: Available across the entire environment.
- Shared network: Bound to a shared grouping of subnets.
A longer prefix creates smaller subnets from the current range. Once a longer prefix is entered, DDI Central automatically loads and displays the first and last addresses for the resulting prefix range.
Exclusion Range: Define a block of IPs within the subnet that should not be used for DHCP assignment. Prevents conflicts with statically assigned IPs. The field appears only if a valid Prefix range is defined for the subnet.
VLAN Management Section for associating the subnet with a VLAN.
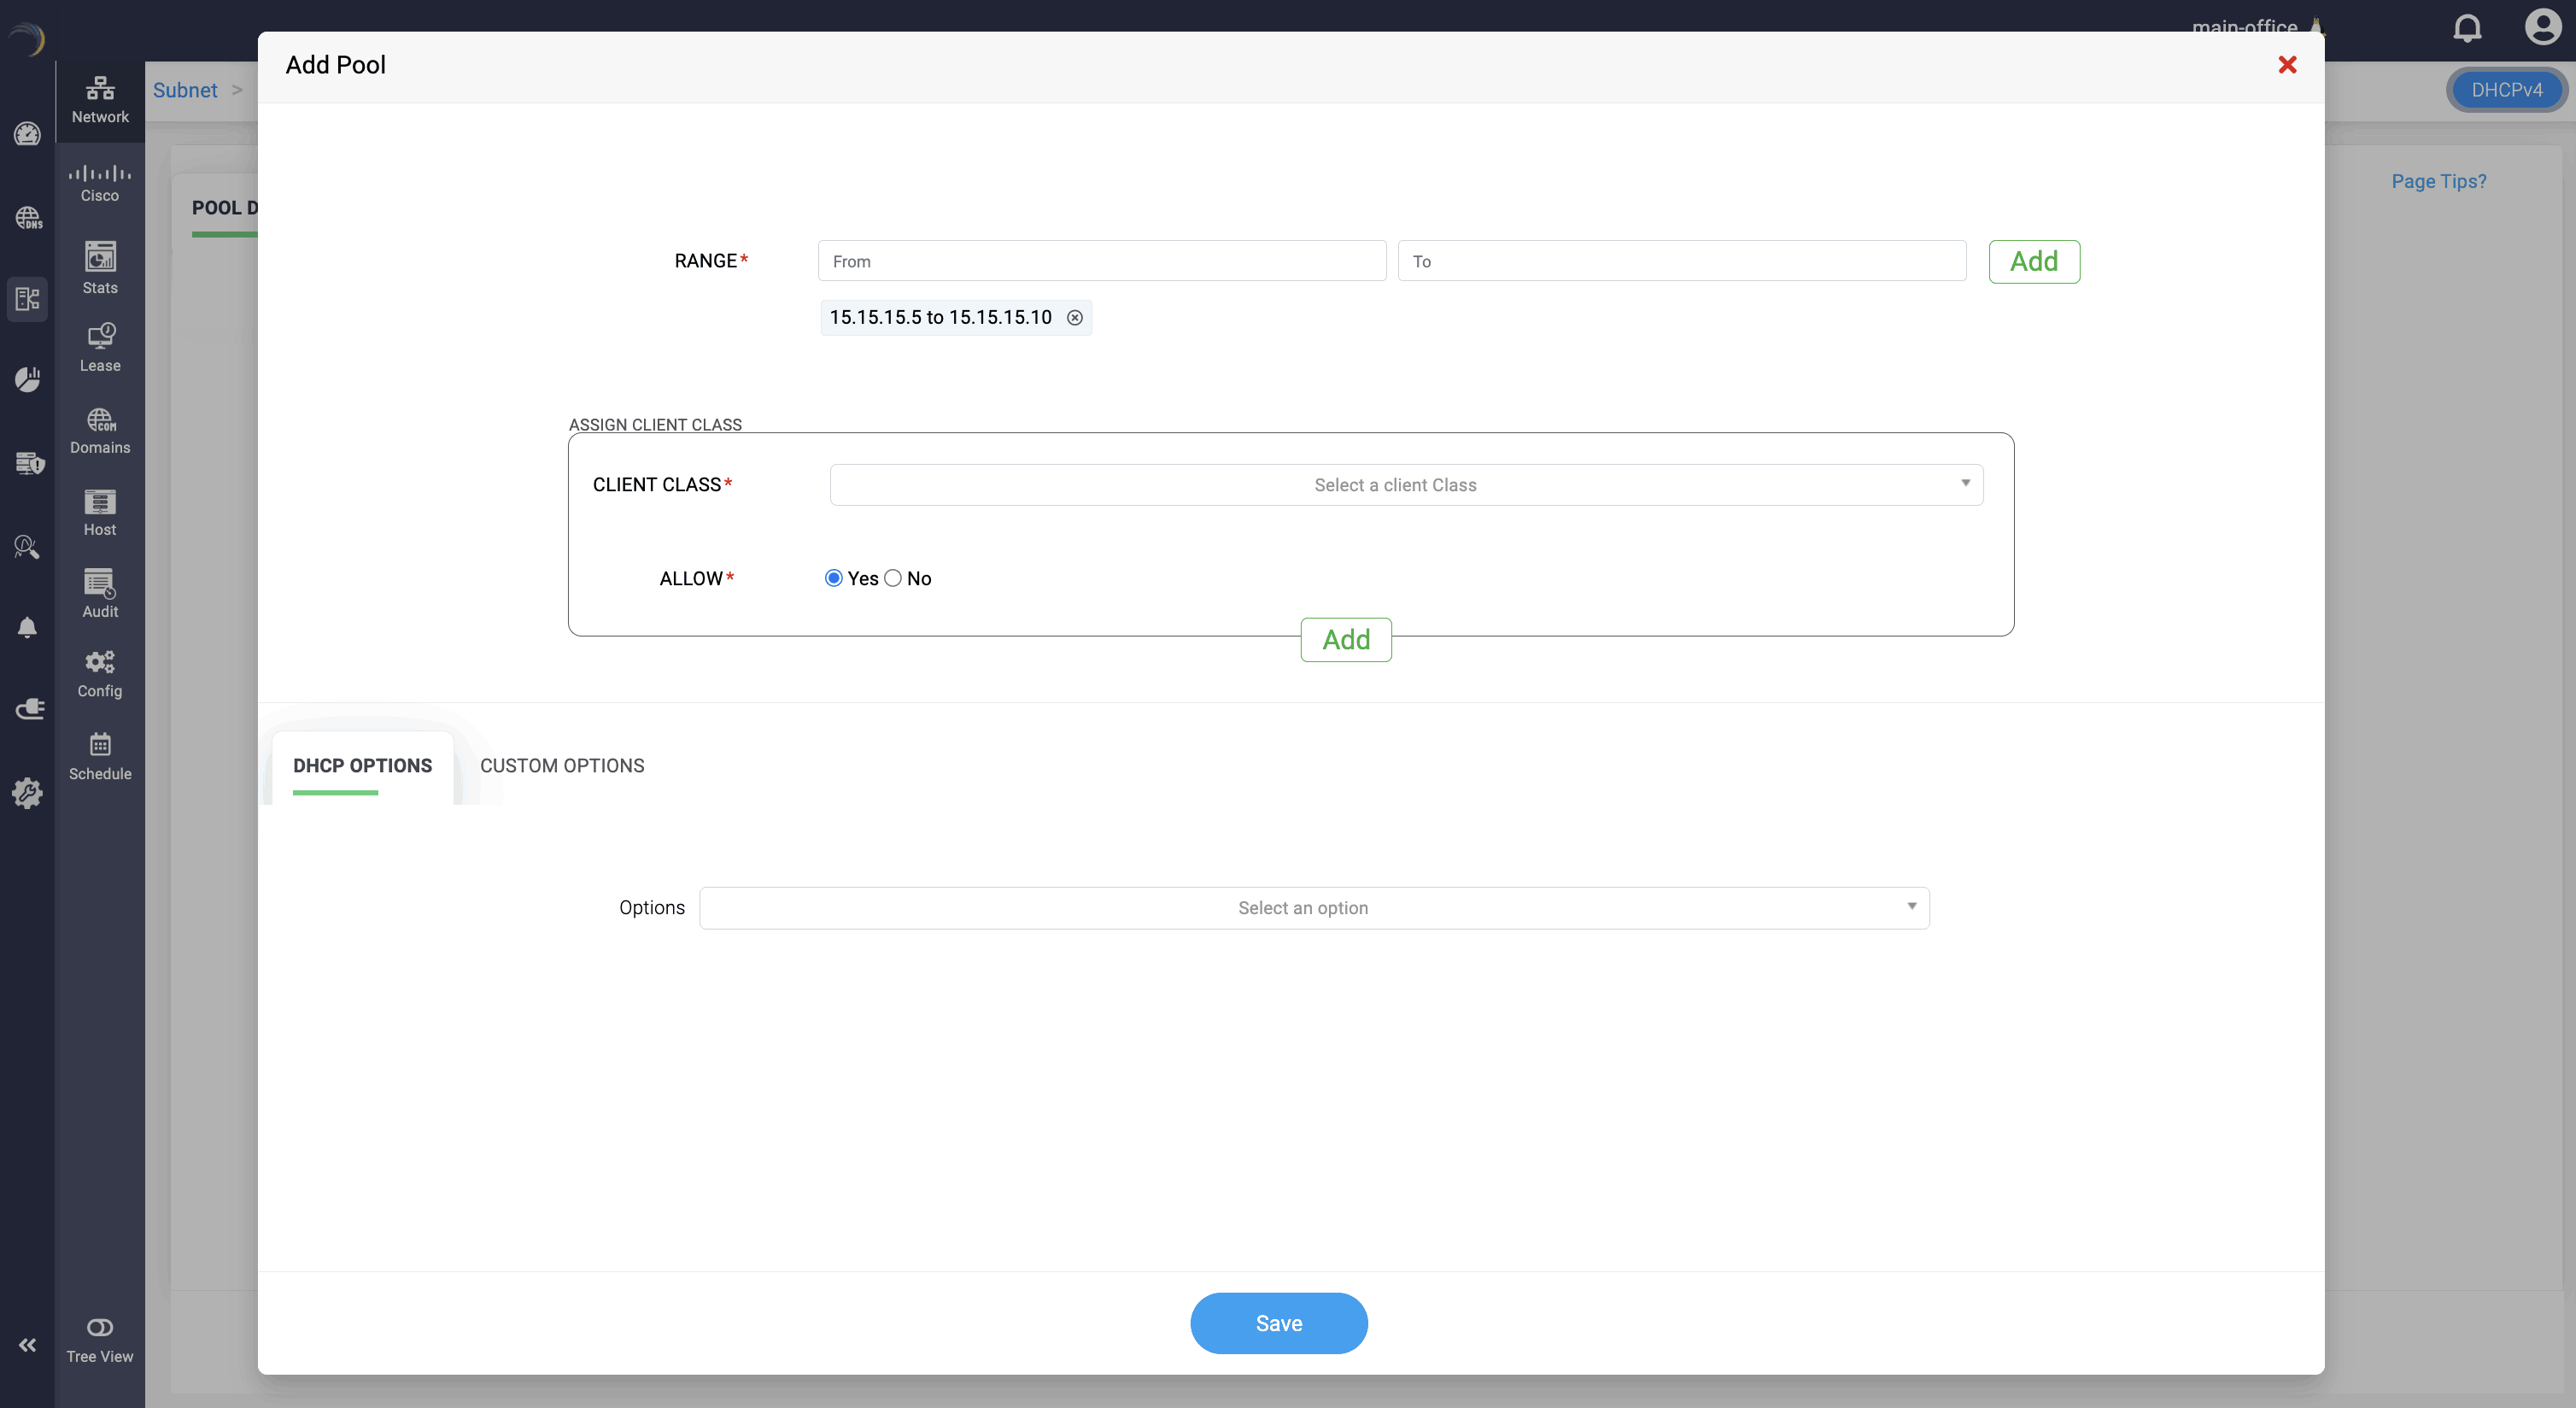
Pool Data
Declare one or more pool ranges within the defined subnet. Each pool can be linked with specific client classes, enabling you to:
- Customize address assignment based on device type or identity.
- Apply targeted DHCP options or custom options
This ensures precise control over how addresses and options are distributed within the subnet.
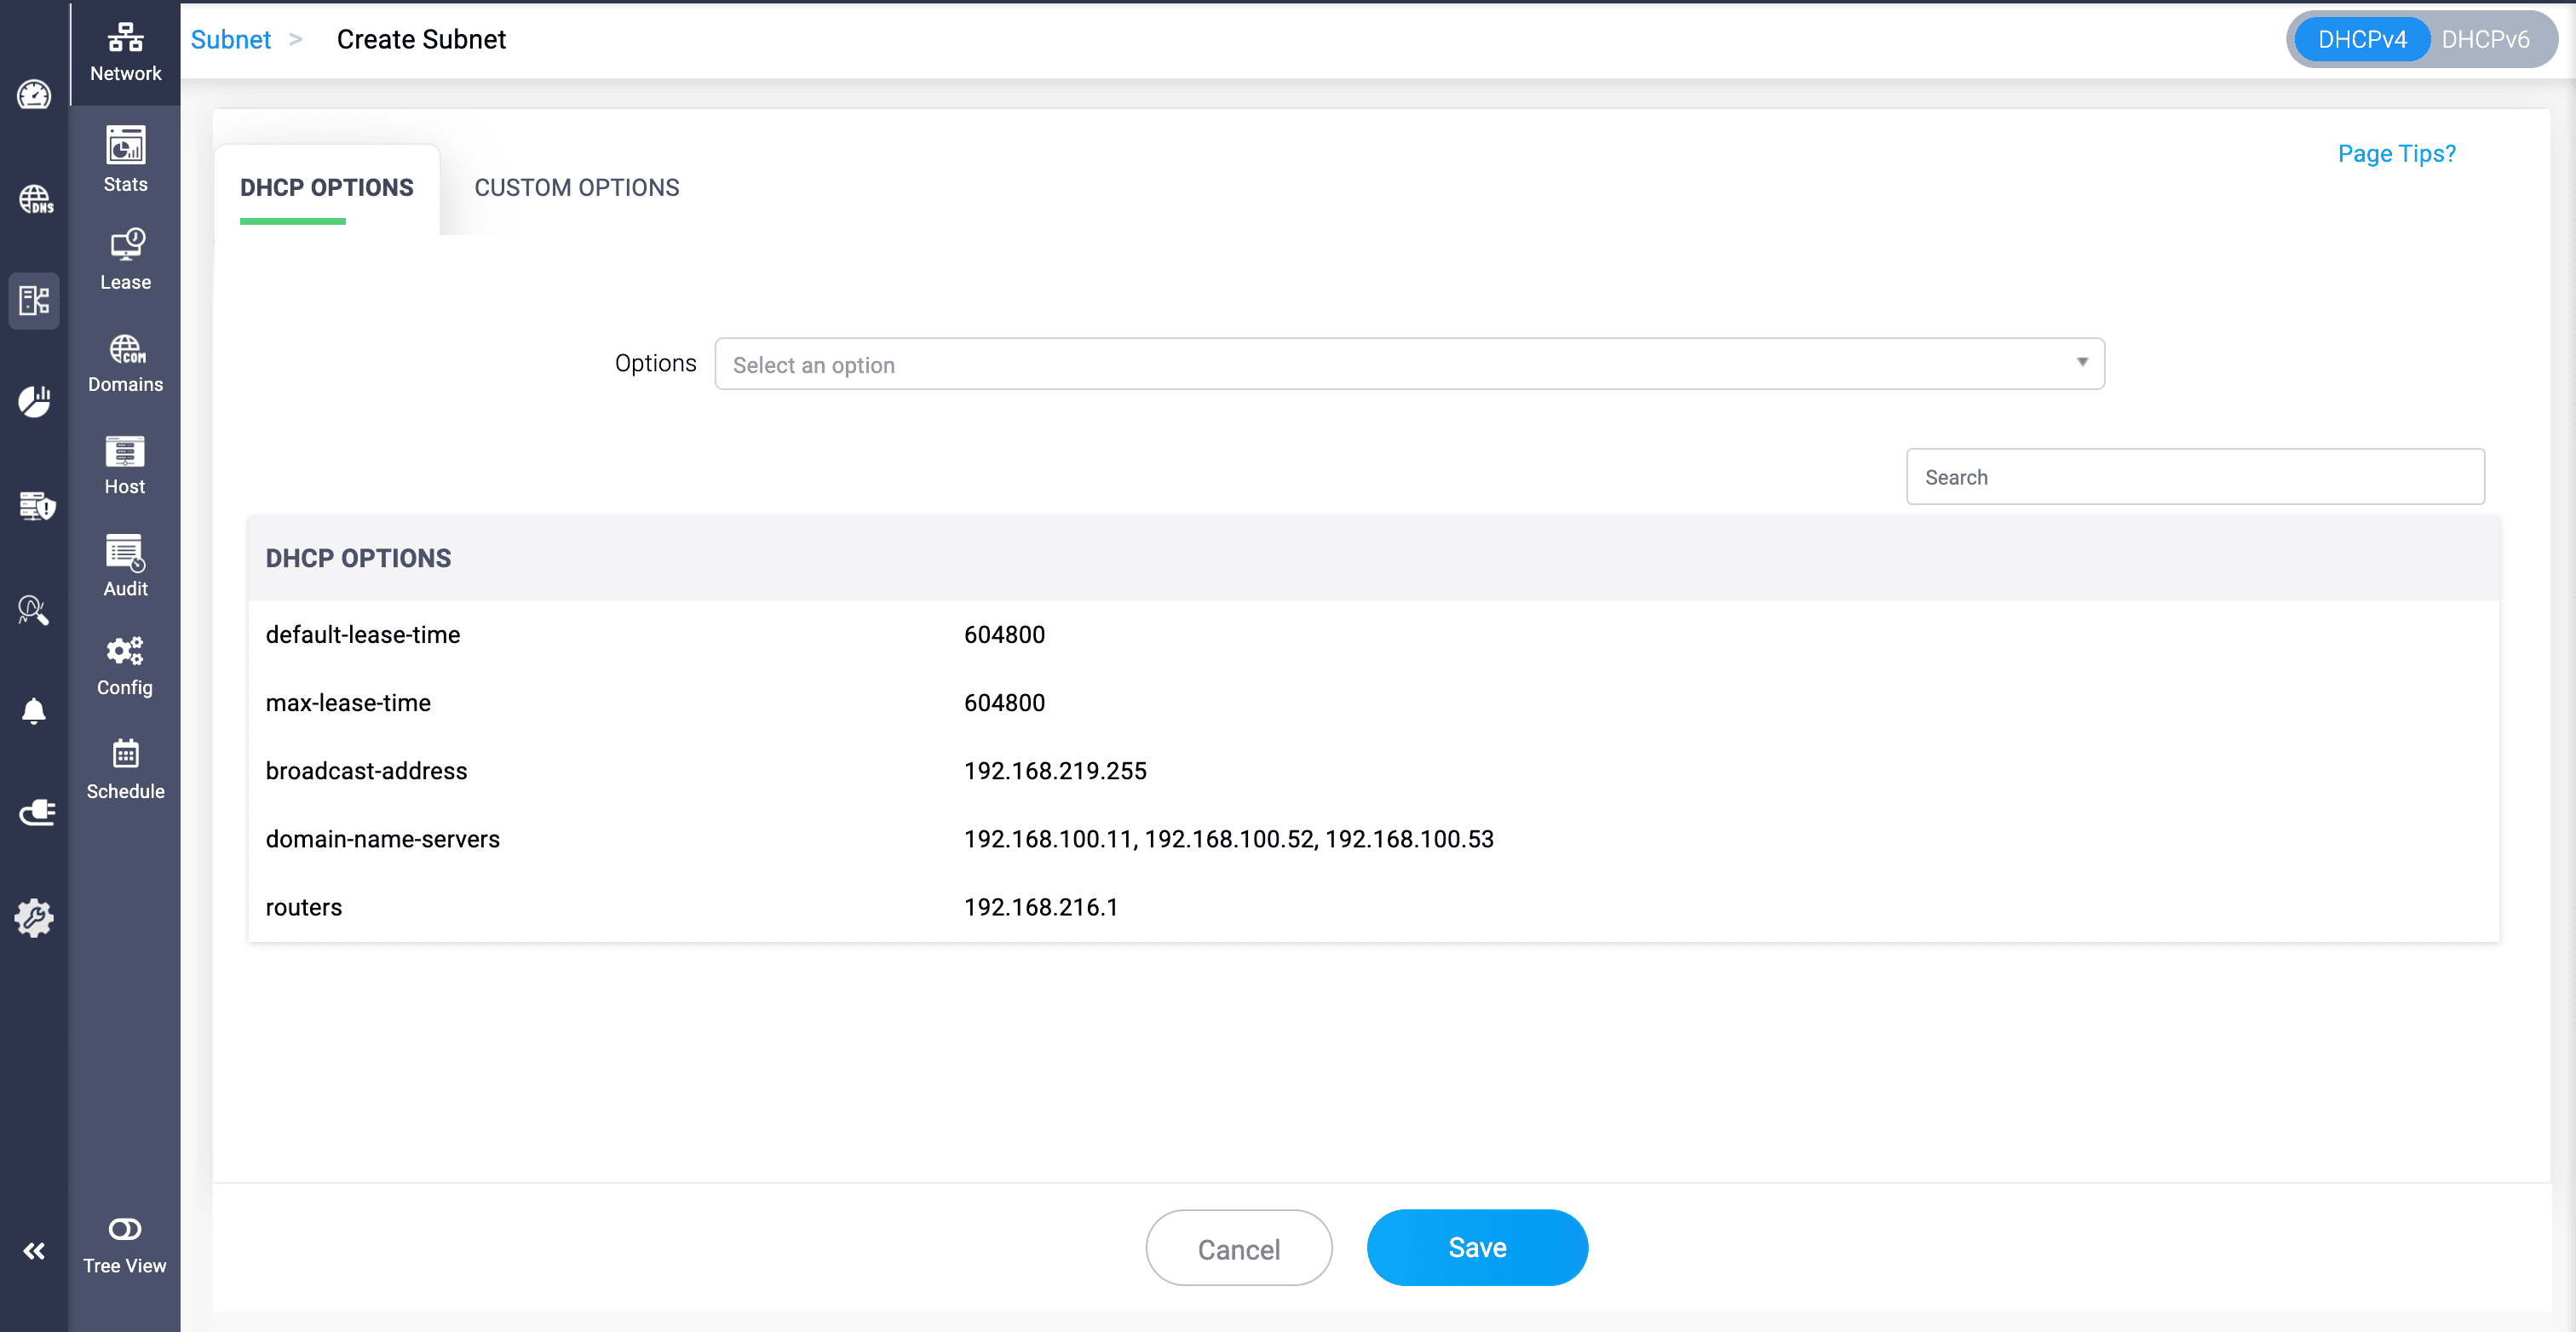
DHCP Options
Select from a list of standard DHCPv6 options (such as DNS servers, domain search lists, preferred lifetime, etc.) to be associated with the subnet or specific pools. These options help define the behavior and network parameters for the assigned clients.
Custom Options
Define and assign custom DHCPv6 options using option codes and hexadecimal values or string formats, as required by specific applications or hardware needs. This allows support for vendor-specific or non-standard configurations.
Click Save to finalize the configurations.
Address Pools
- An address pool within a subnet specifies the range of IP addresses available for dynamic assignment.
- Pools are used to control the distribution of IP addresses to clients within a subnet. They allow for more granular management of IP address allocations, including setting different options or restrictions for different pools within the same subnet.
- When configuring options at the subnet level, you can add and define the pool or address range within the subnet that should be configured with a specific set of options. Multiple combinations of options can be applied to various address ranges within the same subnet.
- Address pool configurations in a subnet can either allow or deny specific client classes for dynamic IP provisioning. If "Allow" is set to "yes," the pool permits provisioning for the chosen client class, while setting it to "NO" excludes provisioning for that class. Choosing "none" means the address pool is open for dynamic provisioning to all clients in the subnet without class restrictions.
Static Subnets
Static subnets refer to segments of a network that have fixed IP addresses assigned to them. Unlike dynamic subnets, where IP addresses can be assigned on-the-fly by a DHCP server, static subnets have pre-defined IP ranges and the IP addresses are usually assigned manually to devices.
To define a static subnet in DDI Central:
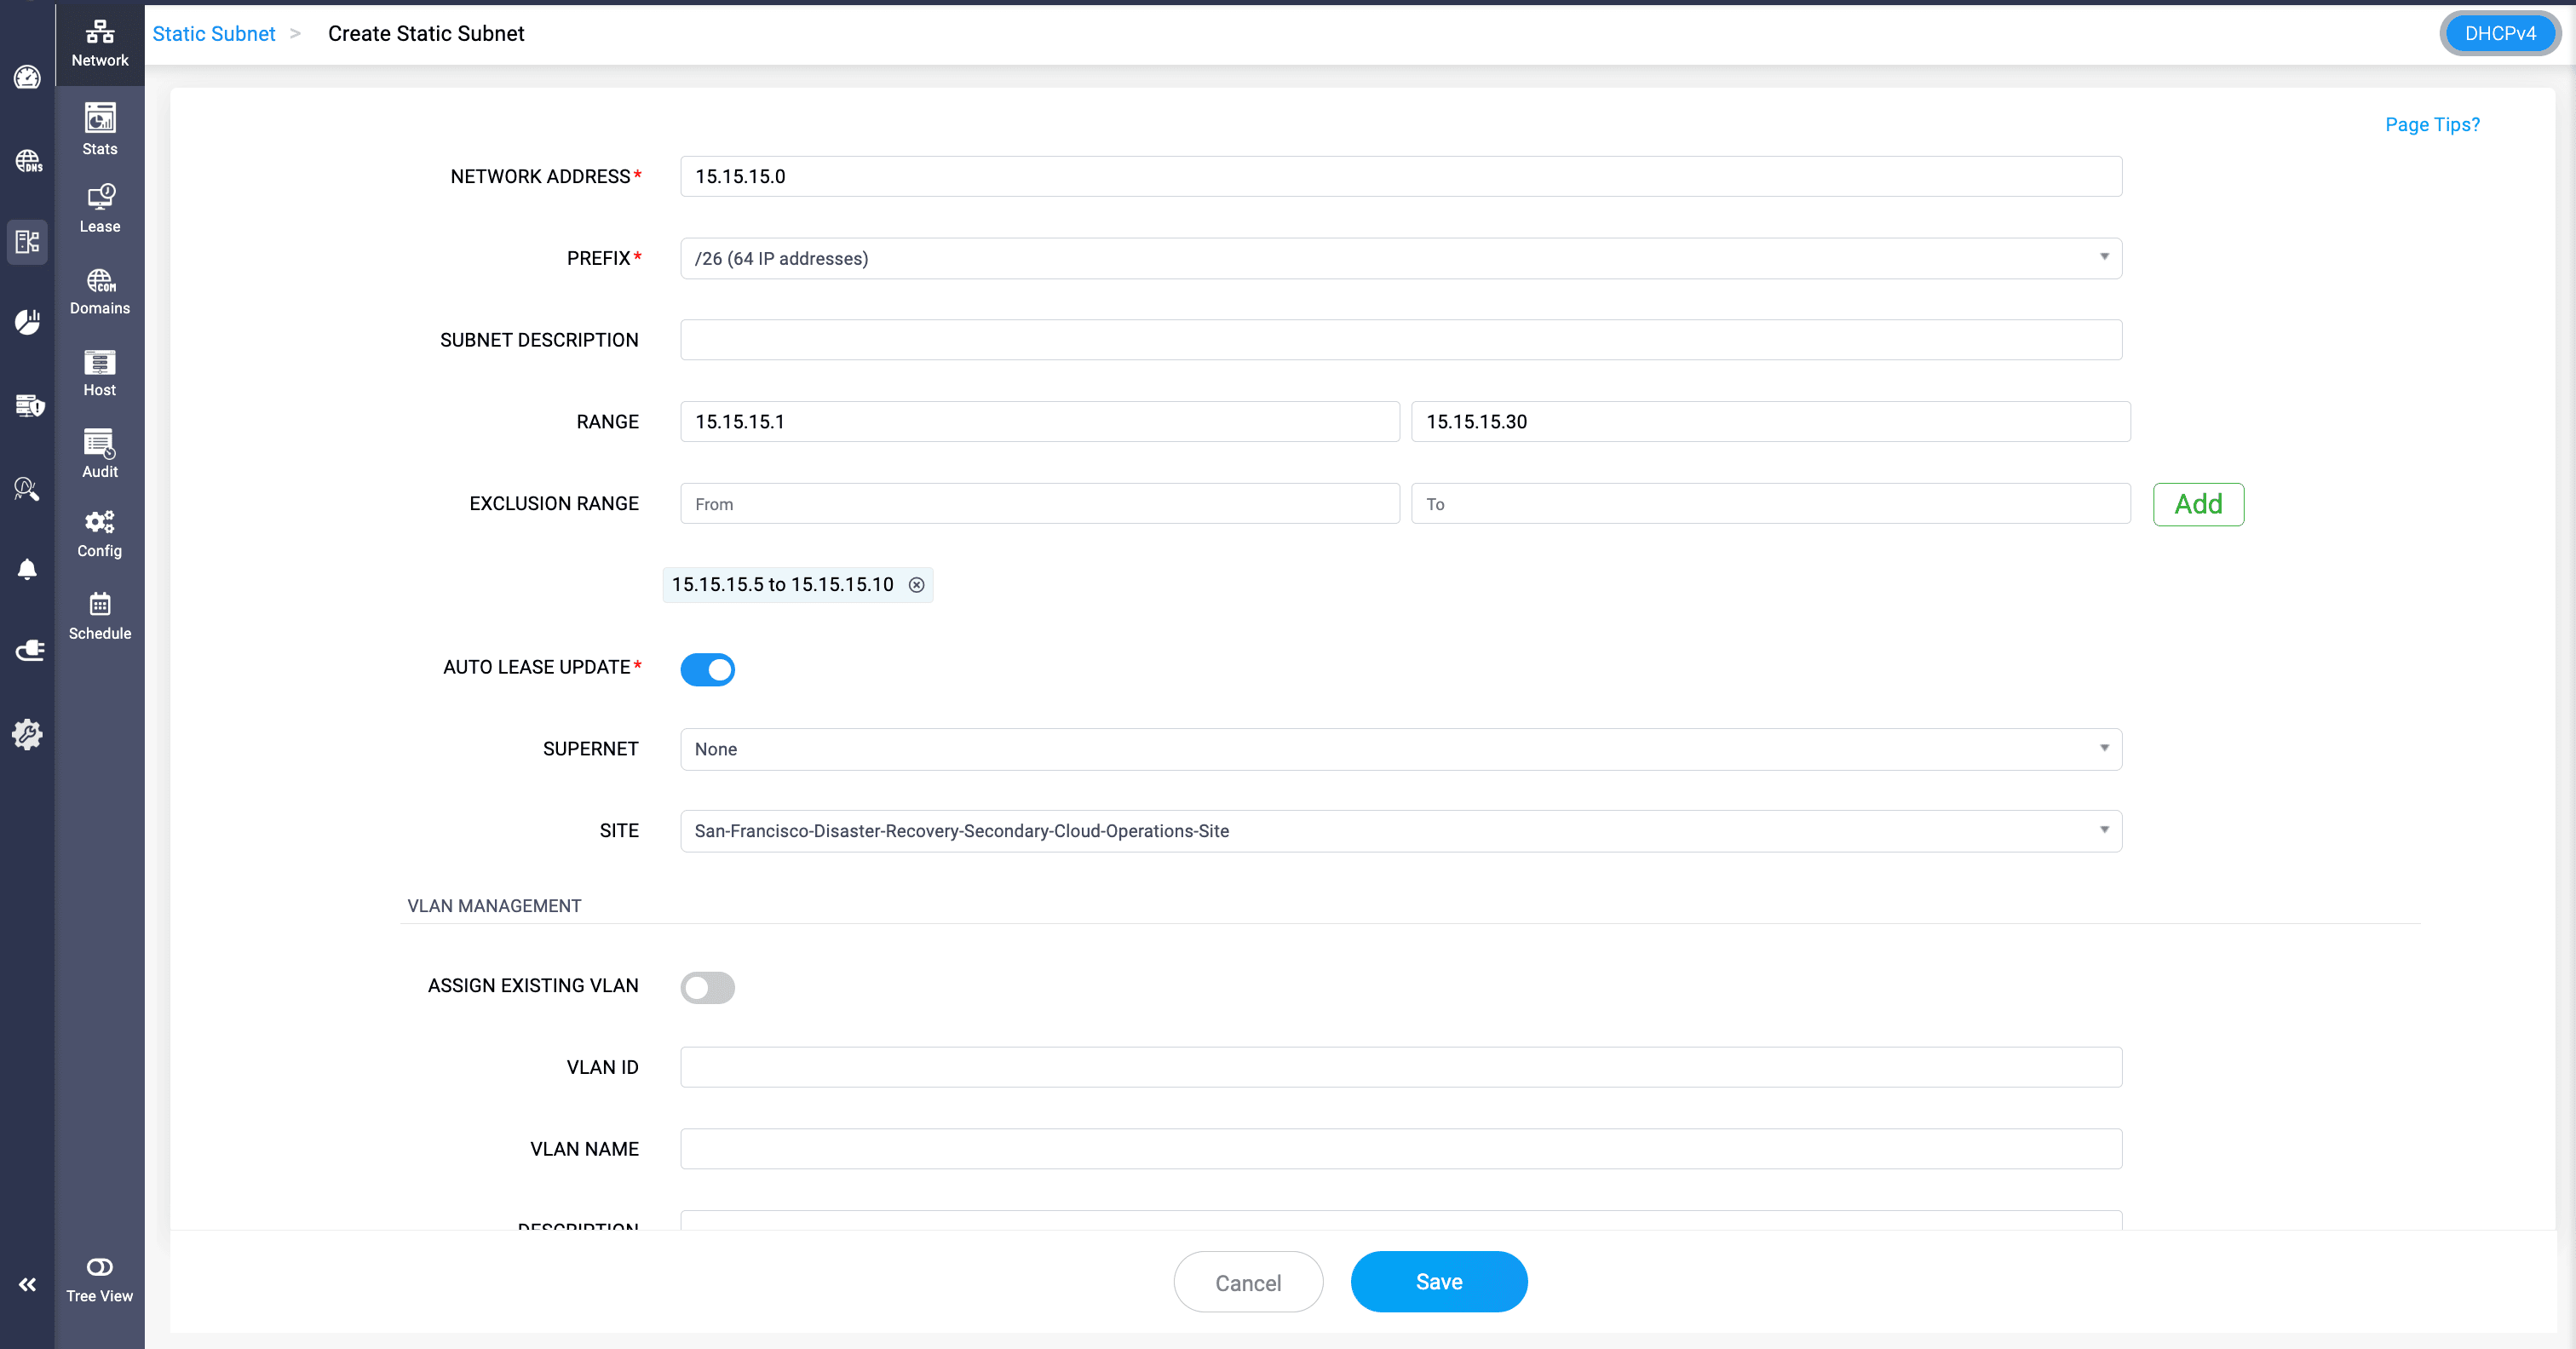
- Select DHCP-> Network. On the Network page, navigate to the Static Subnet tab. You can either click the Add Static Subnet button in the top right corner of the page or click the Import button to import the spreadsheet you use to maintain the static subnet leases.
- On clicking the Add Static Subnet button, the Create Static Subnet page appears, prompting you to enter the essential details for the static subnet, like the Network Address and network prefix of the static subnet, a suitable description to identify the static subnet and you can also map the Static subnet to a Supernet to position it hierarchically in the tree view of your cluster's IP address plan. You can also specify if this subnet is associated with a VLAN by entering the targeted VLAN details and then click Save to finalize the configurations for the Static Subnet.
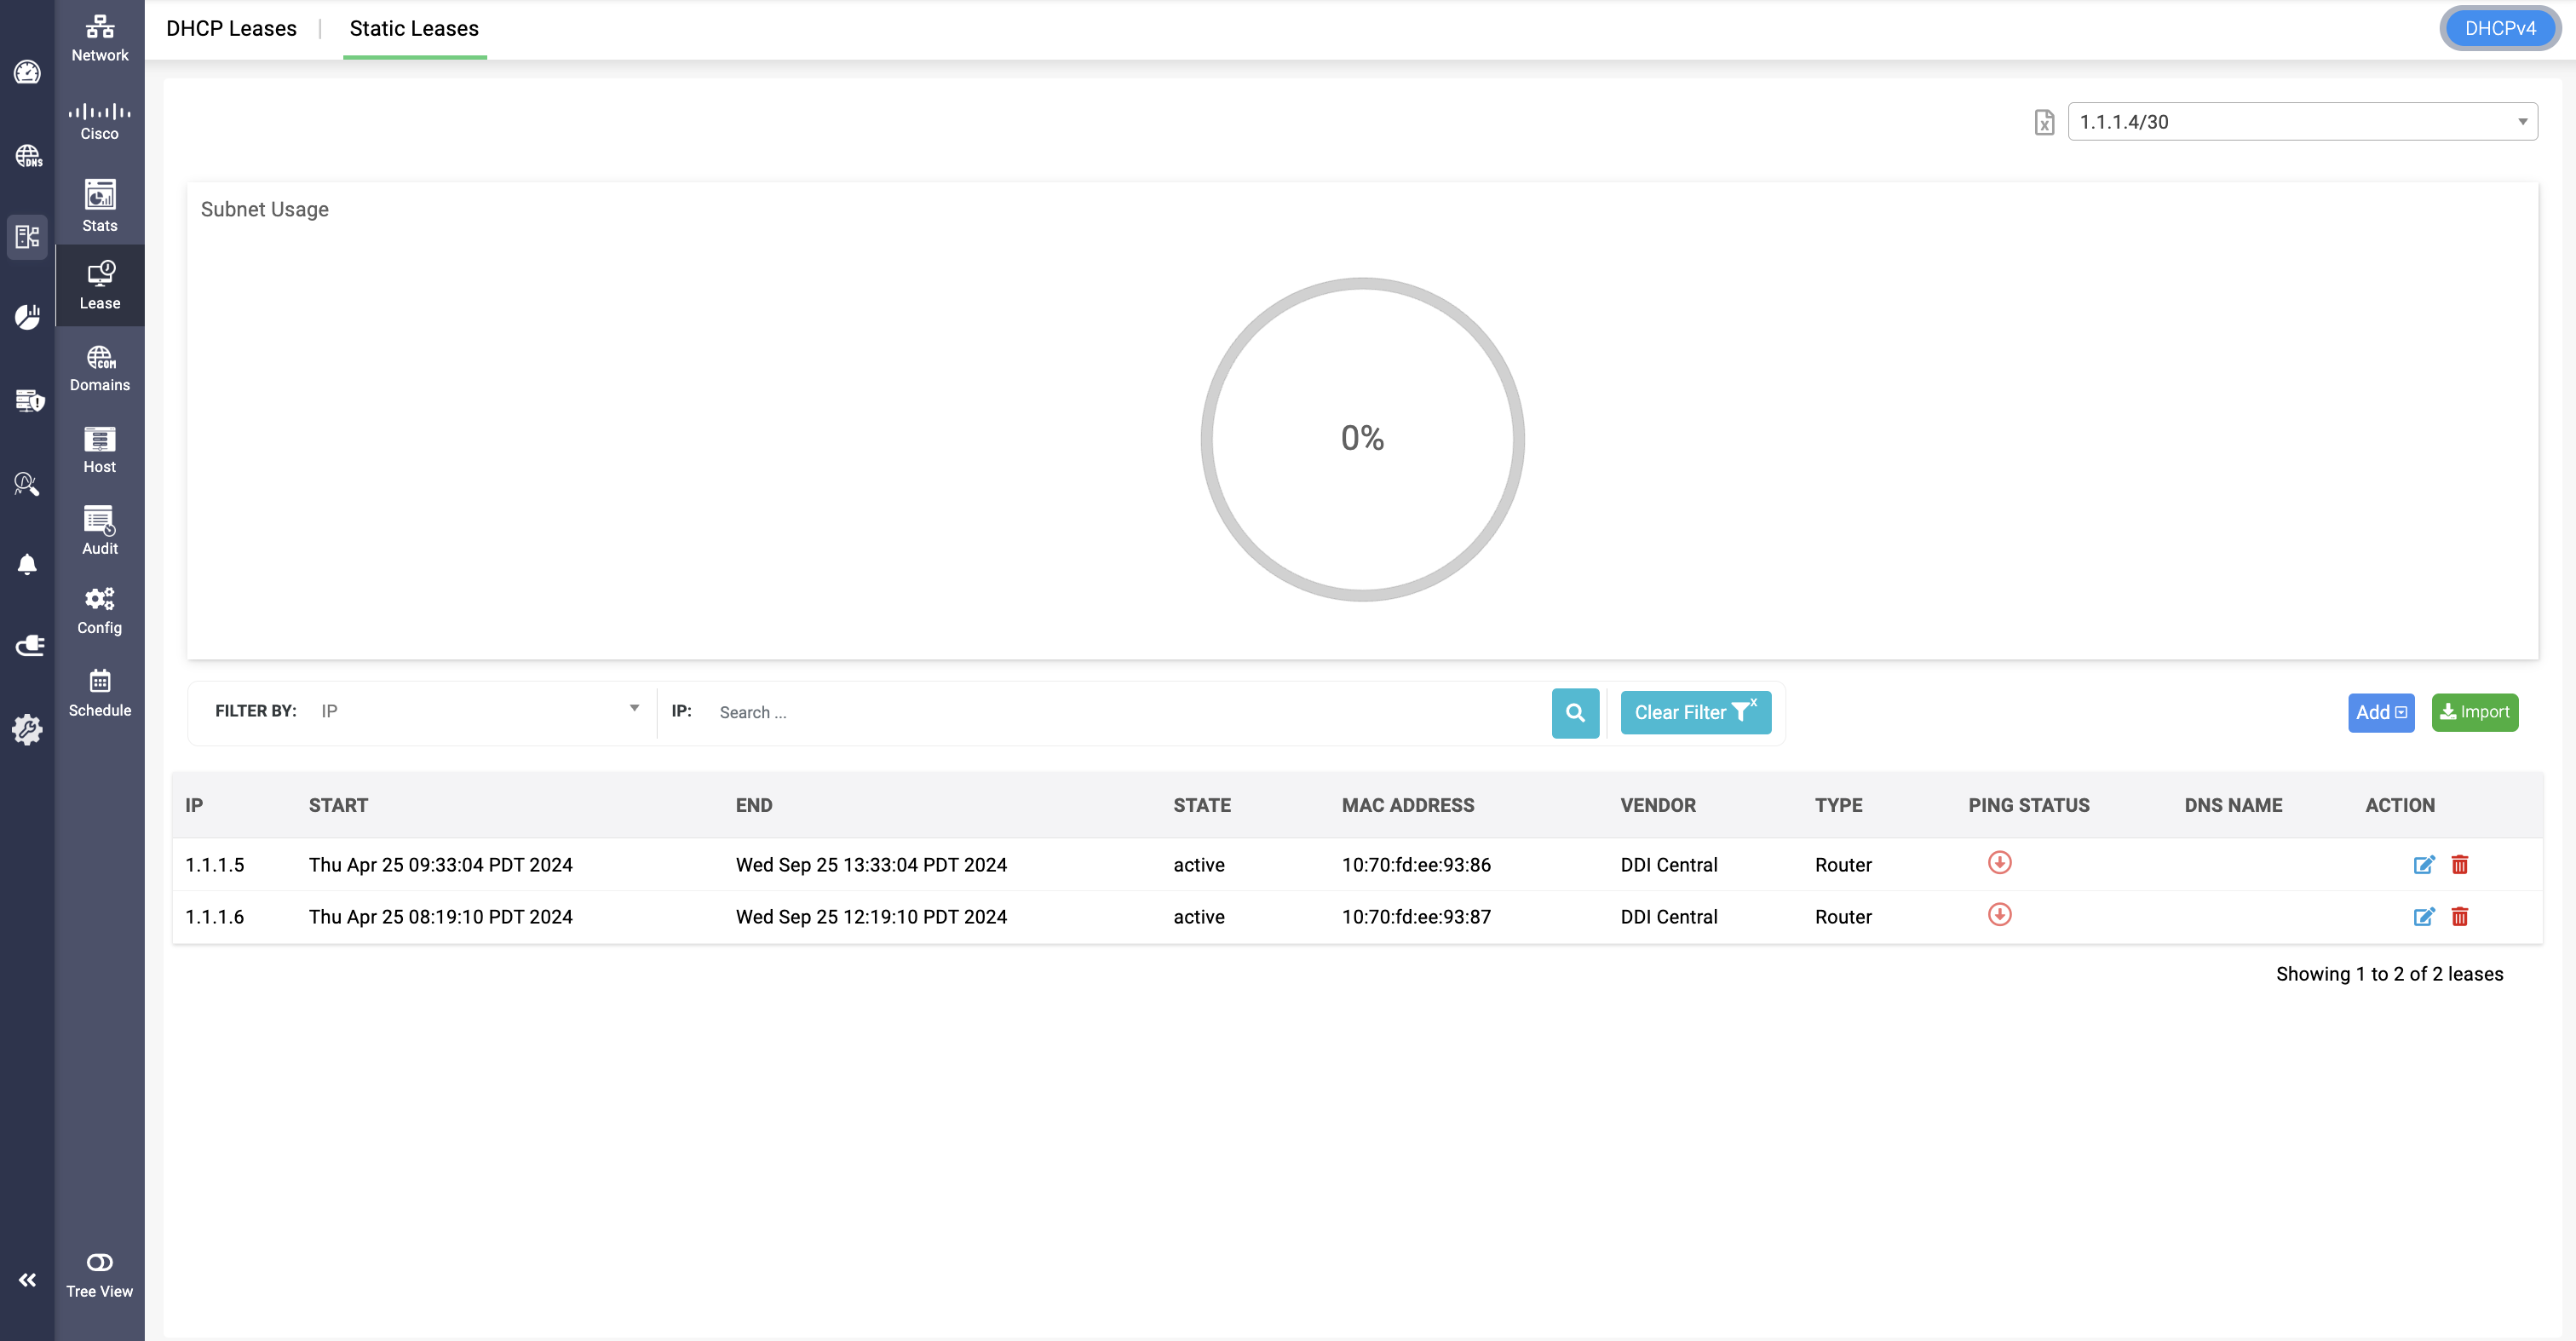
- Once you create and define the IP address space for a static subnet, the entry you just created will be displayed under the static Subnet tab in the Network page. Here you can click on the Import button available in the top right corner to import the static subnet's lease details you maintain in a spreadsheet. More on Static Leases here.
- Once the Static Leases are successfully imported, the capacity and other details of the Static Subnet are reflected under the Static Subnet tab on the Network page. On clicking through the targeted static subnet entry on this page, will immediately redirect you to the Lease->Static Leases page, where you will see the leases pertaining to the specific Static Subnet you clicked on.
Shared Networks
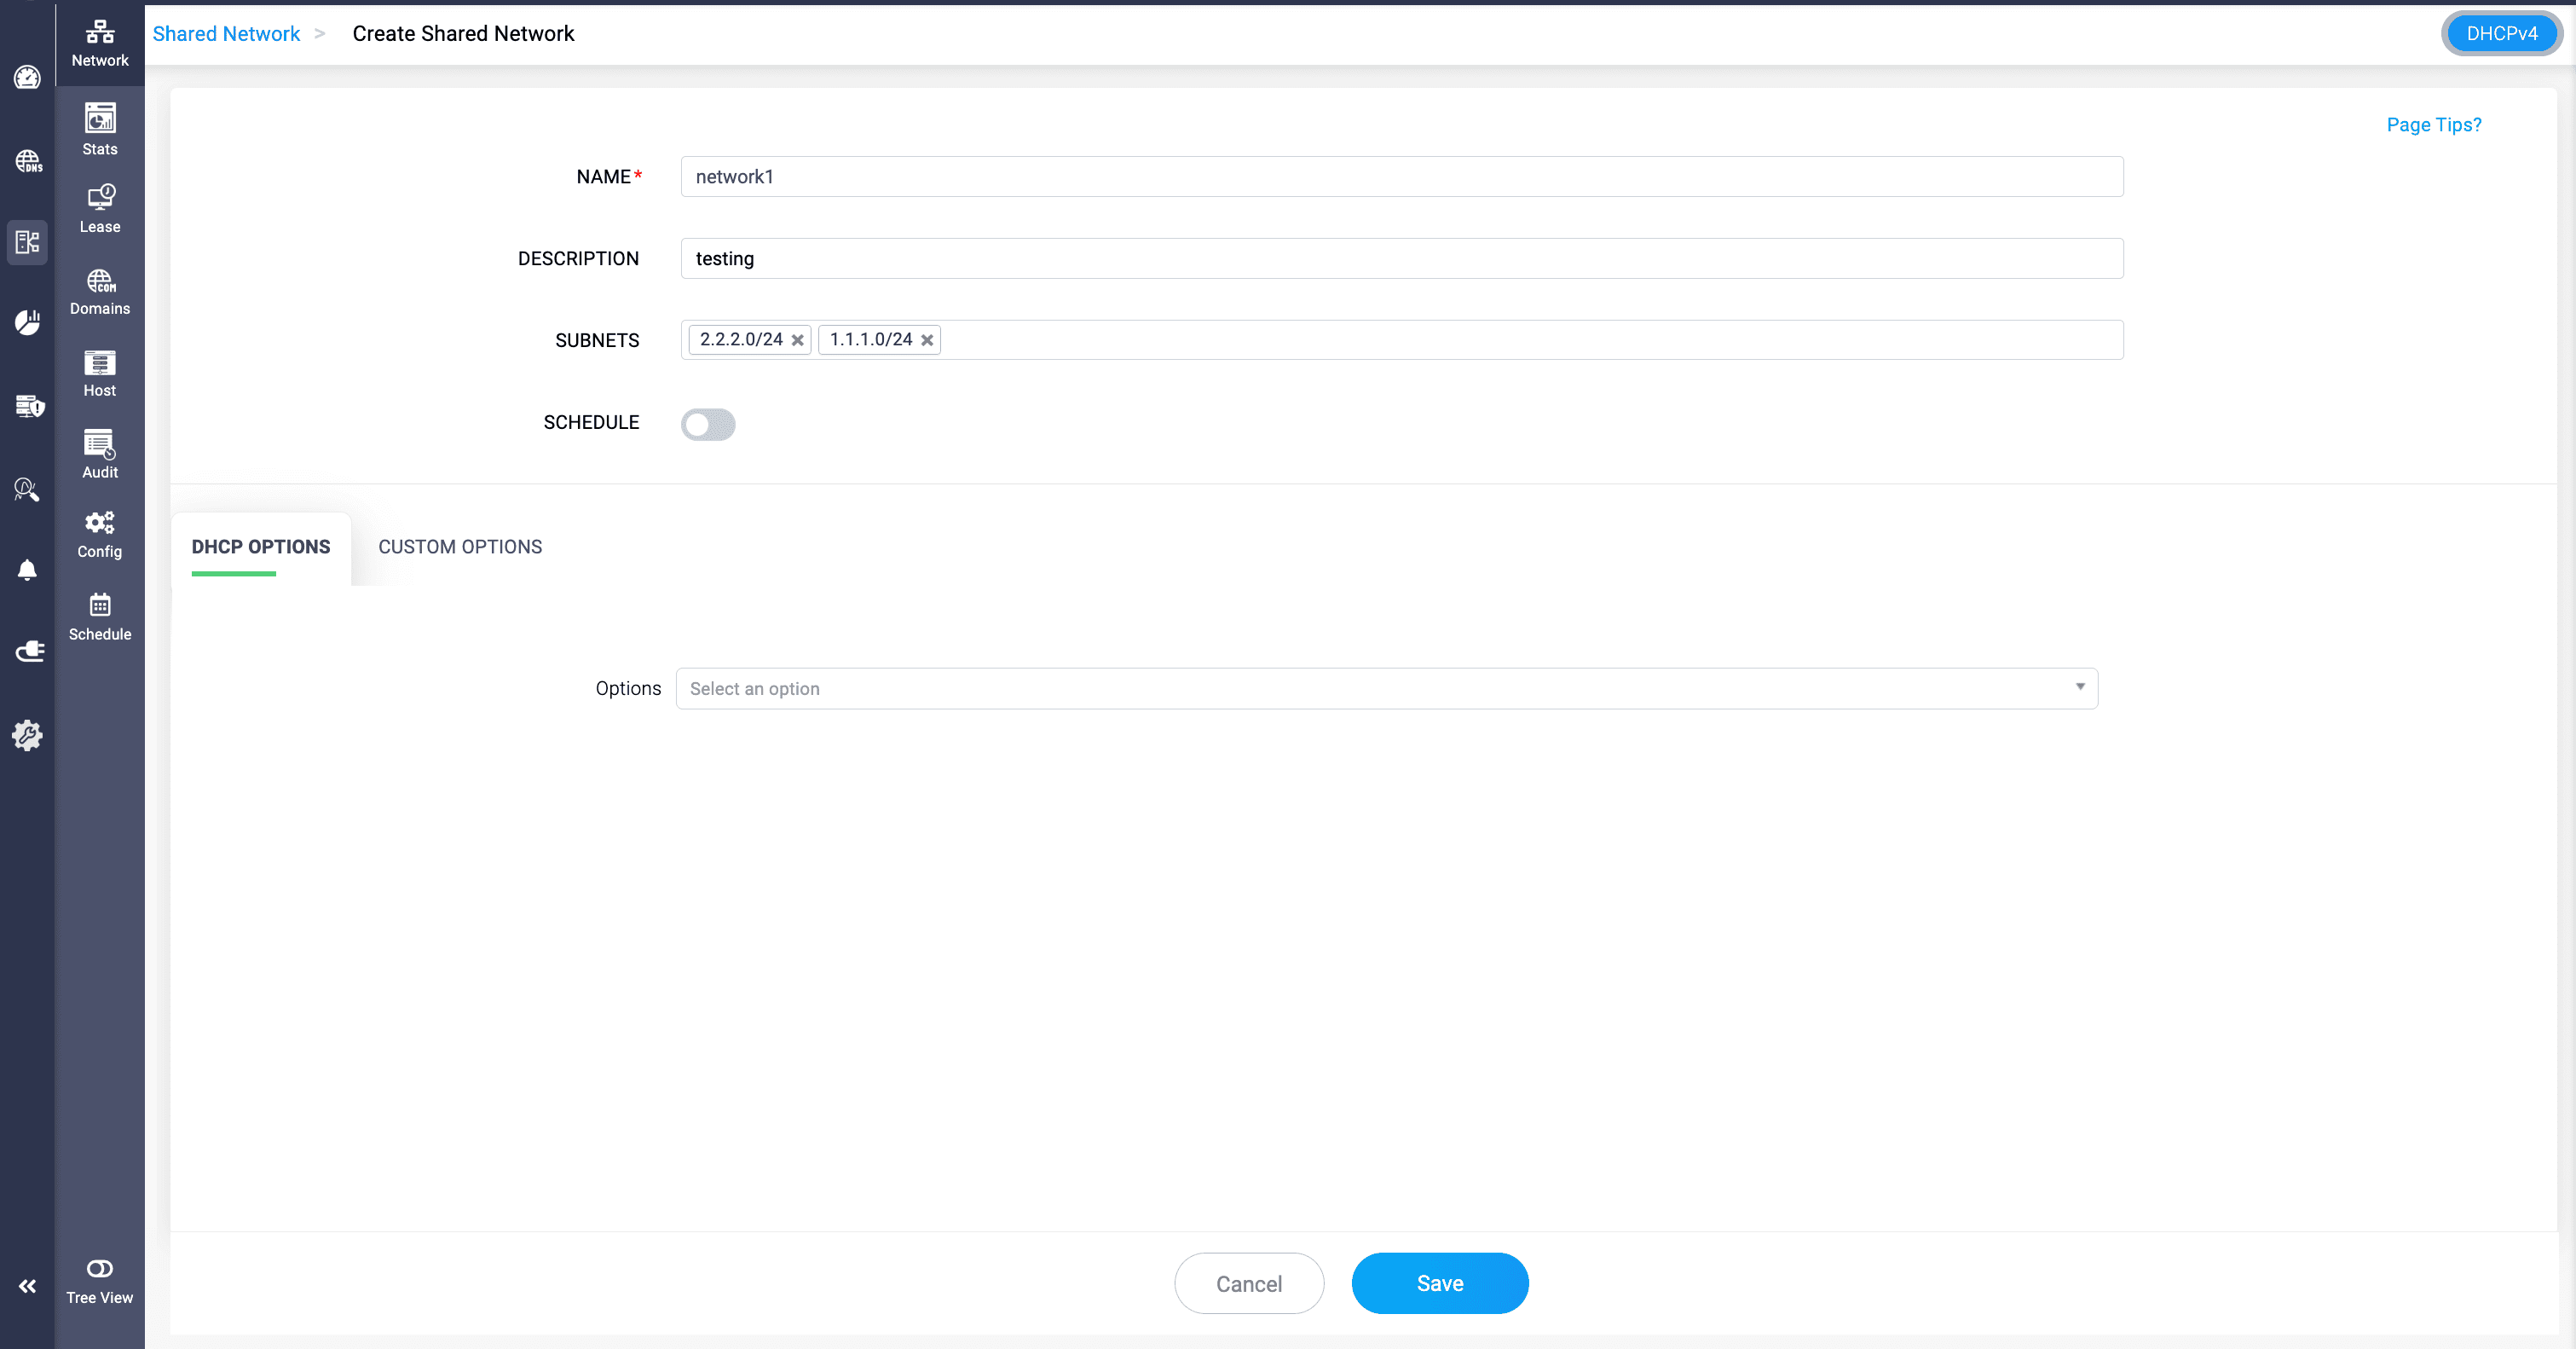
- A shared-network defined in DDI Central is used when multiple logical IP networks (subnets) share the same physical network segment.
- Shared networks allow DHCP to serve multiple subnets on a single physical network, providing different IP configurations to clients based on their network segment.
- To create a new shared network, go to DHCP-> Network-> Shared Network.
- Assign a unique name and description for the shared network.
- Just add the required subnets and apply the necessary DHCP or custom options .
- Click Save.
Hosts or DHCP Reservations
- A host declaration specifies settings for individual clients based on their hardware (MAC) address.
- This is used for assigning fixed IP addresses or specific configurations to particular clients, ensuring that a specific client always receives the same IP address and settings.
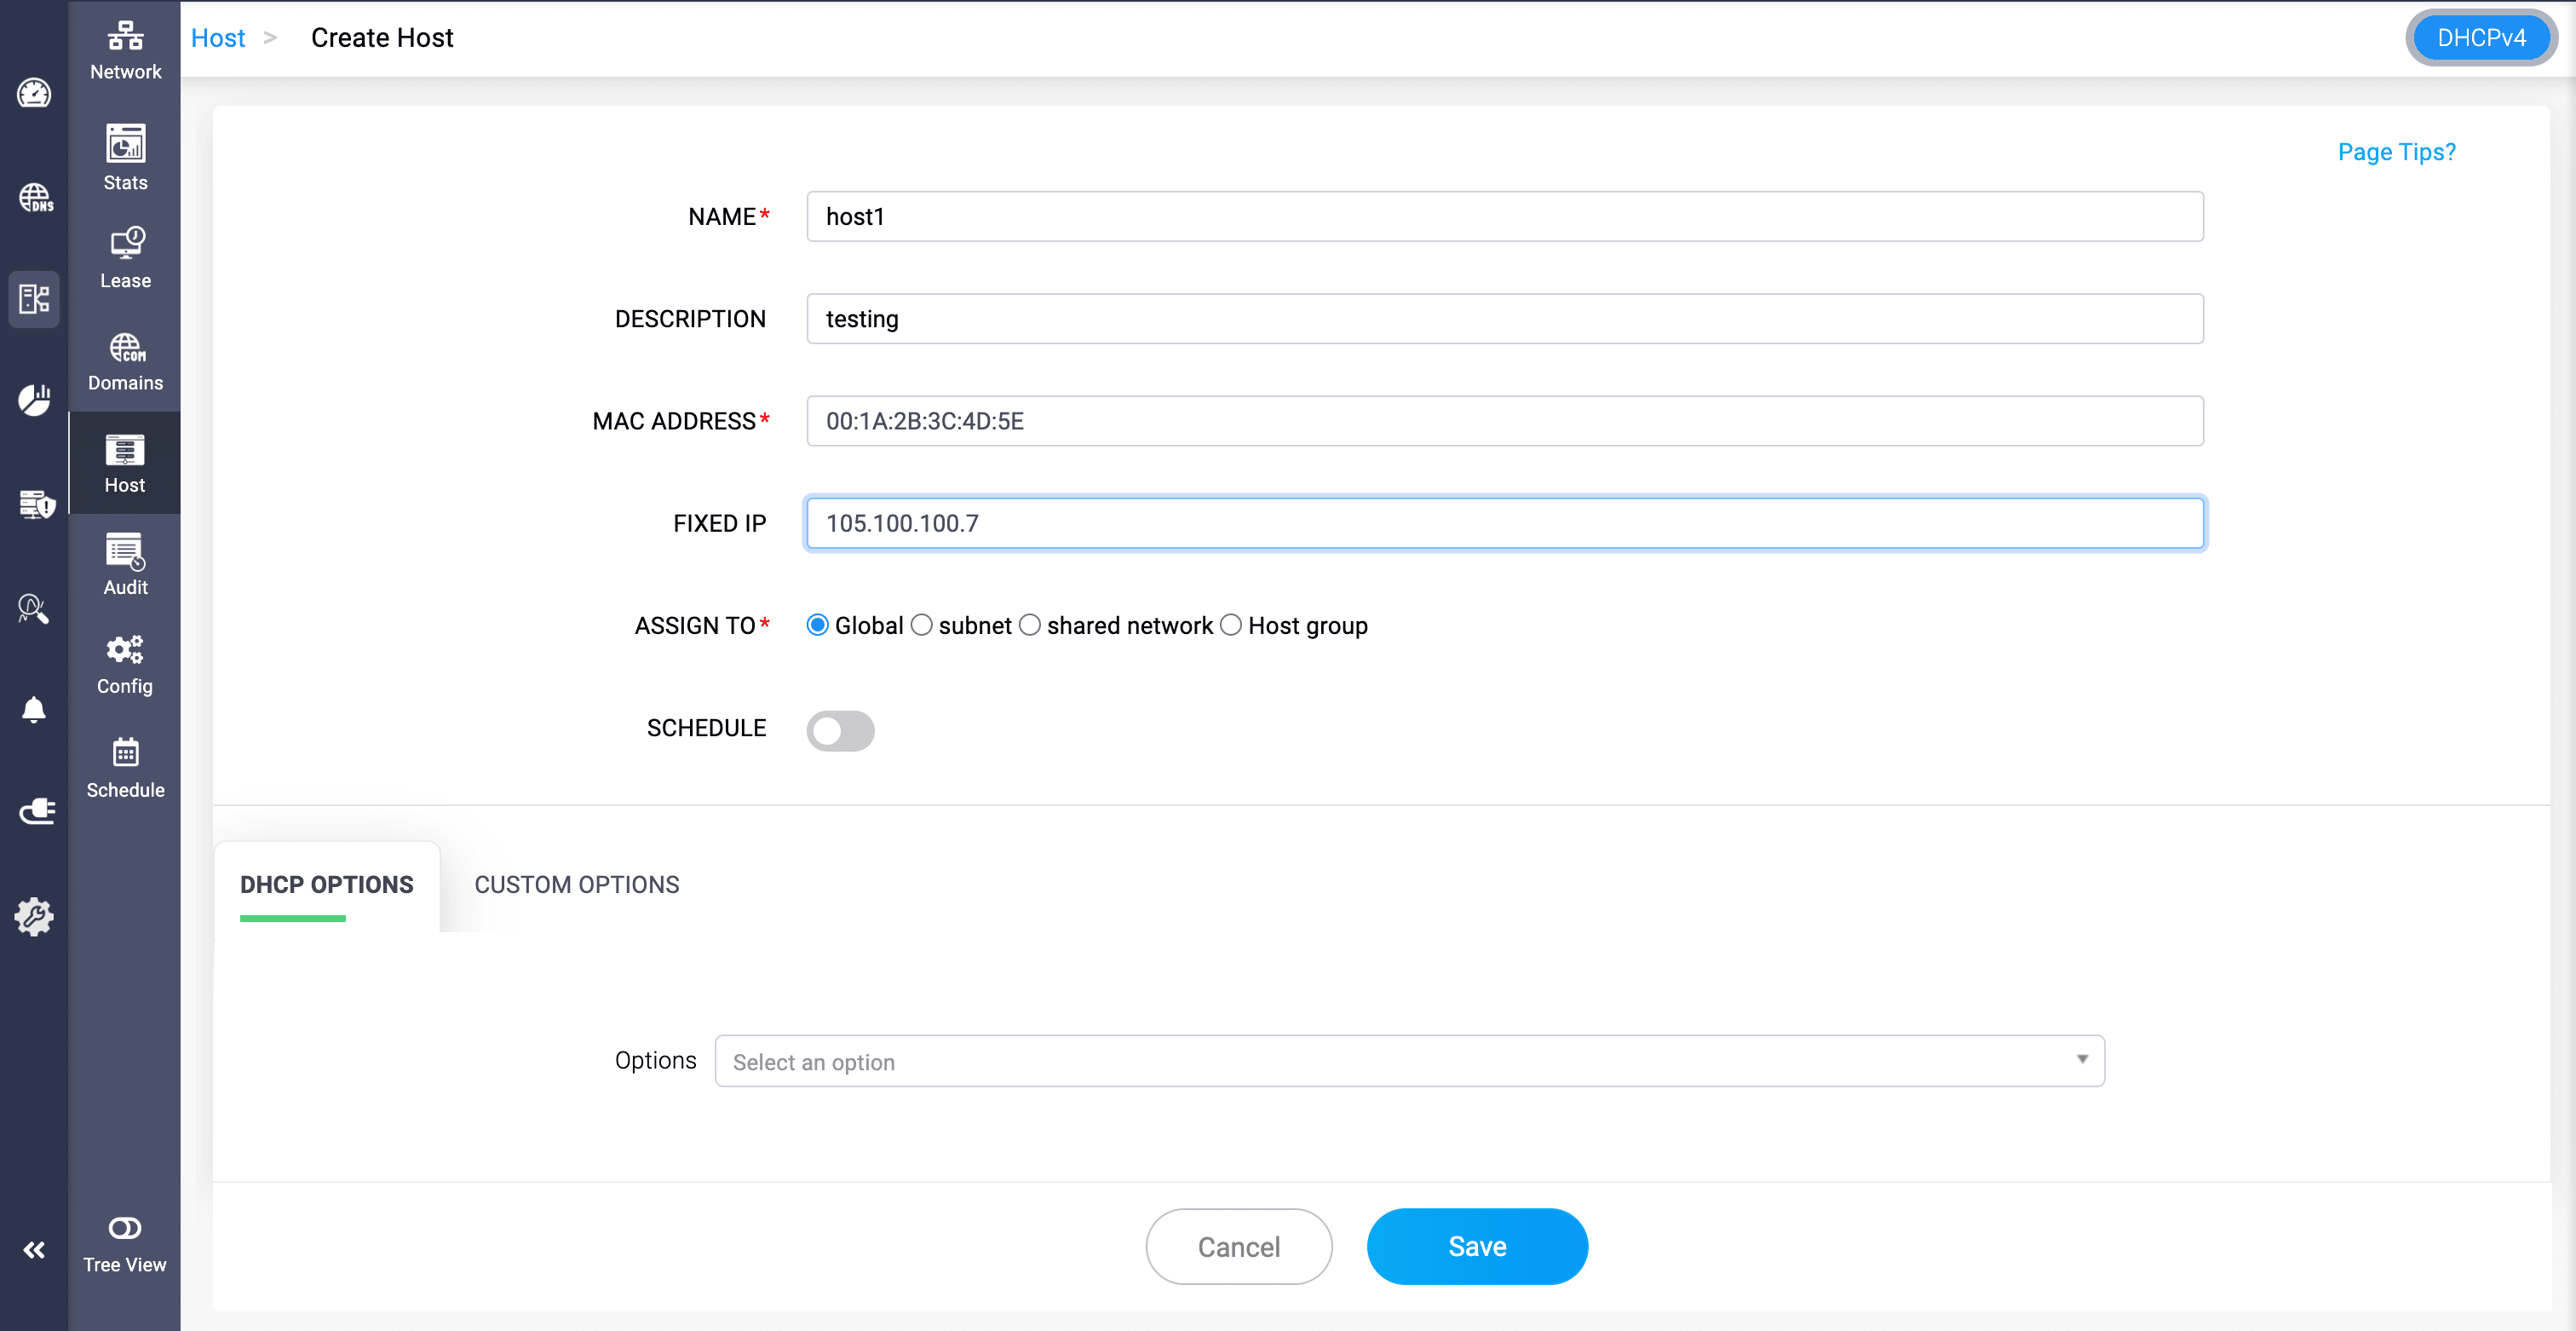
- To create a Host with a fixed address, go to DHCP-> Network-> Host.
- On the Host page, provide a unique name, description and the mac address of the host.
- Click Save to finalize the configurations.
To create a DHCPv6 Host or reservation,
Navigate to DHCP-> Host page.
Here navigate to the top right corner of the page and switch to the DHCPv6 mode.
Now click on the Add Host button. On the Create Host page that appears, enter the following details below:
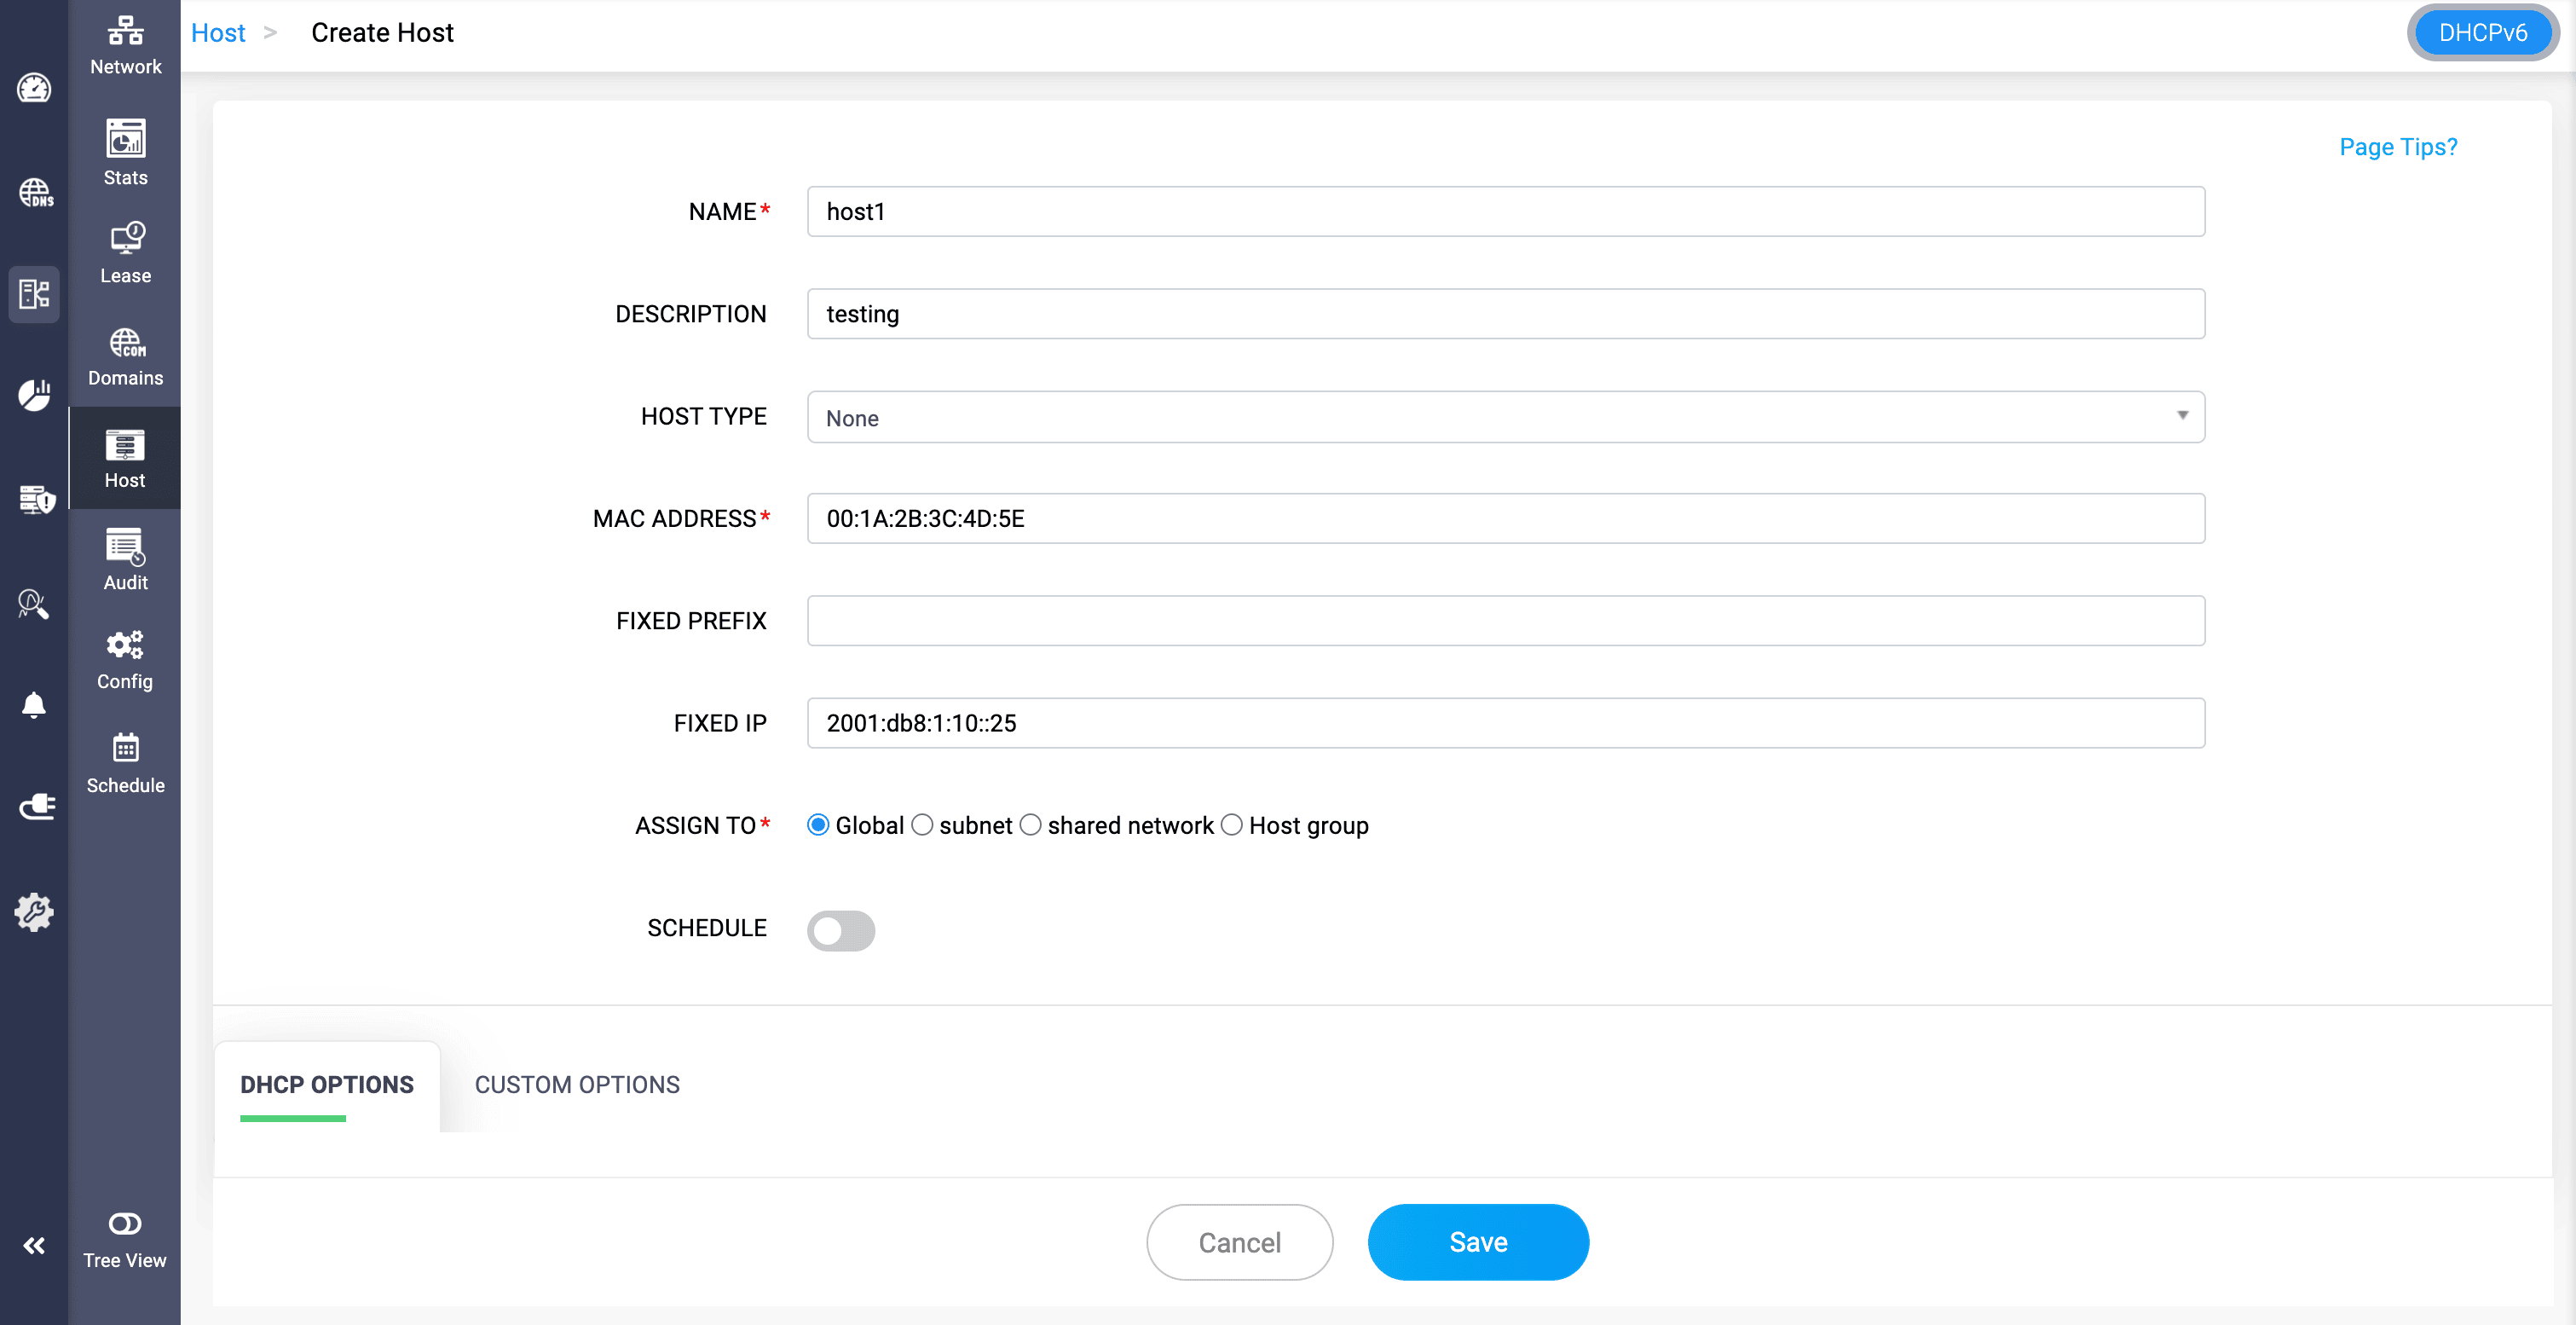
- NAME*: A user-defined name to uniquely identify the DHCPv6 reservation entry.
- DESCRIPTION: Optional text to describe the host—e.g., purpose, location, owner, etc.
- HOST TYPE: Select the type of host identifier used for DHCP reservation. The type chosen determines what identifier should the DHCPv6 server use to match the client.
Possible values include one of the following:
- IA-NA (Identity Association for Non-Temporary Address): Assigns a permanent IPv6 address to the client.
- IA-TA (Identity Association for Temporary Address): Allocates a temporary IPv6 address that changes periodically for privacy.
- IA-PD (Identity Association for Prefix Delegation): Delegates an IPv6 prefix (subnet) to routers or downstream clients.
- IA-Addr: Assigns a specific static IPv6 address to the host.
- IA-Prefix: Manually assigns an IPv6 prefix instead of using automatic delegation.
- Relay Msg: Used for DHCP relay agent communication and forwarding client requests.
- Vendor Opts: Allows adding vendor-specific options to DHCP messages.
- Interface ID: Assigns an IP based on the client’s interface identifier.
- FQDN (Fully Qualified Domain Name): Registers hostnames dynamically in DNS via DHCP.
- LQ Query (Lease Query): Queries existing DHCP leases for troubleshooting and diagnostics.
- Client Data: Uses client-provided data as an identifier for DHCP assignments.
- Relay Agent Information: Includes relay metadata in DHCP messages for tracking clients.
- Circuit ID (Agent): Identifies a client based on a VLAN or interface-specific tag.
- Remote ID (Agent): Uses a relay-inserted identifier to authenticate clients, often in ISPs.
- Client ID (DUID - DHCP Unique Identifier): Identifies a client using a persistent DUID across network interfaces.
- Subscriber ID: Uses a subscriber-specific identifier, commonly in ISP networks, for authentication.
- Client Link-Layer Address (MAC Address): Identifies a client using its MAC address, similar to DHCPv4 reservations.
- Remote ID: Identifies a client based on information provided by a DHCP relay agent.
- Relay ID: Uses a DHCP relay agent's unique identifier to track clients.
- Server ID: Identifies the DHCP server itself, primarily for administrative or debugging purposes.
Options include:
- Global — Applies across the entire DHCP configuration.
- Subnet — Tied to a specific IPv6 subnet.
- Shared network — For grouped subnets.
- Host group — Logical grouping of hosts.
Click Save to finalize the configurations.
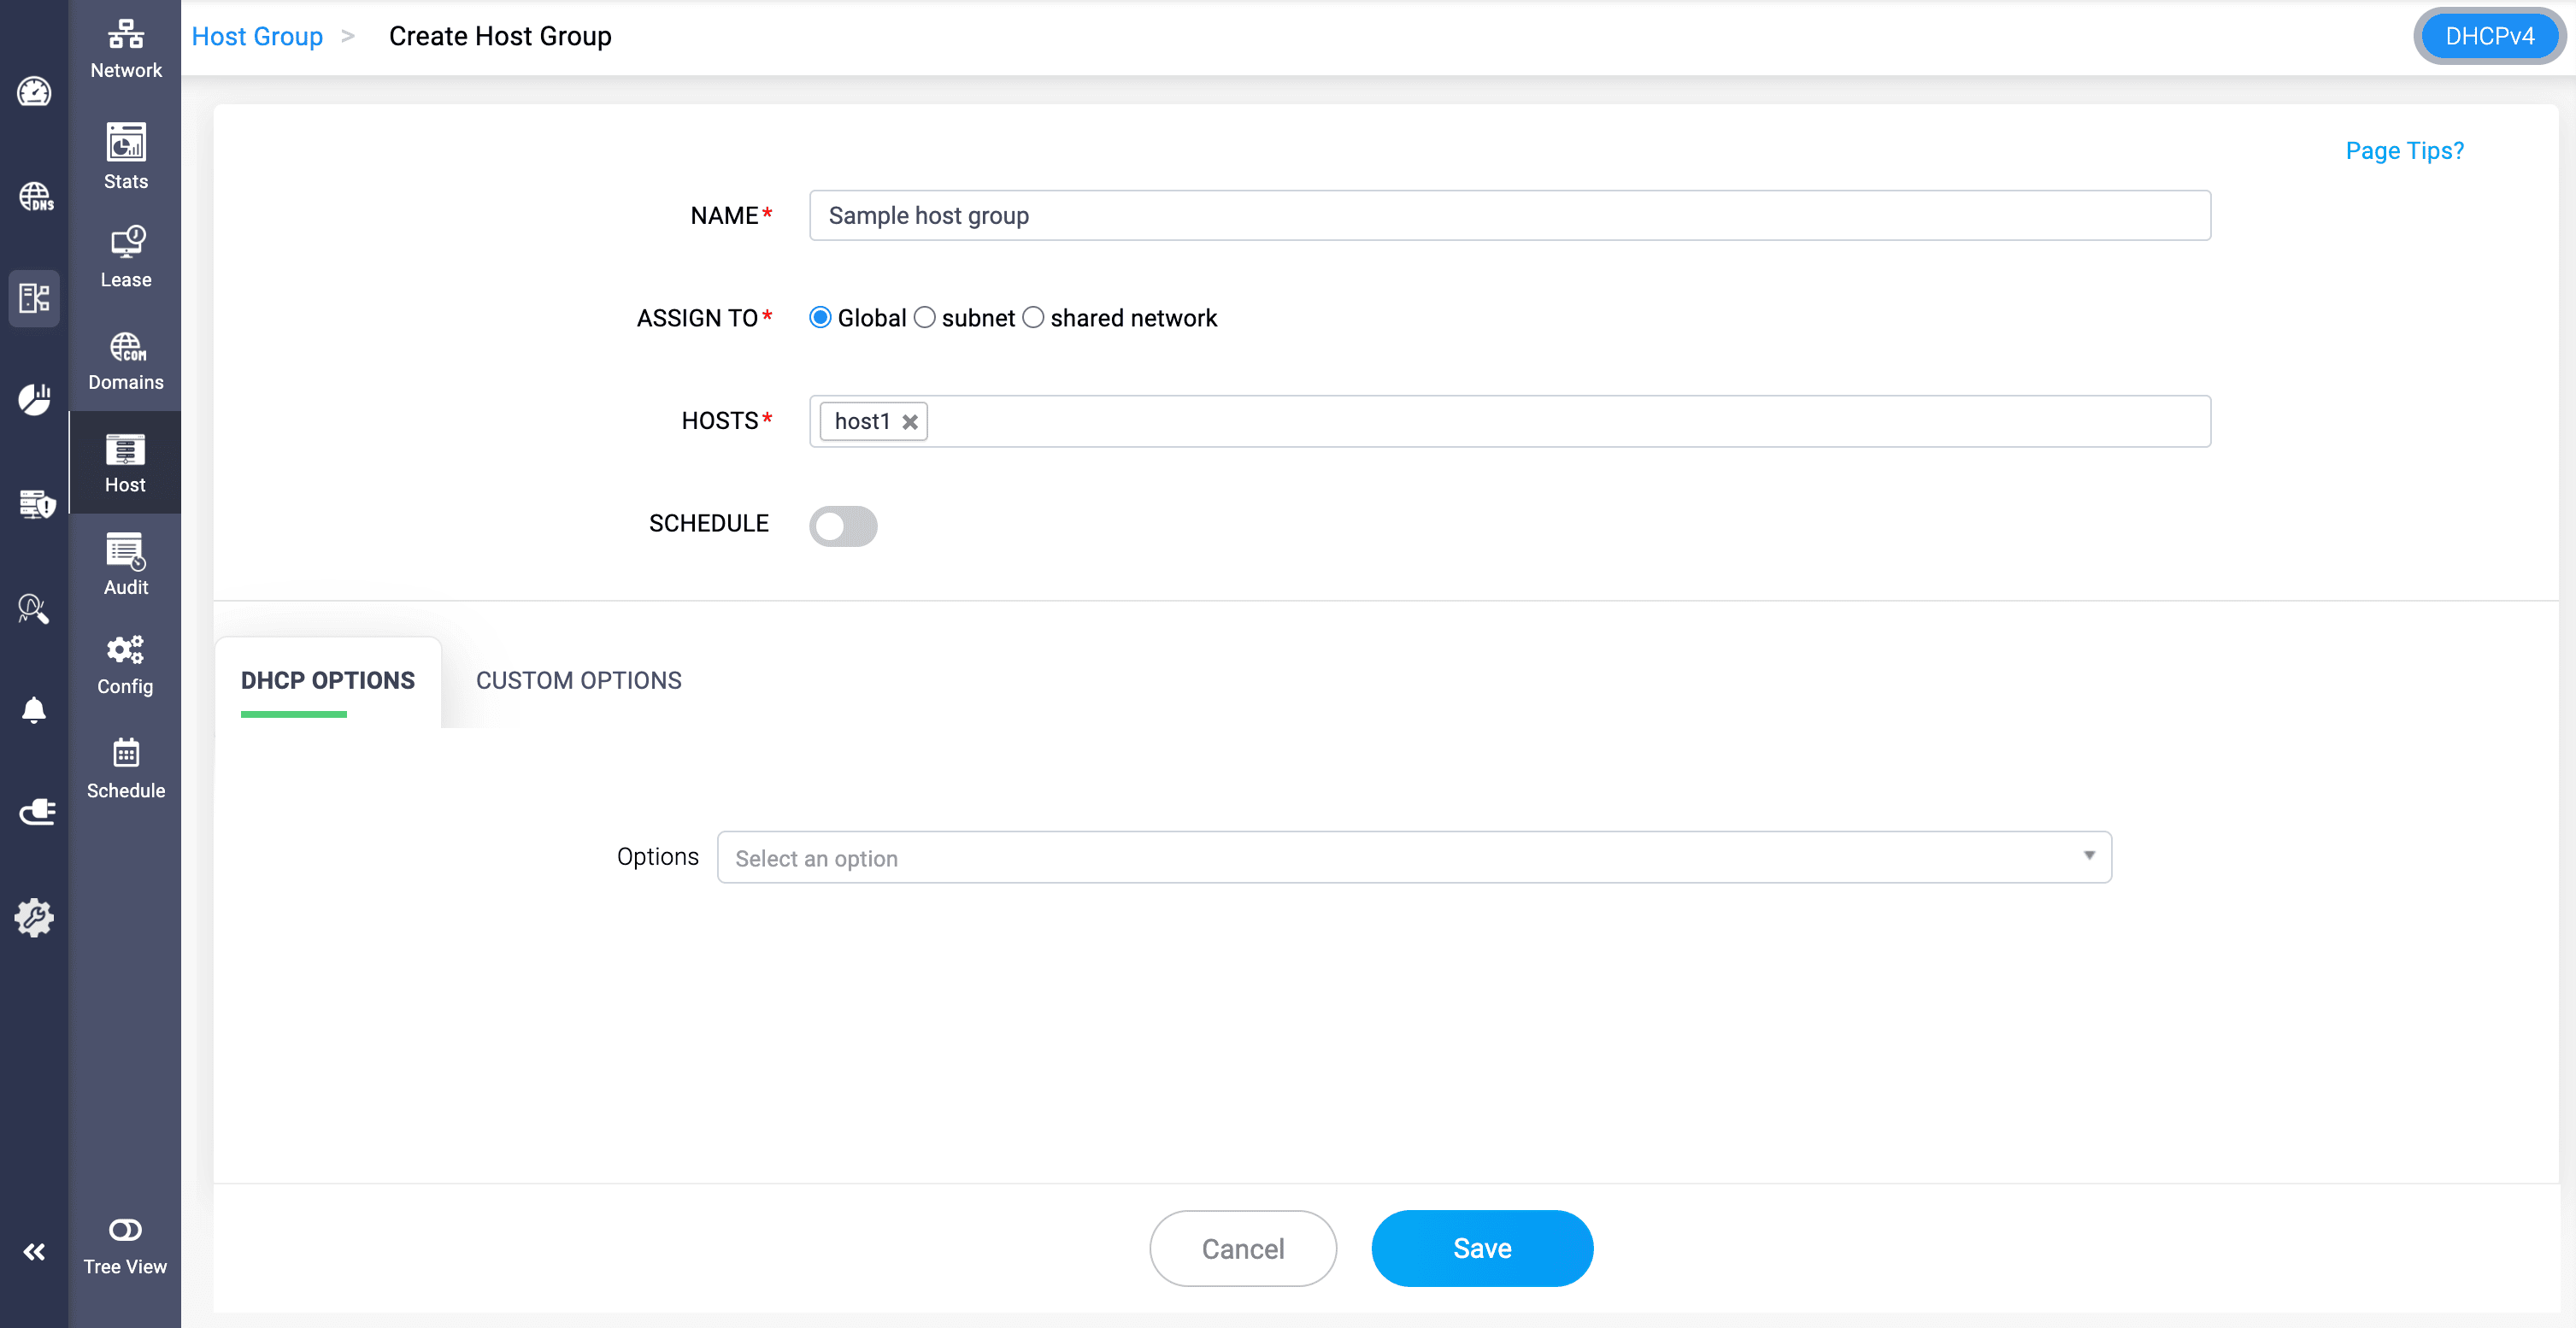
Host Groups
- Host groups are a group of hosts combined logically for easier management.
- Grouping hosts can simplify configuration, especially in large networks, by applying common settings to multiple hosts.
- You can apply a multiple DHCP options over this combination of hosts for customized management.
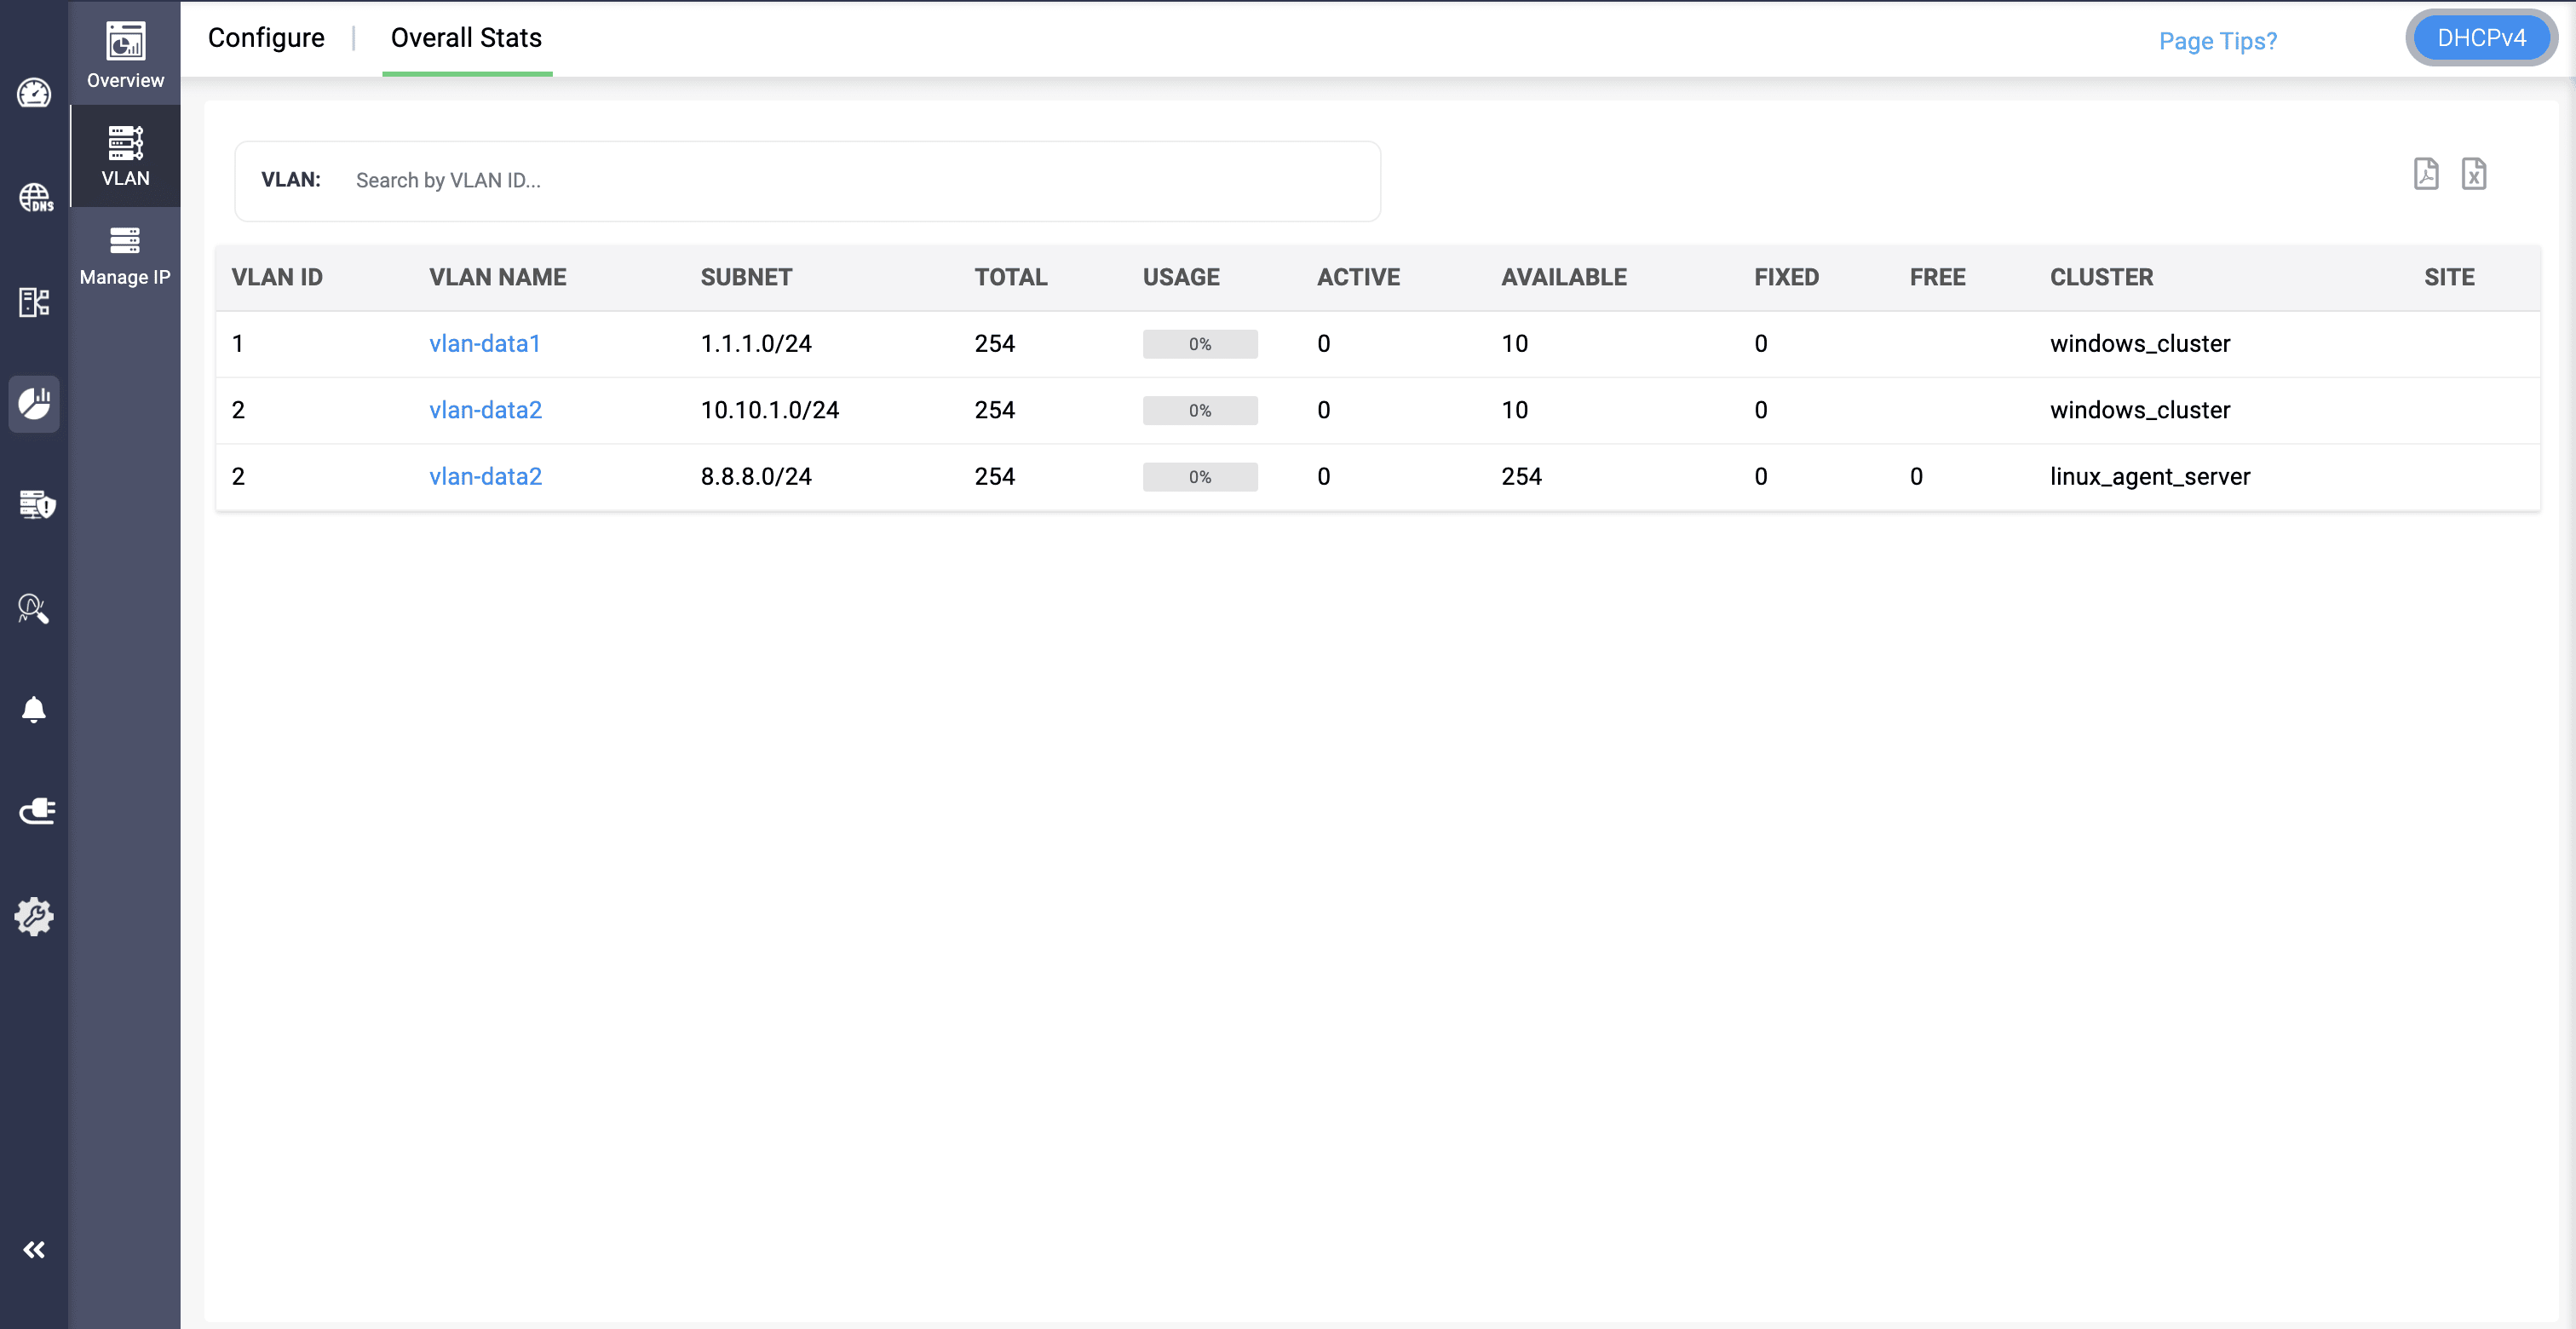
VLANs (Virtual LANs)
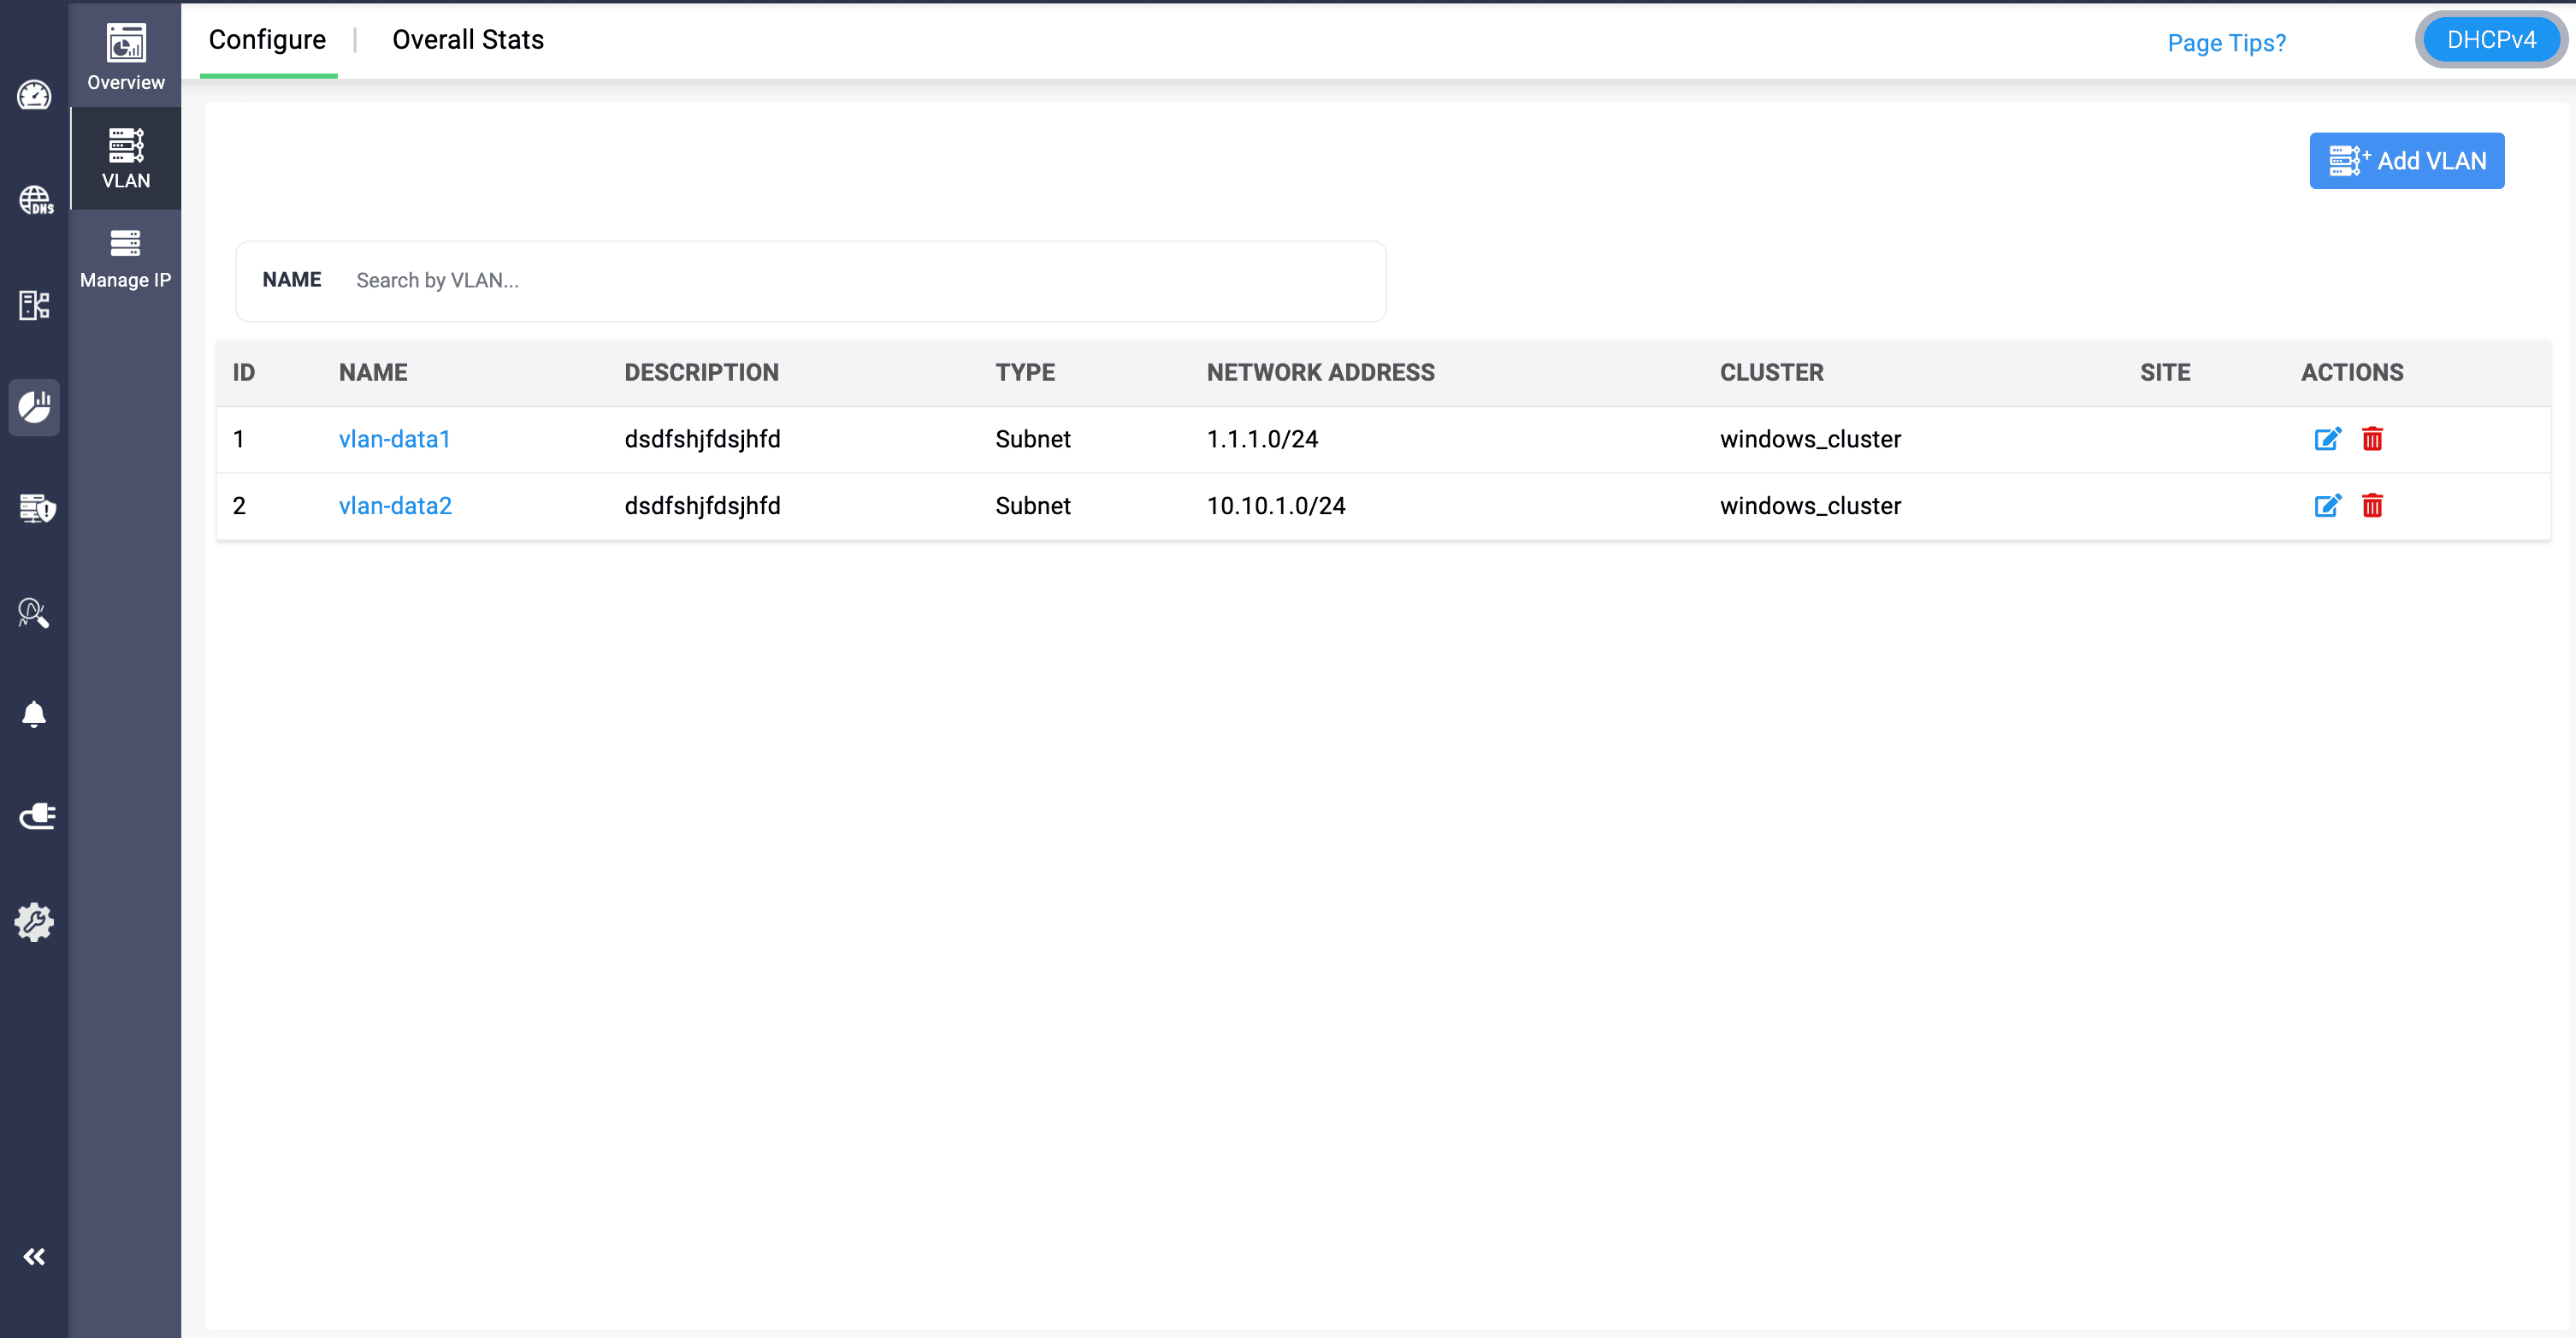
- VLANs are a network configuration that segments a physical network into multiple logical networks at the data link layer (Layer 2).
- DDI enables DHCP servers to serve different VLANs as distinct subnets or shared networks.
- Each VLAN you create within a subnet functions as a separate network, which improves performance by reducing broadcast traffic, enhances security by isolating sensitive data, and simplifies management by grouping devices according to function, department, or project.You can also associate an already existing VLAN to the subnet.
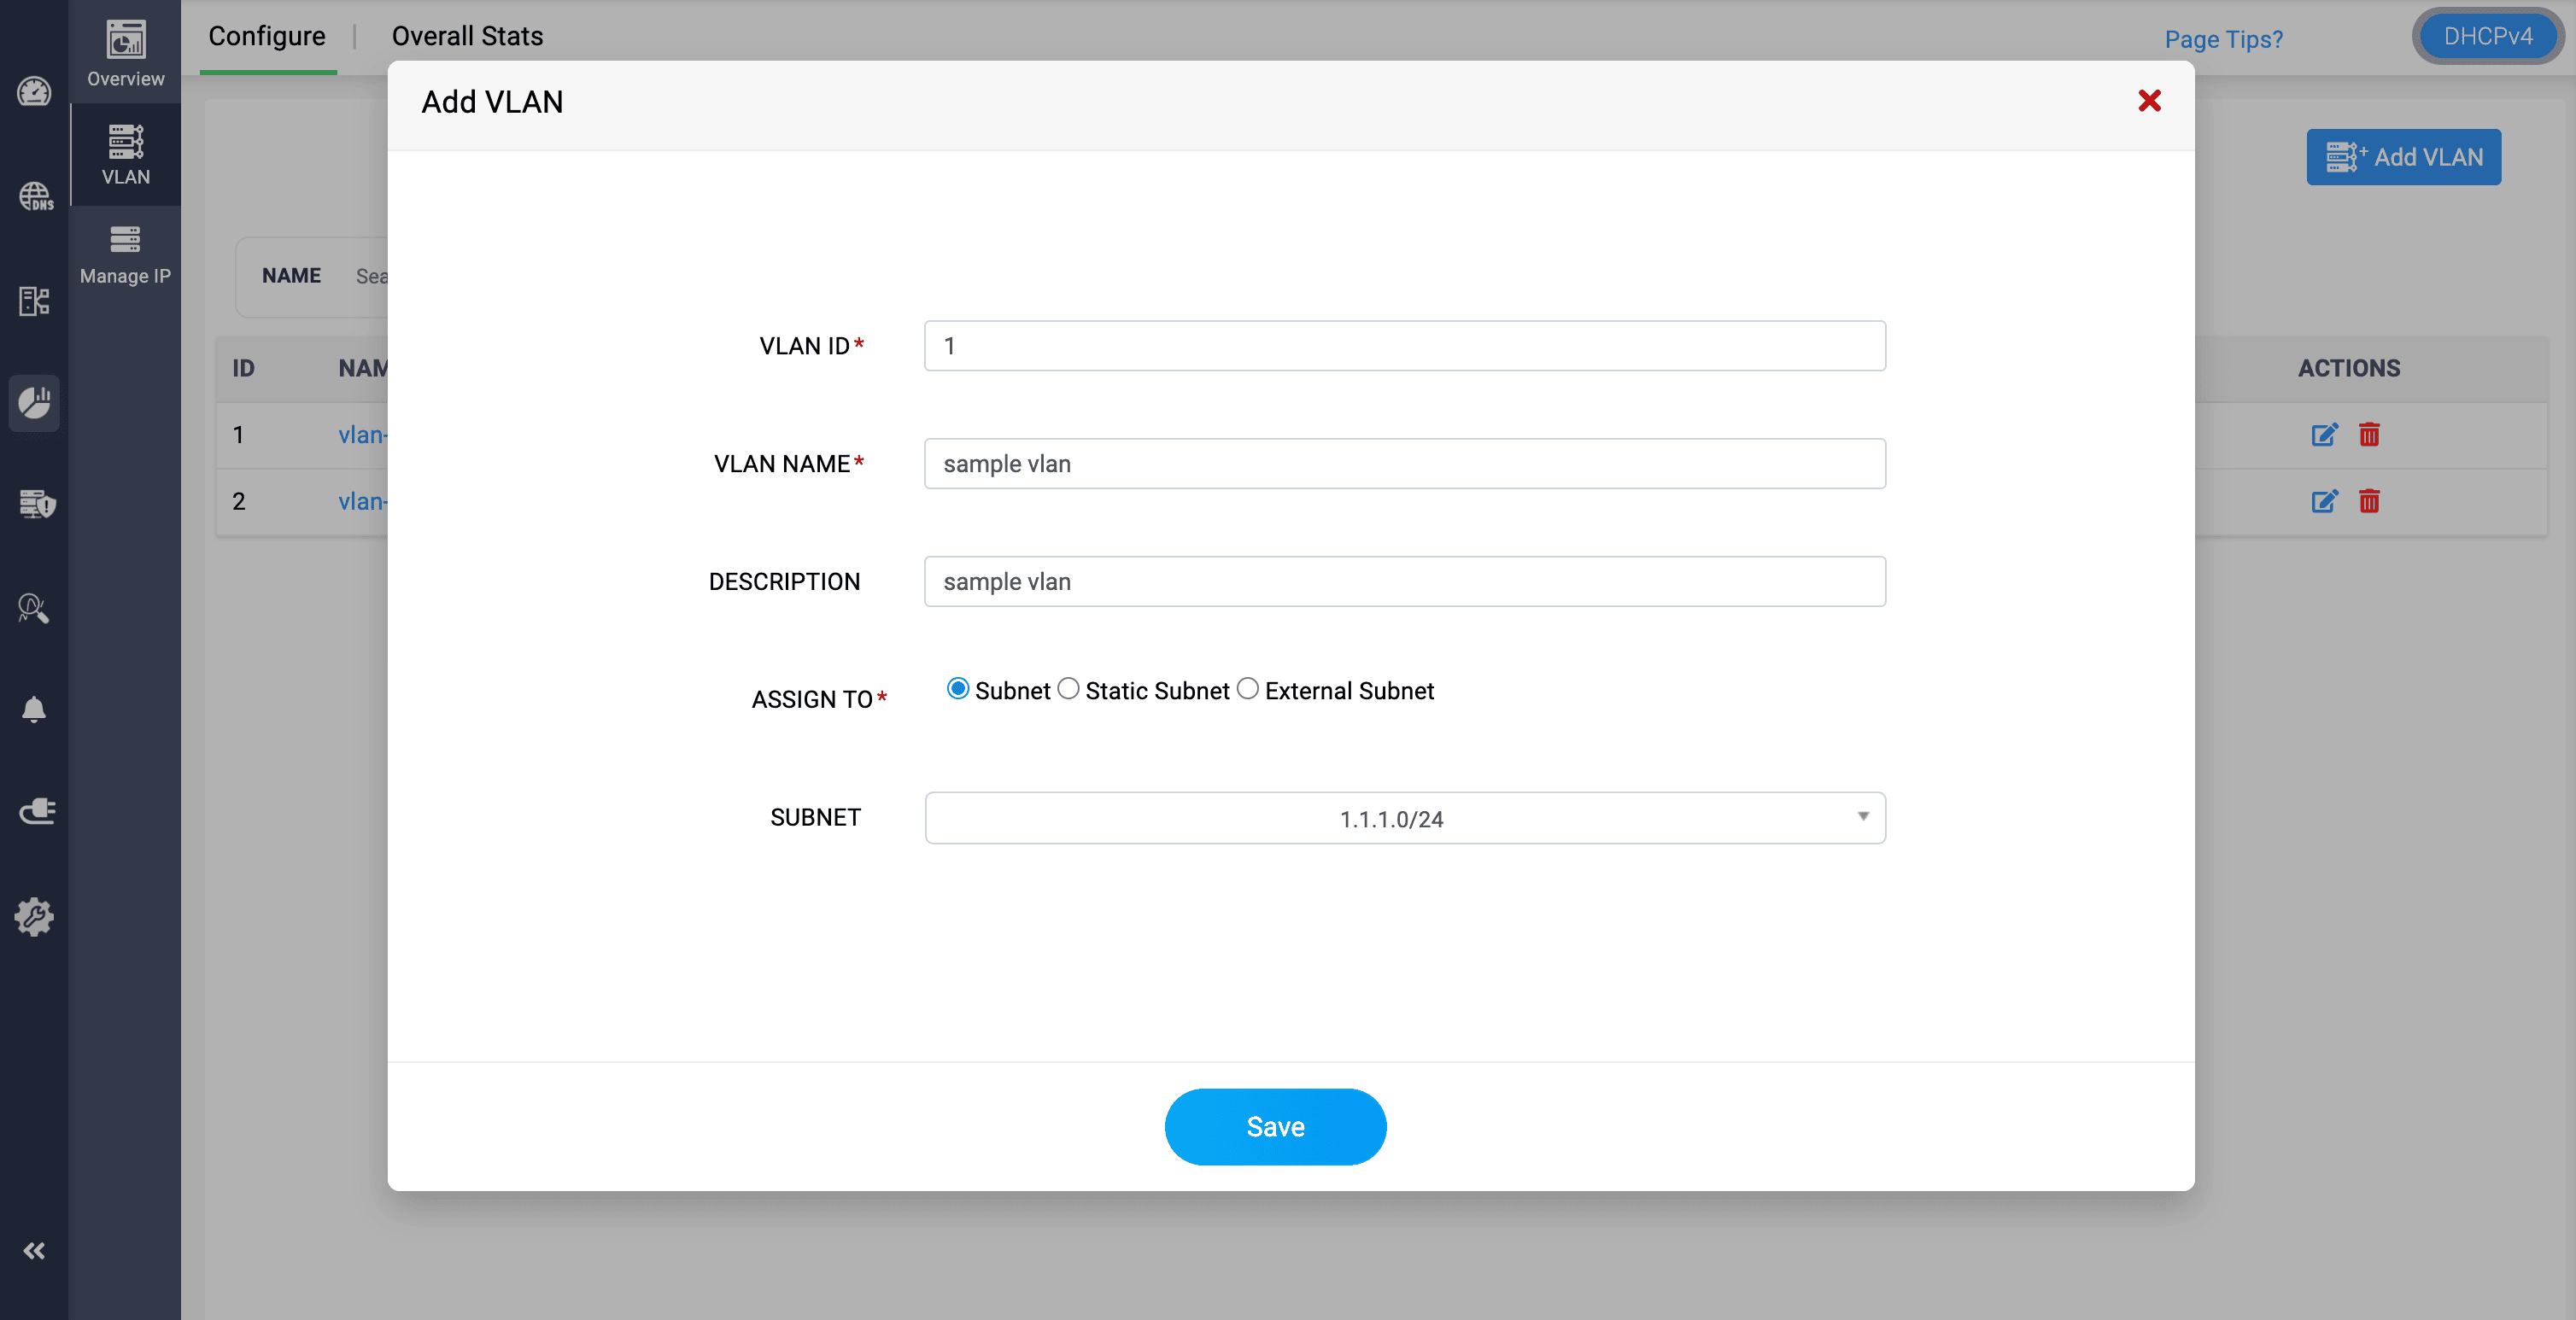
- Name and provide a suitable description to quickly identify the new VLAN. Also assign a suitable VLAN ID.
- Note: VLAN IDs are represented by a 12-bit number, but the usable range of VLAN IDs is from 2 to 4094.
Also, when discovering your current configurations from your network infrastructure using DDI Central discovery tools, it's crucial to note that VLANs and Supernets configured in your network will not be discovered. Therefore, ensure that you configure them separately in DDI Central for comprehensive and accurate network management.
DHCP scope visualization
DDI Central also lets you organize and manage the scopes in a hierarchical manner by providing hierarchical tree-view that show how different scopes relate to one another within the network. The DHCP scope tree view enables admins to quickly locate and access specific scopes, subnets, to manage configurations and troubleshooting tasks for a specific scope.
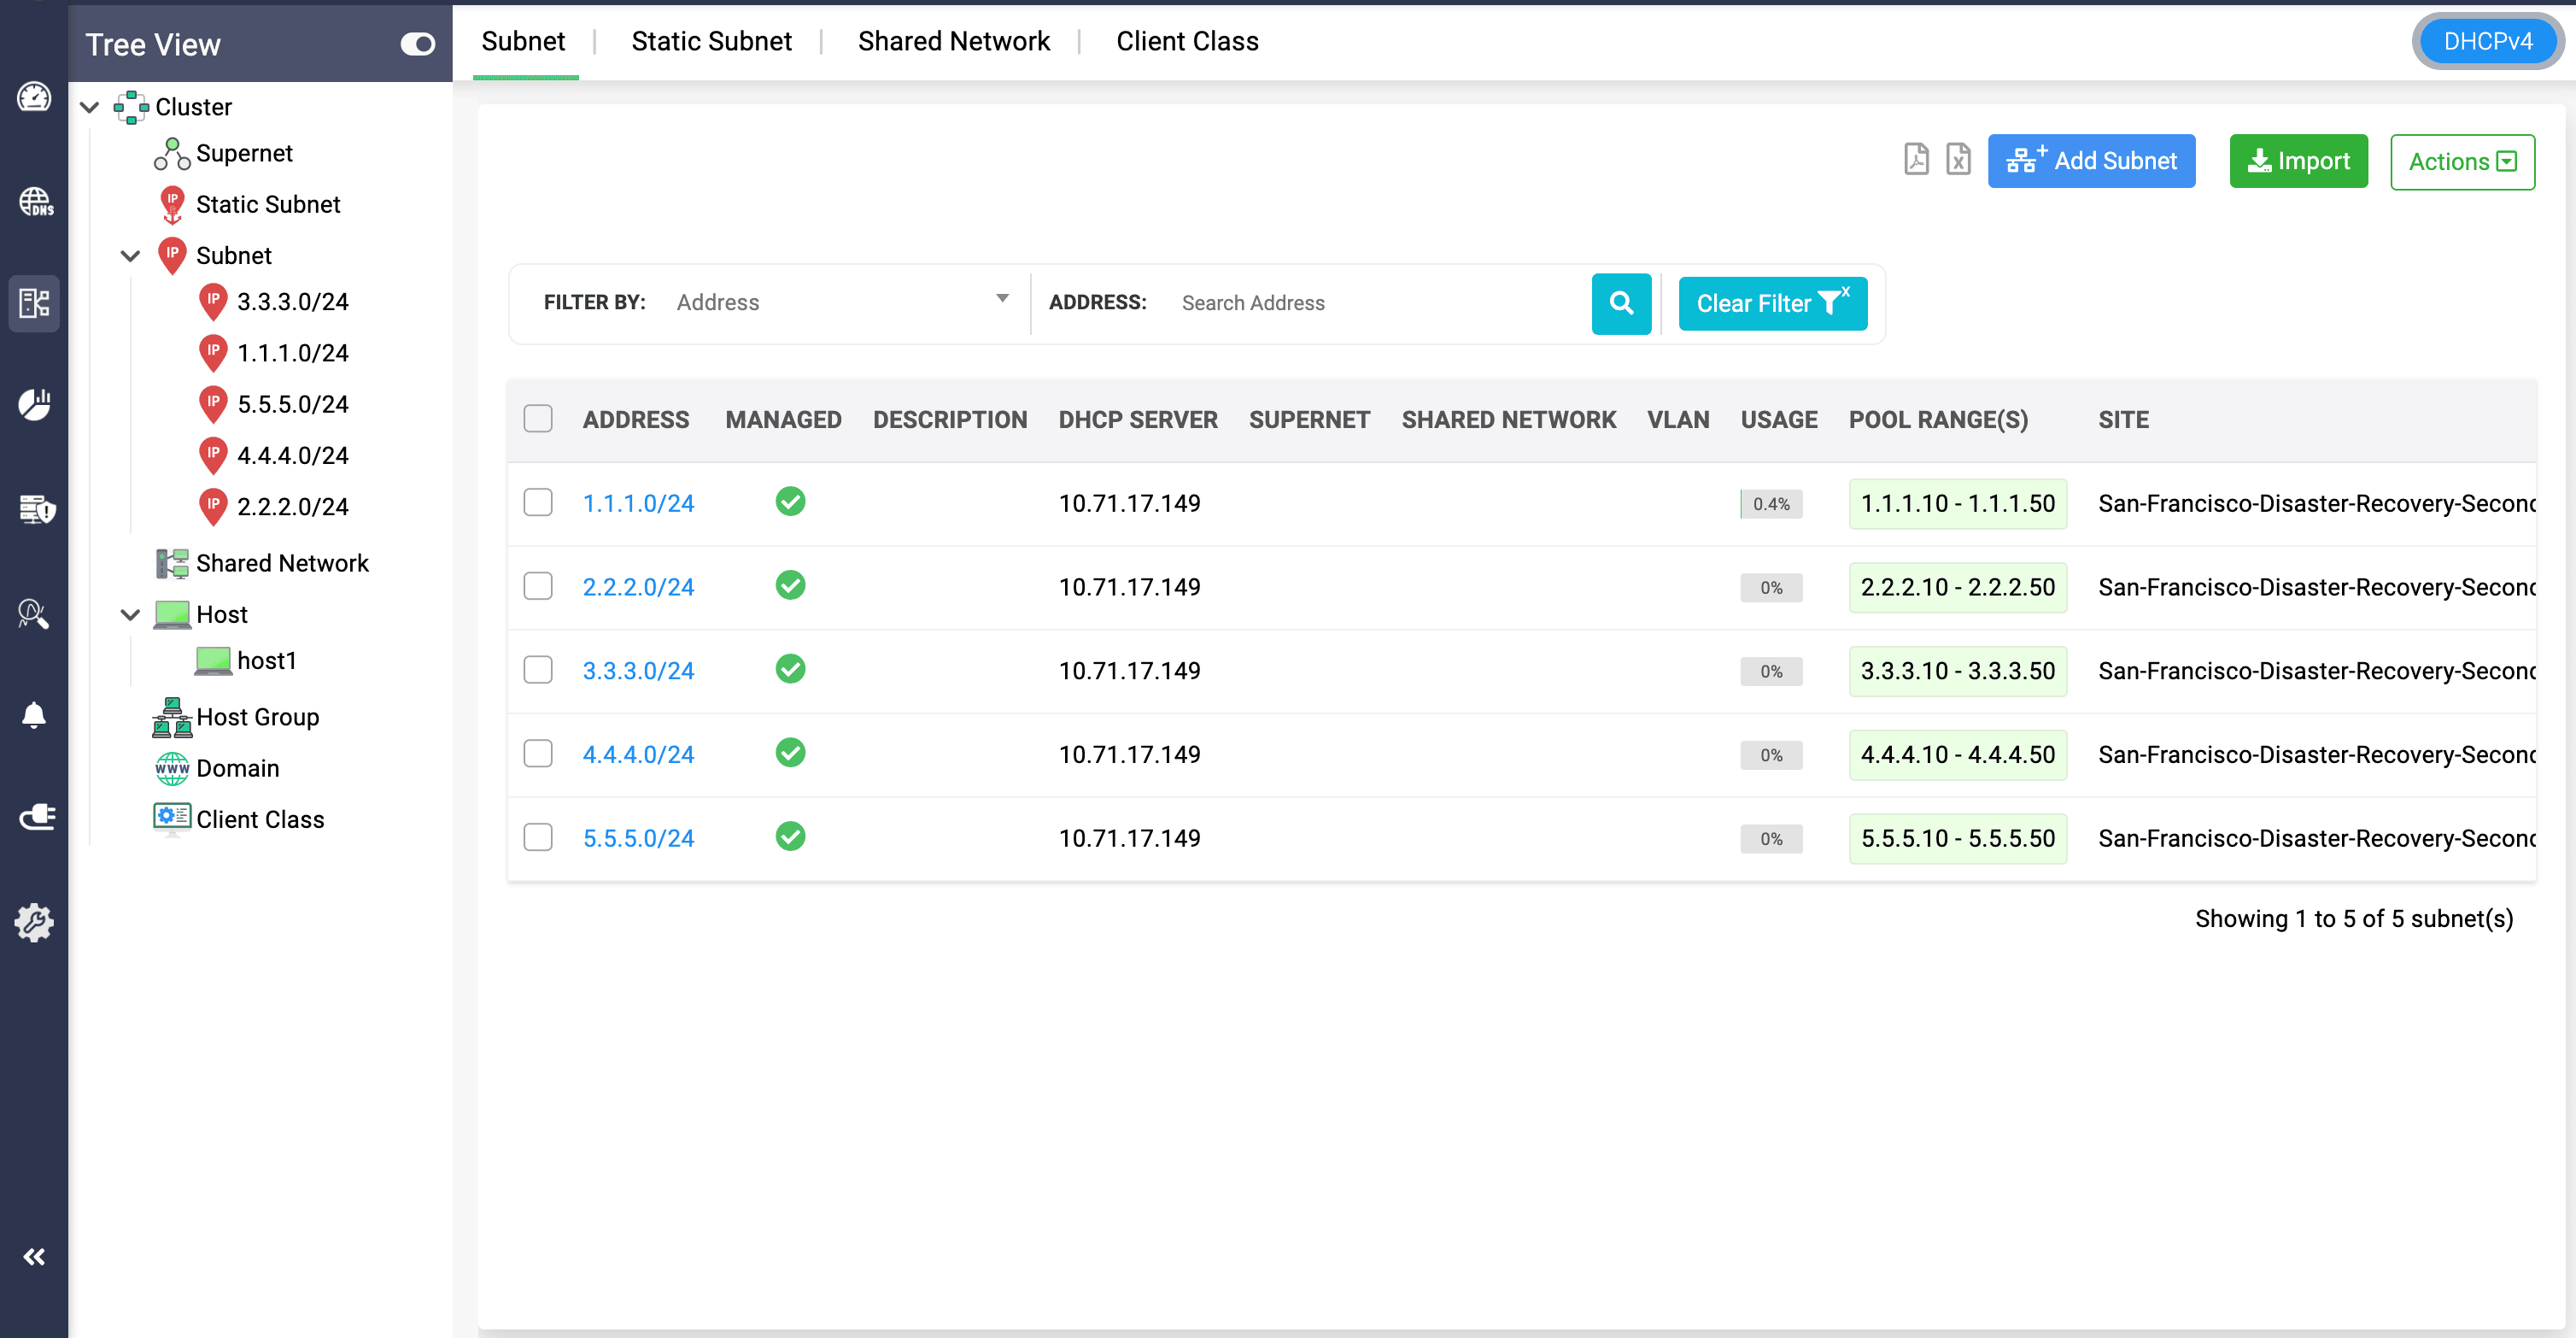
DDI Central provides flexible and powerful ways to manage IP address assignment and network configurations. Understanding these elements is crucial for network administrators to effectively design and manage their network's IP addressing scheme.
Bulk Import of IPv4/IPv6 Subnets and Hosts/DHCP Reservations in DDI Central
DDI Central enables administrators to import IPv4/IPv6 subnets, and hosts/DHCP reservations in bulk using CSV files. This feature simplifies large-scale network configuration and reduces manual entry errors.
To perform a bulk import:
- Click on the Import button located at the top of the respective section.
- The Import button is positioned next to Add Subnet ,and Add Host buttons respectively.
- Upload the CSV file containing the required data.
Guidelines for Importing DHCP Scopes Using CSV Files
- The CSV file size must not exceed 50 MB. Files beyond this size limit will not be processed by DDI Central.
- Ensure that the columns in the CSV file follow the format specified in the sample files for each DHCP scope:
Following these guidelines will ensure a smooth and error-free import process.