OAuth/OpenID Connect SSO
OAuth/OpenID Connect is one of the single sign-on (SSO) methods you can use to integrate a custom application. It uses the OAuth 2.0 authorization framework with OpenID Connect as the identity layer for authentication. In this method, the product acts as the identity provider (IdP) while the application acts as the service provider (SP). It supports both web and mobile applications, and SSO can run in either SP-initiated or IdP-initiated flows.
SP-initiated and IdP-initiated SSO
OAuth/OpenID Connect SSO supports two flows:
- SP-initiated SSO: The user first tries to log in to the application (the SP), which sends an authorization request and redirects the user to the product (the IdP) to sign in. After successful authentication including MFA, the IdP returns an authorization code to the application. The application exchanges that code for an ID token or an access token and verifies the IdP's signature. It then reads the user's details, either from the ID token or by using the access token to retrieve them, and signs the user in.
- IdP-initiated SSO: The user signs in to their portal first and selects the application from the Applications tab. If a conditional access policy applies to the application, the user completes MFA before it launches. The IdP sends the ID token directly to the application, which verifies the signature, reads the user details, and signs the user in.
Prerequisites
Before you configure OAuth/OpenID Connect SSO:
- Sign in to the application (the SP) as an administrator.
- Decide whether you will set up SP-initiated or IdP-initiated SSO, and collect the URLs that flow needs from the application (usually on its OAuth/OpenID Connect SSO configuration page). You enter these during configuration:
- SP-initiated SSO: The authorization redirect or callback URL(s) from the application. This is the endpoint on the application where Identity360 returns the authorization code and tokens after the user signs in. You enter it in the Login Redirect URL field.
- IdP-initiated SSO: The Login Redirect URL and the IdP Login Initiate URL, i.e., the application endpoint that receives the ID token so users can launch the app from the Applications tab.
Configuring OAuth/OpenID Connect SSO for a custom application
To configure OAuth/OpenID Connect-based SSO for a custom application:
- Go to Applications > Application Integration, and click Custom Application.
- On the General Settings tab, enter an Application Name. Optionally, you can add a Description and upload a Logo Icon.
- Under Choose Capabilities, select Single Sign-on and click Continue.
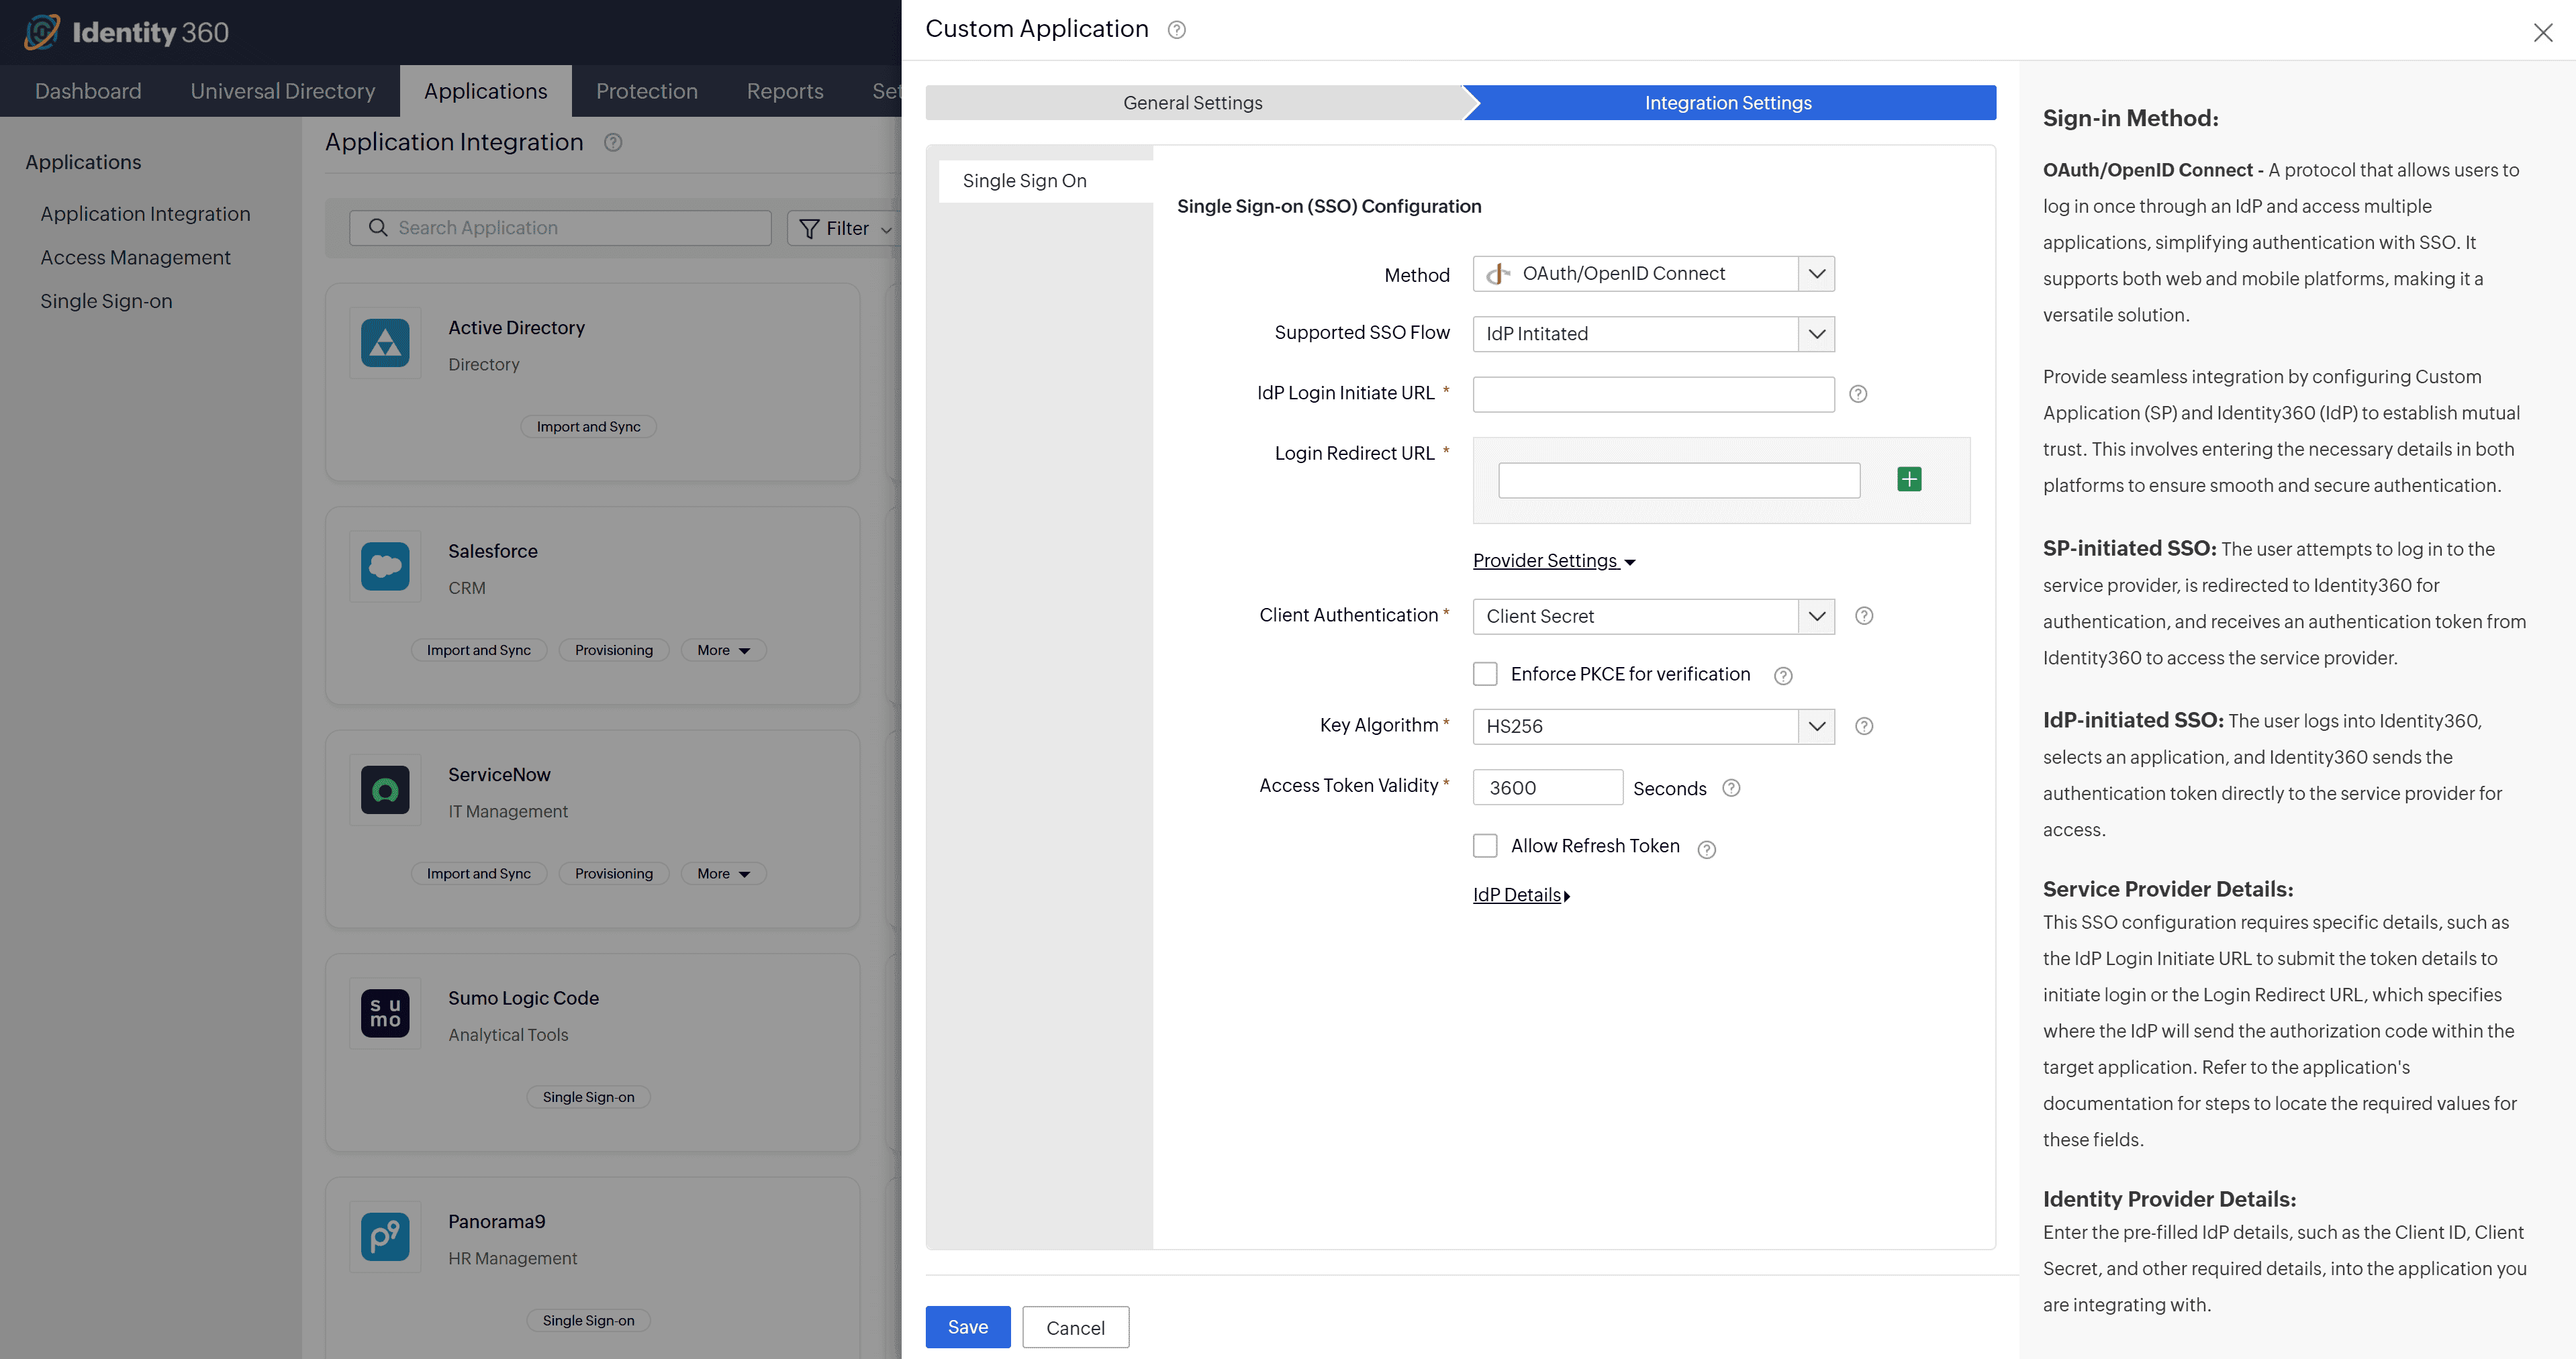
- On the Integration Settings tab, in the Method dropdown, select OAuth/OpenID Connect, then set Supported SSO Flow to SP Initiated or IdP Initiated.
Note Choose the flow based on where your users start signing in and what the application supports. Select SP Initiated if users open the application first and are redirected to Identity360 to sign in. Select IdP Initiated if users sign in to Identity360 first and launch the application from the Applications tab, or if the application supports only IdP-initiated login. Because IdP Initiated also captures the Login Redirect URL, selecting it covers both flows, so choose it when you want to support both. If you are unsure which flows your application supports, check the application's OAuth/OpenID Connect documentation, or contact the application's support team or Identity360 support.
- Enter the redirect details for the flow you chose:
- For SP-initiated SSO, in the Login Redirect URL field, enter the authorization redirect or callback URL(s) from the application.
- For IdP-initiated SSO, fill in the Login Redirect URL and the IdP Login Initiate URL, which is used to send the ID token to the application so users can launch it from the Applications tab.
- Under Provider Settings, configure the token options:
- Client Authentication: How the application proves its own identity to Identity360 when it calls the token endpoint, which happens when it exchanges the authorization code for tokens and when it uses a refresh token. These calls are back-channel requests, sent directly from the application to Identity360 rather than through the user's browser, so client authentication is separate from authenticating the user. Choose Client Secret, Private Key JWT, or None based on the application type. For server-based applications, use Client Secret or Private Key JWT. Private Key JWT requires the application's JWKS URL, the endpoint where the application publishes the public keys used to verify the signed JWT. Get this URL from the application's OAuth/OpenID Connect configuration and enter it during configuration. For client-only applications that cannot store a secret, use None to enforce Proof Key for Code Exchange (PKCE).
- Enforce PKCE for verification: You can also select this checkbox for added security.
- Key Algorithm: The algorithm Identity360 uses to sign the ID token or access token it issues; the application then verifies the signature. Choose the algorithm your application expects. Use HS256 for symmetric signing, where the token is signed and verified with the shared client secret. Use RS256, RS384, or RS512 for asymmetric signing, where Identity360 signs with its private key and the application verifies the signature using Identity360's public keys. The number is the SHA hash size, so a higher number is stronger. If you are unsure which algorithm your application expects, contact the application's support team or Identity360 support.
- Access Token Validity: Set how long the access token stays valid in seconds (the default is 3,600).
- Allow Refresh Token: Enable this to let the application get new access tokens without making the user re-authenticate each time.
- Click Save.
After you save
The IdP Details section shows the values you enter into the application to complete the setup: the Client ID, Client Secret, and Issuer, plus the Authorization Endpoint URL, Token Endpoint URL, User Endpoint URL, Keys Endpoint URL, and Revocation Endpoint URL, along with the Well-Known Configuration URL. Copy each value into the matching field in the application. If the application supports OpenID Connect discovery, give it the Well-Known Configuration URL instead of the individual endpoints and it will read them automatically. Either way you enter the Client ID and Client Secret manually, because those are not part of the discovery document.
Before you save, the IdP Details section on the Integration Settings tab shows the endpoints. The Well-Known Configuration URL appears only after you save. To see the full set at any time, go to Applications > Single Sign-on, find your application in the SSO Configured Applications list, and click View in the IdP Details column.
Assign the application to the users and groups who need it. Until it is assigned, it does not appear on anyone's Applications tab. Go to Applications > Single Sign-on, find your application in the list, and in the Assigned To column click the users icon or the groups icon to assign it to specific users or groups. You can return here at any time to change access or unassign the application.