Last updated: August 14, 2026
Overview
MDM Invite Enrollment enables administrators to enroll BYOD and corporate-owned devices by sending enrollment invitations via email or SMS, without requiring a factory reset or physical access to the device. This method is ideal for contract employees or users outside your organization's directory services. Administrators can enroll devices individually or in bulk using a CSV file, with support for Android, iOS, iPadOS, macOS, and Windows, while ensuring corporate and personal data remain segregated throughout device management.
MDM Invite Enrollment allows administrators to seamlessly enroll Bring Your Own Device (BYOD) in the MDM Console. This method is especially useful for enrolling devices that are not part of the organization's directory services, such as contract employees' devices or personal devices that need corporate management.
With Invite Enrollment, administrators can send enrollment requests via email or SMS, allowing users to self-enroll their devices without the need for a factory reset. This process ensures the segregation of corporate and personal data, protecting sensitive information while maintaining user privacy. Invite Enrollment supports multiple operating systems, including Android, iOS, iPadOS, macOS, and Windows, making it a versatile solution for device management across various platforms.
Benefits of Invite Enrollment
Enrolling a device through Invite Enrollment provides several benefits for the admin, end user:
Admin Benefits: Streamlined Device Enrollment and Management
- Invite enrollment ensures that corporate data is protected while allowing employees to use their personal devices (BYOD) devices securely.
- It simplifies the process of bringing new devices into MDM, improving overall efficiency.
- Organizations can support a wide range of different Platform devices, enhancing flexibility in the workplace.
- Invite enrollment supports contract workers or temporary employees, enabling rapid device management without requiring directory service integration.
- Admins can enroll devices without the need for physical access or device factory reset, allowing for remote management.
- Admins can invite multiple users at once using CSV upload for bulk enrollment, saving time.
End User Benefits: Simplified and Secure Device Enrollment
- The user can enroll their device by following simple instructions via email or SMS.
- Users can keep their personal data intact as there's no need to reset the device during the enrollment process.
- Corporate data is managed separately from personal data, ensuring user privacy while maintaining security for work-related information.
- Users can enroll their devices from anywhere, making the process convenient and flexible.
Invite Enrollment Methods
Invite Enrollment provides multiple methods to enroll devices for both Admins and End Users. Administrators should perform a test enrollment on their first device to validate the enrollment workflow and platform features prior to enterprise-wide implementation.
Individual User Invite Enrollment
- Admins can choose to send invitations via Email or SMS for a specific user.
- Admins can modify the enrollment instructions in the invite email template based on user requirements.
- Platform-specific invites can be sent individually, while the 'Create Common Invite' feature accommodates unknown devices, offering a versatile enrollment approach
- The user receives an enrollment invitation via email or SMS containing step-by-step instructions, enabling them to complete the enrollment process at their preferred time.
Bulk User Enrollment (CSV Bulk Invite)
Administrators can efficiently onboard multiple users at once by uploading a CSV file containing device and user details. This bulk enrollment method is ideal for large-scale deployments or managing numerous BYOD (Bring Your Own Device) implementations. The MDM automatically processes and sends all invitations, significantly reducing manual effort for IT staff. SMS will be sent in bulk if phone number is provided in csv ( Applicable only for cloud). Administrators maintain full visibility of invitation statuses (pending, completed, etc.) through the dashboard and can resend invites as needed.
Note:
For ME MDM Cloud users, invitations can be sent via both Email and SMS. However, for ME MDM On-Premises, only Email invitations are supported. Consequently, if using ManageEngine MDM On-Premises, ensure that the mail server is configured before sending out email invitations.
Manage Enrollment Invites
After sending enrollment invitations, use the Managed, Enrollment Pending, Staged, and Awaiting License tabs to track devices and manage enrollment requests.
Managed Tab
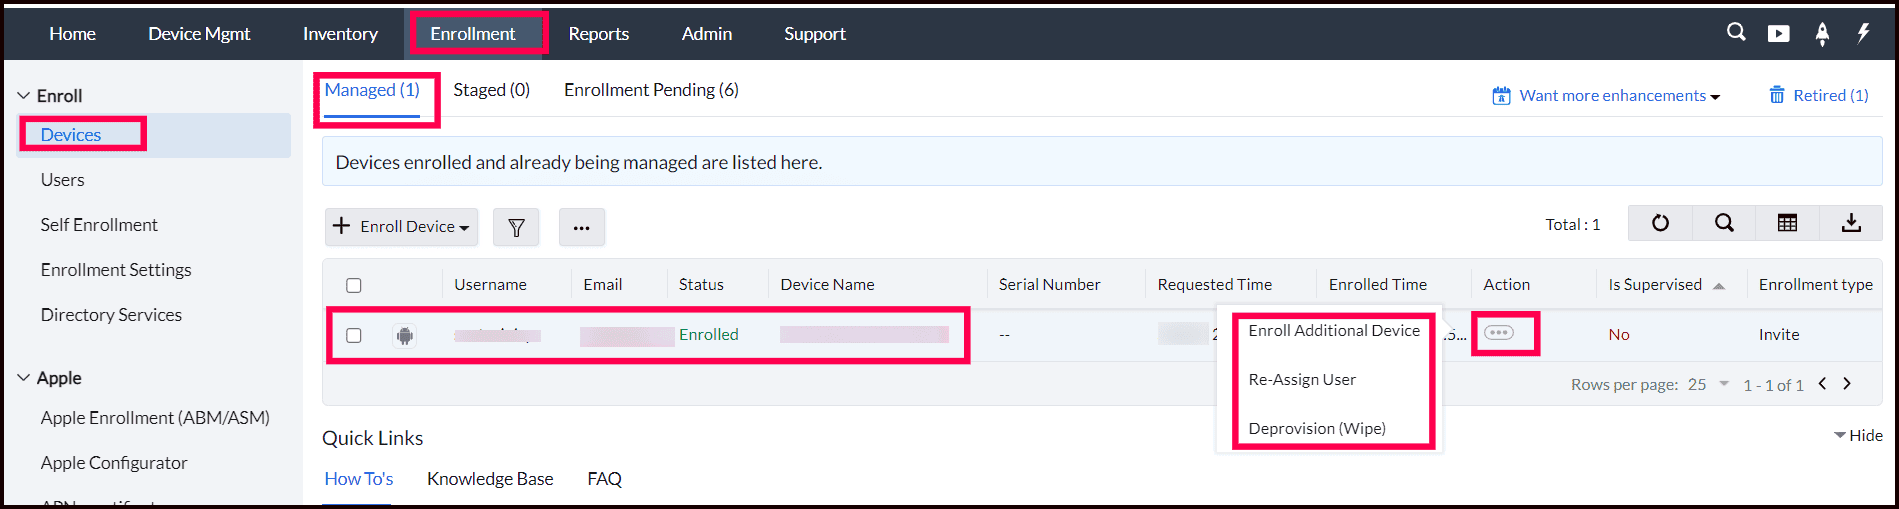
The Managed tab in MDM Console provides a comprehensive view of all devices that have been successfully enrolled and are currently being managed in MDM. This tab is essential for administrators to monitor, control, and perform actions on registered devices. This tab covers only devices enrolled through mobile MDM. For Windows or Mac computers managed through the Endpoint Central Agent, MDM enrollment/profile status is not shown here; instead, go to Agent > Computers > Managed Computers and use the grid's column-chooser icon to add the "MDM Profile Status" and "MDM Profile Remarks" columns. To see the exact date and time a device was enrolled, click the Columns icon above the device list, select "Enrolled Time", and click Save.
Device Overview
- Displays a list of all managed devices, including key information such as device name, platform (Android, iOS, macOS), user details, and enrollment status, etc.
- Allows quick identification and access to any device within the organization’s network.
Device Status
If a newly enrolled device is missing from Managed, also check Staged and Enrollment Pending, and review Awaiting License under Device Enrollment categories . A device still awaiting activation, assignment, or license association should not be assumed to have completed the Managed workflow.
- Enrolled: Once the enrollment process is completed successfully, the device status will be marked as " Enrolled ."
- Unmanaged: The status will change to " Unmanaged " if the MDM profile is removed from the device.
Device Actions
- Enroll Additional Devices: This action allows admin to send another enrollment invitation to the same user for additional devices they may have. If a user needs to enroll more than one device, such as a new phone or tablet, you can initiate a new enrollment request for these additional devices. This process involves sending out an enrollment invitation that includes instructions and a link for the user to complete the enrollment, ensuring that all their devices are properly managed in MDM.
- Re-Assign User: This action allows admin to reassign an enrolled device from one user to another. If a device is being transferred from one employee to another, or if user responsibilities change, you can update the device’s user assignment to reflect these changes. This process ensures that the new user receives the appropriate access, settings, and configurations specific to their role or department, maintaining proper management and security for the device. A device must complete enrollment and move to the Managed tab before Re-Assign User becomes available; it cannot be reassigned to a different user while still in the Staged or Enrollment Pending state.
For enrollment-template assignment options and device naming patterns, see QR Code Enrollment and Naming Pattern .
- Bulk Re-Assign Users: This action is available only for managed devices. Go to Enrollment > Managed > Action > Bulk Re-Assign Users , download the managed-devices CSV, and edit it with the new user details. Include Username , Email address , and, for directory users, Domain . Include at least one device identifier: IMEI , Serial Number , or UDID . If the same user exists in multiple directories, include the domain and directory name (for example, example.com/Microsoft Entra ID ) to identify the correct directory. Optionally include a DEVICE_NAME column to rename devices. Upload the edited CSV and click Assign .
Deprovision (Wipe): This action is used to completely remove a device from management, which can be performed in two ways:
- Revoke MDM: This option removes the device’s management profile, effectively severing its connection to the MDM and erasing all corporate data and configurations. The device will no longer be under management, but it will retain its current state, including any personal data that was not removed.
- Factory Reset Device: This option performs a full factory reset on the device, returning it to its original state as if it were newly purchased. This process erases all data, apps, and settings, including those configured by the MDM. It is typically used when a device is being retired or repurposed.
To learn more about deprovision, Visit our Deprovision guide for more details.
Enrollment Pending Tab
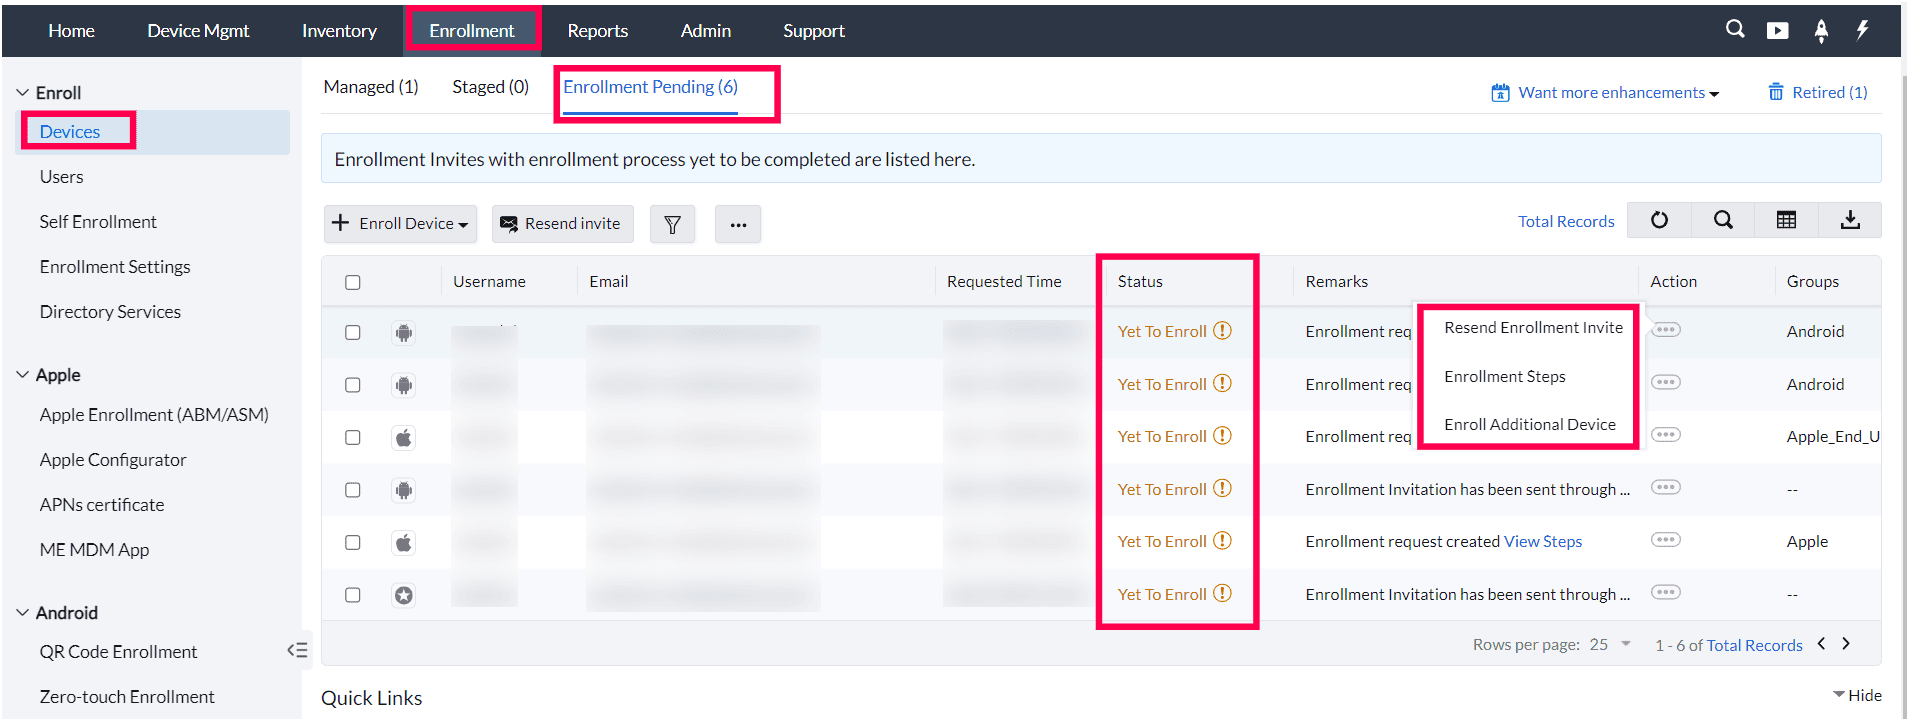
The Enrollment Pending tab in the MDM console is designed to help administrators manage and track devices that have been sent an enrollment invitation but have not yet completed the enrollment process. This tab provides visibility into which devices are awaiting user action and allows the admin to take follow-up actions if necessary.
Overview of Pending Devices
- The Enrollment Pending tab displays all devices for which enrollment invitations have been sent but where the users have not yet completed the enrollment process.
- If a user who was sent an Invite Enrollment link instead completes enrollment via Self Enrollment, the device appears as Enrolled in the Managed tab while the original invite remains listed here - it is not auto-cleared. Admins should manually select the stale invite and use Remove Request from this tab; doing so does not affect the already-enrolled device.
- Devices are listed with relevant information such as the user’s name, device type (e.g., Android, iOS), and the date when the enrollment invitation was sent.
Enrollment Invite Status
Each entry in the Enrollment Pending tab provides essential details about the device invitations that have been sent. This includes the Device Type icon, indicating whether the device is Android, iOS, macOS, Windows, or another platform. Additionally, you'll find the User Name associated with the device invitation, the Email to which the invitation was sent, and the Requested Time, which shows the date the enrollment invitation was issued. The status of the invitation is also displayed, along with any Remarks that may provide further context. Finally, the Actions column offers options for managing the invitation, and the Groups section indicates the device's assigned group for better organization and management.
Actions Available for Pending Devices
The Enrollment Pending tab offers several actions to manage the pending enrollments:
- Resend Enrollment Invite: Admins can resend the enrollment invitation to users who have not yet completed the process. This option is particularly useful for users who may have missed the initial invite or need a reminder. If the resent invite is rejected with "Enrollment Already Completed," the previous invite was already used to complete enrollment; see Invalid Enrollment Invite for this and other invite-error scenarios.
- Enrollment Steps: Admin can view the Enrollment steps in the MDM console and use it for troubleshooting issue.
- Enroll Additional Device: Admin can send an Additional invitation to an user for enrolling multiple devices.
Bulk Actions
In scenarios where multiple devices have pending enrollments, admins can perform bulk actions:
- Bulk Resend Invitations: Admins can resend invites to multiple users simultaneously by selecting the pending invitations and clicking on the "Resend invite" tab.
- Remove Request: Admins can cancel enrollments for multiple devices in one action, simplifying the management process. Select the list of pending invitations you want to remove, Click the elipsis, and select "Remove Request" to remove enrollment invitations in bulk.
Enrollment Invitations Validity
The enrollment invitations are valid only for 7 days. Administrators need to resend the invitation once it gets expired.
Use Cases
- Tracking enrollment progress: Admins can monitor the status of pending devices to ensure users are following through with the enrollment process.
- Proactive follow-up: If a device remains in pending status for an extended period, admins can resend the invitation or follow up with users to complete the enrollment.
- Clearing unused invites: For devices that are no longer required to be enrolled, admins can quickly cancel pending enrollments to maintain an organized dashboard.
Staged Tab
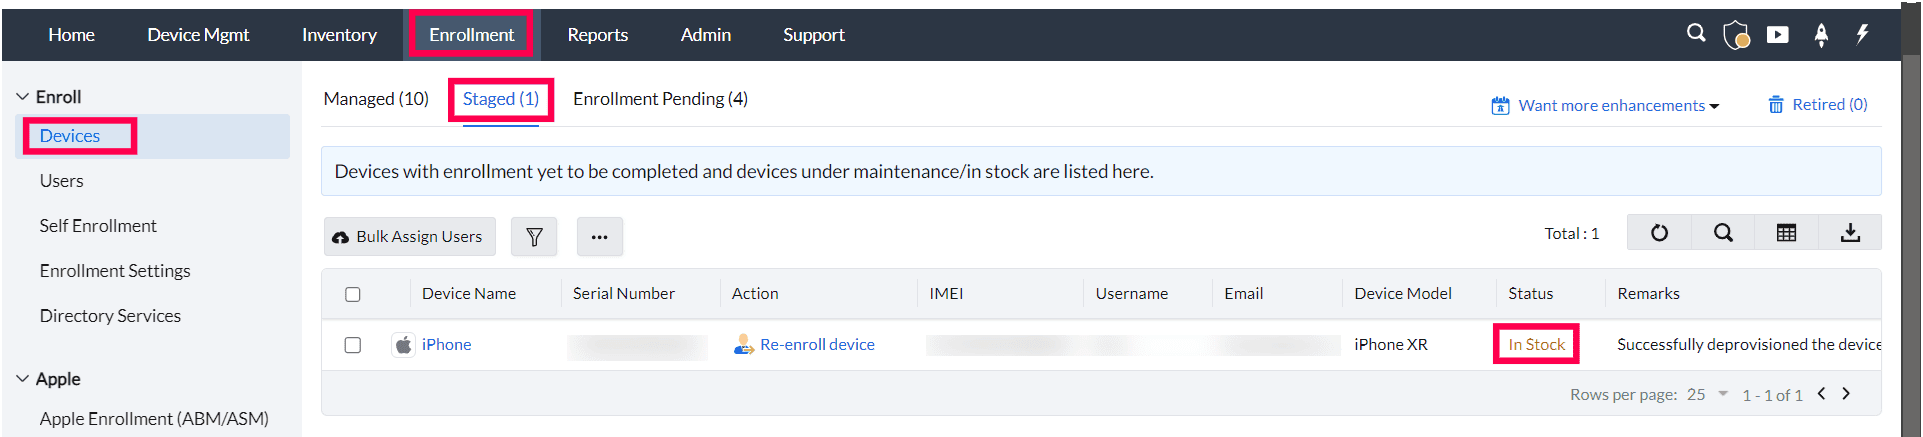
The Staged tab in the MDM Console provides administrators with a centralized location to manage devices that have been pre-configured for enrollment but are not yet fully enrolled in the system. The staging process allows admins to prepare devices in advance, ensuring that they are ready to be quickly enrolled when needed. This is particularly useful for large-scale deployments or when devices are being set up in batches.
Staged Devices
- Displays a list of devices that have been pre-staged for enrollment but are awaiting the final enrollment process.
- Information such as device name, serial number, platform type (iOS, Android, macOS, etc.), username, email, device name, Status and IMEI is displayed for easy management.
Actions on Staged Devices
- Remove staged devices if they are no longer required for enrollment.
- During an Apple Business Manager (ABM) migration, unassigning a device from ABM (or reassigning it to a different MDM server) does not automatically remove its entry from the Staged tab. The admin must separately select the device and use the Remove Device action from the '...' menu to clear it.
- Bulk Assign or Re-Enroll: reassign the device to a different user if necessary. Bulk actions on staged devices apply to user reassignment only - group reassignment or removal in bulk is only possible after the device moves to the Managed tab, using the 'Move to Group' action.
Use Cases
- Pre-configuring bulk device deployments: Staging devices before distributing them to employees or students allows for rapid, streamlined enrollment, reducing the time needed to configure each device manually.
- Managing BYOD and COPE setups: Admins can pre-stage devices for users not yet part of the directory, especially in Bring Your Own Device (BYOD) and Corporate-Owned Personally Enabled (COPE) environments.
- Simplifying large-scale roll outs: Schools or organizations deploying hundreds of devices can benefit from pre-staging, as it reduces post-distribution setup effort.
Awaiting License Tab
The Awaiting License tab lists devices that have completed enrollment but cannot be moved to the Managed tab because no device license is currently available. A device in this state does not consume a license and remains under Awaiting License until a license becomes available, at which point it is automatically moved to the Managed tab. If a listed device is no longer needed, admins can remove it directly from the Awaiting License tab.
What's Next?
Sending Enrollment Invites:
To learn how to send Individual User Invite Enrollment and Bulk User Invite Enrollment invites, visit our Invite Enrollment Methods guide.
Enrolling Your Device:
For step-by-step instructions on enrolling your device using the email or SMS invite, check out our Invite Enrollment Process guide.
Frequently Asked Questions
1. Can I send enrollment invitations to multiple users at once?
Yes. ManageEngine MDM allows you to upload a CSV file containing user details to send bulk enrollment invitations to multiple users simultaneously. Each user receives an individual invitation with a unique enrollment URL or QR code.
2. What happens if a user does not enroll after receiving an invitation?
You can resend enrollment invitations from the Manage Enrollment Invite section in the MDM console. Invitations that have not been acted upon can be tracked by their pending status and re-sent as needed.
3. Is authentication required when a user enrolls using an email invitation?
This depends on the authentication type configured in Enrollment Settings. If OTP authentication is enabled, a one-time password is included in the invitation email and the user must enter it to complete enrollment.