Deploying Endpoint Detection and Response (EDR) Policy
This page explains how to create and deploy an EDR policy in Endpoint Central — covering general settings, backup, network isolation, anti-ransomware, next-gen antivirus configurations, target definition, and priority order.
Create an EDR Policy
Navigate to Policy → Add Target Policy. Enter a name and description for the policy.
Endpoint Central can coexist with existing antivirus or next-generation antivirus solutions to provide a layered defense strategy. For more details, see Strengthening Endpoint Security.

General Settings
User Device Alert Notification
- Enabled — Users receive direct alerts on their endpoints for immediate action.
- Disabled — No notifications are shown to users. Threats are still detected and blocked, but users are not alerted.
Server OS Protection
- Enabled — Applies the configured policy to Server OS endpoints (Windows Server, Linux Server) in the Custom Group, providing protection for server infrastructure.
- Disabled — The policy applies only to workstation and desktop endpoints. Server operating systems are excluded from this policy's scope.
Keep Quarantined Files For
- Specifies the duration for which quarantined files are retained before automatic deletion.

Backup Settings
System Backup Creation
- Enabled — Enables automatic creation of system backups. Recommended to keep this setting enabled.
- Disabled — No automatic backups are created. Not recommended unless backups are managed by another system.
Allocated Backup Storage
- Reserves the specified percentage of disk space exclusively for storing backups.
Backup Interval
- Defines how frequently backups are created, in minutes.

Network Isolation Settings
Allowed IPs
- Specifies IP addresses that are permitted to communicate with isolated endpoints during network isolation.
Allowed Domains
- Specifies domain names that isolated endpoints are permitted to access during network isolation.

Anti-Ransomware Settings
Anti-Ransomware policies are crucial for safeguarding an organization's data against encryption-based cyber threats. These policies help mitigate ransomware attacks by enabling proactive threat detection and ensuring secure data backups, allowing for swift recovery in the event of an incident.
Ransomware Detection Engine
Prevention Policy
- Audit Only — Detects and alerts on identifying any ransomware incidents without taking any blocking action. This mode is ideal for initial deployment and testing, allowing security teams to analyze detection patterns and fine-tune policies before enforcement.
- Kill Process — Blocks the execution of malicious processes by intercepting them before they can run, and quarantines the endpoint from the network.
Detection Sensitivity
- Standard — Uses balanced detection thresholds that minimize false positives while catching known ransomware variants. Suitable for environments where business continuity is critical and interruptions from false detections must be avoided. May miss some zero-day or sophisticated ransomware variants.
- Aggressive — Employs heightened detection thresholds that catch even subtle indicators of ransomware activity, including new and unknown variants. This mode may generate more false positives but provides stronger protection against emerging threats. Recommended for high-security environments or during active threat campaigns.
Decoy File Deployment
- Enabled — Deploys hidden decoy (honeypot) files strategically across the file system. These files act as tripwires — when ransomware attempts to encrypt them, the engine immediately detects the attack, often before legitimate files are affected. This provides early warning and faster response times.
- Disabled — No decoy files are deployed. Detection relies solely on behavioral analysis of running processes. This may be preferred in environments where decoy files could interfere with specific applications or file integrity monitoring systems.

Exfiltration Detection Engine
Prevention Policy
- Audit Only — Detects and alerts on identifying any data exfiltration attempts without blocking them. Useful for understanding normal data flow patterns in your environment and identifying potential data leakage risks.
- Kill Process — Blocks the execution of processes attempting unauthorized data exfiltration by intercepting them before they can run, and quarantines the endpoint from the network.

Next-Gen Antivirus Settings
DeepAV — Deep Learning Based Antivirus
DeepAV uses advanced deep learning neural networks to analyze file structures, code patterns, and binary characteristics. Unlike traditional signature-based antivirus that relies on known malware databases, DeepAV can identify both known and previously unseen (zero-day) malware by recognizing malicious patterns learned from millions of samples.
Detection Trigger
- On Execute — The file is scanned whenever a process is initiated. The file from which the process is being created will be scanned. This trigger is always active and cannot be disabled.
- On DLL Load — The file scan is conducted when the Dynamic Link Libraries (DLLs) associated with a process are loaded. The DLL being loaded will be scanned.
- On Write — Files are analyzed as they are written, identifying and blocking threats before execution. This is triggered when a file is acquired through a browser download or transferred (copied or moved) from within or outside the system.
Prevention Policy
- Audit Only — Detects and alerts on identifying any malware incidents without blocking or quarantining them.
- Kill Process — Blocks the execution of malicious processes by intercepting them before they can run, and quarantines the endpoint from the network.

Behavior Detection Engine
The Behavior Detection Engine monitors running processes in real-time, analyzing their actions against predefined threat behavior rules. Instead of scanning files for known signatures, it watches what programs actually do — detecting suspicious activities like unauthorized registry modifications, process injection, privilege escalation attempts, or communication with command-and-control servers. This behavioral approach catches zero-day threats and fileless malware that evade traditional detection.
Prevention Policy
- Audit Only — Detects and alerts on identifying any malicious behavior without taking any blocking action.
- Kill Process — Blocks the execution of malicious processes by intercepting them before they can run, and quarantines the endpoint from the network.

Credential Hardening
Credential Hardening protects authentication credentials stored on endpoints from theft and misuse. Attackers commonly target credentials stored in memory (LSASS), Windows credential stores (SAM database), browser password managers, and cached tokens. This module prevents credential dumping attacks used in lateral movement, pass-the-hash, and privilege escalation techniques commonly employed in advanced persistent threats (APTs).
Credential Hardening
- Audit Only — Detects and alerts on identifying any credential theft attempts without blocking them.
- Kill Process — Blocks the execution of processes attempting to harvest or steal credentials by intercepting them before they can run, and quarantines the endpoint from the network.
LSASS Protection (RunAsPPL)
LSASS Protection (RunAsPPL) prevents unauthorized access to the Local Security Authority Subsystem Service (LSASS) process, which is responsible for enforcing security policies and storing sensitive credentials.
- Enabled — Restricts DLLs and other processes from accessing LSASS memory.
- Disabled — Allows DLL processes to access LSASS memory, increasing the risk of credential theft.

Anti-Malware Scan Interface (AMSI)
The Anti-Malware Scan Interface is a Windows security framework that allows applications to request malware scans of content at runtime. This module integrates with AMSI to inspect scripts (PowerShell, VBScript, JavaScript, Office macros) and dynamically-loaded code before execution. It is particularly effective against fileless malware, obfuscated scripts, and living-off-the-land attacks that abuse legitimate system tools.
Prevention Policy
- Audit Only — Detects and alerts on identifying any malicious script content without blocking execution.
- Kill Process — Blocks the execution of malicious script content by intercepting it before it can run, and quarantines the endpoint from the network.

All exclusions, detection settings, and prevention policies configured in an EDR policy apply to all endpoints in the associated custom group. Individual endpoint or machine-level exclusions are not supported. To apply different settings to a specific endpoint:
- Create separate EDR policies with different configurations.
- Associate each policy to a different custom group containing the target endpoints.
- Manage policy priority if an endpoint belongs to multiple groups.
To remove Malware Protection from specific machines while keeping the agent active, use the Scope option in the policy to select Limited and choose only the machines you want to protect. This applies the policy to selected machines only — machines not selected receive no protection from this policy.
To completely disable Malware Protection for all managed endpoints, refer here.
Define Target
Target Groups
- Select the Custom Group to which the policy should be applied.

Click Deploy to apply the policy to the selected target computers.
Priority Order
Priority Order determines which policy takes precedence when multiple policies are assigned to the same target and have conflicting settings. It establishes a clear hierarchy among policies to resolve conflicts predictably.
Managing Priority Order
- Navigate to Policy → Priority Order.
- Move the policy that needs higher priority to the top.
- Click Save to apply the changes.
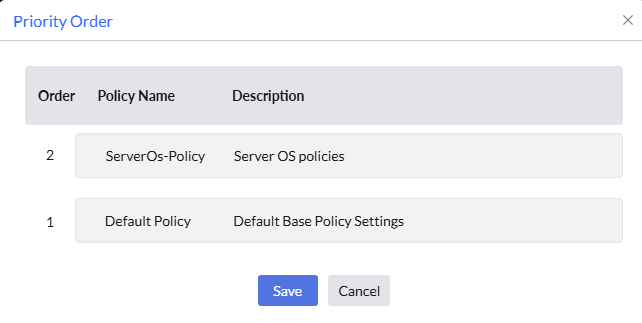
In an organization, IT sets up three backup policies for its servers. The DB-Anti-ransomware Backup Policy (Priority 1) runs hourly backups for critical database servers. The App-Anti-ransomware Backup Policy (Priority 2) runs daily backups for regular application servers. The Default-Anti-ransomware Backup Policy (Priority 3) runs weekly backups.
One server hosts both a database and an app, so it belongs to both groups. Because the Database policy has higher priority, that is the policy it follows — the App policy is ignored for that server.
When a brand-new server is introduced that has not been tagged yet, it automatically falls under the Default policy and receives weekly backups, rather than having no backup at all while IT decides where it belongs.