Steps to configure SAML SSO for Microsoft Entra ID
About Microsoft Entra ID
Microsoft Entra ID, previously known as Azure Active Directory (Azure AD), is a cloud-based identity and access management (IAM) solution that enables organizations to manage user identities and access permissions securely. Microsoft Entra ID provides users with a range of functionalities for efficient and secure access to organizational resources.
The following steps will help you enable SAML-based single sign-on (SSO) for Entra ID from Identity360.
Prerequisites
Note:
- SSO can be enabled only for domains that are verified in Entra ID. By enabling SSO for the entire domain, any user within the domain can access Entra ID only via Identity360 SSO.
- SSO cannot be enabled for "onmicrosoft.com" domains that are created by Microsoft.
- Users will not be able to log in to their Microsoft Entra joined devices if Identity360 SSO is enabled.
- SSO cannot be enabled for the default domain (the primary domain in which users are created). It can only be configured for custom domains. Entra ID prohibits SSO configuration for default domains to ensure that administrators can log in to Entra ID regardless of issues with the identity provider (IdP). If your organization does not have a custom Entra ID domain, you need to create one to configure SSO. Additionally, you can have the Global Administrator within the default domain to handle any IdP-related issues.
Updating the ImmutableID value in Entra ID
To enable SSO to Entra ID through Identity360, it is mandatory to have the ImmutableID attribute as the unique identifier in Entra ID. You can create new users with the ImmutableID attribute or update existing users' ImmutableID attribute value in Entra ID using the following PowerShell commands.
Command to create new users with the ImmutableID attribute
Copy
- Connect-MsolService
- New-MsolUser -UserPrincipalName "<user_principal_name>" -ImmutableId "<immutable_id>" -DisplayName "<display_name>" -FirstName "<first_name>" -LastName "<last_name>" -LicenseAssignment "<service_pack>" -UsageLocation "<location>"
Command to update the ImmutableID attribute for existing users
Copy
- Connect-MsolService
- Set-Msoluser -UserPrincipalName "<user_principal_name>" -ImmutableID “<immutable_id> ”
Note: You can check whether the update was successful using this command:
Command to confirm the ImmutableID attribute update for existing users
Copy
Get-MsolUser -UserPrincipalName "<user_mailID>" | select userprincipalname, Immutableid
- PowerShell access with administrative rights is required in order to set up SSO in Entra ID.
- The MFA and SSO license for Identity360 is required to enable SSO for enterprise applications. For more information, refer to the pricing details.
- Log in to Identity360 as an Admin or Super Admin, or Technician with a role that has Application Integration and Single Sign-on permissions.
- Navigate to Applications > Application Integration > Create New Application and select Azure Active Directory from the applications displayed.
Note: You can also find Azure Active Directory from the search bar located at the top.
- Under the General Settings tab, enter the Application Name and Description.
- Under Choose Capabilities, select SSO, then click Continue.
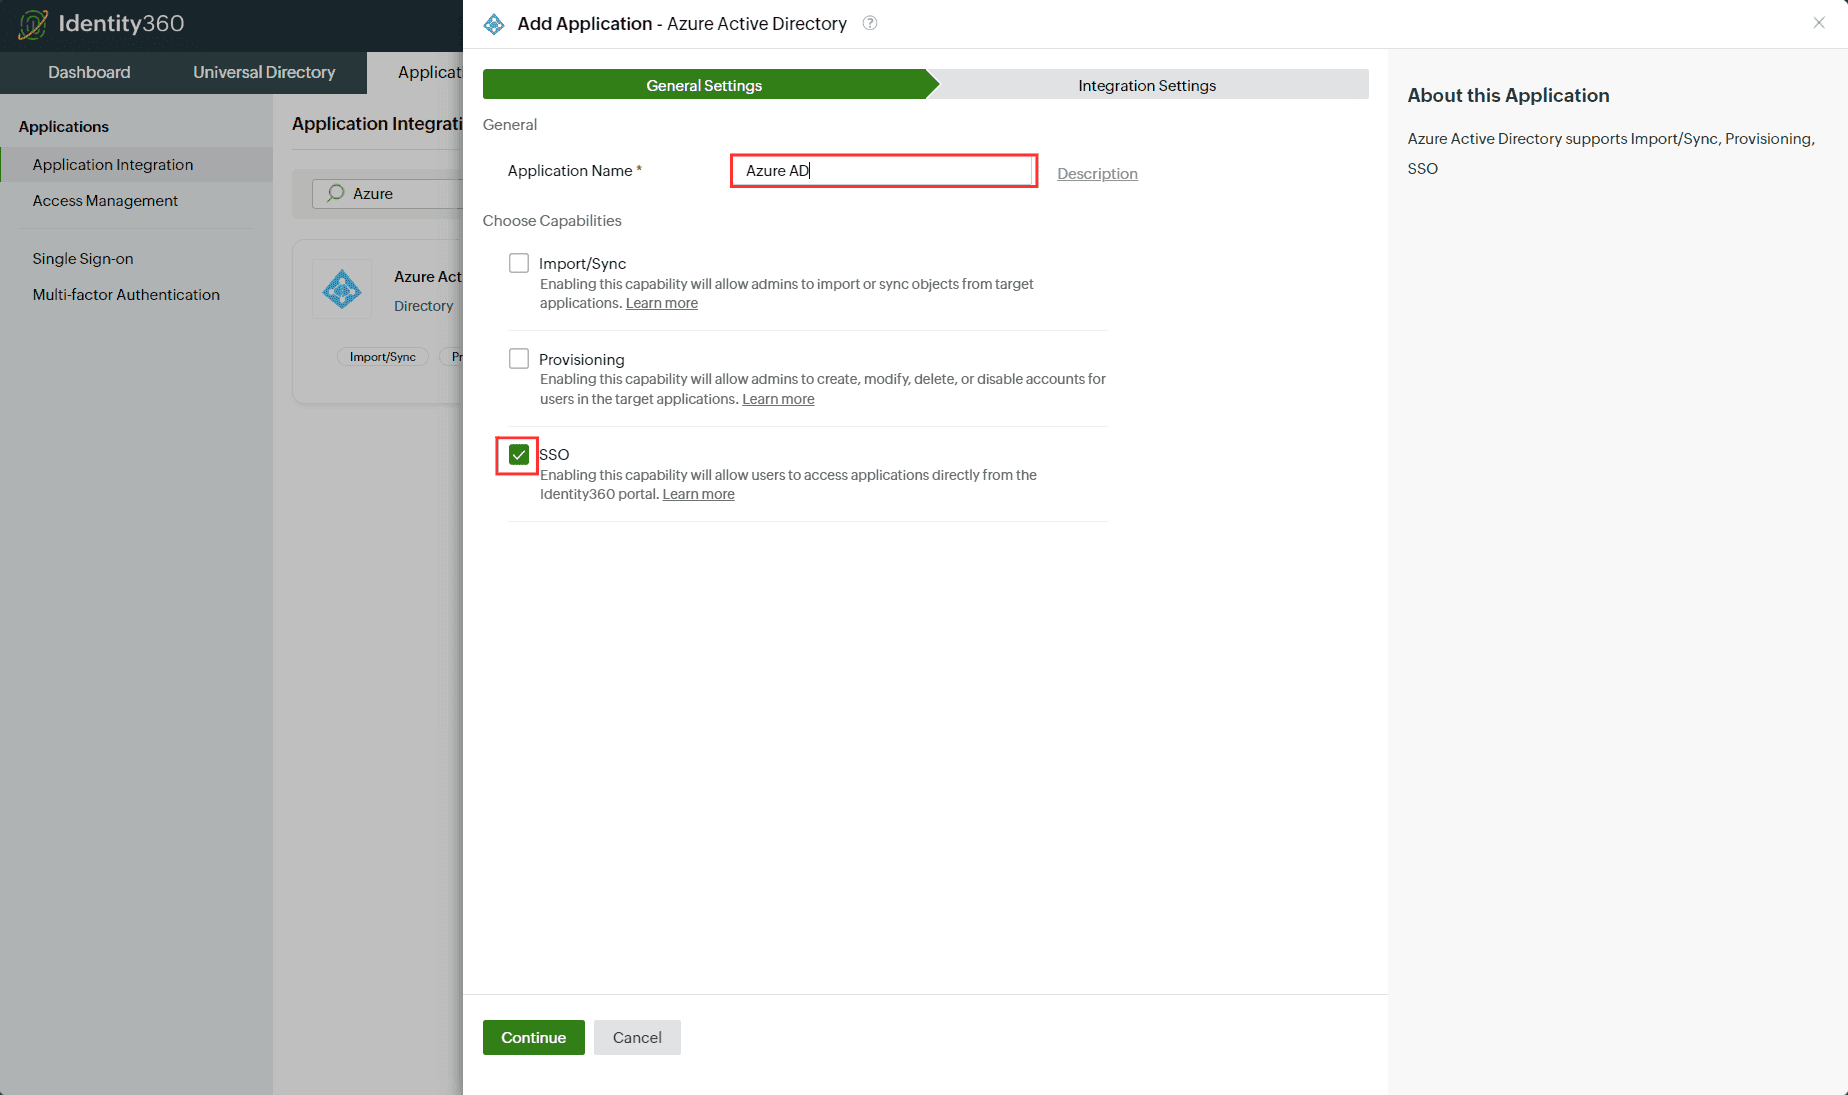 General Settings of SSO configuration for Entra ID
- Under Integration Settings, navigate to the Single Sign On tab and click Metadata Details.
- Copy the Login URL, Logout URL, Entity ID/Issuer URL, and Signing Certificate values, which will be used during the configuration of Entra ID.
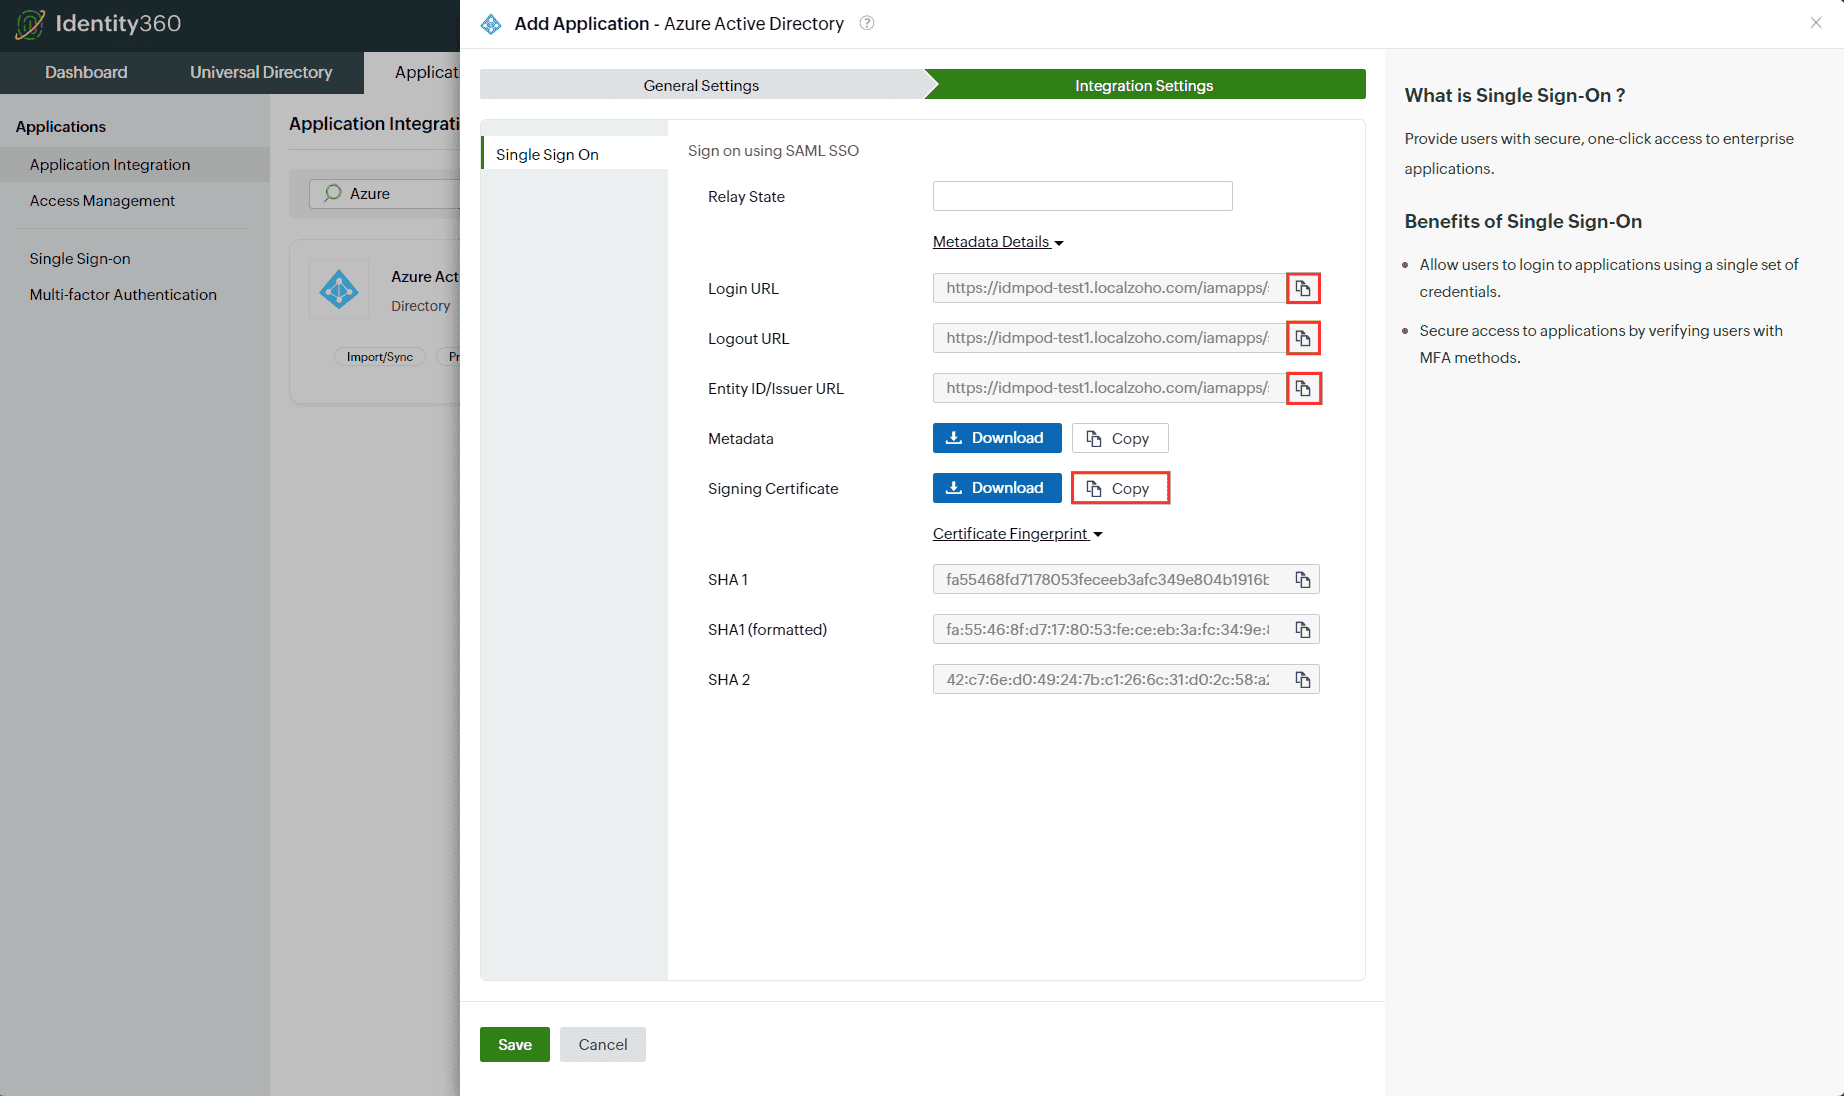 Integration Settings of SSO configuration for Entra ID
Entra ID (service provider) configuration steps
- Open PowerShell with admin rights.
- Connect with MsolService using the following command.
Command to connect with MsolService
Copy
- Use this command to get the list of domains available.
Command to fetch the list of domains
Copy
- Enter the domain for which you would like to enable SSO.
Command to enable SSO for the domain
Copy
- Enter the Login URL, Entity ID/Issuer URL, and Logout URL values copied from Step 7 of the prerequisites for the $url, $uri, and $logouturl commands respectively.
- Now paste the Signing Certificate file copied from Step 7 of the prerequisites for the command mentioned below.
$cert = "<SSO certificate file>"
For example, $cert = "MIICqjCCAhOgAwIBAgIJAN..........dTOjFfqqA="
 Configuring Identity360's SSO in Microsoft Entra ID
- Run the following command to enable SSO in Entra ID.
Command to enable SSO in Entra ID
Copy
Set-MsolDomainAuthentication -DomainName $dom -FederationBrandName $dom -Authentication Federated -PassiveLogOnUri $url -SigningCertificate $cert -IssuerUri $uri -LogOffUri $logouturl -PreferredAuthenticationProtocol SAMLP
- Execute the command below to confirm the SSO setup by verifying the Login URL, Logout URL, Entity ID/Issuer URL, and Signing certificate values that were configured previously.
Command to confirm the SSO setup
Copy
Get-MSolDomainFederationSettings -DomainName "mycompany.com" | Format-List *
Note: The completion of the SSO configuration will take time. Once it is set up, users will be able to sign in using SSO.
 Confirmation of SSO setup in Microsoft Entra ID
- Reconfigure or update SSO settings: If you are already using SSO for Entra ID from another IdP or want to update Identity360 SSO settings, you must first disable SSO in Entra ID, then proceed with the reconfiguration by referring to step 2 in this guide. To disable SSO in Entra ID, use the command given below.
Command to reconfigure SSO in Entra ID
Copy
$dom = "mycompany.com" Set-MsolDomainAuthentication -DomainName $dom -FederationBrandName $dom -Authentication Managed
Identity360 (identity provider) configuration steps
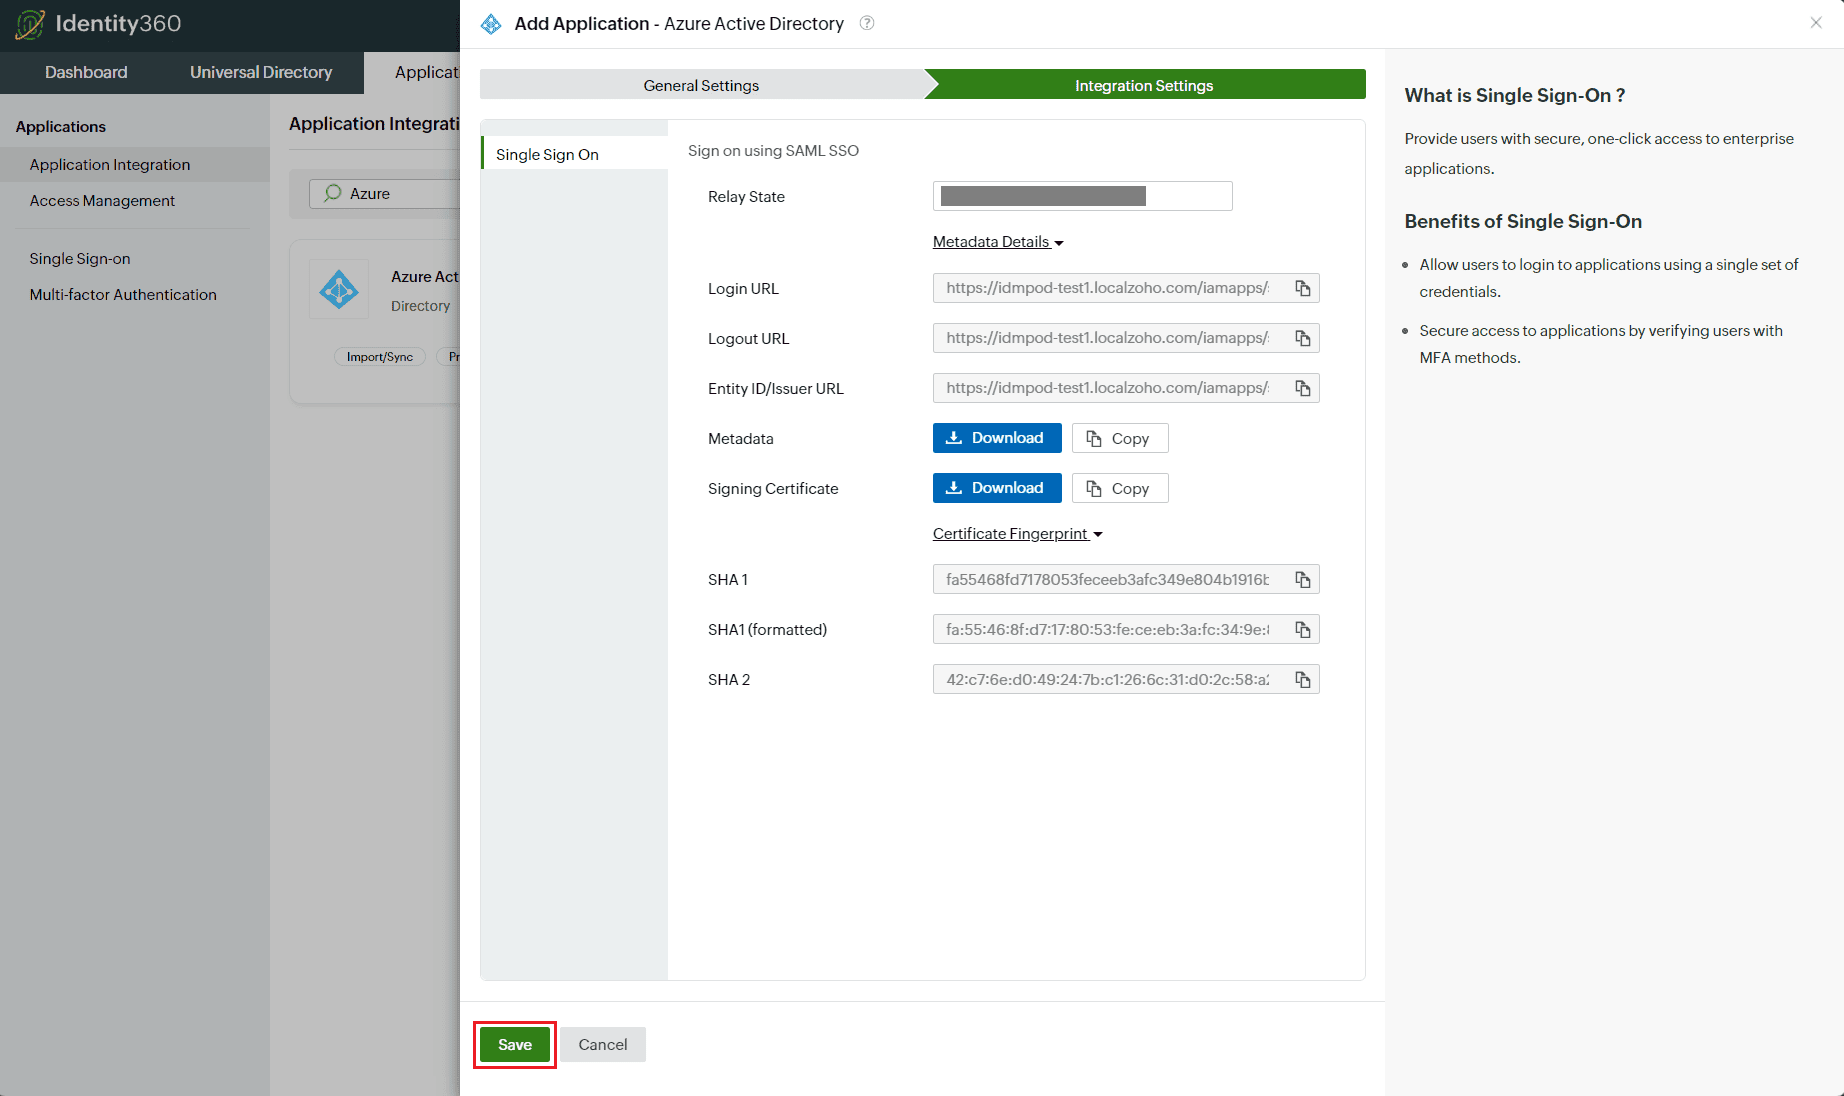
- Switch back to Identity360's Integration Settings tab.
- Enter the Relay State parameter, if necessary.
Note: Relay State is an optional parameter used with a SAML message to help you remember where you were or to direct you to a specific page after logging in.
 Integration Settings of SSO configuration for Entra ID
- Click Save.
To learn how to assign users and groups to one or more applications, refer to this page.
Your users should now be able to log in to Entra ID through the Identity360 portal.
Note: For Entra ID, both SP-initiated and IdP-initiated flows are supported.
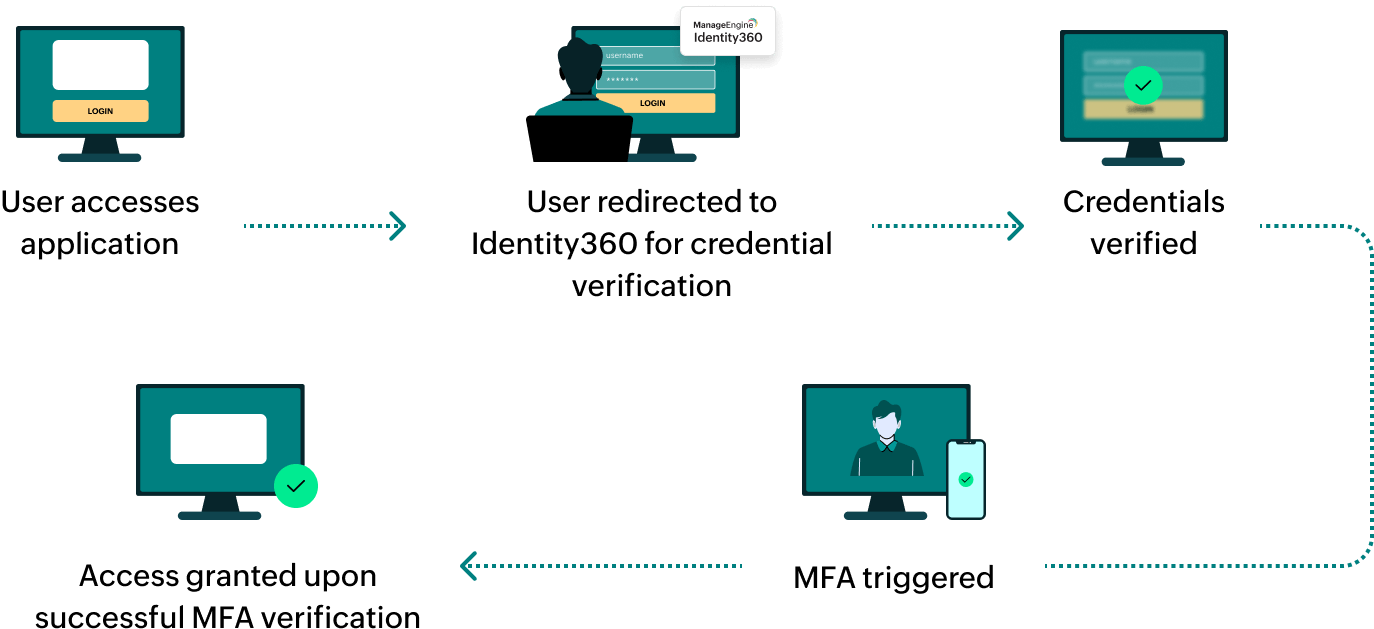
Steps to enable MFA for Entra ID
Setting up MFA for Entra ID using Identity360 involves the following steps:
- Set up one or more authenticators for identity verification when users attempt to log in to Entra ID. Identity360 supports various authenticators, including Google Authenticator, Zoho OneAuth, and email-based verification codes. Click here for steps to set up the different authenticators.
- Integrate Entra ID with Identity360 by configuring SSO using the steps listed here.
- Now, activate MFA for Entra ID by following the steps mentioned here.
How does MFA for applications work in Identity360?