Adding Threat Feed Servers in DDI Central
Threat-feed servers are the lifeline of DDI Central’s DNS Threat Intelligence Module. Without them, your DNS servers in each cluster would have no up-to-the-minute list of malicious domains to block, and built-in DNS Detection and Response engine would be flying blind.
- Real-time threat updates
Feed servers sync curated blocklists of malicious domains continuously based on polling intervals, so you’re protected the moment new threats emerge. - Vendor diversity and coverage
Every vendor brings its own data sources, analytics, and scoring methodologies. Integrating multiple feeds broadens your visibility and catches all possible threats. - Automated enforcement
DDI Central automatically converts every new feed entry into RPZ/ACL rules and pushes them out to all your DNS/DHCP servers—no manual rule-writing or deployments required. - Adaptive security posture
As your network grows or as attackers shift tactics, you can add, remove, or reprioritize feeds instantly—maintaining a defense that’s as dynamic as the threat landscape itself.
In short, feed servers give DDI Central the threat intelligence it needs to detect, block, and quarantine malicious activity in real time—turning your DNS infrastructure into an active security control rather than a passive resolver.
Whether you’re pulling feeds from ManageEngine CloudDNS or any third-party vendor (STIX/TAXII, OTX, IBM X-Force, Kaspersky, etc.) follow the process below to integrate threat-intel feed servers including (CloudDNS's feed server) in DDI Central.
1. Navigate to the Feed Servers page
- Log in to your DDI Central Management UI Console as an administrator.
- In the left-hand menu, select Threat Intel → Threats.
- Navigate to the Feed Servers tab. On the Feed Servers page, click on the Add Feed Server button in the top right corner.
2. Pick a threat-intel vendor

- In the Vendor dropdown, choose one of the supported vendors:
- ManageEngine CloudDNS (default)
- AlienVault OTX
- Cyware Threat Intelligence
- IBM X-Force
- Kaspersky Threat Intelligence
- PulseDive Threat Intelligence
- Sectrio Threat Intelligence
- Custom (for any STIX/TAXII or proprietary feed)
2. CloudDNS (ManageEngine CloudDNS) as your default threat-intel source
ManageEngine CloudDNS-Advanced Threat Intelligence engine delivers a continuously curated, real-time stream of malicious domains, IPs, and URLs—right out of the box. Every DDI Central deployment automatically includes the CloudDNS feed, ensuring immediate DNS-layer protection from day one.
3. Multiple-vendor integration
Whether you’re on the Enterprise edition (where DNS Threat Intelligence + DNS Detection and Response are built-in) or the Professional edition (where you can purchase it as add-on), CloudDNS remains your baseline feed. To broaden your defense, simply add each additional vendor—AlienVault OTX, IBM X-Force, Kaspersky, Pulsedive, Sectrio, Cyware, or any custom STIX/TAXII server—one feed at a time. Each new feed you onboard will be pulled and enforced alongside CloudDNS, giving you layered, multi-source threat coverage.
4. Note:
You must have a valid license or subscription for each third-party threat-feed vendor (other than CloudDNS) in order to pull their feeds into DDI Central. You’ll need to enter your own vendor-issued credentials (client ID/secret, API key, or STIX/TAXII access details) when configuring each Feed Server. Without a proper license, DDI Central cannot authenticate to or retrieve updates from that vendor’s threat-intelligence service.
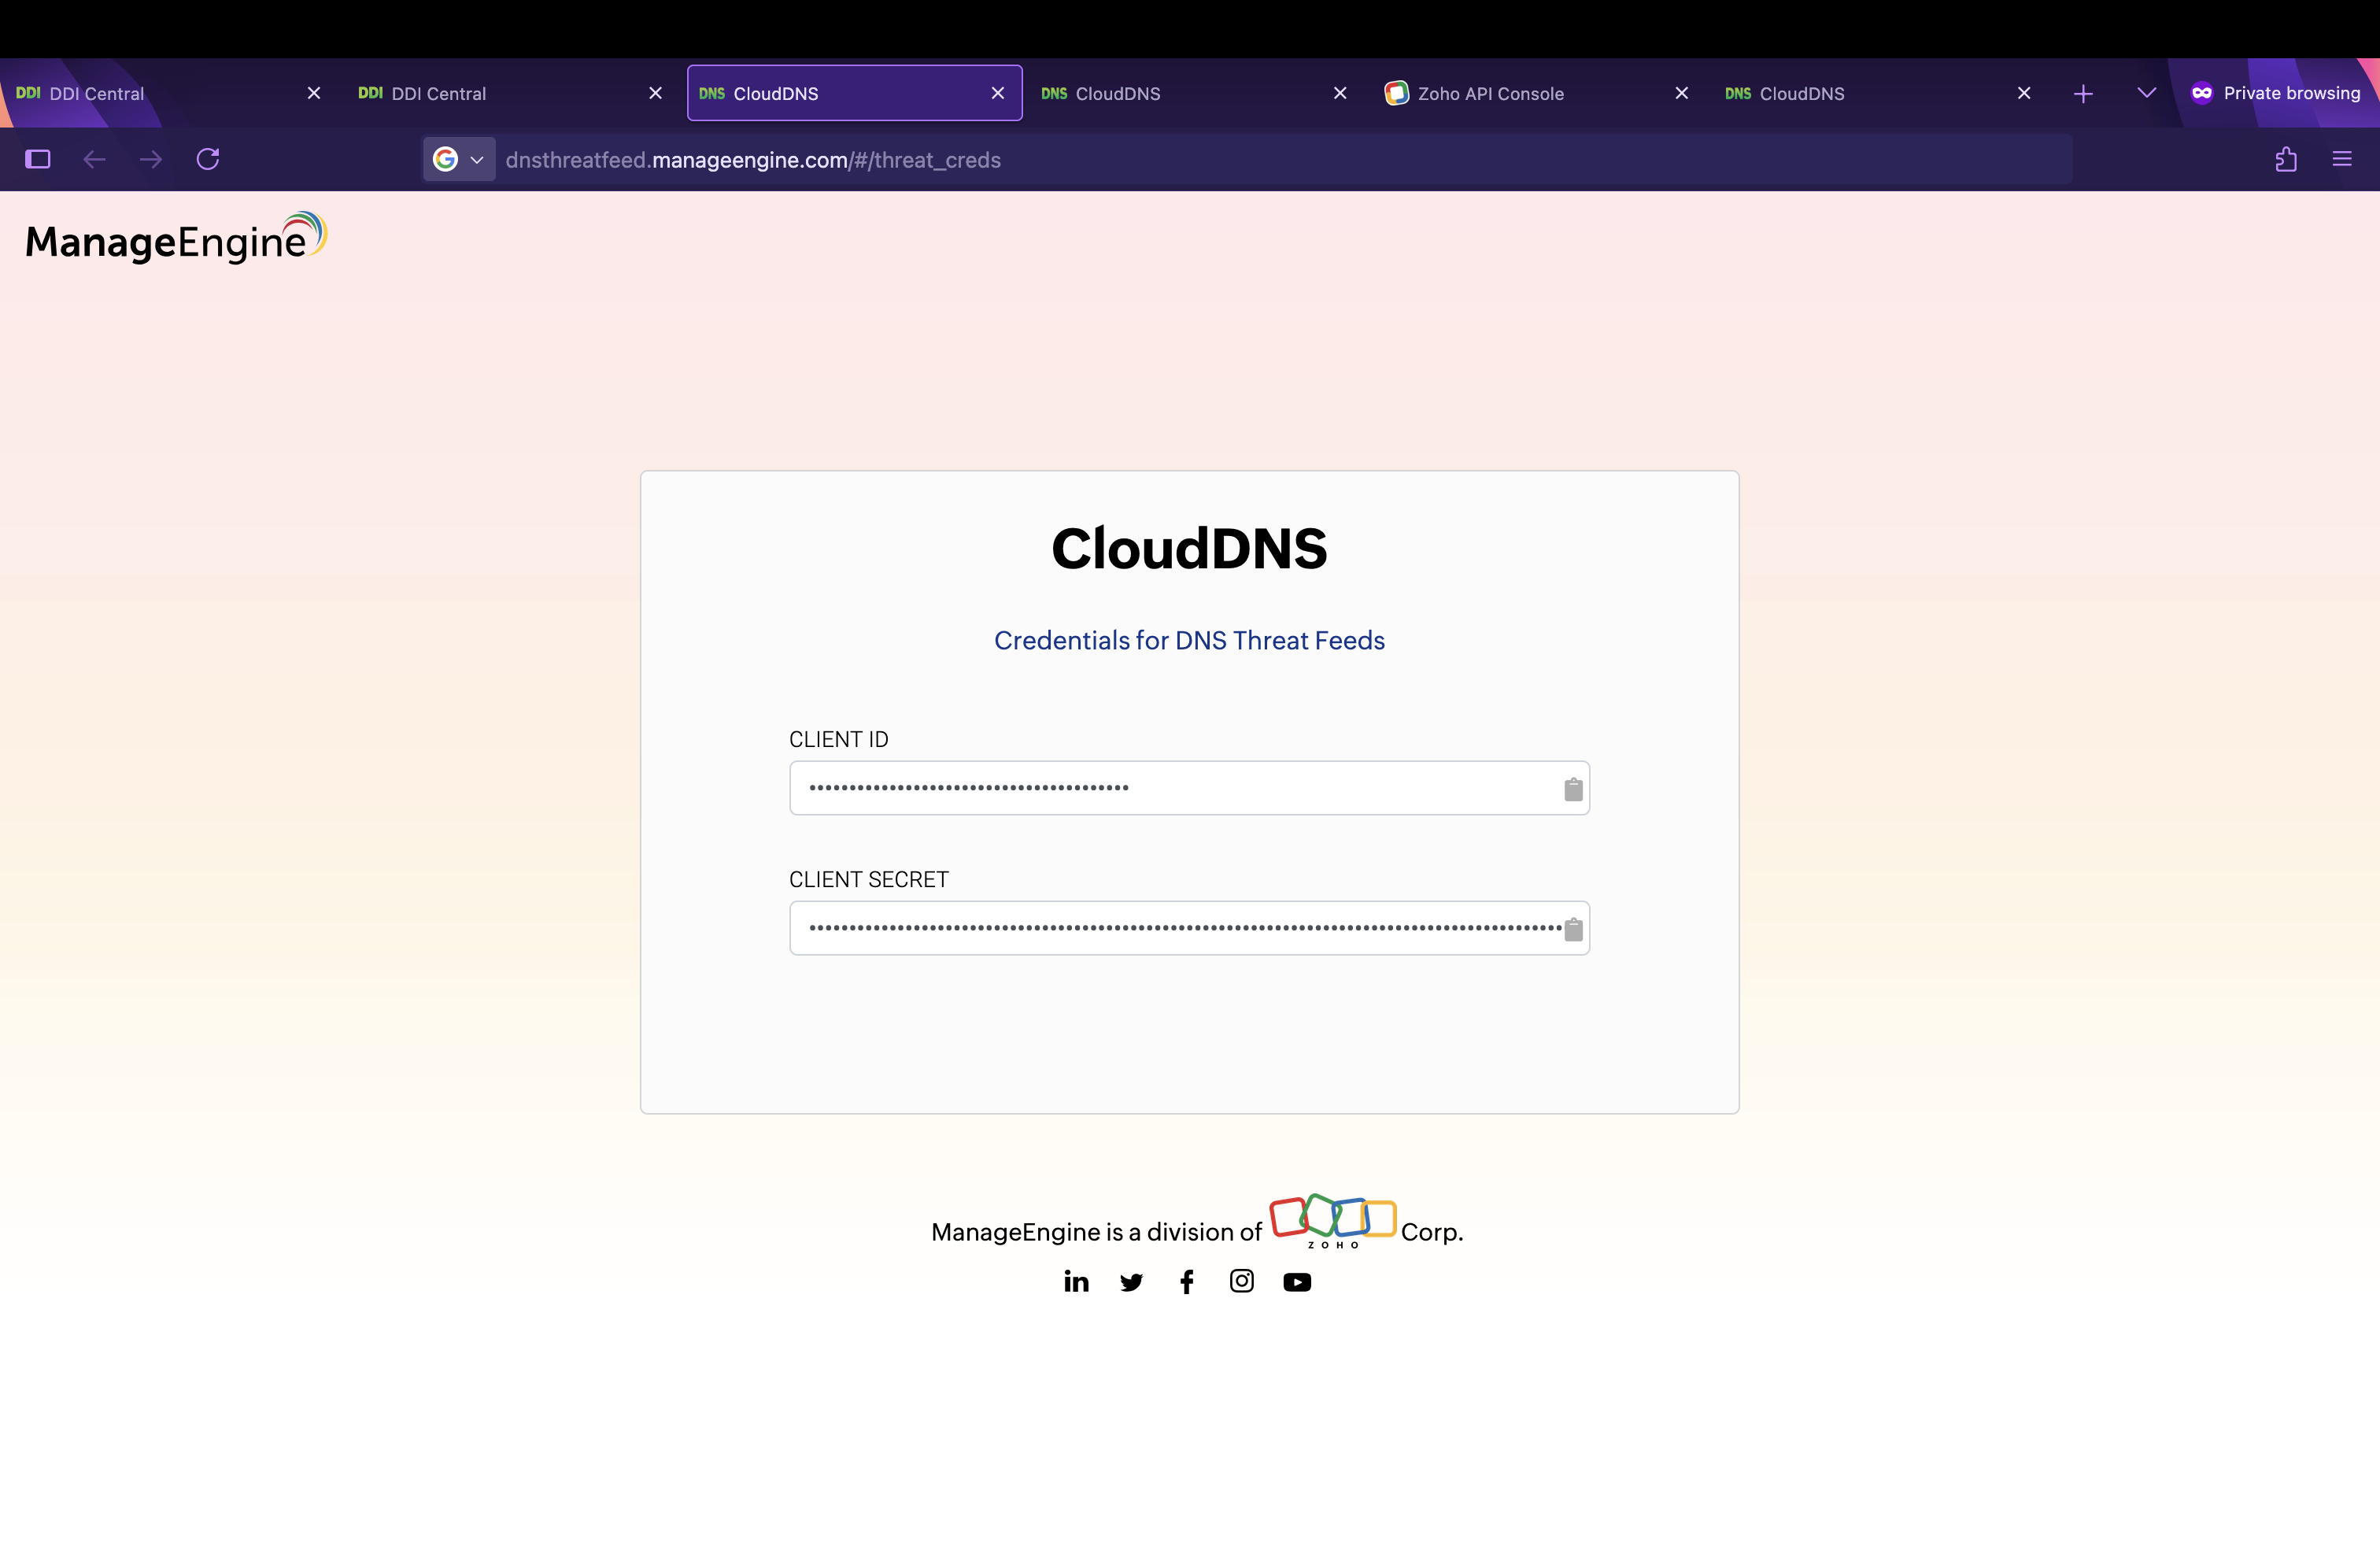
3. Retrieve CloudDNS credentials (if using the default ManageEngine CloudDNS feed server)
- If you select the default Advanced Threat Intelligence (ME CloudDNS), click Get Credentials link to open the CloudDNS sign-in page.
- Sign in with your Zoho (US) account. If you already have a Zoho US account, simply clicking Get Credentials will redirect you to the CloudDNS portal and back—no extra registration needed.
While the users' existing Zoho accounts may be associated with other data centers (DCs), users are required to register specifically for the CloudDNS service under the US data center, using only their First Name, Last Name, and Email ID.
It is ensured that these details are securely encrypted and stored in the US data center. This data handling process is designed to be compliant with GDPR and ensures that personal information is collected, processed, and stored responsibly and transparently.
- Copy your Client ID and Client Secret from CloudDNS. Now switch back to DDI Central, and paste the credentials.
4. Enter connection details
- Name: Auto-filled when you pick a vendor.
- URL: Pre-filled for CloudDNS as
https://dnsthreatfeed.manageengine.com/. For other vendors, the selected feed API endpoint is prefilled. For Custom TAXII/STIX servers, enter the feed API endpoint manually. - Client ID / Client Secret
- For CloudDNS, these can be retrieved by clicking on Get Credentials. This will take you to https://dnsthreatfeed.manageengine.com/#/threat_creds
- For other vendors, paste in the API key, OAuth, or other credentials you obtained from that vendor’s portal.
Polling Interval
- Hourly — Fetch updates every hour. Select Hourly. Pick a minute value (e.g. “25 mins”).
- Daily — Fetch updates once per day. Select Daily. Choose the hour and minute (e.g. “06 hrs 25 mins”).
- Weekly — Fetch updates once per week. Select Weekly. Pick a weekday, hour, and minute (e.g. “Sunday at 06 hrs 25 mins”).
Why poll at different intervals?
- Hourly — Best for high-velocity feeds (e.g., zero-day URL watchlists).
- Daily — Good for stable reputation lists (e.g., monthly malware domain lists).
- Weekly — Suited to low-change data (e.g., static blocklists).
- Enable: Toggle On to start pulling this feed immediately; toggle Off to save without activating.
5. Save and verify
- Click Save to finalize the configurations.
- You’ll return to the Feed Servers list, where the new entry will appear with a green checkmark under the ENABLED field once it's activated.
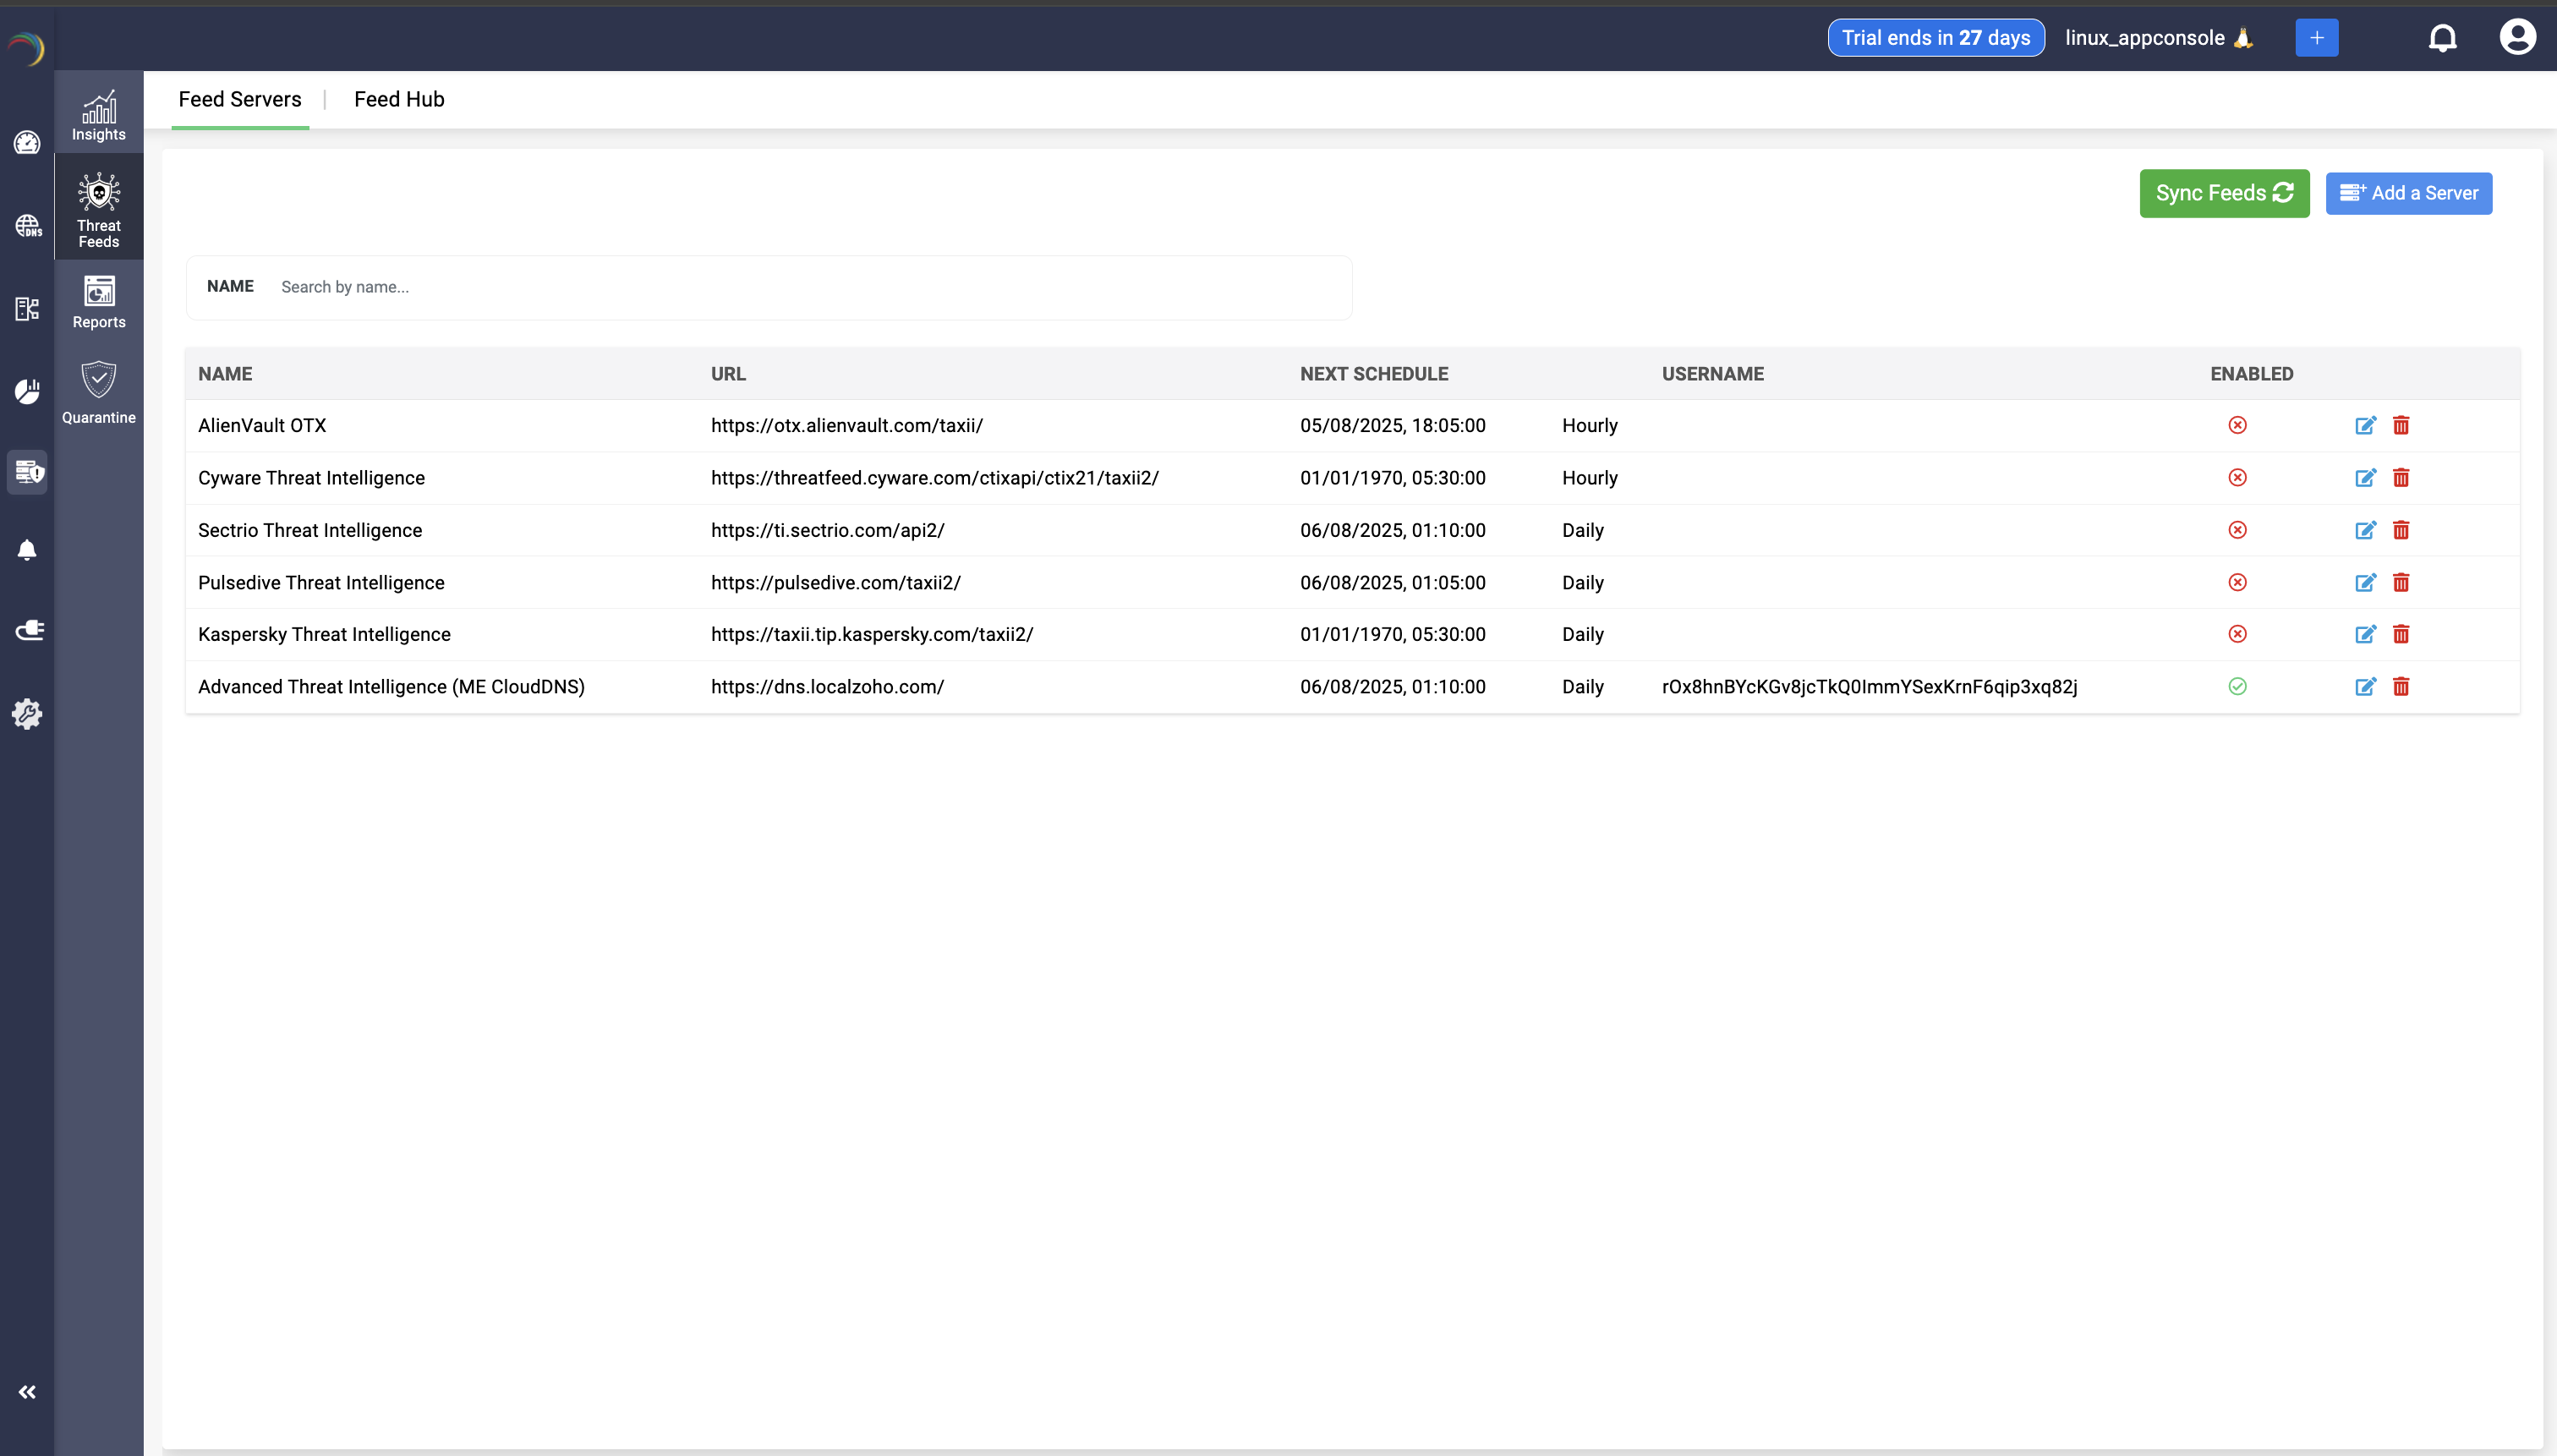
- In case you need to pull all vendors’ threat feeds immediately—rather than waiting for the next scheduled polling interval—just click the Sync Feeds button in the top-right corner.
- To see the threat domain feed of each vendor, navigate to the adjacent tab Feed Hub.
6. Add additional vendors or Custom STIX/TAXII Feeds
- Repeat steps 2—5 for each threat-intelligence source you want to ingest.
- For a Custom STIX/TAXII server, pick Custom in the Vendor dropdown and specify:
- The STIX/TAXII server URL
- Authentication method (API key, OAuth, other credentials)
- Polling interval
By integrating multiple vetted feeds, DDI Central continuously updates its policy enforcements, ensuring that any queries to malicious domains are blocked in real time across your network.
Forcing a target DNS server to pick up the latest threat feed
If you notice a specific DNS server isn’t blocking one (or more) of your threat-feed domains:
- Force a Feed Sync
- Go to Settings → Servers, locate the target server, open the Actions menu and click Sync Threat Feeds.
- This immediately pulls in the latest threat entries from all your configured feed servers.
- Flush Its DNS Cache
- In the same Actions menu, click Flush DNS Cache.
- Clearing the cache ensures no stale records allow the “bad” domain to slip through.
- Verify
- Run a test query (e.g.
dig bad-domain.com @<your-dns-ip>) or use the Analytics menu search for the query log for a threat domain under the Blocked category or Non Hosted category of domains with a denied symbol to confirm the server now returns a blocked/refused response.
- Run a test query (e.g.
By syncing feeds and flushing the cache, you guarantee the target DNS server has the most up-to-date threat data and will correctly block every domain from your feeds.

The Feed Hub
The Feed Hub is your single window for viewing every domain flagged by all your integrated threat-intel feeds.
Here’s what the feed hub displays and how it helps you stay on top of emerging threats:
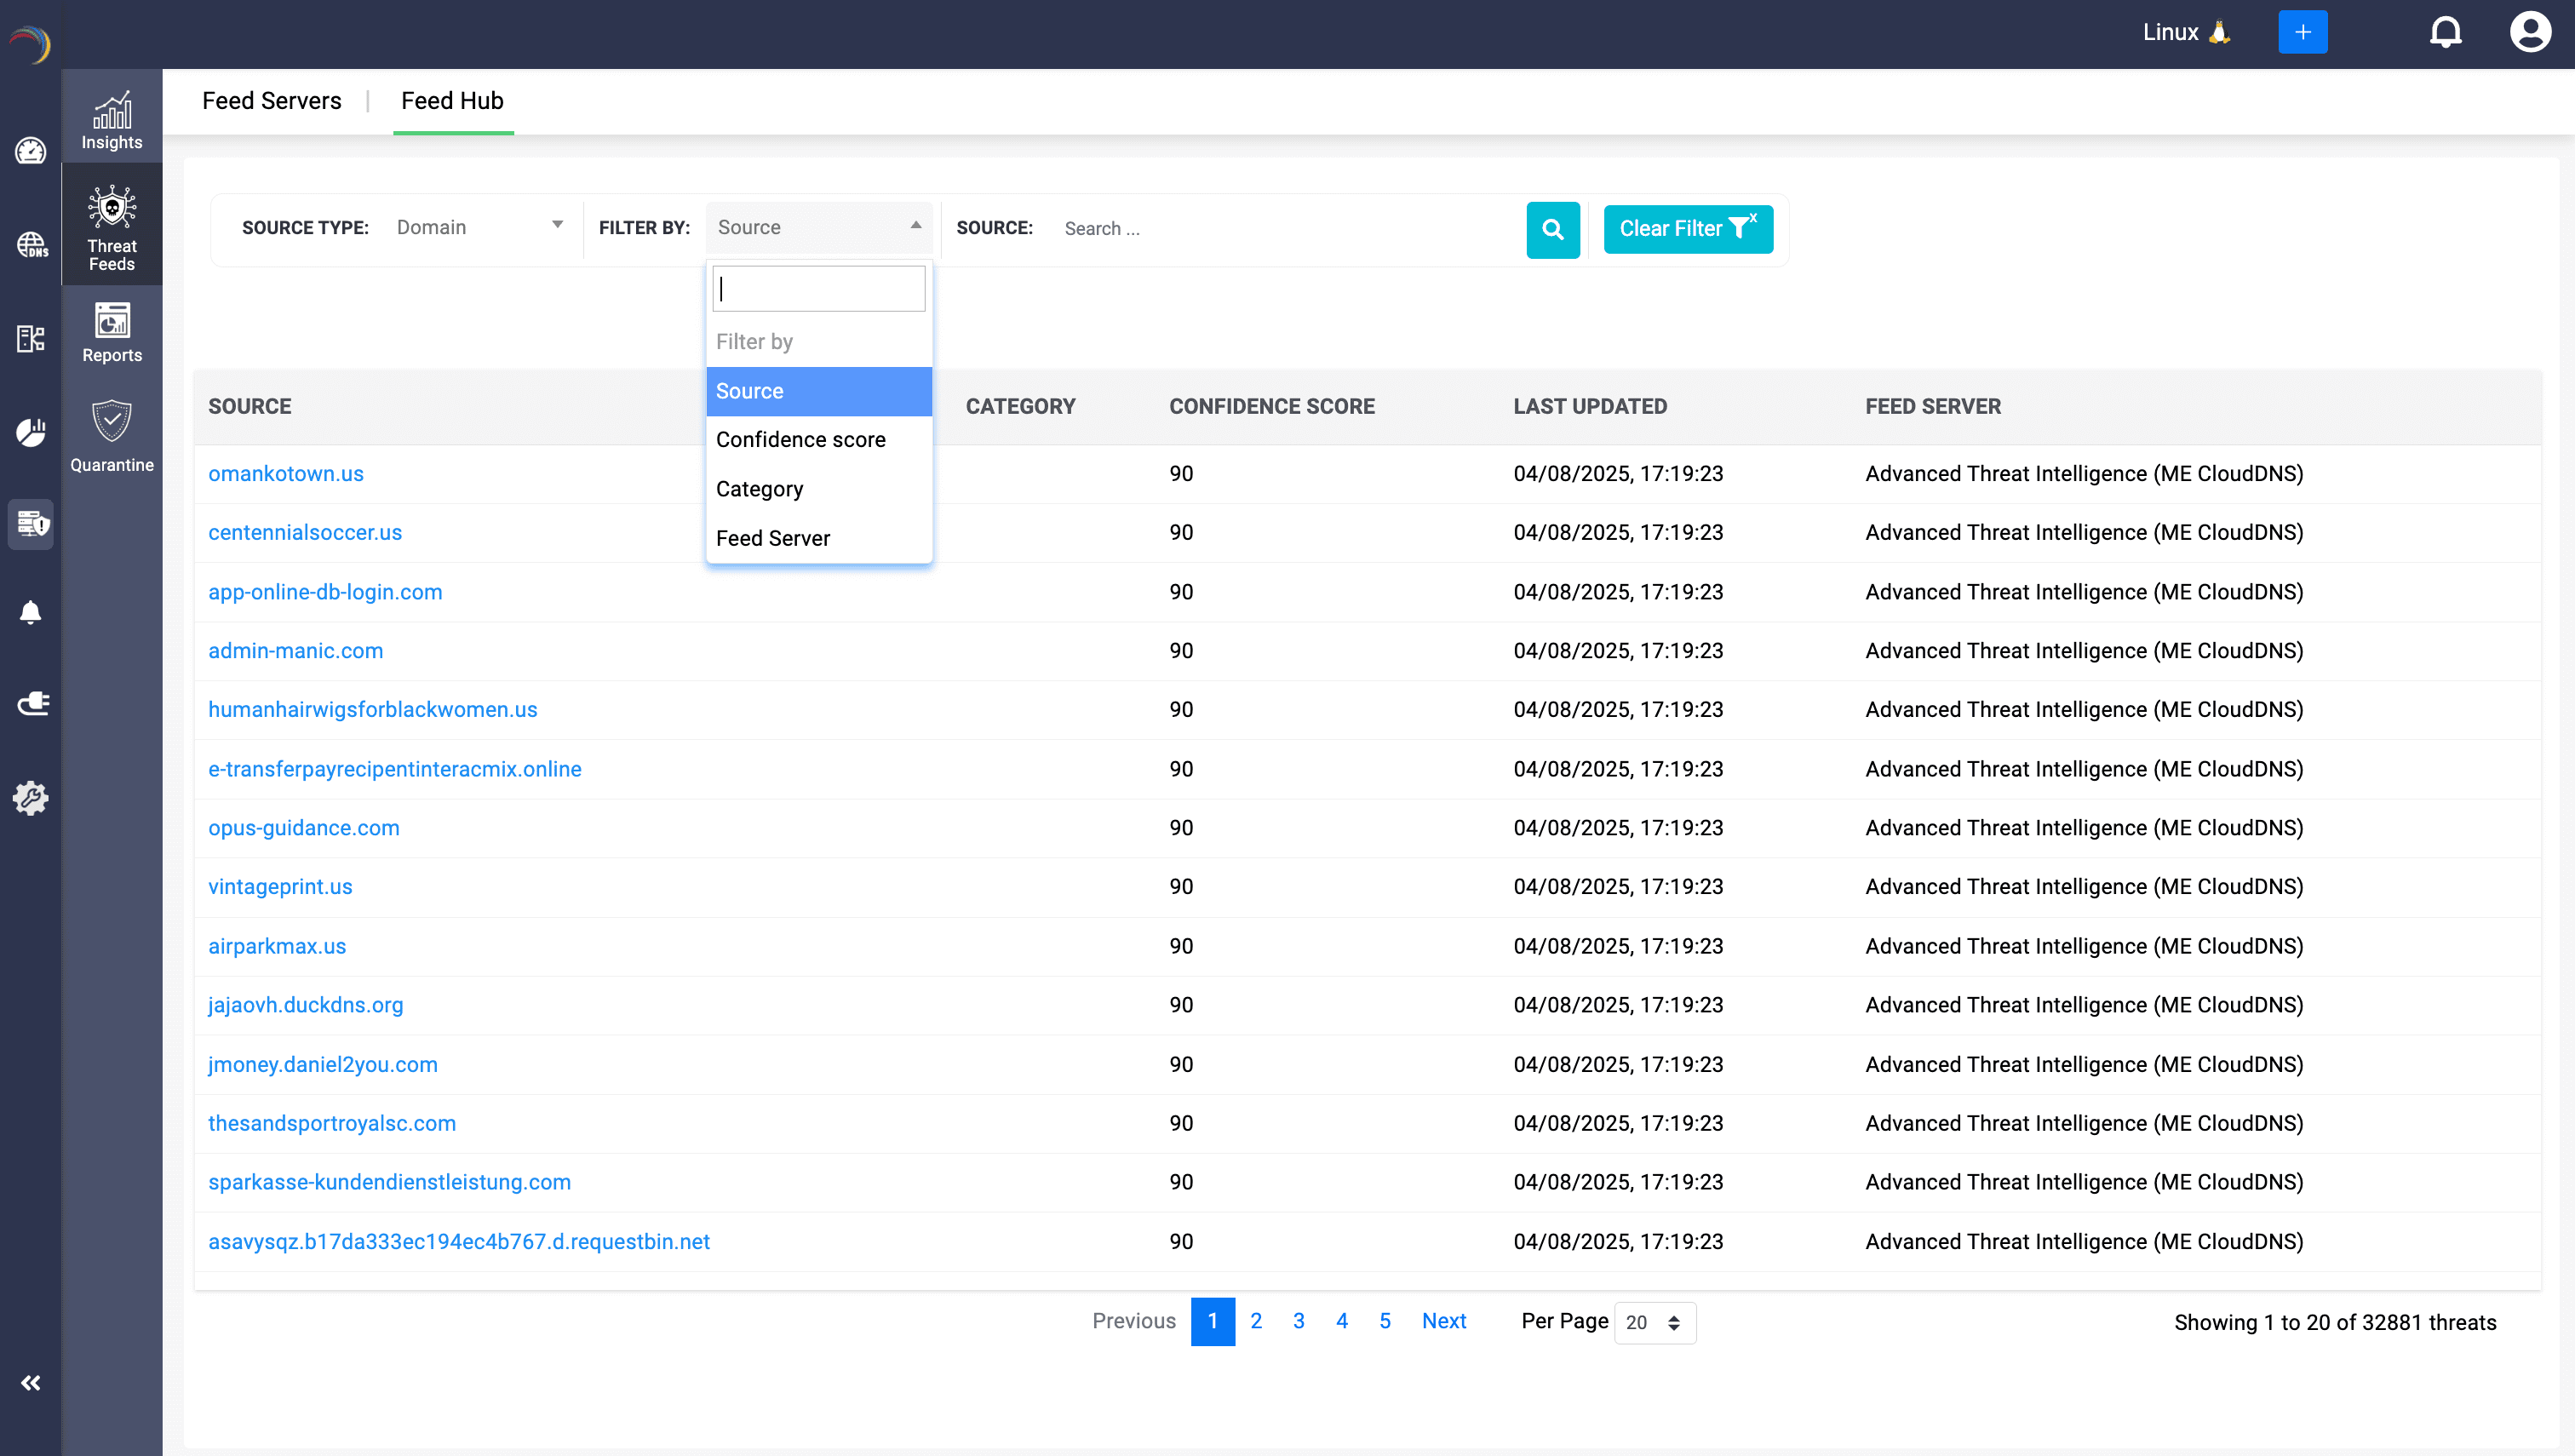
On the Feed Hub page you can drill down your view in two primary ways:
- Source Type
- Domain — shows malicious domain names.
- IP — shows the source IP address or raw IP addresses (e.g., command-and-control server IPs) used in place of a hostname or FQDN to reach a resource on the Internet. Attackers sometimes host malicious content or command-and-control servers directly at an IP address to evade domain-name filters.
Filter By: Narrow the list further by vendor (“Feed Server”), category (type of threat), confidence score, cluster (Linux/Windows), and more granularly with direct Source: domain name or IP address.

- Source: The malicious domain name or any malicious IP indicator (available only for Linux clusters)
- Category: The vendor’s classification (e.g. "URL", "Phishing", "Malware", "Command-and-Control")
- Confidence Score: A numeric rating (0—100) that the vendor assigns—higher than 50 means more likely to be malicious and queries to it will be blocked.
- Feed Server: Which threat-feed integration supplied this data (for example, “Advanced Threat Intelligence (ME CloudDNS)”).
- Once you update the filter and initiate the search, the feed hub displays all the entries relevant to the filter. Each entry bears the Last Updated Timestamp of when that feed server last refreshed this entry.
- Hyperlink drill-in: Clicking any hyperlinked domain name takes you directly to that domain’s detailed report.
Clicking any hyperlinked IP address opens the report for that source IP, showing every feed hit for that address.
How does it benefit admins
- Quick triage
Instantly see which domains have the highest confidence scores—and block them—without digging through multiple vendor portals. - Multi-Vendor visibility
If you’ve added feeds from AlienVault OTX, IBM X-Force, Kaspersky, and custom STIX/TAXII servers, you’ll see them all side by side. No more switching tabs. - Audit and reporting
Export these reports of top entries to PDF to demonstrate to auditors exactly which malicious domains were active in your environment and when they were added. - Actionable filtering
Filter down to the handful of critical (90) entries or (95) entries and consolidate reports for each confidence score. - Real-Time Enforcement
Every domain listed here is automatically propagated into your DNS servers' policy enforcements—so once it appears in the Feed Hub, your resolvers are already denying it.
Typical Workflows
- Daily threat review
- Filter by Confidence Score ≥ 90 and Category = “Malware.”
- Export the top 20 reports to share with your SOC team.
- Vendor comparison
- Filter by Feed Server = “IBM X-Force” vs. “Cyware Threat Intelligence” to see which one is catching the latest phishing domains faster.
- Incident investigation
- Search for
bad-actor[.]example.comto confirm when it first appeared and which feed flagged it—then check your DNS logs for any internal queries to that domain.
- Search for
As soon as a new malicious domain or indicator arrives from any of your configured vendors, it will show up here—ready for you to investigate, report on, or let your DNS Firewall silently neutralize.