-
Microsoft .NET version 4.8 and PowerShell version 5.1 must be installed.
Microsoft .NET version 4.8 comes preinstalled with the Windows 10 May 2019 Update (Version 1903) or Windows
Server 2022. If you have installed the product in a system running below these versions, make sure that you
have Microsoft .NET version 4.8 and PowerShell version 5.1 installed.
- To check if Microsoft .NET Framework is installed, open the Command Prompt from
Run. Enter the following command:
reg query "HKEY_LOCAL_MACHINE\SOFTWARE\Microsoft\NET Framework Setup\NDP\v4\full" /v version
Check the displayed version. If the version is below 4.8, install Microsoft .NET Framework version
4.8 from here.
- To check if PowerShell is installed, type PowerShell from Run. If PowerShell
is installed, check for its version number by running the following command:
$PSVersionTable
If the version is below 5.1 or if PowerShell is not installed, install PowerShell version 5.1 from here.
-
Azure module must be installed to perform this action. Please restart the product.
Azure module must be installed to perform this action. Please restart the product.
Azure Active Directory module must be installed to generate reports and do management actions
on Azure AD.
-
Azure AD will be automatically installed when M365 Security Plus is configured.
-
To check if this module is installed, open PowerShell and enter get-module -Name
AzureAD. This will list the module if it is installed.
-
Even though the module is not installed, please restart the product.
-
Internet Connection! Please check your internet connection.
-
The product requires an active internet connection to interact and function as
desired. Please make sure that your internet connection is active and stable.
- To allow the product to interact with Microsoft 365, add these ports
and url’s to your firewall’s allowed to connect to the internet list. Failure to
do so will result in certain features not working as intended.
-
Database backup failed.
PostgreSQL
The backup fails due to one of the following reasons.
- The backup file size exceeds the available free space.
- Free up some space in the product installation directory and try again.
- User Logon Account does not have Write permission for the backup folder
- Provide the User Logon Account Write permission for
<product_installation_directory>/Patch/backupDB folder.
- The database is down.
- Bundled PostgreSQL users,
- Navigate to <product _installation_directory>\bin folder
- Start Command Prompt as an administrator
- Execute the command startDB.bat to start the database.
- External PostgreSQL users,
- Open Run window using Winkey + R
- Type services.msc
- Locate PostgreSQL service based on version installed.
- Right click and choose Start.
- If the External PostgreSQL is not listed
- Open Command Prompt
- Navigate to <postgres_installation_directory>\bin
- Execute pg_ctl -D "<postgres_installation_directory>\data" start
- Missing pg_dump.exe file in the <product _installation_directory>\pgsql\bin folder.
- Download the file from this page based on the
PostgreSQL version you are on. To find the PostgreSQL version. Run the below command
in <product _installation_directory>\pgsql folder.
If the problem still persists please contact support@m365managerplus.com.
MSSQL
The backup fails due to one of the following reasons.
- The backup file size exceeds the available free space.
- Free up some space in the product installation directory and MSSQL Installation
directory and try again.
- User Logon Account does not have Write permission for the backup folder
- Provide the User Logon Account Write permission for
- <product_installation_directory>/Patch/backupDB folder.
- <MSSQL_SERVER_installation_directory>/MSSQL/Backup folder.
- Database Version incompatibility.
- M365 Security Plus and M365 Security Plus supports MSSQL 2008 and above. Please
migrate to a compatible database version.
- The database is down.
- To start your database,
- Ensure that the TCP/IP port is set to static in the SQL Server Configuration
Manager.
- Ensure that the SQL Server Browser is Enabled and Running.
- Restart the MSSQL Server.
If the problem still persists please contact support@m365managerplus.com.
-
Untrusted certificate provider
This error occurs when certificate based authentication is used in firewall, and the
product's JRE does not trust the certificate. To rectify this condition, the certificates
must be added to the JRE's trusted certificate store. To add the certificate to the trust
store,
-
Elasticsearch has been switched to read-only mode due to low disk space (<1 GB). Please free up some
space.
Elasticsearch is a distributed search engine which helps to analyze huge volumes of data in near
real-time. Unlike conventional techniques, Elasticsearch fetches data real quick which results
in reduced report generation time, quicker threat detection, and a lot more. In M365 Security
Plus we use Elasticsearch in the following modules,
- Reports
- Audit
- Alert
- Content search
Recommended:
It is advised to have at least 1 GB free hard disk space for Elasticsearch to function
effectively. If the disk space runs low, Elasticsearch will be switched to read-only mode,
during which the data collected from native will not be stored in the engine. To enable Write
for Elasticsearch,
- Free up space in hard disk to maintain the recommended threshold.
- Restart the product.
-
Enable access to Azure AD applications configured in M365 Security Plus
M365 Security Plus uses applications in Azure AD to fetch data for report generation and other tasks. When
the administrator disables access to these applications, report generation will fail. In such a scenario,
users will face this error.
To resolve this error, application access must be enabled for all users.
Note: Only an administrator or a user with appropriate permissions can enable access.
To enable application access:
- Log into Azure.
- From the left pane, choose Enterprise Applications.
- From the Application type drop-down, choose All Applications.
- Find and select the application created for M365 Security Plus.
- Select Properties from the left pane.
- Toggle to Yes next to Enable users to sign-in?
-
The service account is disabled for remote PowerShell
If your service account is disabled for remote PowerShell execution, enable it by running the following
command in PowerShell as an administrator:
Set-User -Identity <service account> -RemotePowerShellEnabled $true
-
Tenant configuration errors
You will see one of the following conditions if tenant configuration is incomplete.
- REST API Access column in Tenant Settings shows 'Enable Now'
Cause
- The above error will be shown if you have not granted all the permissions required by
M365 Security Plus while configuring the tenant.
Solution
- Follow the steps in this document to
enable REST API access with the required permissions.
- REST API Access column in Tenant Settings shows 'Update Permissions'
Cause
- The above error will be shown if M365 Security Plus needs a few additional permissions
for the newly added features to work.
Solution
- Follow the steps in this document to
grant the required permissions for REST API access.
- 1. Service Account column in Tenant Settings shows 'Configure'.
2. Status column in Tenant Settings shows 'Failed to create a service account' or
'Service account is not configured'.
Cause
- One of the above errors will be shown if the service account creation could not be
completed.
Solution
- Follow the steps below to resolve this issue.
- Create an
Microsoft 365 service account with following roles: Exchange Admin, Global
Reader, Privileged Authentication Admin, Privileged Role Admin, Teams Service Admin,
and User Admin.
- In M365 Security Plus, click on the Configure option under the Service Account
column.
- Provide the credentials of the service account you had created.
- Click on Update.
- Status column in Tenant Settings shows 'Azure AD Secret Key is invalid'.
Cause
- The above error will be shown if the Application Secret Key is invalid or has expired.
Solution
- Check this document to know how to get
your Azure AD Application Secret Key.
- Update the Secret Key in the product's Tenant Settings.
-
To test the connectivity of your Microsoft 365
-
To test the connectivity of your Microsoft 365 environment using PowerShell, follow
the steps listed here.
-
Dashboard graph empty
-
Make sure that the report corresponding to the graph can be generated without any
issue for the specified number of days.
-
If the report cannot be generated, follow the troubeshooting tips listed based on the
cause of error.
-
If the report can be generated but the graph in the dashboard does not mirror the
values, contact m365securityplus-support@manageengine.com .
-
Access Denied
-
Make sure that you have entered the correct user name and password.
-
Check if the user account is blocked. To check if an account is blocked, follow the
steps listed here.
-
Check if the required roles are assigned to the service account. Click here to view the list of required roles.
-
Run the M365SecurityPlusTroubleshoot.ps1 script file
- Open PowerShell as the administrator.
- Run the command Set-ExecutionPolicy -ExecutionPolicy RemoteSigned -Force -Scope
process.
- Run the below script:
<install-dir>/bin/Microsoft365Troubleshoot.ps1
Note: <install-dir> here refers to the directory in which you have
installed the M365 Security Plus application.
- Enter the username and password of the configured Microsoft 365 account.
- If Exchange session returns a value Error Occurred, the problem is
with the configured account.
- If the problem occurs when you try to configure an Microsoft 365 tenant, try
using a dedicated service account to configure M365 Security Plus by
following the steps listed here.
- If the problem occurs at any other stage, please contact m365securityplus-support@manageengine.com with a
screenshot of the error.
-
Invalid account
-
Make sure that you have entered the correct user name and password.
-
Run the M365SecurityPlusTroubleshoot.ps1 script file
- Open PowerShell as the administrator.
- Run the command Set-ExecutionPolicy -ExecutionPolicy RemoteSigned -Force -Scope
process.
- Run the below script:
<install-dir>/bin/Microsoft365Troubleshoot.ps1
Note: <install-dir> here refers to the directory in which you have
installed the M365 Security Plus application.
- Enter the username and password of the configured Microsoft 365 account.
-
Password Expired
-
Please check if you can log in to the Microsoft 365
portal with the user
account.
-
Reset the account password and try again.
-
Logon failure
-
Please check if you can log in to the Microsoft 365
portal with the user
tenant.
-
Check if the user account is blocked. To check if an tenant is blocked, follow the
steps listed here.
-
Open Session failure/ Connection Error
-
The error occurs when a PSSession can not be opened successfully.
-
Run the M365SecurityPlusTroubleshoot.ps1 script file
- Open PowerShell as the administrator.
- Run the command Set-ExecutionPolicy -ExecutionPolicy RemoteSigned -Force -Scope
process.
- Run the below script:
<install-dir>/bin/M365SecurityPlusTroubleshoot.ps1
Note: <install-dir> here refers to the directory in which you have
installed the M365 Security Plus application.
- Enter the username and password of the configured Microsoft 365 account.
- If Exchange session returns a value Error Occurred, the problem is
with the configured account.
- If the problem occurs when you try to configure an Microsoft 365 tenant, try
using a dedicated service account to configure M365 Security Plus by
following the steps listed here.
- If the problem occurs at any other stage, the error may be temporary and try
again after some time. If the issue persists, please contact m365securityplus-support@manageengine.com .
-
Permission denied
-
Run the M365SecurityPlusTroubleshoot.ps1 script file
- Open PowerShell as the administrator.
- Run the command Set-ExecutionPolicy -ExecutionPolicy RemoteSigned -Force -Scope
process.
- Run the below script:
<install-dir>/bin/M365SecurityPlus
Note: <install-dir> here refers to the directory in which you have installed
the M365 Security Plus application.
- Enter the username and password of the configured Microsoft 365 account.
- If Exchange session returns a value Error Occurred, the problem is with
the configured account.
- If the problem occurs when you try to configure an Microsoft 365 tenant, try
using a dedicated service account to configure M365 Security Plus by following
the steps listed here.
- If the problem occurs at any other stage, please contact m365securityplus-support@manageengine.com with a
screenshot of the error.
-
Authentication Error
-
Make sure that you have entered the correct user name and password.
-
The Microsoft 365 authentication system may be not functioning properly. Please try
again after some time.
-
Operation Stopped
- MSOnline module might have some compatibility issues.
- To check your module version run the below script:
(Get-Item
C:\Windows\System32\WindowsPowerShell\v1.0\Modules\MSOnline\Microsoft.Online.
Administration.Automation.PSModule.dll).VersionInfo.FileVersion
- If the version is higher than the suggested version, uninstall the module and
install the compatible module using the below command
- Open PowerShell as Administrator.
- Install the MSOnline module with the below command:
- Install-Module -Name MSOnline -Force
- If the version matches, try reinstalling the module.
- Microsoft Online Services Sign-in Assistant may not be ready yet. To restart the
service:
- Type services.msc in Run and hit enter.
- Find Microsoft Online Services Sign-in Assistant, right click
and select restart.
- This error may arise due to credentials without proper permission when the product is
installed as a service. To resolve this, try using Domain User account as a Service
Logon account. To do this:
- Type services.msc in Run and hit enter.
- Right click ManageEngine M365 Security Plus and select
Properties.
- Select Log On tab.
- Select This Account and type the valid credentials.
- Click OK.
- Your tenant might not be available in default Azure environment :
- If the problem still persists, run the M365SecurityPlusTroubleshoot.ps1 script file a
- Open PowerShell as the administrator
- Run the command Set-ExecutionPolicy -ExecutionPolicy RemoteSigned -Force
-Scope process.
Run the below script:
<installdir>/bin/M365SecurityPlusTroubleshoot.ps1
Note: <install-dir> here refers to the directory in which you have
installed the M365 Security Plus application.
-
Unified Audit Log must be enabled to fetch data
The following reports require Unified Audit Log to be enabled:
- Azure Admin Activity
- SharePoint Admin Activity
- All OneDrive activity reports
To enable the collection of Unified Audit Log data, follow the steps mentioned below.
Enable collection of unified audit log data through Microsoft Purview.
- Sign in to the Microsoft Purview portal.
- Select Audit from the sidebar.
- Click the Start recording user and admin activity banner to turn on auditing for your tenant.
-
Incomplete Audit Reports
To generate audit reports for all operations, follow the steps listed below.
- Open PowerShell as the administrator.
- Run the command Set-ExecutionPolicy -ExecutionPolicy RemoteSigned -Force -Scope
process.
- Run the below script:
<install-dir>/bin/M365SecurityPlusTroubleshoot.ps1
Note: <install-dir> here refers to the directory in which you have installed
the M365 Security Plus application.
- If Exchange session returns a value Error Occurred, please contact m365securityplus-support@manageengine.com to resolve this issue.
- If the Exchange session returns a success value, follow the steps listed below:
-
Incomplete User Reports or Mailbox Reports
If any of the generated reports under users or mailboxes section do not contain information for
certain individuals, then follow the steps listed below.
- Check if the user’s information is displayed in the All Users report or Mailbox
Users report.
- If the user’s information is displayed there, the reason for the partial data in the report
is that the specific user is not managed by M365 Security Plus.
To rectify this, purchase more licenses or
reassign licenses to accommodate the user by following the steps listed below:
- In M365 Security Plus, select the Tenant Settings option found at the top right
corner.
- Click Manage Licenses link at the right-corner of the window.
- Click the Total Number of Users in the Managed Users column. This will open a
pop-up.
- Click icon to search for the specified user
- Select the check box against the particular user
- Click OK to save the selection.
-
The data for this report is currently being generated in the
background.
This message indicates that,
-
The data for this report is currently being generated in the background for some other
report opted by you.
-
Or the data is already being generated in the background by some other user.
Note:
If the data generation was successful in either of the above mentioned cases, it will be updated
automatically. Hence try switching to any other report and check the required report at a later
time.
-
Please choose the correct Azure environment.
-
Missing Azure AD application scope or permission.
- Update the necessary permissions in the application.
- You can check and update permissions by navigating to Tenant Settings > Rest API Access > Update
Permissions.
-
Frequent Microsoft credential pop-up.
- This can happen if the configured service account password is invalid or the account is blocked.
- Check if MFA is enabled for the account. To bypass MFA for the account, kindly read this.
- Once the above changes are made, close the pop-ups and wait for a few minutes. If the pop-up reappears,
restart the product.
- The service account used to run this operation is no longer available in the given tenant
Cause:
This error occurs when the service account used to configure a tenant in M365 Security Plus is disabled or deleted from the tenant.
Solution:
- If the service account is disabled, please enable the service account to continue using M365 Security Plus.
- If the service account is deleted, Follow the steps below to resolve this issue.
- Create an Microsoft 365 service account with the following roles: Exchange Admin, Global Reader, Privileged Authentication Admin, Privileged Role Admin, Teams Service Admin, and User Admin.
- In M365 Security Plus, click on the Configure option under the Service Account column.
- Provide the credentials of the service account you had created.
- Click Update.
-
Other Errors
-
Run the M365SecurityPlusTroubleshoot.ps1 script file
- Open PowerShell as the administrator.
- Run the command Set-ExecutionPolicy -ExecutionPolicy RemoteSigned -Force -Scope
process.
- Run the below script:
<install-dir>/bin/M365SecurityPlusTroubleshoot.ps1
Note: <install-dir> here refers to the directory in which you have installed
the M365 Security Plus application.
- Enter the username and password of the configured Microsoft 365 account.
- If Exchange session returns a value Error Occurred, the problem is with
the configured account.
- If the problem occurs when you try to configure an Microsoft 365 tenant, try using a dedicated service account to configure M365 Security Plus by following the steps listed here.
- If the problem occurs at any other stage, please contact m365securityplus-support@manageengine.com with a screenshot of the error.
Unable to update the Entra application due to an invalid private key
This error can occur when you upload a new application certificate.
Possible causes
- The certificate was signed with an encryption algorithm other than SHA-256 with RSA.
- A corrupted private key file was uploaded.
Solutions
- M365 Security Plus only supports application certificates signed using SHA-256 with RSA. Please use a certificate that matches this requirement. You can also create a new self-signed certificate by following the steps mentioned here.
- If the private key is corrupted, please use a valid version of the certificate and try again.
This service account cannot be used to fetch data due to a restriction by a Conditional Access policy
If the service account configured for M365 Security Plus does not meet the requirements of a Conditional Access policy, M365 Security Plus is unable to fetch data using the service account as the login attempt is being interrupted.
Causes
The following restrictions in your Conditional Access policies might prevent your service account from signing in to Microsoft Entra ID:
- Requirement for an MFA factor
- Login from a trusted or compliant device
- Login from a Microsoft Entra hybrid joined device
Solution
To find out which Conditional Access policy is blocking the service account sign-ins, you can check the account's sign-in logs in Microsoft Entra ID by following these steps:
- Navigate to Identity > Monitoring & health > Sign-in logs.
- Search for the service account’s sign-in attempts.
- Apply the Status: Failure filter on the User sign-ins (non-interactive) tab.
- Click the failed attempts to open their details.
- Select the Conditional Access tab to see which policies were applied.
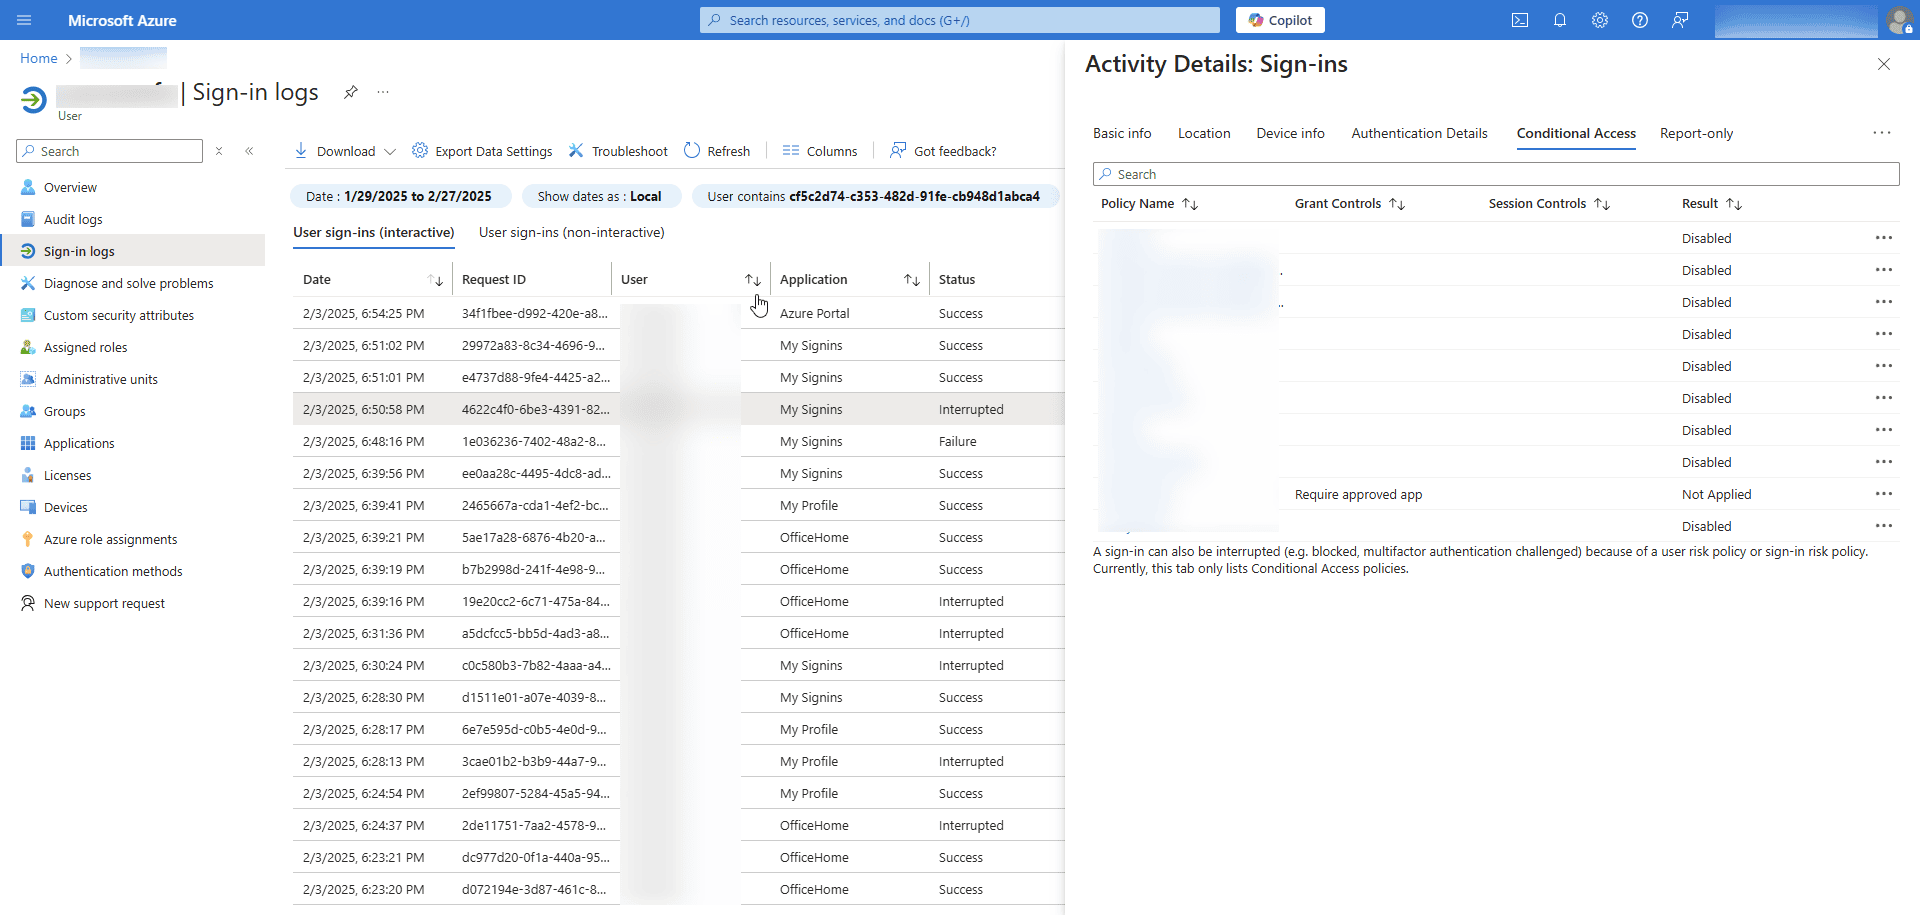
Once you've identified the Conditional Access policy, you can make the appropriate changes to ensure your service account logs in to Microsoft Entra ID.
- Unable to establish Exchange Online Connection due to blocked product files.
M365 Security Plus requires specific DLL files located in the <Installation_dir>\lib\native\ExchangeOnlineManagement directory to connect with Exchange Online and collect data. If these files are blocked from execution, M365 Security Plus will be unable to establish a connection to Exchange Online, preventing all Exchange Online operations.
Cause
The DLL files might have been blocked from being executed by your computer since they were created in an external system.
Solution
You will have to unblock the DLL files so they can be executed in your server. You can do this by running the following script in Windows PowerShell as an administrator: dir "<Installation_dir>\lib\native\ExchangeOnlineManagement" | Unblock-File
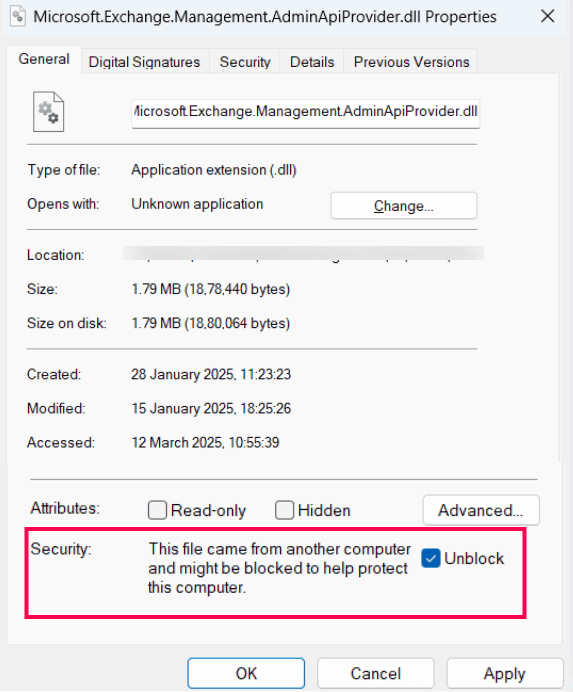
You can verify if the files have been unblocked by following the steps given below:
- Right-click on any of the DLL files in the <Installation_dir>\lib\ directory\native\ExchangeOnlineManagement directory.
- Click Properties
- Verify if the Unblock option is checked.
- Creation of client secrets is blocked by a tenant-wide policy. Please contact your tenant administrator for more information.
M365 Security Plus uses an Entra application to obtain permissions and tokens for admin tasks via GraphAPI. Registering the Entra app grants the tool access to read or manage tenant resources. You must create a client secret to authenticate securely during the OAuth 2.0 flow. Without this secret, Microsoft 365 cannot confirm the app’s identity or authorize its actions.
However, in some cases, you cannot create a client secret in your tenant due to a restriction in your tenant-wide policy.
Cause
Your tenantAppManagementPolicy might be configured to restrict creating new client secrets for Entra applications in your tenant. Refer to this Microsoft document for more details on this policy,
Solution
You will have to edit the passwordAddition attribute in your tenantAppManagementPolicy using Microsoft GraphAPI to allow creation of client secrets in your tenant.
-
Data generation failed. Update REST API permissions in Tenant Settings.
Cause
This error occurs when:
- The product fails to fetch data from Azure AD due to insufficient REST API
permissions.
- There are any internal issues in Azure AD. If the required permissions are provided, Please try again.
Solution: Update REST API permissions with the following steps.
- Go to Tenant Settings at the top-right corner of the product's home page.
- Click on Update Permissions in the Rest API Access column for the required tenant.
- You will now be redirected to Microsoft 365 login. Enter the credentials of a Global Administrator
account.
- Click on Accept to grant Read Service Health permissions and to update the REST API
permissions successfully.
-
This Microsoft 365 account has been blocked
-
This account has been blocked by the administrator.
-
Contact your administrator to login to M365 Security Plus.
-
You must change your Microsoft 365 account password before you can
login
-
An Administrator has changed the password to your Microsoft 365 account.
-
Login to Microsoft 365 Portal and reset
your password to login to ManageEngine M365 Security Plus
-
Rest API authentication required
-
Rest API based authentication must be enabled for MFA-enabled / Federated Help Desk
Technician accounts.
-
Once enabled, users with MFA-enabled / Federated Accounts will be redirected to Microsoft
365 portal for authentication to access M365 Security Plus.
-
Click here to enable Rest API based
authentication
-
An unexpected error occurred
-
The error occurs when a PSSession can not be opened successfully.
-
Make sure that you have entered the correct user name and password.
-
If the problem still persists, contact your administrator.
-
Access Denied
-
Make sure that you have entered the correct user name and password.
-
If the problem still persists, contact your administrator.
-
The Redirect URI is not found in the application.
- In the Redirect URI of the application configured for M365 Security Plus in Azure AD, add your machine
name or IP address, port number, followed by the paths mentioned below. (Eg:
https://testmachine:8365/webclient/GrantAccess, http://localhost:8365/AADAuthCode.do) Know more.
- /webclient/VerifyUser
- /webclient/GrantAccess
- /AADAuthCode.do
- /AADAppGrantSuccess.do
- Click Add URI to add the below Redirect URIs in the subsequent rows. Please note that
for users with M365 Security Plus build 4409 or higher, Redirect URIs (b) and (c) are optional.
- https://identitymanager.manageengine.com/api/public/v1/oauth/redirect
- https://demo.o365managerplus.com/oauth/redirect
- https://manageengine.com/microsoft-365-management-reporting/redirect.html
- If M365 Security Plus is accessed from AD360 or Log360 products with reverse proxy enabled update the
endpoints by providing the above mentioned paths in the Redirect URI fields. The user should include the
accessing URI with the above mentioned paths, like:
- For context based reverse proxy: https://<AD360/Log360 hostname>:<reverse proxy
port>/<reverse proxy context>/webclient/VerifyUser
- For port based reverse proxy : https://<AD360/Log360 hostname>:<reverse proxy
port>/webclient/VerifyUser.
- Multiple technicians with the same UPN cannot be used in the product. Please contact the product administrator to resolve the issue.
Active Directory users can be added as technicians in M365 Security Plus and can be assigned any combination of reporting, management, and auditing tasks. When two Active Directory users with the same UPN are registered in M365 Security Plus as technicians, this can cause an ambiguity in the login process as to which user account should be logged in to.
Cause
When two different users are assigned technician roles in M365 Security Plus, they will need to have unique UPNs to be configured. Once they are added, if their UPNs are edited to be the same, this can cause the error to surface.
Solution
- Update the UPN for one of the conflicting AD user accounts so it becomes unique.
- Remove that user from the technicians list in M365 Security Plus.
- Add the user again as a technician with the new UPN.
- AD domain not reachable for authentication. Please contact the product administrator.
Cause
This error occurs due to any of the following reasons:
- The domain controller configured in Active Directory settings is down.
- Port 389 is closed in the firewall configured for the machine that hosts M365 Security Plus.
Solution
Ensure that the machine that hosts M365 Security Plus can connect to the domain controller.
- Authentication failed due to outdated or invalid domain configuration. Please contact the product administrator.
Cause
This error occurs when the login credentials of the domain controller configured in Active Directory Settings is changed, and is no longer valid.
Solution
Follow the steps mentioned below to re-configure your domain controller in Active Directory Settings.
- Log in to M365 Security Plus and navigate to Delegation > Other Settings> Logon Settings > Active Directory Settings.
- Select the
 edit icon in the Actions column next to the domain controller that you want to edit.
- Enter the current Domain Password of the account you are configuring the login with.
- Click Update.
- Authentication failed. The account used for domain configuration lacks the sufficient permissions to verify AD credentials. Please contact the product administrator.
Cause
This error occurs when the login credentials of the domain controller configured in Active Directory Settings does not have the Read permission over the AD users configured as technicians in M365 Security Plus.
Solution
Follow the steps mentioned below to re-configure your domain controller in Active Directory Settings.
- Log in to M365 Security Plus and navigate to Delegation > Other Settings> Logon Settings > Active Directory Settings.
- Select the edit icon in the Actions column next to the domain controller that you want to edit.
- Enter the Domain Name and Domain Password of the account that has the permissions to read the details of your AD technicians.
- Click Update.
-
Unable to save the changes. Please try again later.
-
Make sure that the product is running in the standby server.
-
Ensure that firewall is disabled for the port in which the product is installed.
-
When I add my domains manually, the domain controllers (DCs) are not
resolved. Why?
-
This problem occurs when the DNS associated with the machine running M365 Security Plus does not
contain the necessary information. You need to add the DCs manually.
-
When I add a DC, I get an error that says "The Servers are not operational/Cannot connect to the domain controller?
This error could be due to any of the following reasons:
- The DC is down.
- The product server is not available.
- A firewall has been enabled, and port 389 is closed.
- The network is busy.
-
When I add a DC, I get an error that says "Unable to get domain DNS / FLAT
name." What does that mean?
This error could be due to any of the following reasons:
- The specified username or password is invalid.
- An anonymous login (where no username and password are provided) was performed.
- The IP address of the DC is specified instead of its name.
- Elasticsearch has stopped
This error message will be displayed when Elasticsearch bundled with the product has stopped unexpectedly.
This may be due to any of the following reasons:
Cause 1: Insufficient disk space
It is advised to have at least 1GB of free disk space for Elasticsearch to function effectively. When the size of data stored in Elasticsearch increases, it is recommended to free up storage accordingly to ensure Elasticsearch functions as expected.
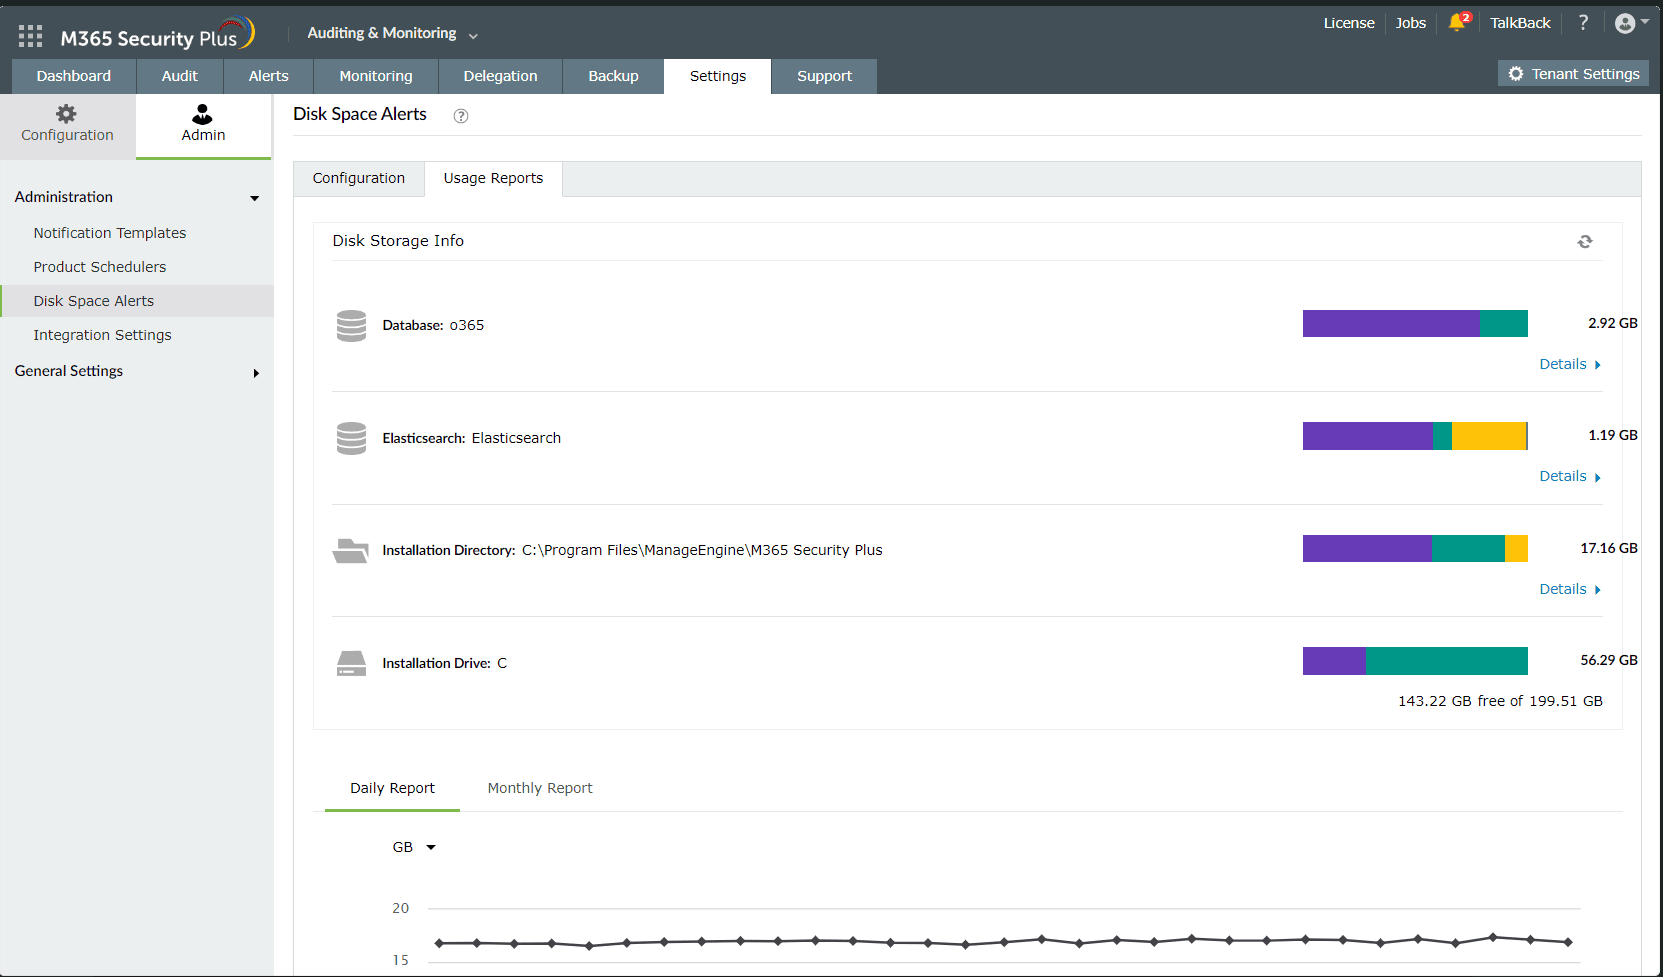
Solution:
- Log in to M365 Security Plus and navigate to Settings > Admin > Disk Space Alerts and click the Usage Reports tab. You can see the amount of storage consumed by Elasticsearch data in the Elasticsearch field.
- Free up more disk space for Elasticsearch to function properly.
Cause 2: Insufficient heap memory
Elasticsearch uses a file-system cache to provide faster searches. It is recommended to have at least 30% of the server's RAM free for Elasticsearch to use. This free RAM will be used to cache Elasticsearch's indices to provide better performance.
For proper functionality, 2GB of heap memory is initially assigned to Elasticsearch. When the size of data stored in Elasticsearch increases, it is recommended to assign more heap memory accordingly. At least 1GB of heap memory for every 60GB of data stored in Elasticsearch is required.
Solution:
You can assign more heap memory to Elasticsearch (1GB for every 30GB of Elasticsearch data is recommended for better performance) if it is feasible to do so.
To configure the heap memory assigned to Elasticsearch, follow the steps below.
- Log in to M365 Security Plus and navigate to Settings > Admin > Disk Space Alerts and click the Usage Reports tab.
- You can see the amount of storage consumed by Elasticsearch data in the Elasticsearch field. Use the storage size to decide how much heap memory has to be allocated to Elasticsearch.
- Shut down M365 Security Plus.
- If the product runs as an application, navigate to Start > All Programs > M365 Security Plus
and click Stop M365 Security Plus.
- If the product runs as a Windows service, navigate to Start > Run, type services.msc,
right-click M365 Security Plus from the list of services, and click Stop.
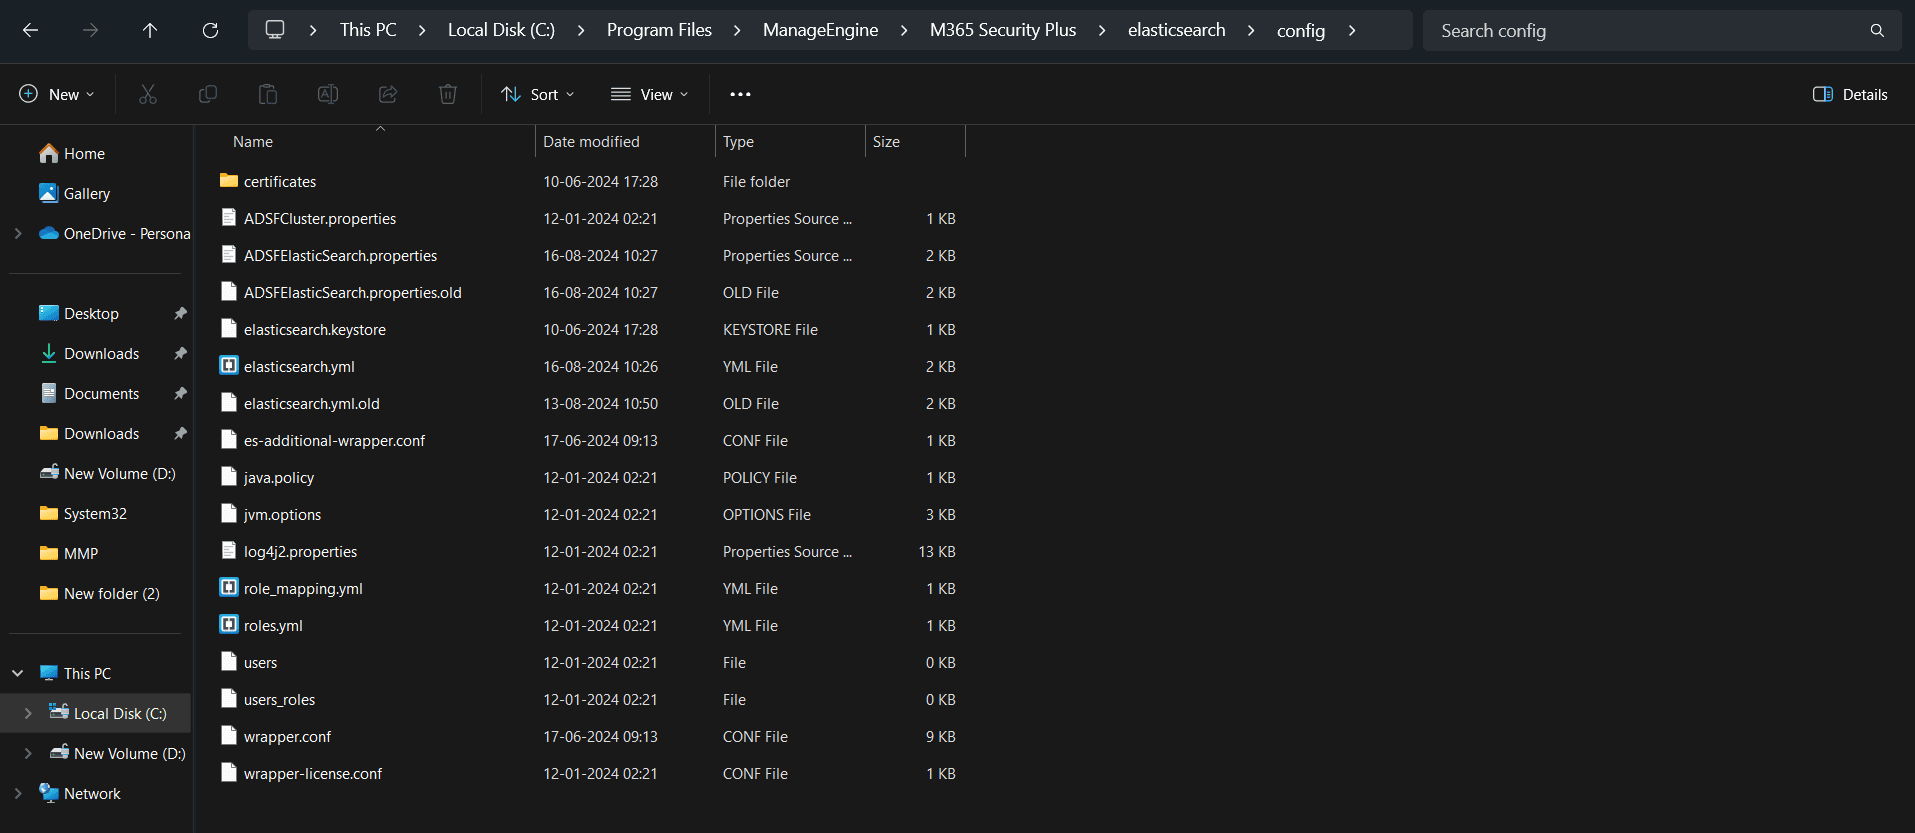
- Navigate to <Installation_directory>\elasticsearch\config and open the es-additional-wrapper.conf file using a text editor of your choice. The default installation directory is C:\Program Files\ManageEngine\M365 Security Plus.
Note: Make sure you back up a copy of the es-additional-wrapper.conf file before making any changes so that you can restore it if you encounter any issues while configuring the heap memory assigned to Elasticsearch.
- The variables wrapper.java.initmemory and wrapper.java.maxmemory need to be set to the same value. In this example, the values are set to 3072, i.e., Elasticsearch's memory is set to (3072MB/1024) = 3GB.
- Save the changes made before closing the file.
- Restart M365 Security Plus for the new heap memory configuration to take effect.
Note:
- Heap memory allocated to Elasticsearch shouldn't exceed 32GB, as larger heaps can cause longer garbage collection pauses, thereby slowing down the functioning of the product.
- Make sure both the values of wrapper.java.initmemory and wrapper.java.maxmemory are the same. Otherwise, the product will not start up properly.
- In the event of OutOfMemory and LowMemory errors, the Elasticsearch heap is automatically increased by 1GB.
- Increasing the heap size is not always the solution to improve performance. Apart from heap memory, other factors like storage devices and CPU used may also cause Elasticsearch to slow down. Ensure that the system requirements are met. Also note that increasing the Elasticsearch heap size should be done with careful consideration of the available resources on your machine.
Cause 3: Firewall ports 9300 to 9400 have been blocked
To allow Elasticsearch to interact with Microsoft 365 and collect data, firewall ports 9300 to 9400 are used.
Solution:
- Allow M365 Security Plus to use firewall ports 9300 to 9400.
If these steps did not resolve your issue, please contact the support team at m365managerplus-support@manageengine.com to get it resolved.
- Microsoft SQL transaction log is full
Cause:
This error occurs in instances where Microsoft SQL Server is configured as the product database. A transaction log that records all transactions and modifications made by each operation is maintained in the database. When the log size reaches the allotted size limit, all transactions in the database will be stopped.
Solution:
To resolve this issue, enlarge the transaction log size or optimize the log file growth by following the steps mentioned in this article.
- Insufficient disk space to update to build 4800.
Cause:
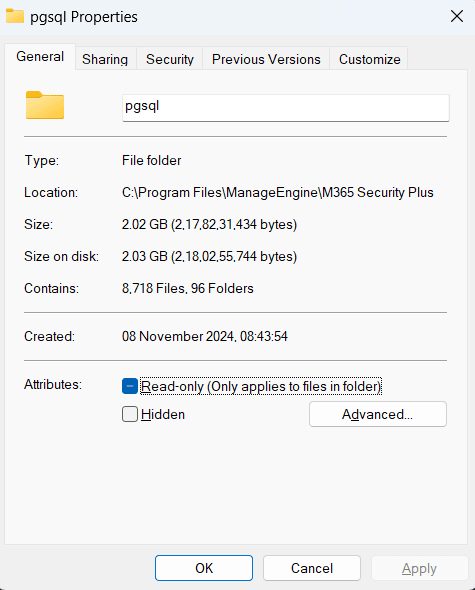
M365 Security Plus users updating to build 4800 will have the product's built-in PostgreSQL database updated to version 15.7. In this case, you will be required to free up more disk space (1.3 times occupied by your product database) to proceed with the update. This space is only required for migrating the database from the old version to the new version. It will be freed up once the update is complete. Follow the steps mentioned below to find the size of your product database.
- Right-click on the pgsql folder in your M365 Security Plus installation directory [By default, the default path to the installation directory is C:\Program Files\ManageEngine\M365 Security Plus].
- Click Properties.
- View the disk space occupied by your product database in the Size on disk field.
Solution:
- Free up the required disk space in the machine where M365 Security Plus is installed.
- Once done, you can now update the product by following the steps mentioned here.
-
Please install the correct version of MSOnline module.
-
Steps to check whether a user account is blocked from logging in:
- Log in to Microsoft 365 portal .
- Navigate to Users --> Active Users.
- In the filters drop-down box, select Sign-in Blocked.
- Check if the user account is blocked from logging in.
-
Steps to create a dedicated service account:
- Log in to the Microsoft 365 portal .
- Navigate to Users --> Active Users --> Add a User.
- Create a new user by filling the mandatory fields display name and user name.
- In the password section, select Let me create the password and enter a password for the user
account.
- Uncheck the Make this user change their password when they first sign in.
- In the product licenses section, select Create user without product license.
- Click Next.
- Under the Roles option, select Admin center access and choose the required roles (Exchange Admin role is
mandatory). Click here to view the list of the
required roles. Click Next.
- Click Save.
- Use this account to configure your Microsoft 365 tenant in M365 Security Plus.
If the problem persists, contact m365securityplus-support@manageengine.com .
-
The remote server returned an error- (401) Unauthorized.
Cause
- Invalid credentials.
- Expired client secret.
- App registration was deleted.
Fix
- Check the credentials of the service account that has been configured.
- Ensure that your client secret has not expired or been deleted.
- Make sure that your app registration exists.
-
The request failed with HTTP status 403.
Cause
- This issue occurs when necessary API permissions were not provided for the application.
Fix
- Log in to the Azure AD portal.
- Click Azure Active Directory from the left pane.
- Choose App registrations from under the Manage section.
- Select the All applications tab.
- Click on the Azure AD application of M365 Security Plus.
- In the API permissions page, check if admin consent has been granted for the
full_access_as_app permission shown in the image below.
- If the permission doesn't exist, follow the steps below:
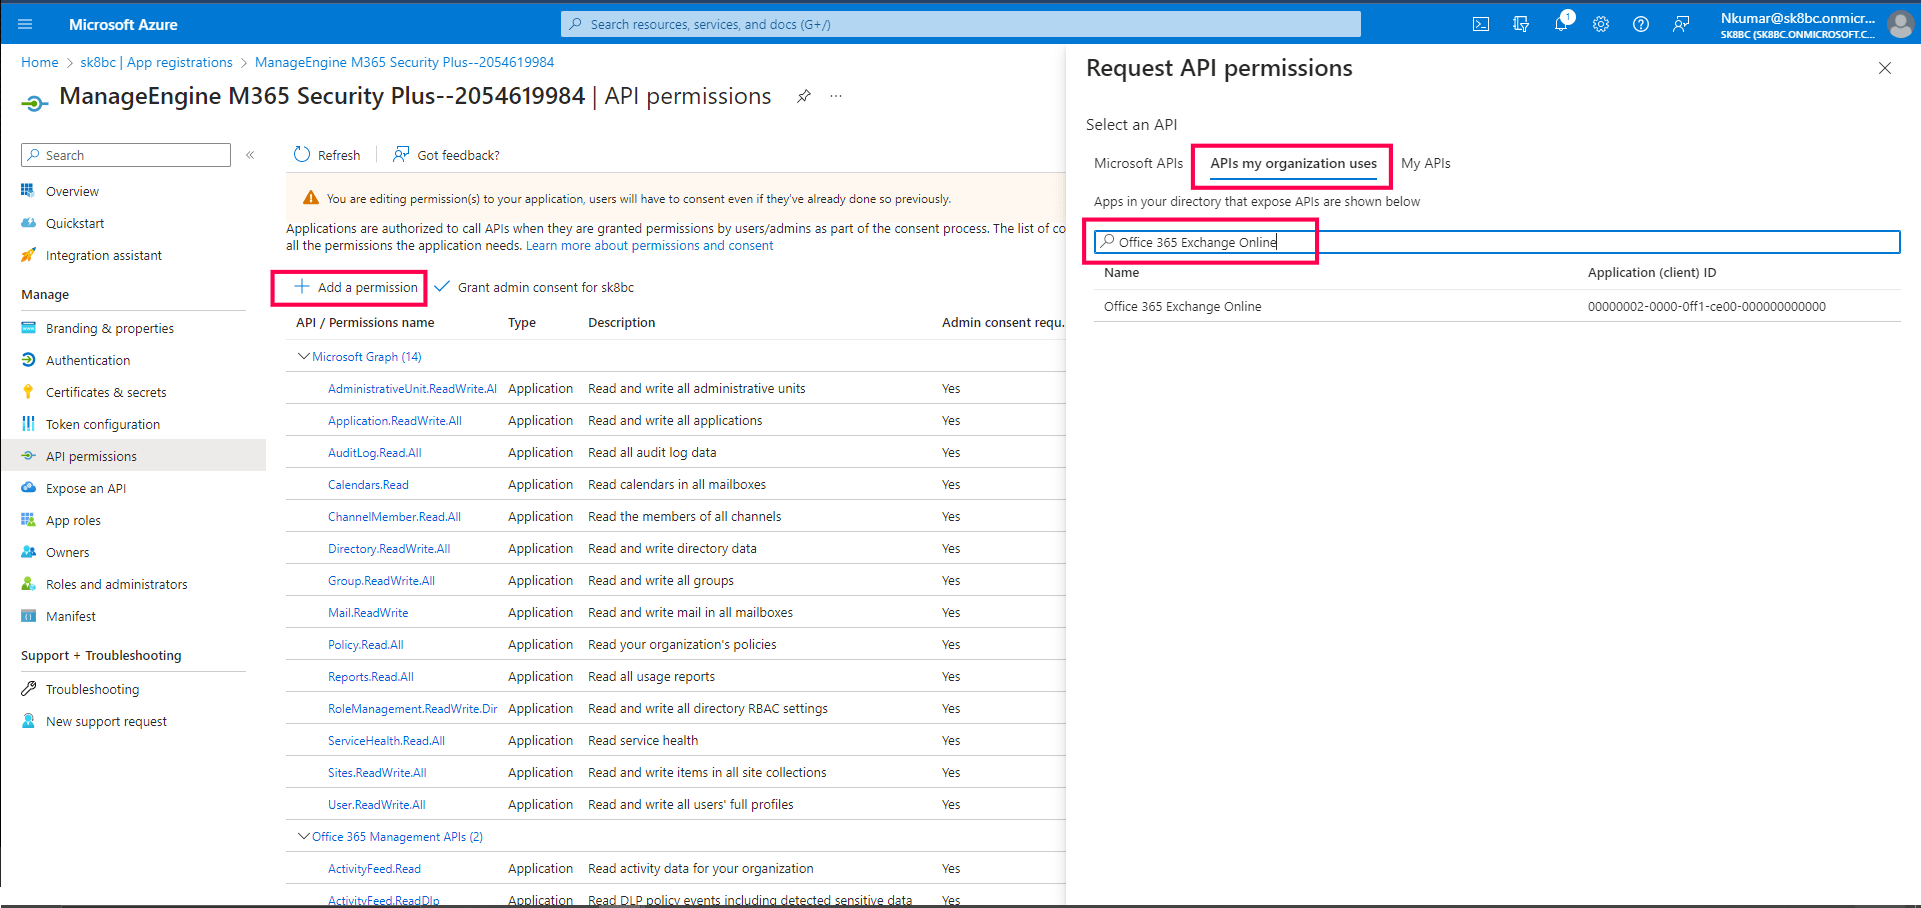
- In the API permissions page, click on Add a permission and select the
APIs my organization uses tab.
- Search for Office 365 Exchange Online and select the same.
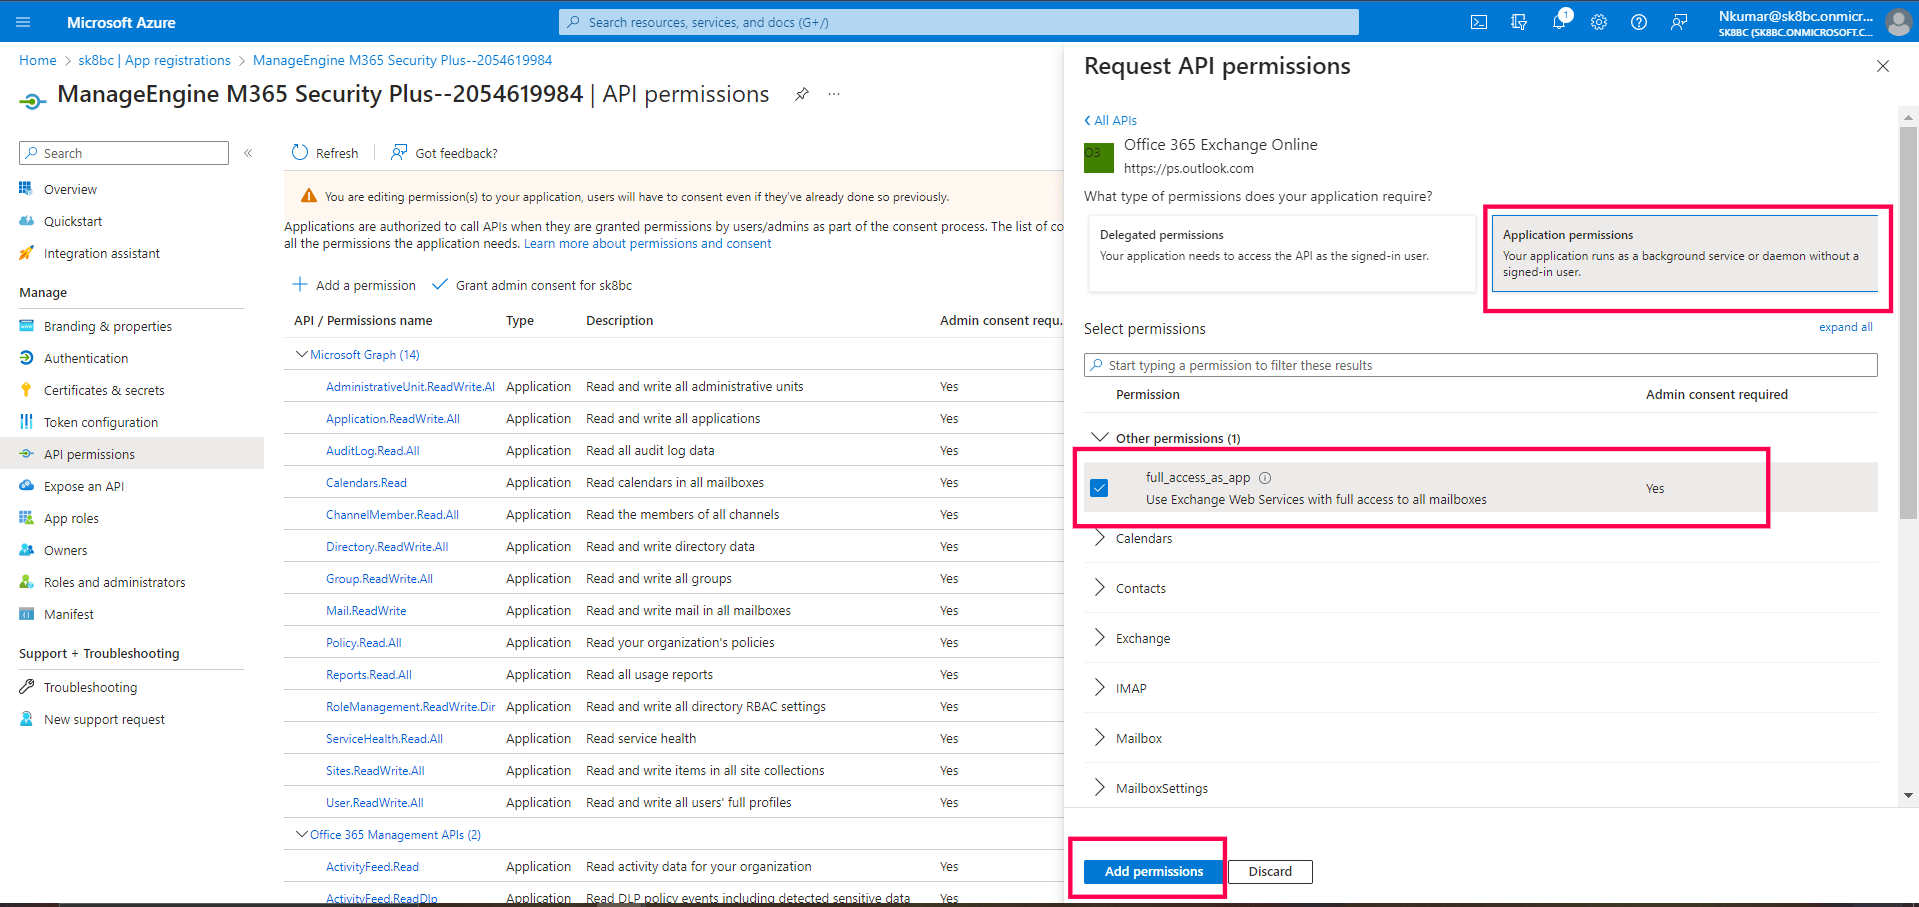
- Choose Application permissions and select the
full_access_as_app checkbox.
Note: The API permission full_access_as_app uses Exchange Web
Services to backup and restore mailboxes.
- Click on Add Permissions button.
- In the Configured permissions section, click on Grant admin consent for
<your_tenant_name>.
- Click Yes in the pop-up that appears.
-
Backup is not supported for 32-bit installation of the product.
Solution:
If you are using a 32-bit version of M365 Security Plus, you won't be able to back up data using the add-on.
Install the 64-bit version of the product to enable backup.
Steps to install the 64-bit version of M365 Security Plus
Note:Take a backup of the M365 Security Plus database
before installing the 64-bit version to avoid loss of data.
- Uninstall the 32-bit version of M365 Security Plus.
- Download and install M365 Security Plus using this link.
- Start the application.


 ADManager Plus
 ADAudit Plus
 ADSelfService Plus
 AD360
AD360