Getting Started
ManageEngine Endpoint Central now facilitates easy integration with your existing infrastructure using REST APIs. You can perform various desktop management activities easily from a single console. You can find the list of modules for which APIs are available in the side bar, if you need more APIs you can contact us with your requirement.
This document describes prerequisites for using the API. It also explains the steps to call an API using an example scenario.
API - URI Structure
All API URI must be structured in the following format,
<Server URL>/api/{Version}/{Entity}/{Operation|Action} - Tags
- Optional/Mandatory
- Description
- Usage
- Version
- Mandatory
- API Version
- 1.4 ie current API Version
- Entity
- Mandatory
- The module for API
- e.g. inventory, som, desktop
- Operation or Action
- Mandatory
- Operation or action in the module
- e.g. computers, computers/installagents
Generating Authentication Key using Endpoint Central Server
1. In the Endpoint Central Server console, click on Admin; under Integrations, click on API Explorer.

2. Click on Authentication, then Login.
3. Select Local Authentication or AD Authentication based on what has been configured in your organization from the Choose Authentication dropdown.
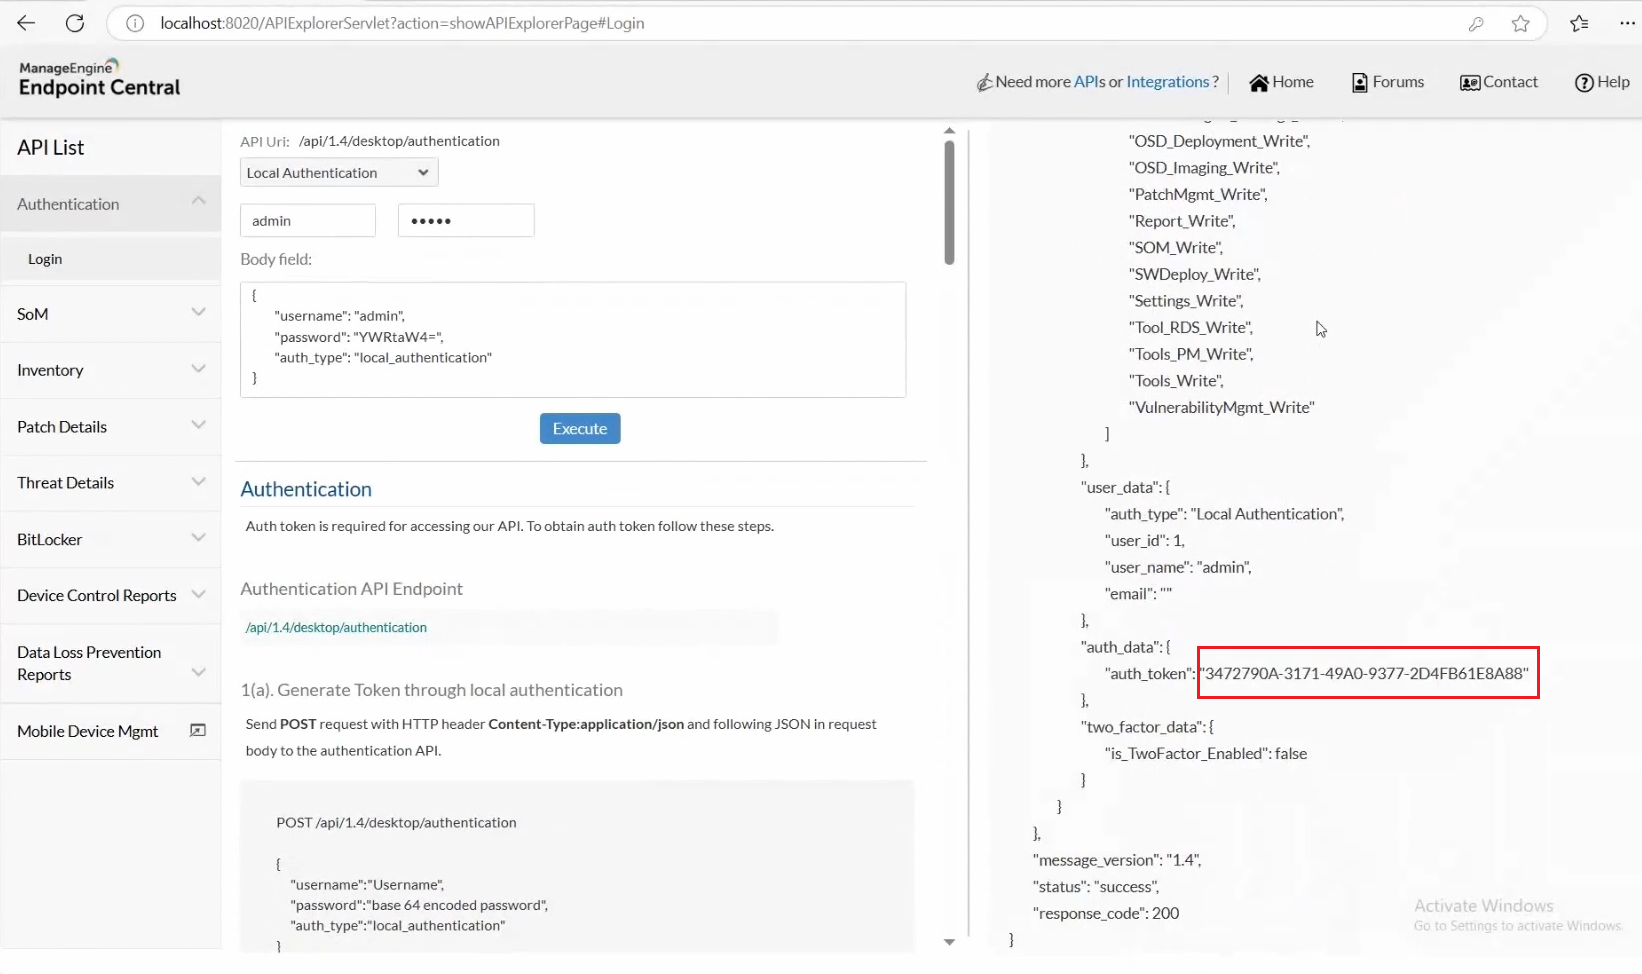
4. Enter your on-premises server credentials in the Username and Password section and click on Execute
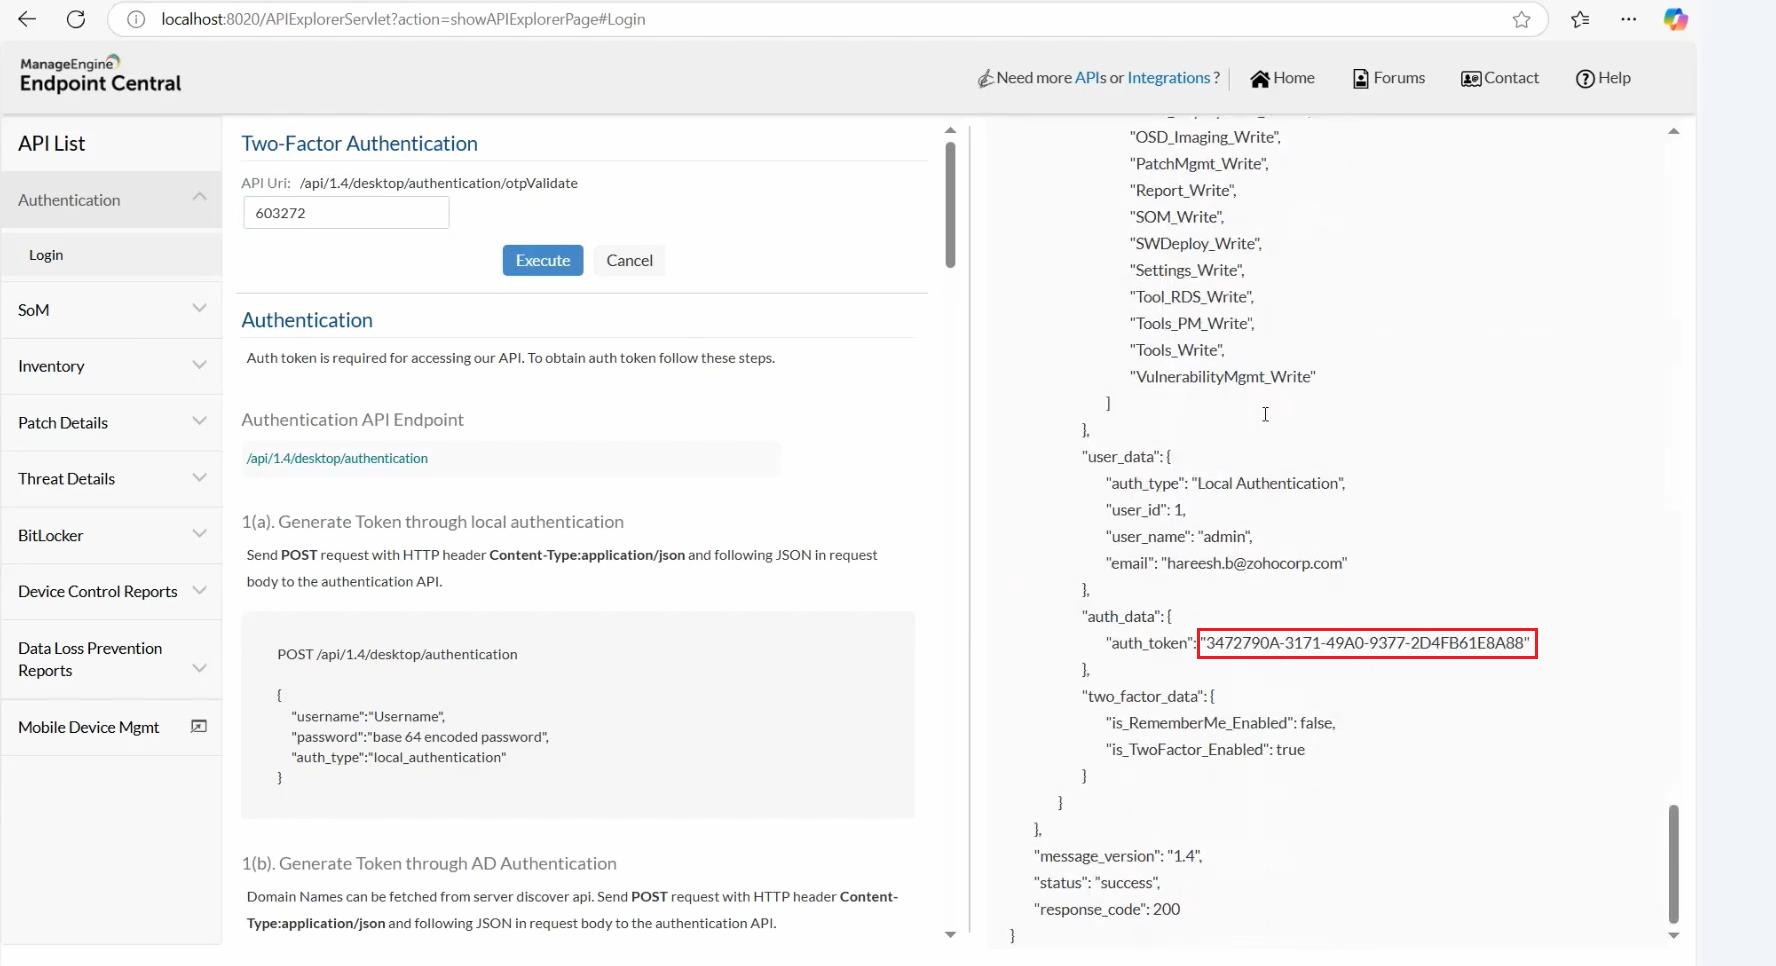
5. You will receive a response on the right; scroll to the bottom of this response. Under auth-data, The value for the auth-token key is the Authentication Key. Copy and store this authentication key for future use.
Two-Factor Authentication
If you have enabled two factor authentication,
1. After selecting the authentication mode (Local Authentication or AD Authentication) and entering your login credentials, click on Execute and wait for processing.
2. If you have selected Email as your Mode of Authentication, an OTP will be sent to your registered email or if you have selected Authenticator App as your Mode of Authentication, OTP can be viewed in the app.
3. Enter this OTP and click on Execute.
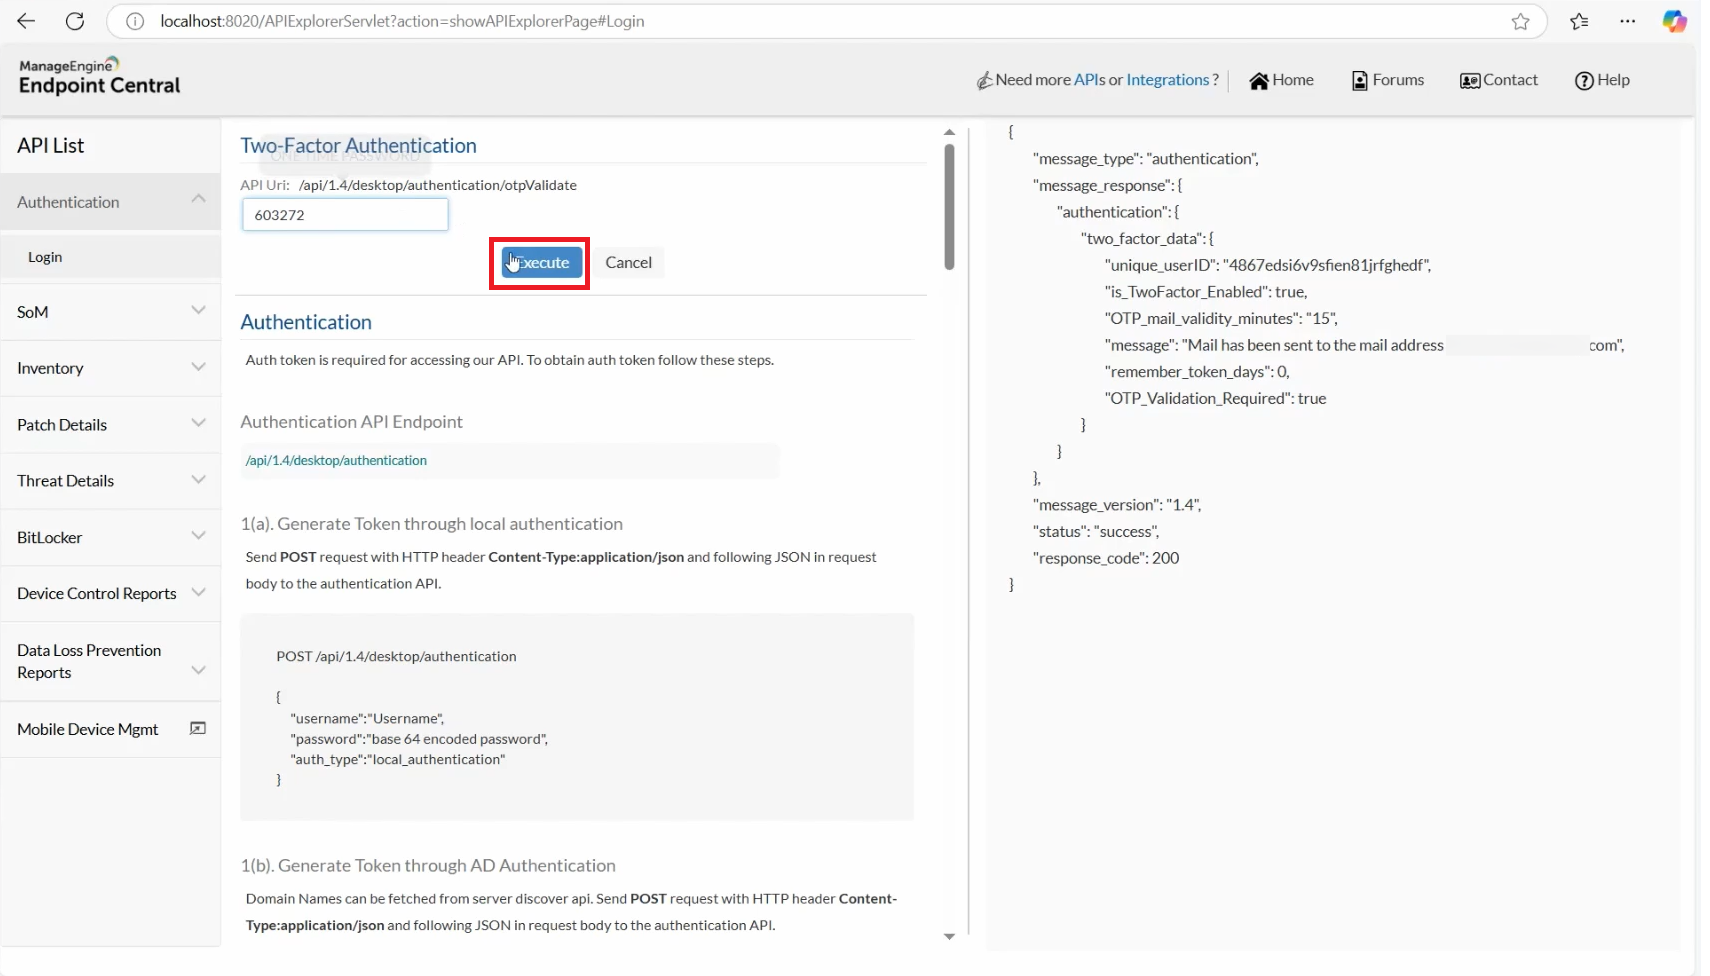
4. The authentication key will be generated only after successful two-factor authentication.
Paginated response
Some API endpoints return responses that consist of array of objects. These are paginated responses that return only subset or page of all the objects for that API.
Page limit and page parameters are used to specify the number of objects per response and which page is to be retrieved.
page={page}&pagelimit={page_limit}
For example, if you want the API to return 10 objects per page and wish to see the second page, add the following line at the end of the API
page=1&pagelimit=10Search
Search operation can be performed in API endpoints that return paginated responses.
Search type and search column parameters are set to the column name that needs to be searched and the search value is set to the search query.
searchtype={resources}&searchcolumn={computername}&searchvalue={searchvalue}
For example, to search for software containing "Adobe" in inventory software,add the following line at the end of the API
searchtype=software_name&searchcolumn=software_name&searchvalue=Adobe
Generating Authentication Key using API tool
Auth token is required for accessing our API. To obtain auth token follow these steps.
Generating Authentication Key using API tool
/api/1.4/desktop/authentication
1(a). Generate Token through local authentication
Send POST request with HTTP header Content-Type:application/json and following JSON in request body to the authentication API.
    POST /api/1.4/desktop/authentication

    {
     "username":"Username",
     "password":"base 64 encoded password",
     "auth_type":"local_authentication"
    }
1(b). Generate Token through AD Authentication
Domain Names can be fetched fetched from server discover api. Send POST request with HTTP header Content-Type:application/json and following JSON in request body to the authentication API.
    POST /api/1.4/desktop/authentication

    {
     "username":"Username",
     "password":"base 64 encoded password",
     "auth_type":"ad_authentication" ,
     "domainName": "Domain name"
    }
2. Obtain Auth Token from the response
{ "message_type": "authentication", "message_response": {"authentication": { "user_permissions": { "read": ["Common_Read","SOM_Read", "Tools_Read"], "admin": ["Common_Admin","SOM_Admin","Tools_Admin" ], "write": [ "Common_Write","SOM_Write","Tools_Write"] },"user_data": { "auth_type": "Local Authentication", "user_id": 1, "user_name": "admin", "phone_number": null, "email": "" }, "auth_data": { "auth_token": "B42550F3-006D-48EB-8011-F6C7D6323EE7"} } }, "message_version": "1.0", "status": "success" } 3. Set Auth Token to request header
Set the authtoken from to Authorization HTTP header for all requests.
For a token B42550F3-006D-48EB-8011-F6C7D6323EE7 set header as Authorization:B42550F3-006D-48EB-8011-F6C7D6323EE7
Generation of Base64 encoded password
- From Endpoint Central's web console, navigate to Admin -> API Explorer.
- On the left pane, click on Authentication -> Login.
- Choose the authentication type as either Local authentication or AD authentication and furnish the user name and password.
- Upon execution, you will obtain base64 encoded password along with the auth token.
Two factor Authentication
If two factor authentication is enabled, perform the following steps to obtain auth token:
- While making a request for Authentication API Endpoint, instead of receiving the above-specified response, the following response will be obtained -
{ "message_type": "authentication", "message_response": { "authentication": { "two_factor_data": { "unique_userID": "admin85424", "is_TwoFactor_Enabled": true, "message": "Google authentication already created for this user. Validate OTP", "remember_token_days": 1, "OTP_Validation_Required": true } } }, "message_version": "1.0", "status": "success" } - You will have to make use of the Unique User ID from this response and make the following request:
POST api/1.4/desktop/authentication/otpValidate { "uid":"admin85424", "otp":"761666", "rememberme_enabled":"true" } - The OTP specified here will be generated either via the Authenticator app you are using or the registered mail address, depending on the mode of authentication enabled for two factor authentication.
- Upon execution, the auth token will be generated.
{ "message_type": "authentication", "message_response": {"authentication": { "user_permissions": { "read": ["Common_Read","SOM_Read", "Tools_Read"], "admin": ["Common_Admin","SOM_Admin","Tools_Admin" ], "write": [ "Common_Write","SOM_Write","Tools_Write"] },"user_data": { "auth_type": "Local Authentication", "user_id": 1, "user_name": "admin", "phone_number": null, "email": "" }, "auth_data": { "auth_token": "B42550F3-006D-48EB-8011-F6C7D6323EE7"} } }, "message_version": "1.0", "status": "success" }
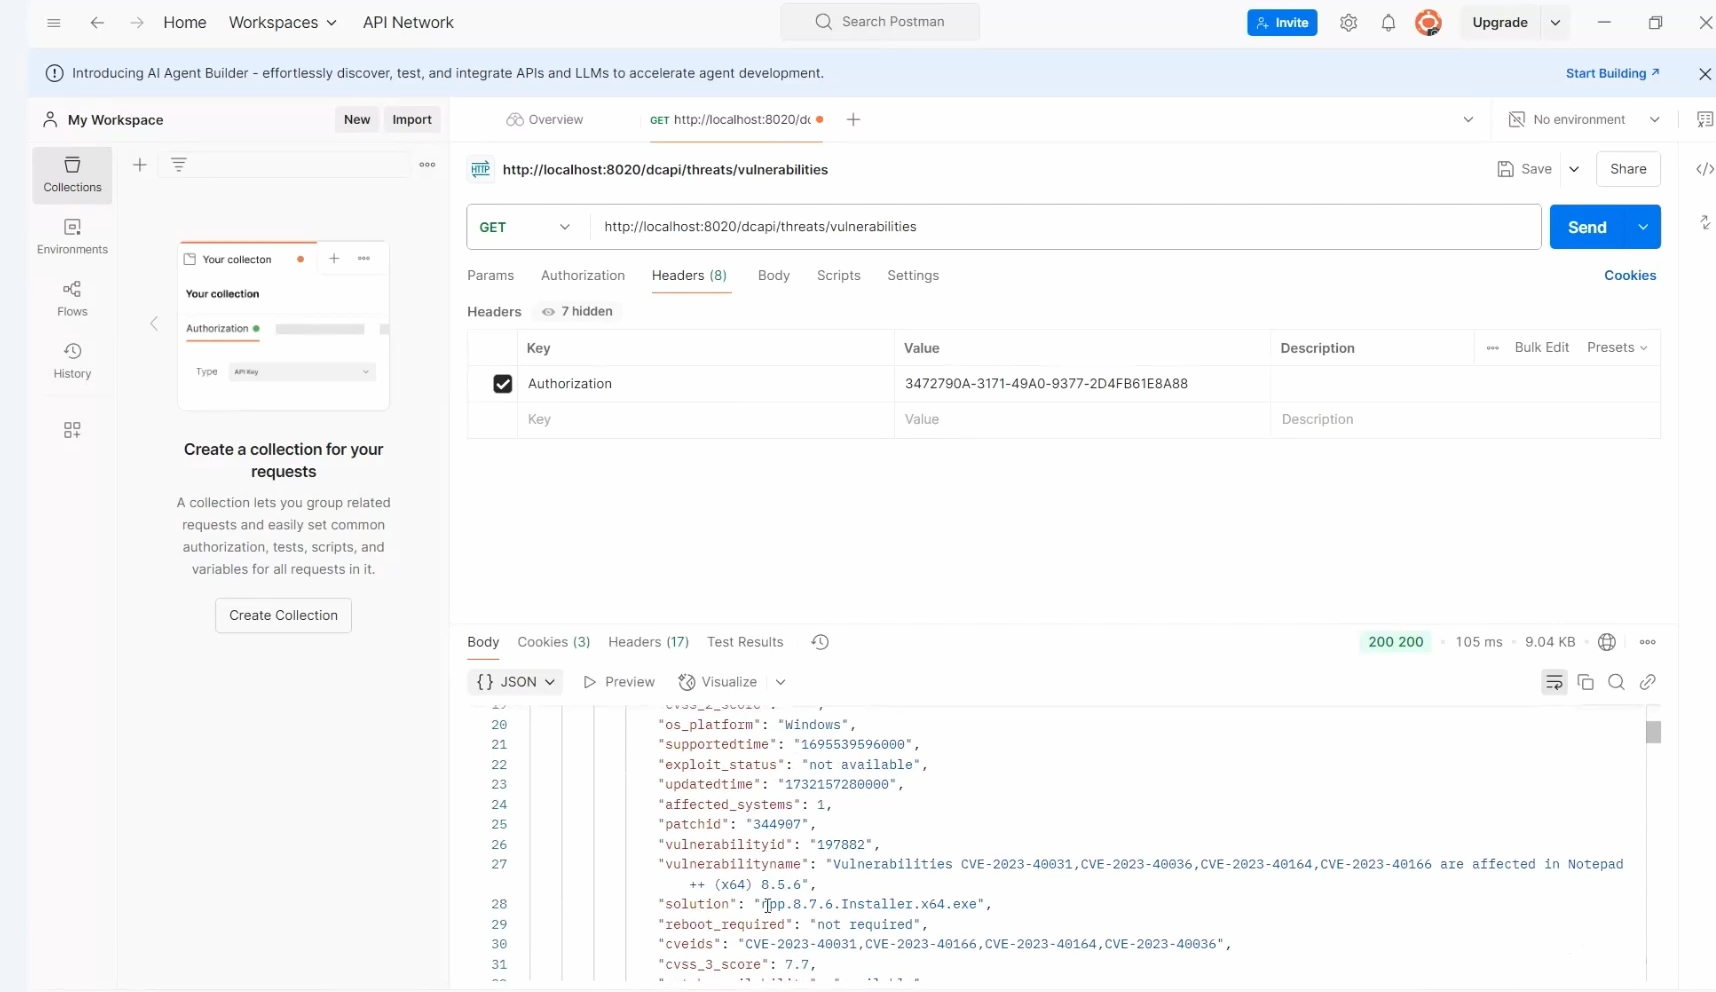
How to call the Desired Endpoint Central API in an API tool?
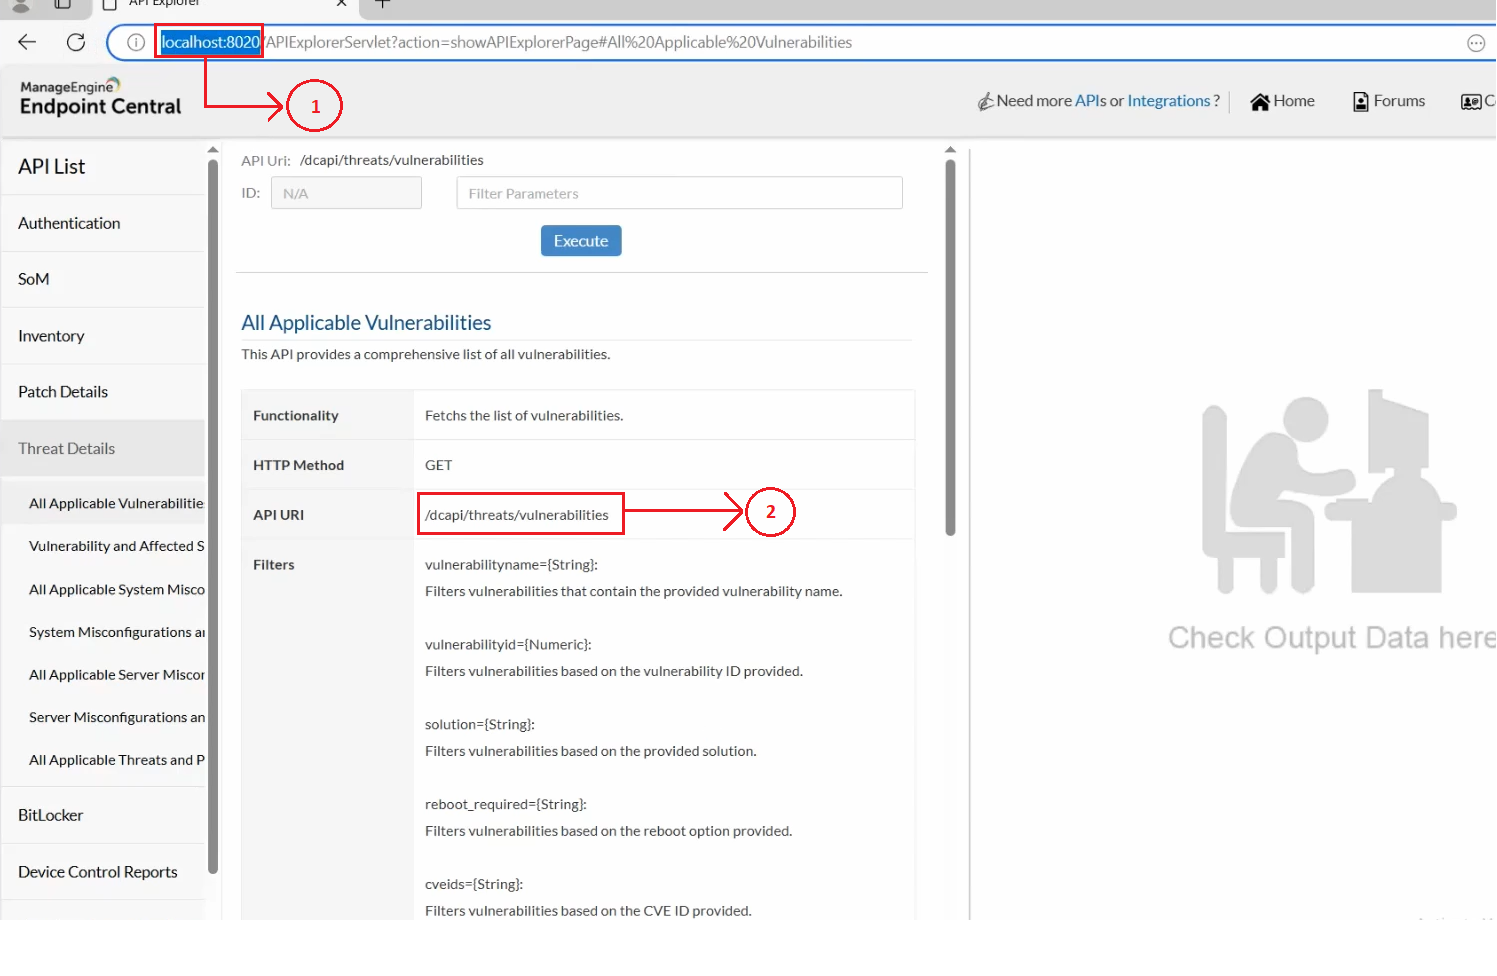
Let us take an example scenario of calling the API for retreiving the comprehensive list of all vulnerabilities.
Generating the Response in the API tool
1. Open an API tool, such as Postman and create a new request.
2. Specify the HTTP Method (Mentioned in the API documentation page. GET in this scenario).
3. Enter the URL:
- The first part of the URL is your Endpoint Central server URL.
- The second part of the URL is the specific API URI from the API page. In this scenario: /dcapi/threats/vulnerabilities
4. Navigate to the Headers tab in the API tool.
5. Select authorization as the key and paste the copied authentication key into the value field.
6. Click on Send.
7. Response will be generated (comprehensive list of all vulnerabilities).
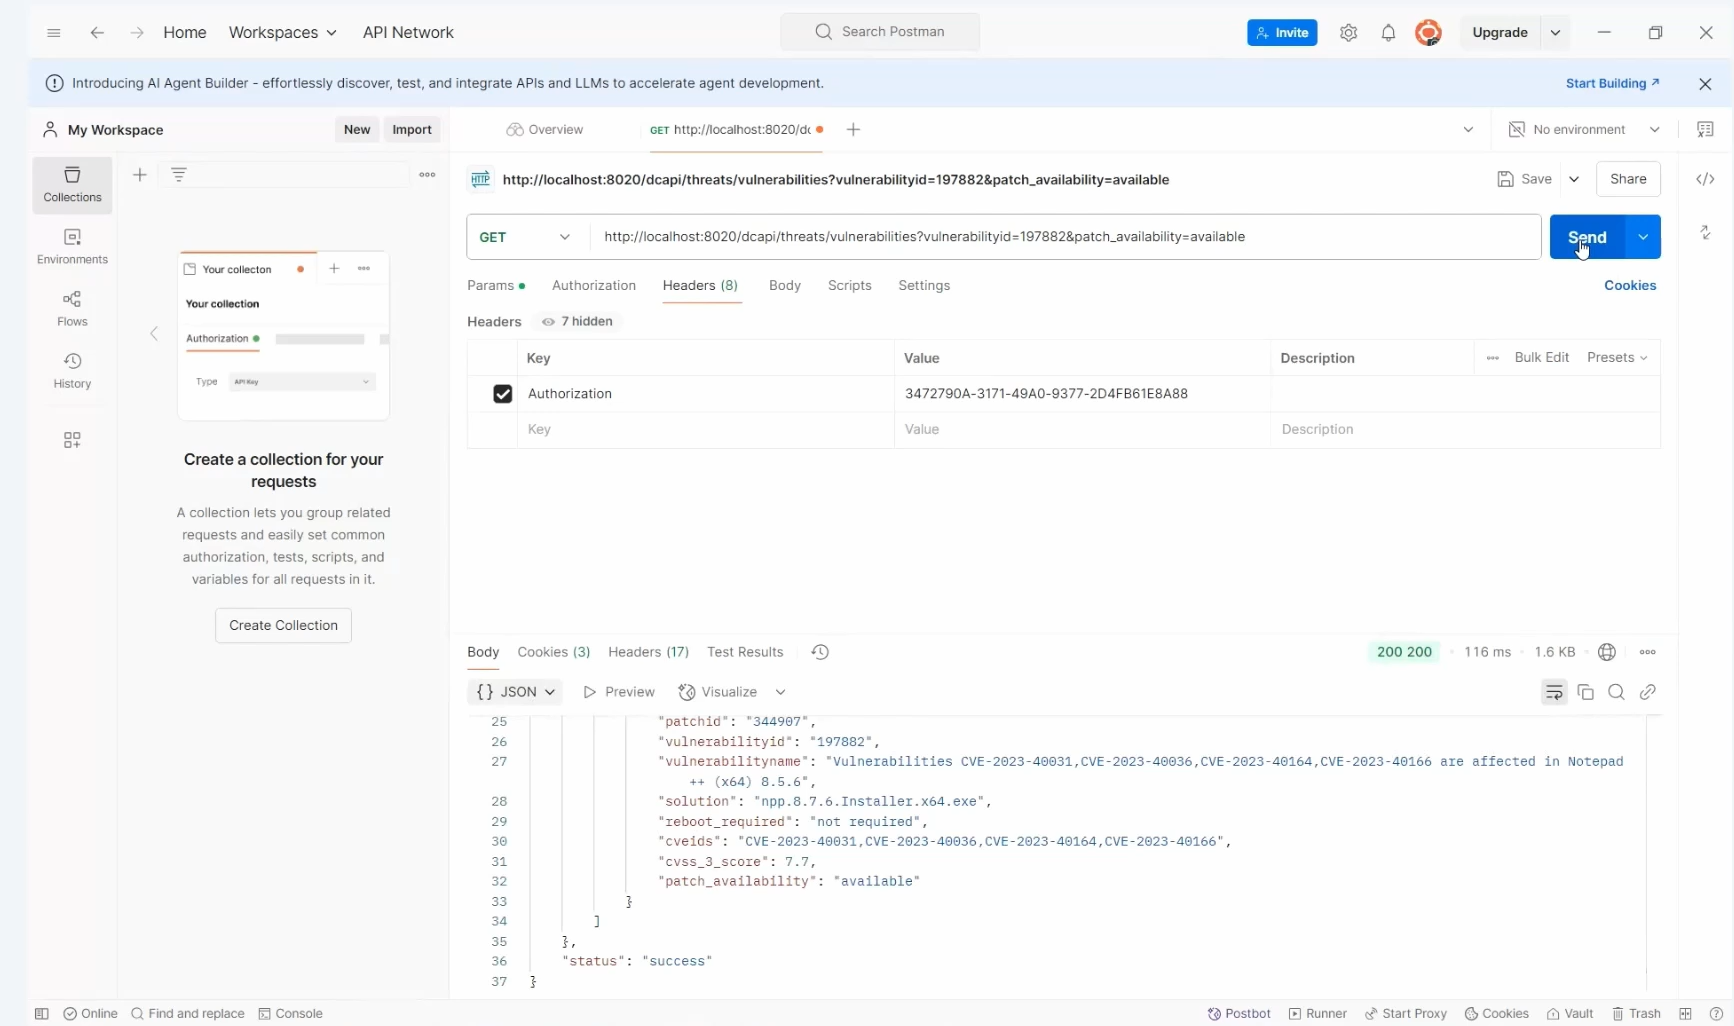
Filtering the generated response
To filter response data:
1. Identify the desired filter criteria such as vulnerability_id in this scenario.
2. Append "?" followed by the filter criteria in the URL, e.g., ?vulnerability_id=197882
3. Click on Send to view the filtered response.
4. To add multiple criteria:
- Use "&" to add another filter such as patch_availability, e.g., ?vulnerability_id=197882&patch_availability=available
Paginating the generated response
1. Use pageLimit to set the number of rows returned per request.
- For example, using pageLimit=5 in a dataset of 10 rows will display the first 5 rows.
2. Use the page parameter to view subsequent data sets, e.g., placing page=2 to access the remaining data.

Using these URLs you can navigate through the data.