Feature Pack Deployment
Note: This Feature Pack deployment is applicable to build 11.5.2627.01 and later. If you are using an earlier build, refer to this page.
Table of contents
Without a centralized feature pack deployment, OS upgrades become difficult to standardize and control. You may often face issues like upgrade failures due to missing prerequisites, compatibility conflicts with applications, unexpected reboots, user disruption during manual updates, language or regional mismatches, and challenges in managing and distributing the correct ISO files across endpoints.
There is also no easy way to enforce an N-1 strategy (keeping systems on the previous stable version), which is important to avoid early adoption risks. Without this control, some devices may upgrade too early while others lag behind, leading to version fragmentation.
Feature Pack deployment in Endpoint Central allows you to centrally manage and upgrade Windows OS versions (like Windows 10/11 feature updates) across endpoints. From the Feature Pack view, you can directly identify available upgrades, track missing and installed systems, and monitor download status and prerequisites. You can first ensure the OS binaries are downloaded, verify prerequisites, and then deploy the feature pack to selected systems. The dashboard provides visibility into deployment status (missing, installed, declined), helping you plan staged rollouts and ensure systems are upgraded before reaching end-of-life.
You can manage feature pack approvals by configuring manual approval, automatic approval, or approval after testing in a pilot group of computers. This also allows you to validate and deploy either the latest (N) feature pack or follow an N-1 approach by deploying the previous stable version based on your organization’s upgrade strategy.
You can automate feature pack deployment by configuring an Automate Patch Deployment (APD) task, enabling scheduled rollouts, and enforcing an N-1 strategy to ensure systems remain on a stable and supported version. This reduces manual effort, maintains version consistency, and enables controlled, phased upgrades across the environment.
Manage and Deploying OS Feature Packs
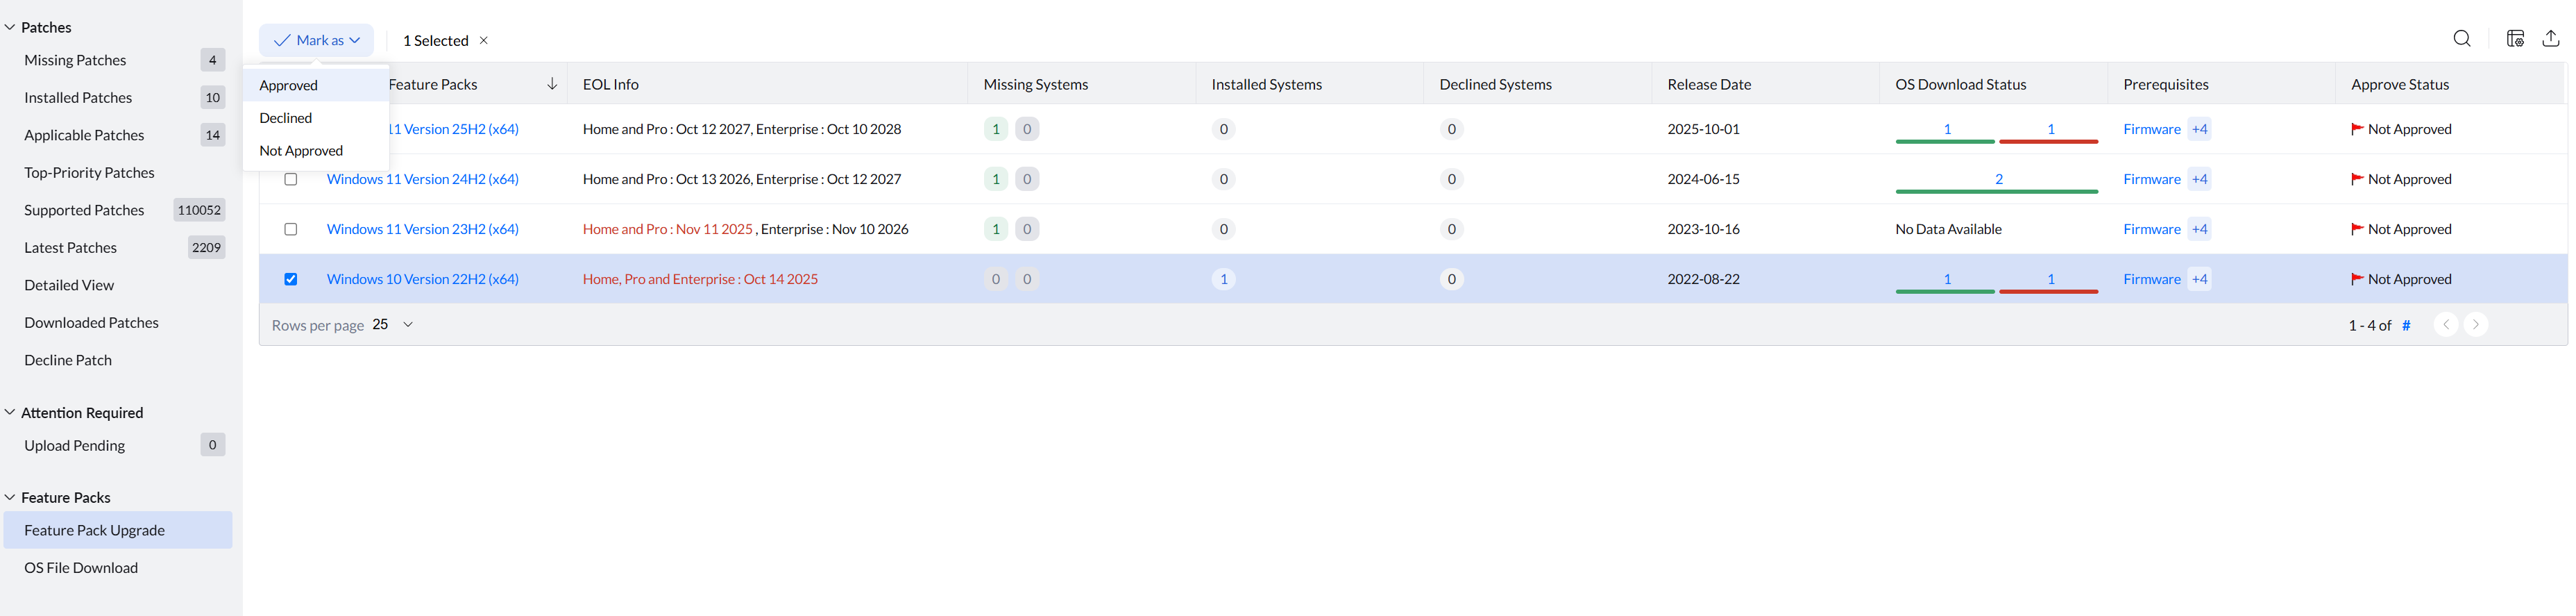
Go to Theats & Patches -> Patches -> Feature Packs -> Feature Pack Upgrade (or) Patch Mgmt -> Patches -> Feature Packs -> Feature Pack Upgrade. In this view, you can manage, track, and control the deployment of OS feature pack upgrades across Windows endpoints, and select any feature pack to mark it as Approved, Declined, or Not Approved. This view also provides key details to help you evaluate and plan deployments effectively:
Note: Previously, these feature packs were displayed under other patch views such as Missing Patches, Supported Patches, or Latest Patches views. They are now consolidated and available only within this dedicated Feature Packs view for better visibility and control.
- Available Feature Packs: Lists OS versions such as Windows 10 Version 22H2 (x64) and Windows 11 versions that are available for deployment.
- End of Life: Shows the support expiry date for each feature pack to help plan upgrades.
- Missing Systems: Indicates the number of systems where the feature pack is yet to be installed.
- Installed Systems: Displays how many systems have already been upgraded.
- Declined Systems: Shows systems where the feature pack has been declined.
- Release Date: Provides the official release date of the feature pack.
- OS Download Status: Indicates whether the feature pack binaries are downloaded and ready for deployment.
- Prerequisites: Displays any required prerequisites that must be met before deployment.
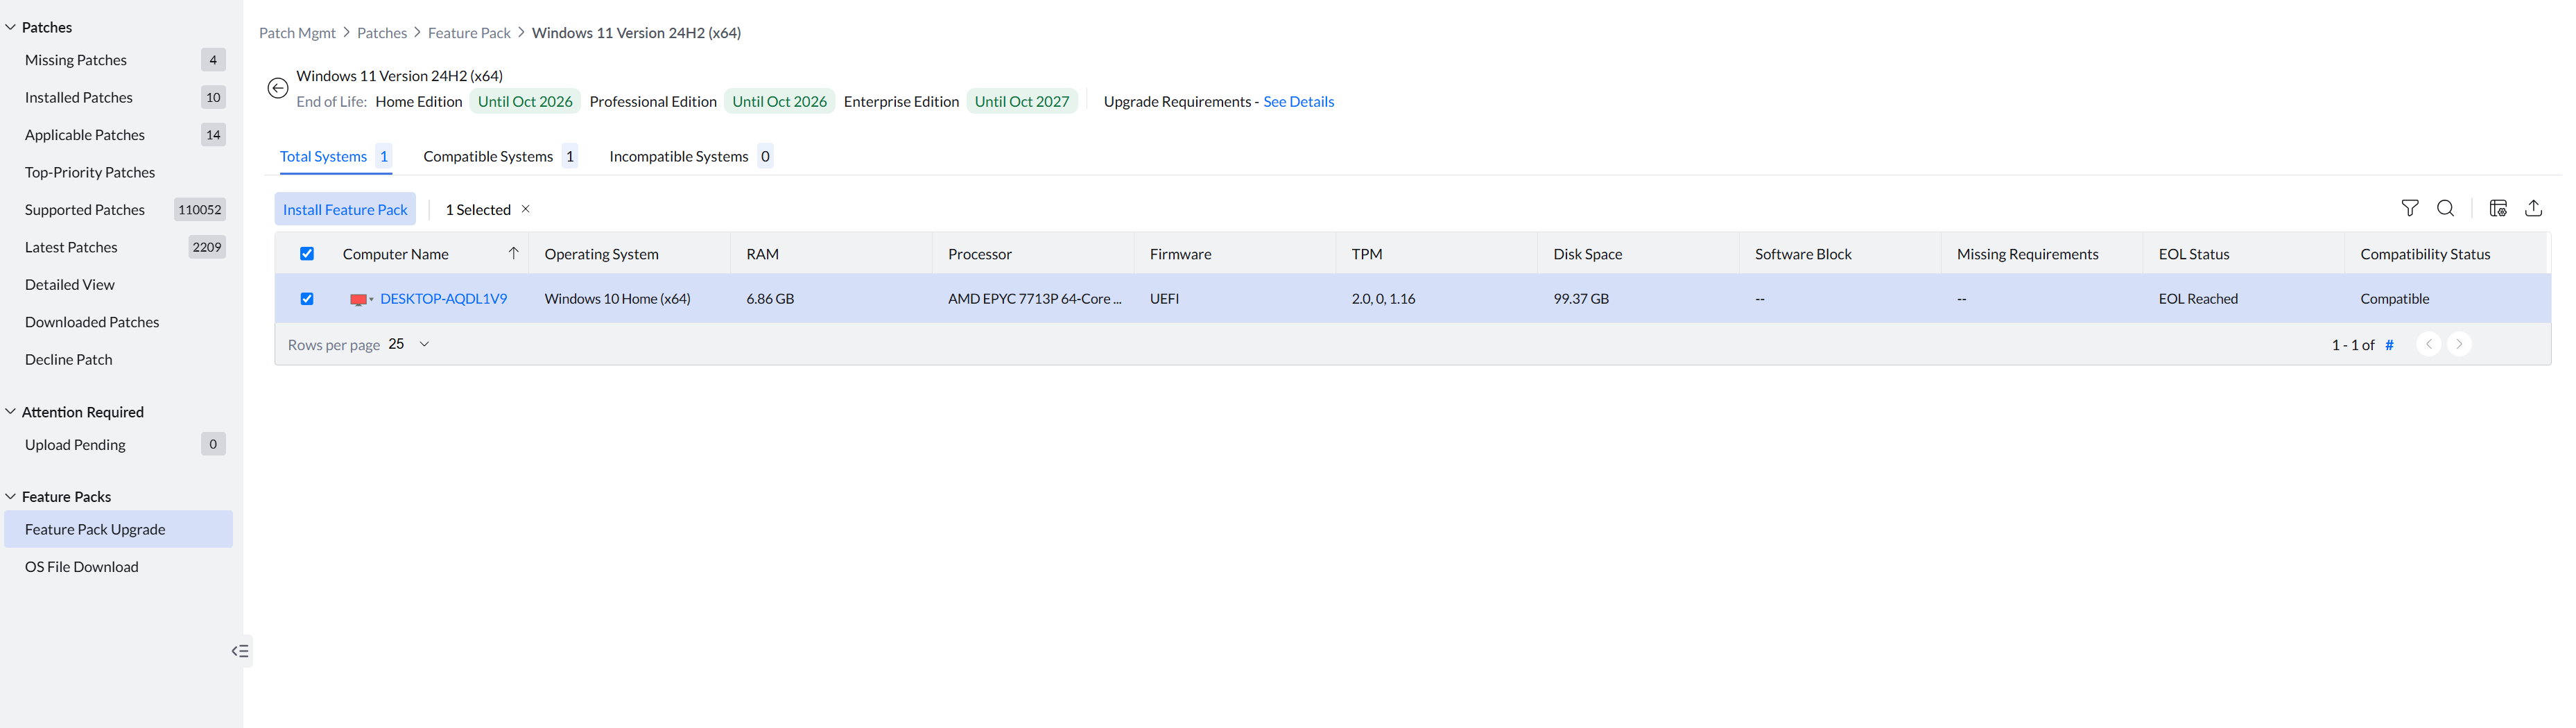
By clicking on any of the feature pack, you can view detailed information for that particular feature pack, such as:
- Total Systems: Displays the total number of systems evaluated for the selected feature pack.
- Compatible Systems: Indicates the number of systems that meet all upgrade requirements.
- Incompatible Systems: Shows systems that do not meet the required criteria.
Note: The Endpoint Central server downloads required OS binaries (ISO) from the vendor websites. If the ISO download failed, you need to manually download and upload the ISO file from the vendor website for that specific feature pack. If the ISO for that feature pack is not uploaded, a warning message will be displayed. Upgrade requirements details are also mentioned to help you prepare systems before deployment.
Under each of these system tabs, you can see details such as:
- Computer Name: Lists the target endpoints.
- Operating System: Displays the current OS version of each system.
- RAM: Shows memory details for compatibility validation.
- Processor: Displays CPU information required for upgrade eligibility.
- Firmware: Indicates firmware type such as UEFI.
- TPM: Shows TPM availability/status.
- Disk Space: Displays available disk space for upgrade readiness.
- Software Block: Indicates if any application is blocking the upgrade.
- Missing Requirements: Highlights unmet prerequisites.
- Compatibility Status: Provides overall readiness status for each system.
You can select the required systems and click Install Feature Pack to initiate the deployment using a manual deployment task. Before proceeding, ensure that the systems you select accurately match your deployment requirement, as these selected targets will be carried forward for deployment. For broader rollouts, you can select all applicable systems from this view, whereas for controlled or specific deployments, you can choose specific systems accordingly.
Managing OS Files Downloads
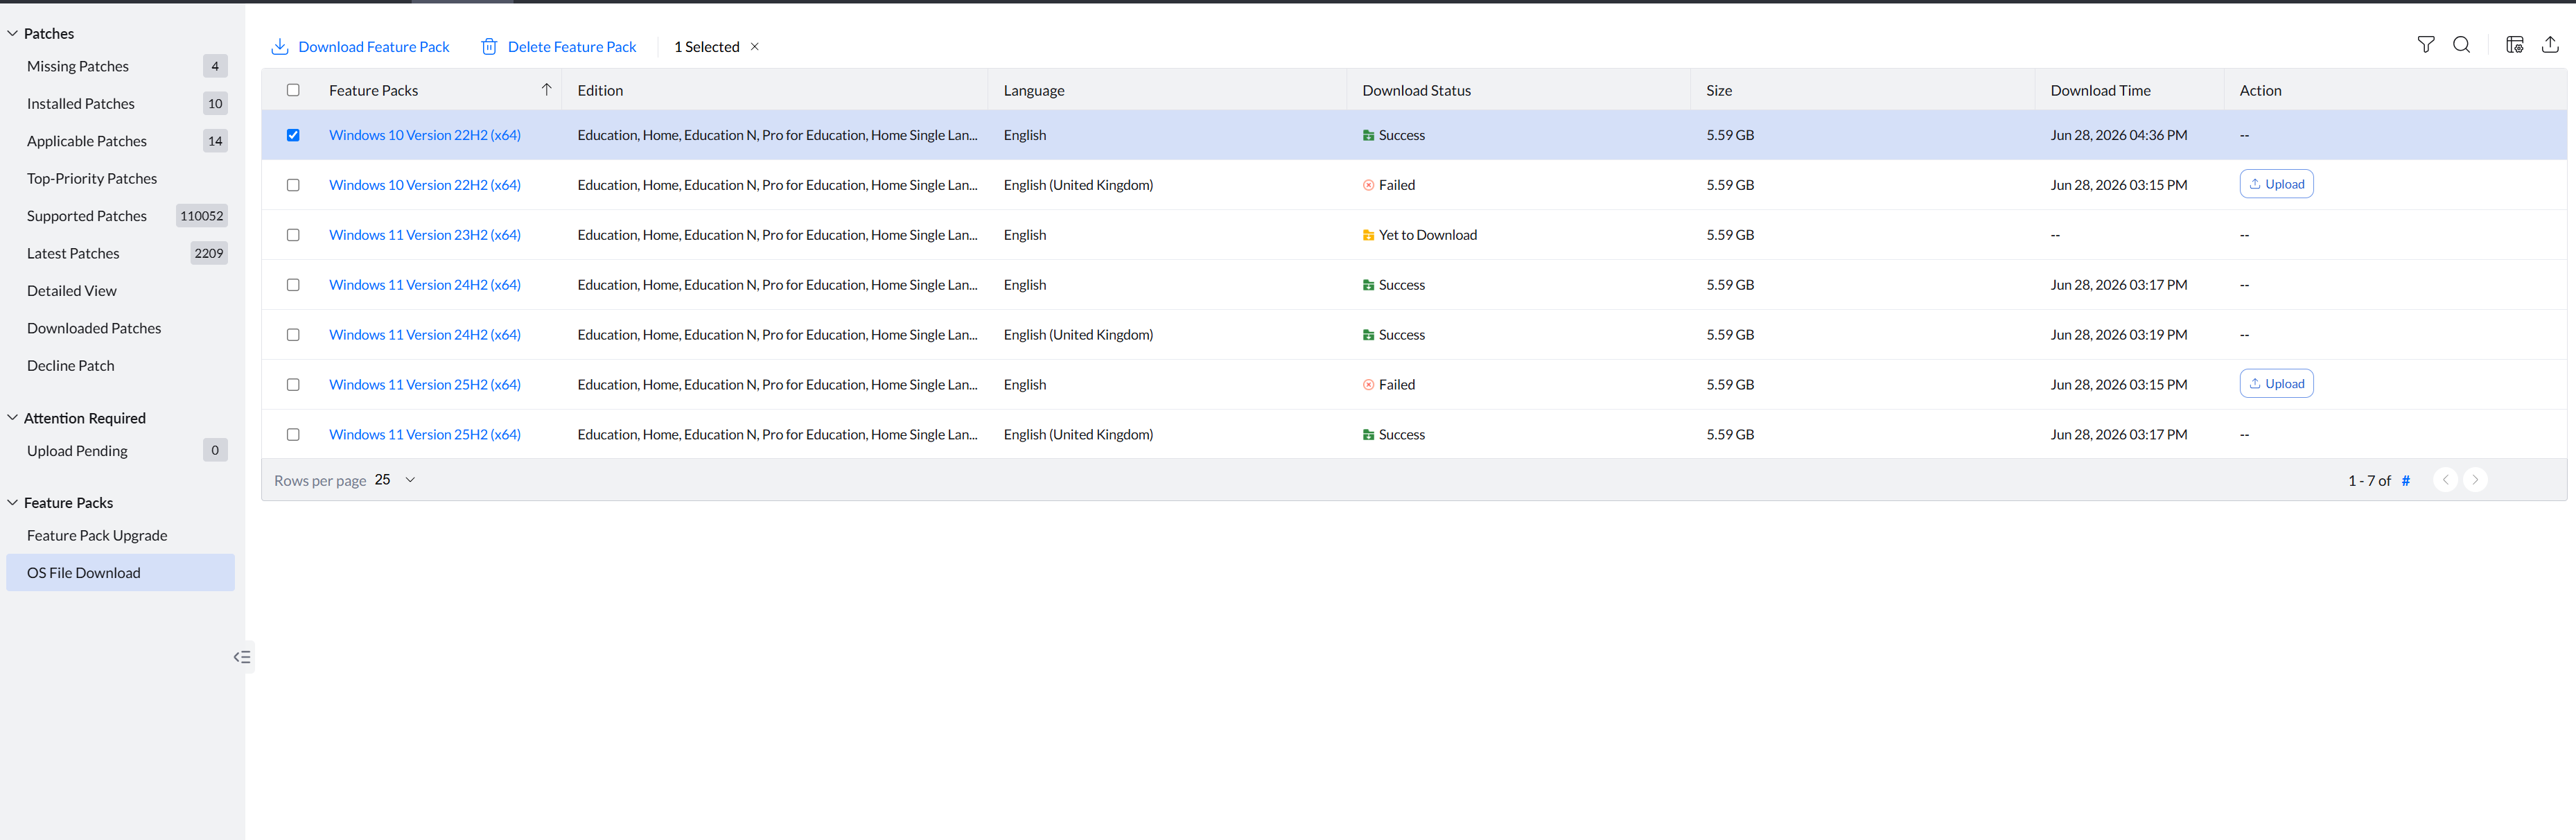
Go to Patches → Feature Pack → OS File DownloadThis page displays all OS files that are either downloaded from the server or uploaded manually, helping you ensure that the required binaries are available before initiating upgrades. OS files displayed are based on applicability. By default, the view is filtered to show only Applicable OS files, ensuring that you see only the required binaries for your environment. You can also upload OS files if the server fails to download the required file.
- Feature Packs: Displays the OS version (e.g., Windows 10 version 22H2, Windows 11 version 23H2).
- Edition: Specifies the OS edition such as Professional, Home, or Enterprise.
- Architecture: Indicates whether the system is 64-bit or 32-bit.
- Language: Lists the available languages configured in your organization.
- Download Status: Shows the current state of the OS file such as Downloaded (file successfully downloaded by the server), Uploaded (file manually uploaded), Yet to download or upload (file not available), or Failed (download or upload unsuccessful).
- Remarks: Provides additional details including success messages or error information.
- Action: Includes the Upload option to manually upload ISO files. This option is disabled when the file is already downloaded by the server from the vendor or uploaded manually and becomes enabled again after deletion.
- Approval Status: Indicates whether the Feature Pack associated with the OS file is approved for deployment.
You can refine the view using filters such as All and Applicable OS, allowing you to control whether all OS files or only applicable ones are displayed. You can also filter based on the Operating System to view specific OS versions and use the Feature Pack Version filter to narrow down results by Service Pack (SP) versions. By default, the page displays All OS and All Service Packs.
Note: If Endpoint Central server fails to download the OS files automatically, you must upload the ISO files manually for each combination of Feature Pack, Edition, Architecture, and Language. Ensure that the correct ISO file is used, as uploading an incorrect file can lead to deployment failures. This page helps you verify that all required OS binaries are available before initiating Feature Pack deployment.
You can upload the required OS file manually using the Upload option when automatic download fails or is not preferred. The Delete option can be used to remove incorrectly uploaded or unnecessary ISO files, and once a file is deleted, the Upload option becomes available again for that entry.
By default, OS files are automatically removed when the associated Feature Pack version reaches End of Life (EOL), when the Service Pack version is no longer required, or when the corresponding Language, Architecture, or Edition is removed from the configuration. You can also manually delete OS files only if an incorrect ISO was uploaded or if the file is no longer required.
Feature Pack Approval Settings
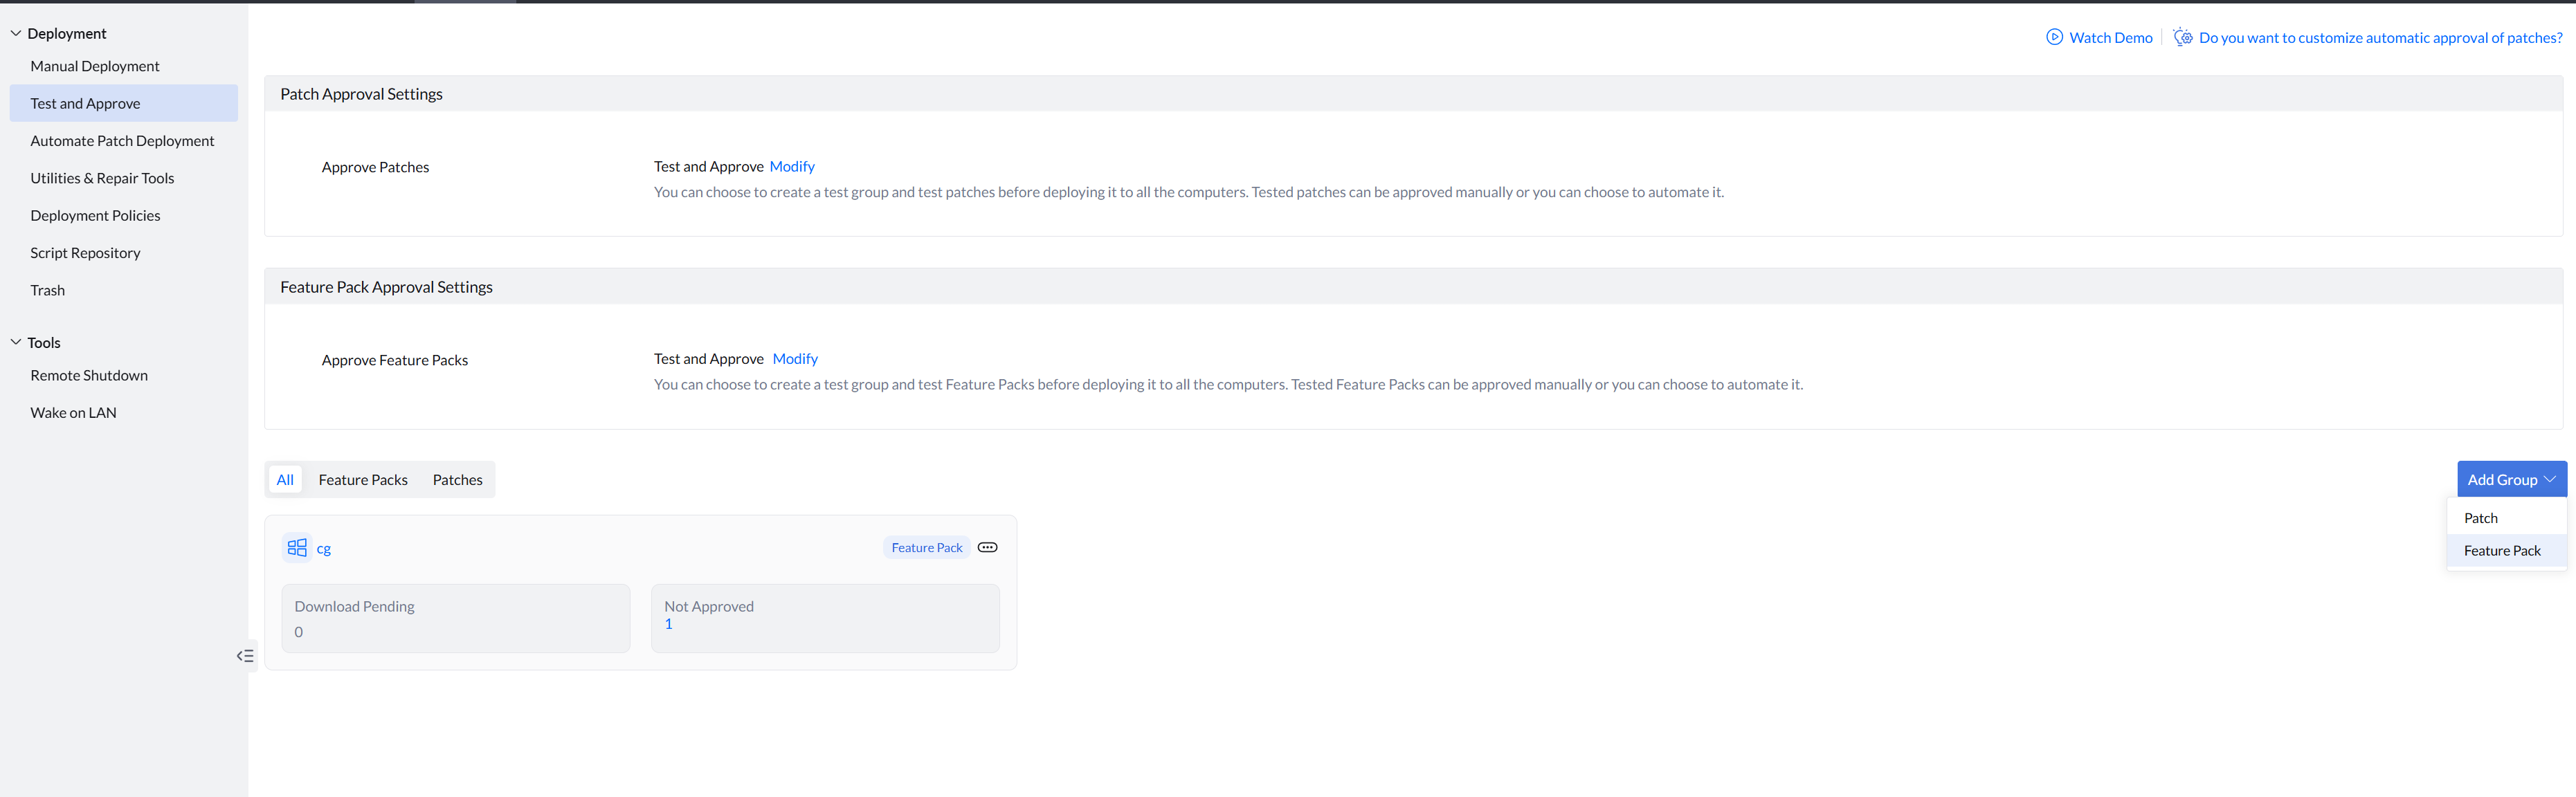
To configure feature pack approval settings, go to Deployment -> Test and Approve. Under Feature Pack Approval Settings, by default, the Approve Feature Patches feature will be configured as Automatically without testing. This means whenever a new feature pack gets released, it will get approved automatically if it passes the evaluation performed by ManageEngine Security Research Team. Those feature packs' approval status will automatically be listed as Approved . This is useful if your enterprise has less critical machines and you want to automatically deploy all the released feature packs immediately.
If you wish to re-evaluate the compatibility or integrity of the feature packs, click on Modify and change it to Test and Approve. Once you select this, you need to configure for retaining approval status under the section For the Existing Feature Packs. Select Retain Approval Status if you prefer to keep the current approval status of the existing feature packs. The newly released feature packs will be marked as Not Approved; which can be tested and later approved.
If you wish to move existing patches to Not Approved status and test for its authenticity again, select Mark Patch as Not Approved.
After configuring these settings, click on Save.
If you have selected Test and Approve as the approval mode, create a test group of pilot computers to test the deployment before rolling it out to all endpoints. To create a test group, click on Add Group and select Feature Pack.
Now under Test Group Settings page, under Group Name, select the Target Group of pilot computers where you want to test the feature pack. If you want to know how to create custom groups, refer to this page.
In Deployment Option section, choose to deploy Latest (N) or N-1 feature pack in the test group under Upgrade Computer Version. You can also review and verify the OS Version, Scheduled Version, and Approval Status for the selected computer version upgrade.
By enabling Deploy Feature Pack update only on Compatible machines, the upgrade is applied only to machines that meet all prerequisites, ensuring a smooth deployment. If not enabled, the feature pack is attempted on all targets, including incompatible machines, which can lead to deployment failures, unnecessary retries, increased network and system load, and potential disruption to end users. Hence, it is recommended to enable this option to ensure reliable and efficient deployments. If you wish to test how the deployment behaves on incompatible machines, you can deselect this option and perform the deployment on a pilot group.
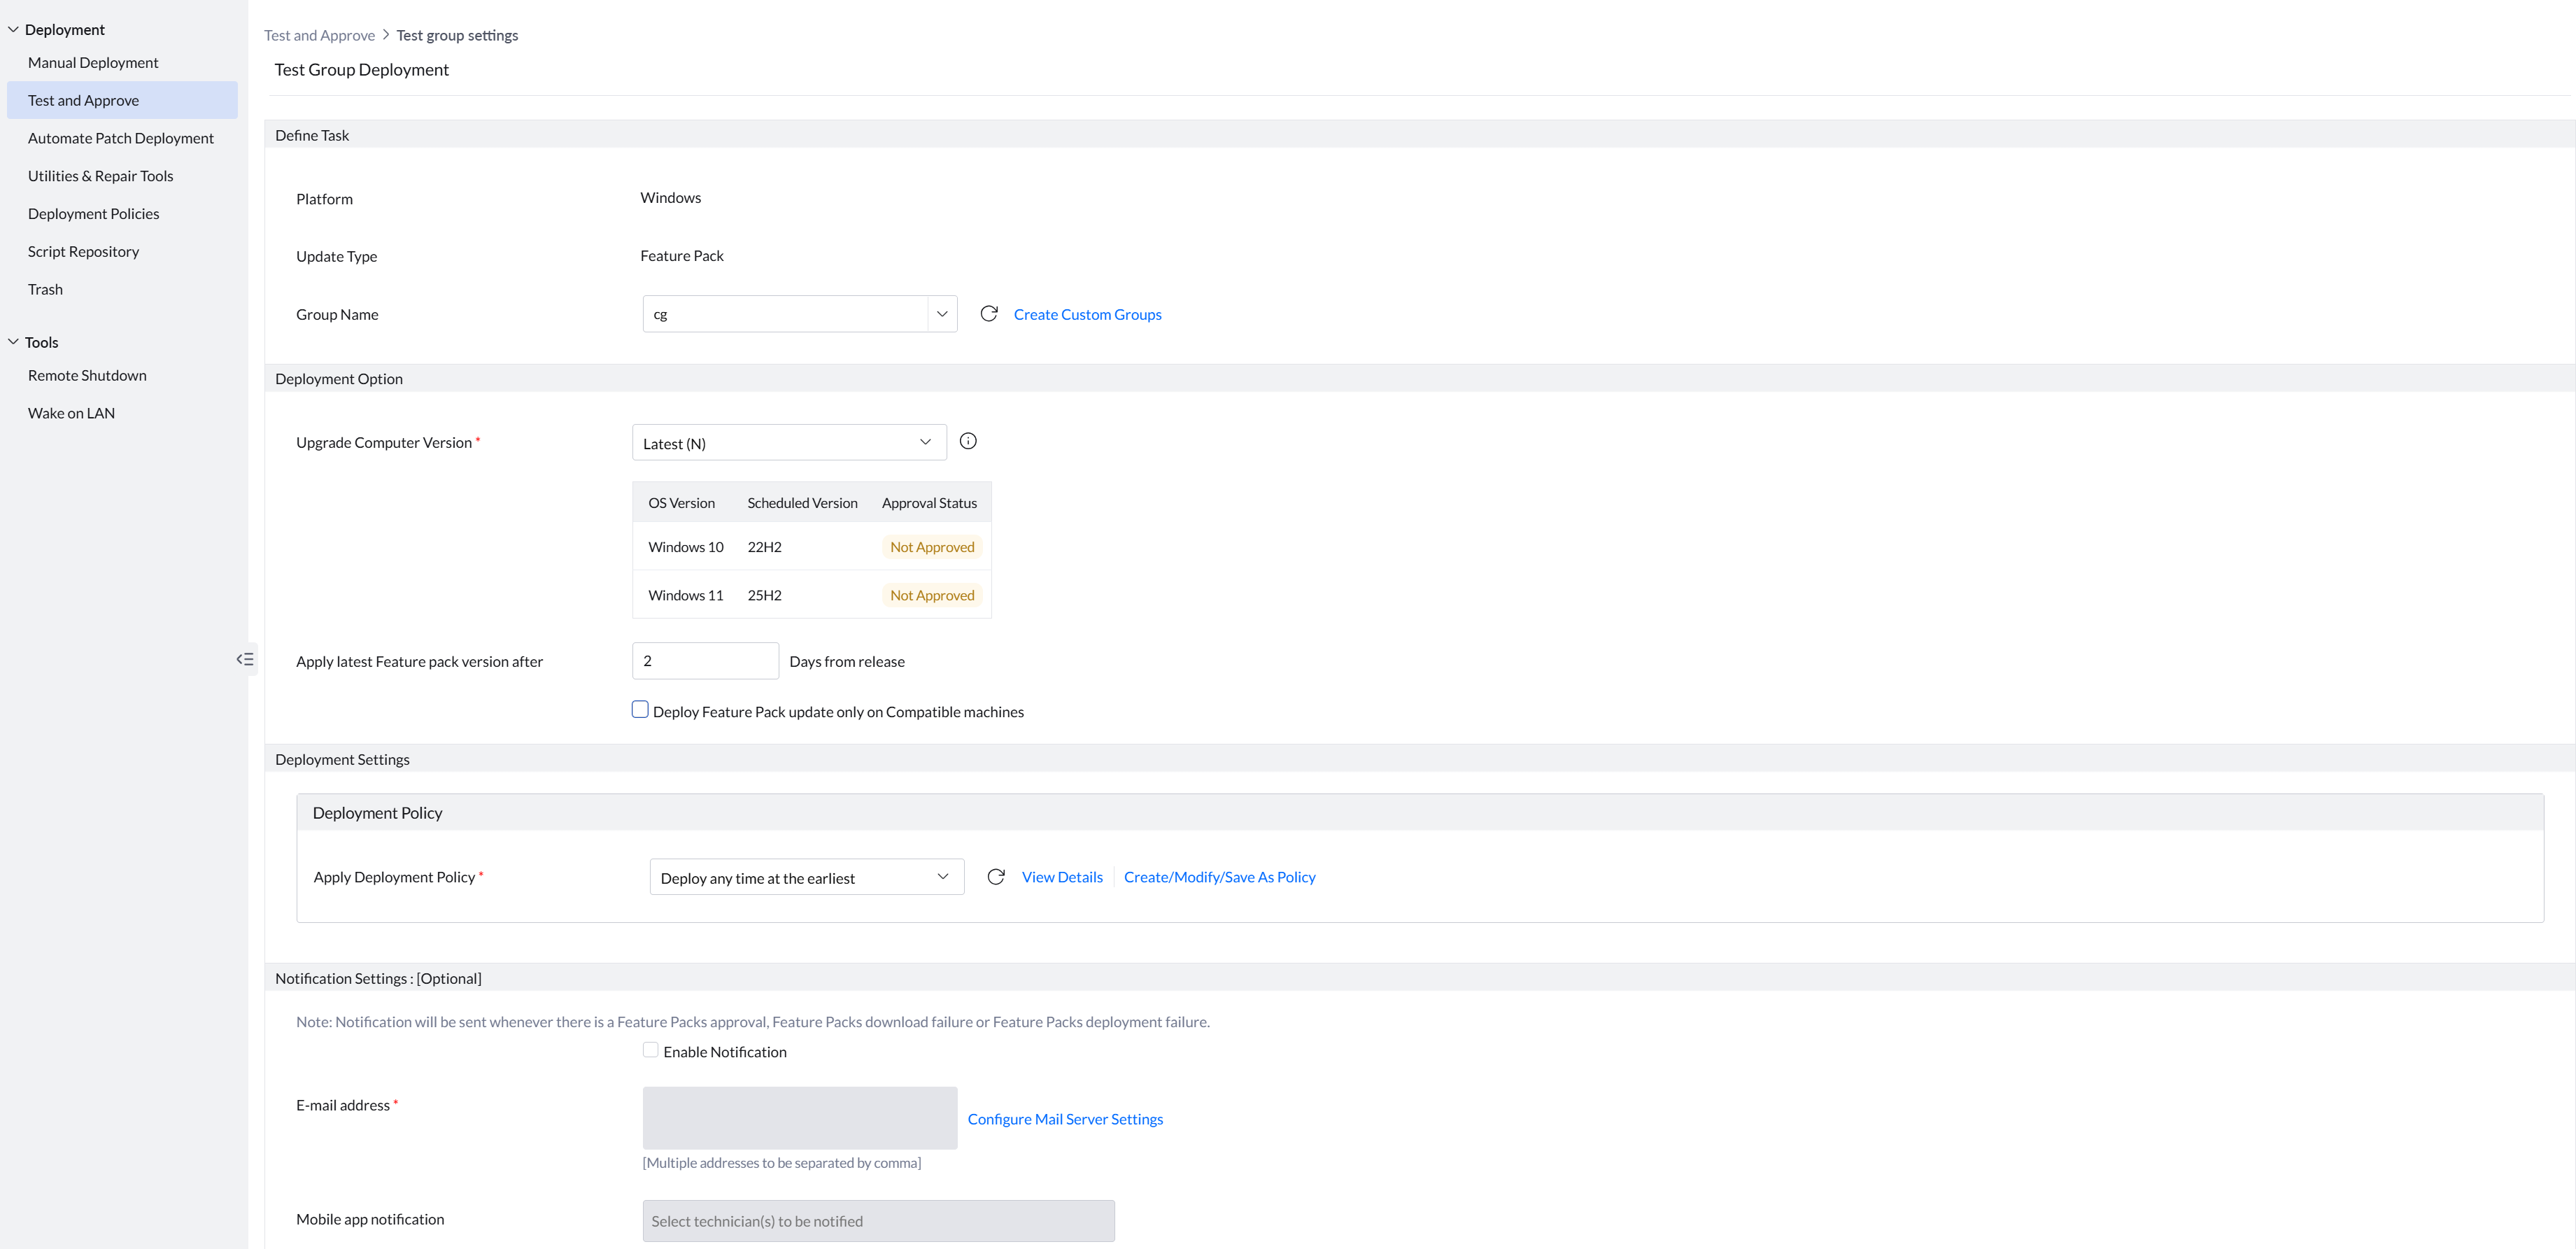
Once you have completed configuring Deployment Option, configure other test group settings such as Deployment Settings, Notification Settings and Approval mode in the same way when you are configuting a test group settings for testing a patch. To learn more about this, refer to this page.
Automated Feature Pack Deployment
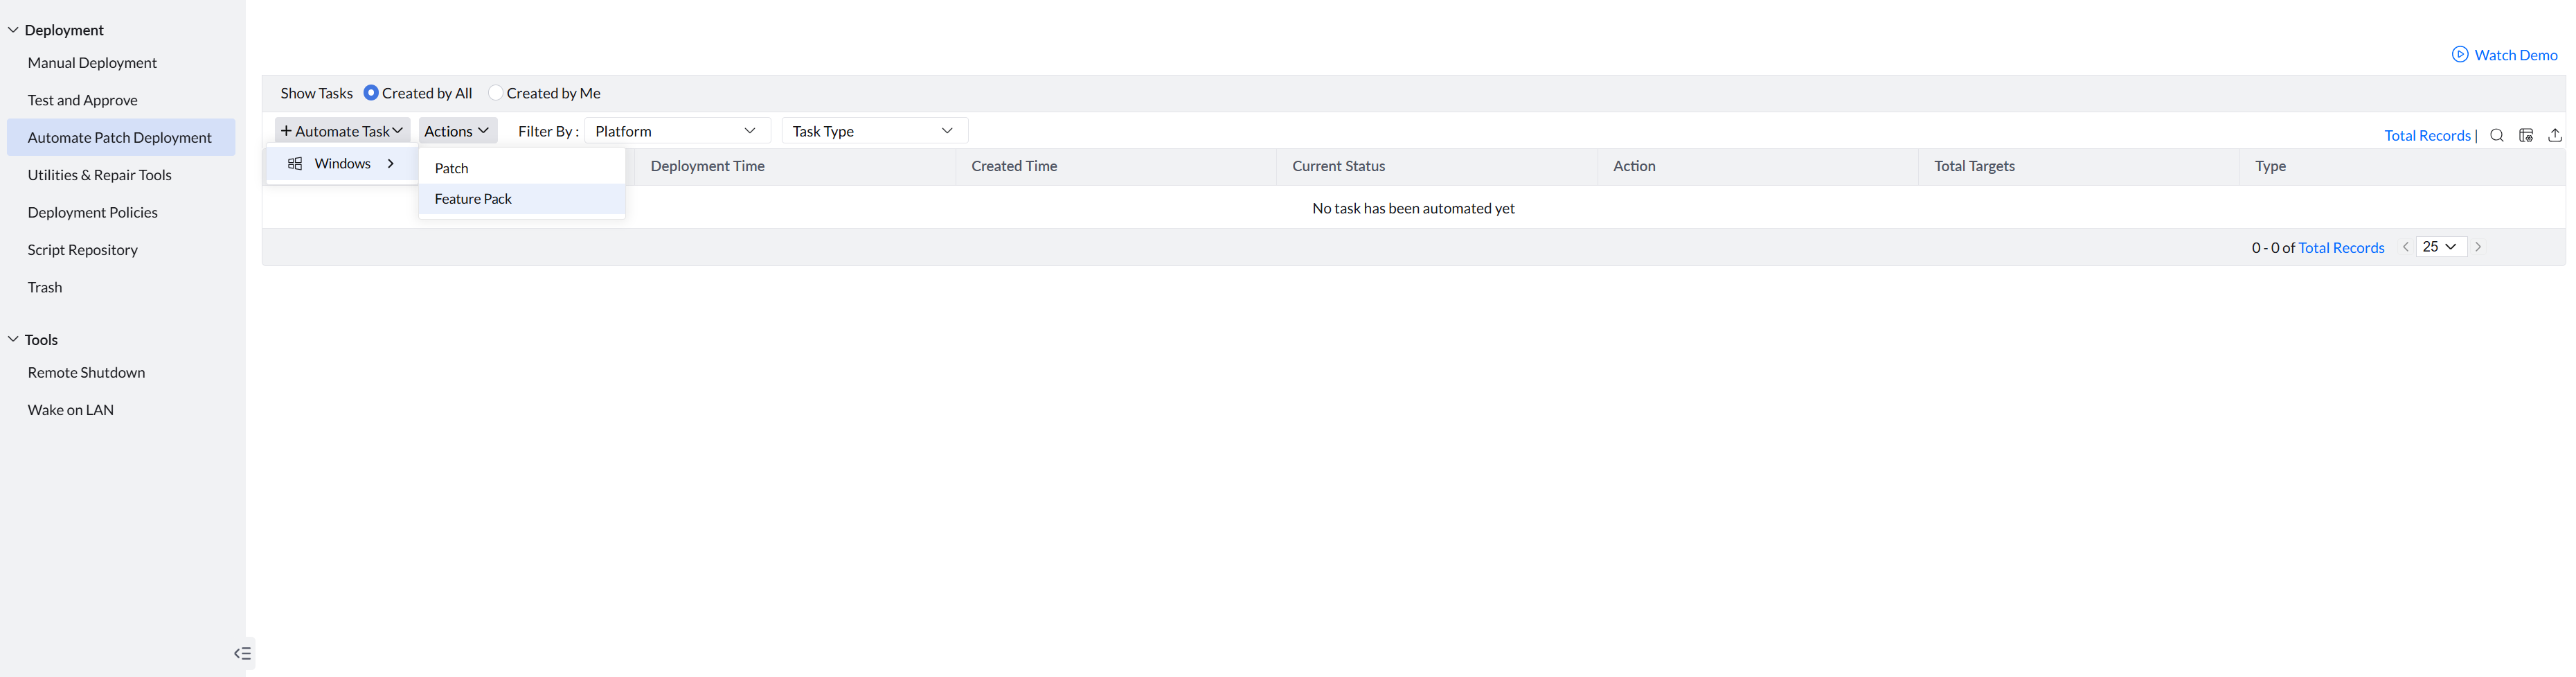
Navigate to Deployment -> Automate Patch Deployment and then click on Automate Task and choose Windows as Operating System and select Feature Pack option to automate Feature Pack Deployments.
Under Select Deployment Method tab, choose to whether to deploy the Latest (N) or N-1 feature pack under Upgrade Computer Version option. Only approved patches will get deployed using this task. You can also review and verify the OS Version, Scheduled Version, and Approval Status from this section before proceeding.
Choose the number of days after the release of a feature pack, after which you want to automatically deploy it, under Apply latest Feature pack version after option.
By enabling Deploy Feature Pack update only on Compatible machines, the upgrade is applied only to machines that meet all prerequisites, ensuring a smooth deployment. If not enabled, the feature pack is attempted on all targets, including incompatible machines, which can lead to deployment failures and unnecessary retries, leading to increased network and system load, and potential disruption to end users due to unsuccessful upgrade attempts. Hence, it is recommended to enable this option to ensure reliable and efficient deployments.
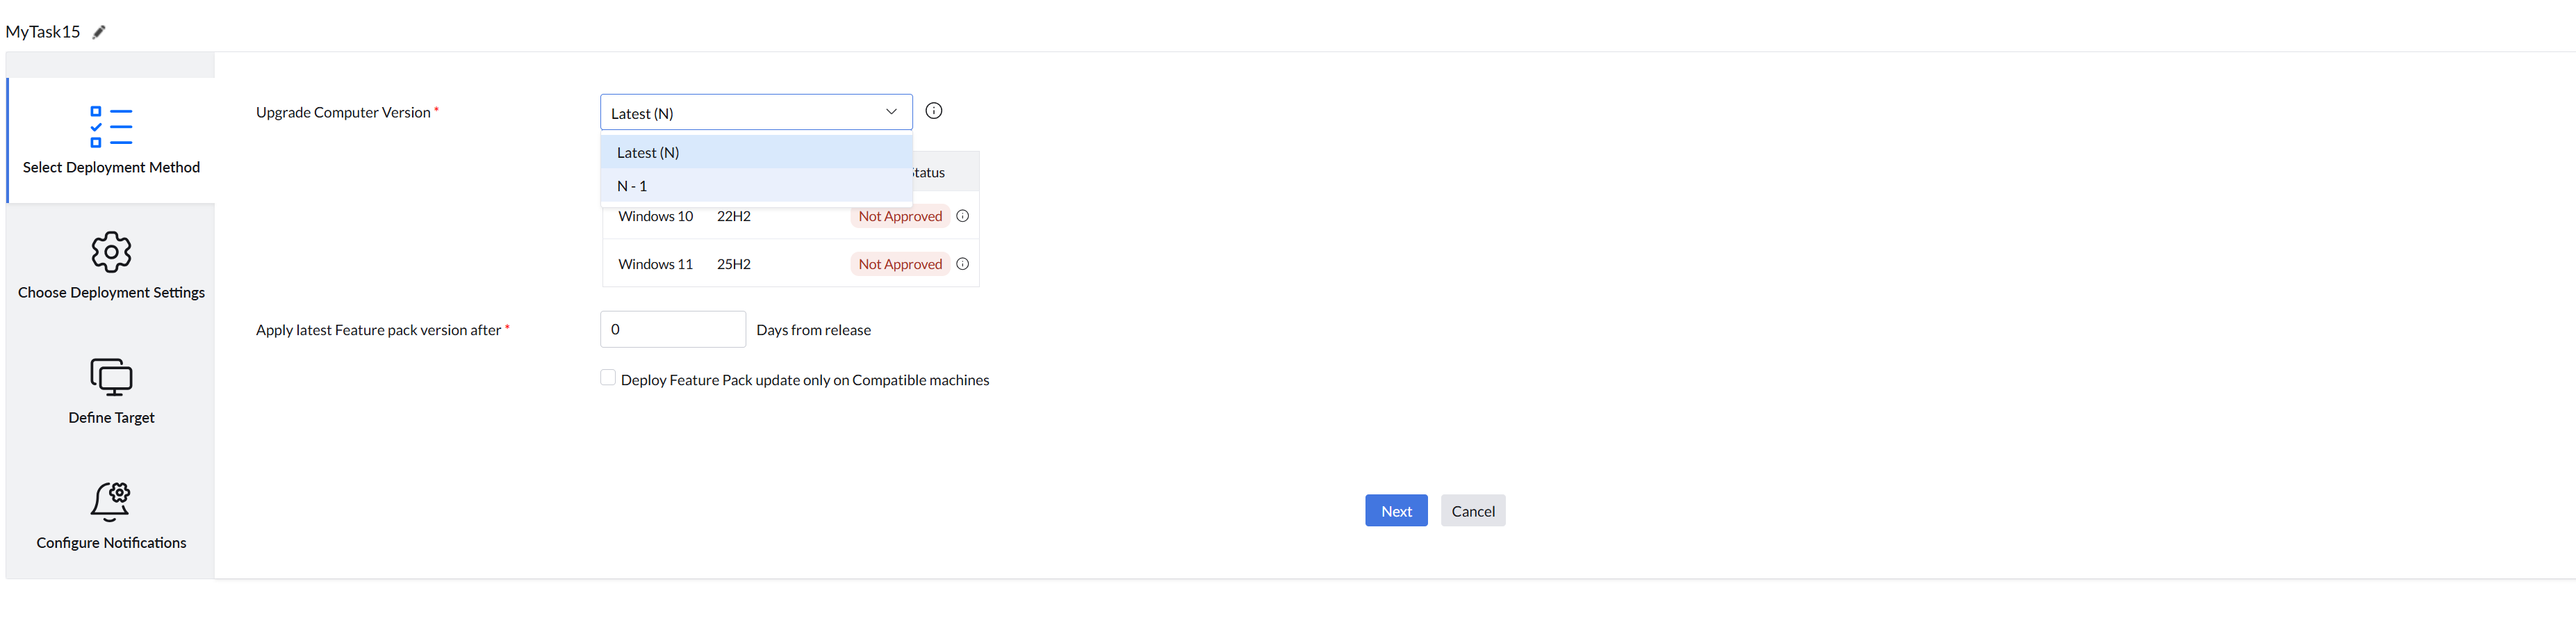
After you have configured the above settings, click on Next and configure other settings of the Automate Patch Deployment task by referring to this page.
Feature Pack Dashboard
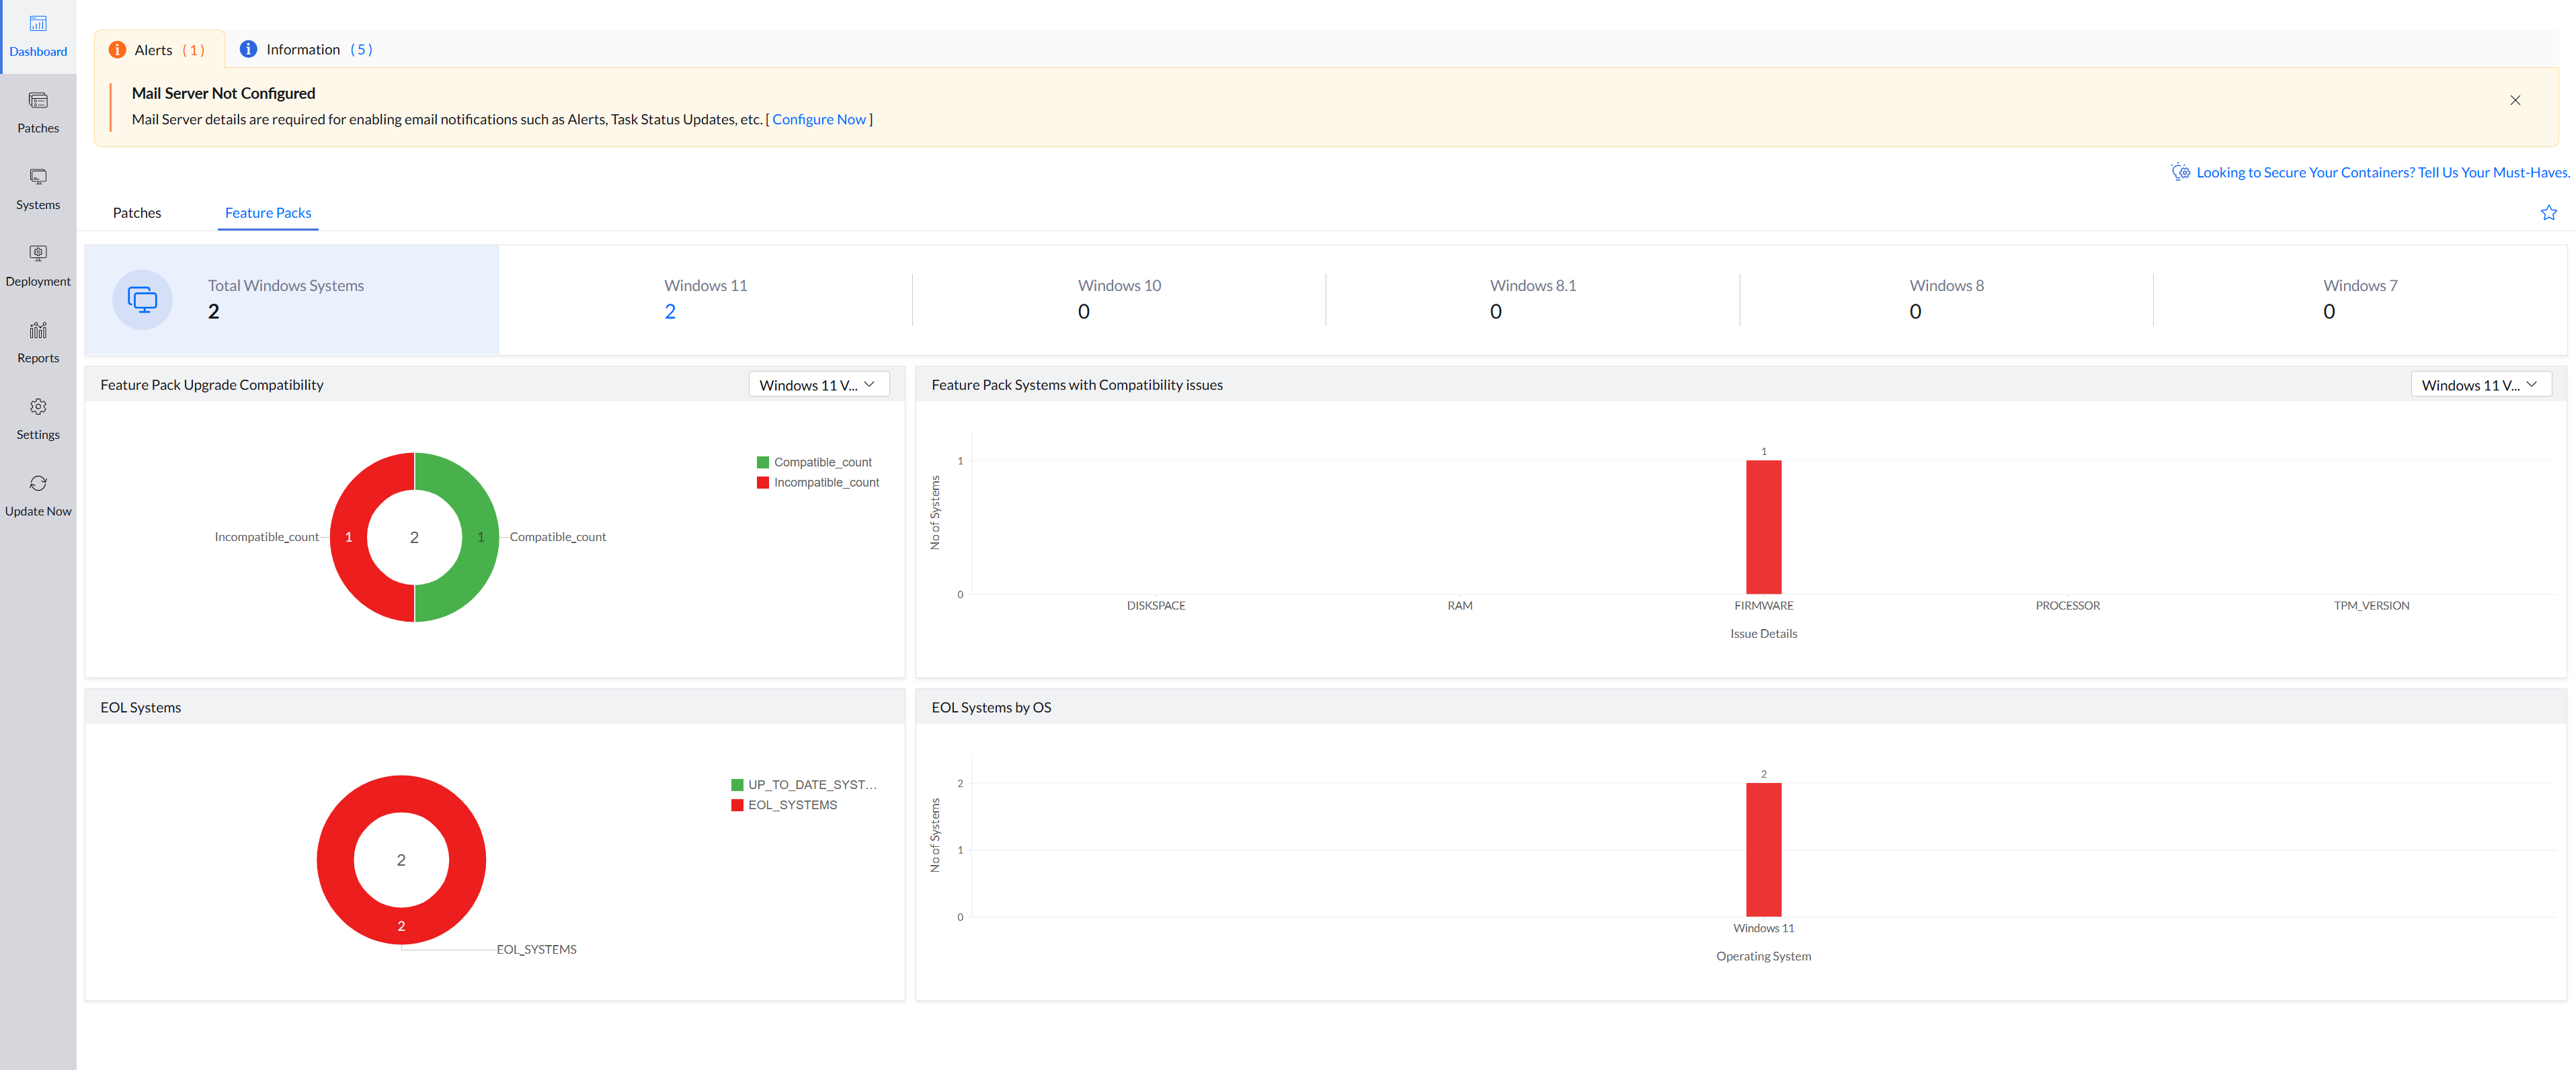
Go to Threats & Patches --> Dashboard --> Feature Packs (or) Patch Mgmt --> Dashboard --> Feature Packs. This feature pack dashboard provides a holistic view with all key information in one place such as:
- Total Windows Systems, which shows the total number of Windows endpoints managed, along with the count of endpoints running each operating system version (such as Windows 11, Windows 10, and Windows 8).
- Feature Pack Upgrade Compatibility, which provides an overall breakdown of compatible and incompatible systems among unupdated computers for upgrading to the latest supported Windows versions, and the specific version can be selected from the dropdown.
- Feature Pack Systems with Compatibility Issues, which highlights the count of systems facing compatibility issues that may prevent successful feature pack upgrades. Issues are categorized based on key requirements such as disk space, RAM, firmware, and processor. This helps identify specific upgrade blockers across endpoints, enabling you to take targeted remediation actions before initiating the upgrade.
- EOL Systems, which provides an overall count of Windows systems that has reached their End of Life
- EOL Systems by OS, which categorizes these EOL systems by operating system and shows the count for each EOL Windows version.
By clicking on any of the above-mentioned, you can access detailed information related to the respective data.
If you have any further questions, please refer to our Frequently Asked Questions section for more information.