Configuring High Availability(HA) and Disaster Recovery(DR) from the Build 11.5.2627.01
This guide explains how to configure High Availability (HA) and Disaster Recovery (DR) for Endpoint Central using the built-in setup wizard under Admin → High Availability. You'll deploy a Data Center (DC) and Disaster Recovery(DR) with one Active server and one or more standby servers so that Endpoint Central services remain available during hardware failures, network outages, or site-level disasters. To know more about High Availability and Disaster Recovery, click here.
Pre-requisites for High Availability Management
- High Availability License: To check whether you have a High Availability license, navigate to Profile > License > Additional Features in the Endpoint Central web console. If you do not have high availability license, contact sales at sales@manageengine.com.
- Remote Database: Check whether you have a remote MSSQL or PGSQL database by navigating to Admin > Database Settings > Database Migration in the Endpoint Central Console. It is mandatory to have a remote MSSQL or PGSQL database in the same domain as the active and standby servers.
- Remote Repositories: Ensure remote repositories are configured on a computer within the same domain, not on the active or standby servers.
- Static IP Address: Required for consistent network identification, ensuring all active and standby servers can reliably locate each other and maintain seamless communication during a switchover.
- Virtual IP address:Identify a free IP within the same subnet as the servers at that site.Verify it's unassigned by running commands such as ping(to confirm no response) or arp -a (to check the ARP table) from any machine on the same network. Kindly refer to configure Virtual IP
- Mail Server Configuration: Adding a Mail Server is to receive email alerts for server health and connectivity issues that impact high availability.
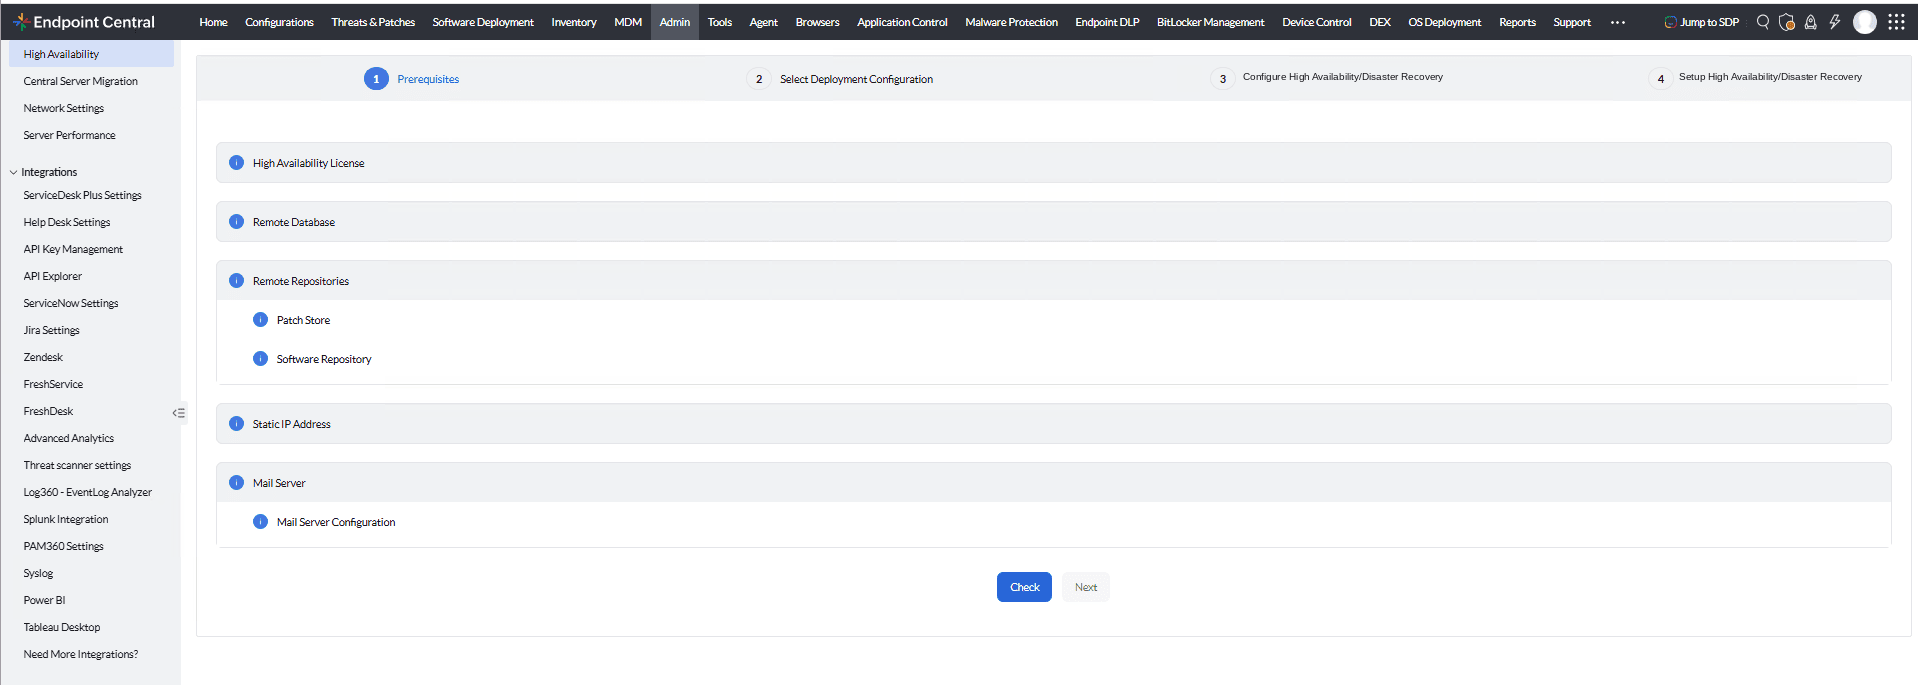
Select Deployment Configuration
Navigate to Setup Architecture > High Availability/Disaster Recovery. Before selecting a configuration, understand how each deployment places your machines and choose the one that best fits your infrastructure needs.
High Availability
High Availability — Both Active and Standby servers are deployed at the same site(same subnet).
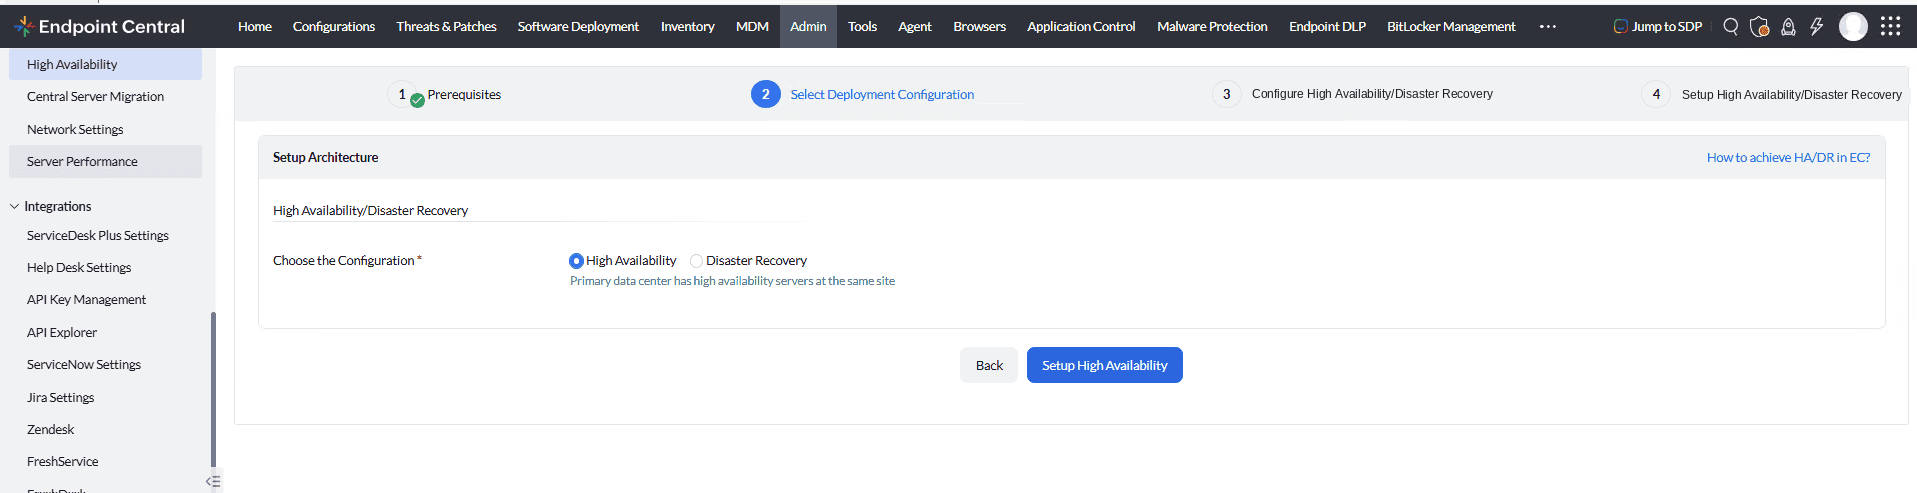
Disaster Recovery
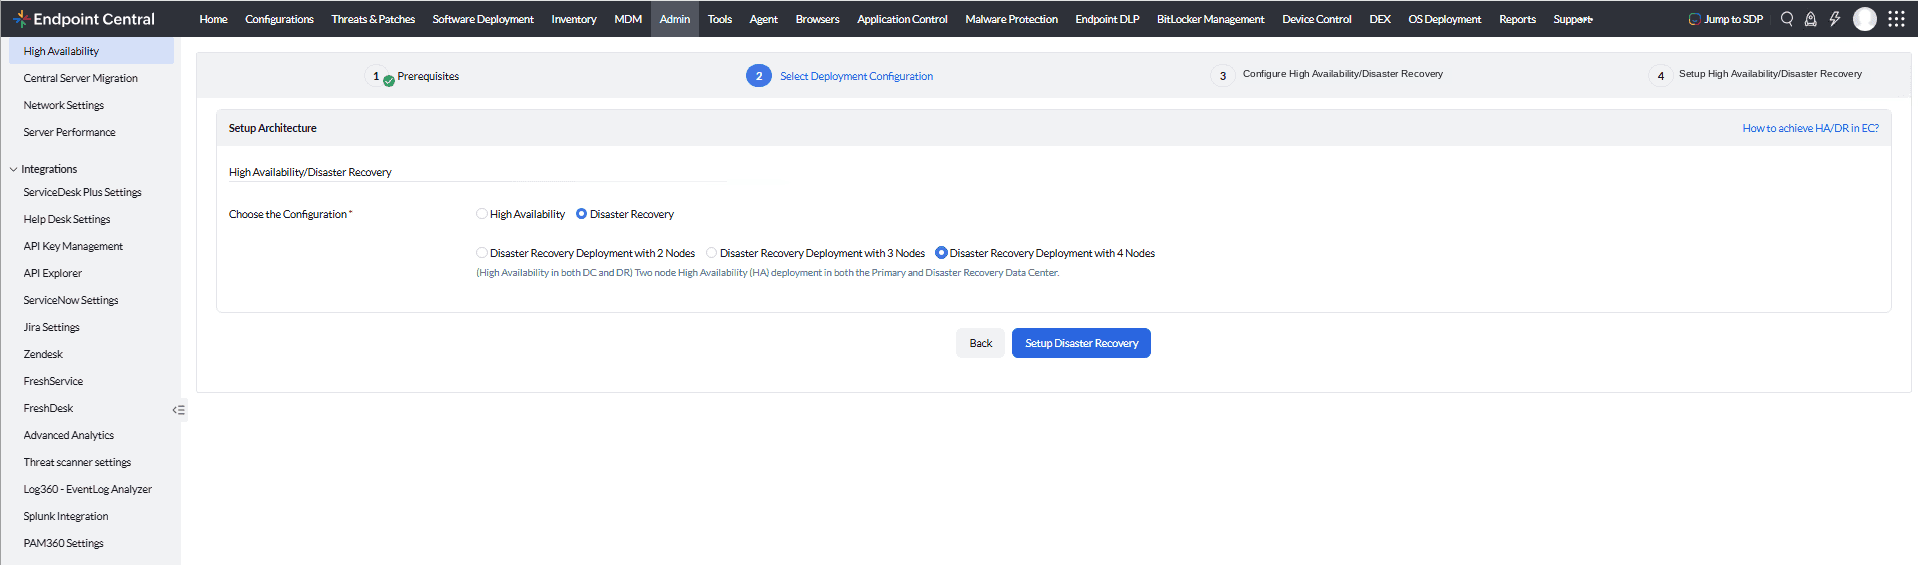
Disaster Recovery — Choose from the following deployment options based on your infrastructure needs:
- Disaster Recovery Deployment with 2 Nodes — One node at the Data Center site and one node at the Disaster Recovery site .
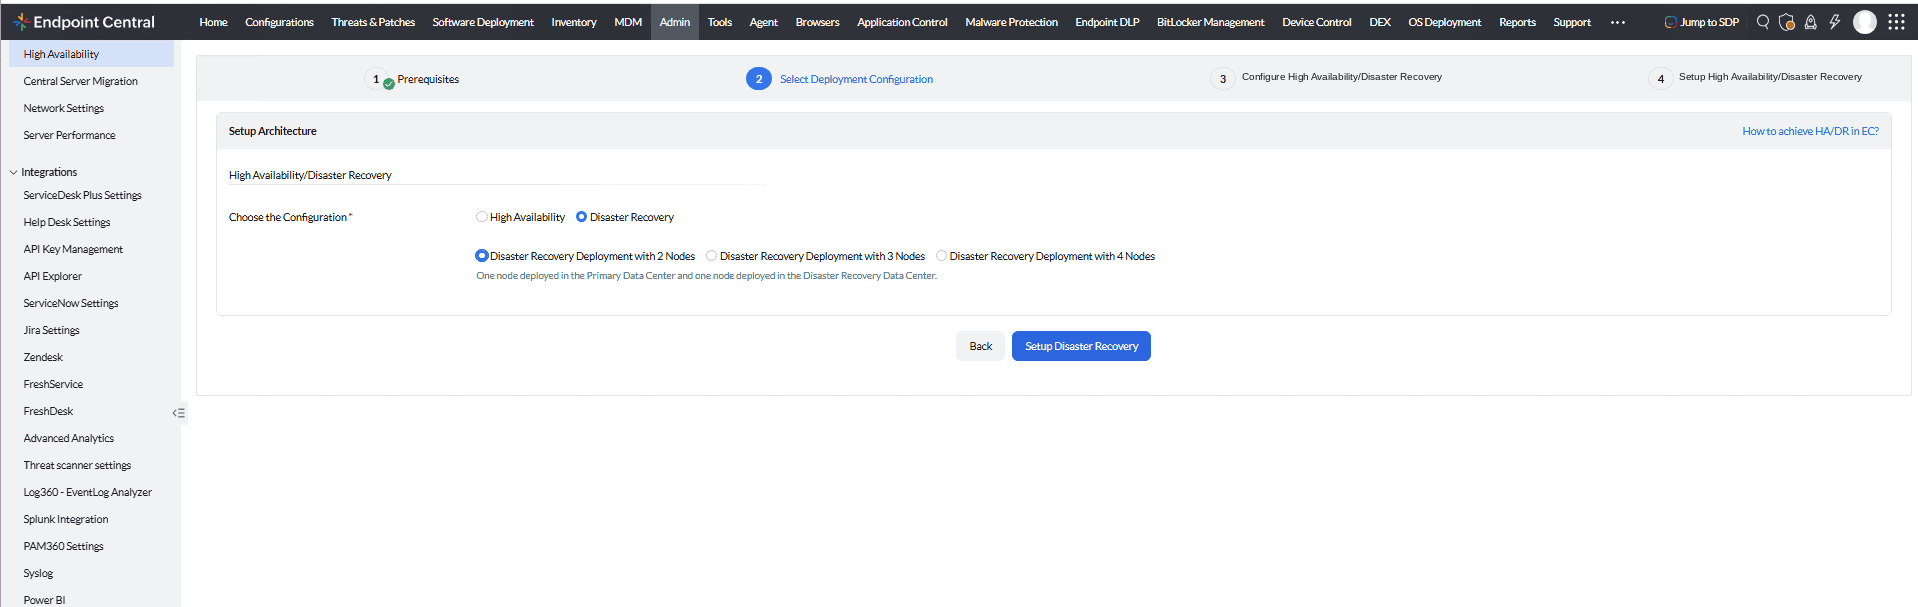
- Disaster Recovery Deployment with 3 Nodes — Two nodes in a High Availability setup at the Data Center site, plus one node at the Disaster Recovery site.
- Disaster Recovery Deployment with 4 Nodes — High Availability enabled at both the Data Center site and the Disaster Recovery site, with two nodes at each location.
Configure High Availability/Disaster Recovery
While configuring High Availability/Disaster Recovery, you will be prompted to enter server details. Refer to the section below to learn how to obtain the required details from the machines designated as High Availability and Disaster Recovery.
How to Obtain the IP (Internet Protocol) Address
Open Windows Command Prompt and run this command on the machine whose details you want to retrieve:
ipconfigNote the IPv4 Address listed under the active network adapter (e.g., Ethernet or Wi-Fi).
How to Obtain the Machine Name
Open Windows Command Prompt and run this command on the machine whose details you want to retrieve:
echo %USERDOMAIN%/%COMPUTERNAME%This returns the domain and computer name in the format DOMAIN/MACHINE-NAME (e.g., FOS/FW-SERVER-01).
Deployment Options
High Availability Deployment with 2 Nodes Same Site
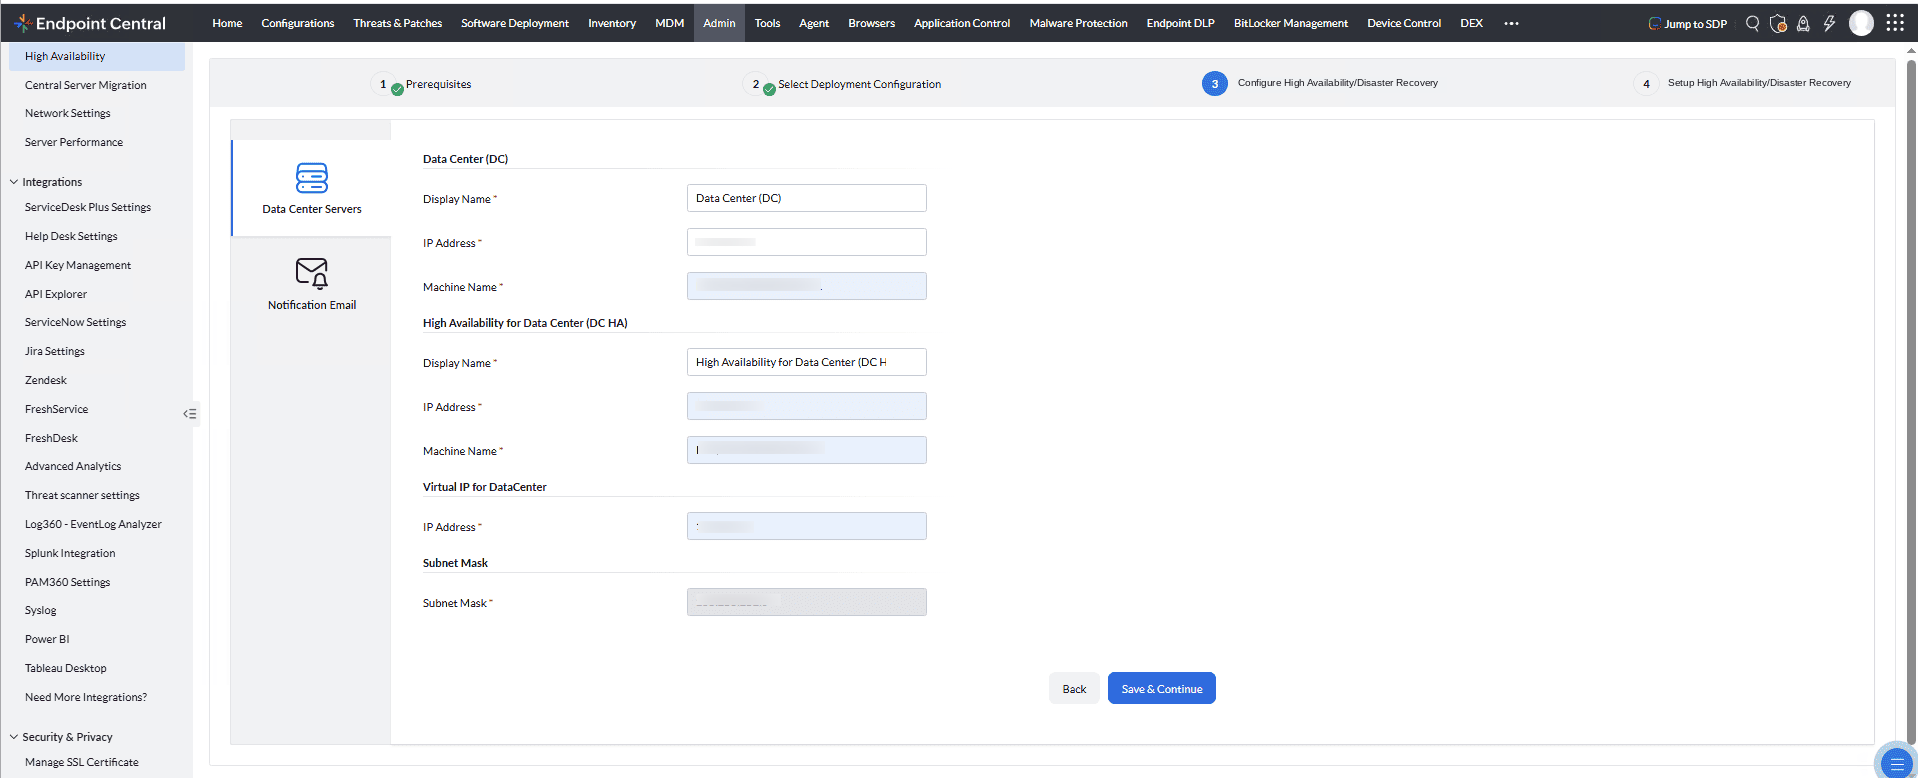
This option deploys both the Data Center server and the High Availability for Data Center server under the same site (same subnet). Provide the following details:
Step 1: Configure Data Center (DC) Servers
The Data Center (DC) server acts as the Active server. Its details will be pre-filled automatically.
High Availability for Data Center (DC HA) Server
The High Availability for Data Center server acts as the standby server at the same site. Enter the details of the standby server.
- Display Name: Enter a name for the High Availability server (e.g., High Availability for Data Center (DC HA)).
- IP Address: Enter the IP address of the High Availability server (e.g., 10.xx.xx.73).
- Machine Name: Enter the machine name of the High Availability server (e.g., FOS/FW-SERVER-02).
Virtual IP for DataCenter
- IP Address: Enter the Virtual IP address shared between the Data Center server and High Availability server(e.g., 10.xx.xx.8).
Subnet Mask
- Subnet Mask: Enter the subnet mask applicable to both servers(e.g., 255.xxx.252.0).
Once all details are filled in, click Save & Continue to proceed.
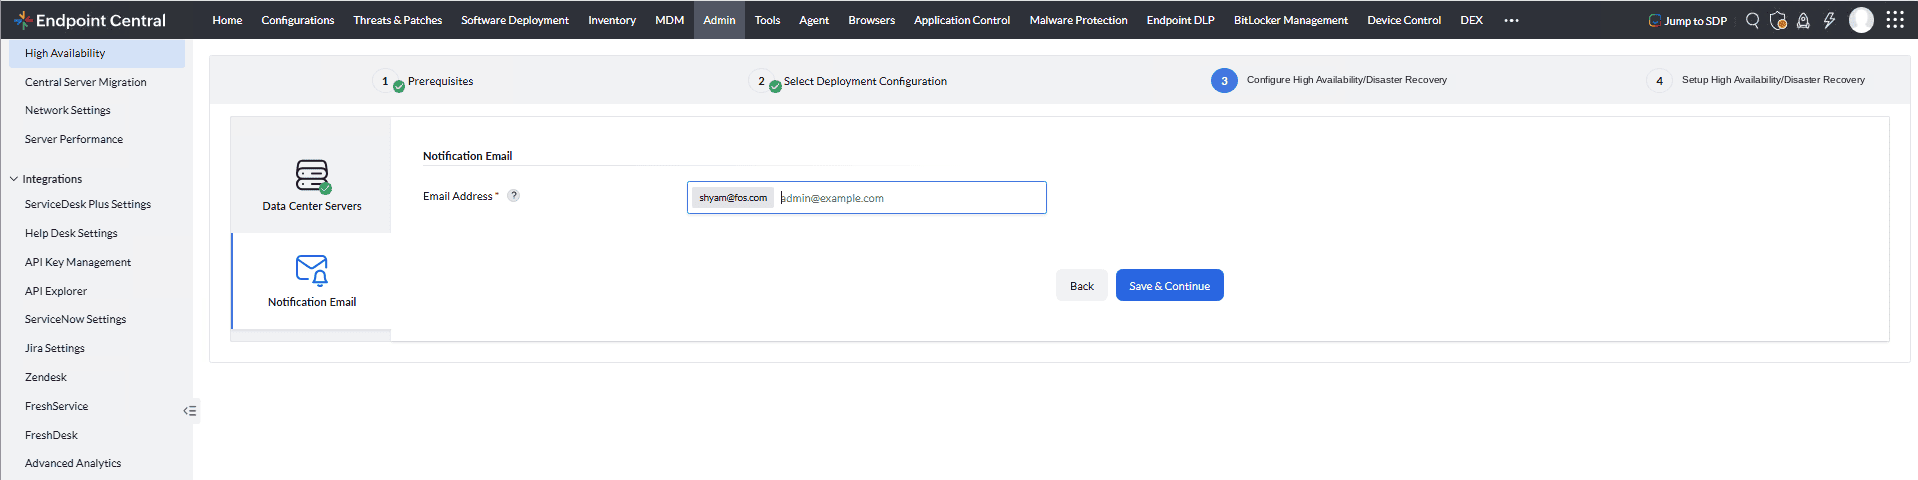
Step 2: Notification Email
Provide the email address(es) to receive alerts about server health, connectivity issues, and high availability events. Click "Save & Continue".
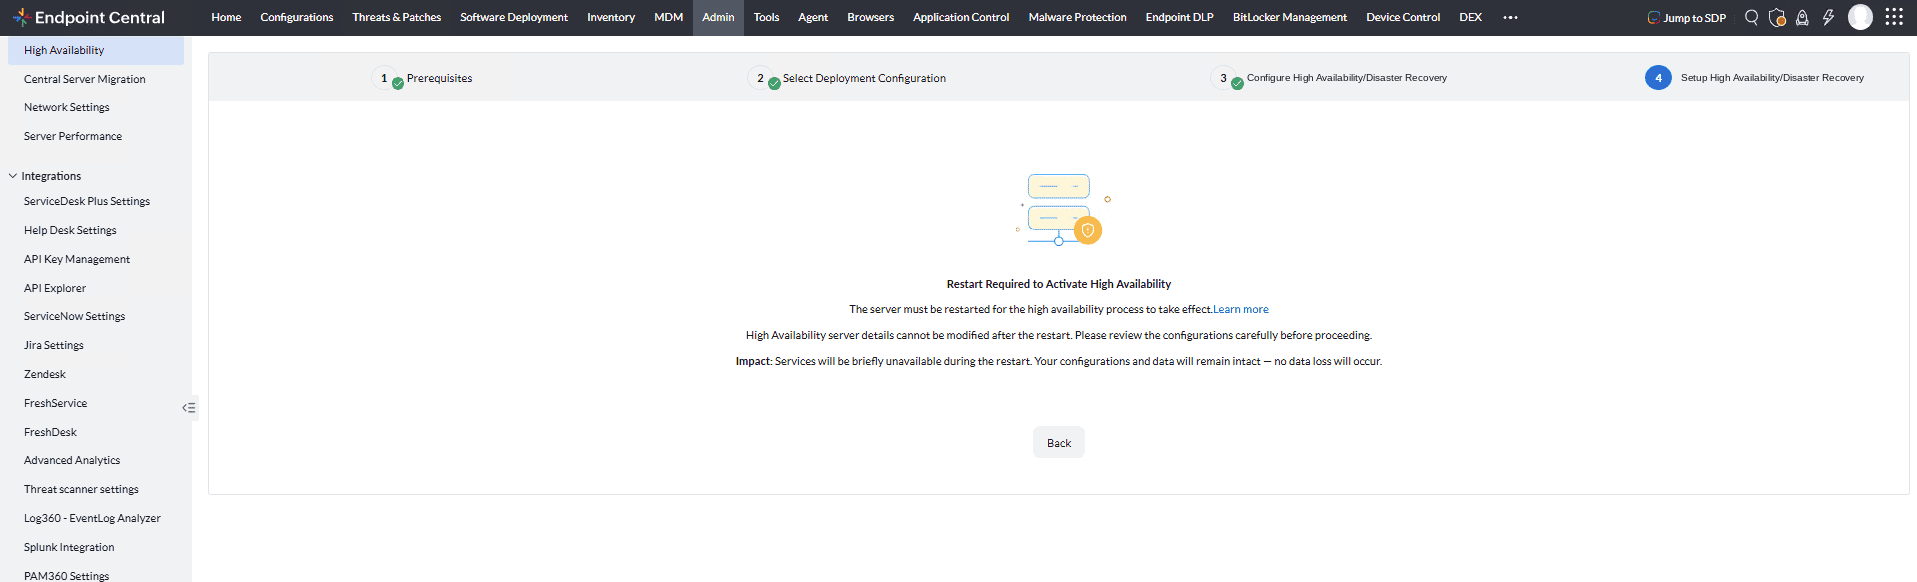
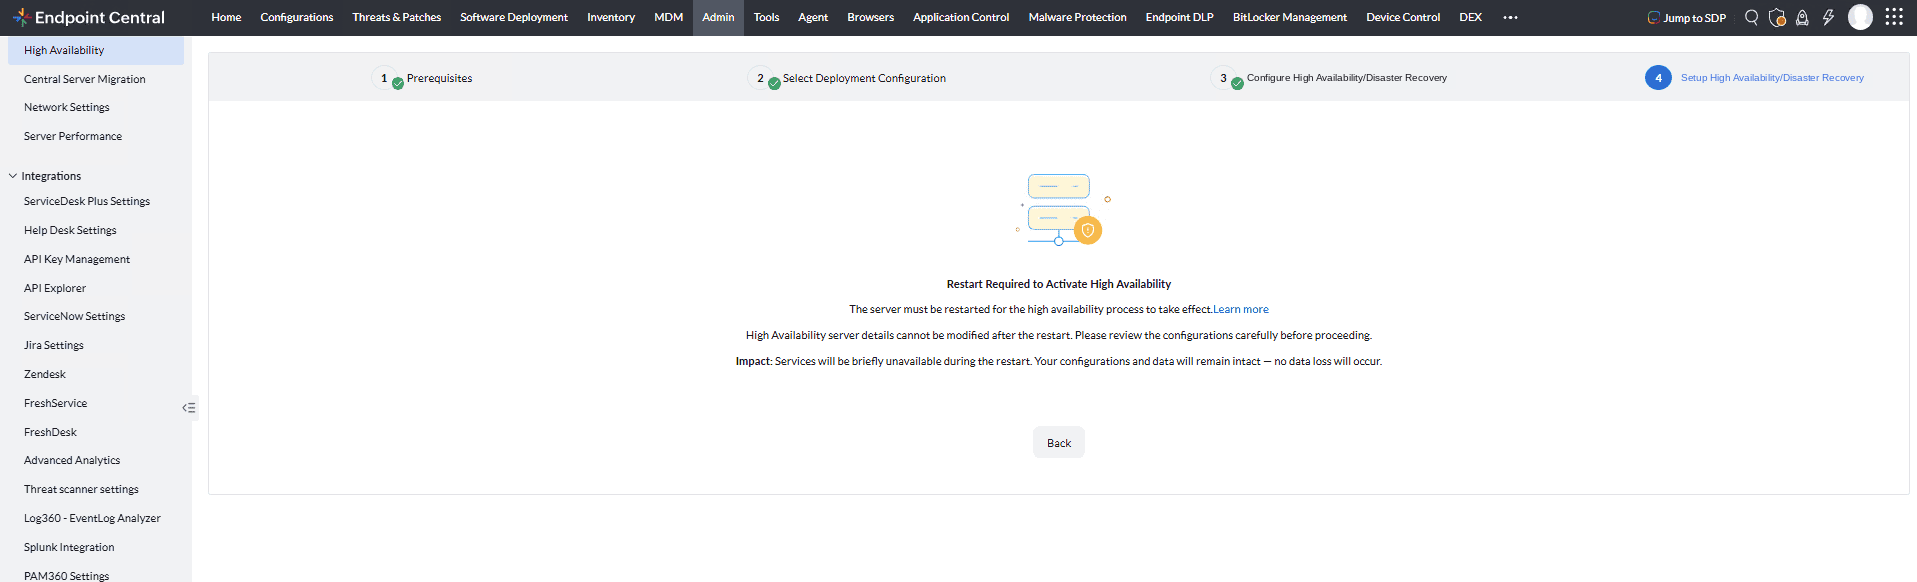
Step 3: Setup High Availability/Disaster Recovery - Restart Required
A status page is displayed indicating that a server restart is required. Restart the Active server to activate high availability.
High Availability server details cannot be modified after the restart. Review configurations carefully. Services will be briefly unavailable during the restart. Configurations and data remain intact — no data loss will occur.
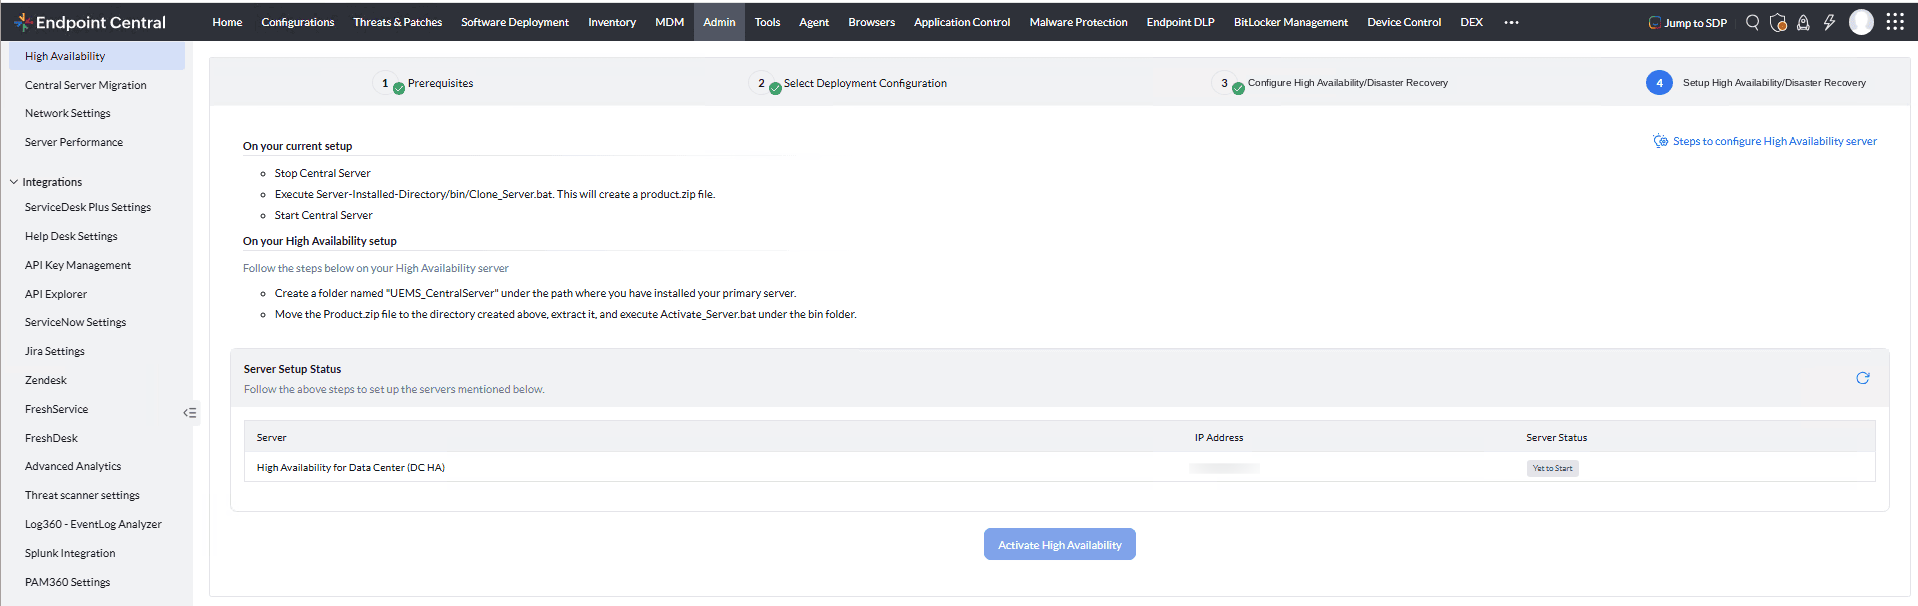
Step 4: Server Setup Status (Before Cloning)
After the restart, the Server Setup Status page displays the High Availability for Data center server with "Yet to Start" status, along with instructions for cloning and activating the High Availability server.
Step 5: Cloning Server Components
Follow these steps on the Active Data center server:
- Stop the Endpoint Central service on the Active Data center server.
- Open the command prompt in administrator mode and navigate to <Server-Installed-Directory>\UEMS_CentralServer (Unified Endpoint Management and Security)\bin.
- Execute Clone_Server.bat (Batch File) to create a backup of server components.
<Server-Installed-Directory>\UEMS_CentralServer\bin>Clone_Server.bat

- A new zip file "Product.zip" will be created in the <Server-Installed-Directory>\UEMS_CentralServer folder.
- Start the Endpoint Central Server.
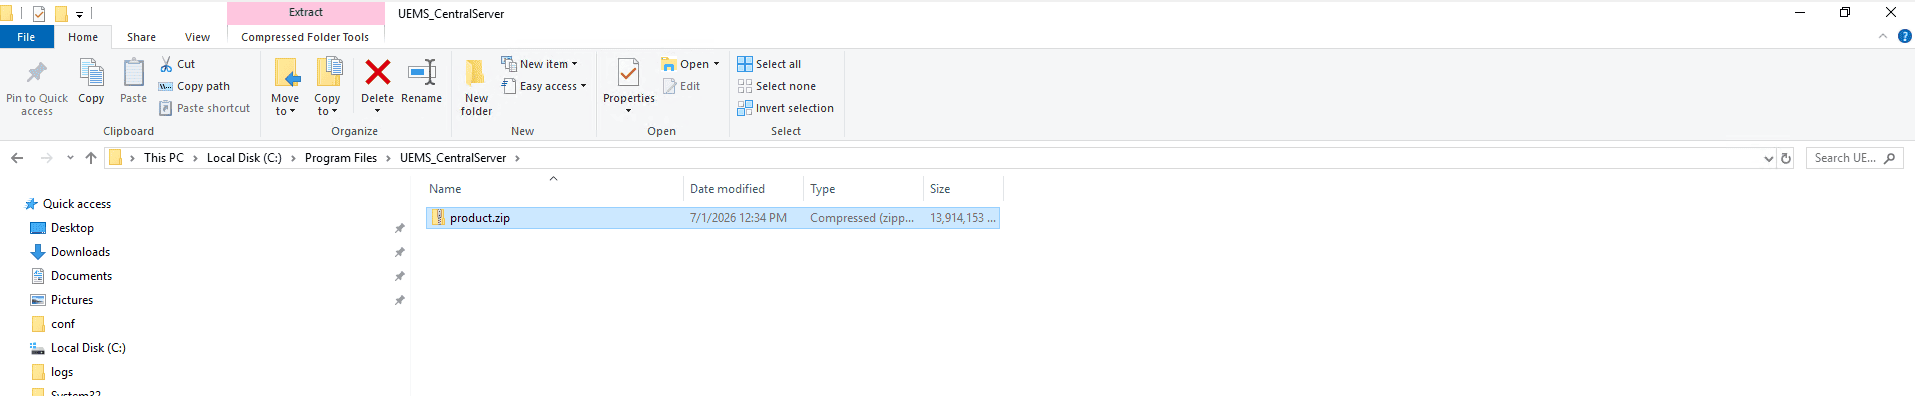
- Start the Endpoint Central Server.
Step 6: Activate High Availability
On the High Availability server, follow these steps:
- Create a folder named "UEMS_CentralServer" under the path where you have installed your Active Data center server.
- Move the Product.zip file to the directory created above and extract it.
- Open the command prompt in administrator mode and execute Activate_Server.bat under the bin folder.
C:\Program Files\UEMS_CentralServer\bin>Activate_Server.bat
Figure 10: Executing Activate_Server.bat
Step 7: Server Setup Status — Success
Return to the Endpoint Central console. The Server Setup Status will update from "Yet to Start" to "Success".
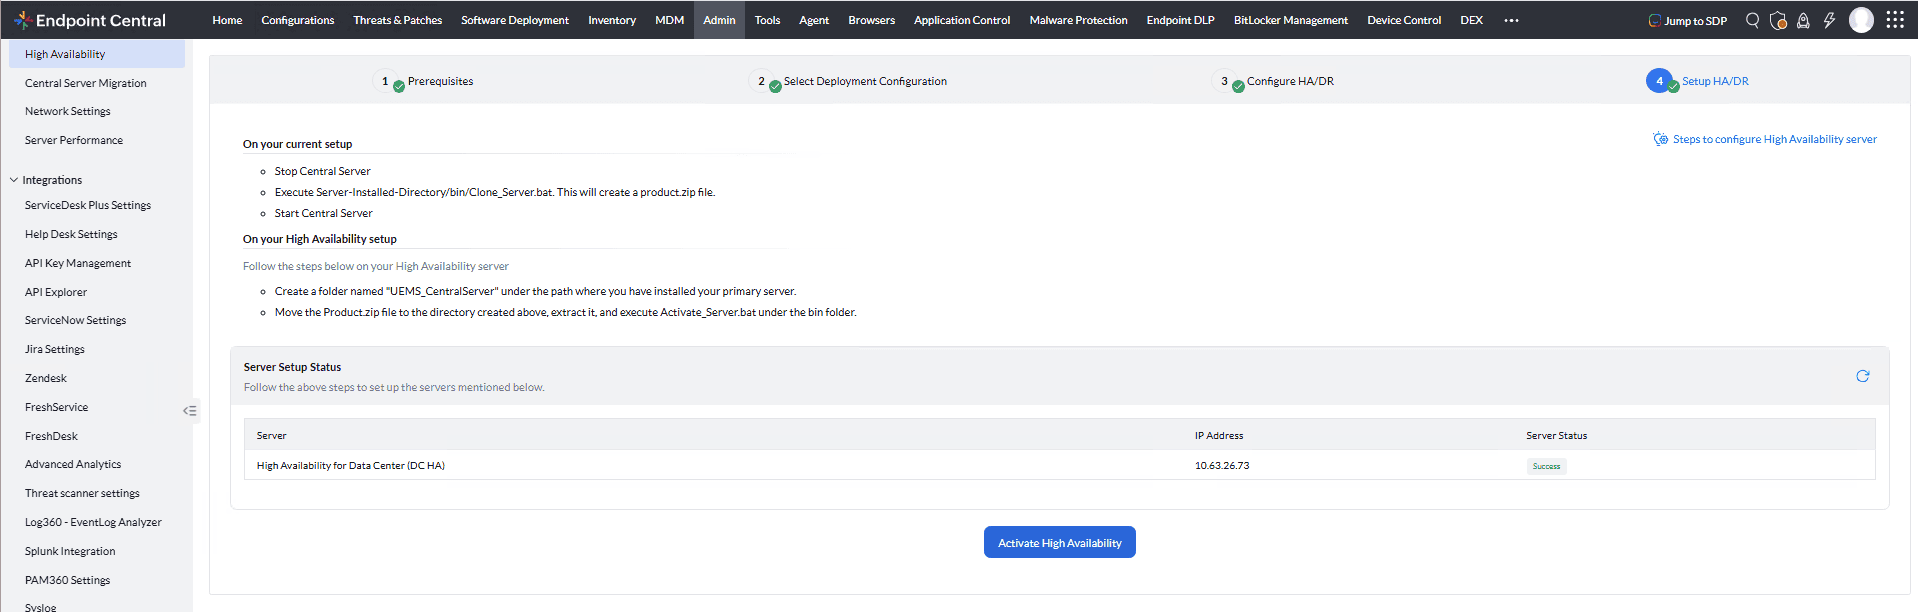
Click "Activate High Availability" to complete the setup.
Step 8: High Availability Server Overview (Dashboard)
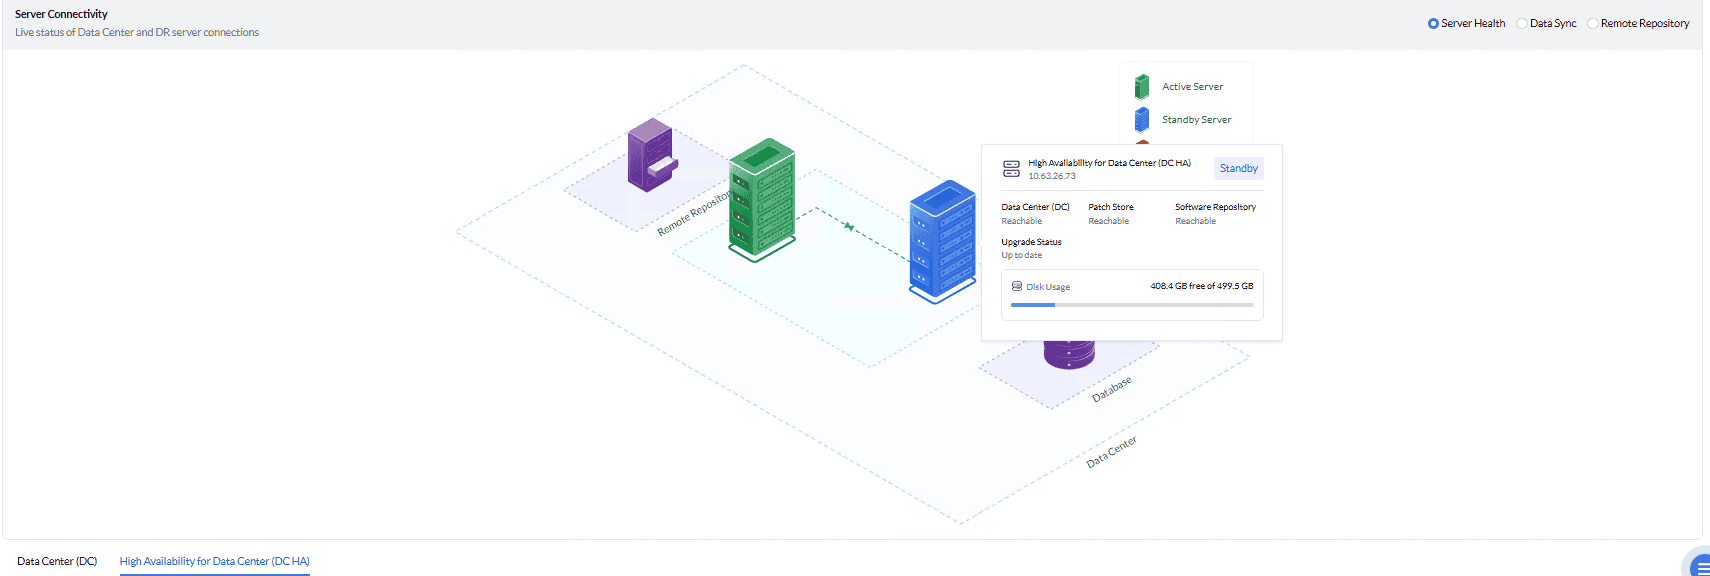
After activation, the High Availability Server Overview dashboard displays all servers with their statuses (Active, Standby, Inactive) and the Virtual IP.
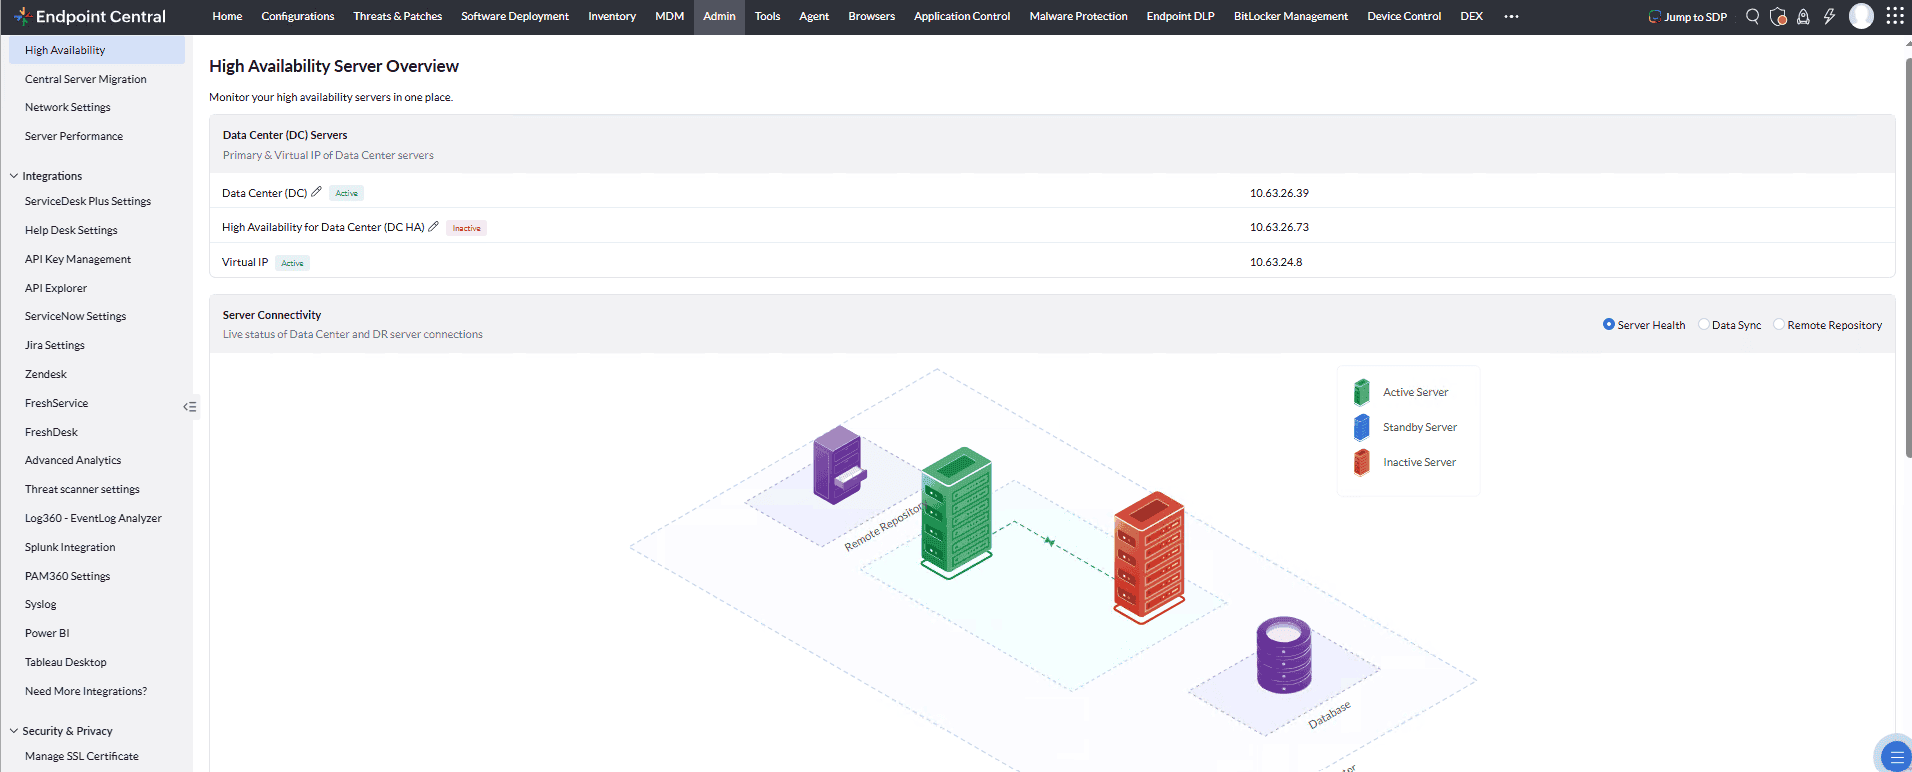
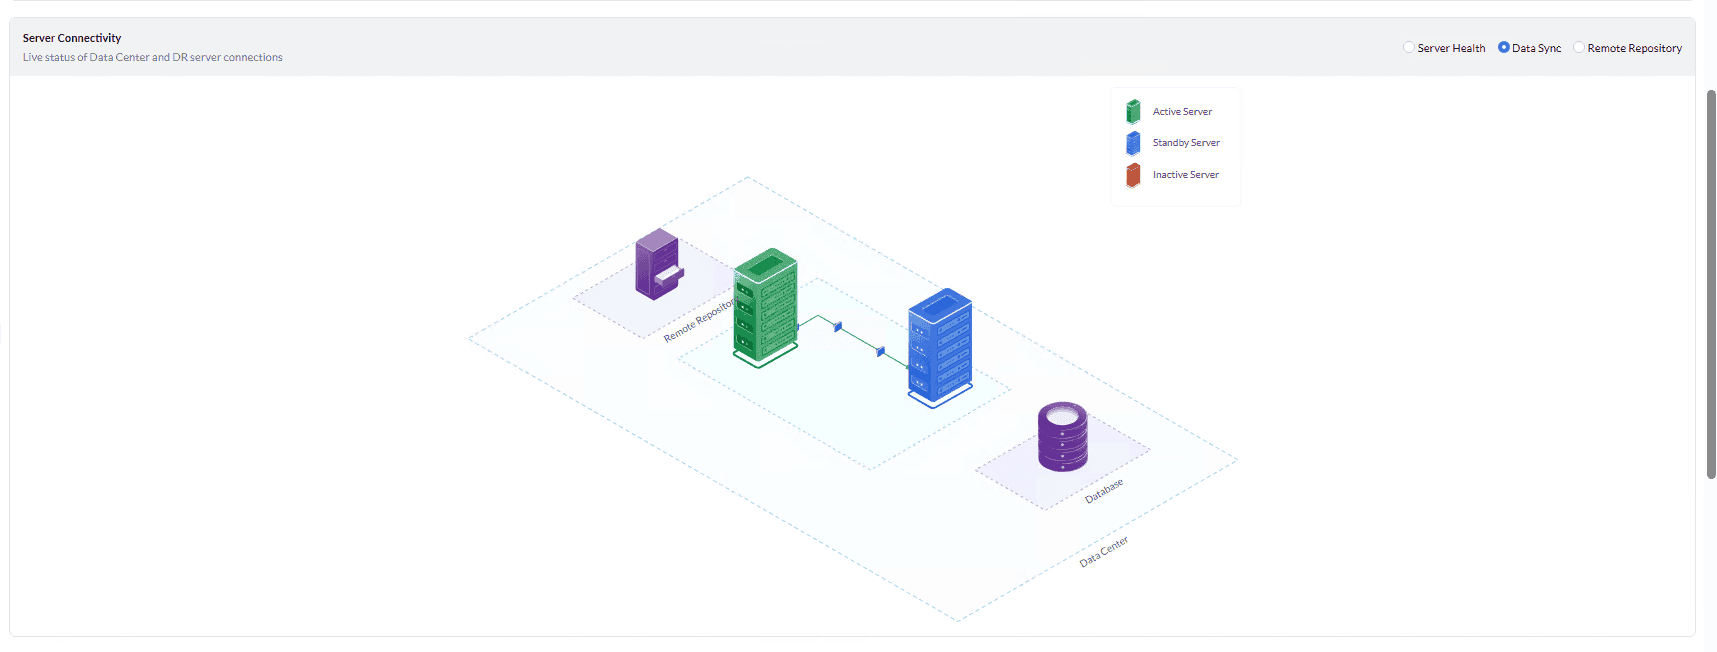
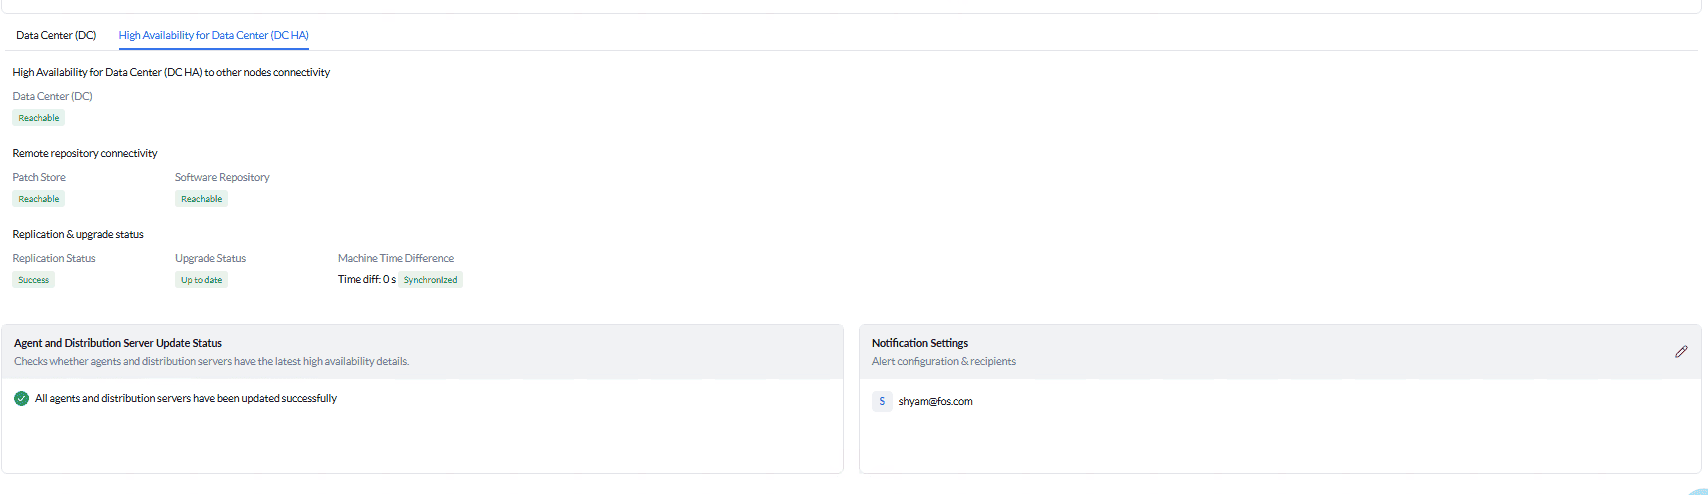
Click on a server to view detailed connectivity, replication status, and disk usage.
Disaster Recovery deployment with 2 Nodes
This option deploys one node at the Data Center site and one node at the Disaster Recovery site. Provide the following details:
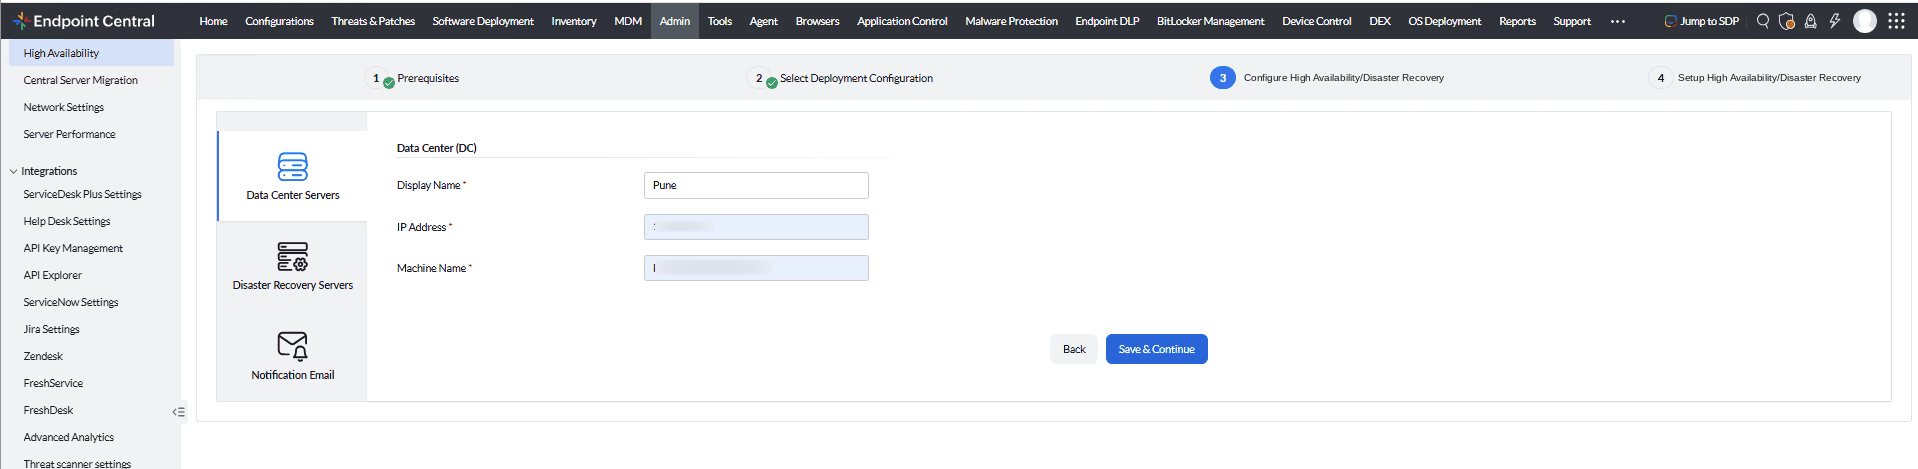
Step 1: Configure Data Center (DC) and Disaster Recovery (DR) Server
The Data Center (DC) server acts as the Active server. Its details will be pre-filled automatically.
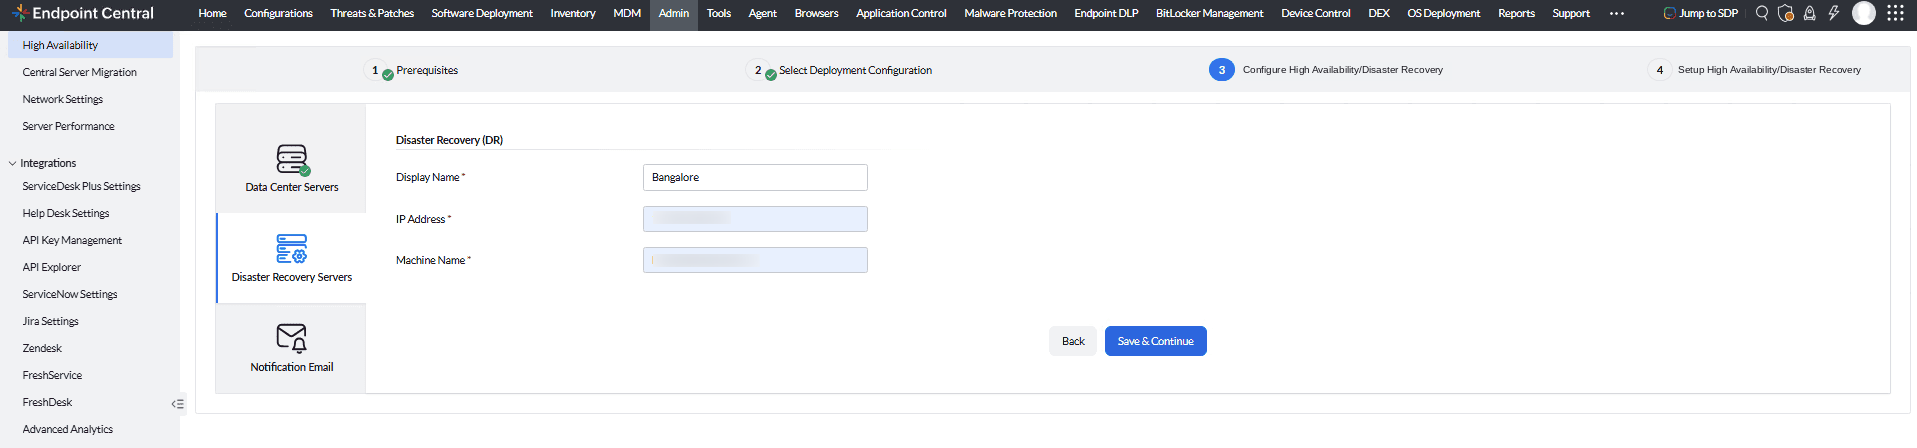
Enter the details of your Disaster Recovery server:
- Display Name: Enter a name for the Disaster Recovery server (e.g., Bangalore).
- IP Address: Enter the IP address of the Disaster Recovery server (e.g., 172.xx.xxx.238).
- Machine Name: Enter the machine name of the Disaster Recovery server (e.g., FOS/FW-SERVER-06).
Step 2: Notification Email
Provide the email address(es) to receive alerts about server health, connectivity issues, and high availability events. Click "Save & Continue".
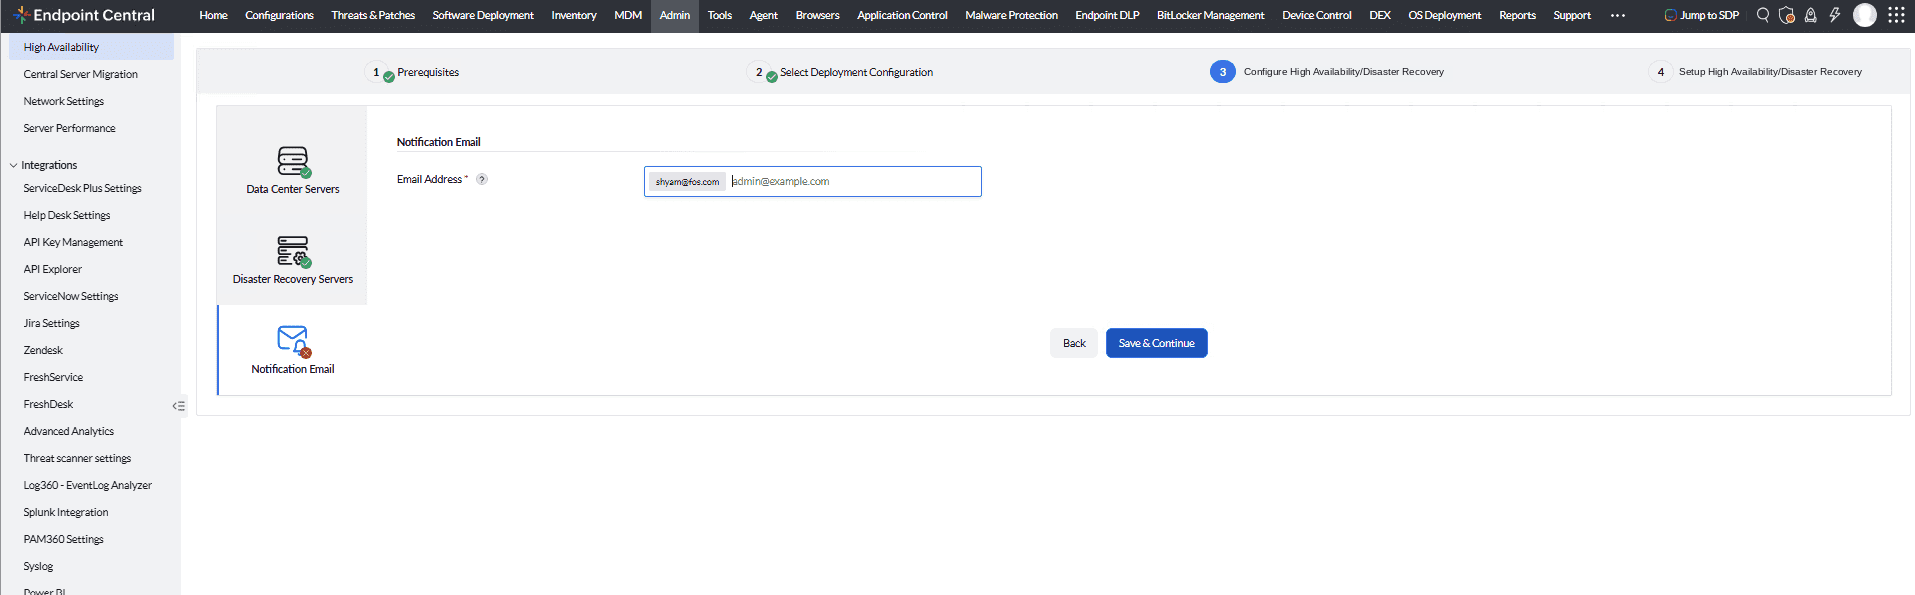
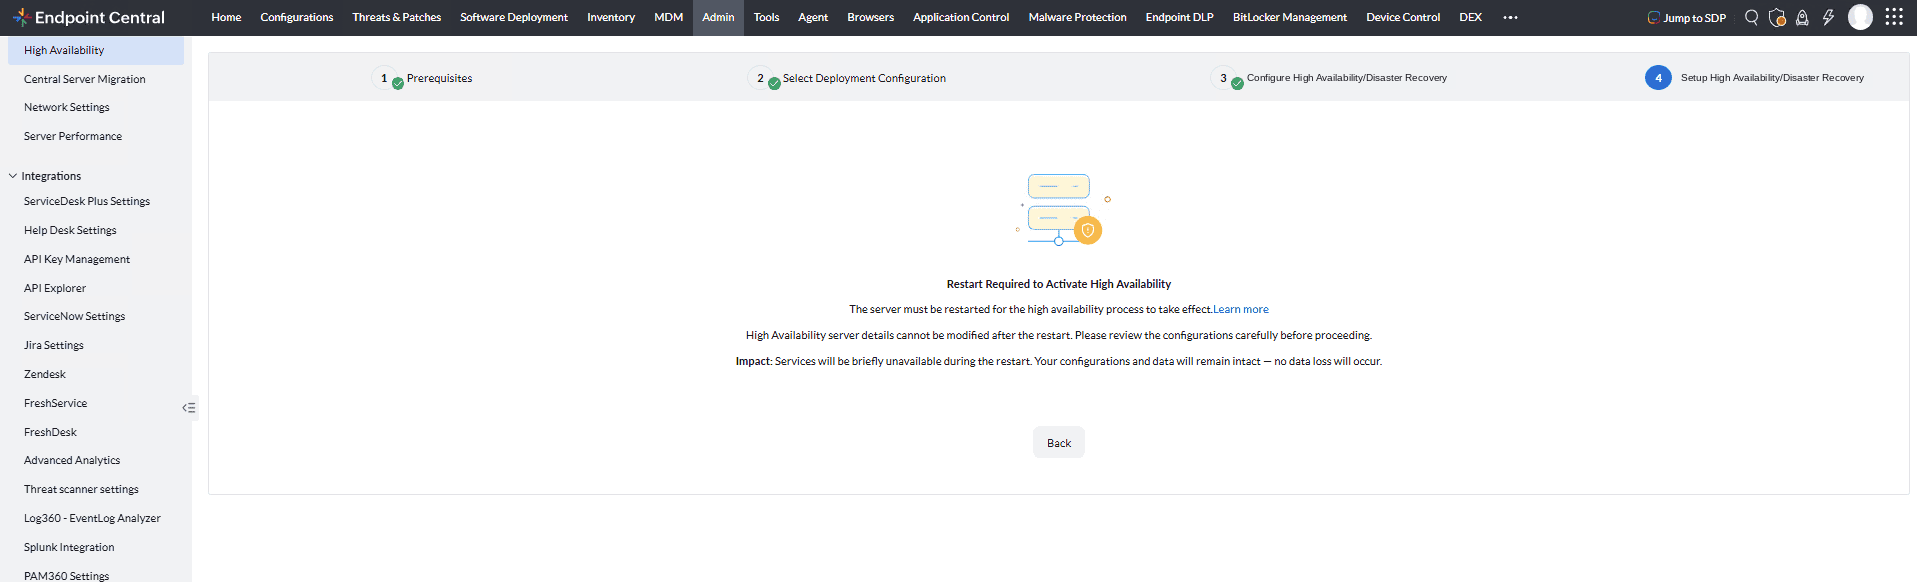
Step 3: Setup High Availability/Disaster Recovery - Restart Required
A status page is displayed indicating that a server restart is required. Restart the Active Data Center server to activate high availability.
High Availability server details cannot be modified after the restart. Review configurations carefully. Services will be briefly unavailable during the restart. Configurations and data remain intact — no data loss will occur.
Step 4: Server Setup Status (Before Cloning)
After the restart, the Server Setup Status page shows the Disaster Recovery server with "Yet to Start" status.
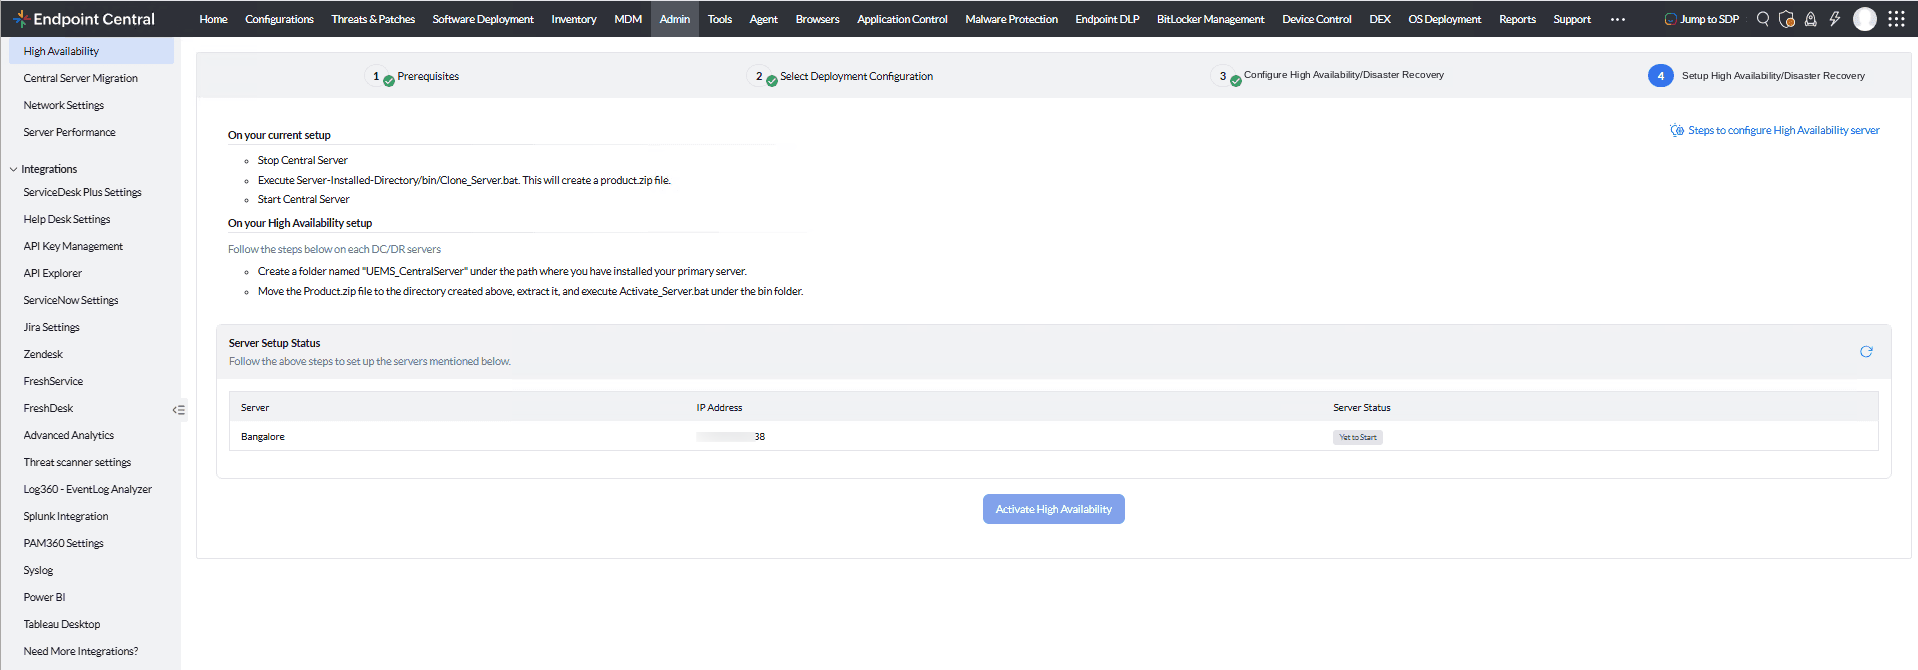
Step 5: Cloning Server Components
Follow these steps on the Active Data Center server:
- Stop the Endpoint Central service on the Active Data Center server.
- Open the command prompt in administrator mode and navigate to <Server-Installed-Directory>\UEMS_CentralServer\bin.
- Execute Clone_Server.bat to create a backup of server components.
- A new zip file "Product.zip" will be created in the UEMS_CentralServer folder.
- Start the Endpoint Central Server.
<Server-Installed-Directory>\UEMS_CentralServer\bin>Clone_Server.bat
Step 6: Activate High Availability
On the Disaster Recovery server:
- Create a folder named "UEMS_CentralServer" under the path where you have installed your Active Data Center server.
- Move the Product.zip file to the directory created above and extract it.
- Execute Activate_Server.bat under the bin folder.
C:\Program Files\UEMS_CentralServer\bin>Activate_Server.bat
Step 7: Server Setup Status — Success
Return to the Endpoint Central console. The status will update to "Success".
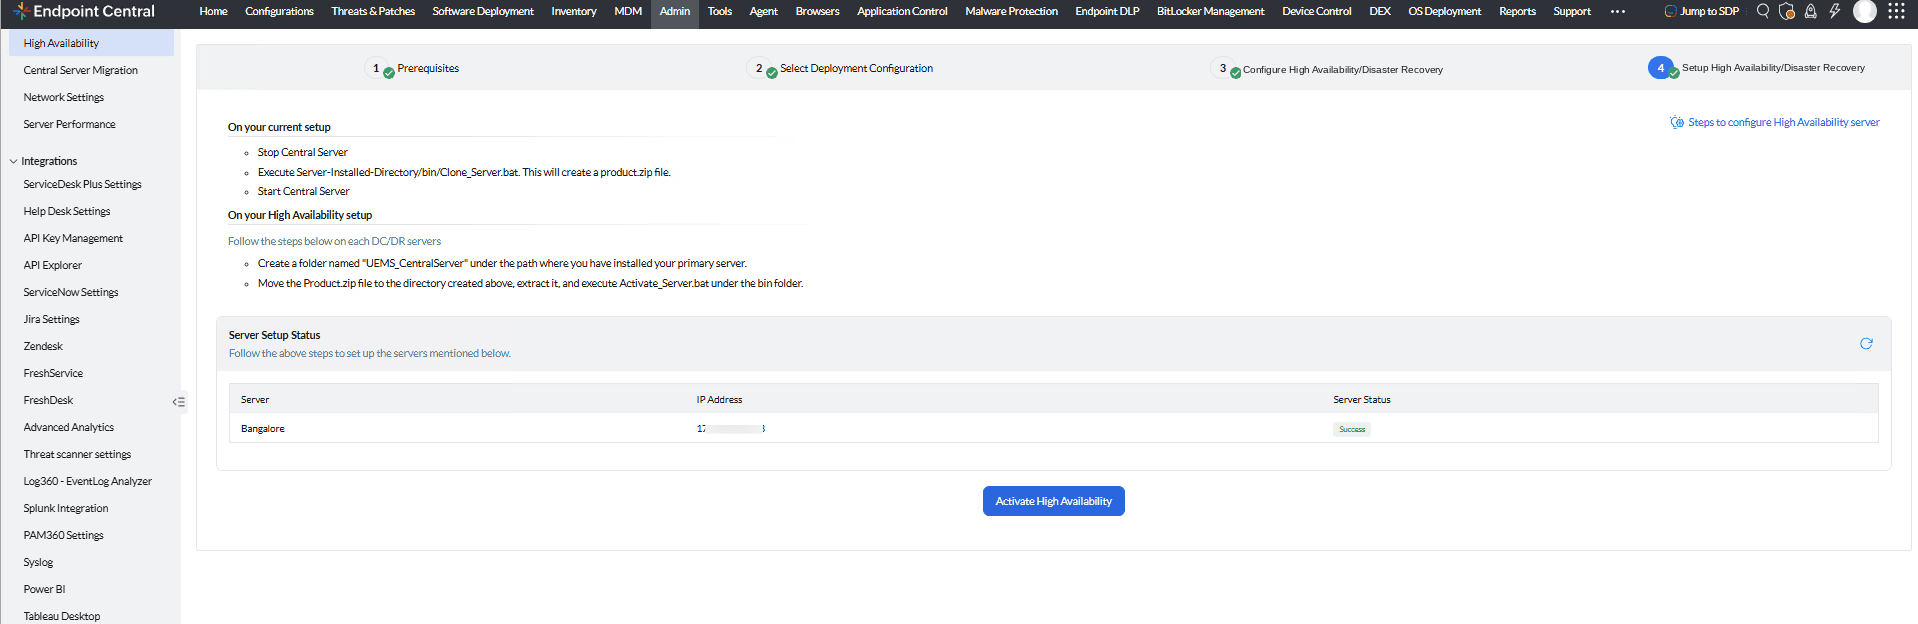
Click "Activate High Availability" to complete the setup.
Step 8: Disaster Recovery Server Overview (Dashboard)
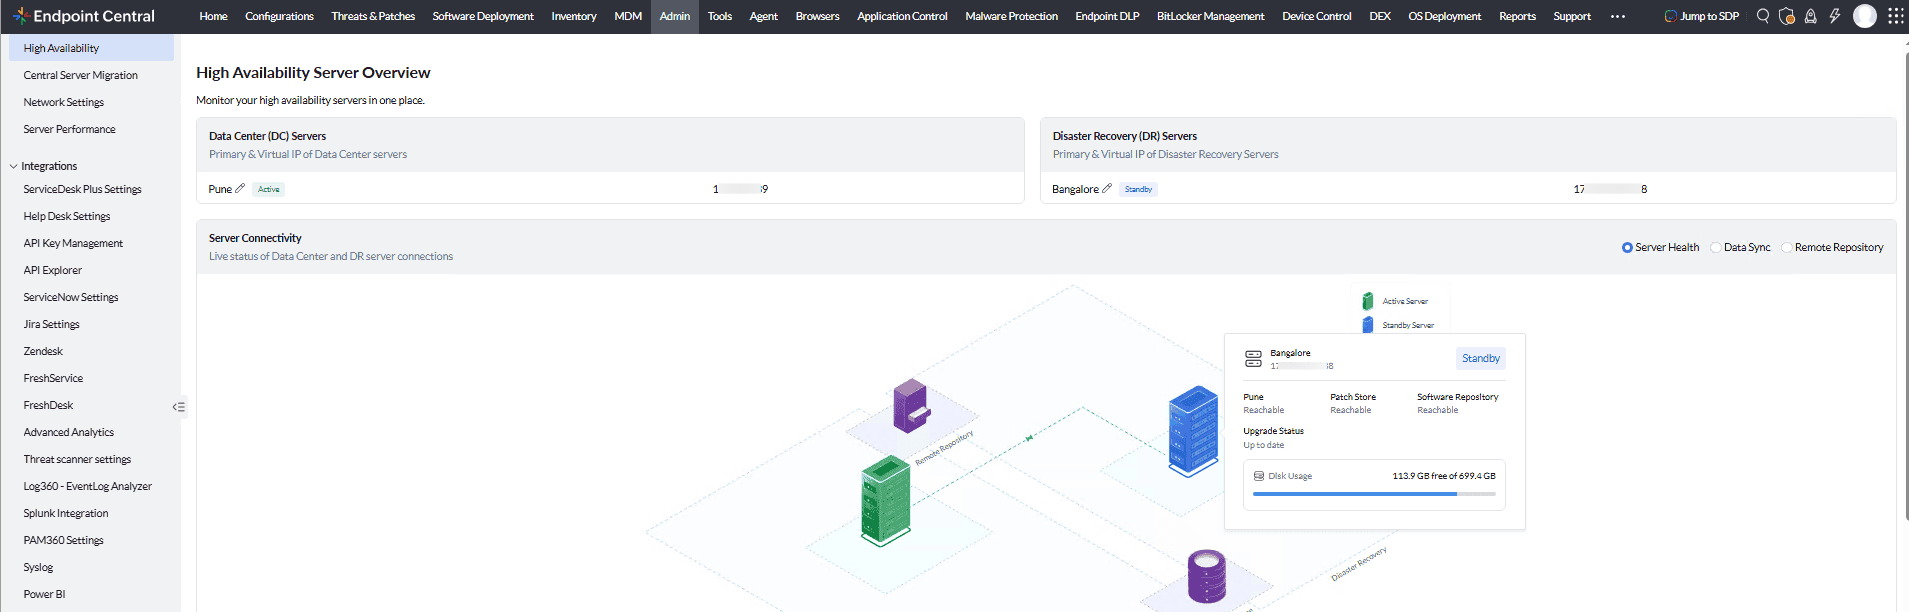
After activation, the overview shows Data Center (DC) Servers and Disaster Recovery (DR) Servers with connectivity diagrams.
Disaster Recovery deployment with 3 Nodes
This option deploys two nodes at the Data Center — one as the Active Data Center server and one as the High Availability (HA) server — and one node at the Disaster Recovery (DR) site. Provide the following details:
Step 1: Configure Data Center (DC) and Disaster Recovery (DR) Servers
The Data Center (DC) server acts as the Active server. Its details will be pre-filled automatically.
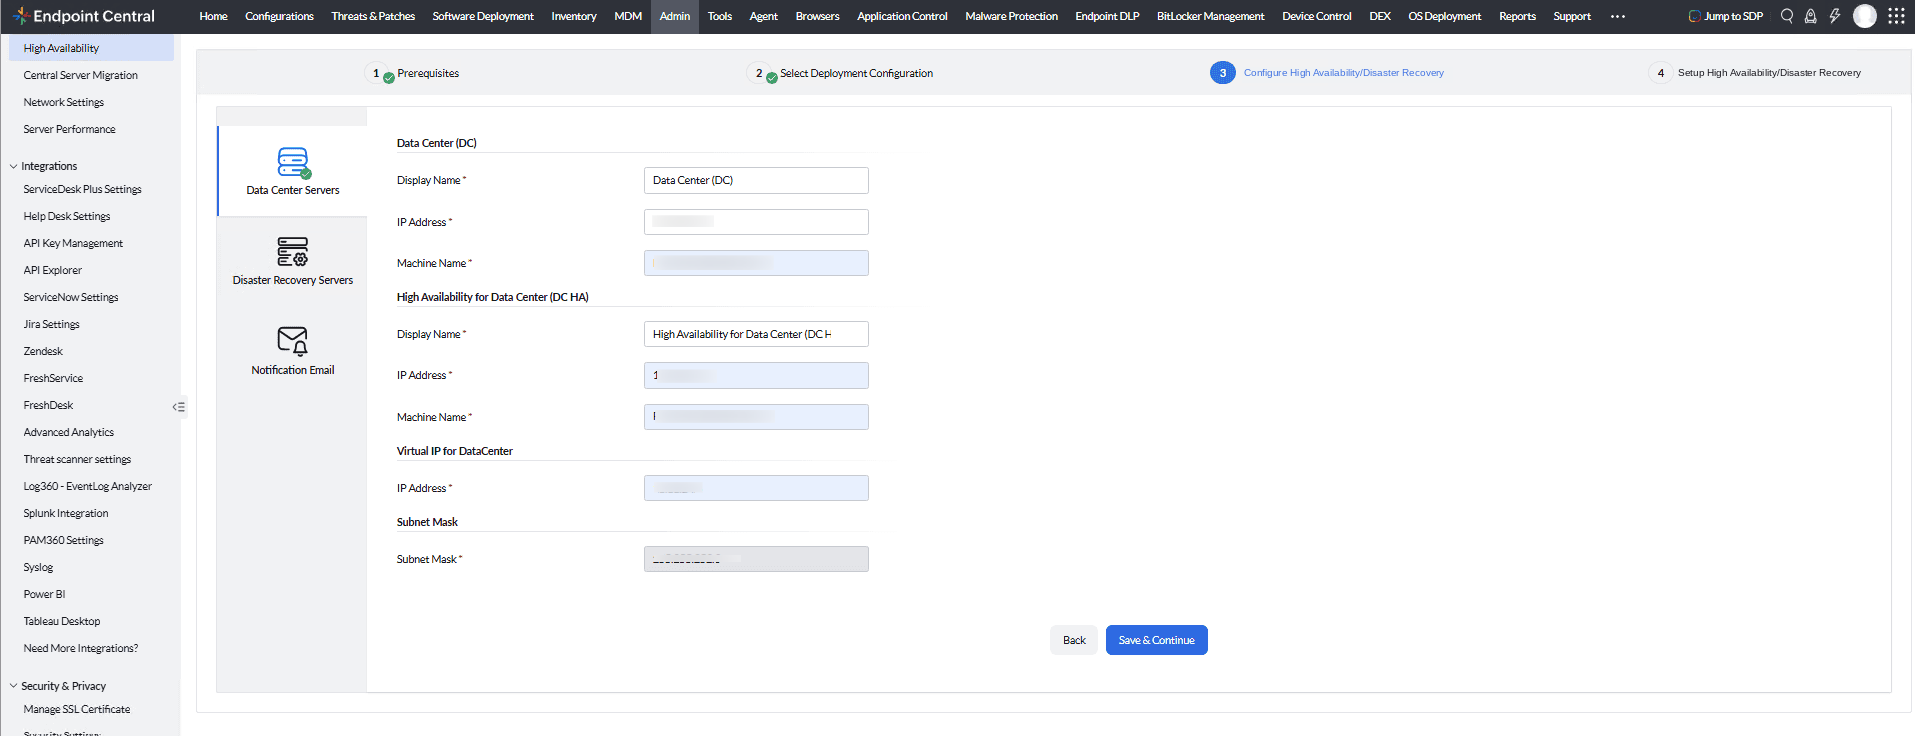
Provide High Availability for Data Center(DC HA)server details with Virtual IP and Subnet Mask:
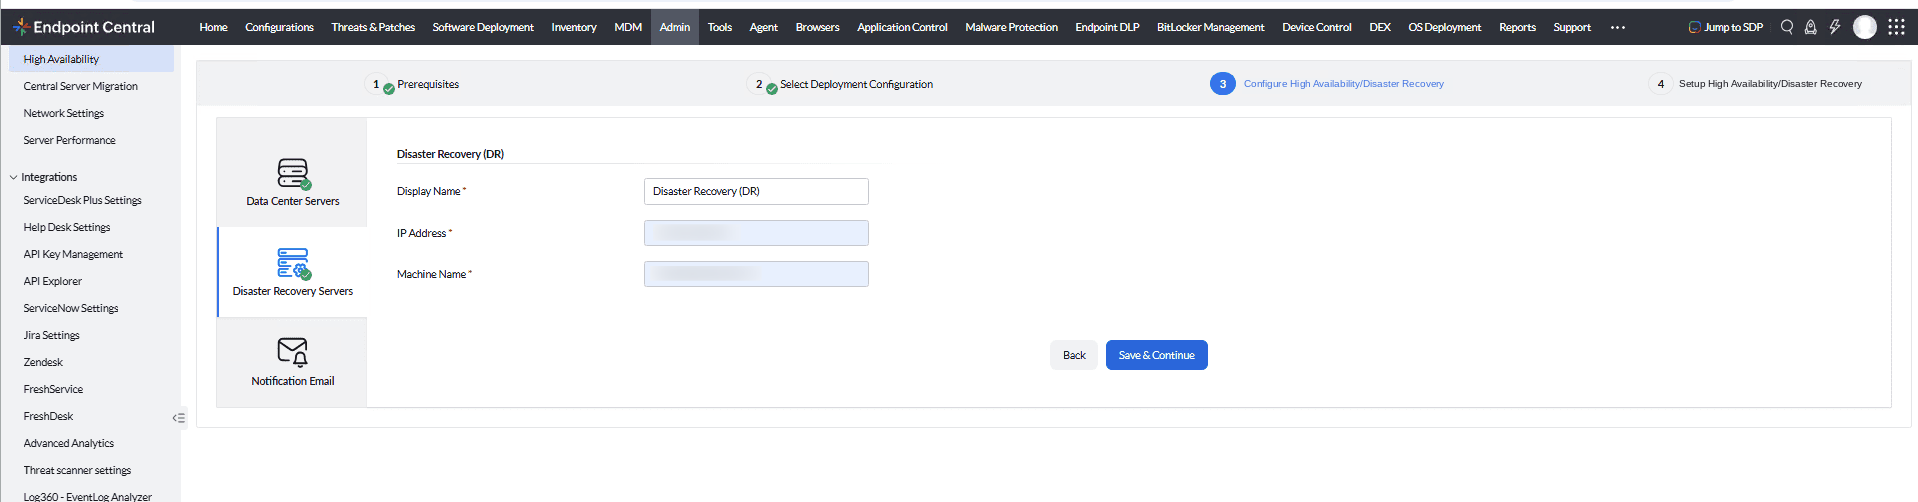
Provide Disaster Recovery(DR) Server details:
- Display Name: Enter a name for the Disaster Recovery server.
- IP Address: Enter the IP address of the Disaster Recovery server (e.g., 172.xx.xxx.238).
- Machine Name: Enter the machine name of the Disaster Recovery server (e.g., FOS/FW-SERVER-06).
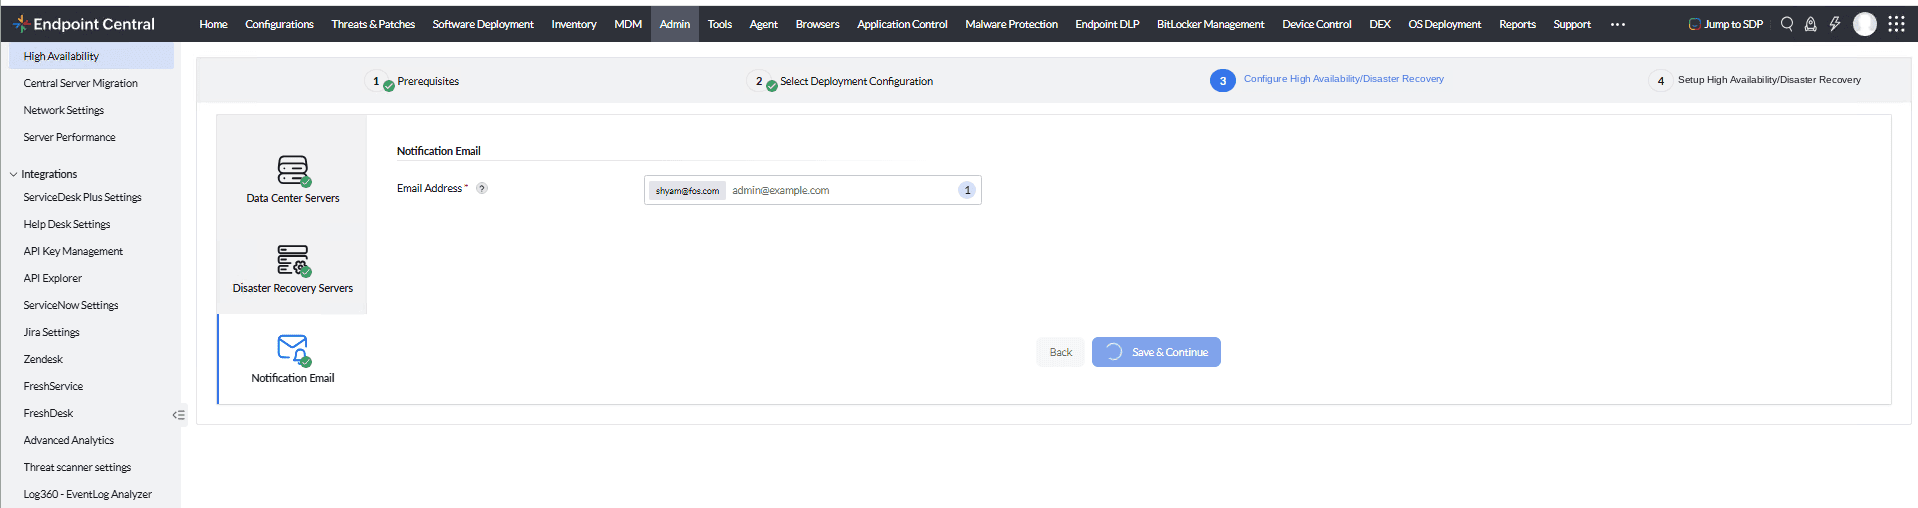
Step 2: Notification Email
Provide the email address(es) to receive alerts about server health, connectivity issues, and high availability events. Click "Save & Continue".
Step 3: Setup High Availability/Disaster Recovery - Restart Required
A status page is displayed indicating that a server restart is required. Restart the Active Data Center server to activate high availability.
High Availability server details cannot be modified after the restart. Review configurations carefully. Services will be briefly unavailable during the restart. Configurations and data remain intact — no data loss will occur.
Step 4: Server Setup Status (Before Cloning)
After the restart, the status page shows both High Availability for Data Center(DC HA) and Disaster Recovery servers with "Yet to Start" status.
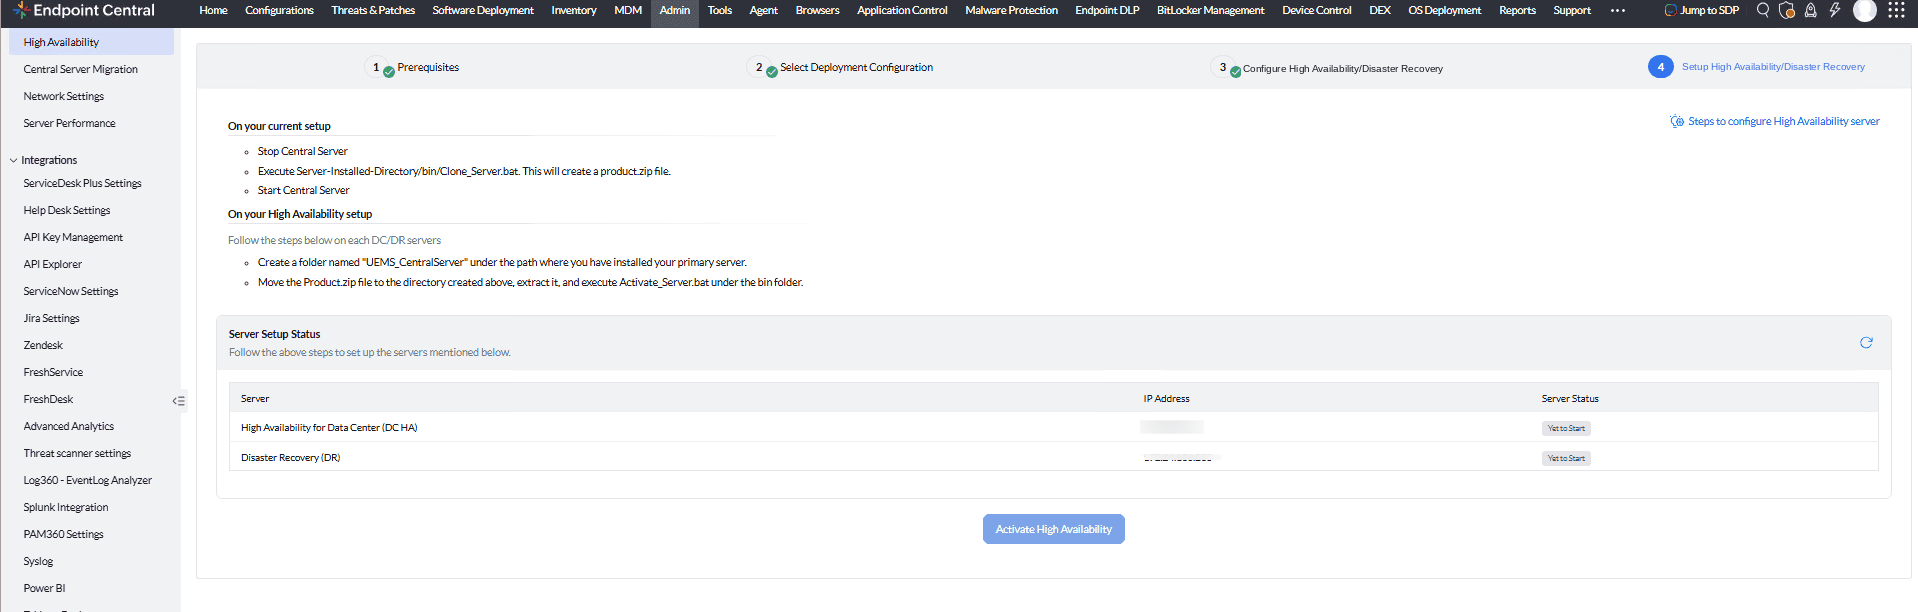
Step 5: Cloning Server Components
Follow these steps on the Active Data Center server:
- Stop the Endpoint Central service on the Active Data Centery server.
- Open the command prompt in administrator mode and navigate to <Server-Installed-Directory>\UEMS_CentralServer\bin.
- Execute Clone_Server.bat to create a backup of server components.
- A new zip file "Product.zip" will be created in the UEMS_CentralServer folder.
- Start the Endpoint Central Server.
<Server-Installed-Directory>\UEMS_CentralServer\bin>Clone_Server.bat
Step 6: Activate High Availability
On each standby servers (High Availability for Data Center server and Disaster Recovery Server), perform the following:
- Create a folder named "UEMS_CentralServer" under the path where you have installed your Active Data Center server.
- Move the Product.zip file to the directory and extract it.
- Execute Activate_Server.bat under the bin folder.
C:\Program Files\UEMS_CentralServer\bin>Activate_Server.bat
Repeat these steps on each standby server (High Availability for Data Center server and Disaster Recovery Server). Both must show "Success" before proceeding.
Step 7: Server Setup Status — Success
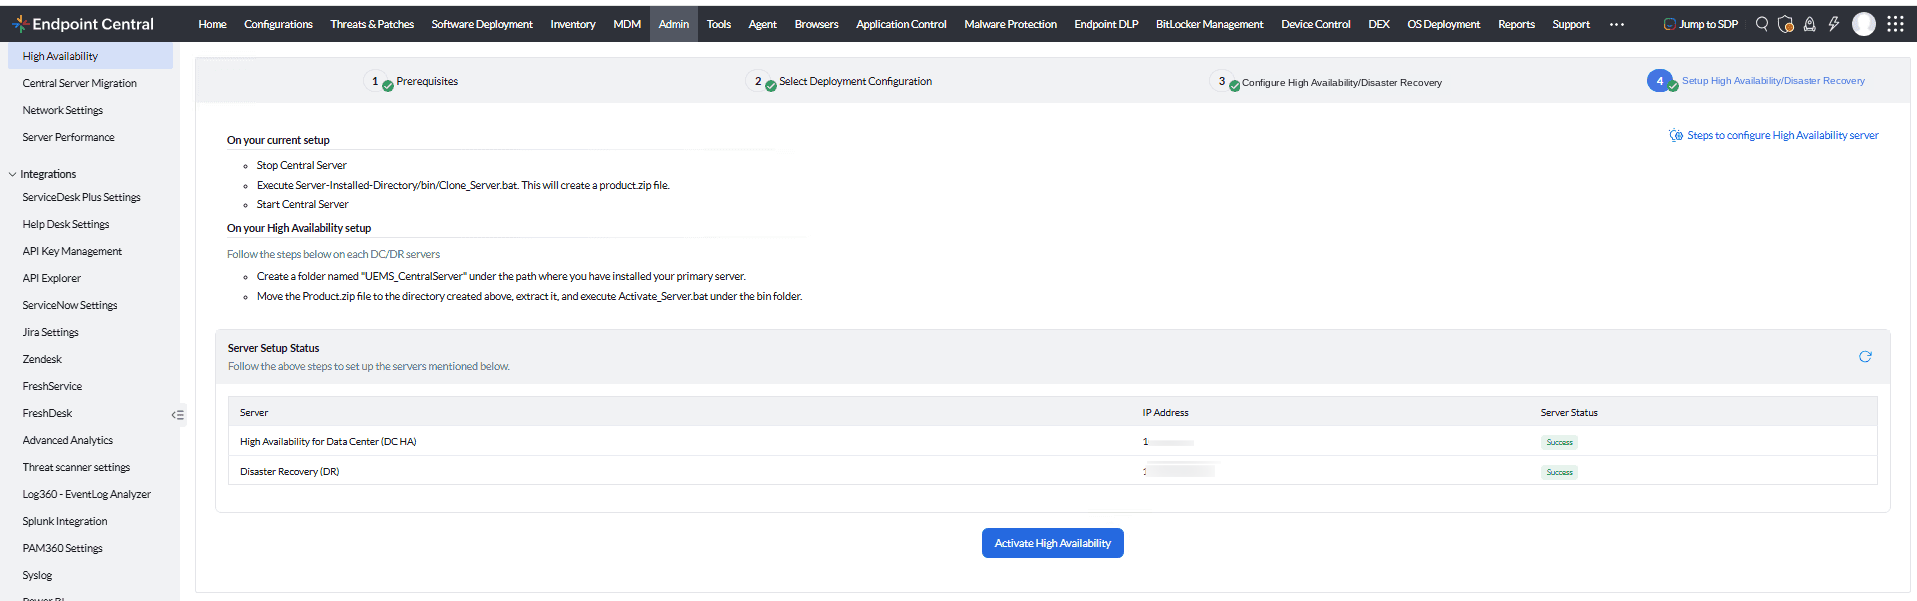
Click "Activate High Availability" once both servers show "Success".
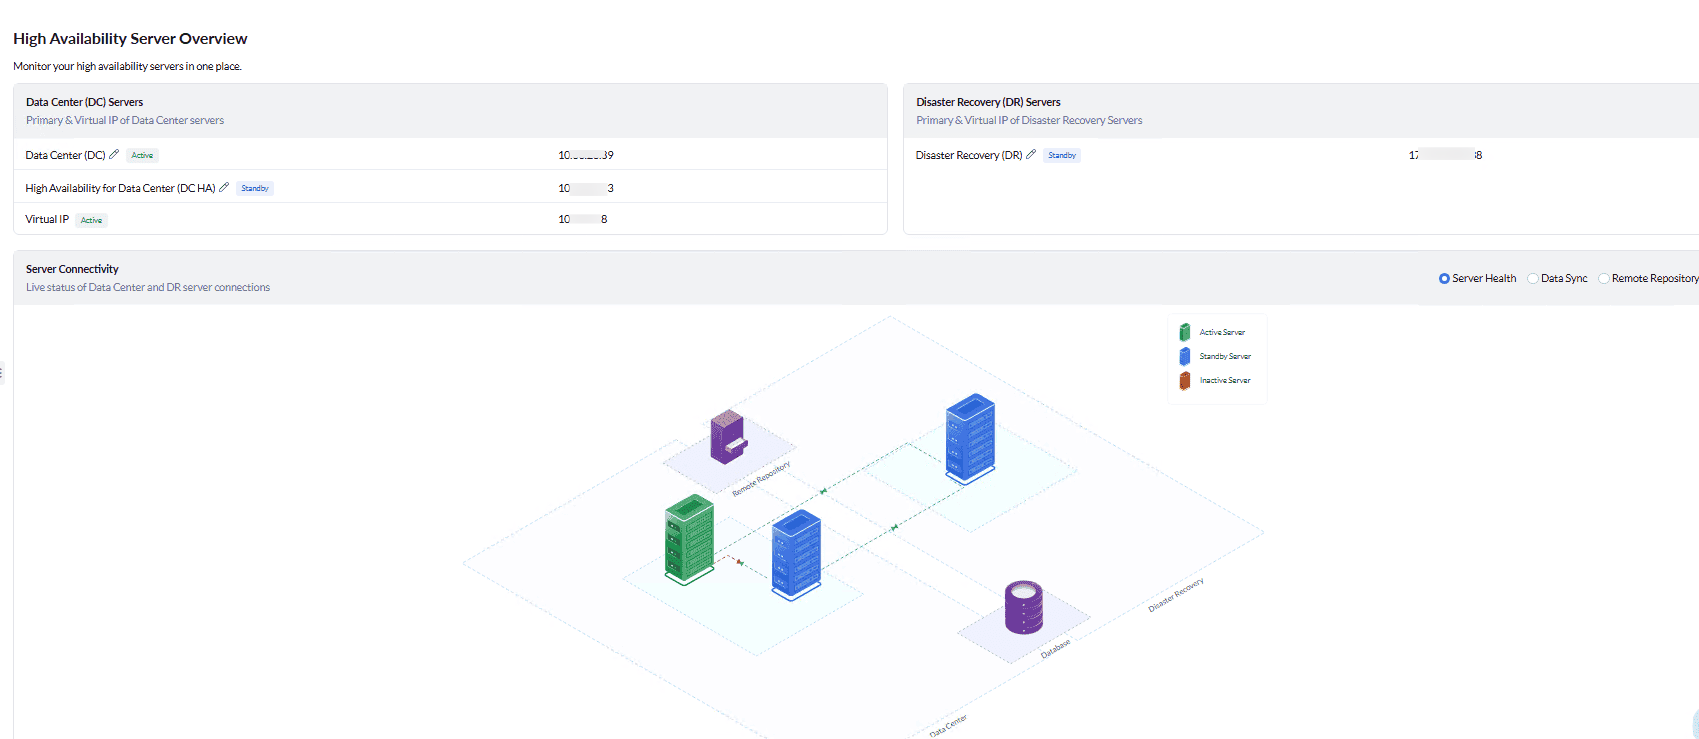
Step 8: High Availability for Data Center and Disaster Recovery Server Overview — Dashboard (3 Nodes)
After activation, the overview page shows Active Data Center Server, High Availability for Data Center (Standby), Virtual IP (Active) on the Data Center site, and Disaster Recovery server(Standby) on the Disaster Recovery site, with server connectivity diagrams.
Disaster Recovery deployment with 4 Nodes
This option provides High Availability (HA) at both data centers: Data Center(DC) server + High Availability for Data Center(DC HA) server at the primary Data Center site, and Disaster Recovery(DR) server + High Availability for Disaster Recovery(DR HA) server at the Disaster Recovery site.
Step 1: Configure Data Center (DC) and Disaster Recovery (DR) Servers
The Data Center (DC) server acts as the Active Data Center server. Its details will be pre-filled automatically.
Provide High Availability for Data Center(DC HA)server details with Virtual IP and Subnet Mask:
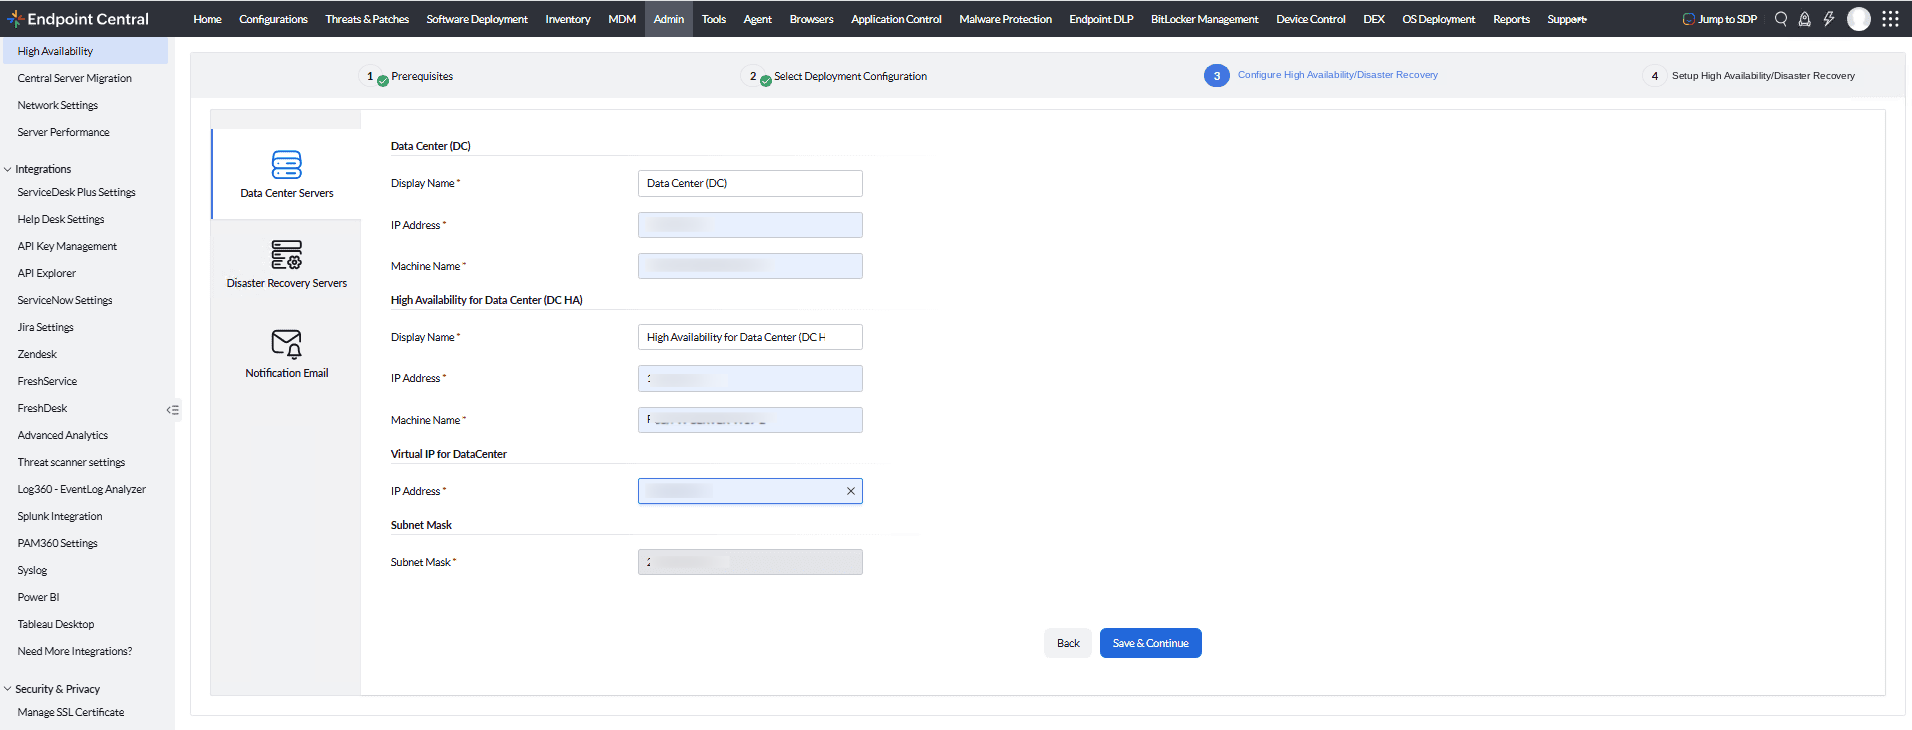
Provide Disaster Recovery(DR) server and High Availability for Disaster Recovery(DR HA) server details with Virtual IP for Disaster Recovery servers and Subnet Mask:
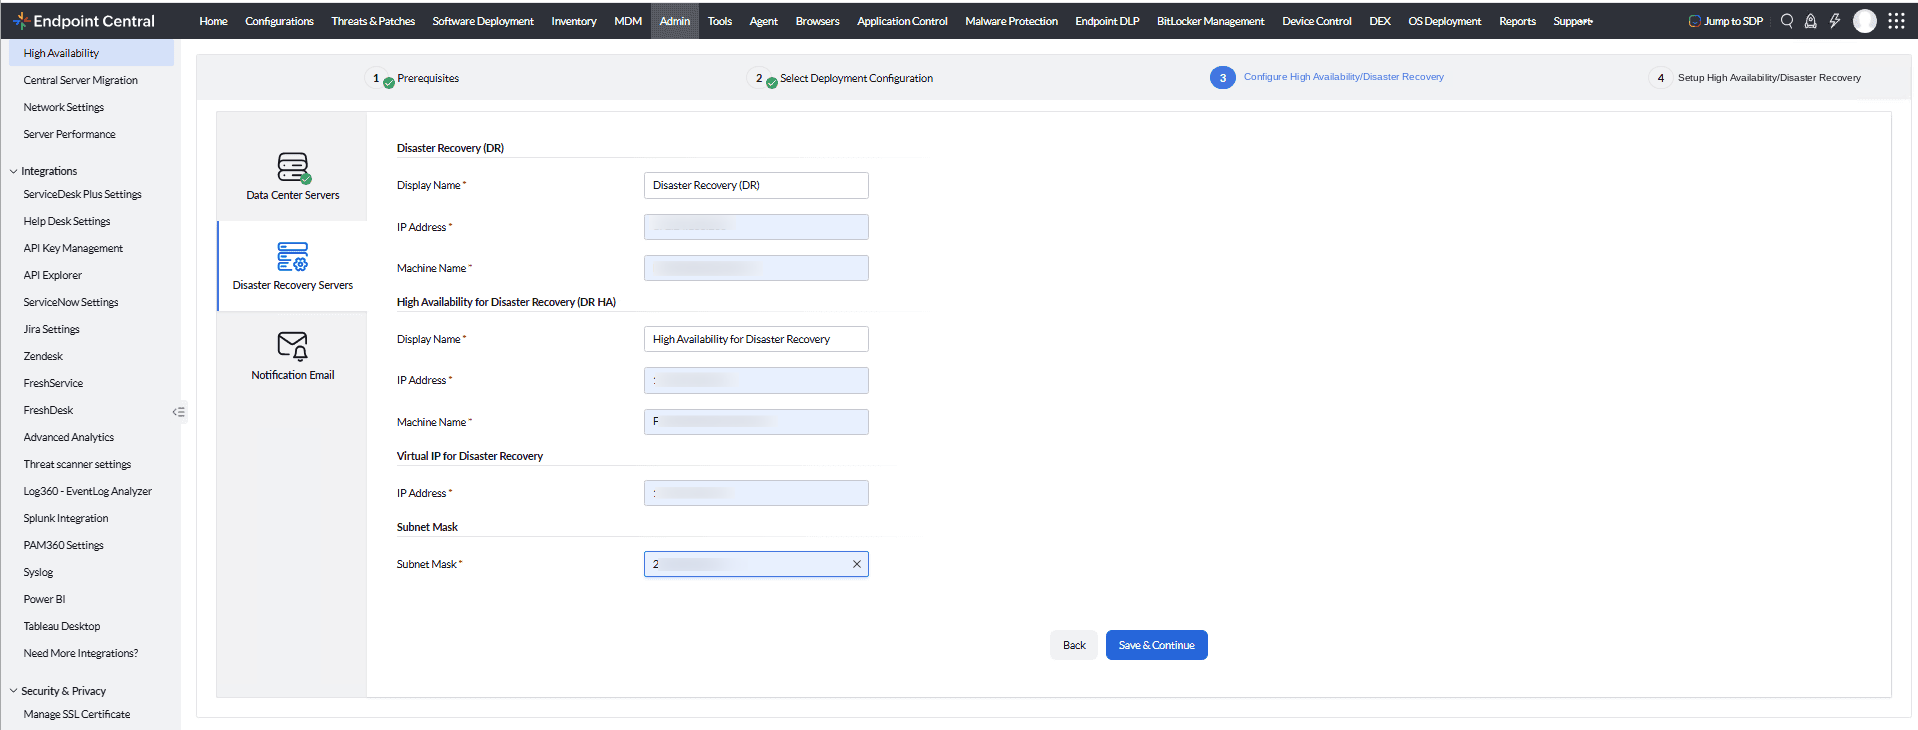
Both the Data Center Site Server and Disaster recovery sites servers have their own Virtual IP addresses and subnet masks. Ensure all Virtual IPs are free and within the correct subnet range for their respective sites.
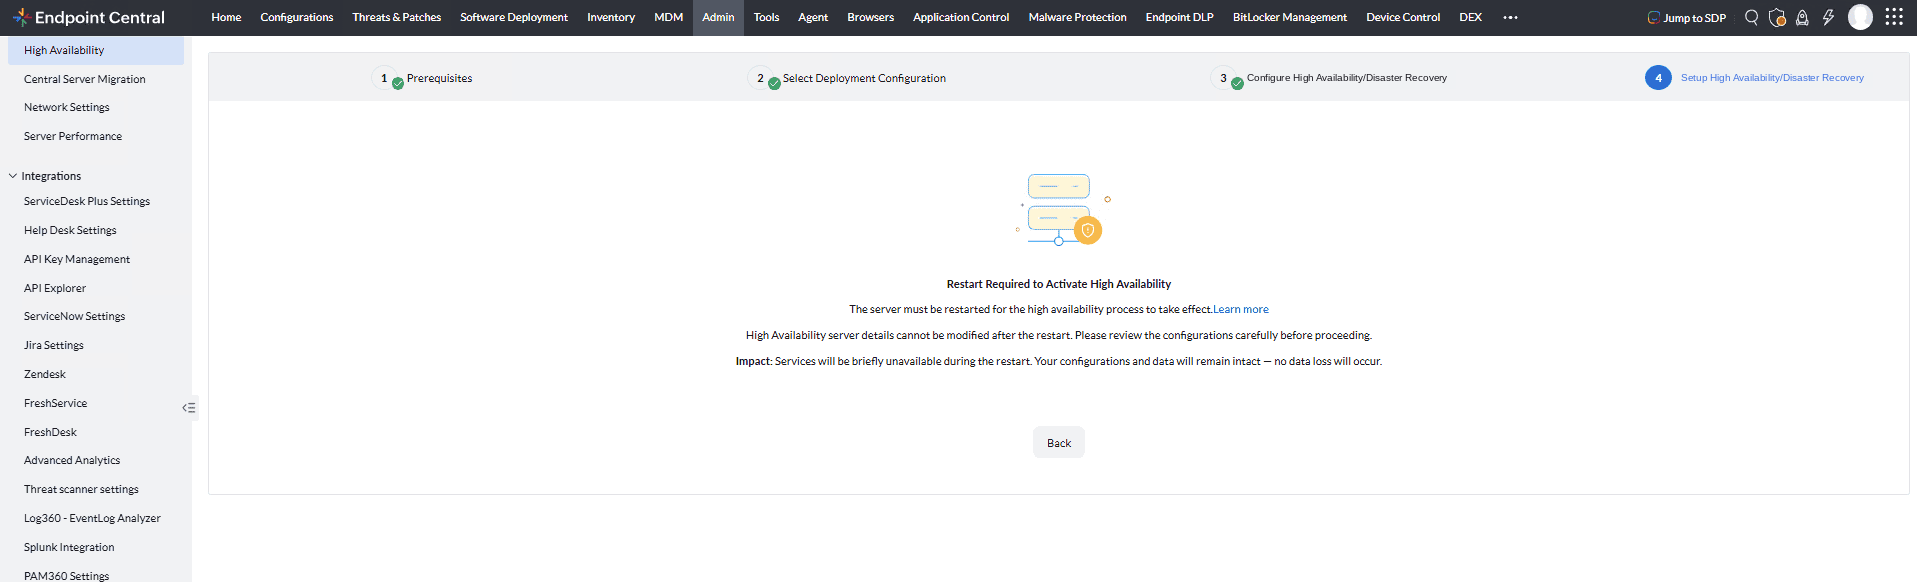
Step 2: Setup High Availability/Disaster Recovery - Restart Required
A status page is displayed indicating that a server restart is required. Restart the Active Data Center server to activate high availability.
High Availability server details cannot be modified after the restart. Review configurations carefully. Services will be briefly unavailable during the restart. Configurations and data remain intact — no data loss will occur.
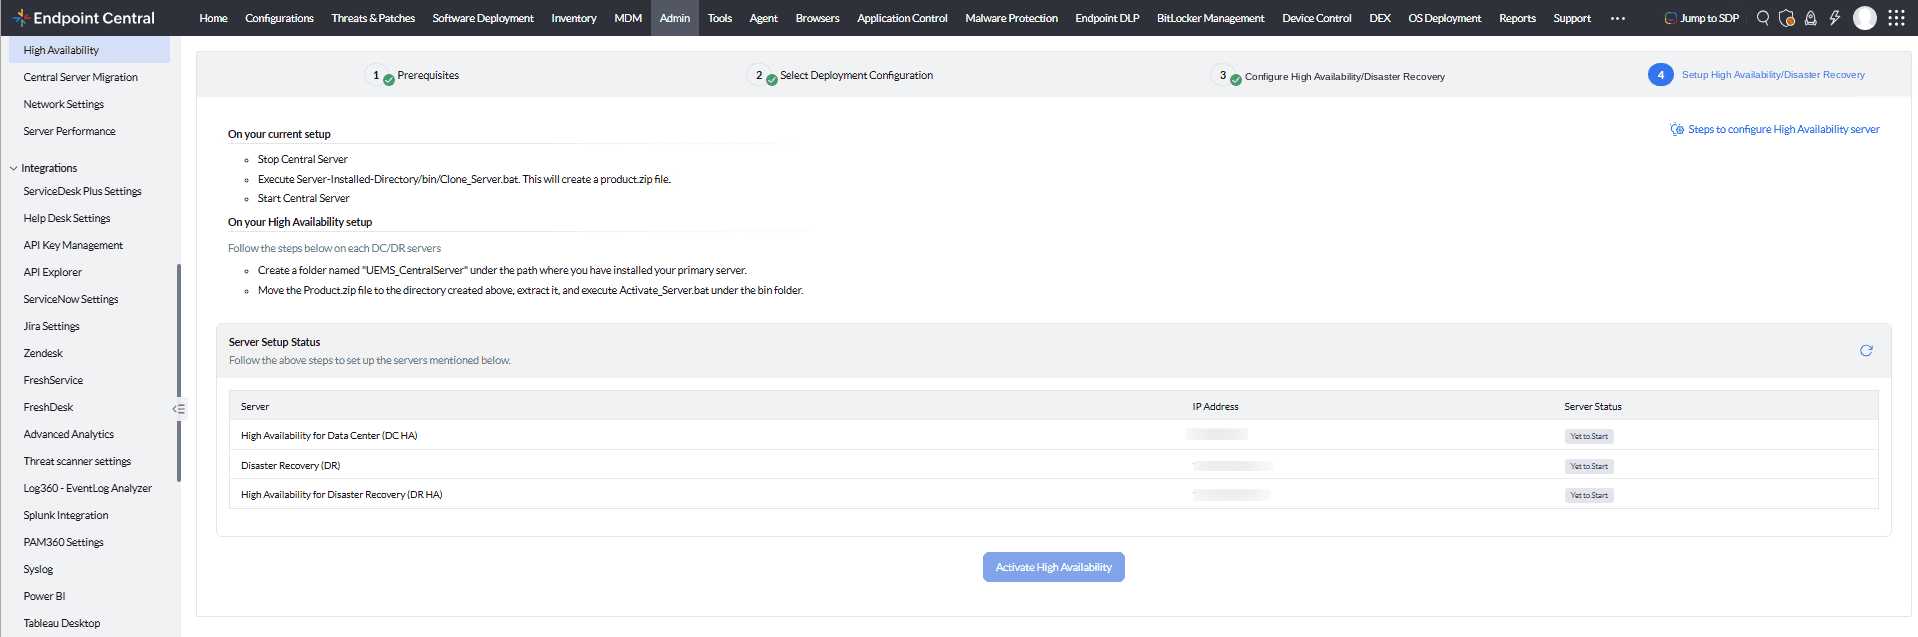
Step 3: Server Setup Status (Before Cloning)
After the restart, all three standby servers (High Availability for Data Center(DC HA) server, Disaster Recovery(DR) server, and High Availability for Disaster Recovery(DR HA) server are listed with "Yet to Start" status.
Step 4: Cloning Server Components
Follow these steps on the Active Data Center server:
- Stop the Endpoint Central service on the Active Data Center server.
- Open the command prompt in administrator mode and navigate to <Server-Installed-Directory>\UEMS_CentralServer\bin.
- Execute Clone_Server.bat to create a backup of server components.
- A new zip file "Product.zip" will be created in the UEMS_CentralServer folder.
- Start the Endpoint Central Server.
<Server-Installed-Directory>\UEMS_CentralServer\bin>Clone_Server.bat
Step 5: Activate High Availability
On each standby server (High Availability for Data Center(DC HA) server, Disaster Recovery(DR) server, and High Availability for Disaster Recovery(DR HA) server), perform the following:
- Create a folder named "UEMS_CentralServer" under the path where you have installed your Active Data Center server.
- Move the Product.zip file to the directory and extract it.
- Execute Activate_Server.bat under the bin folder.
C:\Program Files\UEMS_CentralServer\bin>Activate_Server.bat
Repeat these steps on each Standby server (High Availability for Data Center, Disaster Recovery, and High Availability for Disaster Recovery). All three must show "Success" before proceeding.
Step 6: Data Center + Disaster Recovery Servers Overview — Dashboard (4 Nodes)
After activation, the overview shows all four servers across both sites: Data Center(DC) server (Active), High Availability for Data Center(DC HA) sever (Standby), Virtual IP (Active) on the Data Center site and Disaster Recover(DR) server (Standby), High Availability for Disaster Recovery(DR HA) server (Standby), Virtual IP (Standby) on the Disaster Recover site.
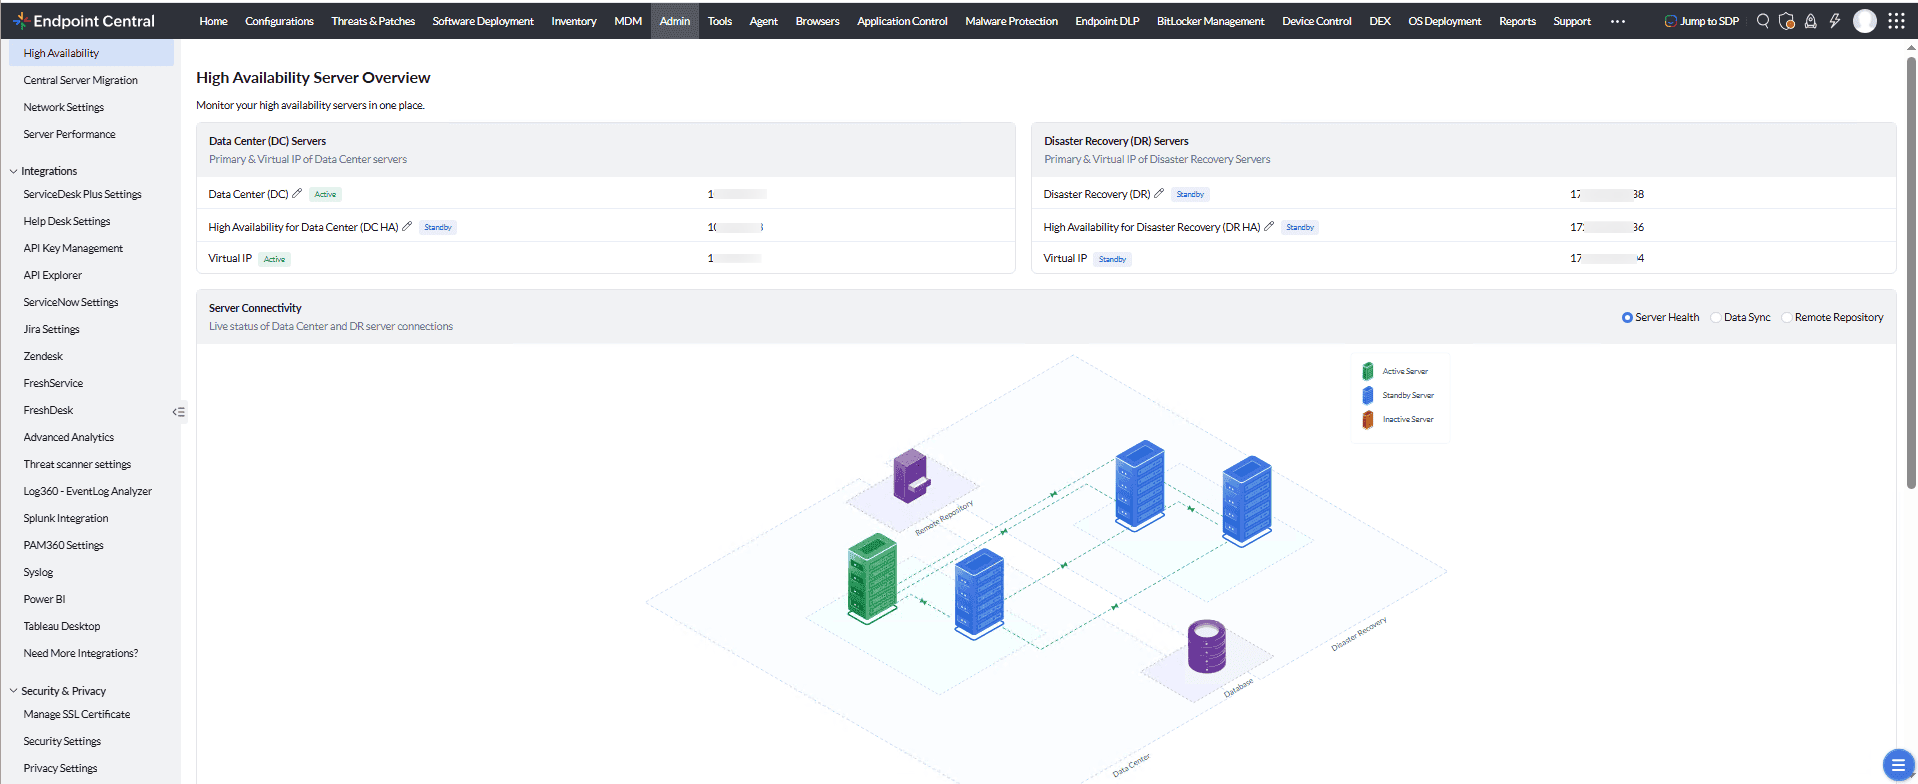
4-Node Server Overview — Server Health with connectivity diagram
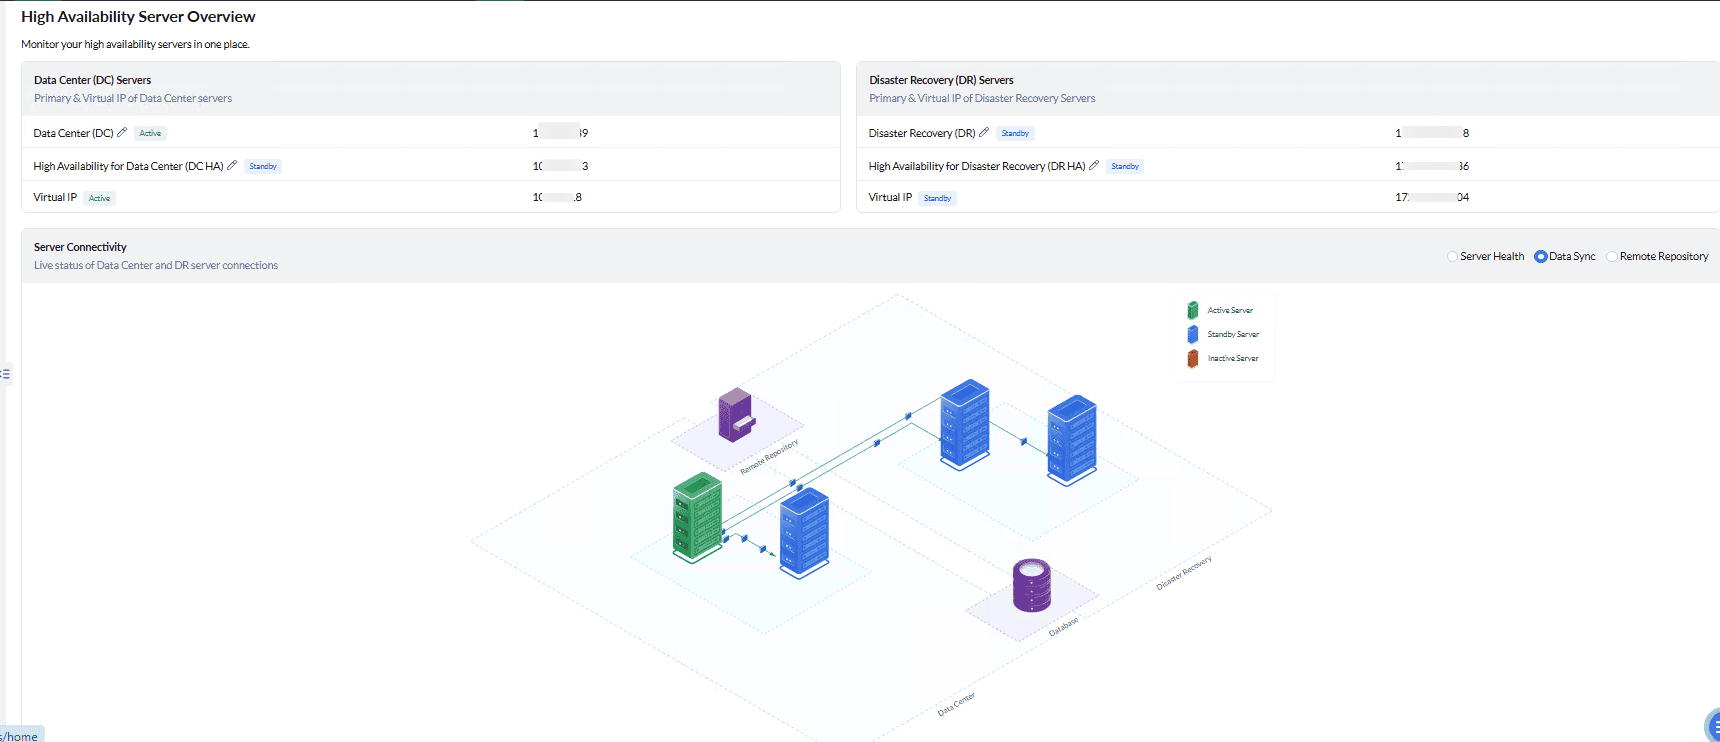
Health Checks After Configuration
- Node Connectivity — Verifies that the servers can communicate with each other, which is essential for data replication and failure detection. A status of Reachable confirms the connection is working properly.
- Patch Store & Software Repository Connectivity — Displays whether the server can independently access the patch store and software repository. A status of Reachable confirms that both sources are accessible and operational.
- Replication Status — Indicates whether data is being copied from the Active server to the standby server correctly. A status of Success confirms that the standby server is fully synchronized with the latest data.
- Upgrade Status — Indicates whether both servers are running the same software version. A status of Up to Date confirms there are no version mismatches.
- Machine Time Difference — Shows the clock difference between the Active and standby servers. A reading of 0 Seconds — Synchronized confirms both servers are in perfect time sync.
- Agent & Distribution Server Update Status — Confirms that all managed devices are aware of the high-availability configuration. A status of All Updated Successfully means devices will automatically connect to the standby server during a failover without requiring any manual intervention.
Support
If you have any queries, kindly reach out to endpointcentral-support@zohocorp.com.