Archive
The log files processed by EventLog Analyzer are archived periodically for internal, forensic, and compliance audits. You can configure the following as per your requirements:
- Archiving interval
- Type of logs that need to be archived
- Storage location of the archived files
- Retention period
The archived files can be encrypted and time-stamped to make them secure and tamper-proof.
How to view archived logs ?
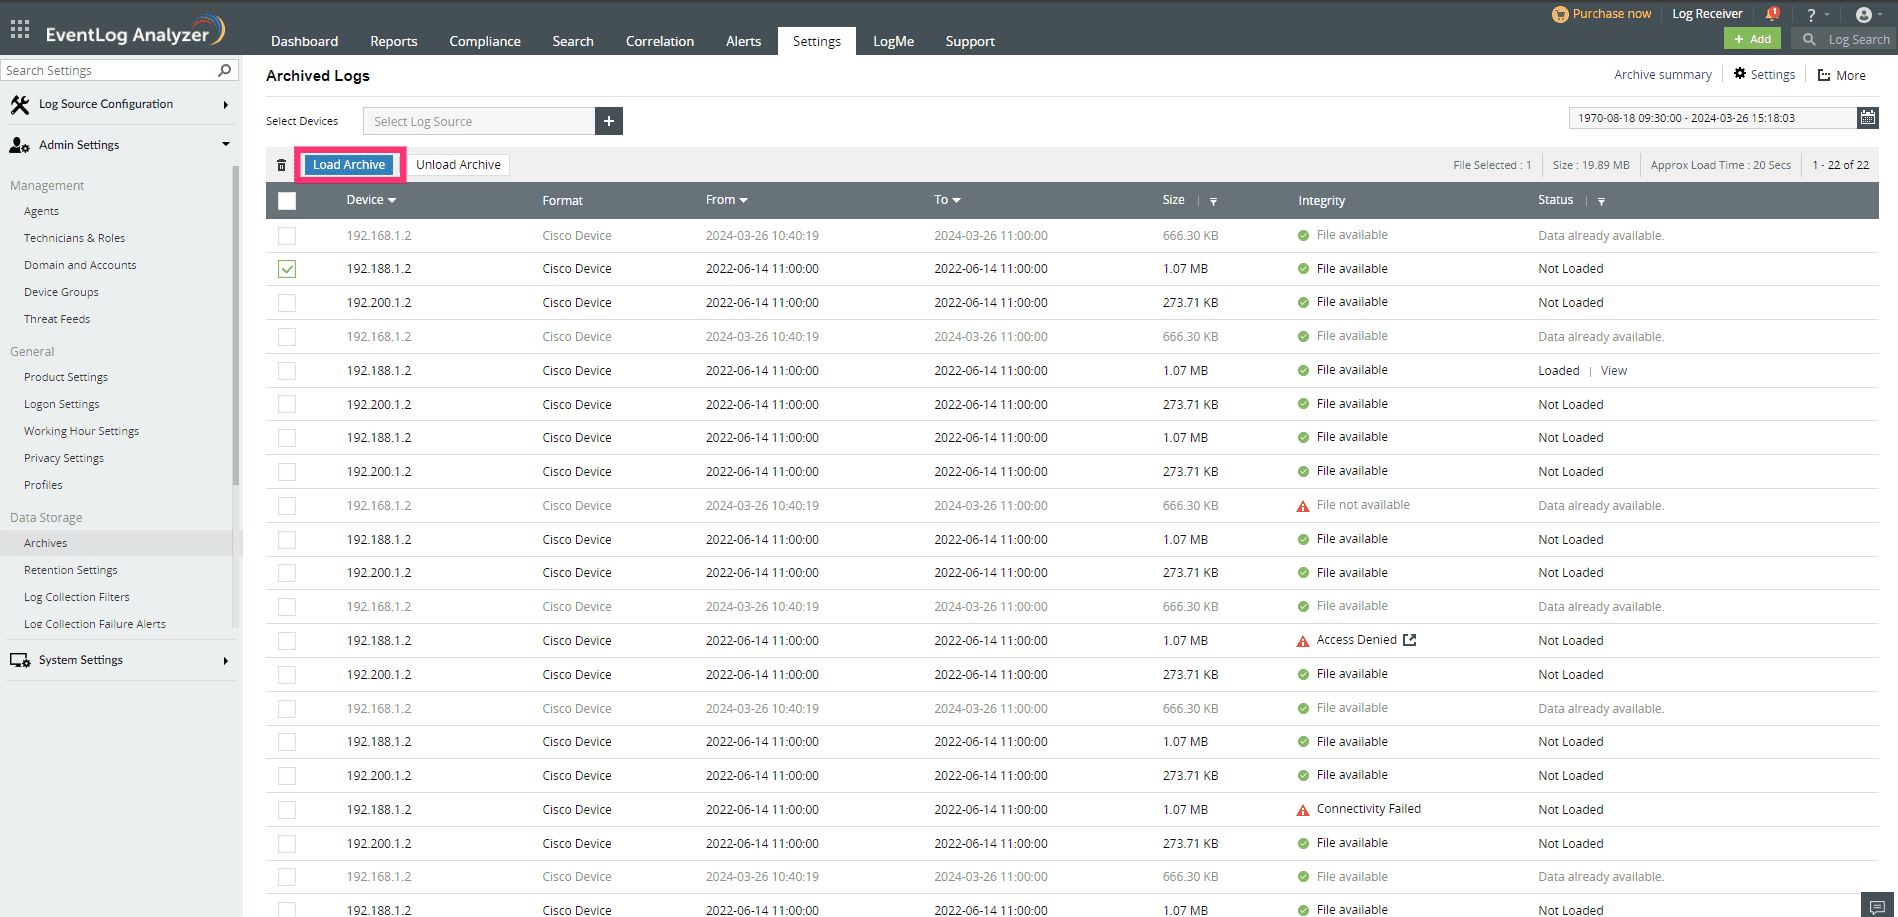
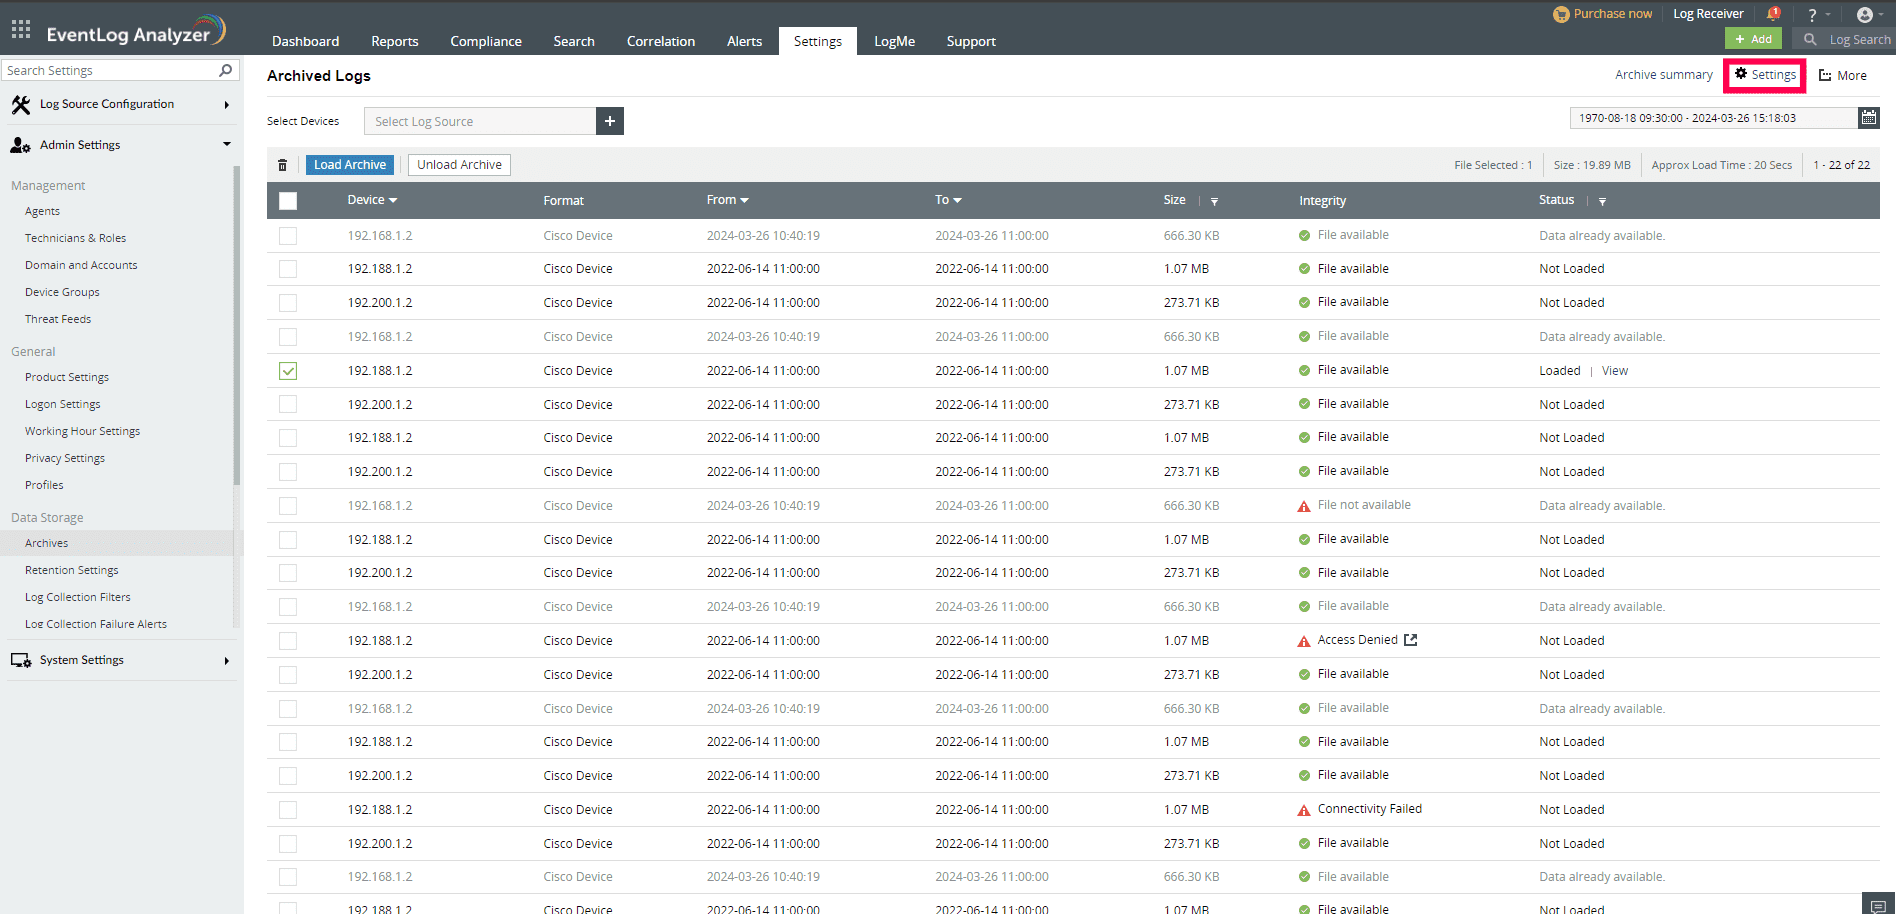
To view your archived log data, go to the Settings tab in EventLog Analyzer and navigate to Admin Settings > Data Storage > Archives
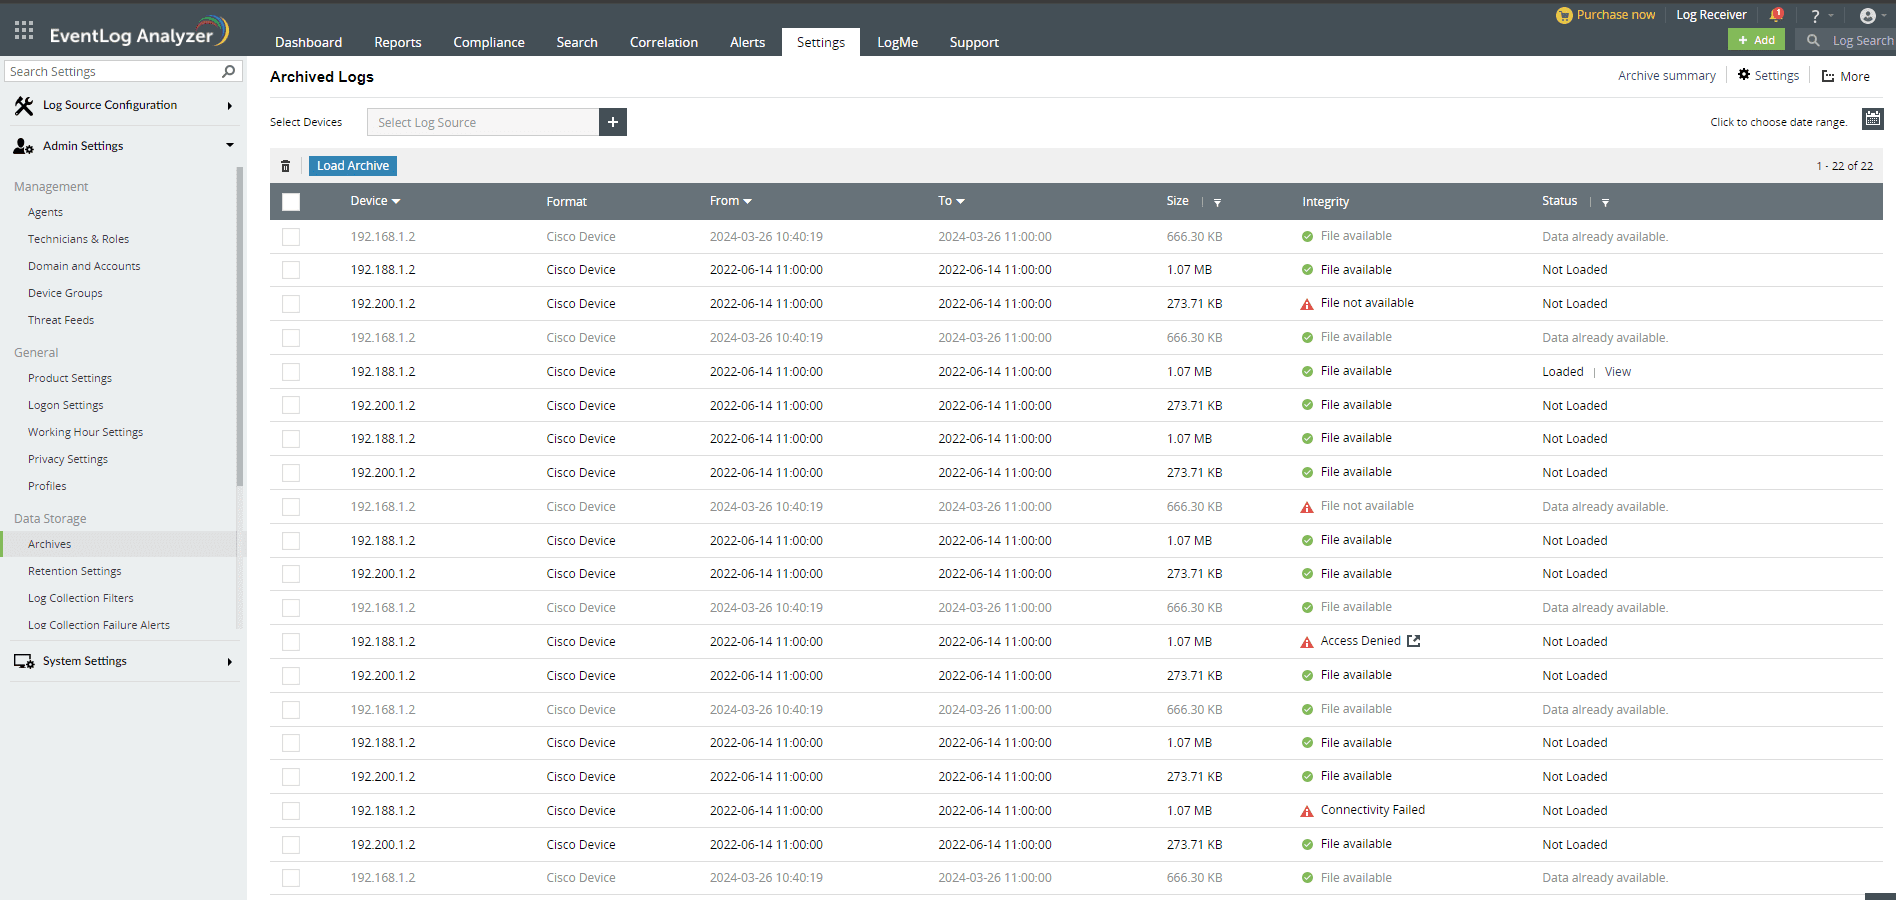
The Archived Logs page contains the following information:
- Device - List of devices from which the logs are being collected
- Format - Device type
- From and To - The time frame denotes the time period during which the logs were collected and archived by EventLog Analyzer.
- Size - Size of the archived log data collected from each device.
- Integrity - The integrity of the archived files, whether they are intact or have been tampered with, is denoted by the following states:
- Verified - Archived logs are intact.
- Archive file is missing - When the flat file is not found during the compression/zipping process.
- Archive file not found - When an archived file is not available in the location where it was originally stored in the DB.
- Archive file is tampered - When the original archive file is edited/some part of the file is deleted externally.
Note: In case a file has been deleted or tampered with, an email notification will be sent immediately containing the message "Archive file is tampered".
- Archive file available - When the archive integrity check is disabled, both the verified and tampered files will carry this status.
- Archive file not available - When the archive integrity check is disabled and the archive file is either missing or not found in the original location, this status will be shown.
- Access Denied - When the remote location can't be accessed where the archives are stored
- Connectivity failed - When the Amazon S3 bucket is not accessible due to network connectivity where archives are stored
- The status of the archival is indicated by the following four different states:
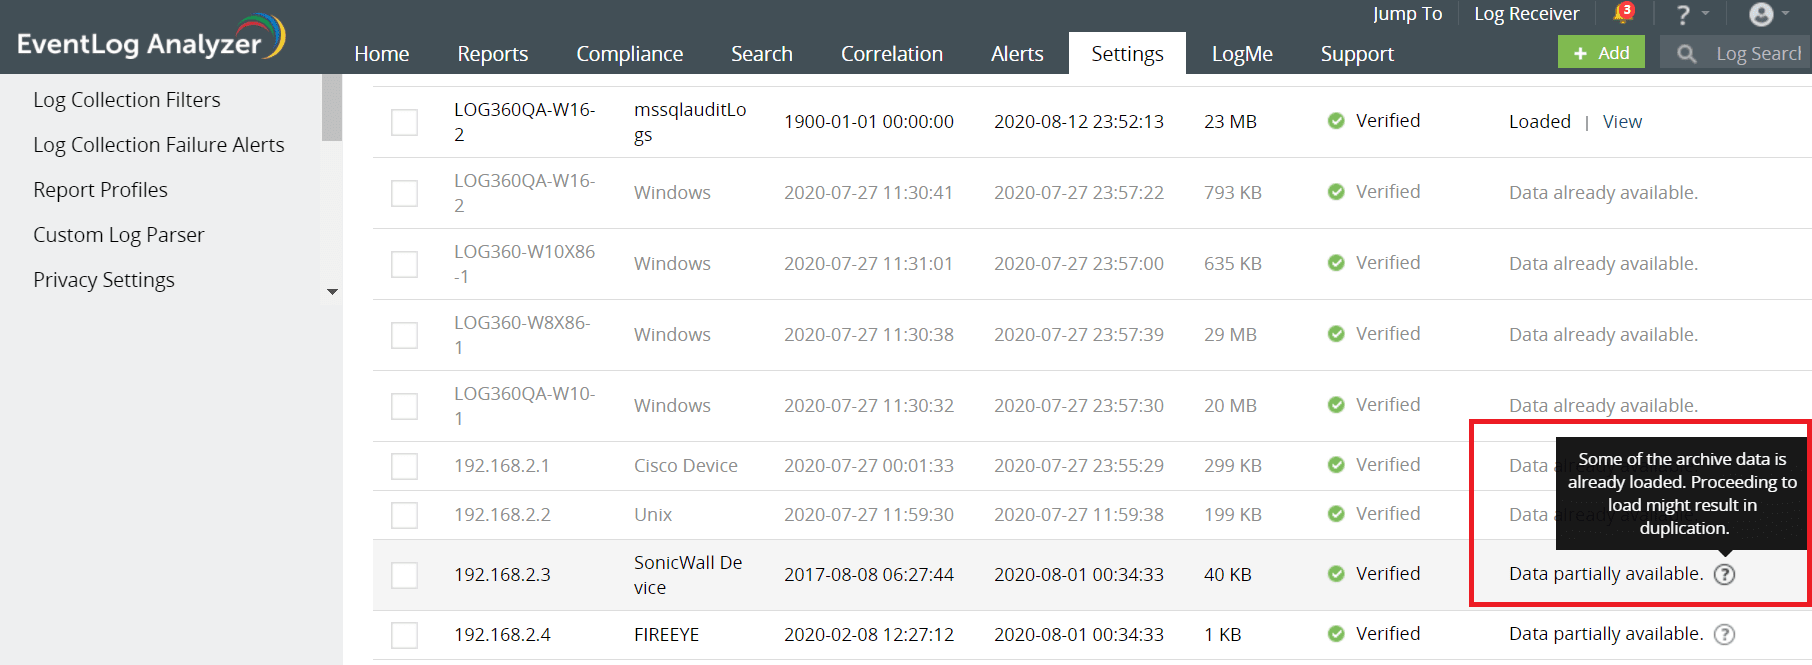
- Loaded - The archived files are already loaded to the database. Click View to view the file
- Data already available - If the archive file is in Elastic Search database
- Data partially available - If some of the archive data is in ElasticSearch database
- Not Loaded - If the archive file is not in ElasticSearch database.
- File yet to be uploaded - If the archive file is not transferred to the specified zip location
How to view a specific archival file?
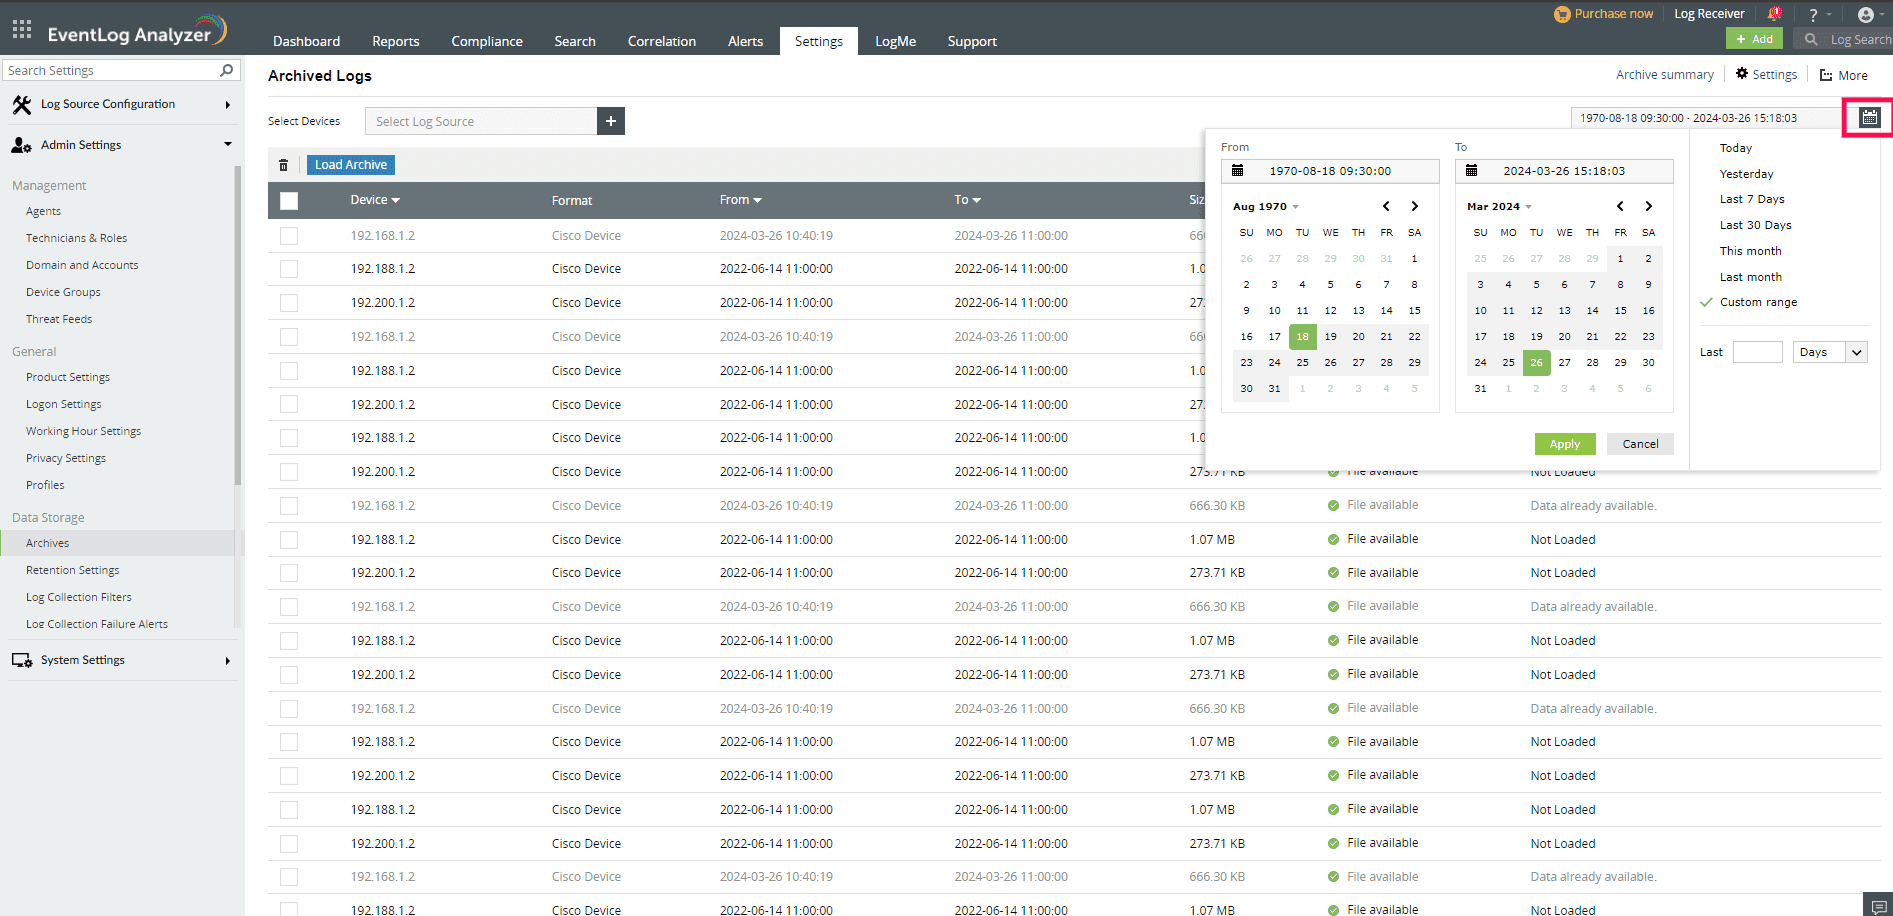
- To view a specific archival file, click on the check box corresponding to Device.
- To view the log files that were archived during a specific time, click on the calendar icon in the top right corner of the page and select the desired period.
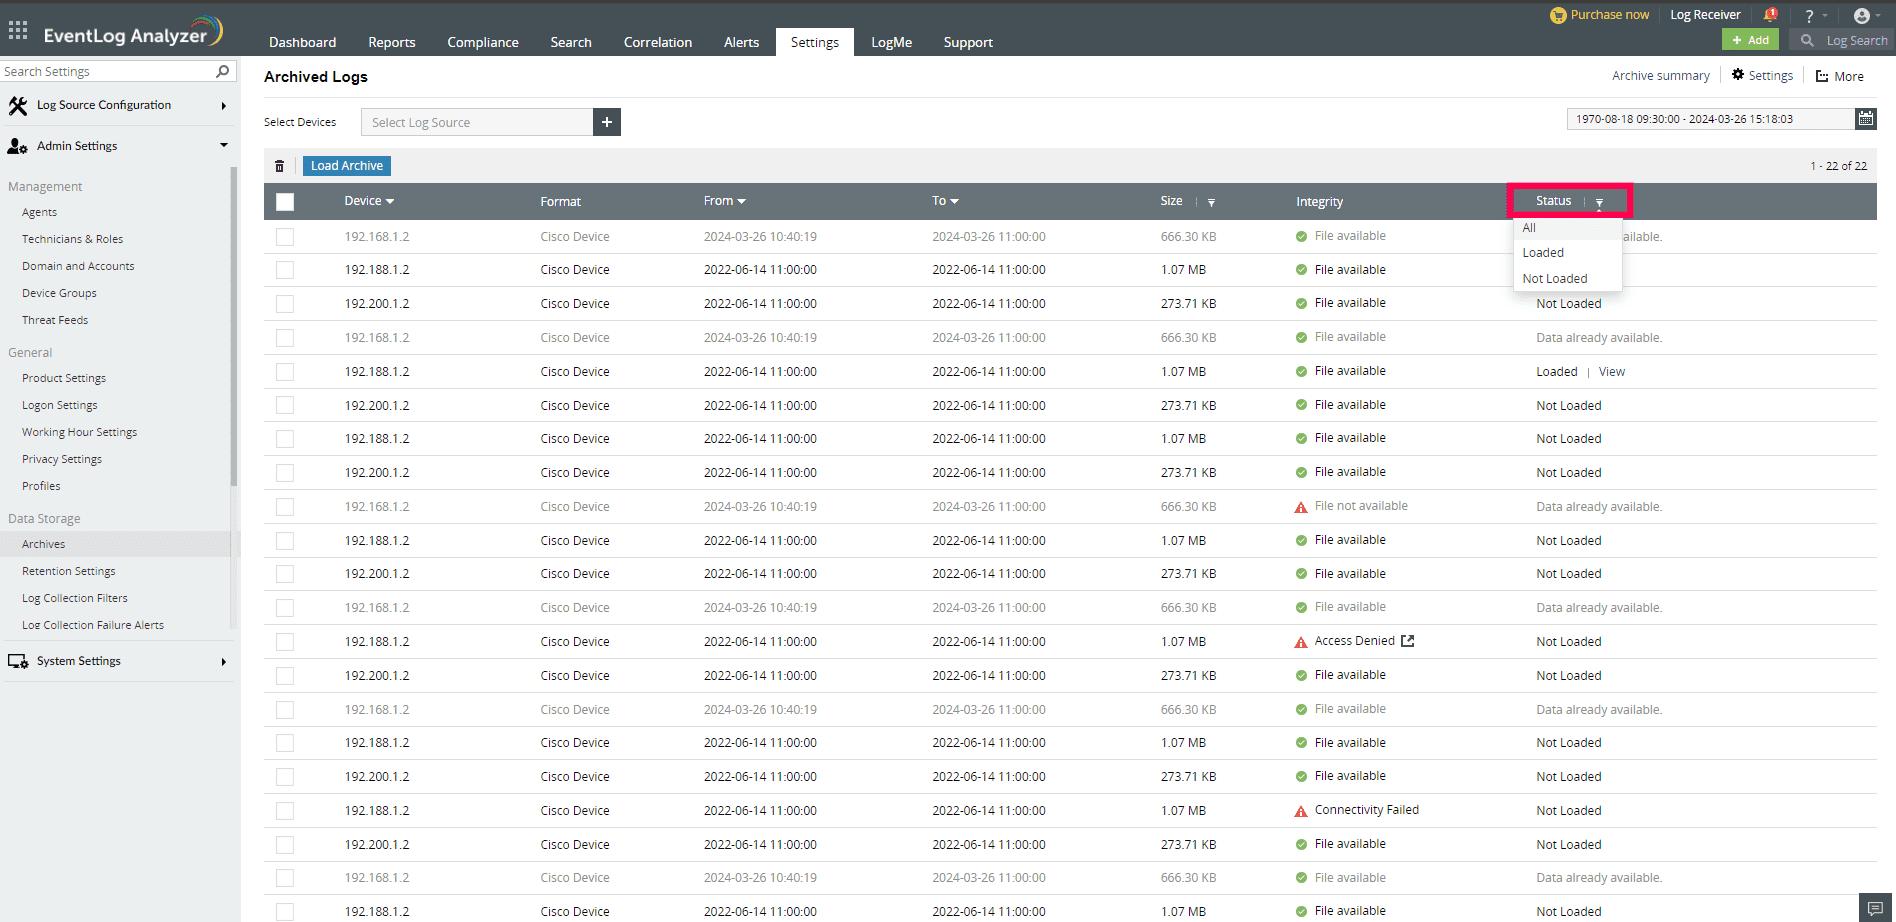
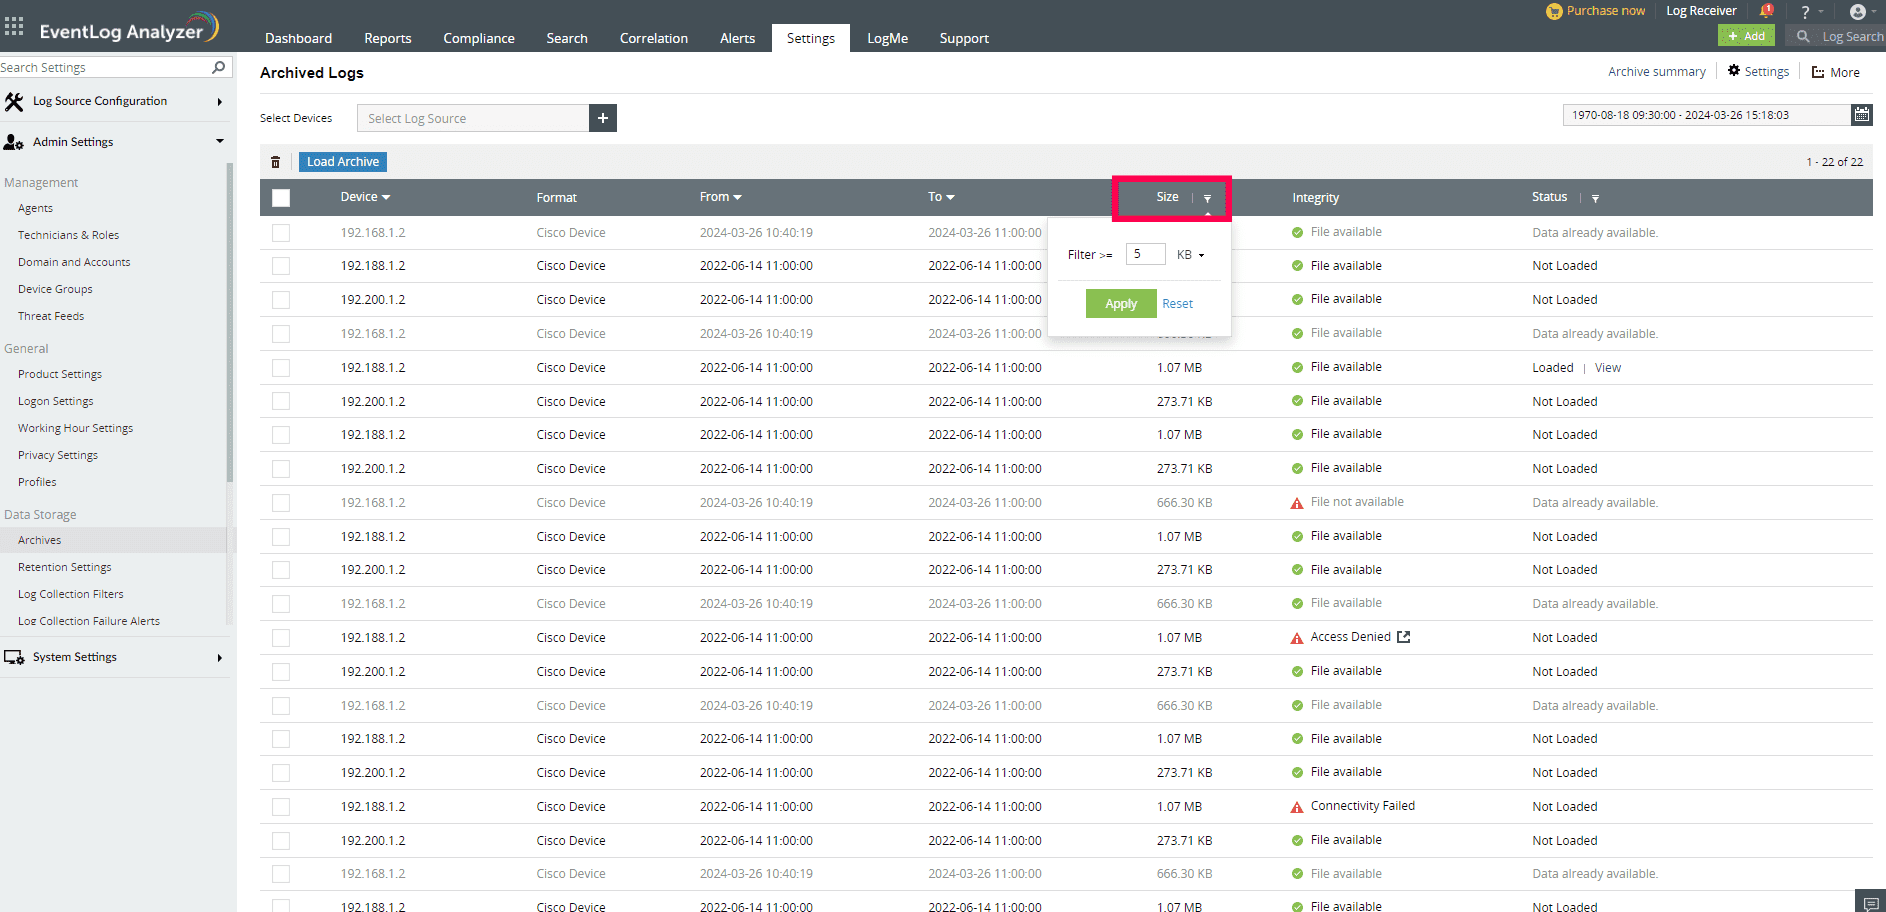
How to filter and view a set of archive files?
To view files based on the size or status of the archive data, click on the filter icon next to Size or Status and set the appropriate values. The files will be filtered based on the given values.
How to sort the list of archive files?
Click on the drop down icon next to Device/From/To, to sort the list in ascending order based on the respective column values. By clicking again, the list will be sorted in descending order.

How to load archive files?
To load your archived files, go to the Settings page in EventLog Analyzer and navigate to Admin Settings > Data Storage > Archives
- Check the status of the archived file corresponding to the device. If it shows Not Loaded, click on the Load Archive button to load the files to the database.
- Once the status of the file changes to Loaded, click on the corresponding View button to view the files.
Note: Archives stored in shared storage and S3 buckets will be downloaded to local storage and loading will be initiated.
Note: To unload a file, select the file and click on the Unload Archive button.

Note: If the status of the file says Data partially available and if you proceed to load the archive, there could be a duplication of the data.
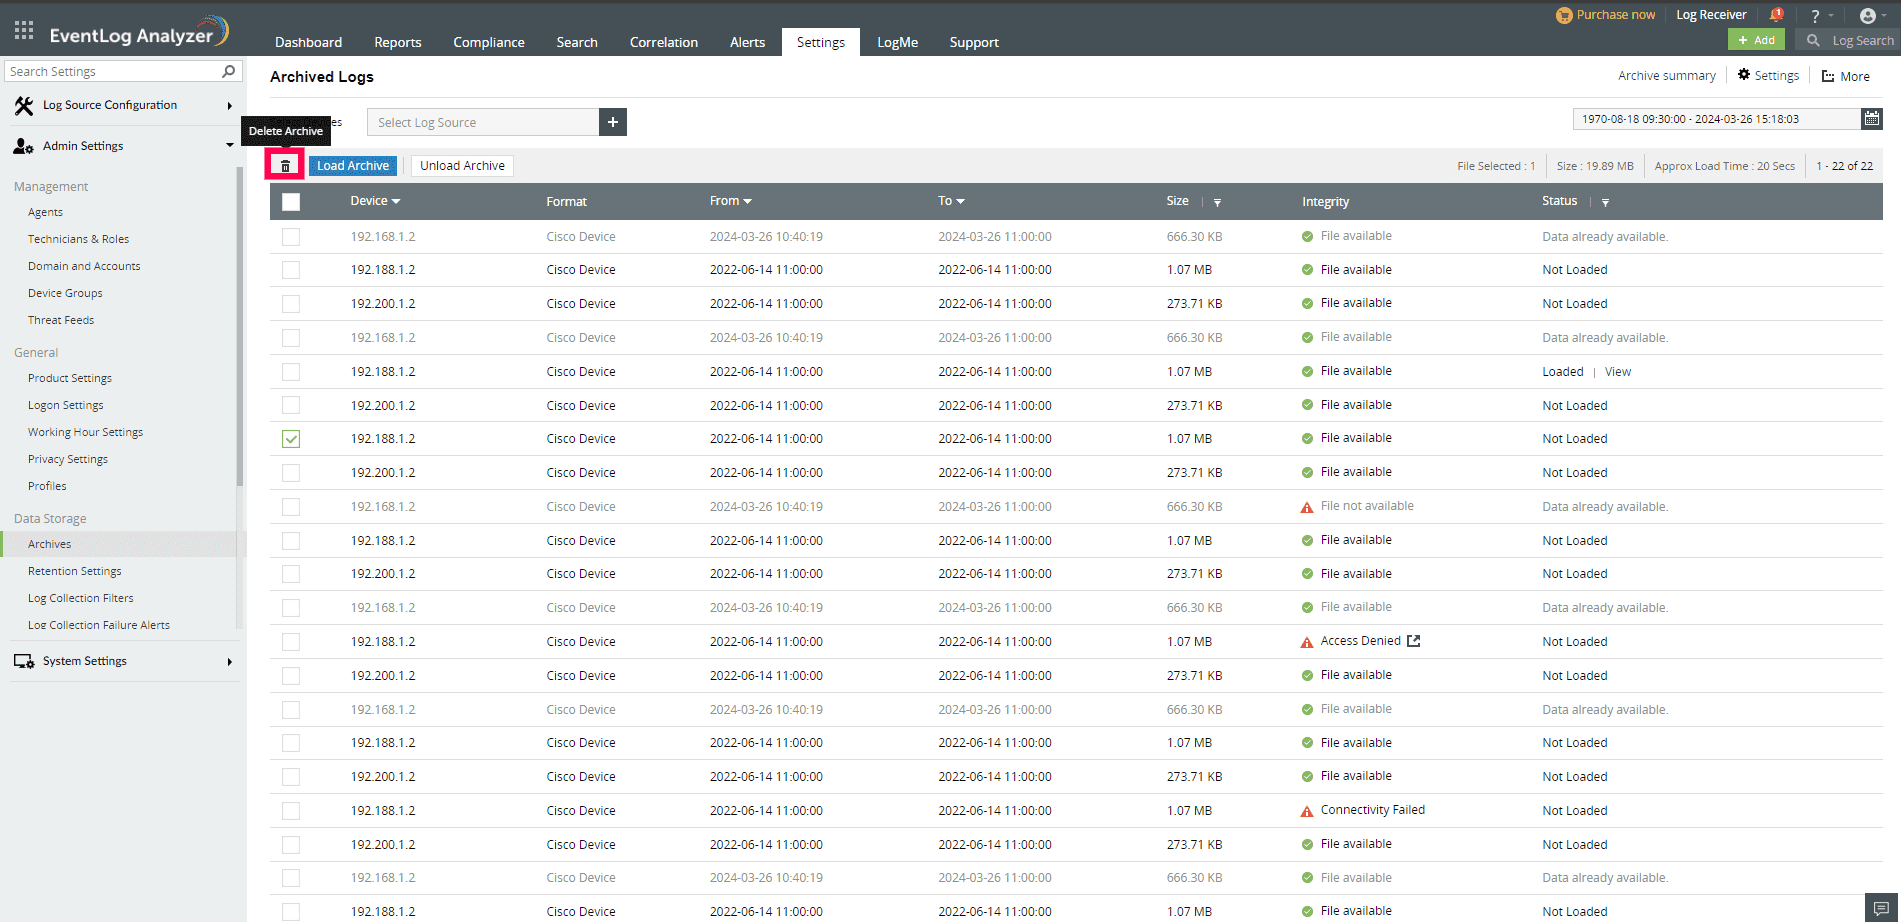
How to delete archive files ?
To delete your archived files, go to the Settings page in EventLog Analyzer and navigate to Admin Settings > Data Storage > Archives.
- Select the archived file(s) by selecting the respective check box(es).
- Delete the archived file(s) by clicking on the Delete icon.
Note:
Deleting a host from the manage device page removes corresponding archive entries from the UI, but the physical files remain stored if you need to retrieve them in the future. If these archives are no longer needed, ensure to delete the files manually to free up space.
Archives that are in yet-to-be-uploaded status can also be deleted. It will delete the file which is stored in the local temp location
How to configure group based/device based archive settings ?
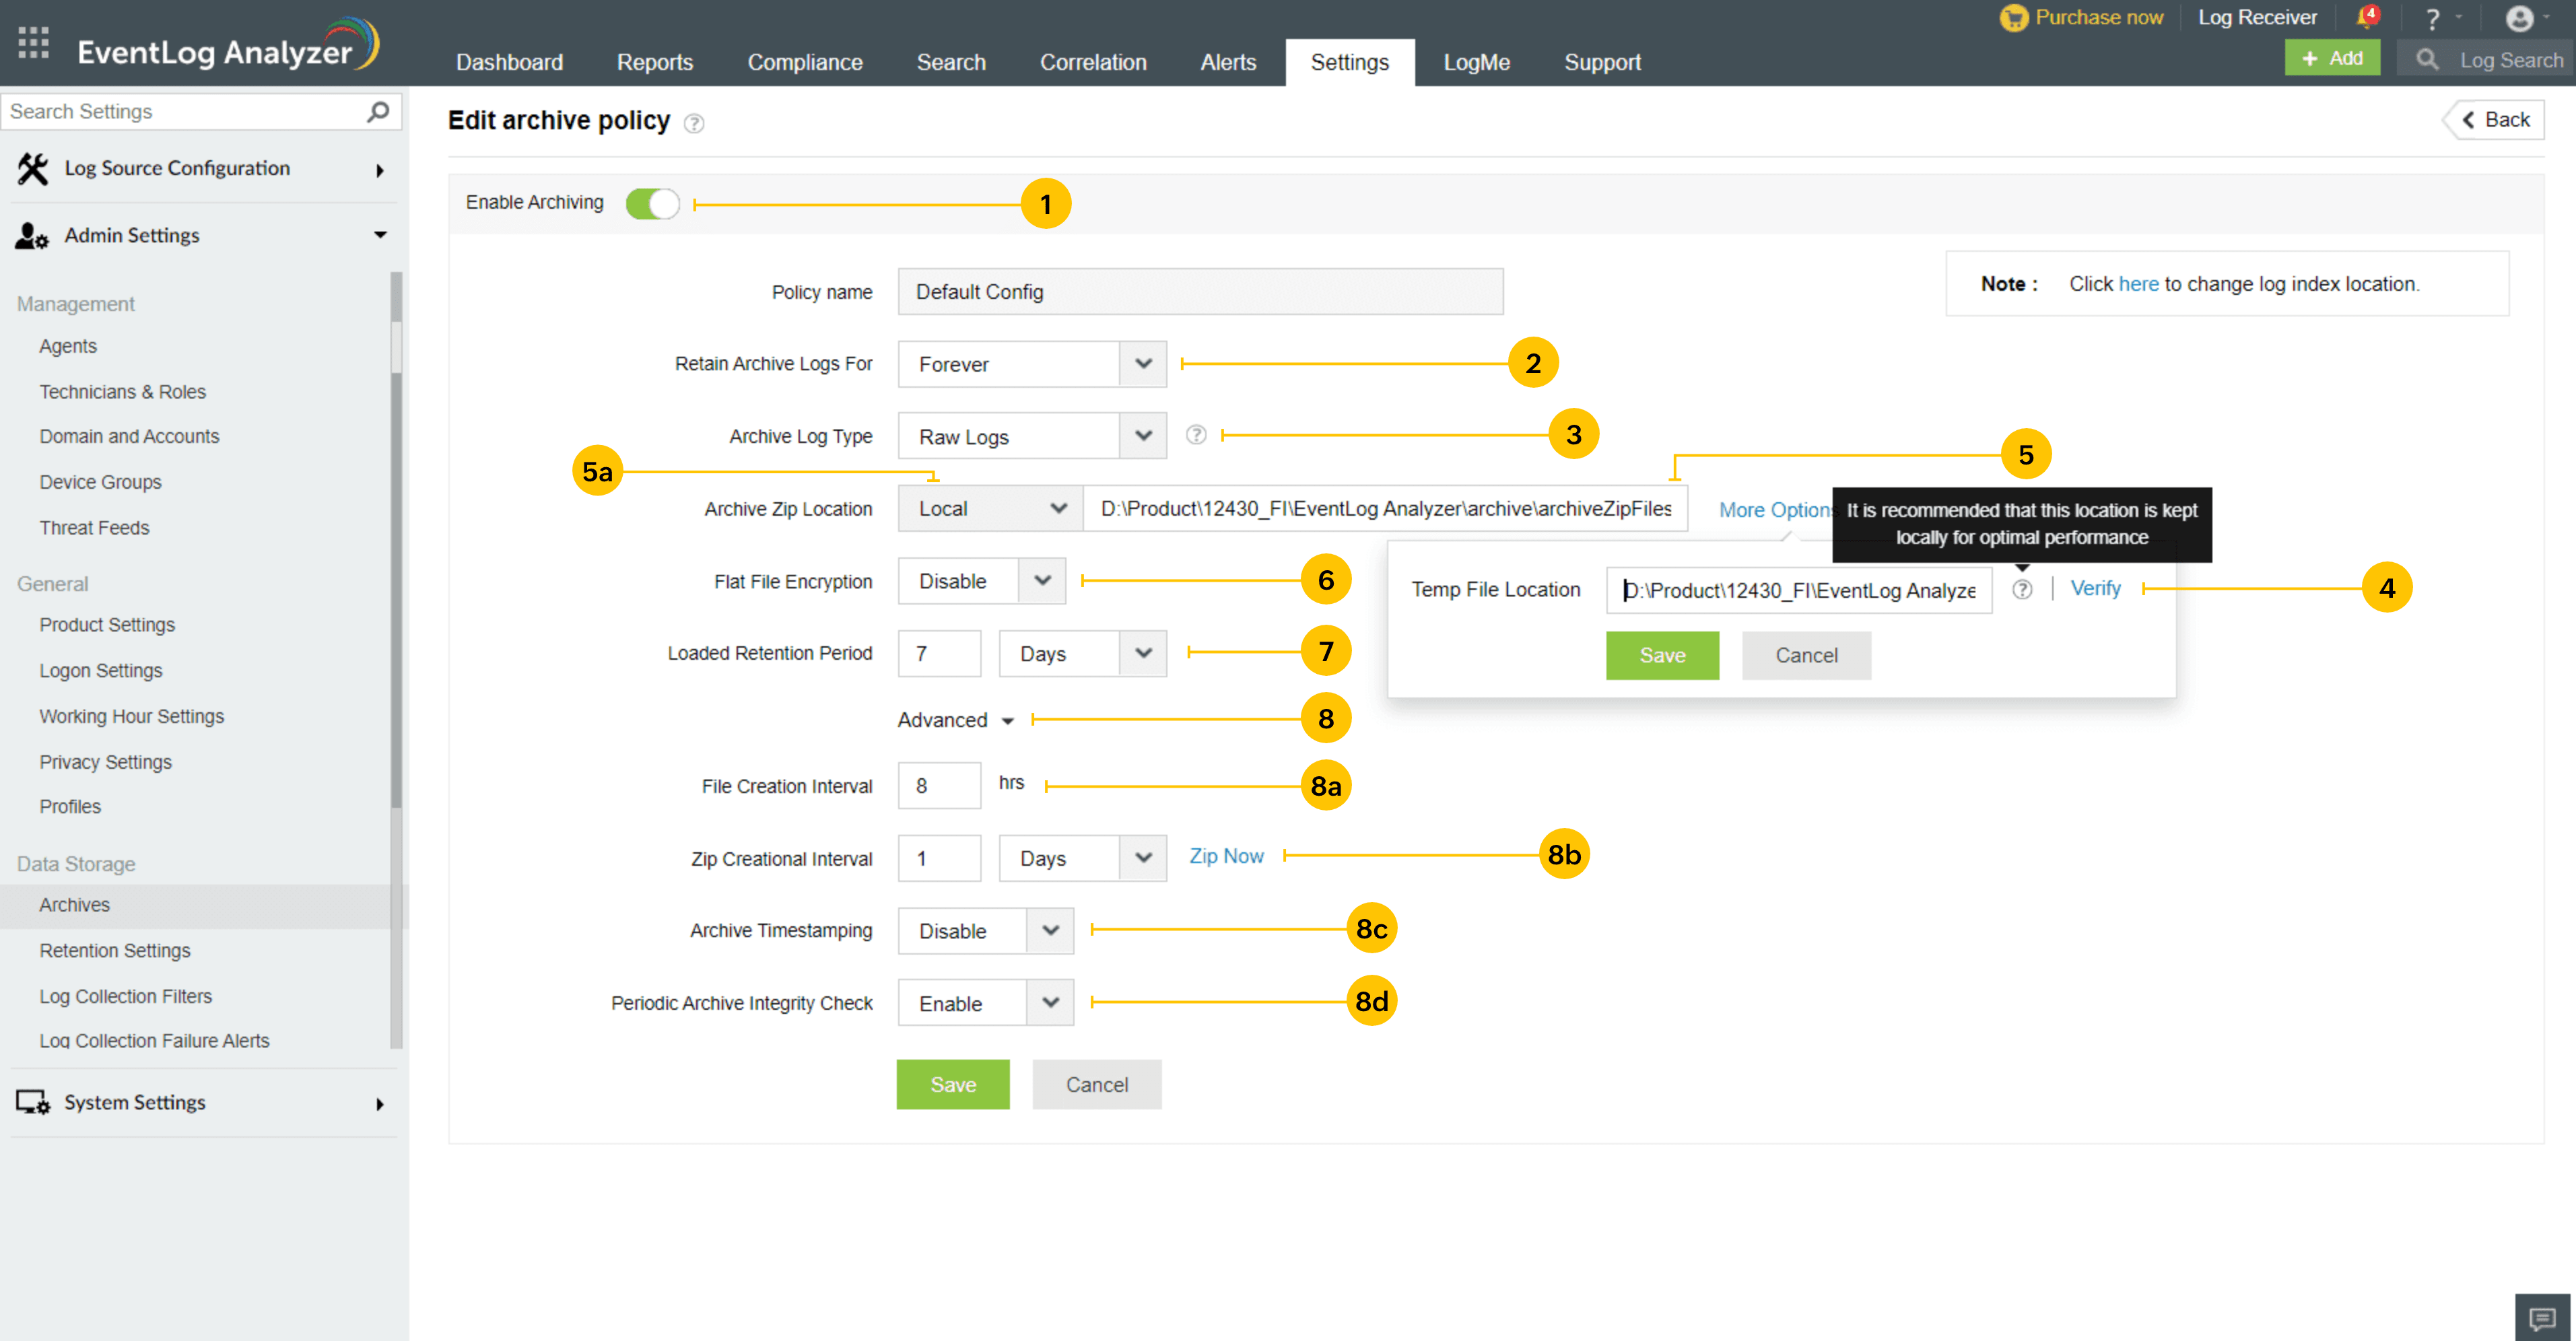
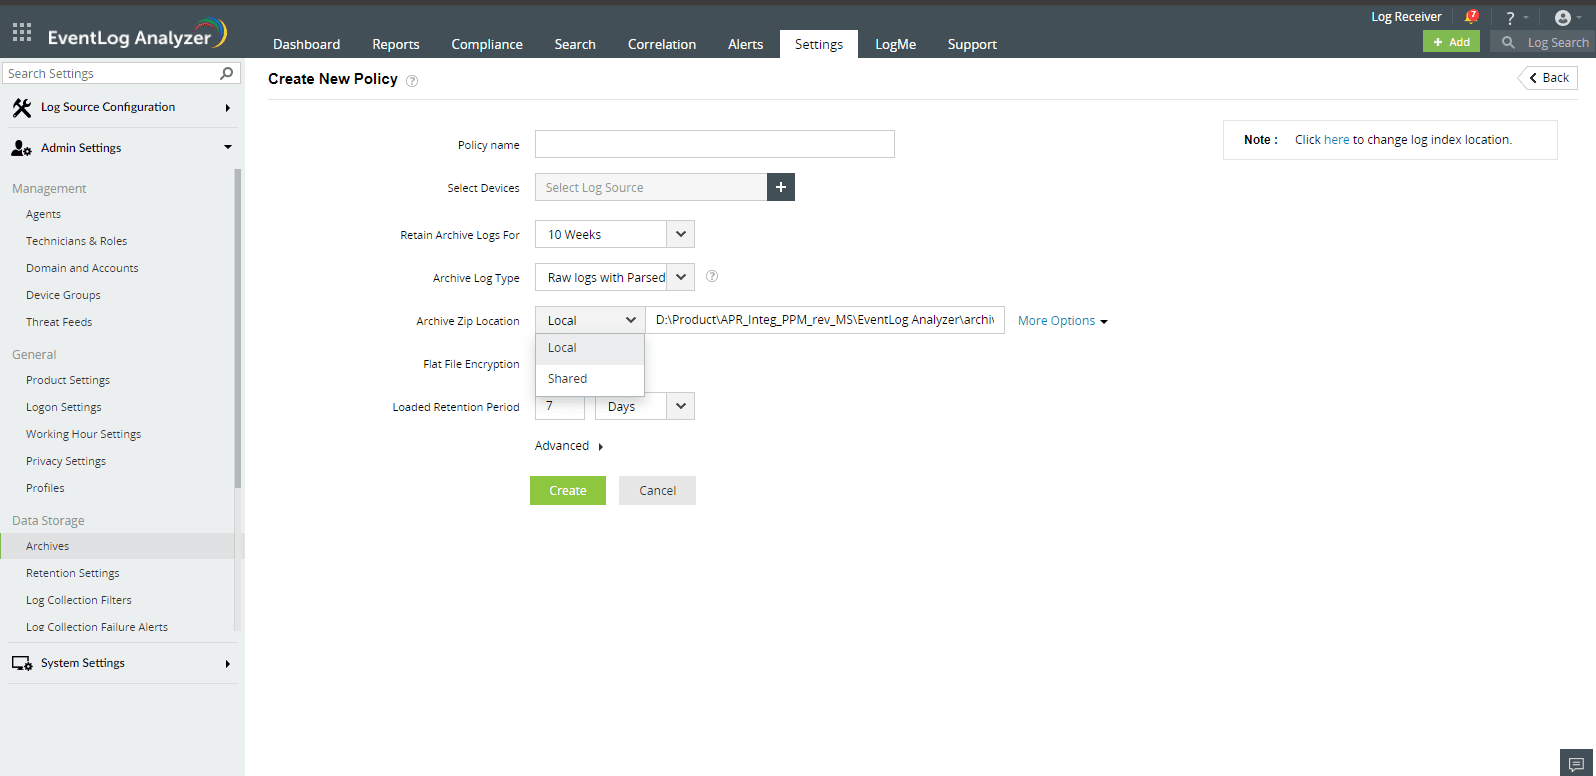
To configure archival settings, click on Settings in the top right corner of the screen.
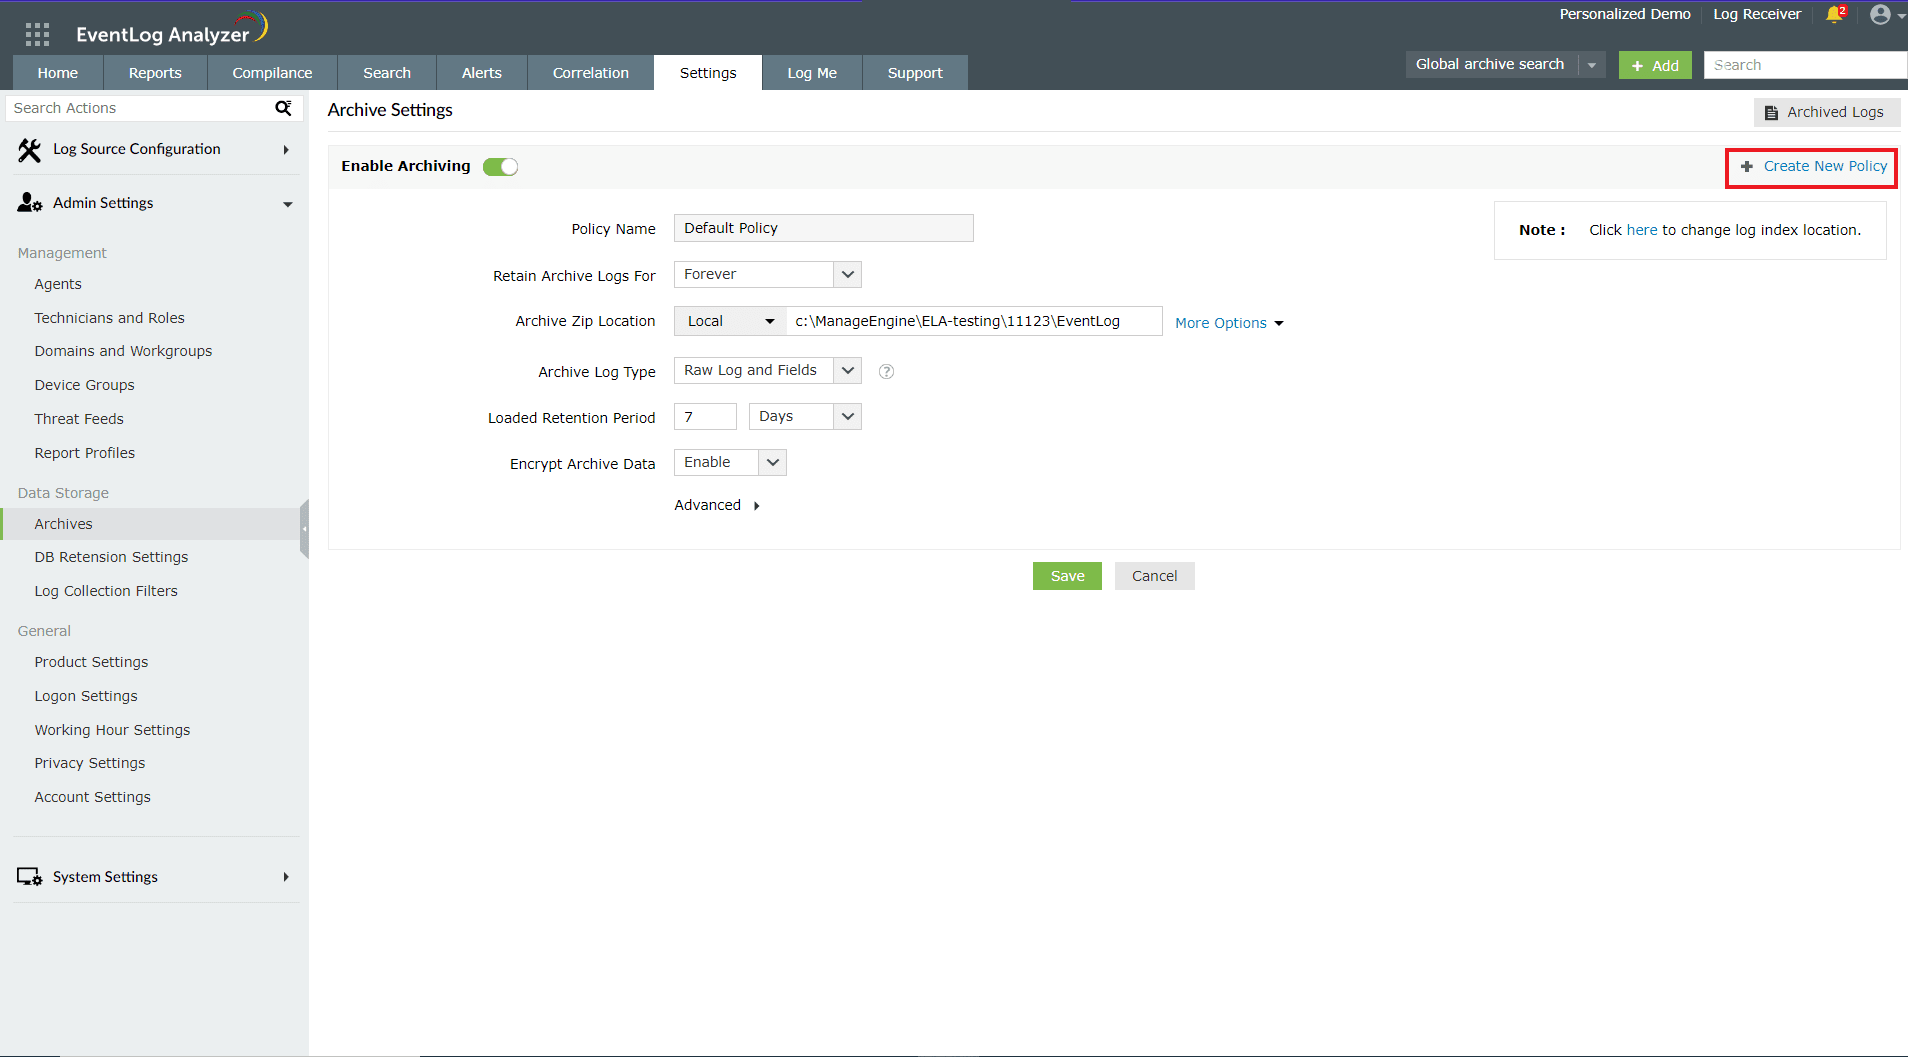
Configure the archive interval, retention period, encryption, time-stamp of the archive files, location to save the archive files and the index files.
Note: The archive and database storage are asynchronus operations. These operations are unrelated.

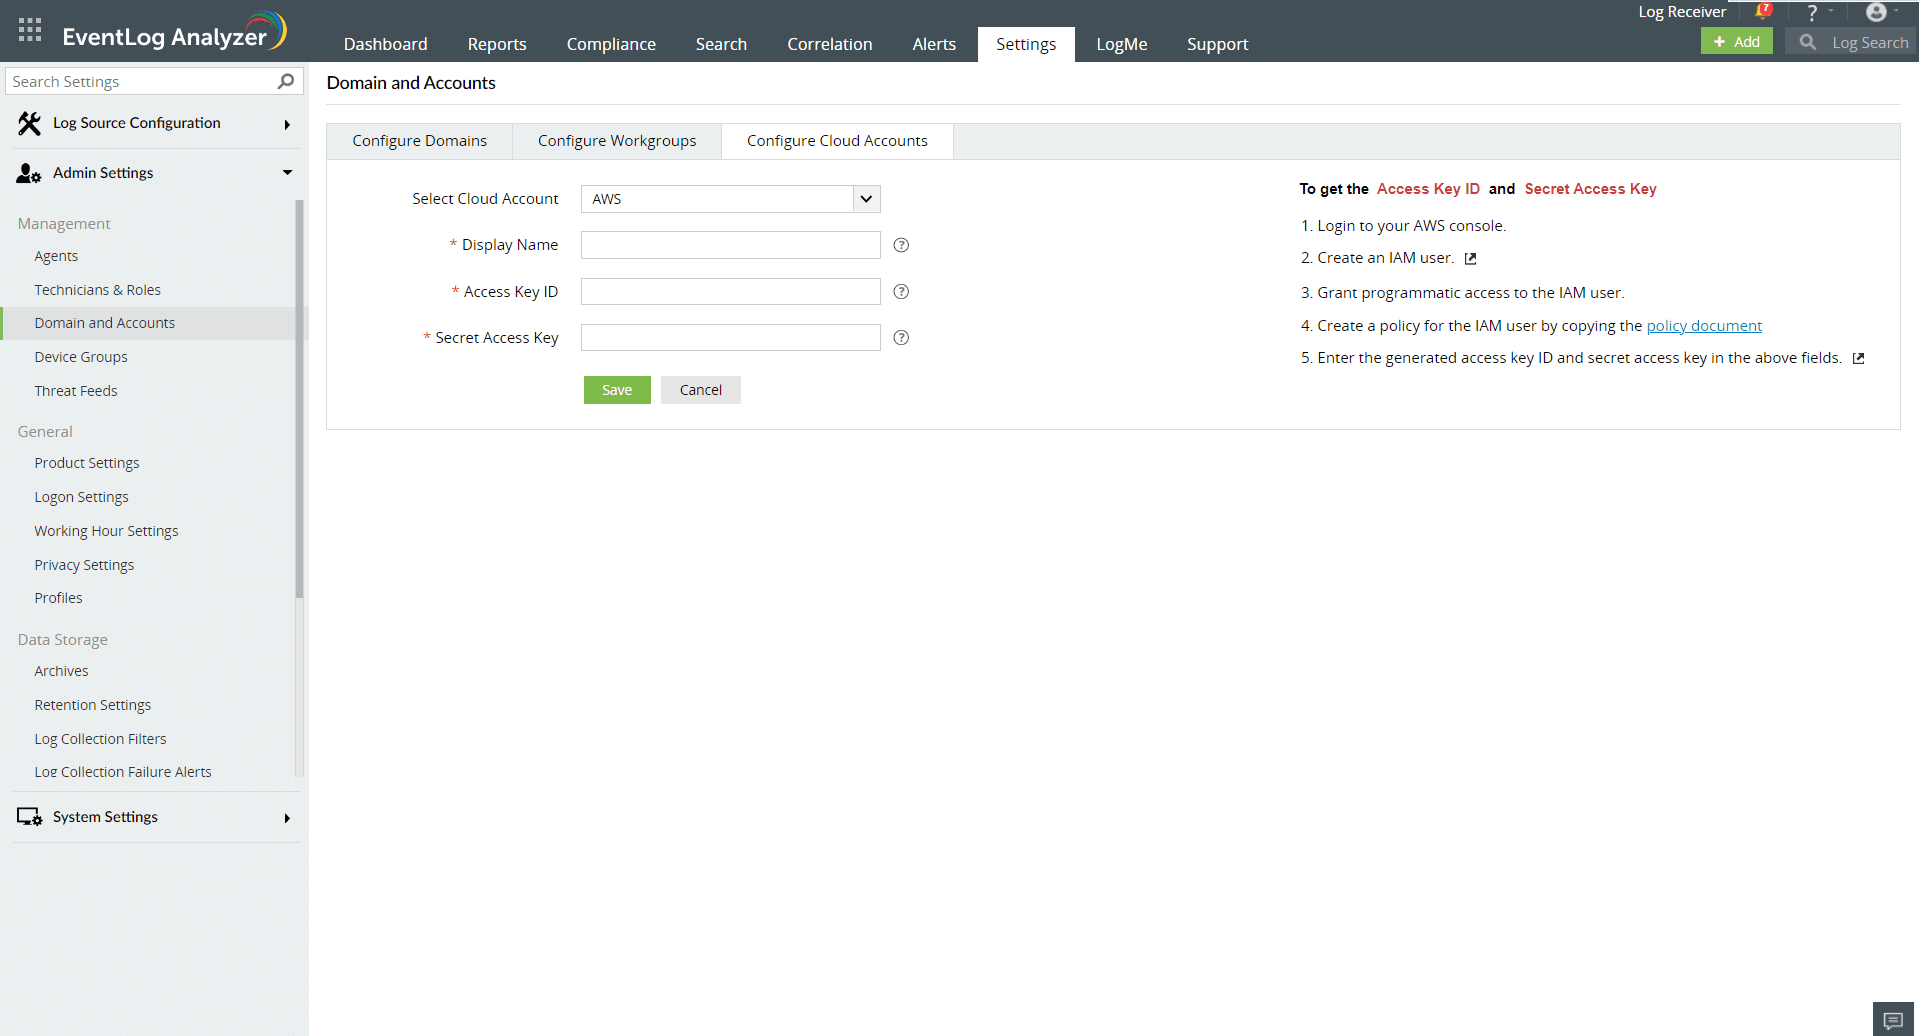
Configure Cloud Account:
- Ensure that archiving is enabled. By default, it is enabled.Use the toggle button to disable archiving.
- Enter the Archive retention period for the archived files. The default period is forever.
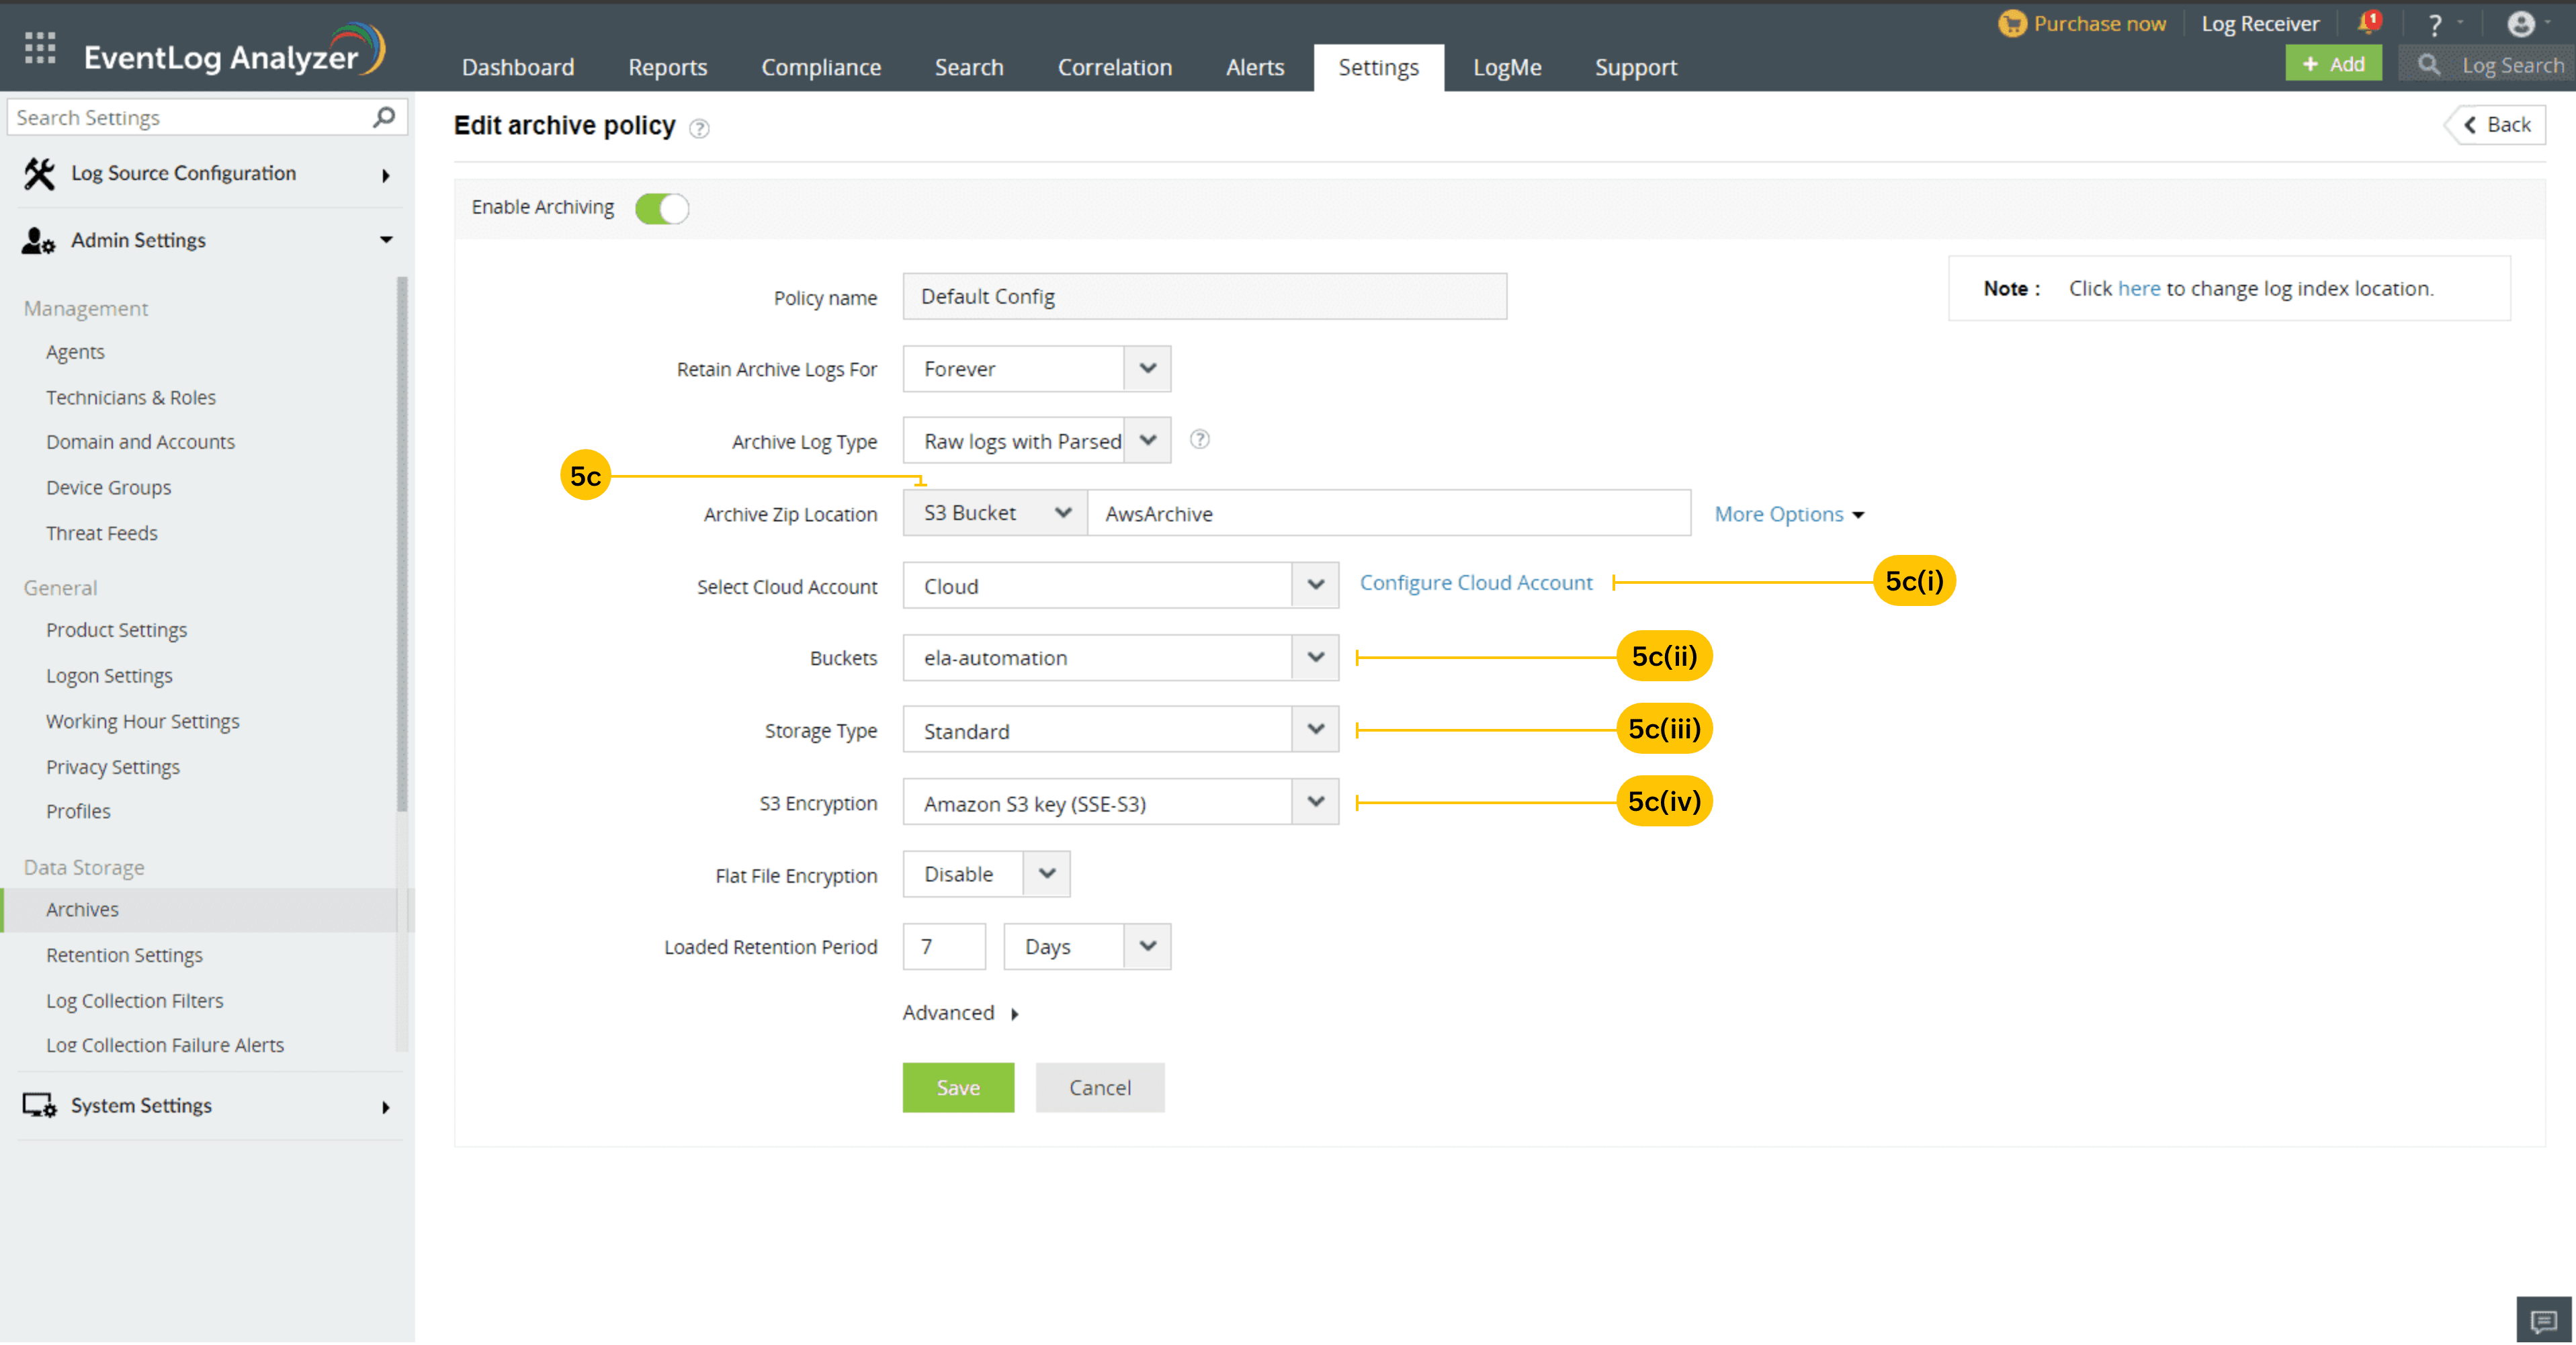
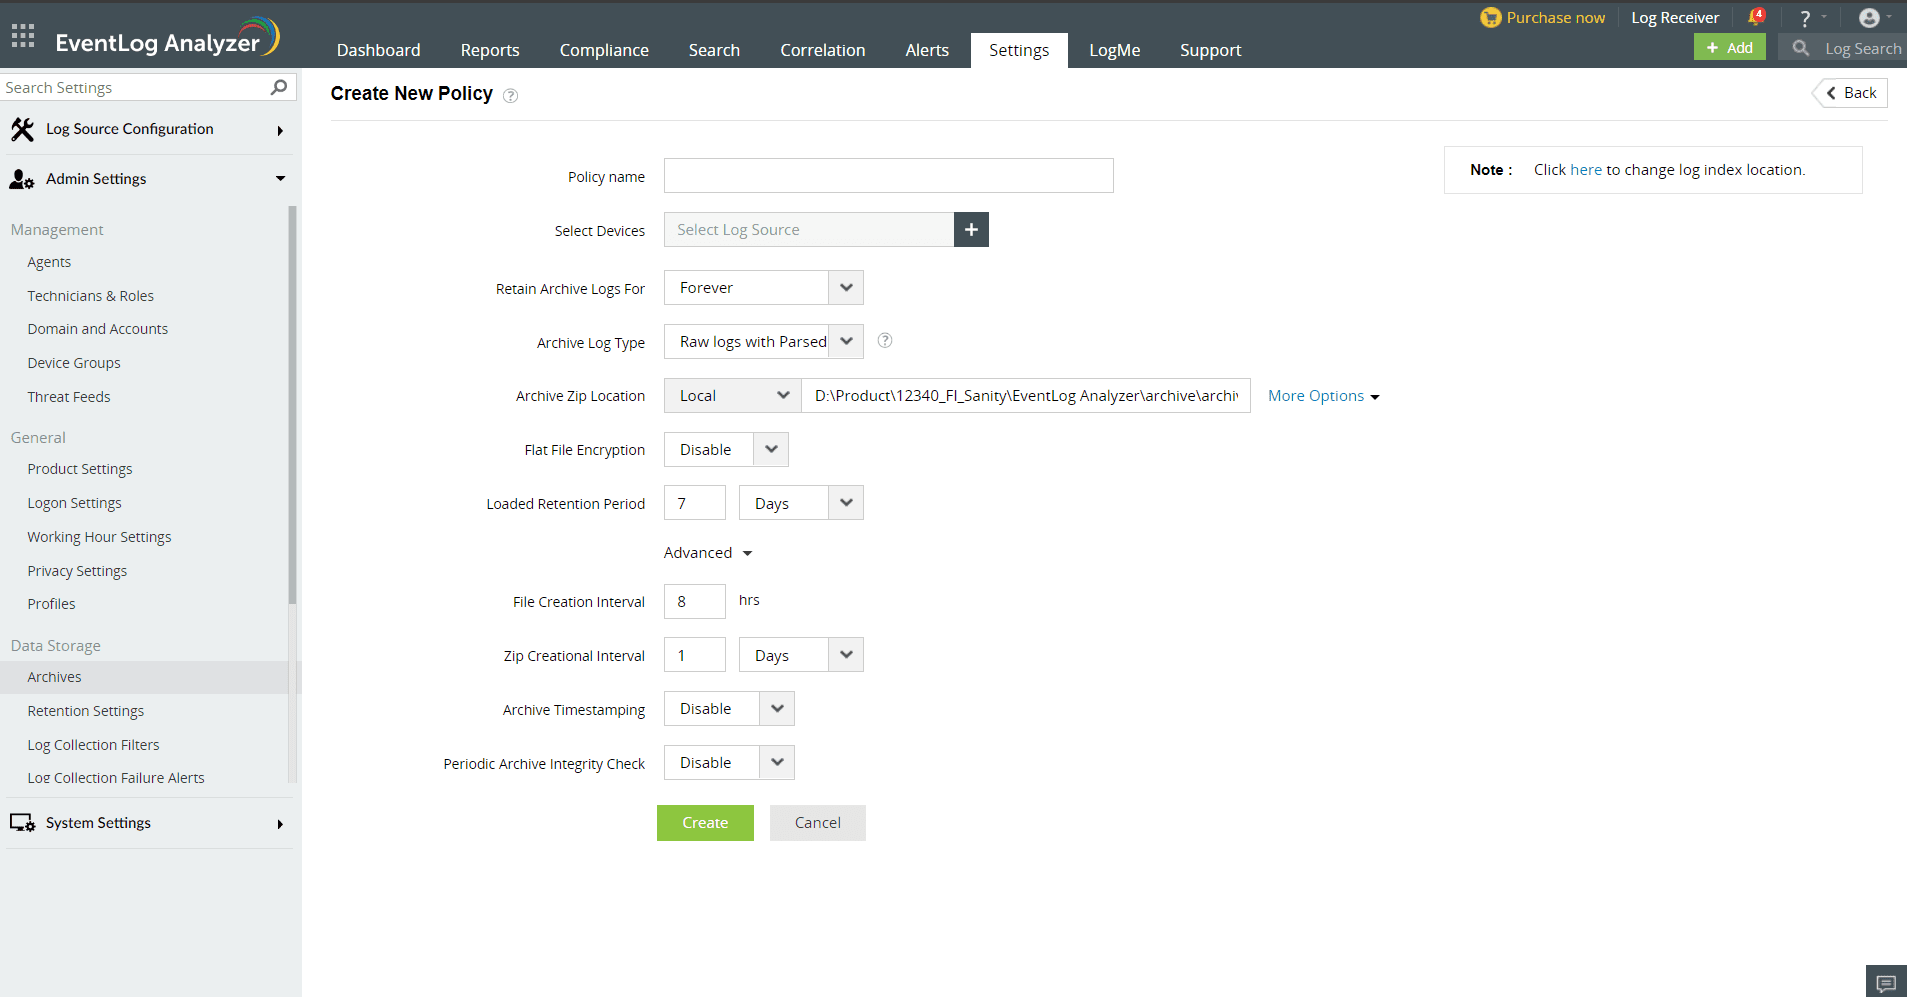
- Logs can be archived in two formats - Raw Logs with Parsed Fields and Raw Logs. Logs will be stored with metadata on selecting the former, and without metadata for the latter.
Note: The storage space for Raw Logs will be lesser but only basic reports can be generated using this data.
- Enter the storage location for Flat file location in the Temp File Location field.Click on Verify to validate the location.
Note: By default, the location is set to local for optimal performance.
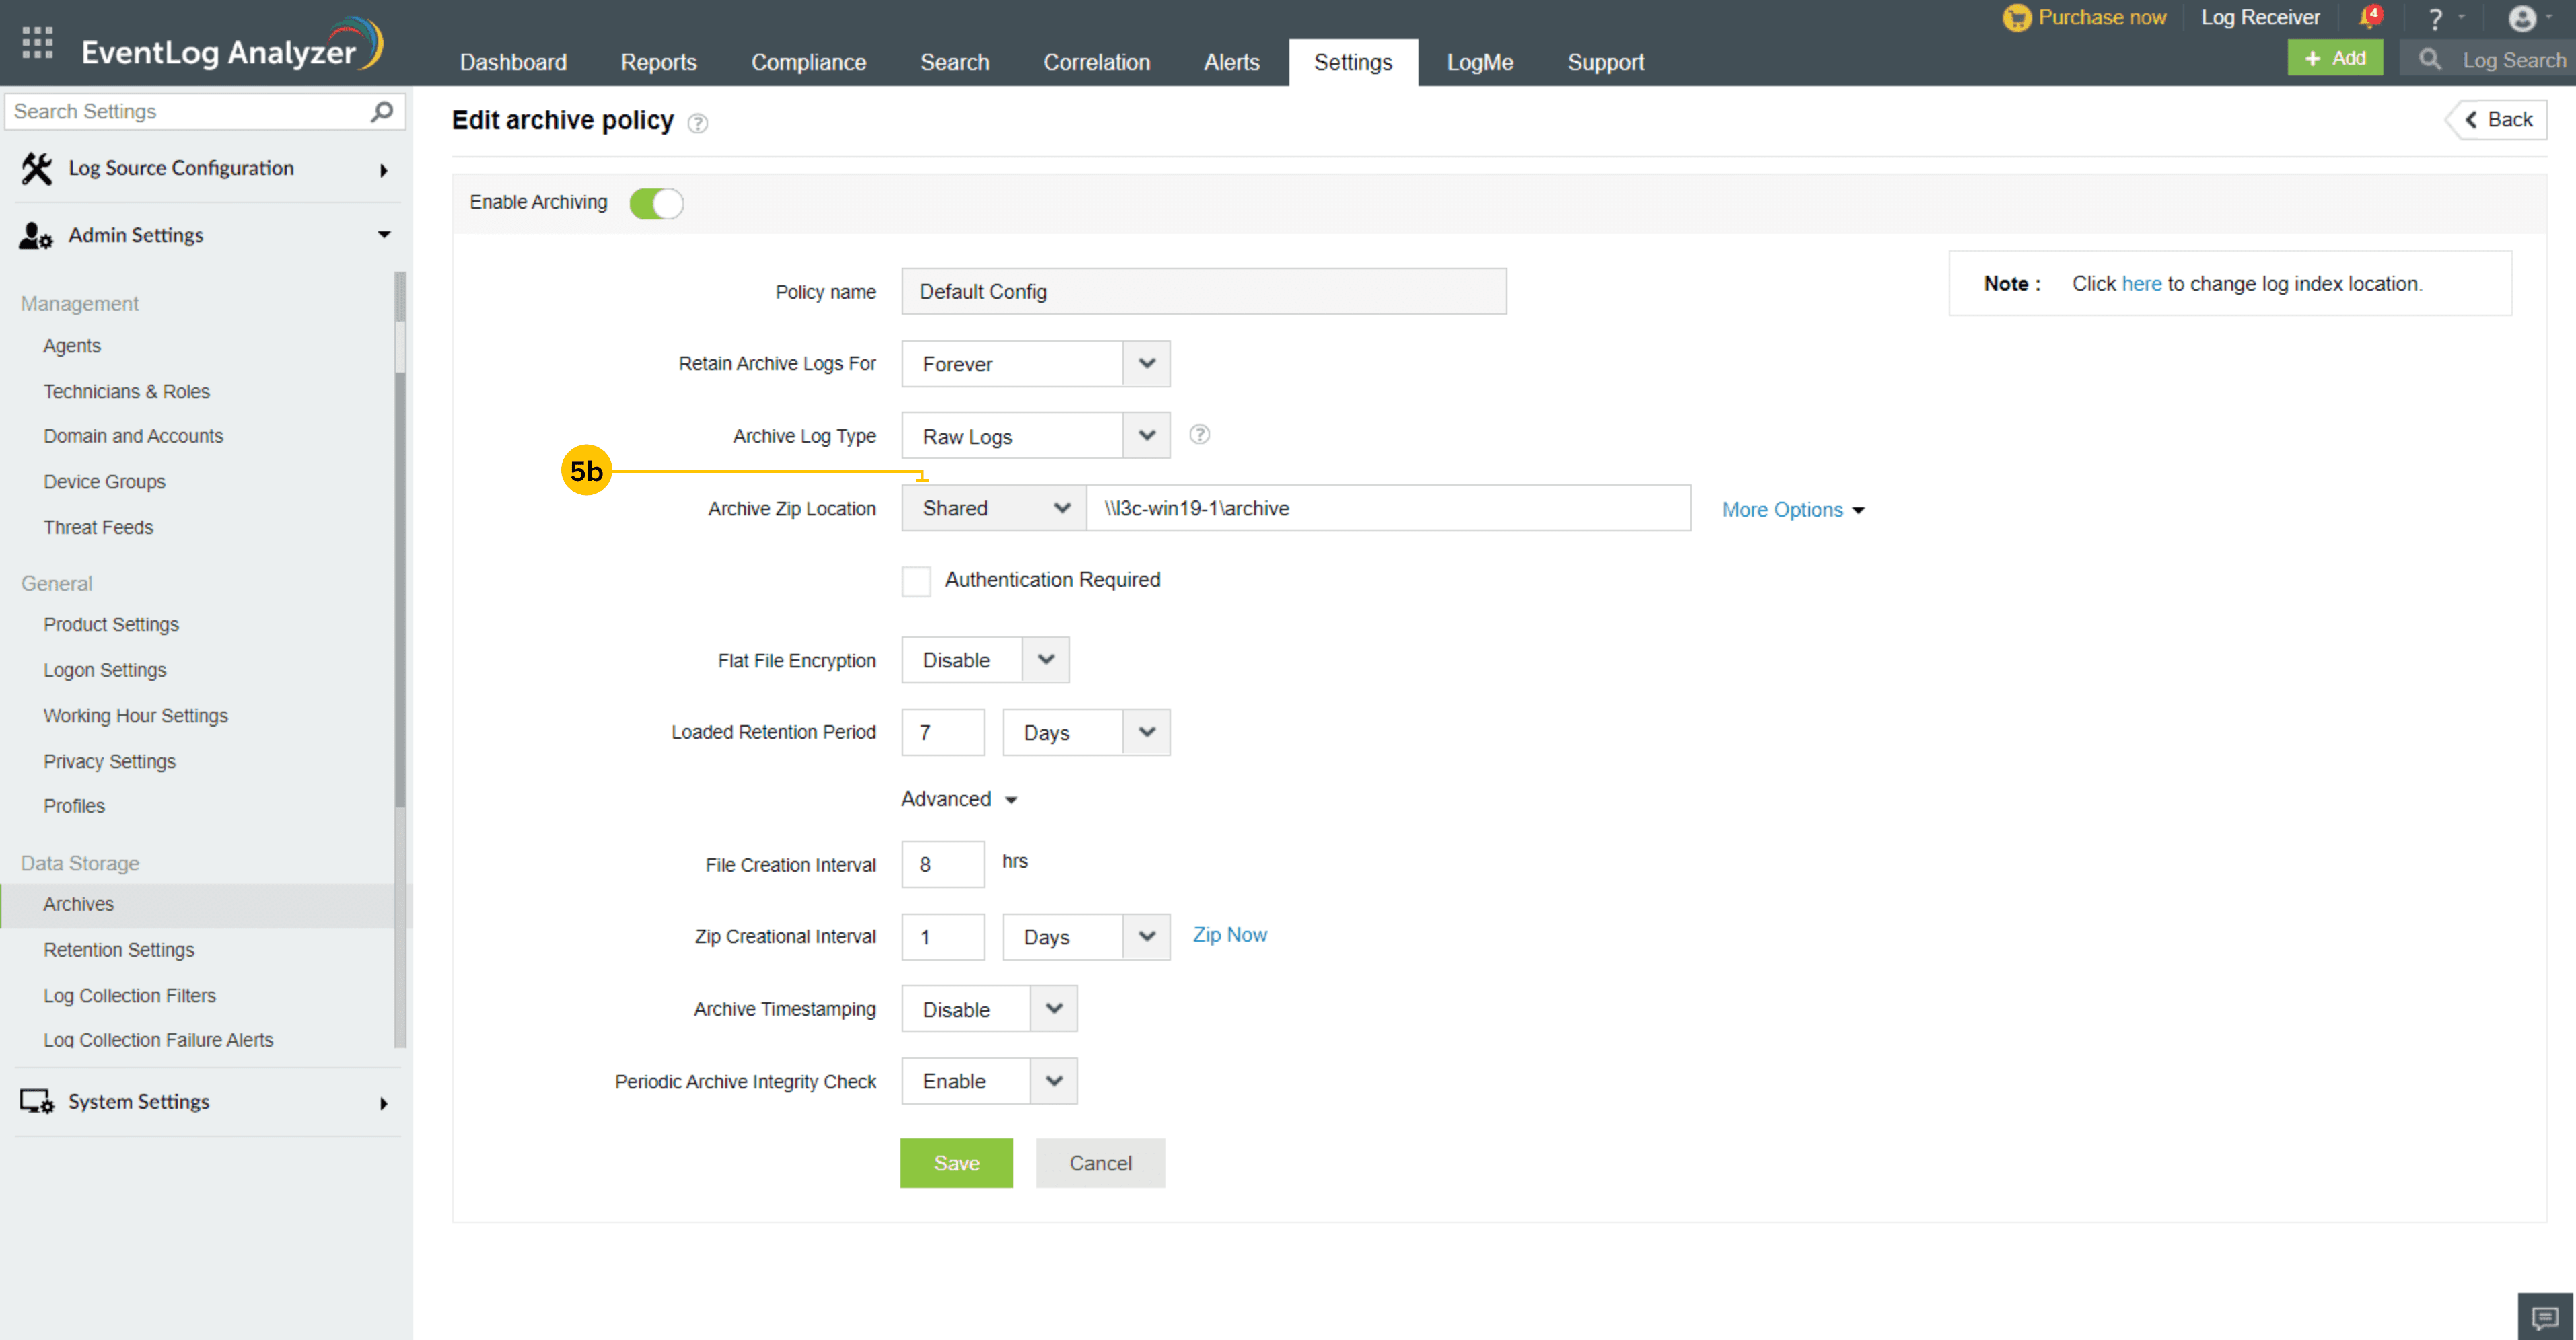
- Enter the storage location for the archived files in the Archive Zip Location field.
- Local - To store archives in a local location, choose local from the dropdown and enter the storage location
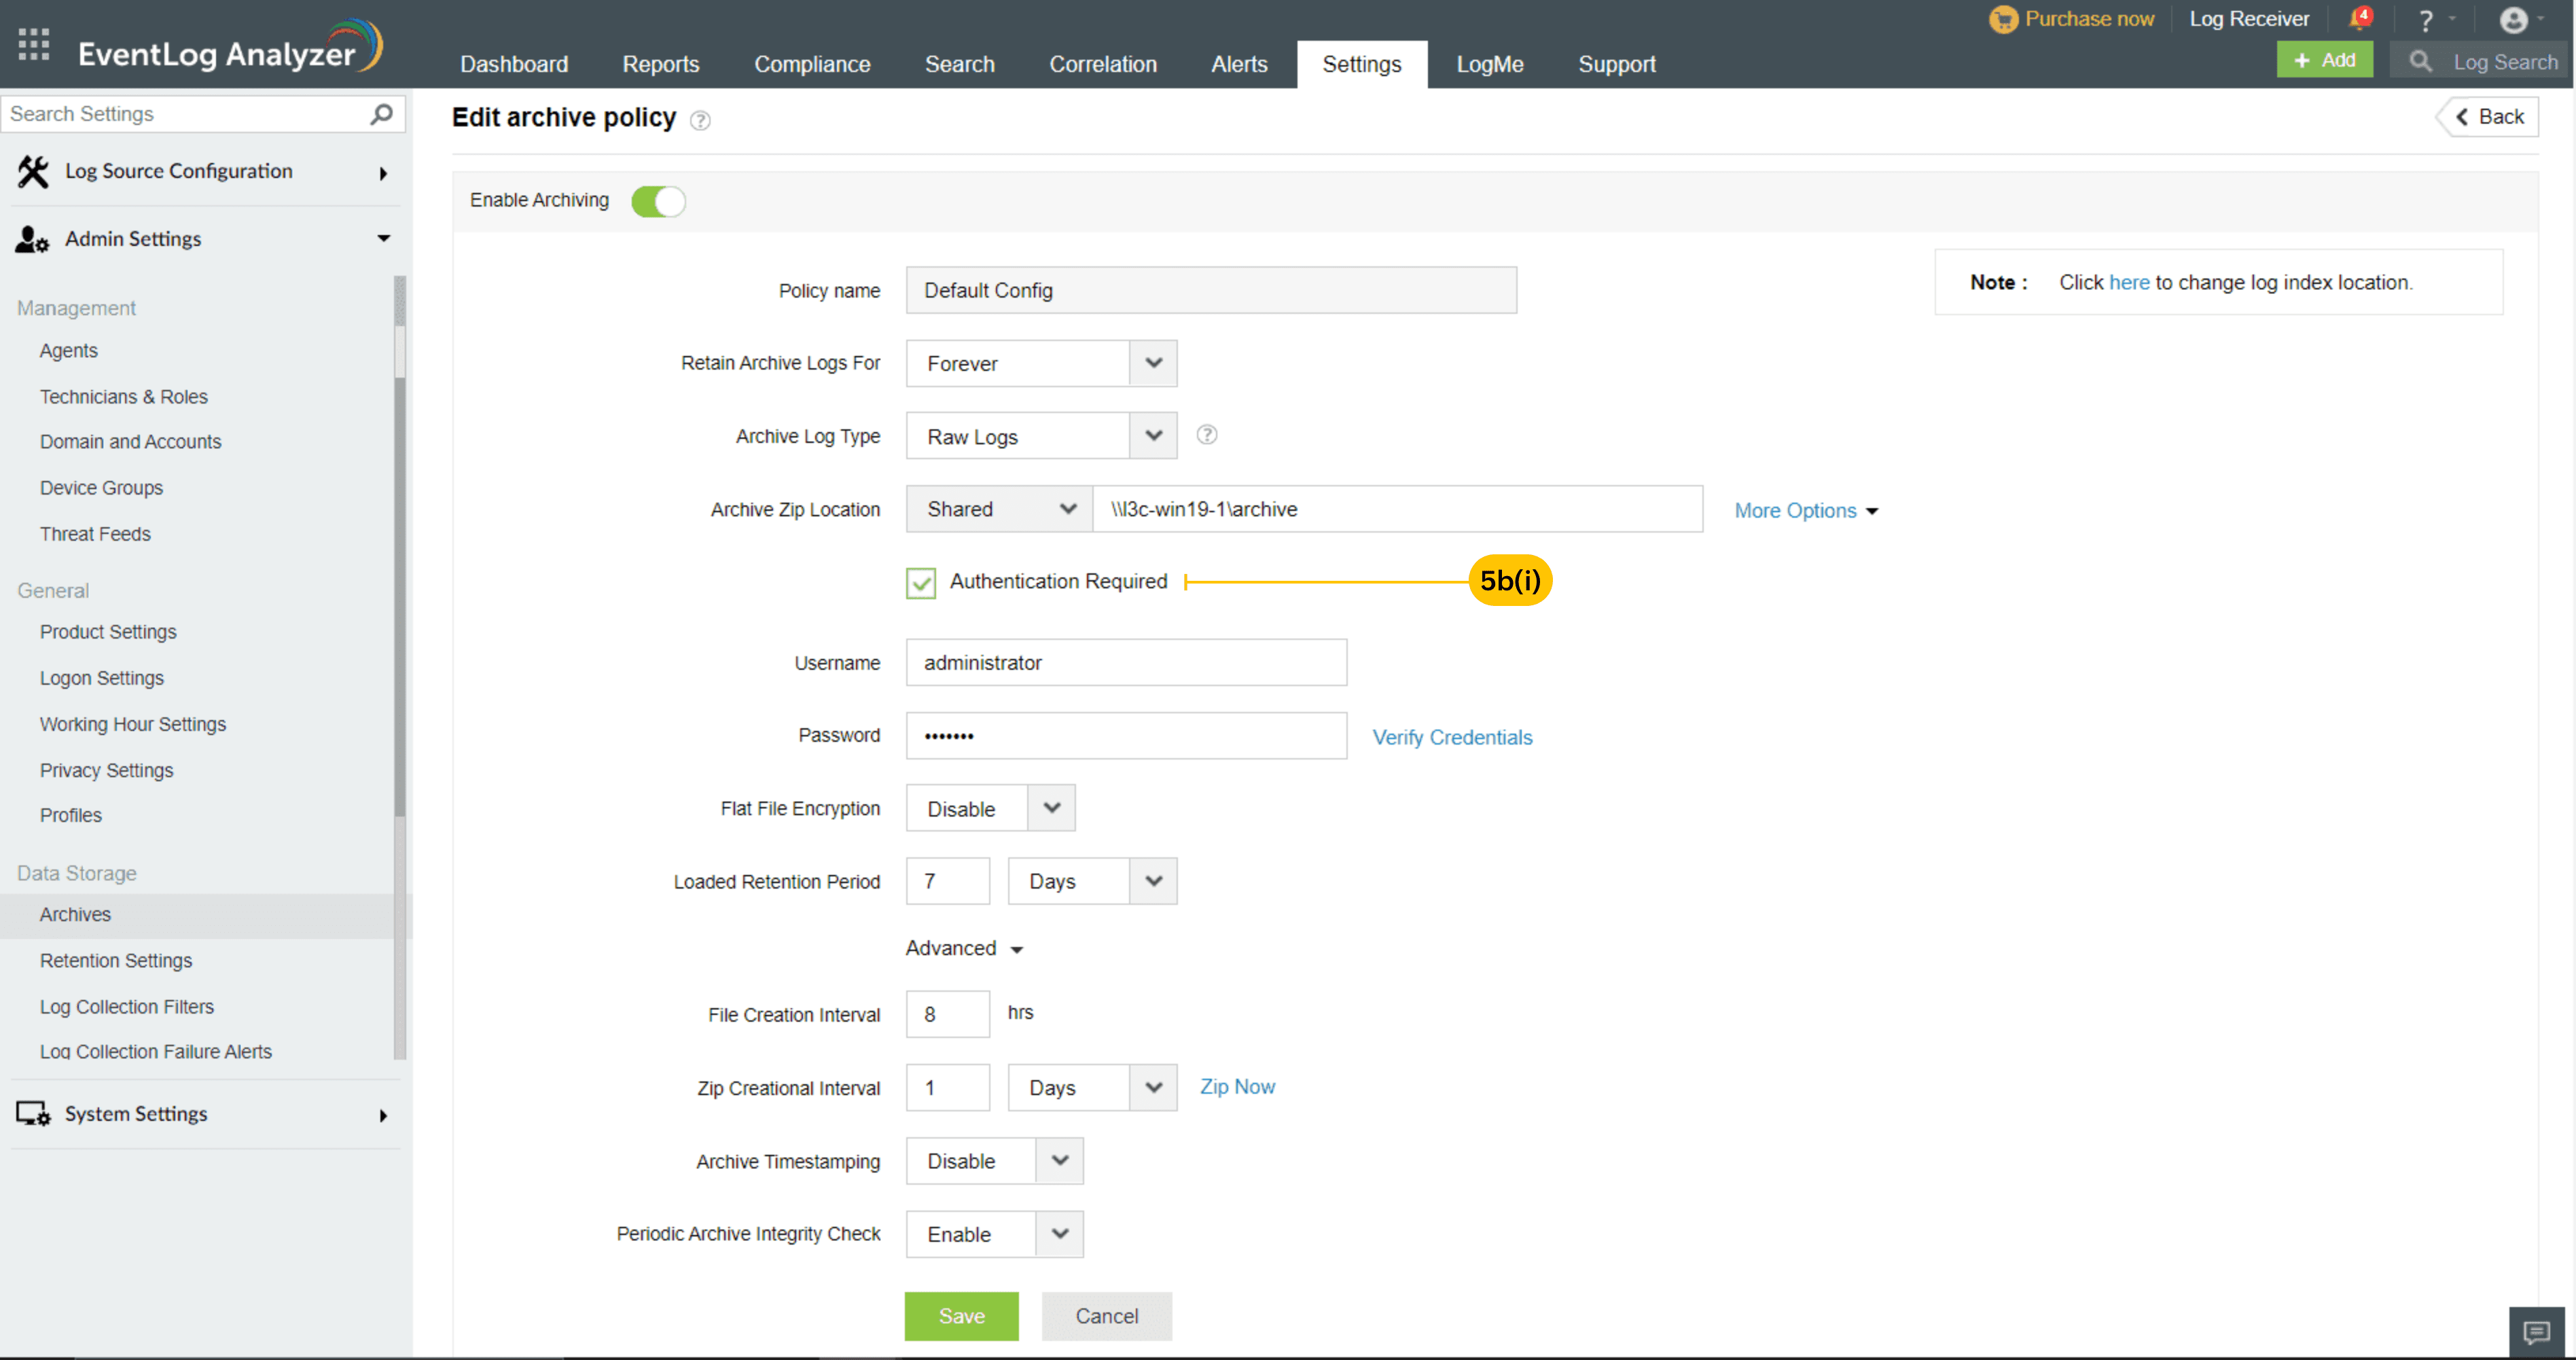
- Shared - To store archives in a shared location, select 'Shared' from the dropdown menu and enter the storage location.
- By clicking on the authentication check box, you will need to enter the credentials to access the shared location. Unchecking it would make the path accessible to everyone with share access.
- Ensure that the remote machine is available and it has sufficient read and write permissions for the share.
- S3 Bucket - To store archives in S3 Bucket, choose S3 Bucket from the dropdown and enter the folder name. By default the folder name will be "AwsArchive"
- Cloud account - Displays the configured cloud accounts.Select the respective cloud account from the dropdown. To configure the cloud account, click on "Configure Cloud Account" - This will configure AWS cloud account without a cloud trial. To configure the cloud account with cloud trial refer this document.
Note: Cloud accounts configured through Domain and Accounts or from Archives can only be listed here
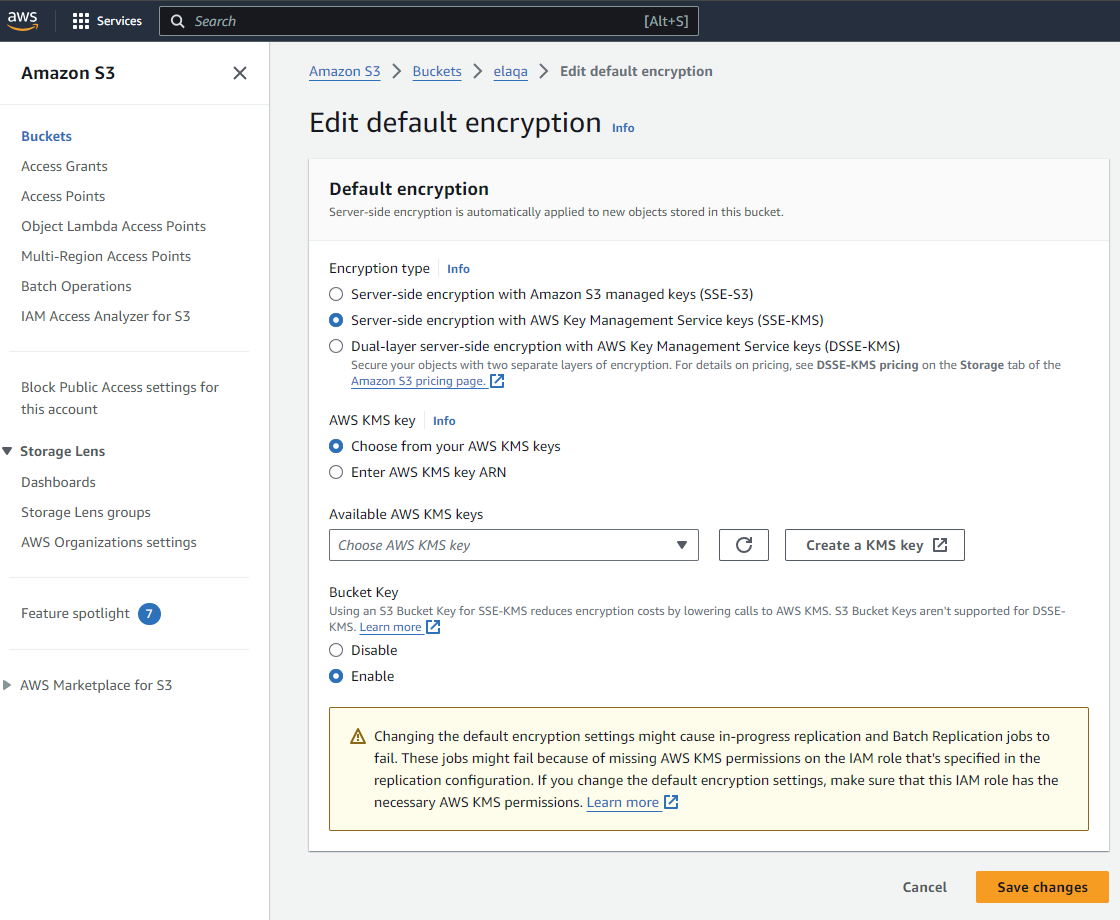
- Buckets - Displays the configured buckets associated with the respective cloud account. Select the respective bucket from the dropdown. Ensure that your bucket has the sufficient permissions. To create a new bucket,enter the bucket name in the input field and click on the "+" icon. By default, the bucket type is General Purpose, and it is in home region. Ensure that bucketname follows this naming convention rules, If the archives stored in these buckets are to be encrypted, Ensure that the buckets have " Bucket Key Enabled " permission. By default, KMS keys will be disabled when creating a bucket. To provide the permissions , navigate to Amazon S3 → Buckets → (Bucketname) → Properties → Default Encryption → Bucket Key
- Storage Type - Displays the S3 Storage Classes. The default storage type utilized is S3 Standard, which comes at no cost. However, additional storage types include pricing based on the amount of storage utilized. AWS Storage Pricing and Permissions
- S3 Encryption - Displays the encryptions for the bucket.The default encryption is Amazon S3 managed keys (SSE-S3) as the base level of encryption.
AWS Key Management Service (AWS KMS) and Dual-layer server-side encryption with AWS KMS keys ( DSSE-KMS ) can be configured if the respective KMS keys are already present.If no keys are available, you can generate KMS key in the AWS console.
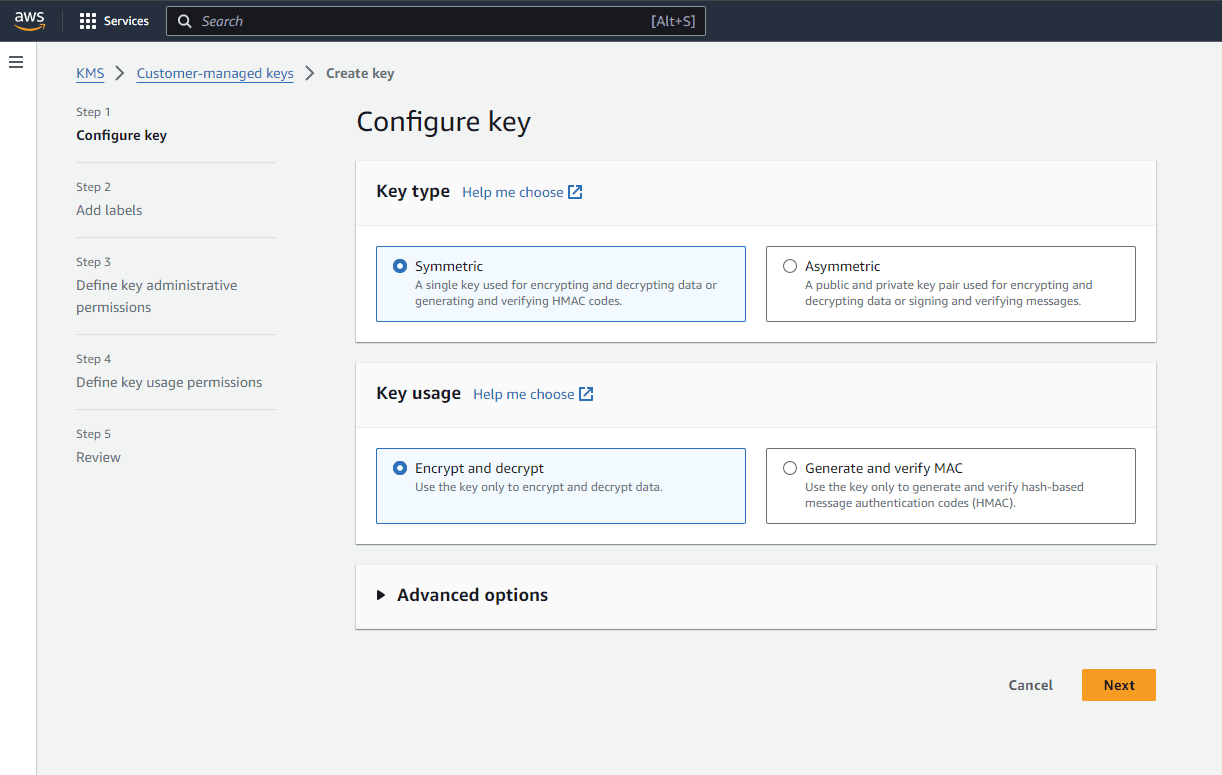
Creating a KMS Key:
- AWS console → Services → All Services → Key Management Service → Create key.
Permissions:
- To list the configured kms keys for your cloud account , provide ''kms:ListKeys" policy permission to your IAM user.
- To encrypt the archives using KMS key , provide "kms:GenerateDataKey" policy permission to your kms key (key ARN) . Refer this document for KMS key permissions
Pricing :
There are no additional charges for using default encryption for S3 buckets
For SSE-KMS and DSSE-KMS, AWS KMS charges apply and are listed at AWS KMS pricing.
- To secure the archival logs, enable flat file encryption. By default, it will be disabled.
- Enter the log retention period for the loaded archive files. The default period is 7 days.
- Click on Advanced and fill in the following fields:
- Choose the time interval for file creation. The logs will be written to flat files at the specified time period.
Note: The default interval is 8 hours.
- Choose the required time interval for creating a zip file. The flat files will be compressed (40:1 ratio) and zip files are created at the specified time period.
Note: The default interval is 1 day.
- Enable Archive Timestamping if required. By default, it is disabled.
- The Periodic Archive Integrity Check is enabled by default.
Note: The default interval is 1 day.
- Save the settings and close the window. For instant archiving, click the Zip Now button next to Zip Creational Interval.
Note: Files will be zipped locally and will be transferred to the destination location, so additional disk space will be required. Ensure that you have sufficient storage in the system(Size).To know about the disk space required in the local storage, calculate using the tuning guide
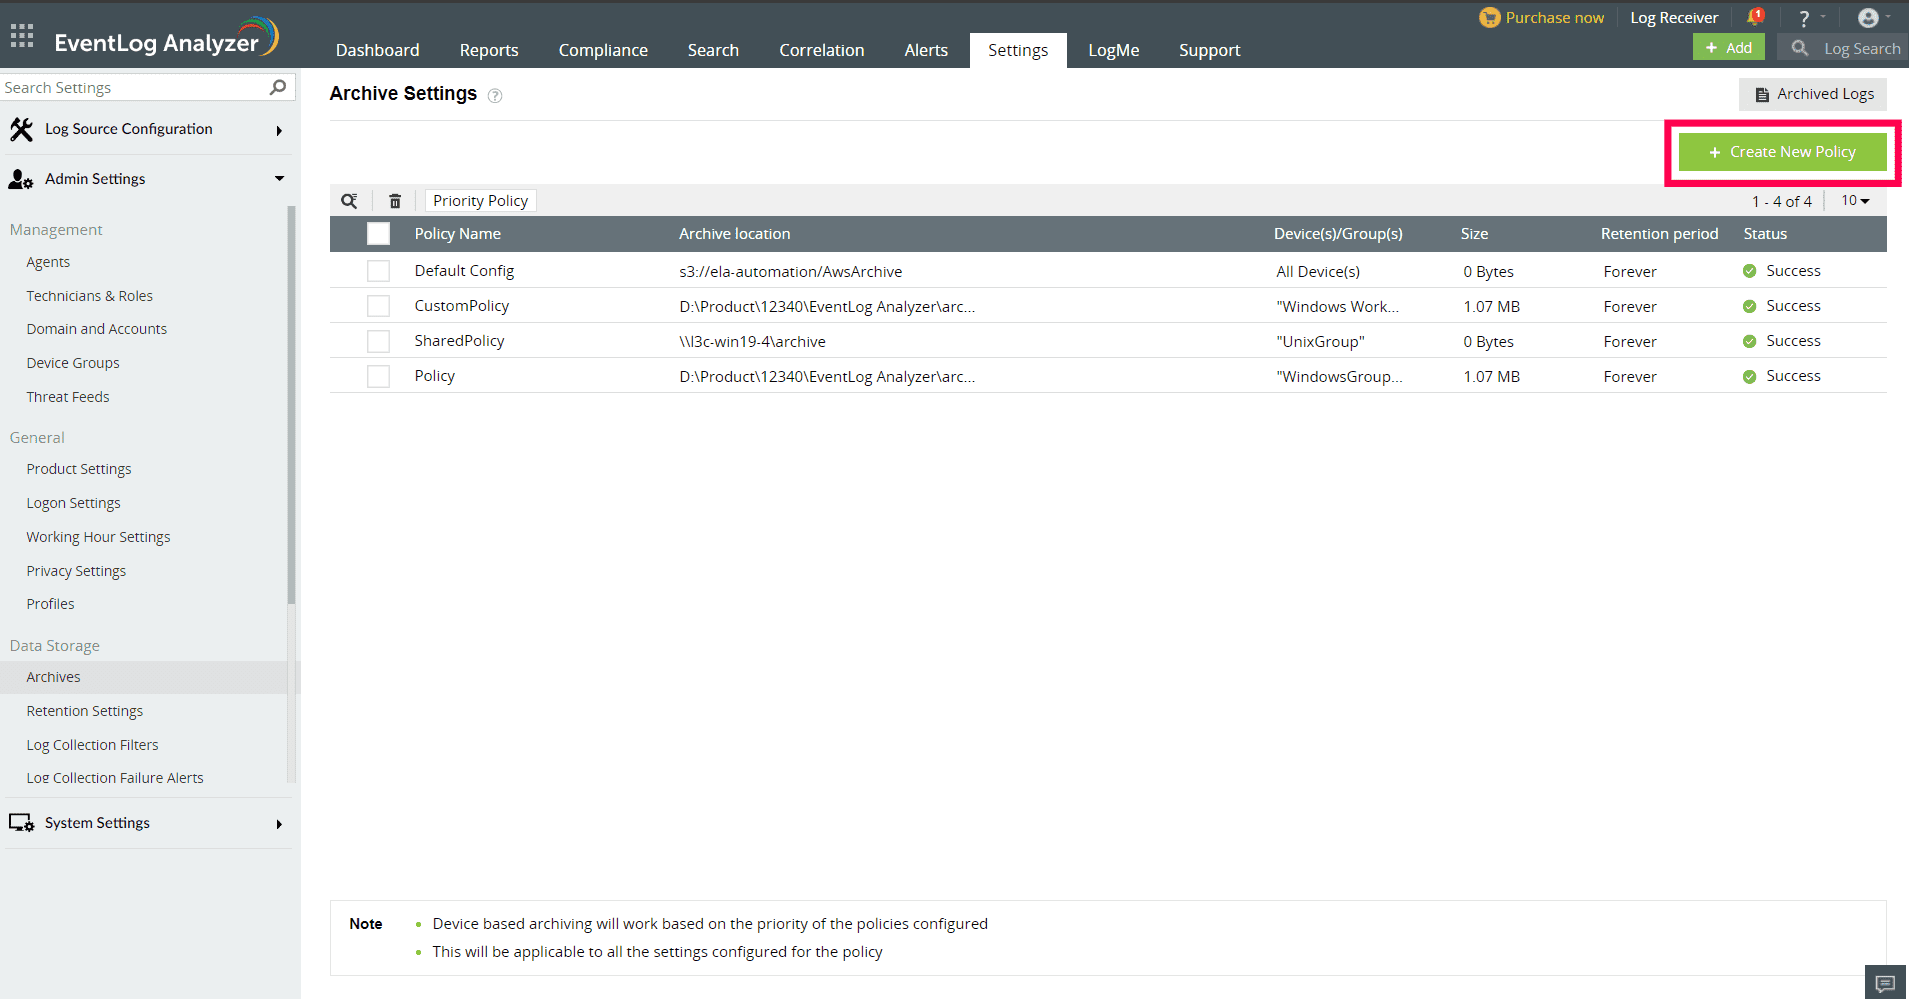
Configure multiple archive settings by clicking on Create New Policy in the top right corner.
Additional configuration - Select the devices/groups for which the policy will be applied.
How to view configured Policy ?
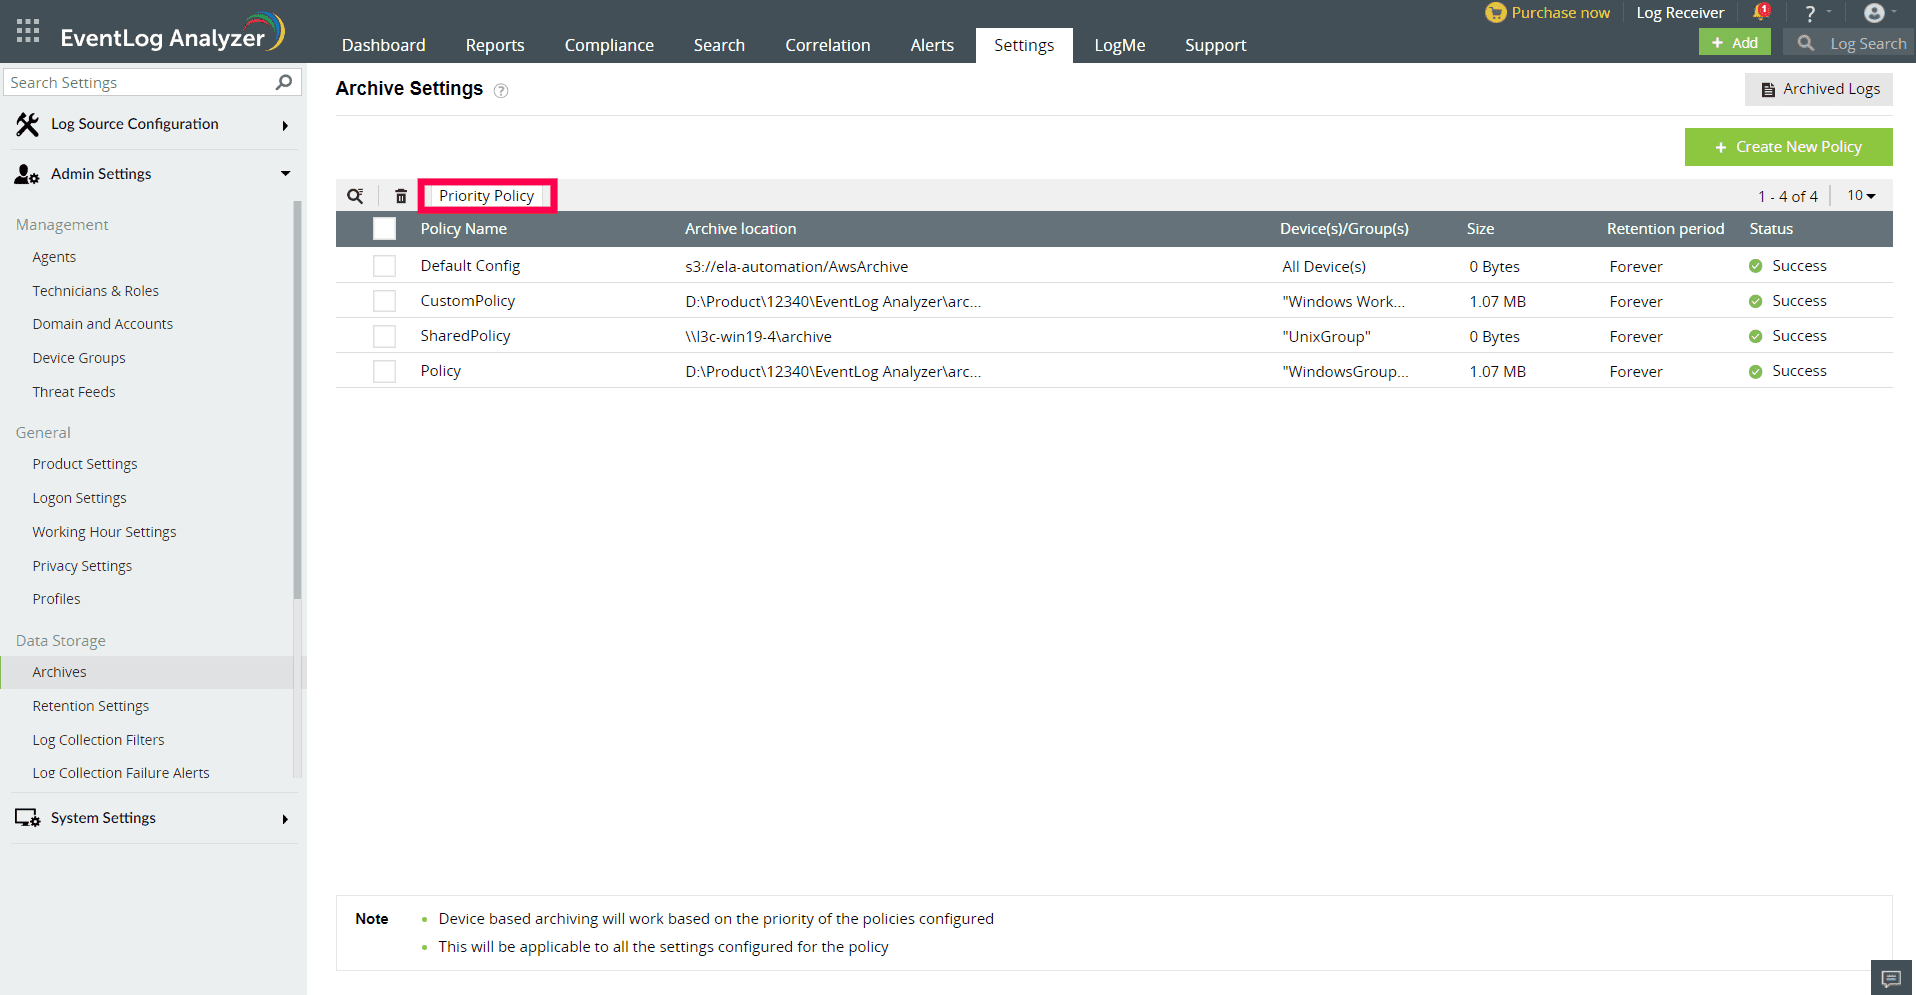
Click on Settings at the top right corner of the screen. This will lead to the Archive Settings page which contains all the configured policies.
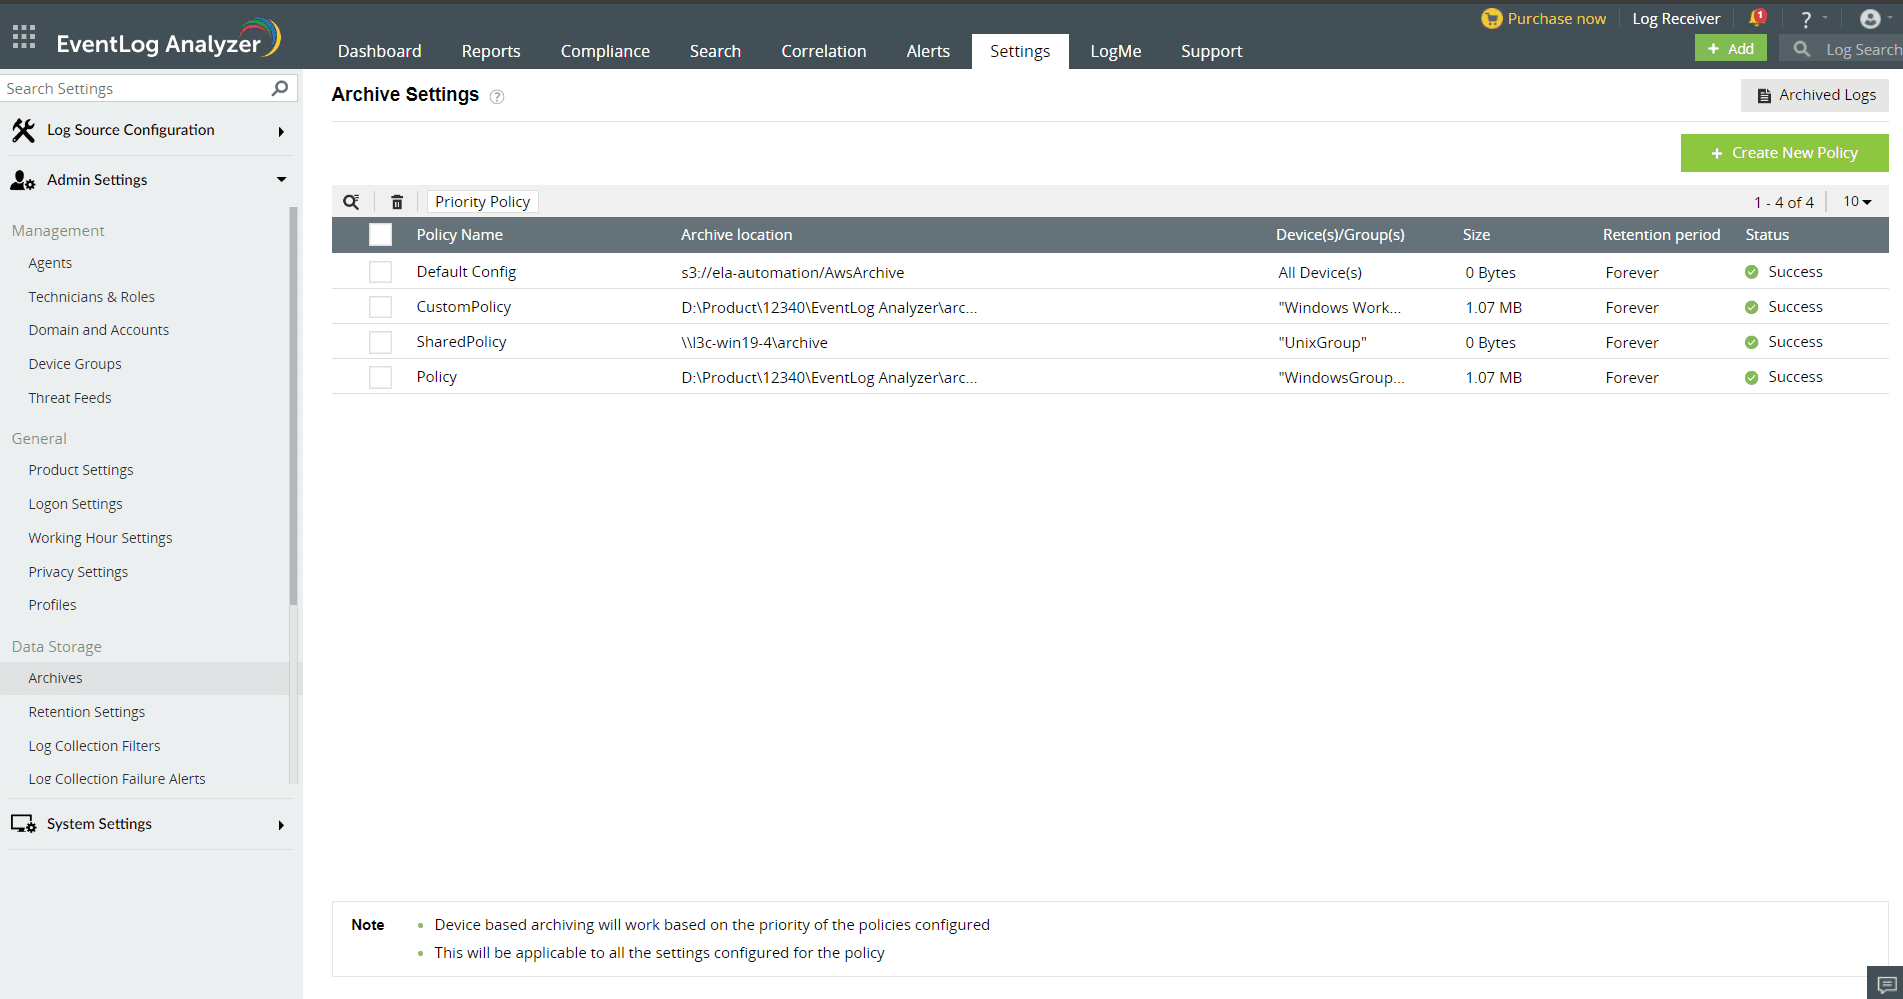
- Policy Name - Specifies the name of the policy.
- Archive Location - Shows the zip location of the policy.
- Devices/Groups - Shows all the devices and groups added in the policy.
- Size - Total size of archive of all the devices/groups added in the policy.
- Retention period - Log retention period of the policy.
- Status - Shows the status of the archival. The status will either be Success or Archiving Disabled.
Click on Edit by hovering on the policy to edit the configured settings.
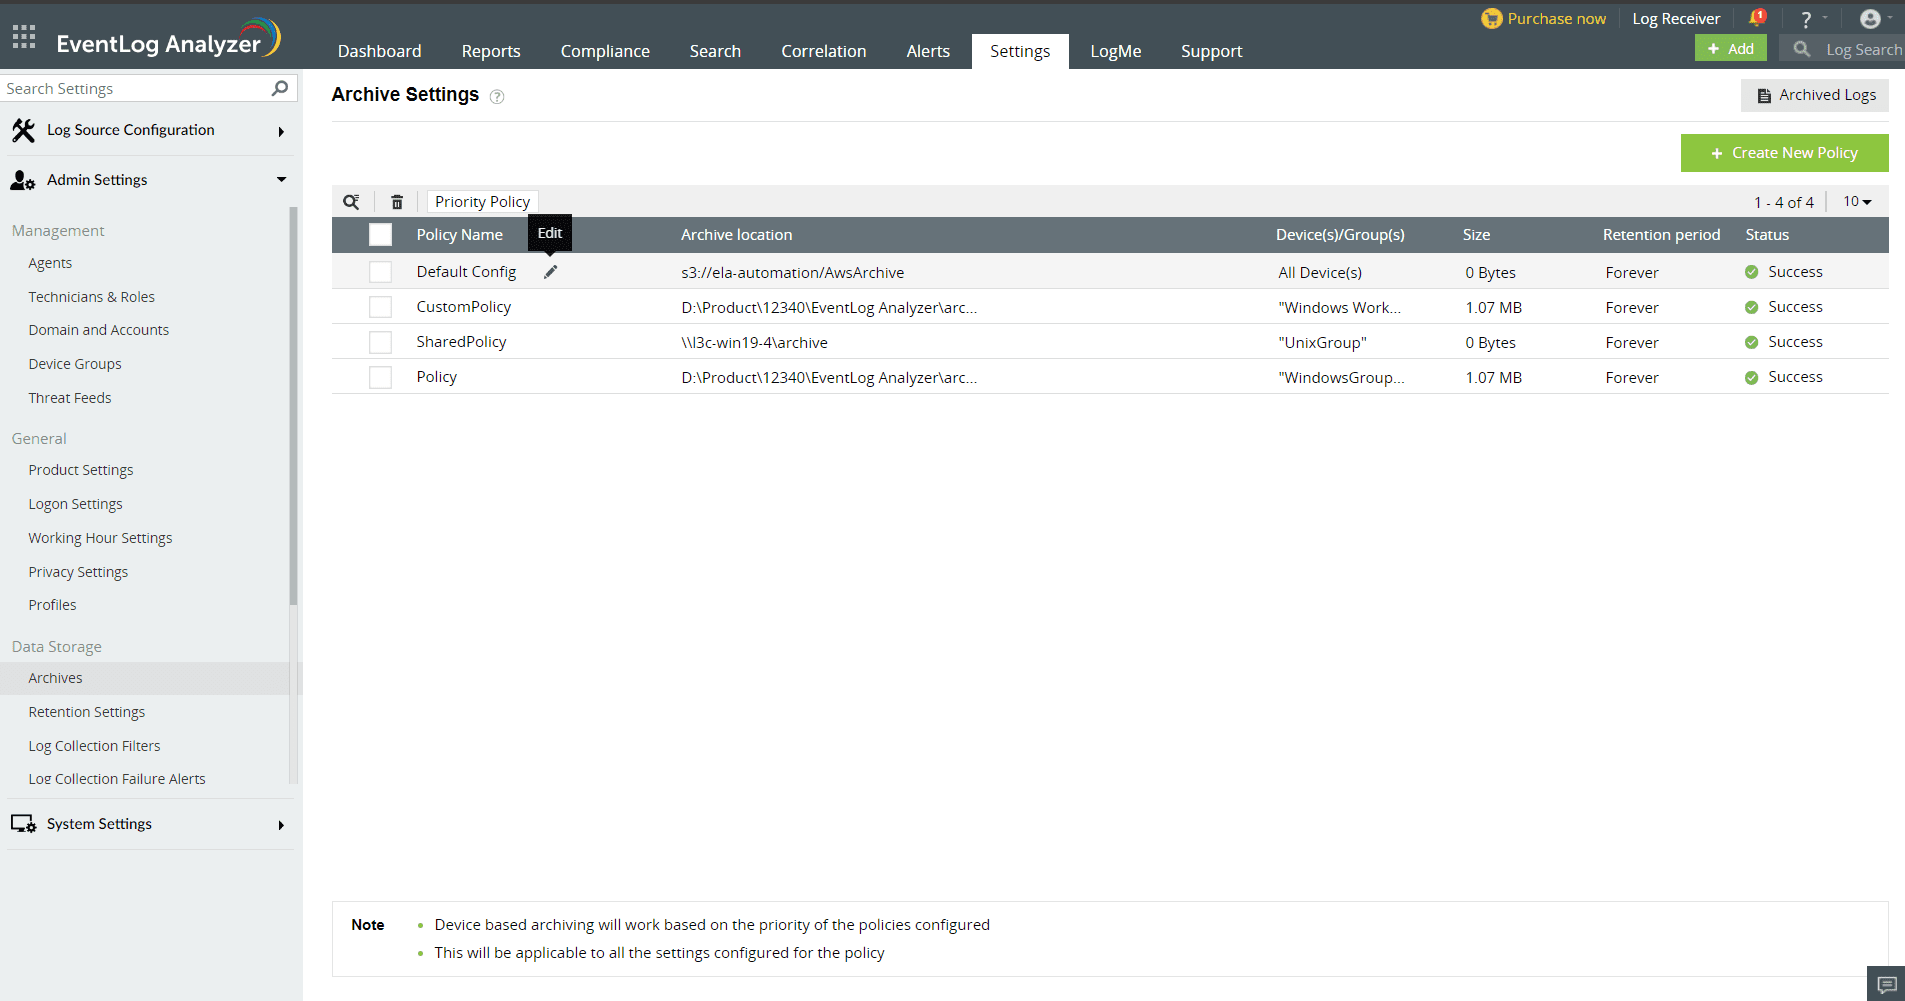
You can also add a new policy by clicking on the Create New Policy button in the top right corner in archive settings page.
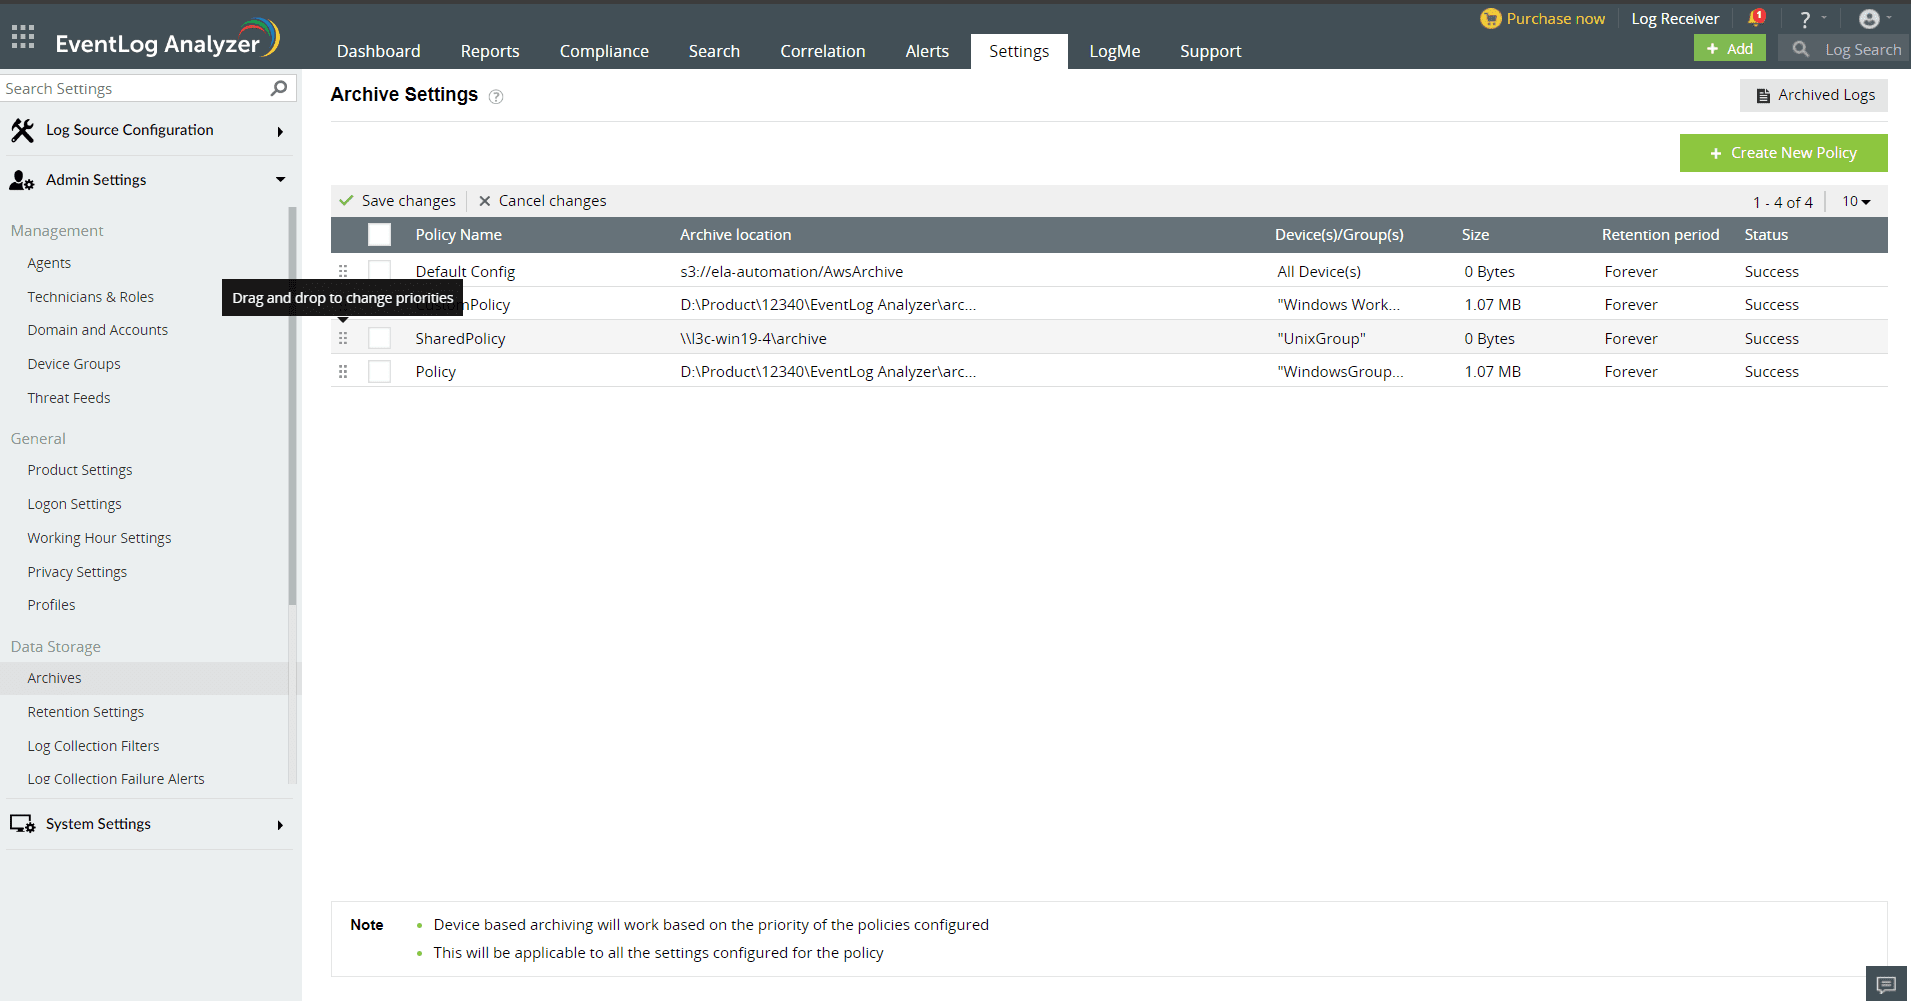
How to edit the priority of the policies?
To change the priority of the policies, click on Priority Policy, rearrange the policies by dragging and dropping them, and save.
Note: If a device/group has been added under multiple policies, the archive settings of the policy with the highest priority will be applied to that particular device/group.
How to check to which policy applies to a specific device?
In the Settings tab of EventLog Analyzer, navigate to Admin Settings > Data Storage > Archives > Settings > Archive Summary
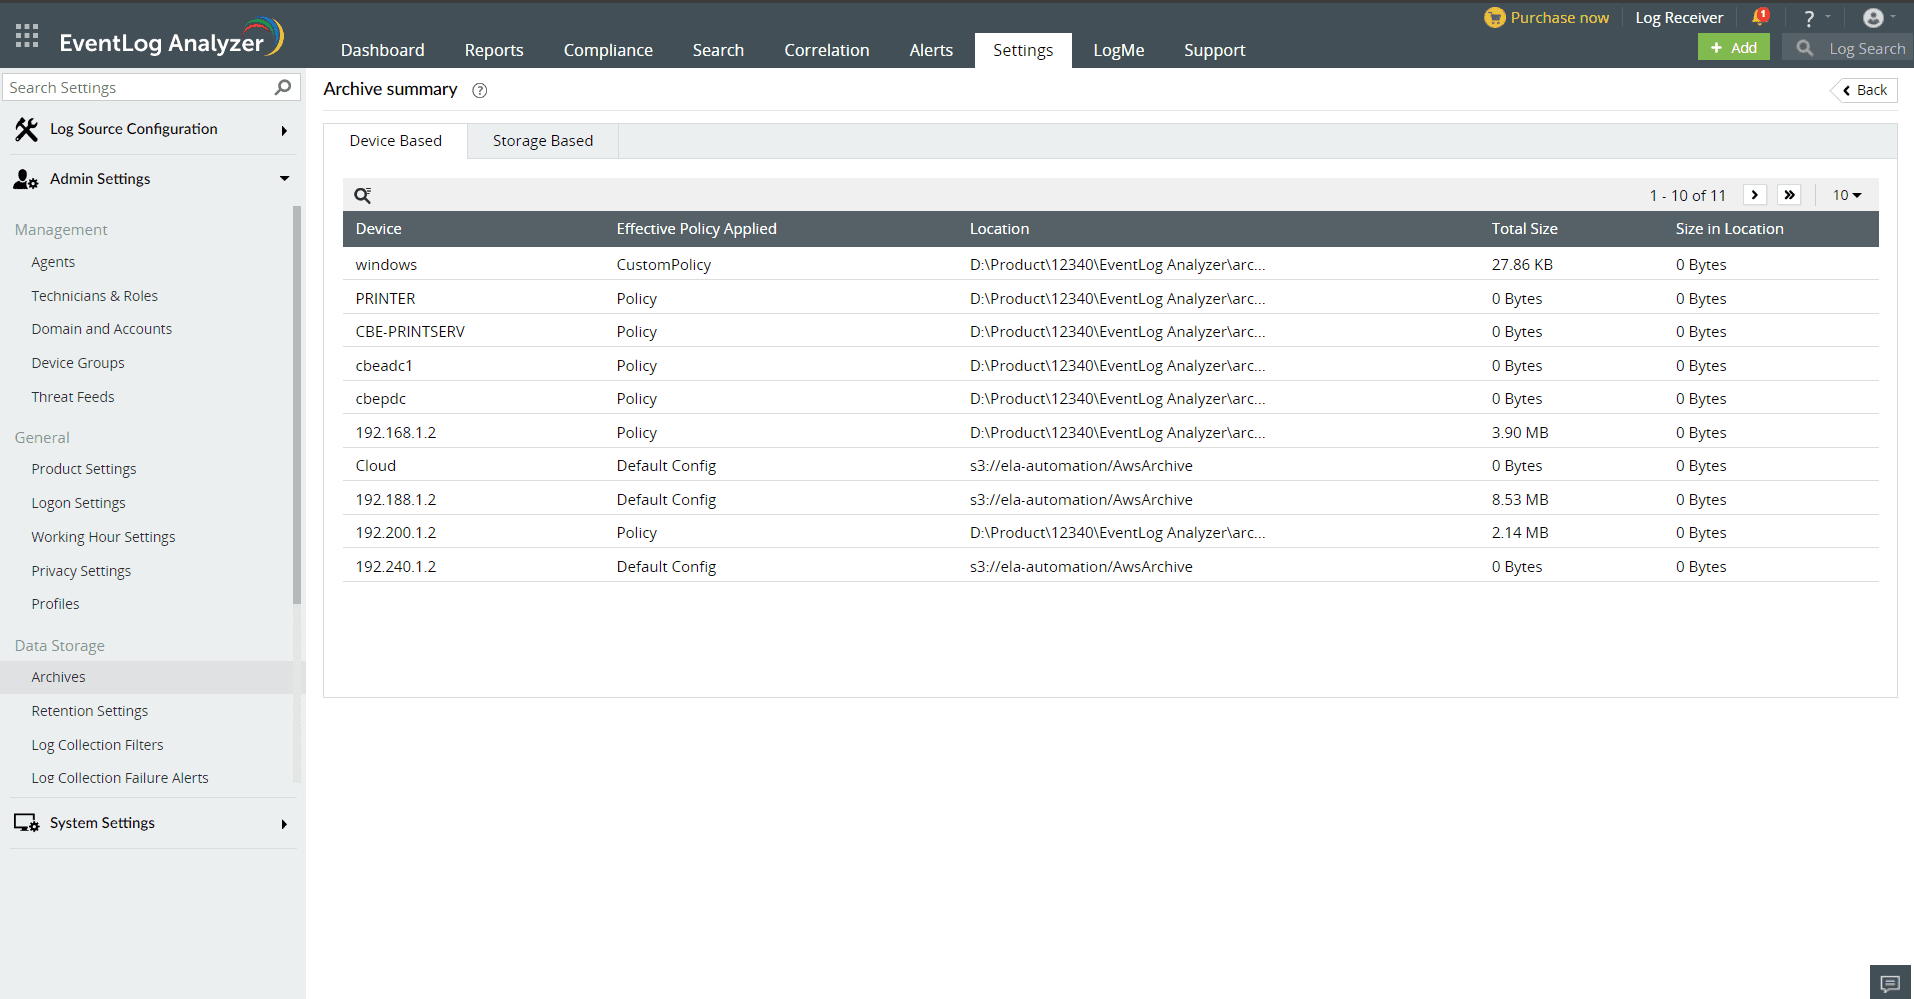
- Device - Shows the list of devices that are added in one or more policies
- Effective Policy Applied - Shows the policy which is applied to that particular device.
- Location - Shows the zip location of the policy.
- Total size - Shows the total size of archives for that particular device.
- Size in location - Shows the size of the device archives collected under that specific policy.
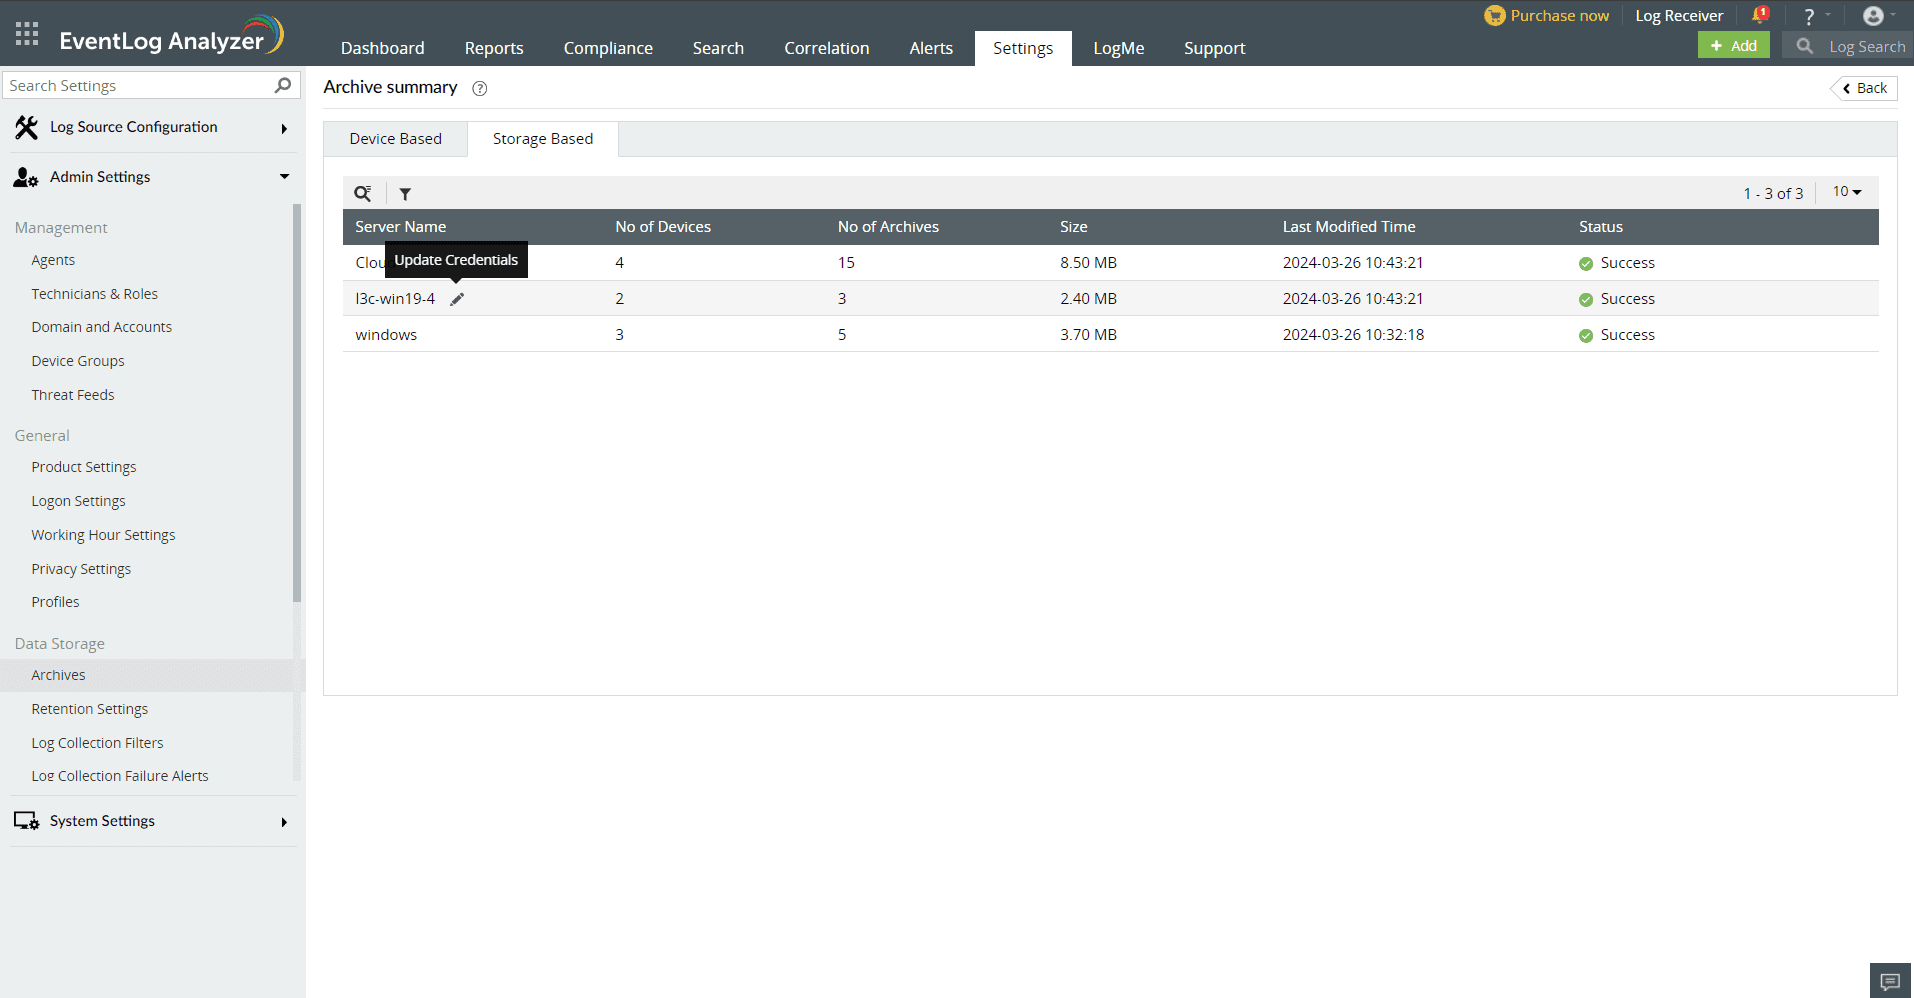
How to check the server status and storage occupied?
Storage Summary:
In the Settings tab of EventLog Analyzer, navigate to Admin Settings > Data Storage > Archives > Archive Summary > Storage Based
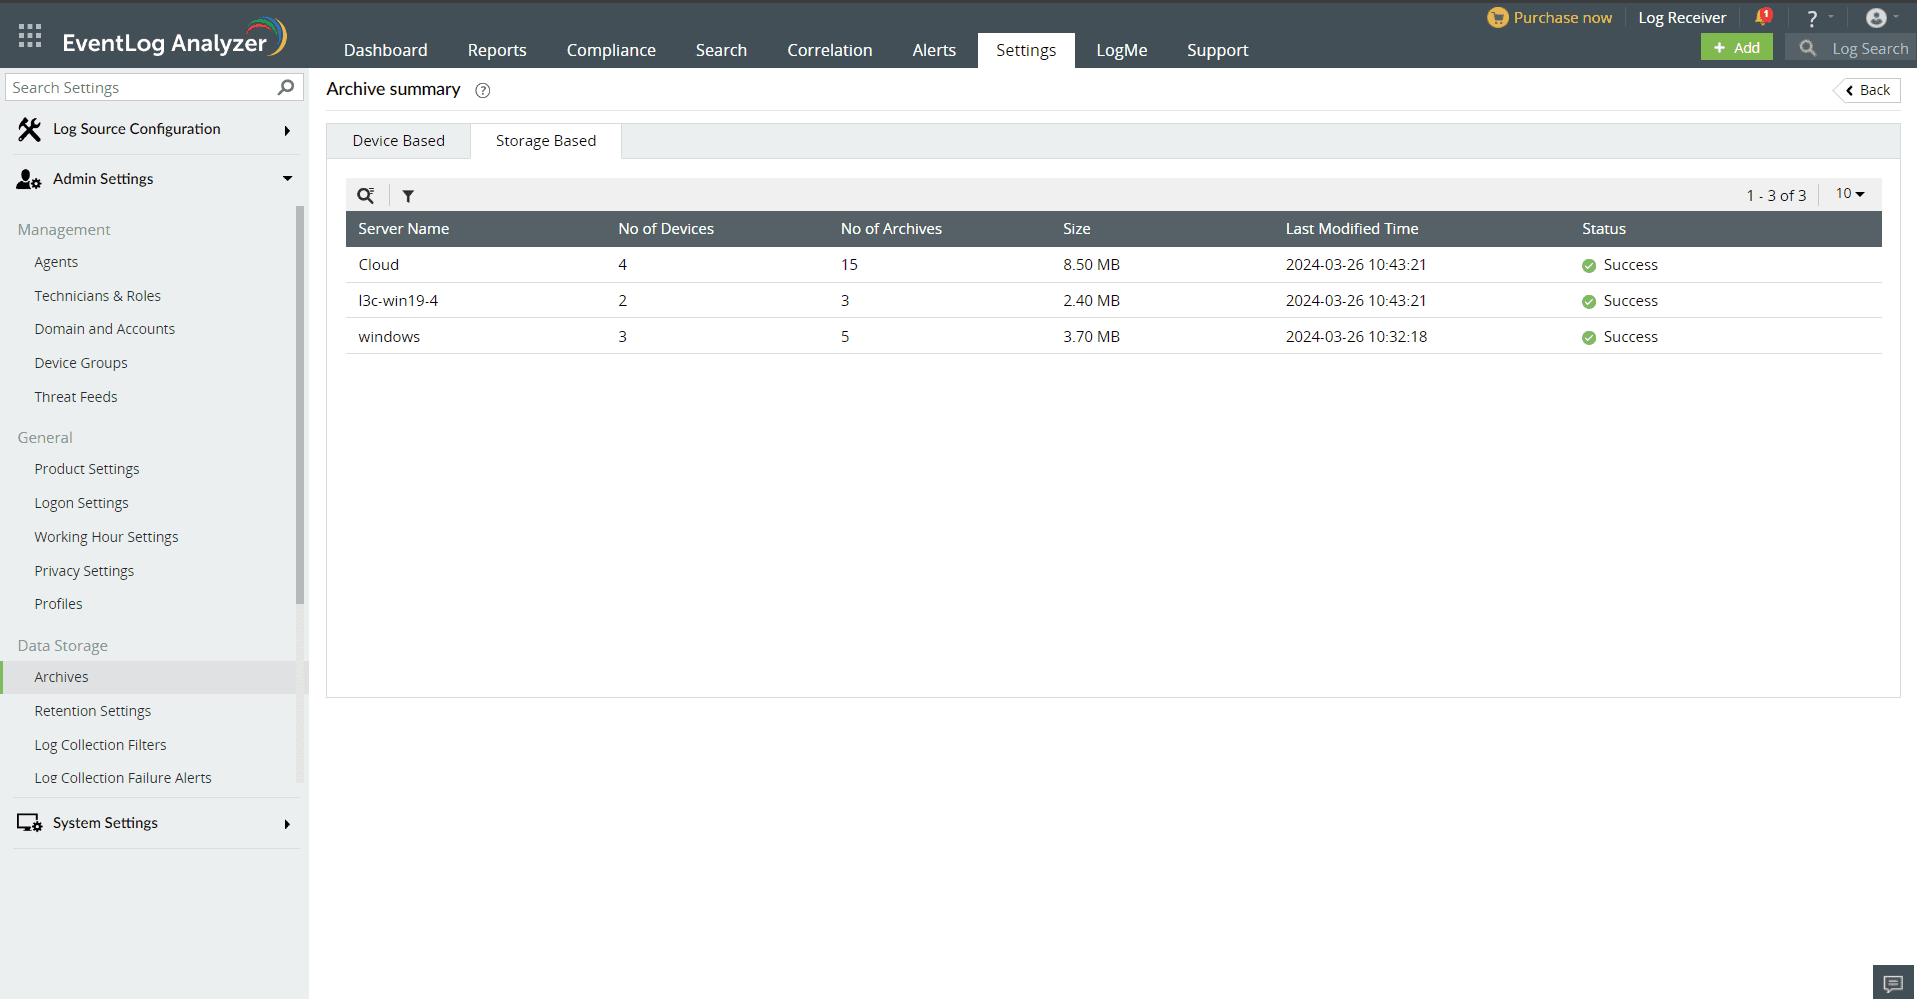
- ServerName - Displays the list of servers configured in archive policies and archives
- No of Devices - Displays the number of devices associated with the server
- No of Archives - Displays the no of Archives present for the respective server
- Size - Displays the total size of the archives in the server
- Last Modified Time - Displays the Last password updated time for the server
- Status - Displays the reachability status of the server
- Access Denied - When the server is unavailable or it doesn't have the necessary permissions
- Connectivity failed - When the cloud is not reachable due to internet disconnection
- Edit icon - Update Credentials - Update the new credentials in case of password change for the server ( Applicable only for shared server )
Update the username and password for the server

Archive troubleshooting cases
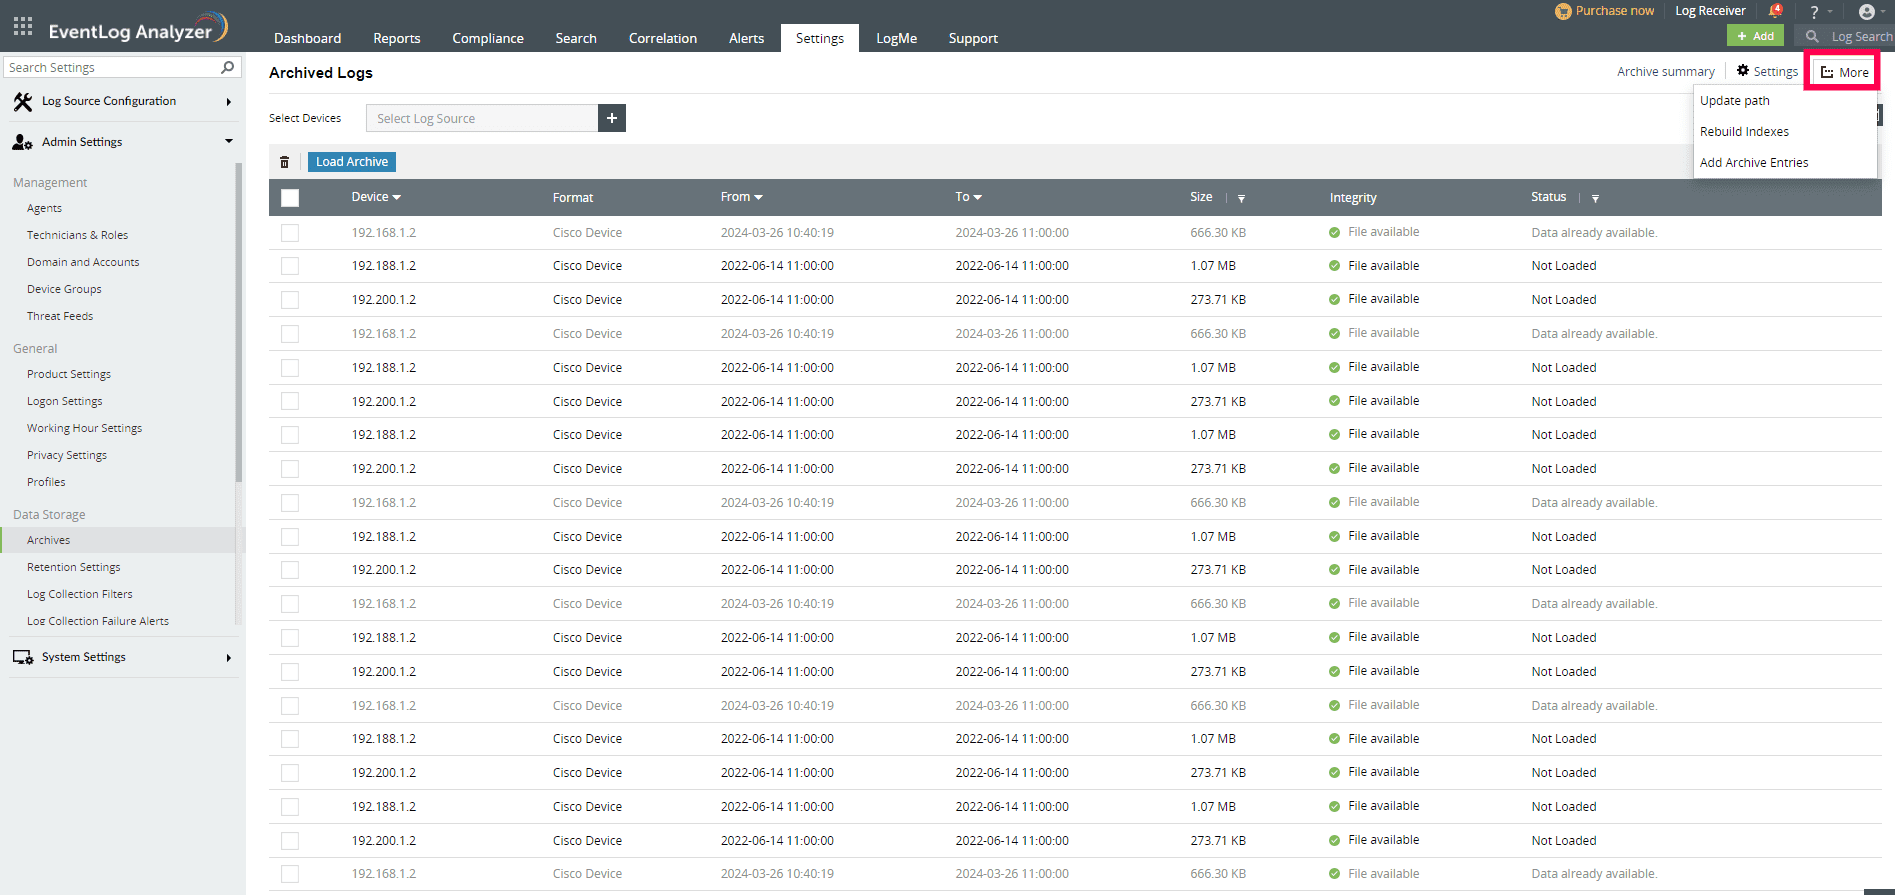
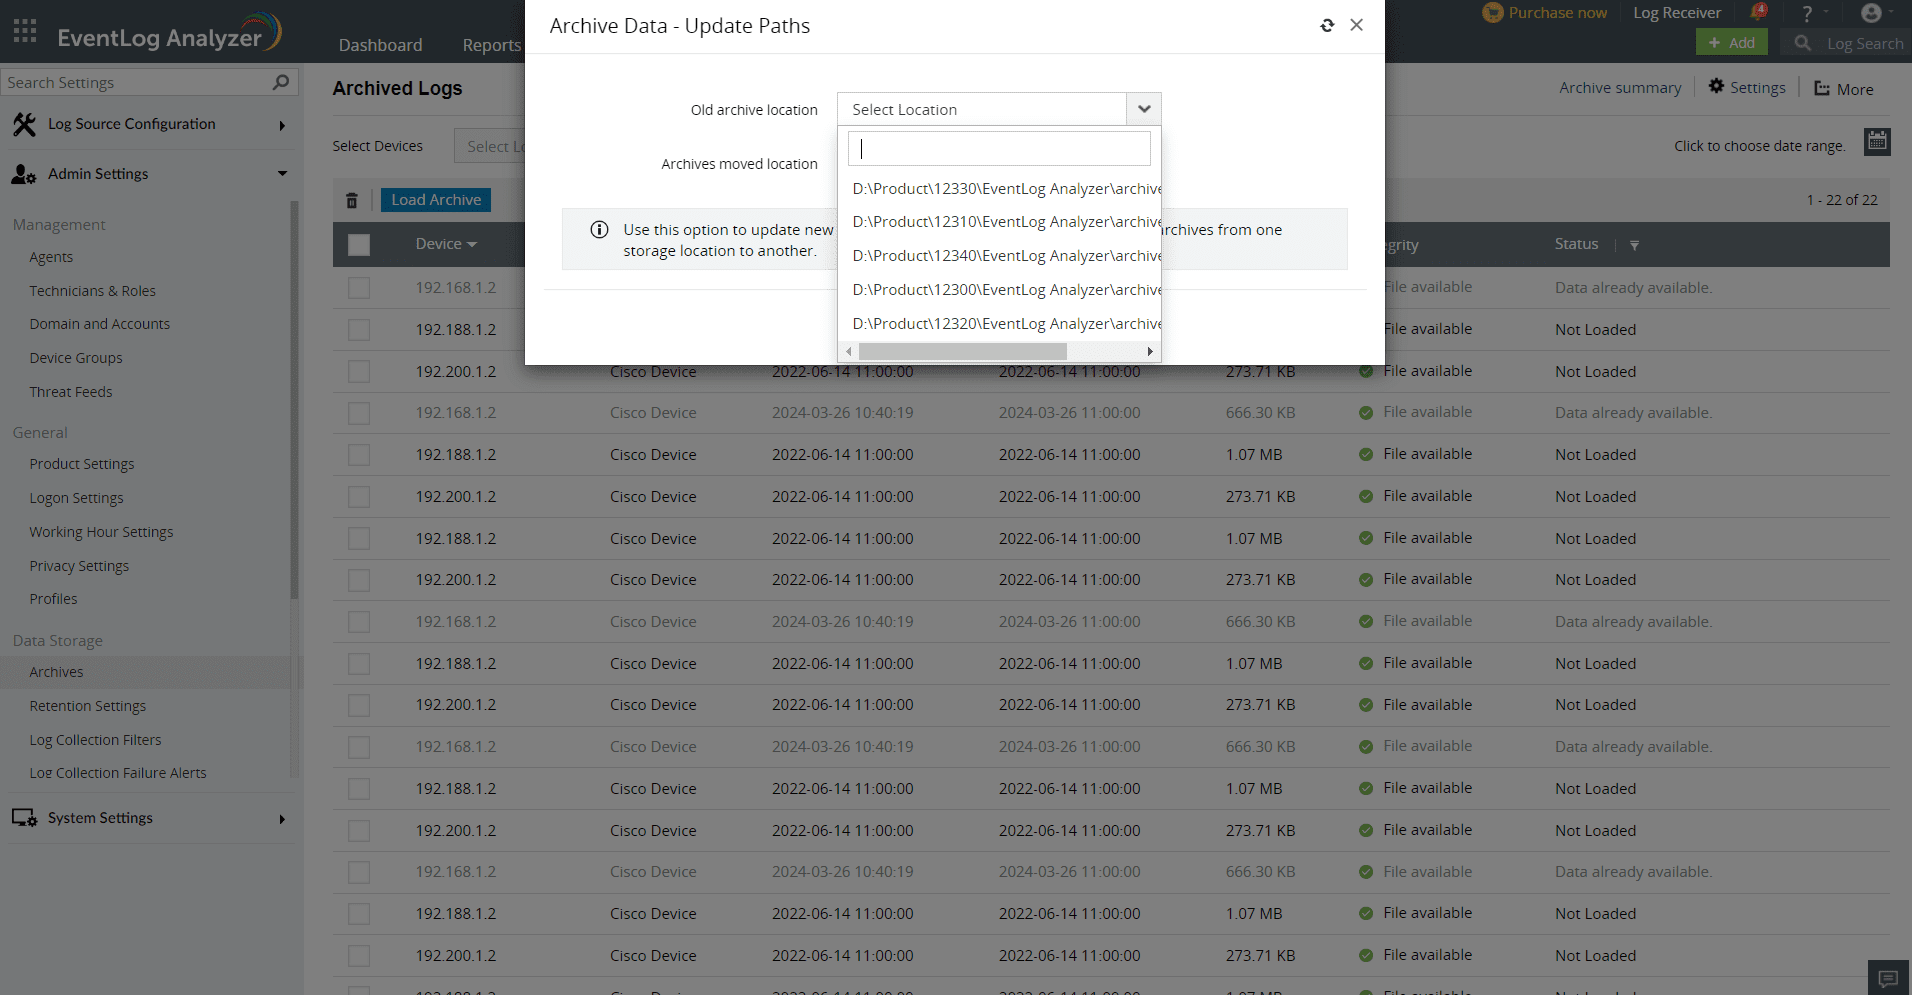
- Update path
- Update archive file integrity
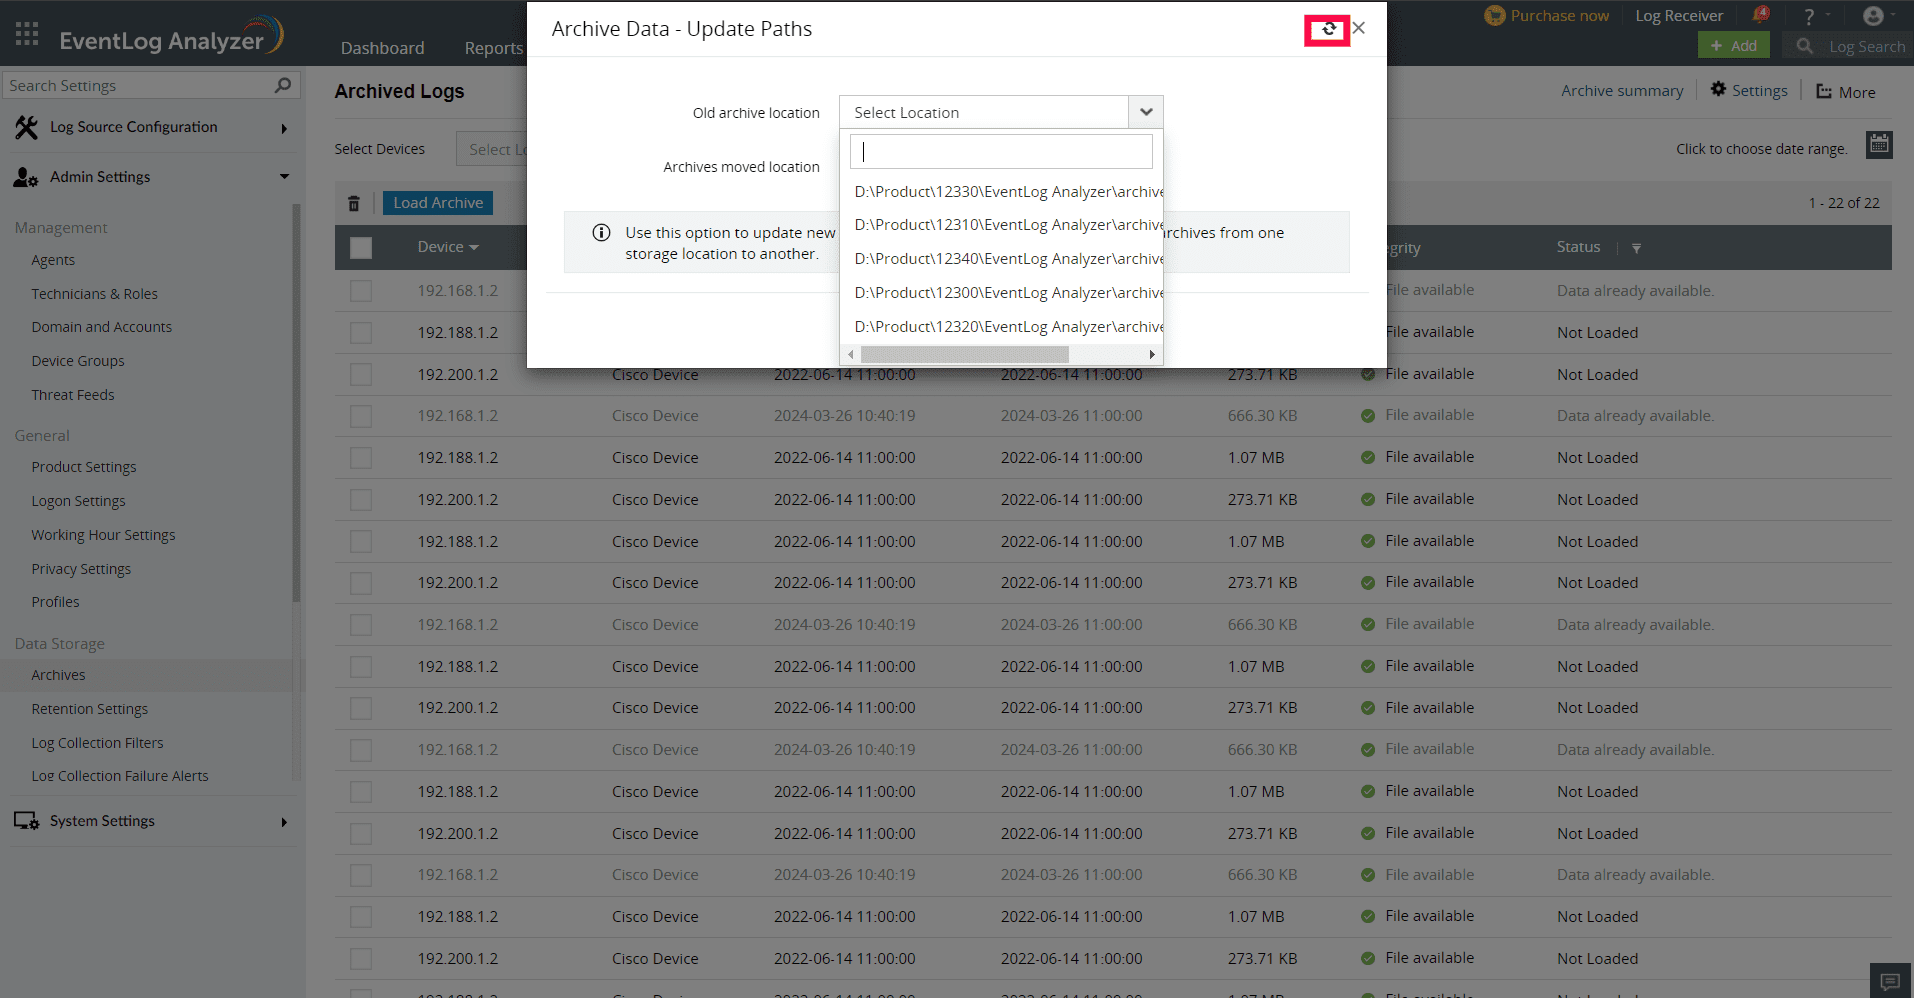
- Goto Settings > Admin Settings > Data Storage > Archives > More > Update path.
- Click the refresh button in the top right corner to update the integrity status of the files.
The File not Found status will change to Verified, if the file is present in the directory as specified in DB. This will also change the status from Tampered Files to Verified.
Integrity Status like Access denied and Connectivity failed will be updated to Verified, if the file is present in the respective location
- To add archives in DB
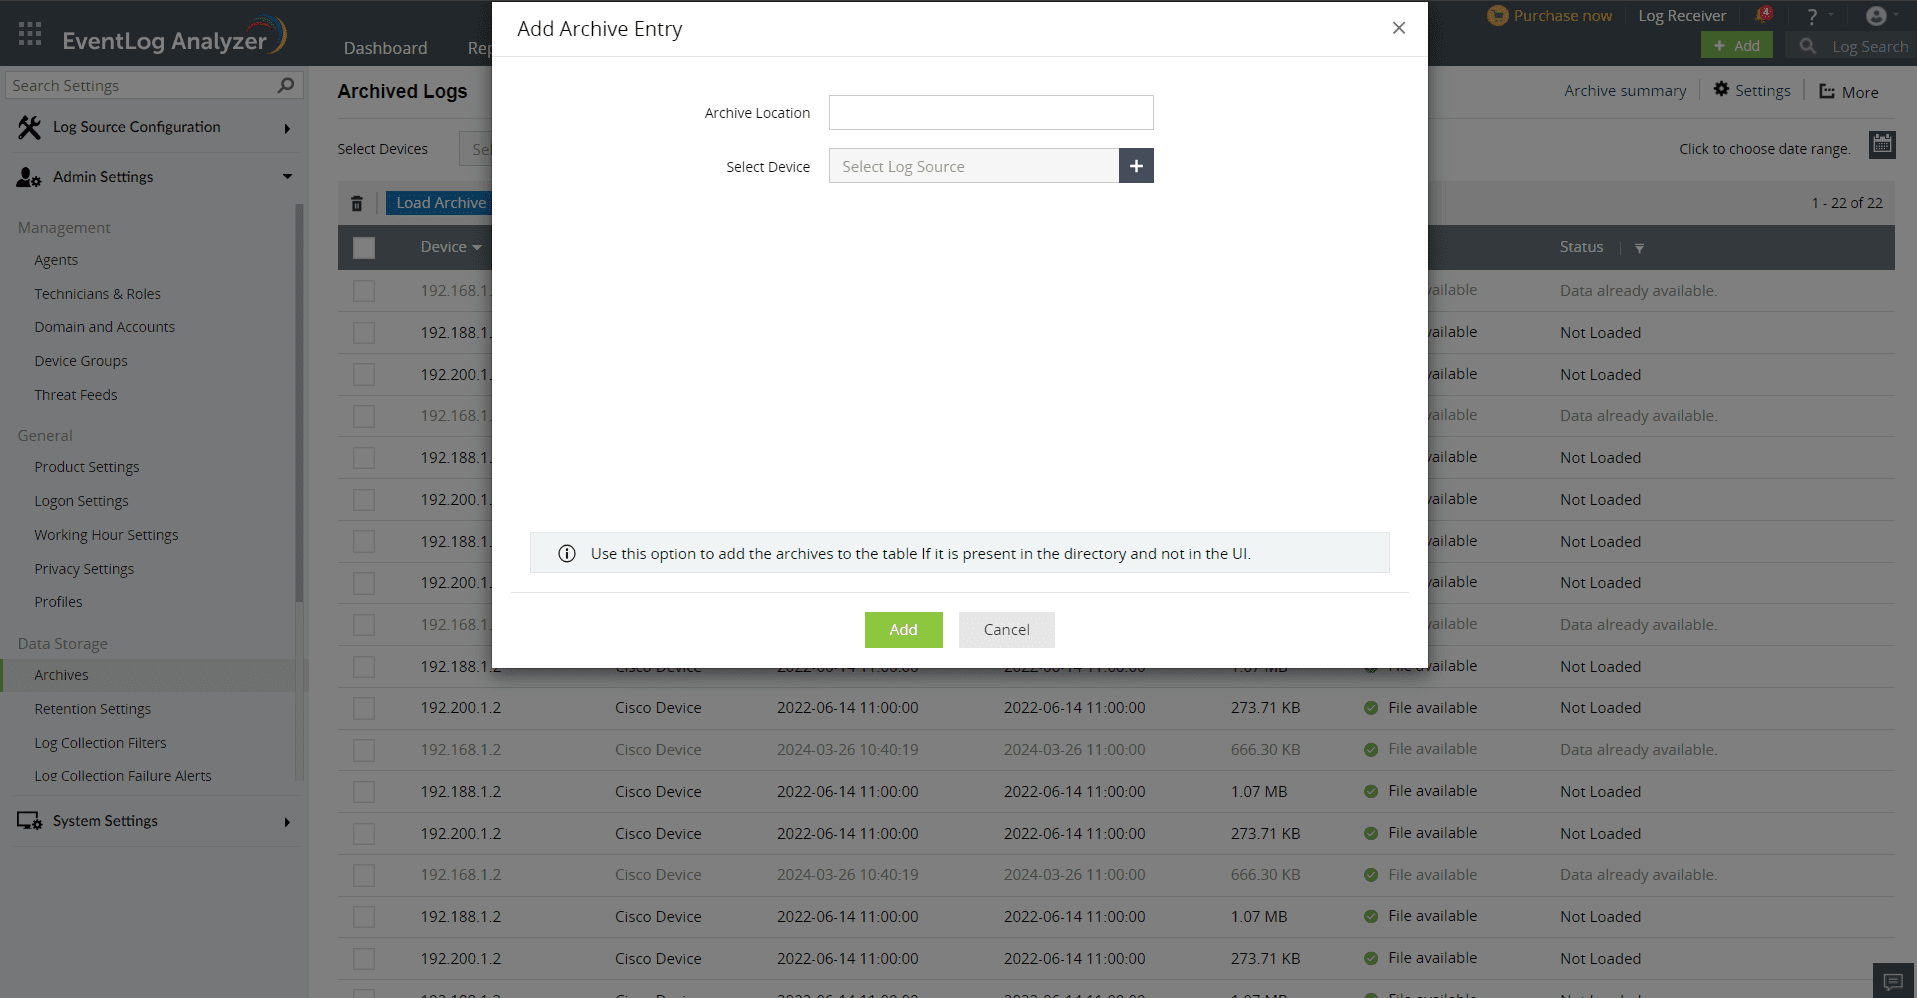
- If ES/data lost or corrupted
- Goto Settings > Admin Settings > Data Storage > Archives > More > Rebuild Indexes.
- Select the date range and the device for which the logs need to be indexed in ES from Archives.Click on Rebuild.

Centralized Archiving:
If centralized archiving is enabled in the Admin Server. In that case, the S3 bucket option will not be displayed for new policies in Manage Server. For existing S3 bucket configured policies, file transfers will continue to upload in S3 locations. Files will be downloaded locally and then transferred to the Admin Server. Ensure that you have sufficient storage, also make sure to change the location to local if centralized archiving is enabled for optimal performance.
 Click here to expand