How to configure Remote Access Plus to make it use MS SQL server as the database?
Remote Access Plus extends support for using MS SQL database for storing the configuration and data. This document will explain the steps to:
- Configure MS SQL as the back-end database for Remote Access Plus Server.
- Set up a fresh MS SQL database or migrate data from an existing database to a new MS SQL database.
This migration is applicable only for Remote Access Plus build 10.0.457 or above. Update your Remote Access Plus server here before following any of these steps.
Hardware Requirements for SQL Server
The hardware requirements for SQL server include the following:
| No. of computers managed | Processor information | RAM size | Hard disk space |
| 1 to 5000 | Intel Core i7 (6 core/12 thread) 3.2 GHz. 12 MB cache | 8 GB | 30 GB* |
| 5001 to 10000 | Intel Xeon E5 (8 core/16 thread) 2.6 GHz. 20 MB cache | 16 GB | 40 GB* |
| 10001 to 15000 | Intel Xeon E5 (12 core/24 thread) 2.7 GHz. 30 MB cache | 32 GB | 80 GB* |
| 15001 to 20000 | Intel Xeon E5 (14 core/28 thread) 2.7 GHz. 30 MB cache | 64 GB | 120 GB* |
* May increase dynamically according to the frequency of scanning.
Note:
- Remote Access Plus supports MS SQL 2005 or later versions.
- This document is applicable for migrating Remote Access Plus from PgSQL to MSSQL and one MSSQL server to another.
Change the Database Server to MS SQL
The following steps will explain how to backup the data from the old server, change the database server, and restore the data in the MSSQL database.
Migrating the database to SQL server
From the computer where Remote Access Plus server is installed, perform the steps below:
- Stop Remote Access Plus service.
- Execute the script changeDBServer.bat available under <Remote Access Plus Home>/bin directory. This invokes the Database Setup wizard.
- Select Database Type as SQL Server.
- Specify the Host Name where SQL Server is installed.
- From the list of available SQL server instances, select the instance on which you wish to run the database.
- You can choose to authenticate the database connection either using Windows Authentication or SQL Server Authentication. Choose the required authentication and provide the credentials.
- Click the checkbox to enable NTLM authentication.
- Have the "Migrate Data from Existing Database" checkbox enabled if you want to migrate your existing database to MSSQL.
Note: This is applicable only if you want to migrate your existing database to MS SQL. If you are trying to create a fresh setup, then you can ignore this step. Click Save to save and complete the SQL Server Configuration. Note that it may take a few minutes to configure the settings on the SQL Server.
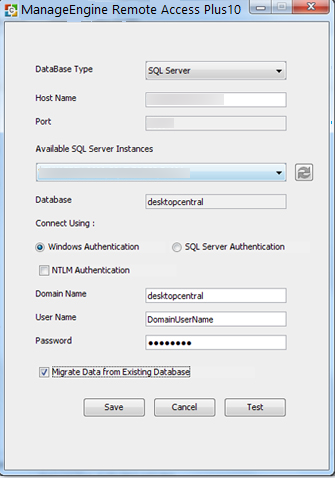
Fig: Windows Authentication
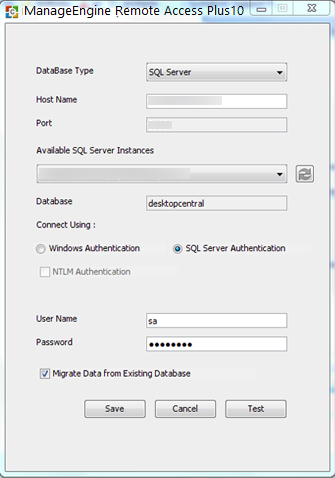
Fig: SQL Server Authentication
Note :
- One of the best practices recommended is to click Test to check whether a connection could be established with the given credentials.
- This might take several minutes; the size of your database determines the time taken.
You can start using Remote Access Plus which has been migrated from the previous location.