Agent installation
Last updated on:
In this page
Overview
This page explains how the agent can be installed using the product console, GPOs, SCCM, Endpoint Central, or manually, depending on your deployment needs.
Agent installation using the product console
- Log in to your account.
- Navigate to the Settings tab, and under Admin Settings, select Collectors/Agents.

Figure 1: Navigating to Collectors/ Agents - Click + Install Agent and then the
 icon corresponding to Device(s).
 - Select the devices on which you want to install the agent.
- Enter the Username and Password for the device(s).This account must have administrator privileges.

Figure 2: Entering username and password - Click Verify Credential to validate the credentials entered.
- Alternatively, you can choose Use Default Credentials by selecting the checkbox next to it.
NOTE If multiple devices are selected, ensure that the credentials are valid for all devices.

Figure 3: Using default credentials
Agent installation using GPOs
Before installing the agent using Group Policy Objects (GPOs), place the following files in a network-shared folder on the server:
- InstallLog360Agent.vbs (Path:<InstallationDirectory>\ManageEngine\Log360\tools\scripts)
- Log360Agent.exe (download from the Manage Agents page).
The installation process comprises the following steps:
- Creating a GPO
- Configuring script settings
- Configuring Administrative Template Settings
- Applying the GPO
Creating a GPO
- Open Group Policy Management.
- In the left pane, right-click Group Policy Objects and select New.
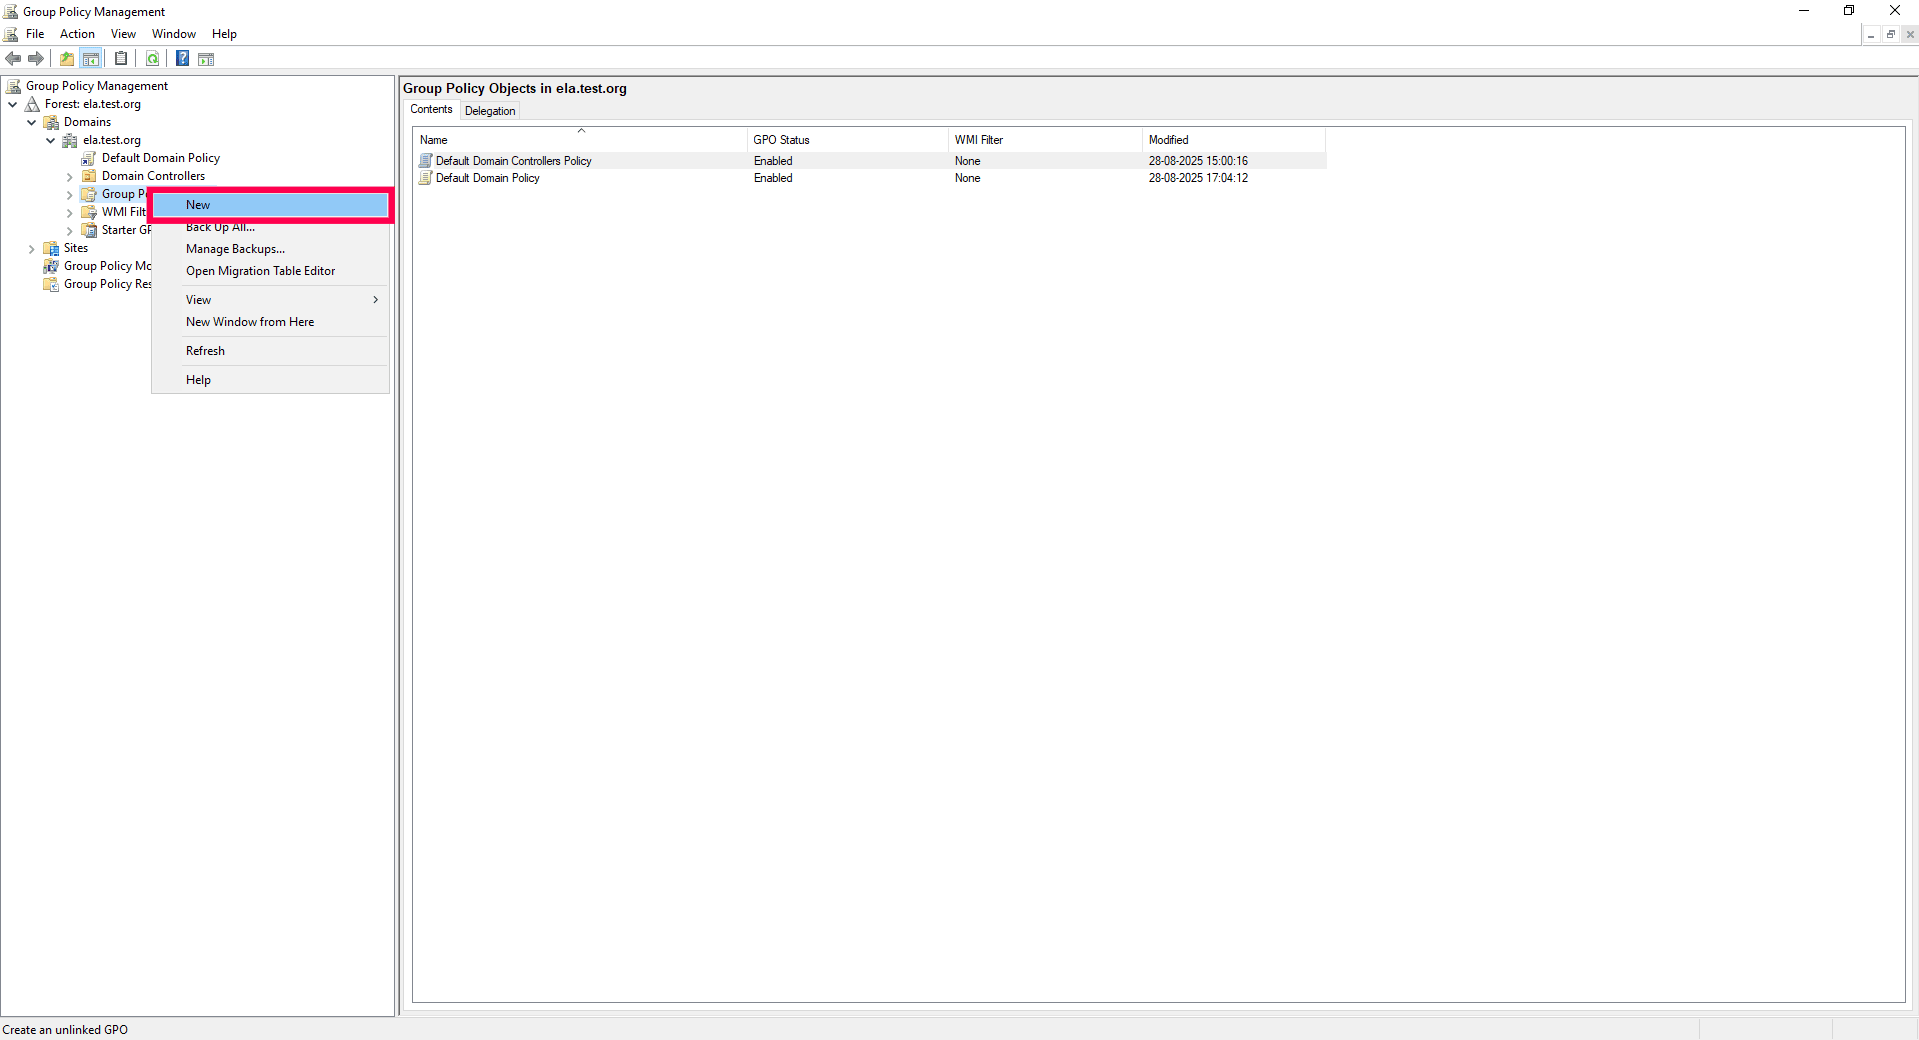
Figure 4: Creating a new group policy object - Enter a suitable name for the GPO and click OK.

Figure 5: Naming the GPO
Configuring script settings
- Right-click the newly created GPO and select Edit.

Figure 6: Editing GPO - For Windows Server 2003, navigate to: Computer Configuration> Windows Settings> Scripts (Startup/Shutdown)> Startup.
- For Windows Server 2008 and later, navigate to: Computer Configuration> Policies> Windows Settings> Scripts (Startup/Shutdown)> Startup.

Figure 7: Configuring script settings - Right-click Startup, and in the dialog box that appears, click Add.
- In the Add Script dialog box, click Browse and select InstallLog360Agent.vbs from the shared location.

Figure 8: Installing agent - n the Script Parameters field, enter the following parameters:
/INSTALLERPATH:"<share path of Log360Agent.exe">
Example:
.\InstallLog360Agent.vbs /INSTALLERPATH:"\\Agent-shared\Log360Agent\Log360Agent.exe" - Click OK to return to the Startup Properties dialog box.
- Click Apply and then OK.
Configuring Administrative Template Settings
- In the Group Policy Management Editor, navigate to Computer Configuration > Administrative Templates > System.
- Under System, select Scripts.
- In the right pane, double-click Run logon scripts synchronously and enable it.
- Click Apply and then OK.
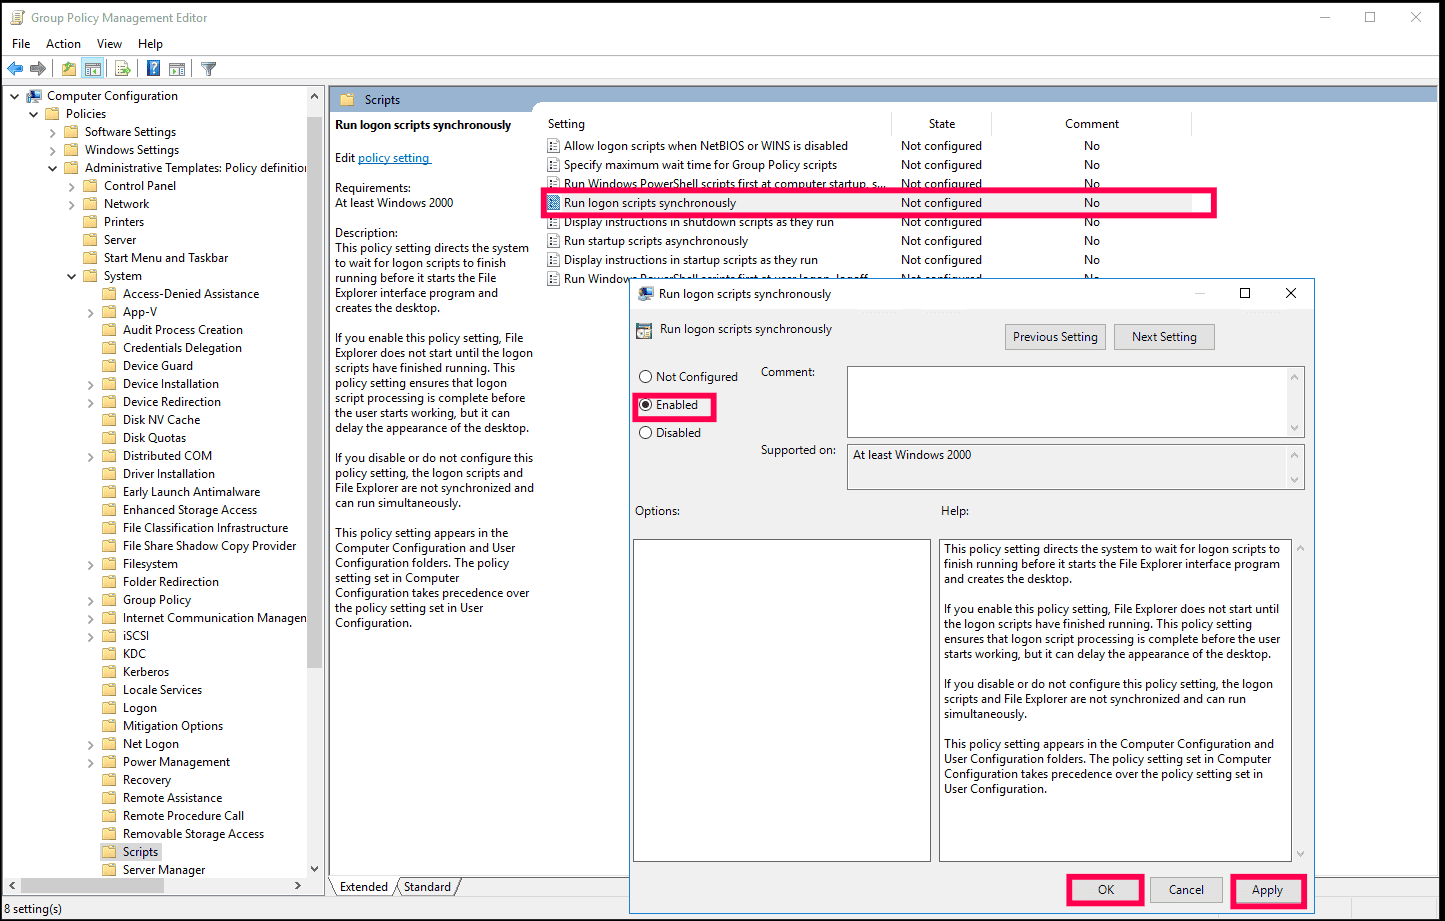
Figure 9: Enabling run logon scripts - Similarly, enable Maximum wait time for Group Policy scripts.
- In the left pane, navigate to System and select Logon.
- Double-click Always wait for the network at startup and logon and enable it.
- Click Apply and then OK.
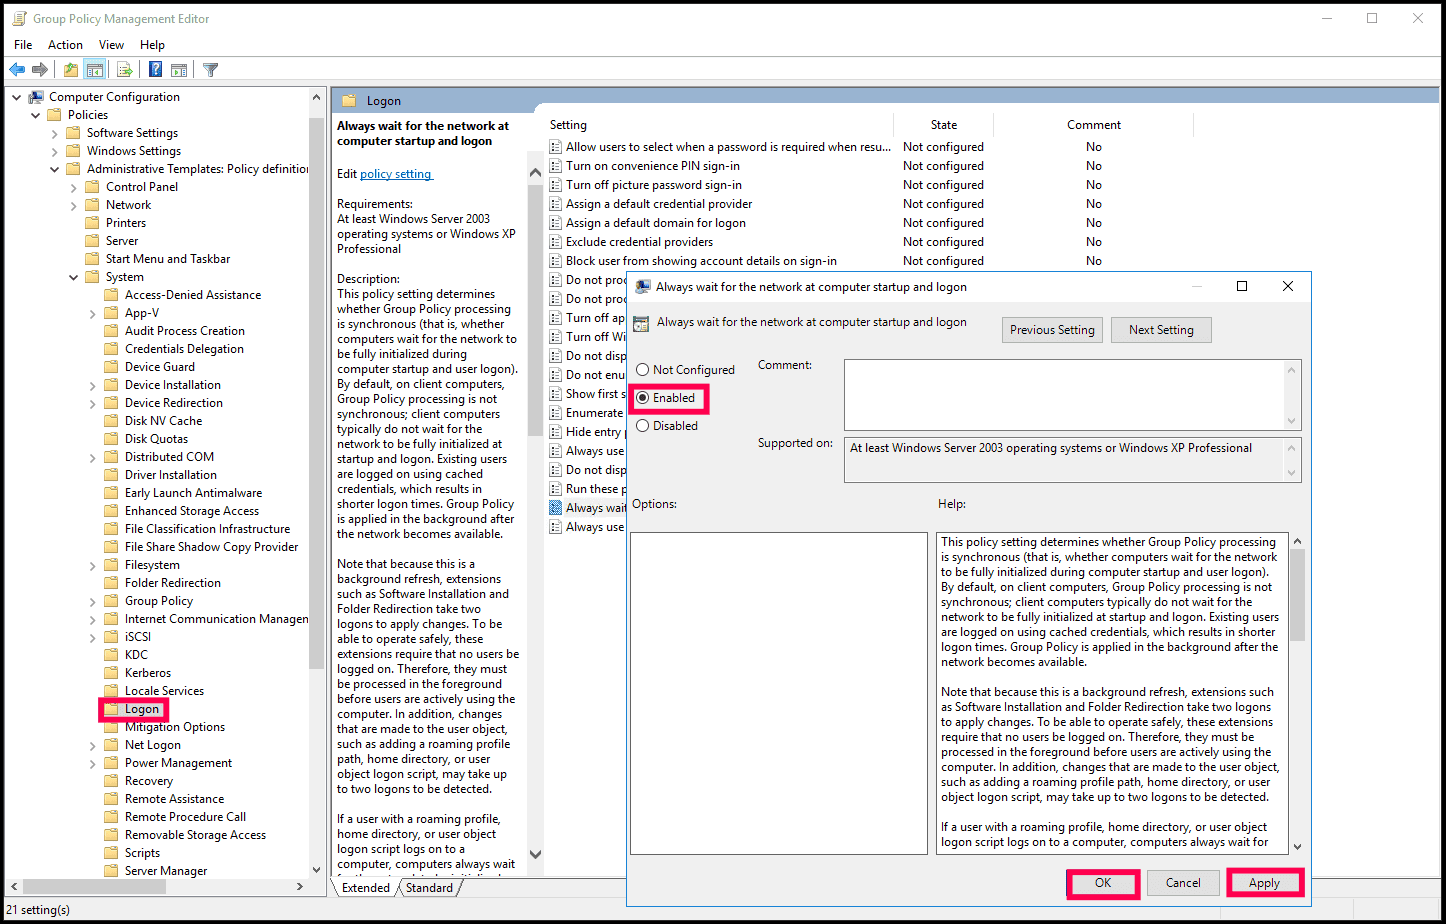
Figure 10: Configuring logon setting - In the left pane, navigate to System and select Group Policy.
- Double-click Group Policy slow link detection and enable it.
- Click Apply and then OK.
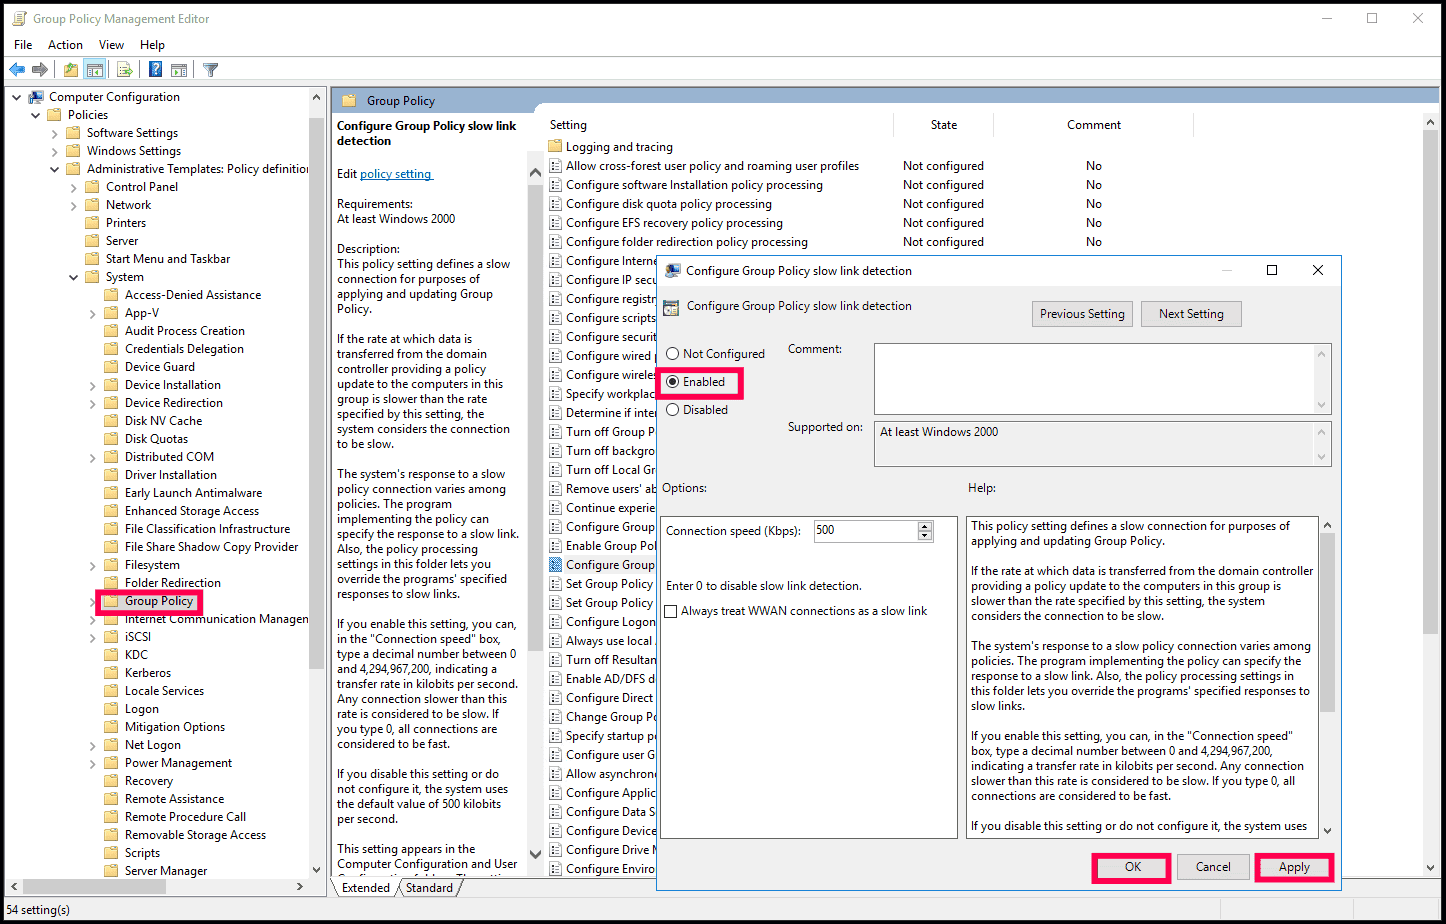
Figure 11: Configuring group policy settings
Applying the GPO
- In Group Policy Management Editor, right-click the GPO and select Properties.
- Navigate to the Security tab and unselect the Apply Group Policy permissions for Authenticated Users.
- Click Add, then in the dialog box, select Object Types.
- To apply the GPO to computers directly, ensure Computers is selected.
- To apply it to a group, ensure Groups is selected.
- Click OK to save and apply the changes.
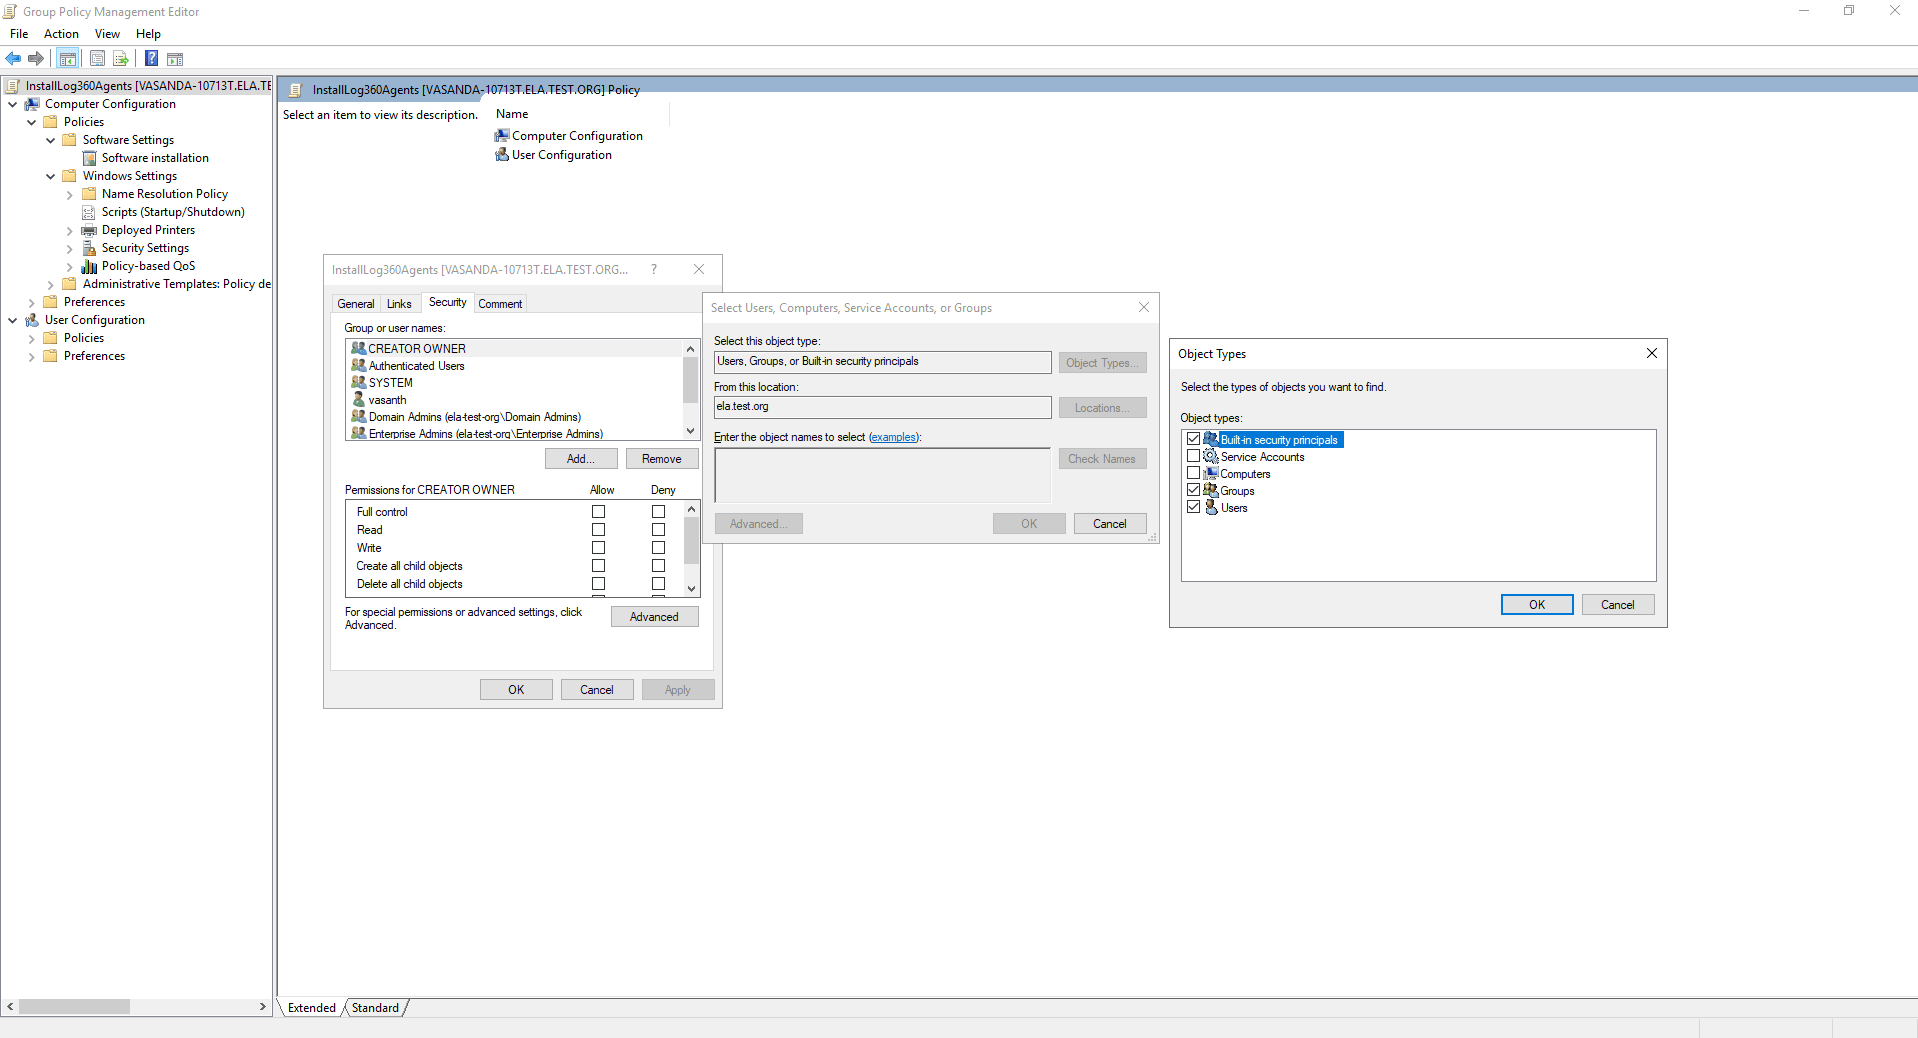
Figure 12: Selecting object types - Enter the name of the desired computer(s) or group(s), then click Check Names.
- Select the correct object(s) and click OK to return to the properties dialog box.
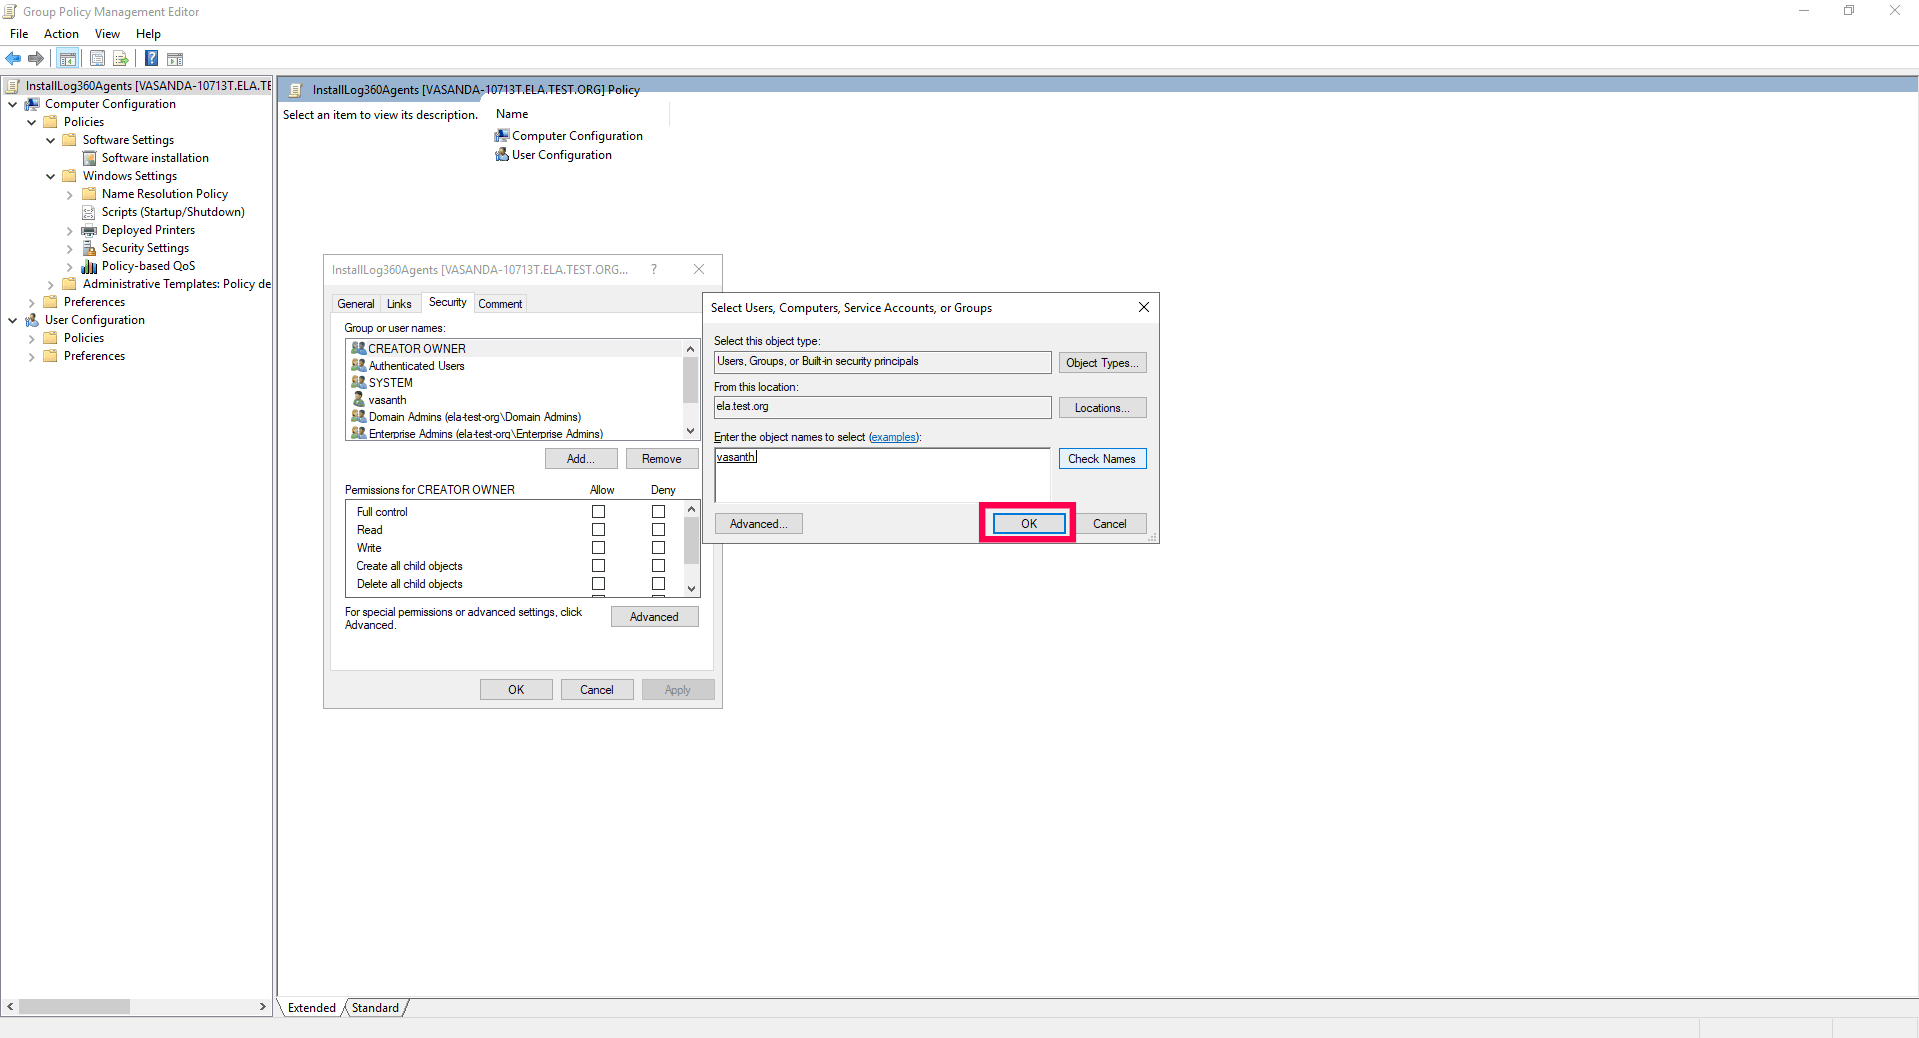
Figure 13: Selecting object types - In the Security tab, assign the following permissions to the selected computer(s) or group(s):
- Read: Allow
- Apply Group Policy: Allow
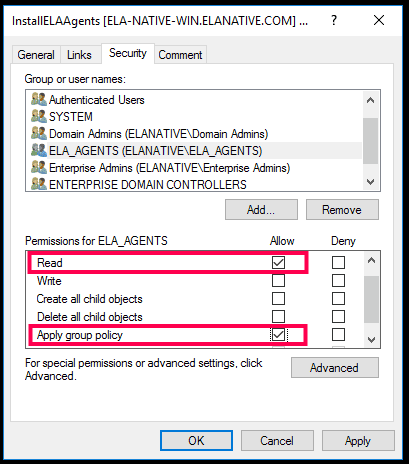
Figure 14: Configuring permissions - Click Apply, then OK.
- In the Group Policy Management Console, right-click the Domain and select Link an Existing GPO.
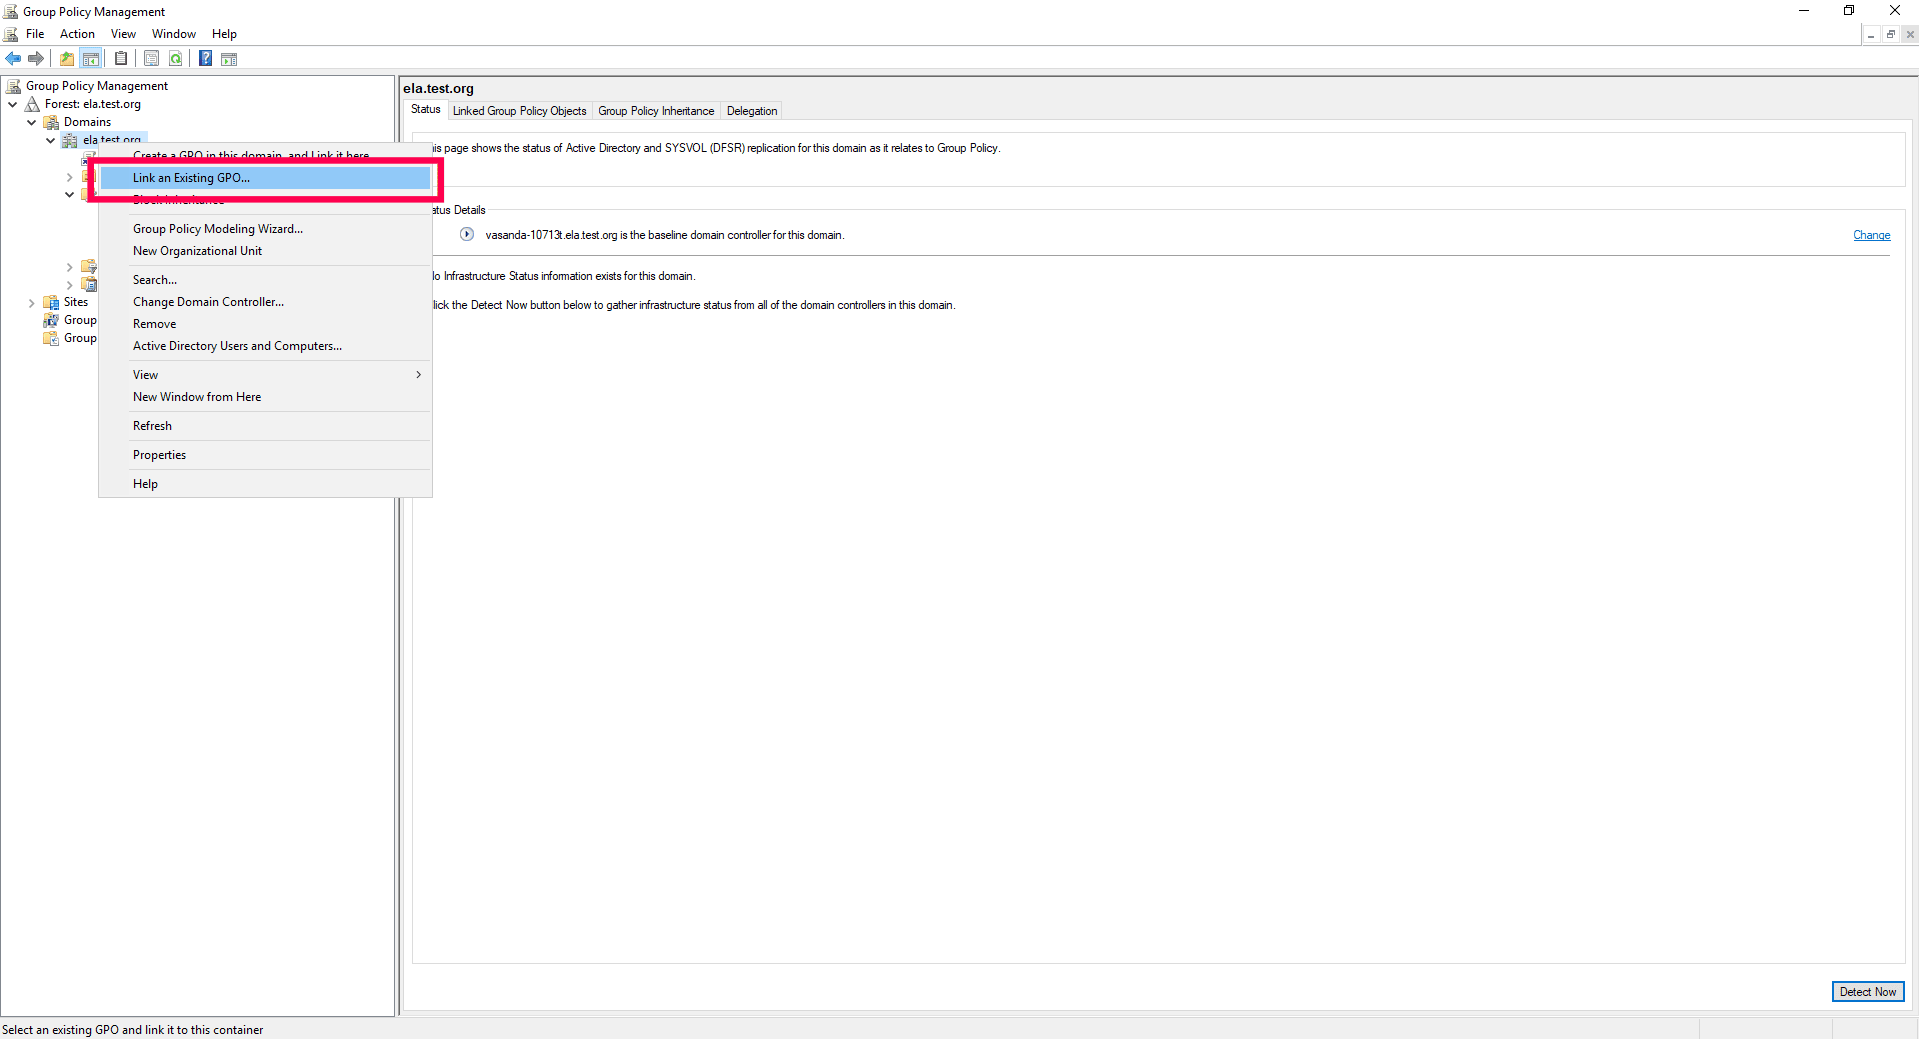
Figure 15: Linking an existing GPO - Choose the GPO you created, then click OK.
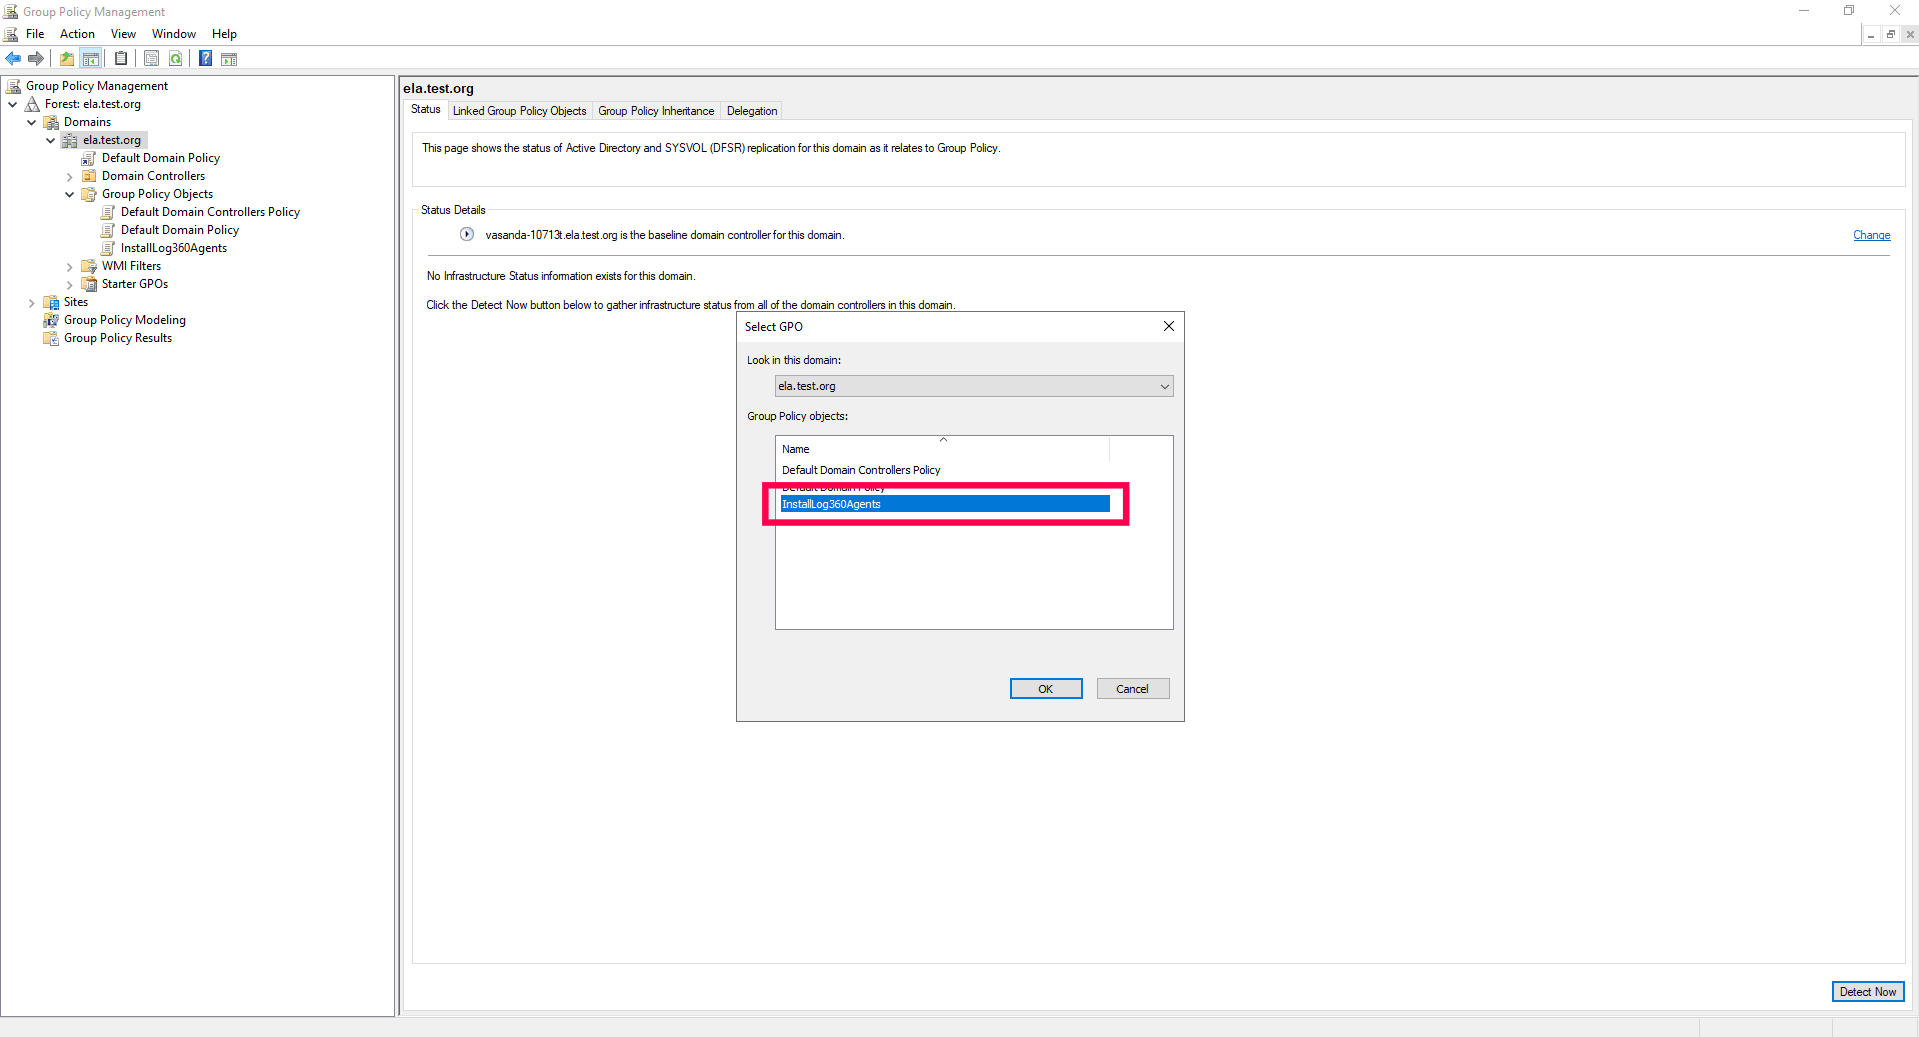
Figure 16: Selecting GPO - Restart the computers to apply the GPO settings and wait for the reset password / unlock account link to appear on the Windows logon screen.
NOTE: After installation, disable or delete the GPO to prevent the script from running at every startup.
Using Microsoft System Center Configuration Manager (SCCM) or similar deployment tools
- Place the appropriate installer file in a network-shared folder:
- Windows: Log360Agent.exe
- Linux: EventLogAgent_<Arch>.bin
- On the target devices, run the following command to install the agent:
- For Windows:
"Log360Agent.exe" SILENT_INSTALL /hide_progress /hide_splash
- For Linux:
./EventLogAgent_64.bin > ./ELAAgent_InstallationLog.log 2>&1
- For Windows:
Agent installation via Endpoint Central
Follow these steps to install the agent using Endpoint Central:
Create an EXE package
- Log in to the Endpoint Central console as an administrator.
- Navigate to the Software Deployment tab, select Packages, and click Add Package.
- From the Add Package dropdown, select Windows.
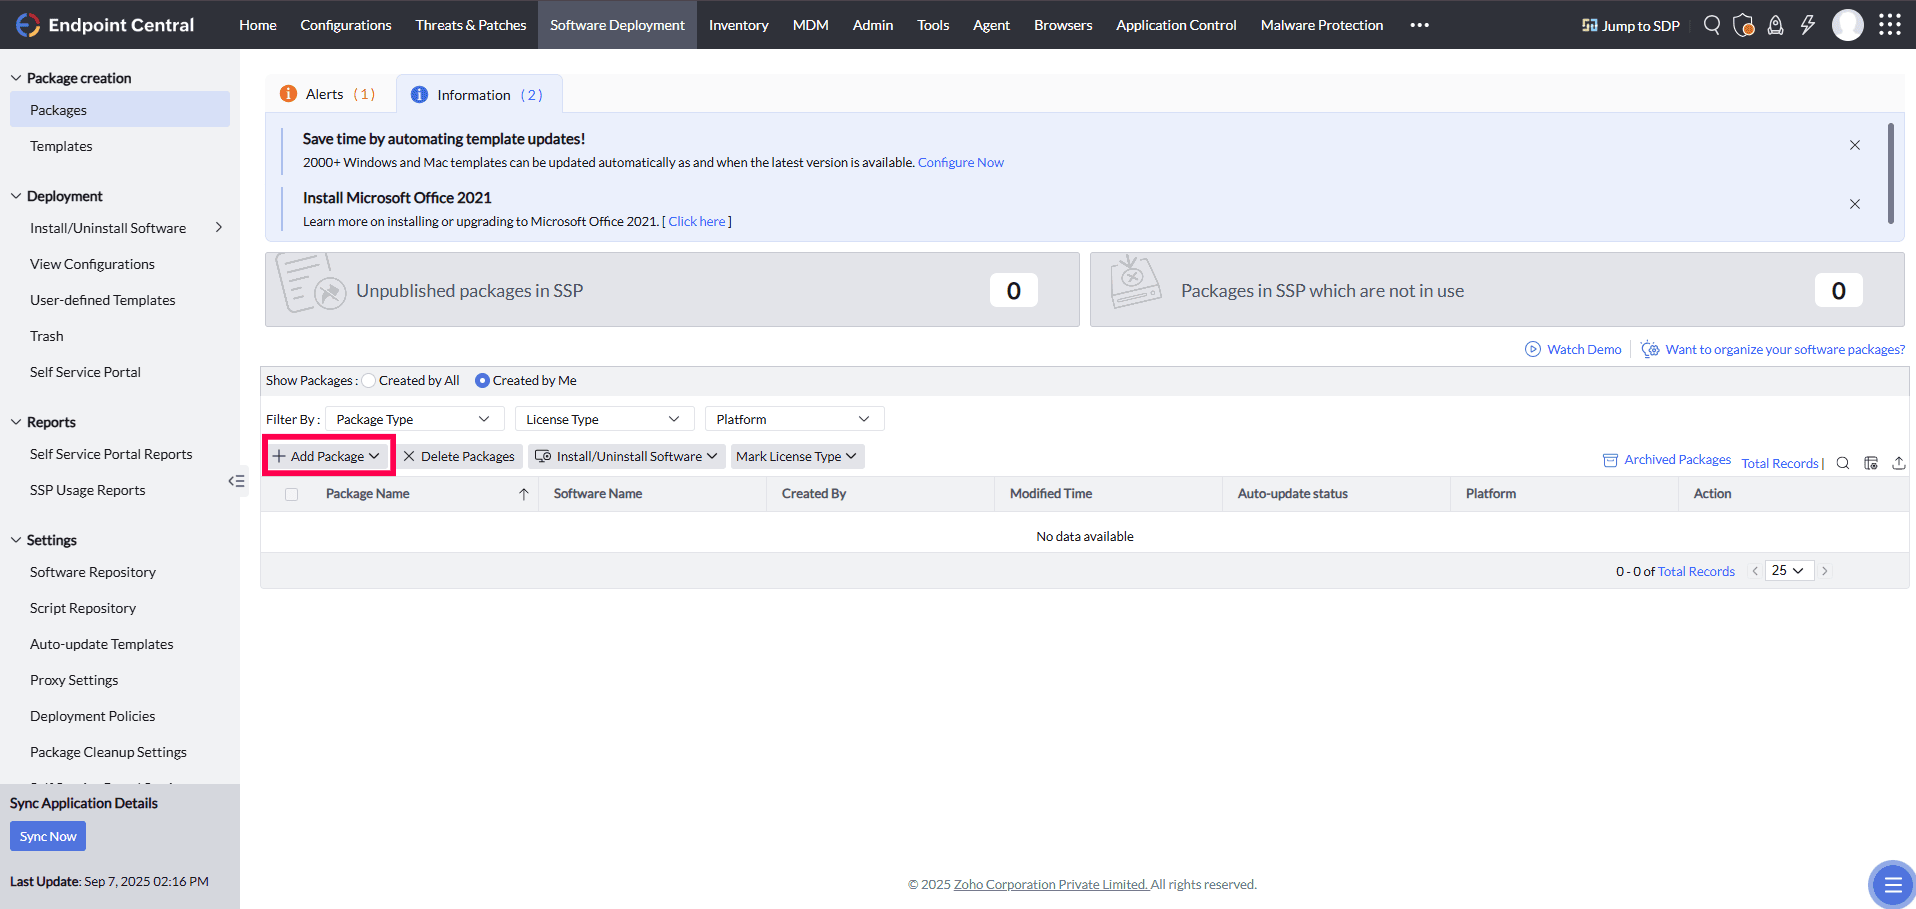
Figure 17: Adding a package - Fill out the package details:
- Package Name: Enter a name, for example, Log360 Agent.
- Package Type: Select EXE / APPX / MSIEXEC / MSU.
- License Type: Select Commercial from the drop-down.
- Locate Installable: To install Log360Agent.exe, choose the Local Computer option to upload the file directly or opt for the Shared Folder option and ensure the Log360Agent.exe file is placed in the shared location.
NOTE The product console includes .exe files for Windows and .bin files for Linux systems.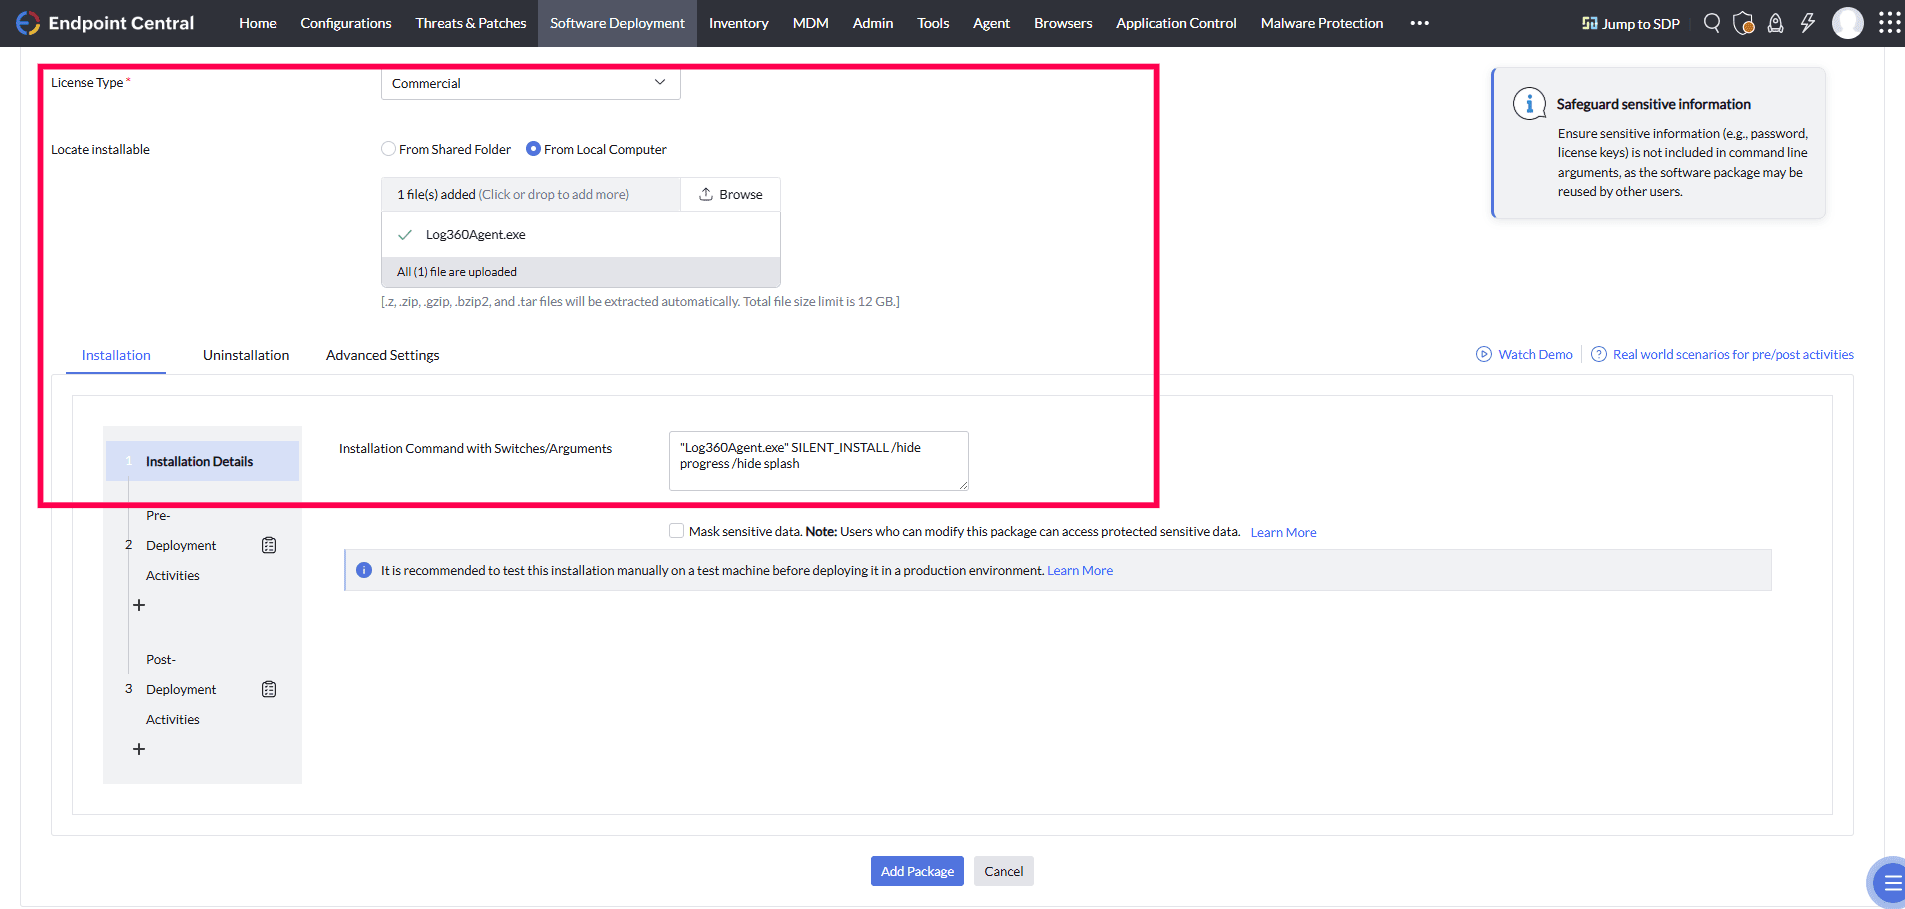
Figure 18: Configuring package details - Update and enter the following text in the Installation Command with Switches/Arguments field.
Log360Agent.exe SILENT_INSTALL /hide_progress /hide_splash
- Click Add Package to save the changes.
Deploy the package
After creating the EXE package, follow these steps to install the agent using Software Deployment:
- Navigate to the Software Deployment tab, select Deployment, and click Install/Uninstall Software.
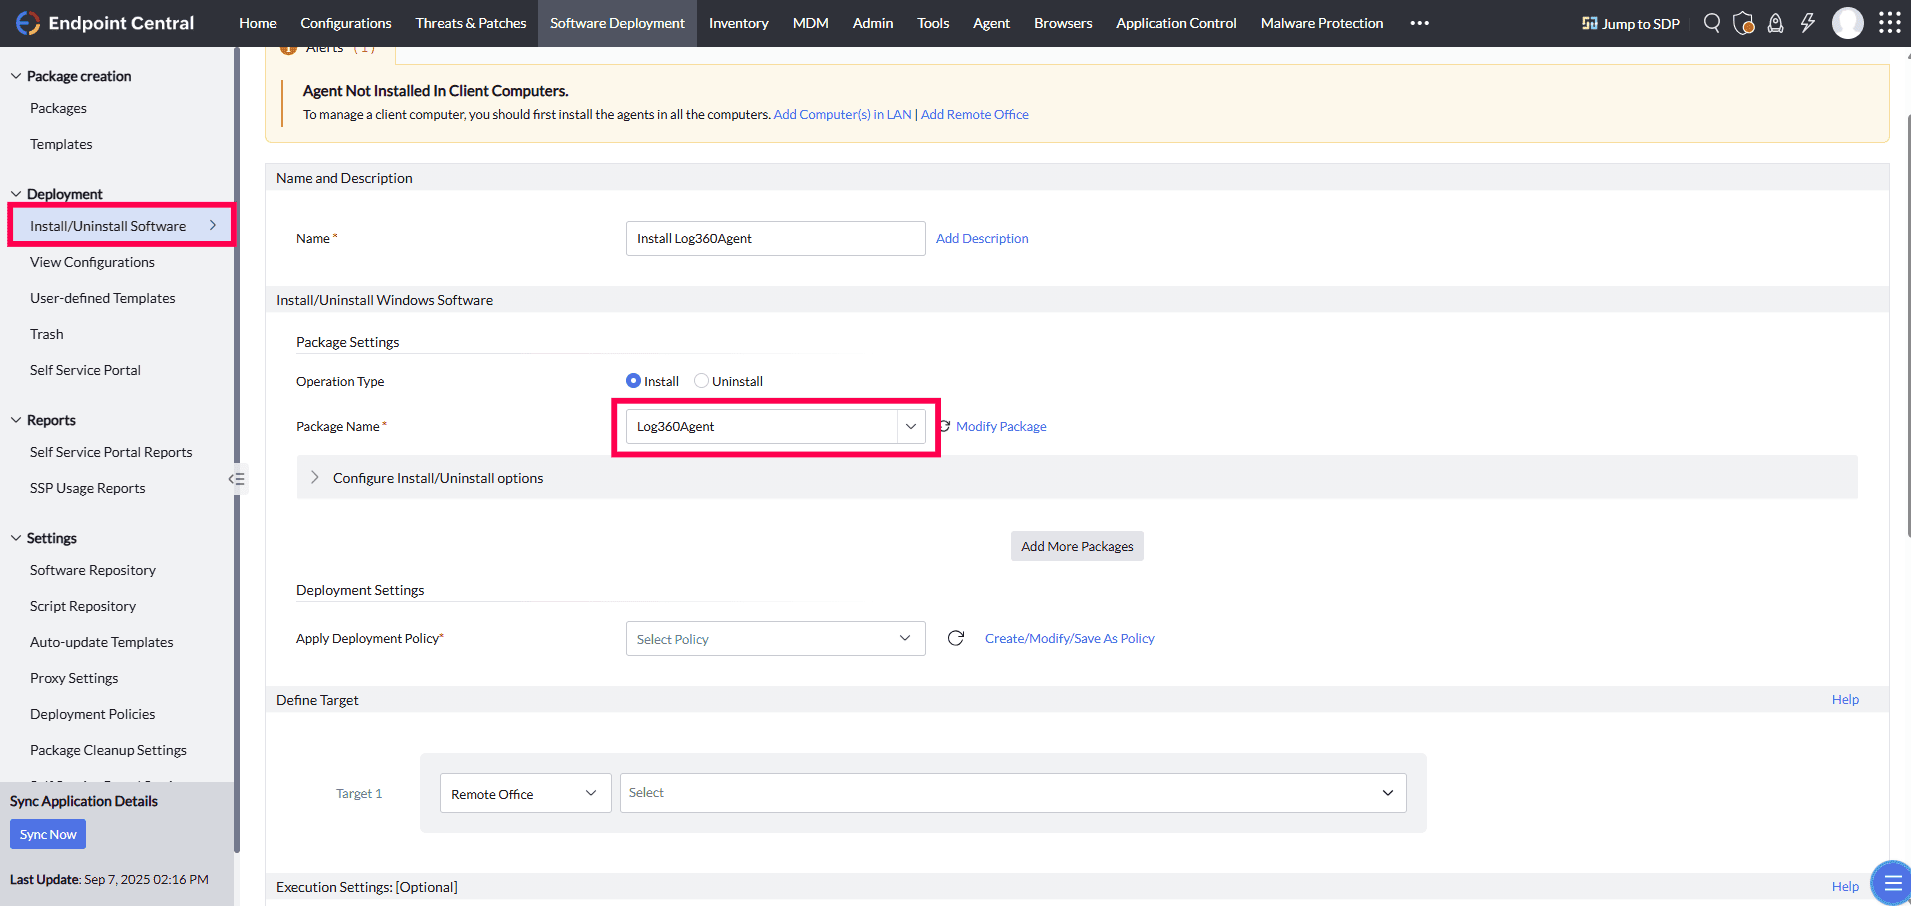
Figure 19: Installing the agent - Provide a name for the installation, for example, Install Log360 Agent, and add an optional description if needed.
- Select Install as the Operation Type, and from the Package Name dropdown, choose the package created earlier.
- Configure the required options under Deployment Settings:
- Configure additional install/uninstall options if needed.
- Specify when the deployment should occur.
- Under Define Target, select the computers or domains where the package should be deployed.
NOTE If needed, configure Retry options in Execution Settings to handle installation failures.
- Click Deploy to initiate the installation.
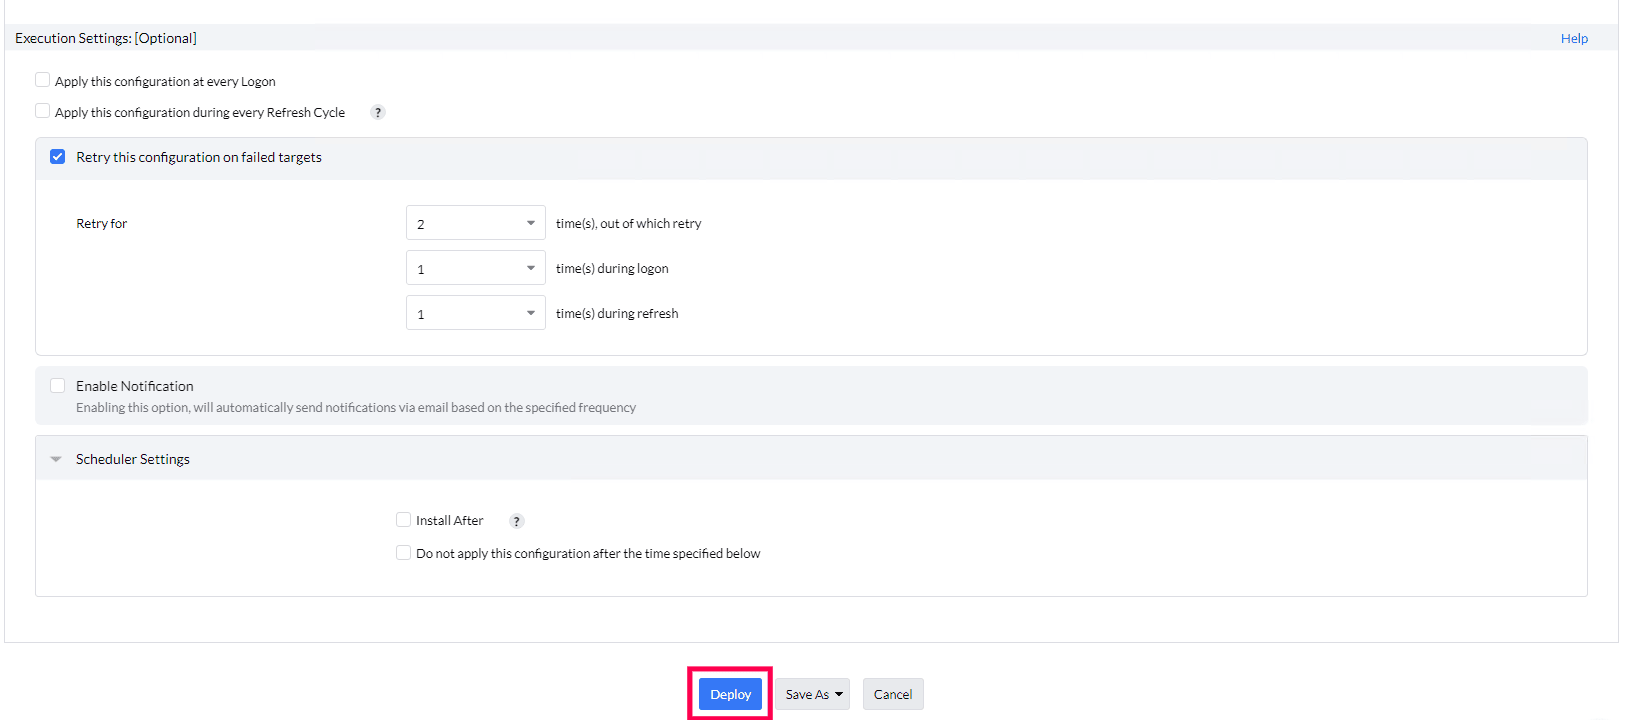
Figure 20: Initiating the installation - Track the deployment progress and status under Deployment > View Configurations.
Manual installation
You can also install the agent manually by downloading it from the console and running the installer on the required devices.
For Windows devices
- Log in to your account and go to the Settings tab.
- Under Admin Settings, select Collectors/Agents.
- Click Install Agent in the top-right corner.
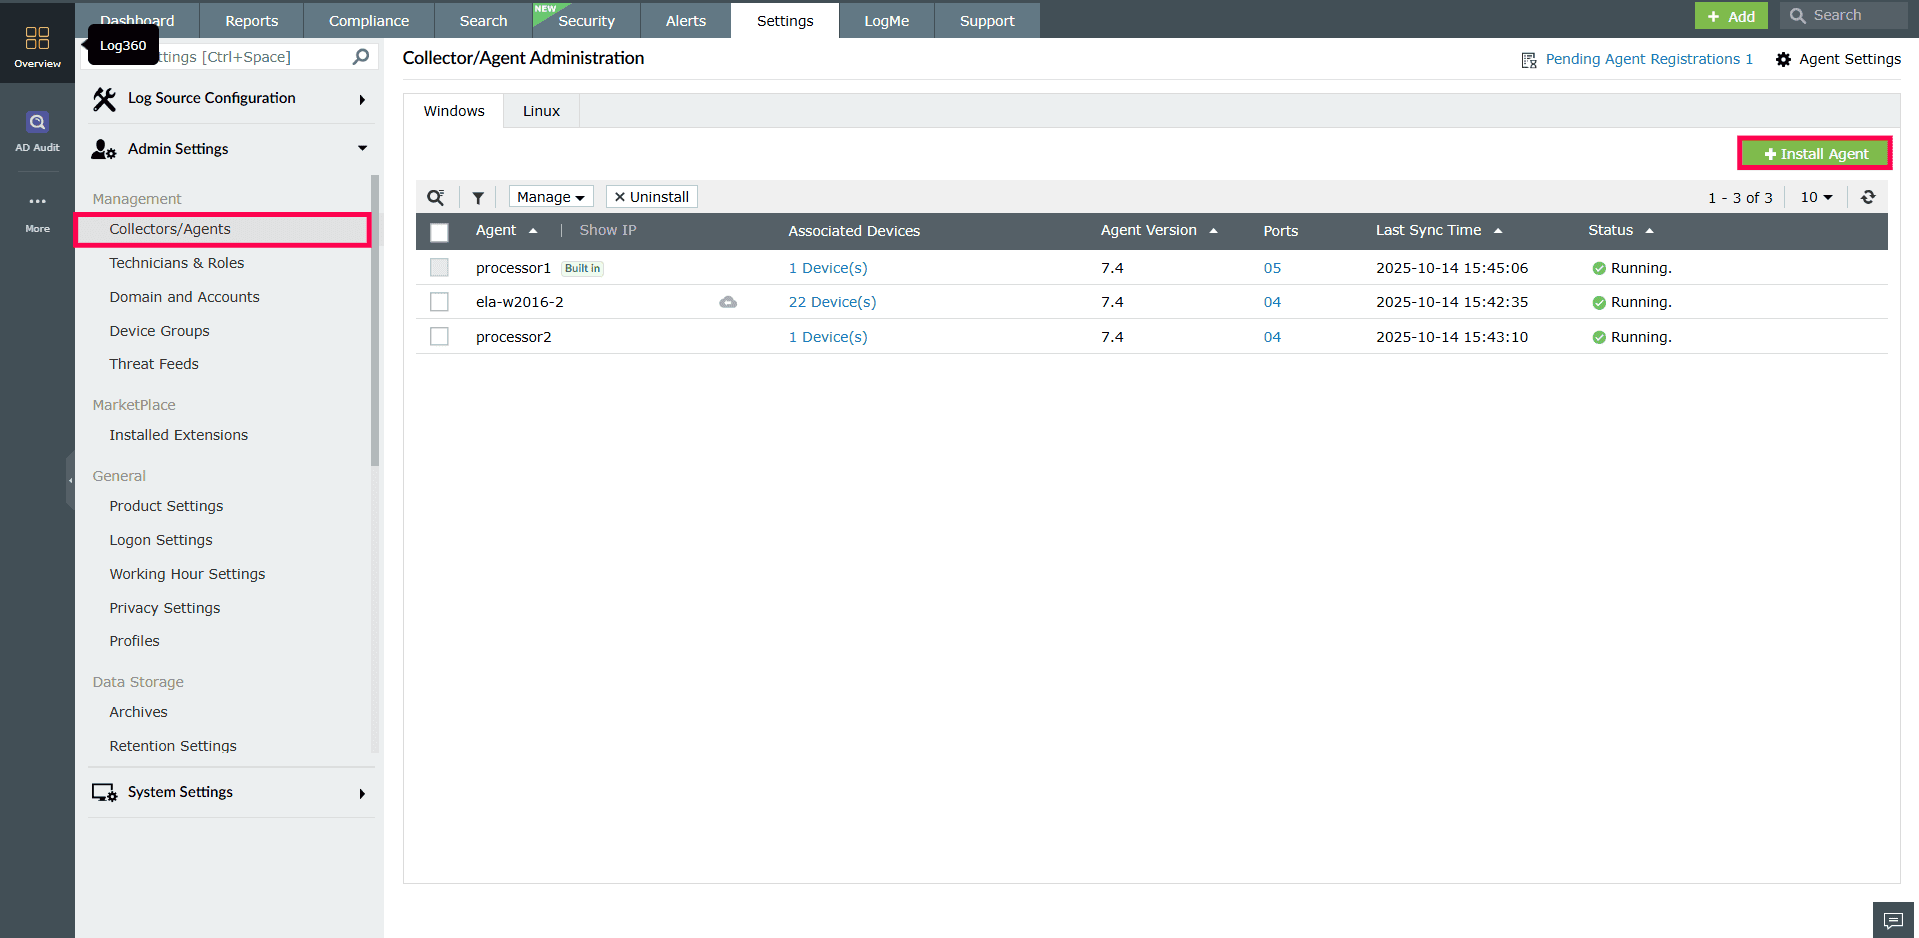
Figure 21: Installing agent - In the installation window, select Install Manually to download the agent package.
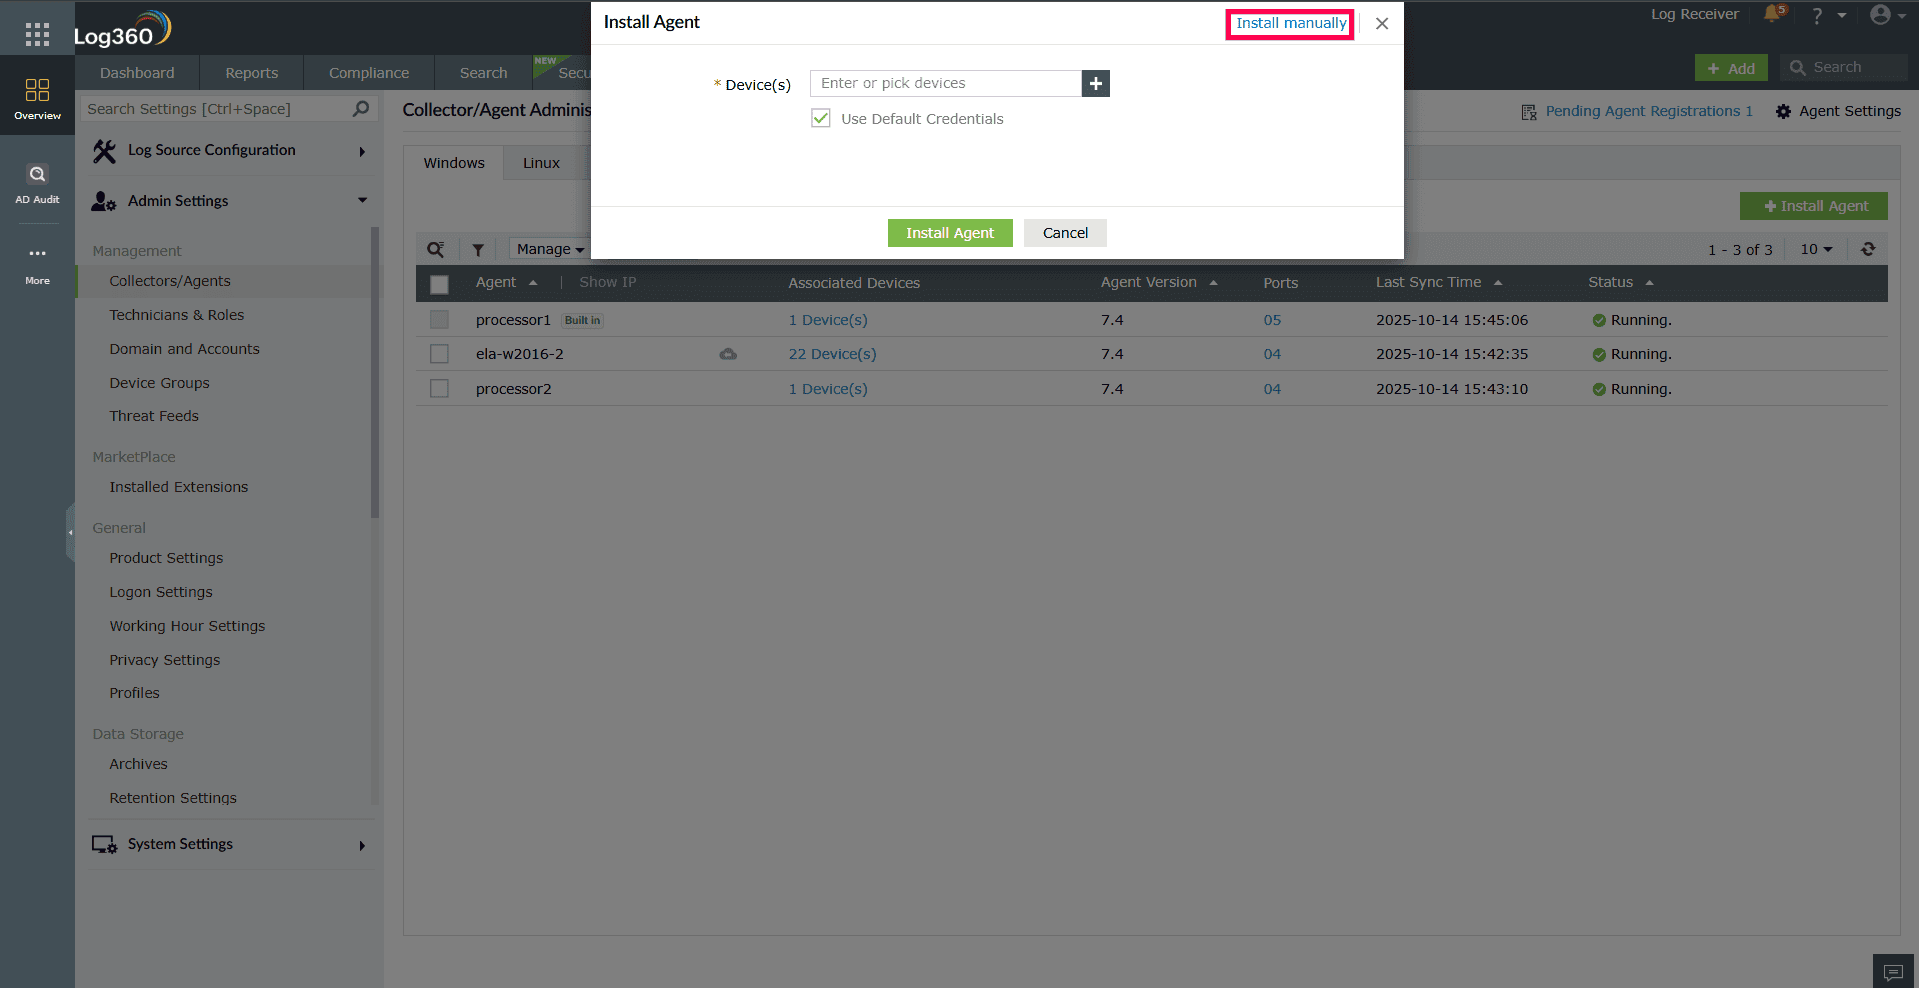
Figure 22: Installing manually - Run the downloaded installer on the target device.
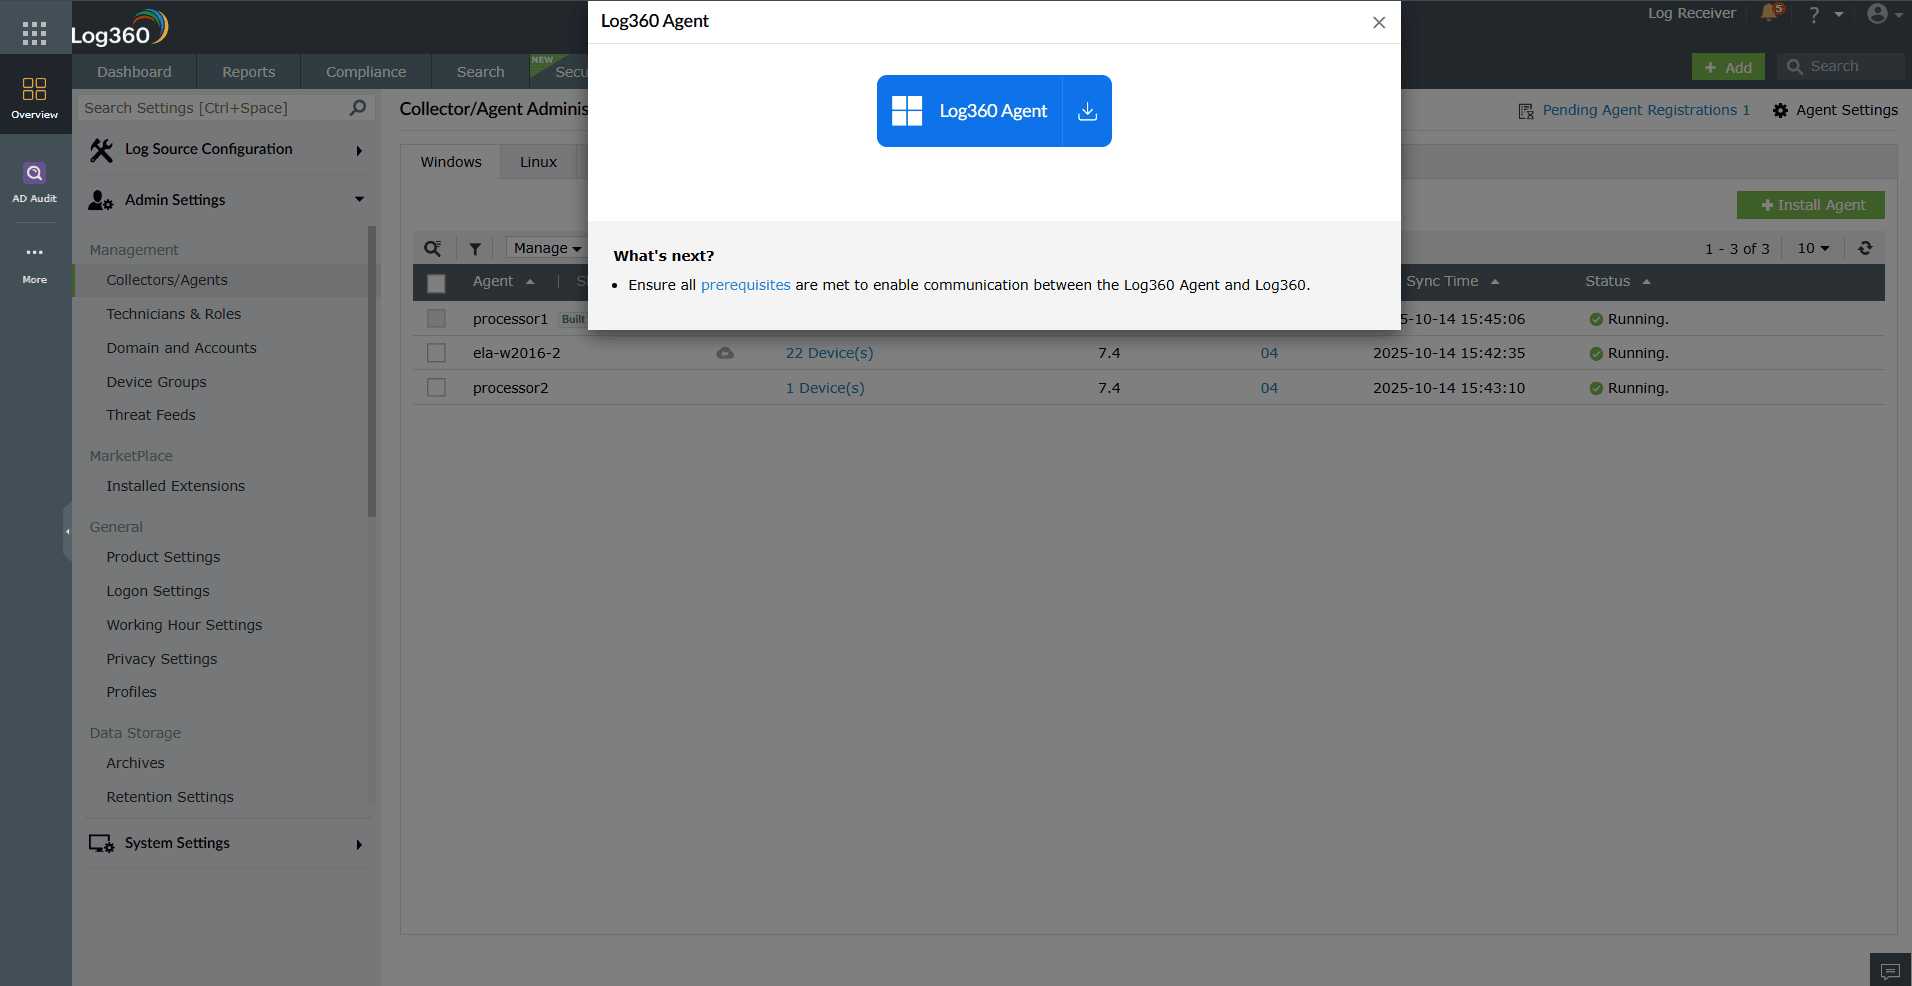
Figure 23: Downloading the installer
For Linux devices
The agent has to be configured in Manage File Integrity Monitoring page of the product. Refer Configuring File Integrity Monitoring to configure the agent in Linux devices. If installation fails due to permission denial, you can manually install it by executing the following command.
Installation Command:
HTTP Command:
eval "wget http://<eventlog_server>:<eventlog_server_port>/downloadMsi.nms?platform=agentInstaller -O AgentInstaller && sh AgentInstaller http://<log360_server>:<log360_port> lesssecure"
HTTPS Command:
eval "wget --no-check-certificate https://<log360_server>:<log360_port>/downloadMsi.nms?platform=agentInstaller -O AgentInstaller && sh AgentInstaller https://<log360_server>:<log360_port> secured"
Example:
Sudo User:
sudo -s eval "wget http://ubuntu:8400/downloadMsi.nms?platform=agentInstaller -O AgentInstaller && sh AgentInstaller http://ubuntu:8400 lesssecure"
Non-Sudo User:
eval "wget http://ubuntu:8400/downloadMsi.nms?platform=agentInstaller -O AgentInstaller && sh AgentInstaller http://ubuntu:8400 lesssecure"
Agent Download Options
The available download options depend on your deployment setup:
- When only the Log Processor is configured
The downloaded agent package will include all the required Log Processor components by default.
- When the Access Gateway Cluster is configured
You can choose whether the agent should be downloaded for the Log Processor or the Access Gateway Cluster.
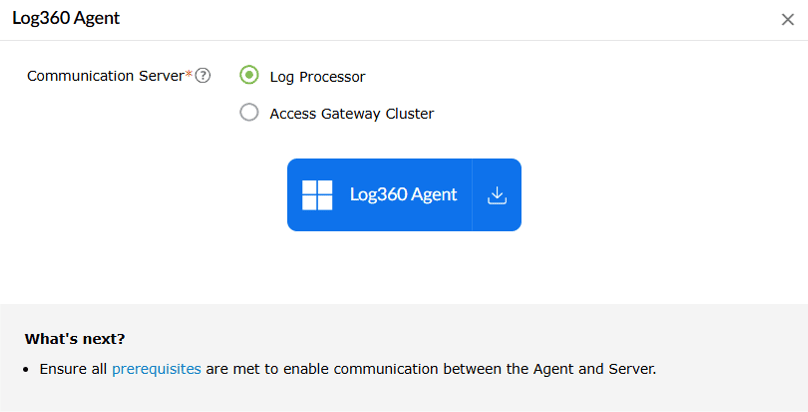
Figure 24: Download options based on deployment setup. - When multiple Access Gateway Clusters are configured
If multiple Access Gateway Clusters are configured, you will be prompted to select one. The downloaded agent will include the configuration details for the chosen server.

Figure 25: Download options based on deployment setup.
Read also
This document explained when and how to install the Log360 agent using different deployment methods. To learn how to manage agents, refer to the following document: