Audit user activities during non-business hours

Your download is in progress and it will be complete in just a few seconds! If you face any issues, download manually here

Thank you for registering with ManageEngine.

We will send the download link to the registered email ID shortly.

Manage and Secure Microsoft 365 with M365 Security Plus

  •  
  •  
  •  
  • By clicking 'Download 30-day free trial' you agree to processing of personal data according to the Privacy Policy.

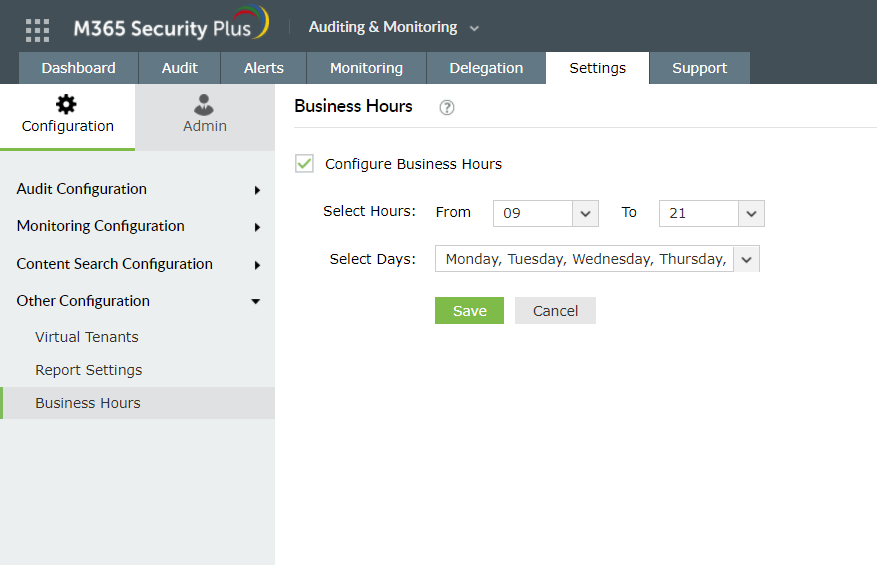
The native Microsoft 365 auditing tool does not show any disparity while fetching audit logs. It fetches audit logs round the clock and so does M365 Security Plus. But the advantage in using M365 Security Plus is that it offers a separate option to distinguish between the activities that take place within and outside the business hours of your organization. Most internal attacks can be traced back to a change or an activity that occurred past the usual work hours. So, having a focused approach towards monitoring such incidents helps you to protect your organization effectively.

The process is simple, consisting of two steps:

  1. Configuring business hours
  2. Fetching the required audit logs

1. Configuring business hours

In M365 Security Plus, you can configure the business hours of your organization as follows:

  1. Under the Auditing & Monitoring section, go to the Settings tab.
  2. Navigate to Configuration > Other Configuration > Business Hours.
  3. Check the box next to Configure Business Hours.
  4. Choose the working hours and days from the drop-down.
  5. Click Save.

Audit user activities during non-business hours

2. Fetching the required audit logs

First, create an audit profile as per your requirements:

  1. Go to the Settings tab.
  2. Navigate to Configuration > Audit Configuration > Audit Profiles.
  3. Click the Add Profile option located in the top-right corner.
  4. Enter a suitable Name and Description for the audit profile.
  5. Choose a Microsoft 365 Service and Category from the drop-down.
  6. Select one or multiple Actions that you want to audit.
  7. Under Advanced Configuration > Filter Settings, check the box next to Business Hours Filter.
  8. Click Add.

After creating the audit profile:

  1. Go to the Audit tab.
  2. Select the profile you created from the left pane.
  3. Choose the report for which you want to view data.
  4. In the Business Hours drop-down, choose Non-Business Hours.
  5. The report will refresh automatically and show the audit data logged during non-business hours.

You can export the report to PDF, CSV, HTML, or CSV format using the Export As option found at the top-right corner, or you can email the report directly from M365 Security Plus by choosing More > Send Mail from the top-right corner of the page.