# Device Addition | v12 | Network Configuration Manager Help
## Device Addition
### Contents
- [Overview](https://www.manageengine.com/network-configuration-manager/help/device-addition-v12.html#Overview)
- [How do I add my devices?](https://www.manageengine.com/network-configuration-manager/help/device-addition-v12.html#How_to_add)
- [Discover Devices](https://www.manageengine.com/network-configuration-manager/help/device-addition-v12.html#Discovering_Devices)
- [Manual Addition](https://www.manageengine.com/network-configuration-manager/help/device-addition-v12.html#Manual)
- [Importing Devices](https://www.manageengine.com/network-configuration-manager/help/device-addition-v12.html#Importing_Devices)
- [Editing Host Names of devices in bulk](https://www.manageengine.com/network-configuration-manager/help/device-addition-v12.html#Editing_host_names)
## Overview
The first step after starting the server and connecting to the web interface is adding your devices to the Network Configuration Manager inventory. The devices whose configurations are to be managed can be added in bulk or one by one.
## How do I add my devices?
Devices can be added to the inventory in four ways:
1. Discovering the SNMP-enabled devices using the "Discover Devices" wizard
2. Adding devices one-by-one manually
3. Adding devices by specifying the IP range
4. Importing devices from a text file
## Discover Devices
### Pre-requisite
Discovery can be initiated only for SNMP-enabled devices. Ensure that your devices are SNMP-enabled before trying discovery.
### The Discovery Process
The SNMP-enabled devices available in the network can be discovered and added to the Network Configuration Manager inventory. You can also discover a specific device present in a specific IP range and even multiple devices.
### To Initiate Discovery
- Go to **Settings >> Discovery** and click on **"Network Discovery"**.
- The discovery wizard provides options for discovering devices with specific IP addresses, devices within a specific IP range, or multiple devices whose details are present in a file. Choose the appropriate option under **"Discover your network"**.
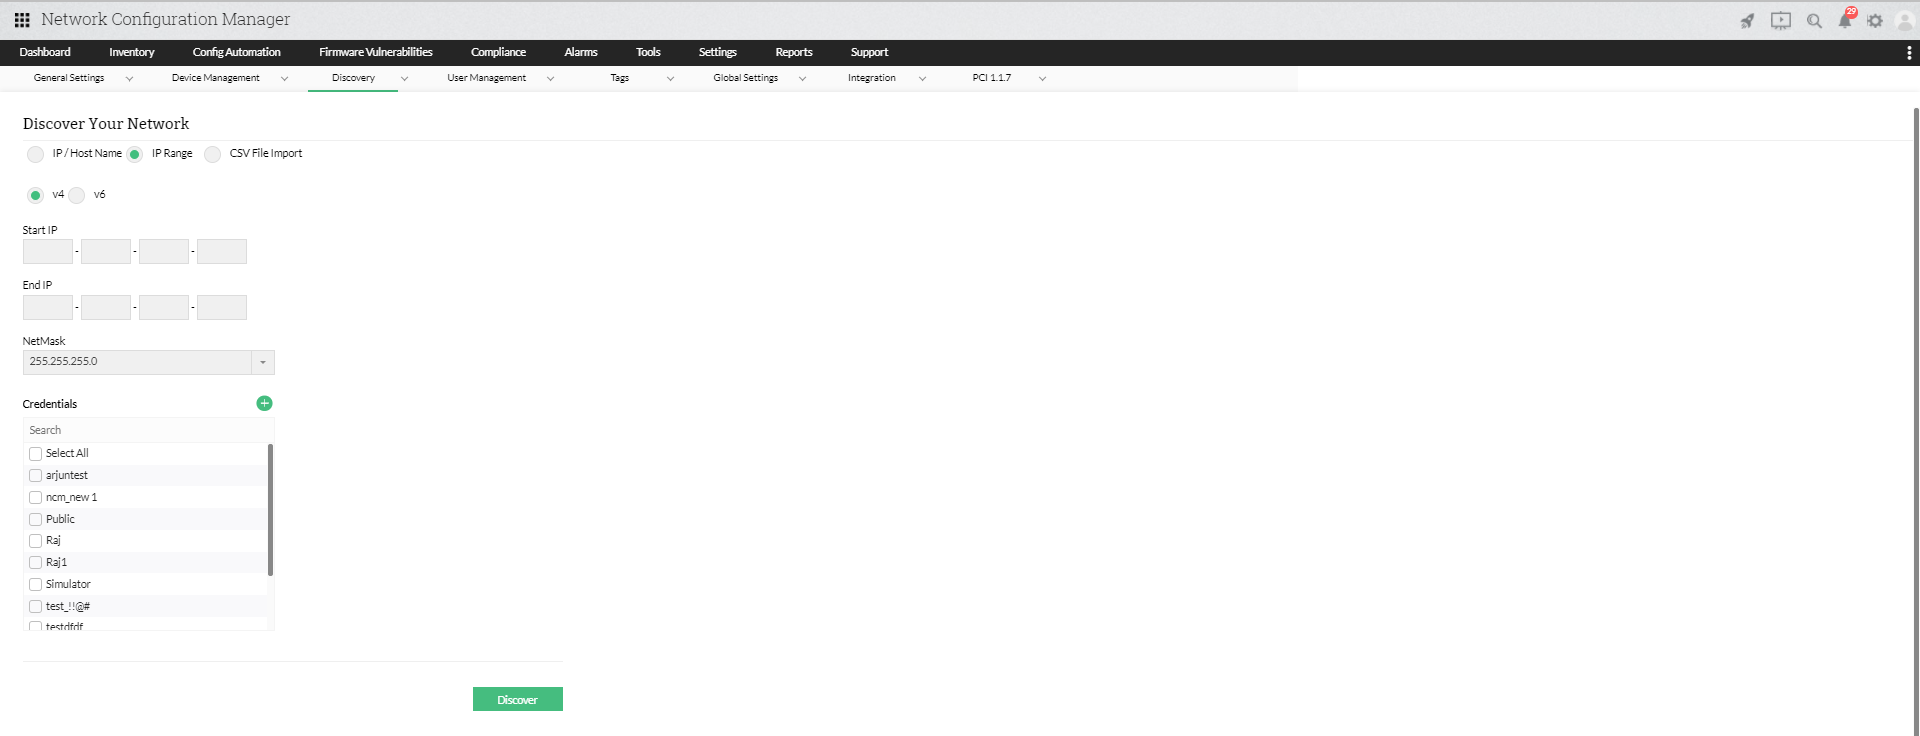
- Create an SNMP profile to specify SNMP credentials.
- Network Configuration Manager supports SNMP versions: v1, v2c, and v3.
- Enter a name and description for the credential profile.
- Enter the SNMP credentials depending on the SNMP version chosen.
| v1 | v2c | v3 |
|---|---|---|
| Enter the SNMP port and read community (mandatory). Optionally, specify write community. | Enter the SNMP port and read community (mandatory). Optionally, specify write community. | Enter the SNMP port.
**User Name:** Name of the user (principal) on behalf of whom the message is being exchanged.
**Context Name:** An SNMP context name is a collection of management information accessible by an SNMP entity. An item of management information may exist in more than one context. An SNMP entity can access multiple contexts. If management information is defined under a specific context by an SNMPv3 entity, any management application can access it by providing that context name. The context name is an octet string that contains at least one management information item.
**Authentication Protocol & Password:** Select either MD5 or SHA and enter the password. These are used for generating authentication/privacy keys in SNMPv3 applications.
**Encryption:** Select either DES or AES-128 and enter the password. Note: Authentication must be configured before encryption. |
- Click **OK** to initiate discovery. The wizard will discover the desired device(s) and add them to the inventory. Newly discovered devices will appear in the inventory list.
### Note
1. You can create multiple profiles, and Network Configuration Manager will use all of them for discovery.
2. To add, edit, or delete a profile, go to **Settings >> Device Management >> Credential Profile**.
### Format for Discovering Multiple Devices from CSV Files
You can discover multiple devices by loading a file containing device details. The entries must follow this format:
- You can enter the hostname, IP address, or both.
- Each entry must be on a separate line.
- If both hostname and IP address are provided, separate them with a space or tab.
Example entries:
```
cisco805
catalyst2900 192.168.117.12
foundry2402
192.168.111.2 cisco1710
```
### Tracking Discovery Status
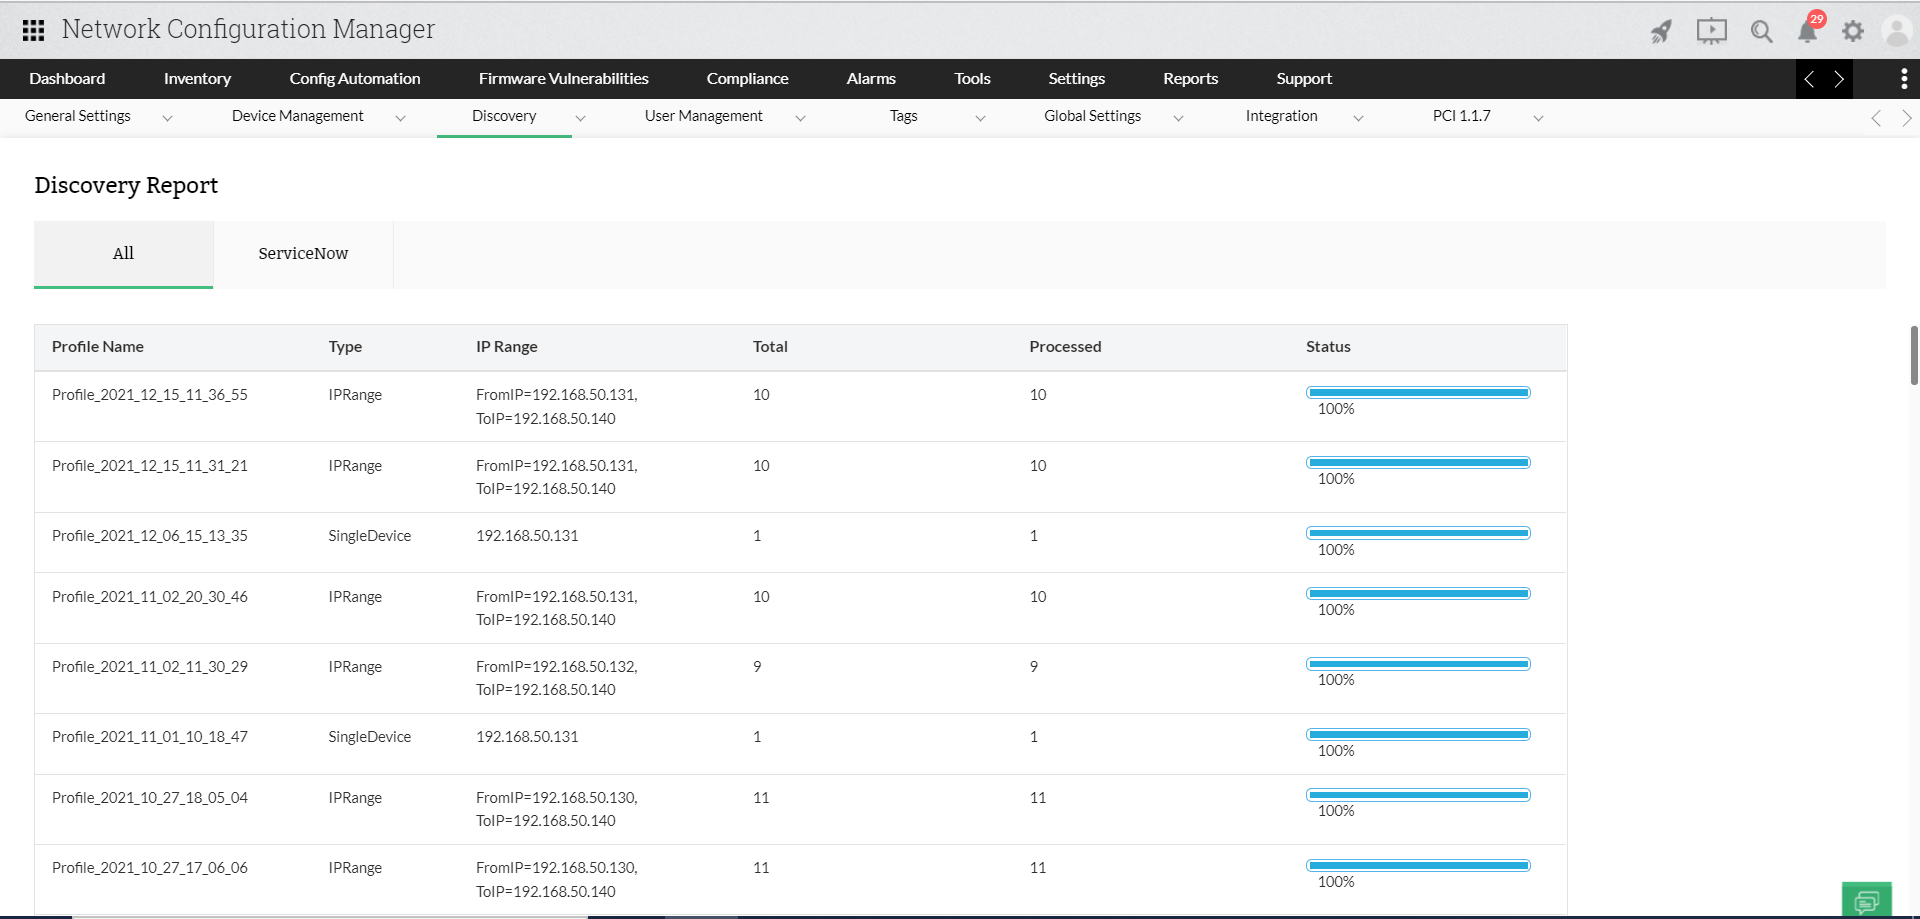
After initiating device discovery, you can track its status in real time. The interface shows the percentage of completion and the final result—whether the device(s) were successfully discovered and added to the inventory. If discovery fails, the probable reason is reported.
You can also view historical information about all discovery attempts and their respective results by clicking **"Discovery Reports"**.
## Manual Addition of Devices
You can also add devices manually.
To add a device manually:
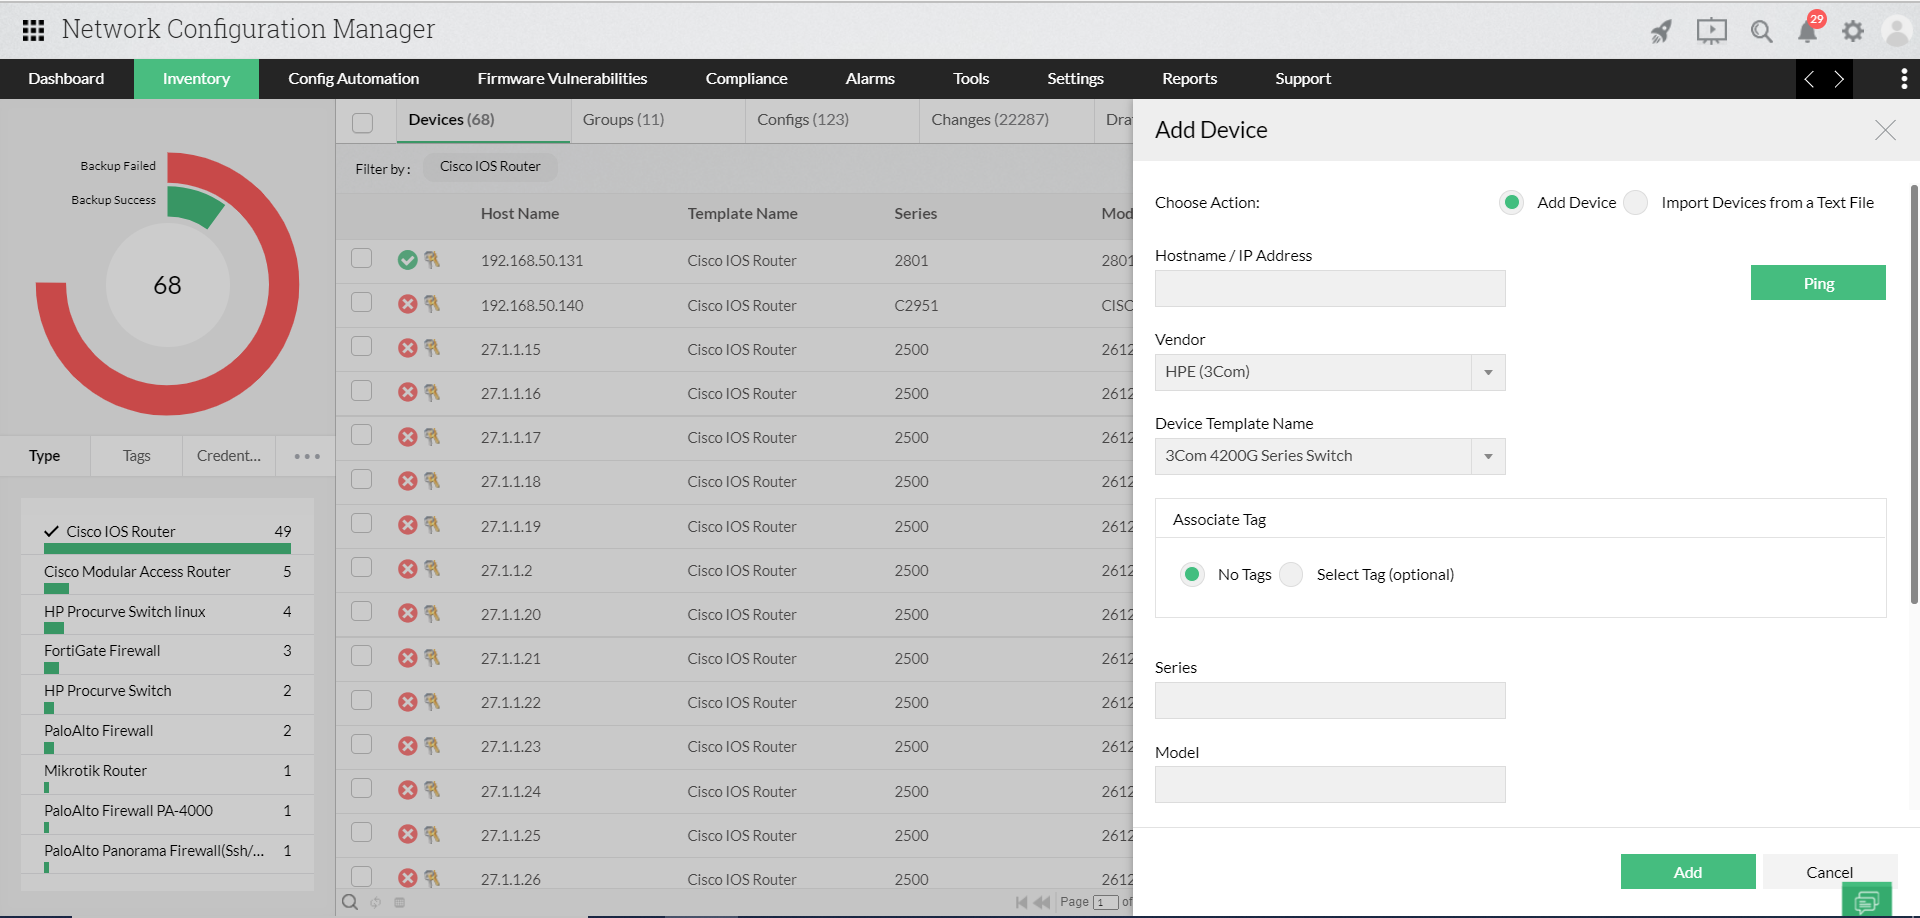
1. Go to **Inventory >> Click on '+' symbol**.
2. Provide the hostname/IP address of the device, select the device vendor, type, series, and model from the drop-down, and click **"Add"**.
3. You will see the progress of device addition in the UI. Once added, you will be prompted to enter [credentials](https://www.manageengine.com/network-configuration-manager/help/establishing-credentials-v12.html) for the device.
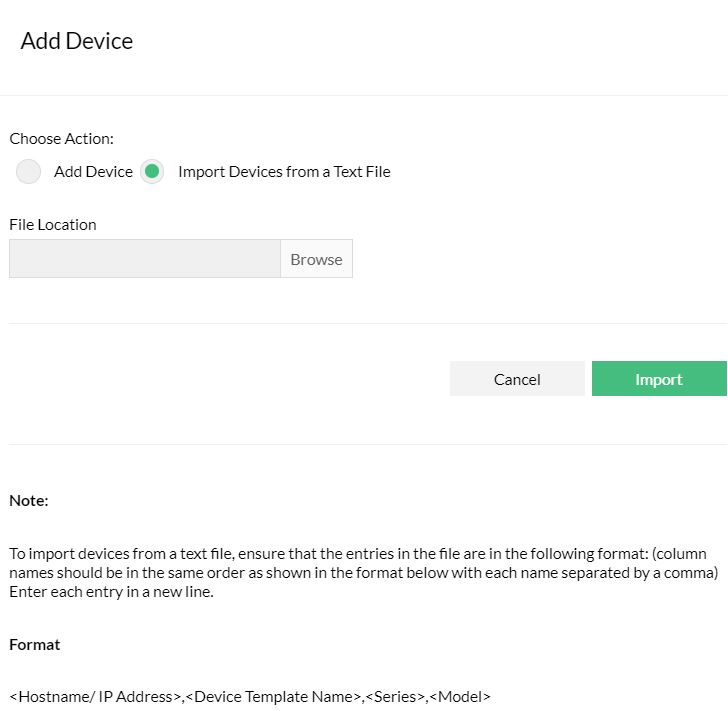
## Importing Devices from a Text File
Network Configuration Manager allows you to import devices from a text file. The entries must follow a specific format.
Ensure that the entries in the file follow this format (column names in the same order, separated by commas):
**Format:**
`,,,`
**Examples:**
```
catalyst2900,Cisco IOS Switch,2900,2924
192.168.111.11,Cisco IOS Router,800,805
192.168.111.22,Force10 E-Series Switch,E600
procurve2524,HP Procurve Switch
```
To import devices from a text file:
1. Go to **Inventory >> Click on '+' symbol >> Import Devices from text file**.
2. Click **"Browse"**, locate the file, and click **"Import"**.
3. Check the inventory to verify that the device has been added.
## Editing Host Names in Bulk
During device discovery or addition, device names may not be recorded correctly due to DNS issues. This can be corrected later by updating hostnames in bulk using a flat file.
While a single device’s host name can be edited from **Device Properties Page >> Actions >> Edit device details**, multiple host names can be edited as described below.
1. Go to **Inventory >> Select a device >> More Actions >> Update Host Names**.
2. In the UI, choose one of the following options:
- **Update Host Name Using DNS Server**
- **Update Host Name Using Entries in Text File**
Host names can be updated either using a DNS server or through entries in a text file.
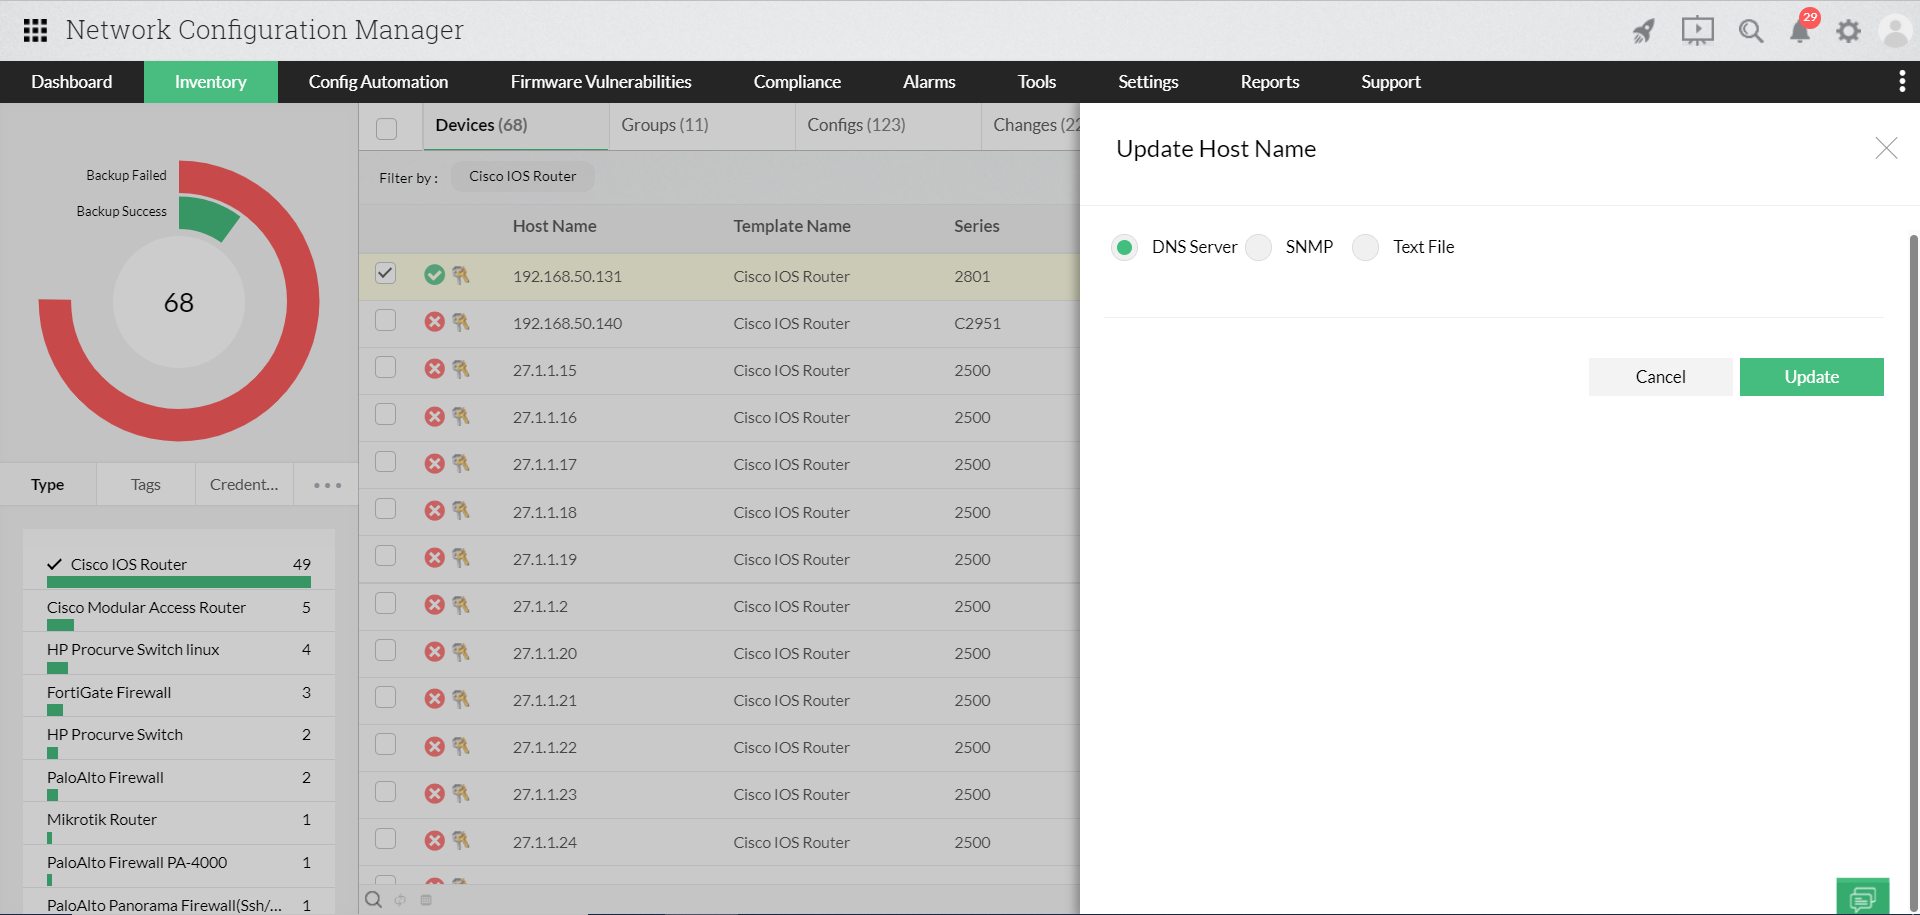
### Update Host Name Using DNS Server
This updates the host names of selected devices in the inventory by resolving DNS server values. Ensure that the required devices are selected before choosing this option.
### Update Host Name Using Entries in Text File
This option updates the host names of all entries listed in the text file. The flat file must contain:
- The IP address of the device.
- The new host name.
Requirements:
- Column order must match the format below.
- Entries must be separated by a space.
- Each entry must be on a new line.
- Host names must not contain spaces.
**Format:**
```
```
**Example:**
```
192.168.111.11 CiscoIOSRouter
192.168.111.22 Force10E-SeriesSwitch
```
To update host names using a text file:
1. Go to **Inventory >> Select the devices >> More Actions >> Update Host Name**.
2. Click **"Browse"**, locate the file, and click **"Load File"**.
3. Verify the entries when prompted.
4. Check the inventory to confirm that the host names have been updated.