Migrating OpManager database
Migration Steps
PGSQL to MSSQL Migration Steps
- For Windows: In the PGSQL setup, go to OpManager home → bin, start Command Prompt with administrator privilege from this path and run DBConfiguration.bat.
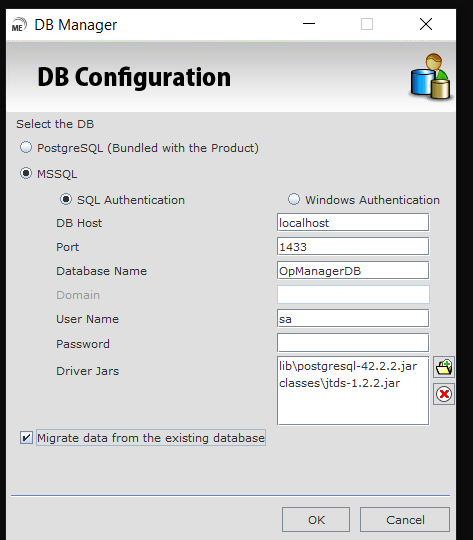
For Linux: In terminal, go to <OpManager_Home>/bin directory and execute the DBConfiguration.sh file. - In the popup shown, please choose MSSQL, check the "Migrate data from the existing database" option and click OK.
- Once the migration is completed, start the product and check whether it is working properly.
Note: From version 128330, DB Migration can be done in Linux installations of OpManager.
MSSQL to PGSQL Migration (For Prepopulated and non prepopulated setups)
- In the MSSQL setup, make the below changes in db_migration.conf file under the <OpManagerHome>\conf directory.
- Change the value of dest.db.postgres.dir to <OpManagerHome>/pgsql directory (E.g., dest.db.postgres.dir = <OpManager Base Home>/pgsql).
This step is not applicable for OpManager versions 125324 and above.Note: It is mandatory to use "/" as a directory separator.
- For Windows: Go to the OpManager home → bin, start the command Prompt with administrator privileges from this path and run DBConfiguration.bat.
For Linux: In terminal, go to <OpManager_Home>/bin directory and execute the DBConfiguration.sh file. - Once the migration is completed, start the product and check whether it is working properly.
MSSQL to PGSQL Migration (Remote PGSQL)
- In the MSSQL setup, make the below changes in db_migration.conf in <OpManagerBase Home>\conf directory.
- create.dest.db=false
- start.dest.postgres.server=false
- Rename the database_params_dbconfig.conf.bkp file in <OpManagerHome>\conf\OpManager\POSTGRESQL folder if it exists.
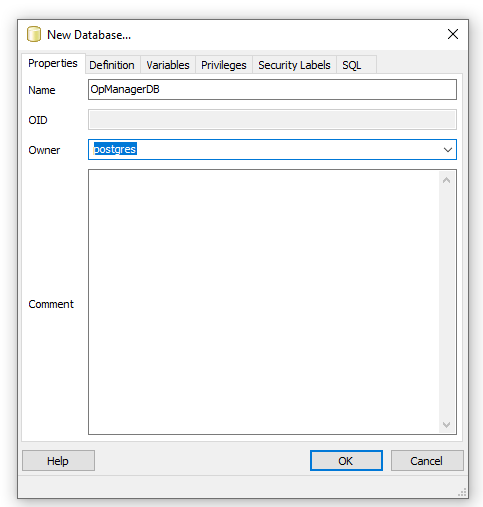
- Create a database in Remote PostgreSQL server.
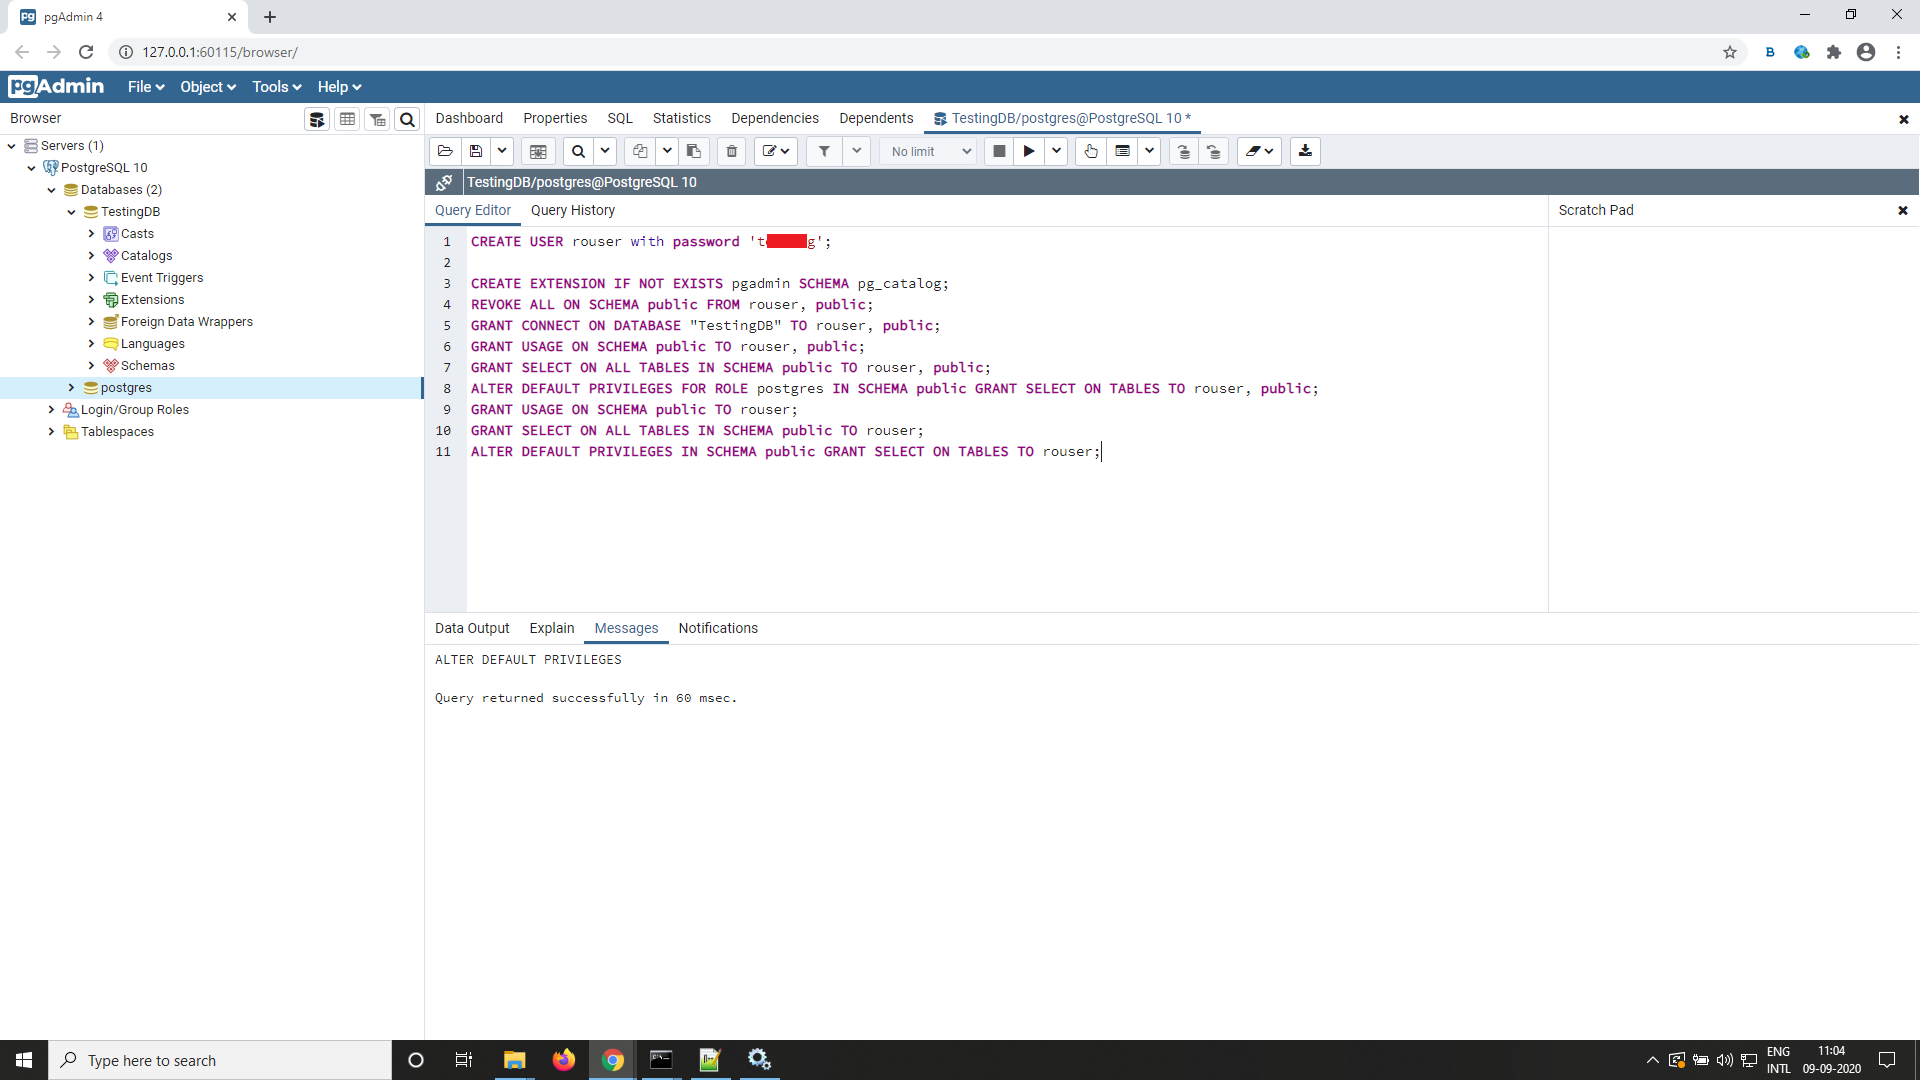
- Create 'rouser' for read-only permissions. Connect to pgAdmin and execute the below queries:
- CREATE USER rouser with password '<ROPASSWORD>';
- CREATE EXTENSION IF NOT EXISTS pgadmin SCHEMA pg_catalog;
- REVOKE ALL ON SCHEMA public FROM rouser, public;
- GRANT CONNECT ON DATABASE "<DatabaseName>" TO rouser, public;
- GRANT USAGE ON SCHEMA public TO rouser, public;
- GRANT SELECT ON ALL TABLES IN SCHEMA public TO rouser, public;
- ALTER DEFAULT PRIVILEGES FOR ROLE postgres IN SCHEMA public GRANT SELECT ON TABLES TO rouser, public;
- GRANT USAGE ON SCHEMA public TO rouser;
- GRANT SELECT ON ALL TABLES IN SCHEMA public TO rouser;
- ALTER DEFAULT PRIVILEGES IN SCHEMA public GRANT SELECT ON TABLES TO rouser;
- Changes to be made in the <OpManagerHome>\conf\OpManager\POSTGRESQL\database_params.conf
- Make the changes in URL field jdbc:postgresql://<remotePgSQLInstalledIPAddress>:<PortNumber>/<DBName>?dontTrackOpenResources=true&useUnicode=true&characterEncoding=utf8
- Change the username to postgres. (username=postgres)
- Encrypt the password of the postgres user and change the same in the above-mentioned file. (password=<EncryptedPassword>)
- Add the property isBundledPgSQL=false as well in the same file.
- Change the ro_password to the password supplied in point 4 <ROPassword>. Encrypt the same and include it in the same file (ro_password=<ROPassword>)
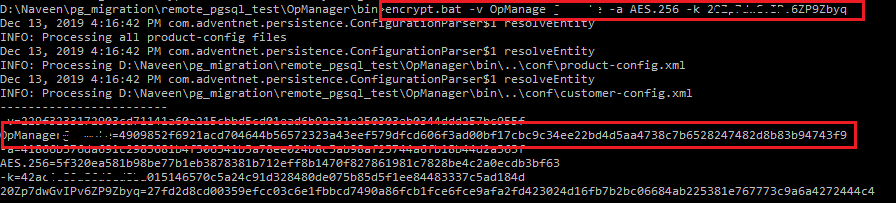
- Encryption of the plain text can be done using <OpManagerHome>\bin\encrypt.bat by specifying the algorithm as AES.256 and by using CryptTag which can be found in <OpManagerHome>\conf\customer-config.xml (Usage:: encrypt.bat -v <Password> -a AES.256 -k <CryptTag> )
- For Windows: Go to OpManager home → bin, start Command Prompt with administrator privilege from this path and run DBConfiguration.bat.
For Linux: In terminal, go to <OpManager_Home>/bin directory and execute the DBConfiguration.sh file. - In the popup shown, please chose PostgreSQL and check the "Migrate data from the existing database" option and click OK.
- After the migration is complete, start the product and check if it is working properly.
Migrating SQL server from one machine to another
Note: These steps are applicable for all versions of OpManager.
- Stop OpManager Service.
- Take a SQL DB backup using the SQL Management tool.
- Restore the MSSQL DB backup(taken from old server) in the new server using the SQL Management tool.
- For Windows: Open cmd with admin privilege and go to <OPMHome>/bin and run DBConfiguration.bat. Provide new sql details and save.
For Linux: In terminal, go to <OpManager_Home>/bin directory and execute the DBConfiguration.sh file. - Start OpManager Service.
Migrating OpManager Server when using MSSQL or Remote PgSQL
- Stop OpManager service.
- Copy the entire OpManager folder from old Server and move it to required location in the new server.
- Go to the new server's command prompt using the 'run as administrator' option.
- Change the directory to <OpManagerHome>/bin and execute "OpManagerservice.bat -i"
Ex: C:\ManageEngine\OpManager\bin>OpManagerService.bat -i
(The above command will install OpManager service) - Now you can go to Windows Services (Go to run > type Services.msc) and you can find "ManageEngine OpManager" service listed which should be used to Start and Stop OpManager.
Note: The above steps will work if you have OpManager with MSSQL as the OpManagerDB or Remote PGSQL on a remote server, provided the new OpManager server has access to the remote server database.
Frequently Asked Questions
How do I update the database connection settings (Username, Hostname, Port, Password, or IP address) in OpManager after they’ve changed?
+