Configuration of Remote PostgreSQL in OpManager (for versions 12.5 and 12.6)
Click here to know the steps for the Remote PostgreSQL PPM Migration from OpManager version 12.6 to 12.7.
Click here for the steps to configure Remote PostgreSQL in OpManager (from version 12.7 to any versions up to 12.9)
Download and install the appropriate version of the Enterprise PostgreSQL and follow the below steps.
Note: The below steps are applicable only for OpManager versions 12.5 and 12.6 (PgSQL 10.21 to 10.x)
Click here to download PostgreSQL.
If Remote PostgreSQL is installed in linux, please use the below command to install the PostgreSQL contrib package.
- For Fedora (using dnf package manager):
sudo dnf install postgresql-contrib
- For CentOS (using yum package manager):
sudo yum install postgresql-contrib
- For Ubuntu (using apt package manager):
sudo apt-get install postgresql-contrib
It is recommended to use a dedicated Remote PostgreSQL server for OpManager. If a shared resource is being used, please increase the maximum number of connections, under Remote PostgreSQL settings.
1. Download and install latest version of OpManager
Choose PostgreSQL DB while installing. After the installation is complete, DO NOT hit the 'Finish' button.
2. Changes to be made in the pg_hba.conf file
- Open the pg_hba.conf file from <InstalledRemotePgSQLHome>\data.
Replace the existing address value with the IP range that you wish to allow (ex:192.168.93.0/24). If you plan on listening to all the interfaces, specify the address as all and save the changes.
#TYPE DATABASE USER ADDRESS METHOD #IPv4 local connections: host all all <ip that is allowed to connect> md5
3. Changes to be made in the postgresql.conf
- Open the postgresql.conf file from the installation directory <InstalledRemotePgSQLHome>\data.
- Change the value of listen_address to the IP that is allowed to connect (ex: 192.168.0.192, localhost) or just '*' if you wish to listen to all the network interfaces.
listen_address = <192.168.0.192>
- Save the changes made.
- Restart the PostgreSQL service.
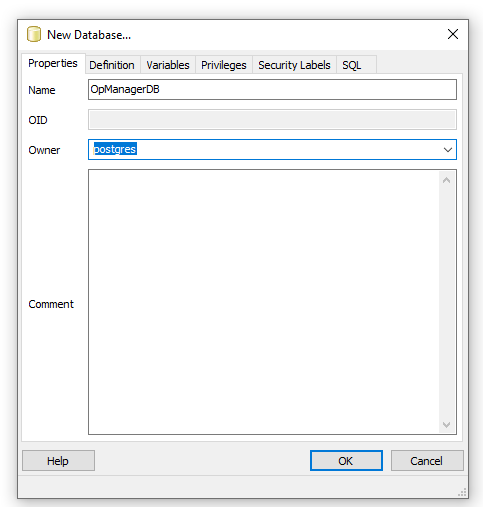
4. Creating a new database in the Remote PgSQL server.
- Create a new database in the Remote PostgreSQL server.
5. Create 'rouser' for read-only permissions.
Connect to pgAdmin and execute the below queries:
- CREATE USER rouser with password '<ROPASSWORD>';
- CREATE EXTENSION IF NOT EXISTS pgadmin SCHEMA pg_catalog;
- REVOKE ALL ON SCHEMA public FROM rouser, public;
- GRANT CONNECT ON DATABASE "<DatabaseName>" TO rouser, public;
- GRANT USAGE ON SCHEMA public TO rouser, public;
- GRANT SELECT ON ALL TABLES IN SCHEMA public TO rouser, public;
- ALTER DEFAULT PRIVILEGES FOR ROLE postgres IN SCHEMA public GRANT SELECT ON TABLES TO rouser, public;
- GRANT USAGE ON SCHEMA public TO rouser;
- GRANT SELECT ON ALL TABLES IN SCHEMA public TO rouser;
- ALTER DEFAULT PRIVILEGES IN SCHEMA public GRANT SELECT ON TABLES TO rouser;

6. Changes to be made in the OpManager Directory
I. Edit database_params.conf under <OpManagerHome>\conf
- Change the existing URL in the following format: url jdbc:postgresql://<remotePgSQLInstalledIPAddress>:<PortNumber>/<DBName>?dontTrackOpenResources=true&useUnicode=true&characterEncoding=utf8
- Change the username to postgres (username=postgres) and password (password=<Password(password of the postgres user)>) [Note - It will be encrypted on cold start automatically.]
- Change the ro_password to the password supplied in step 5 (ro_password=<ROPASSWORD>)

II. Edit customer-config.xml under <OpManagerHome>\conf
- Change StartDBServer value to false: <configuration name="StartDBServer" value="false"/>
[Note - OpManager should not be started before completing step 6. It must be started only after configuring Remote PgSQL.]
7. Start the OpManager service.
After successful startup, try logging in to the client. Post that, stop the service.
8. Encrypt the password of rouser and change the same in <OpManagerHome>\conf\database_params.conf.
- Encryption of the plain text can be done using <OpManagerHome>\bin\encrypt.bat/sh by specifying the algorithm as AES.256 and by using CryptTag which can be found in <OpManagerHome>\conf\customer-config.xml
- Execute the following command: encrypt.bat/sh -v <ROPASSWORD> -a AES.256 -k <CryptTag>


9. Now start the OpManager service
After starting service, for sanity testing, execute a query in submit query page and try adding device or any other basic functionality in product. [Sample Query - Select * from BuildDetails;]