Setting up Two-Factor Authentication (TFA) - PhoneFactor Authentication
ManageEngine has partnered with PhoneFactor, the leading global provider of phone-based TFA, to enable simple, effective two-factor security for PAM360. ManageEngine is a PhoneFactor Alliance Partner and offers seamless integration with PhoneFactor's authentication services.
PhoneFactor works by placing a confirmation call to your phone during the login process. Upon completing your first authentication through usual means and when you go to the second authentication stage, you simply need to answer your phone and press # (or enter a PIN), which serves as the phone-based authentication.
The following topics are discussed in this document:
- How does PhoneFactor Work with PAM360?
- Sequence of Events
- Enabling PhoneFactor Authentication
3.1 Prerequisite
3.3 Deciding the type of PhoneFactor Authentication
- Connecting to PAM360 Web-Interface when TFA through PhoneFactor is Enabled
- Workflow
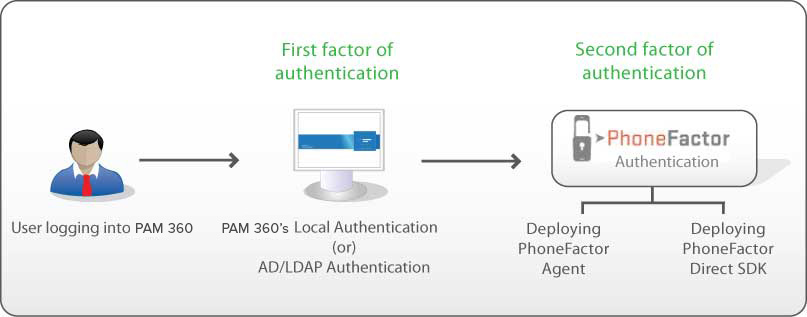
1. How Does PhoneFactor Work with PAM360?
You will be specifying the phone numbers for your users, which results in a mapping between the users and the corresponding phone numbers. In PhoneFactor agent mode, the details about the user, including the phone numbers are maintained at the agent. In Direct SDK mode, the phone numbers are maintained in PAM360 database itself. When a user tries to login to PAM360, PhoneFactor finds out the phone number of the respective user and triggers a call.
2. Sequence of Events
- A user tries to access PAM360 web-interface.
- PAM360 authenticates the user through Active Directory or LDAP or locally.
- PAM360 prompts for the second factor credential through PhoneFactor.
- PhoneFactor calls you. Answer the call and press # or enter a PIN.
- PAM360 grants the user access to the web-interface.
3. Enabling PhoneFactor Authentication
3.1 Prerequisite
Prior to enabling PhoneFactor authentication, you need to buy PhoneFactor. Refer to PhoneFactor website for details. After getting PhoneFactor, you need to decide about the specific authentication method - whether you want to install PhoneFactor agent in your environment or deploy PhoneFactor Direct SDK.
3.2 Setting up TFA in PAM360
- Navigate to Admin >> Authentication >> Two-factor Authentication.
- Choose the option PhoneFactor.
- Click Save.
Note: Before proceeding further, ensure that you have entered the phone numbers for all the users for whom you wish to enable TFA through PhoneFactor in PAM360. You can enter a landline number or a mobile number as the primary contact number for PhoneFactor authentication.
3.3 Deciding the type of PhoneFactor Authentication
You can choose to deploy PhoneFactor Agent or PhoneFactor Direct SDK.
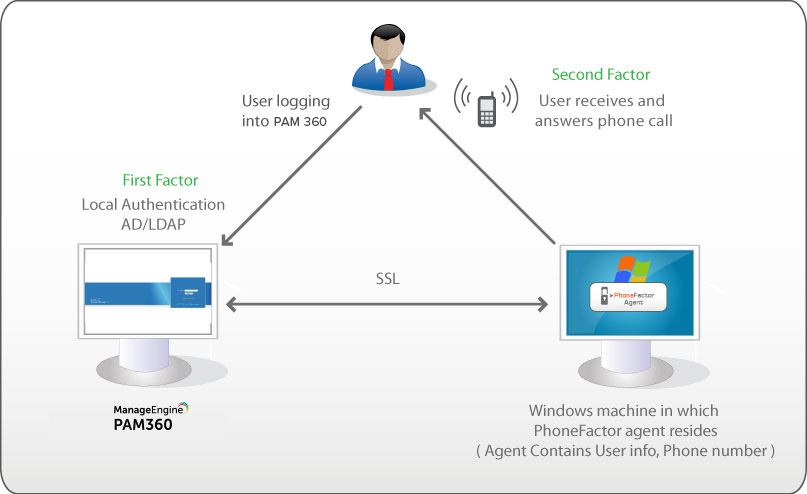
3.3.1 Configurations in PhoneFactor Agent
The PhoneFactor agent runs on a Windows server within your network. It includes a configuration wizard that guides you through the setup process for securing PAM360 with PhoneFactor. The PhoneFactor agent can also integrate with your existing Active Directory or LDAP server for centralized user provisioning and management. All user data is stored within the corporate network for additional security. Extensive logging is available for reporting and auditing.
Obtain and install the PhoneFactor Agent and Web Services SDK on a Windows server within your network. The wizard will guide you through the installation process.
1. Configurations in PhoneFactor
Note: If you have already installed PhoneFactor agent, skip this step and directly proceed to Step 2.
- After installing the agent, make sure you add all the PAM360 users and their phone numbers (maintained in the PhoneFactor agent) to PAM360. You can also integrate Active Directory / LDAP with PhoneFactor agent and automatically import users. If you have users authenticated through PAM360's local authentication, add them to PhoneFactor manually providing details about the phone number.
- While adding users in the PhoneFactor agent, take care to provide the same username as available in PAM360. (In PAM360, you would have provided a 'PhoneFactor username' for the users who will be authenticated by PhoneFactor. Take care to enter the same username here in PhoneFactor agent configuration)
- After importing users, check if the phone numbers have been entered in the correct format.
Important Note: User information and their phone numbers are maintained in PhoneFactor agent. That means, users will receive the call only at the phone numbers specified in the agent. Whenever, you want to modify the phone number, you need to carry out the change at the agent. Similarly, whenever you add new users to PAM360 and if TFA through PhoneFactor is enabled for them, you need to add the user in PhoneFactor agent too. Otherwise, TFA through PhoneFactor will not work.
2. Configurations in PAM360
- In the Two-Factor Authentication console in PAM360, select the Authentication Method as PhoneFactor Agent.
- Enter the credentials to access the PhoneFactor. You need to enter the user name, password and the URL of the host where the PhoneFactor agent is running
- Communication between PAM360 and the host where the PhoneFactor agent is running takes place through SSL. So, you need to import (into PAM360) the SSL certificate, which you specified while installing the Web Services SDK.
While installing the PhoneFactor agent/ Web Services SDK, you would have either created a self-signed SSL certificate or you would have used an already available internal certificate (your own certificate). Here, in PAM360, you need import the root of the CA. If you are using a certificate signed by third-party CA, you may skip this step.
If you have configured PAM360 High Availability, Configurations in PAM360 Secondary: (PhoneFactor Agent Mode)
If you have configured High Availability in PAM360 and if you chosen to deploy PhoneFactor Agent, you need to carry out the following configuration in PAM360 Secondary server. Just as you imported the root of the CA as explained below, you need to do the same in the PAM360 secondary. If you are using a certificate signed by third-party CA, you may skip this step.
Steps to Import the Root of the CA:
- Navigate to PAM360_Installation_Folder>/bin directory
- Execute importPhoneFactorCert.bat (in Windows) orimportPhoneFactorCert.sh (in Linux) as follows
(In Windows)
In the case of Self-Signed certificates
importPhoneFactorCert.bat <absolute path of the Self-signed certificate>
In the case of your own certificates or already available internal CAs
importPhoneFactorCert.bat <absolute path of the root of the CA>
(In Linux)
In the case of Self-Signed certificates
sh importPhoneFactorCert.sh <absolute path of the Self-signed certificate>
In the case of your own certificates or already available internal CAs
sh importPhoneFactorCert.sh <absolute path of the root of the CA>
- Restart PAM360 server
- Once you execute the above, the root of the CA will be recorded in PAM360. All the certificates signed by the particular CA will henceforth be automatically taken.
- Proceed to Step 3 - Enforcing Two-Factor Authentication for required users in PAM360.
Note: If your enterprise network setup requires connecting to the internet via a proxy server, you need to configure the proxy settings to enable PAM360 connect to PhoneFactor website. (PAM360 console >> Admin >> Server Settings >> Proxy Server)
3.3.2 Configurations in PhoneFactor Direct SDK
Instead of using the Agent, you can also use PhoneFactor Direct SDK, which can be used to integrate with PAM360 and it leverages PAM360's existing user database.
1. Configurations in SDK
PhoneFactor jars have been bundled with PAM360. So, it is enough if you buy PhoneFactor and supply the license details as explained in Step 2 below.
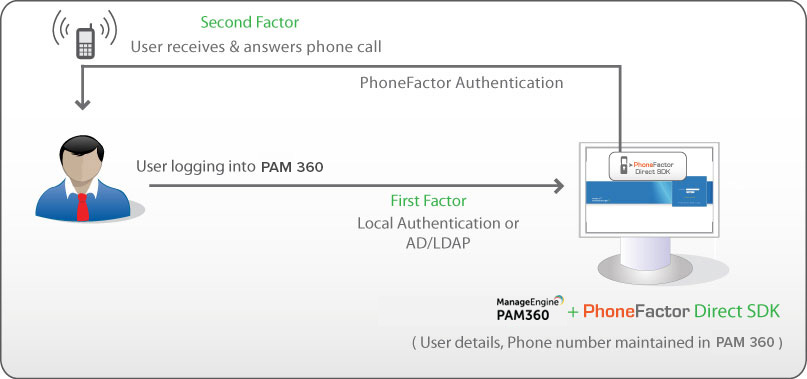
2. Configurations in PAM360
i. Include phone numbers for all the users for whom you wish to enable TFA through PhoneFactor in PAM360. The phone numbers should be entered in proper format. In sharp contrast to PhoneFactor agent where the phone numbers of the users are recorded and maintained at the agent, in the case of Direct SDK, phone numbers are maintained at PAM360 itself.
ii. In the PhoneFactor console, specify the path of PhoneFactor license file, PhoneFactor Certificate and Private Key password. (These files will be present under the PhoneFactor SDK folder.)
iii. Proceed to Step 3 - Enforcing two-factor Authentication for required users in PAM360.
Note: If your enterprise network setup requires connecting to the internet via a proxy server, you need to configure the proxy settings to enable PAM360 connect to PhoneFactor website. (PAM360 console >> Admin >> Server Settings >> Proxy Server)
If you have configured PAM360 High Availability, Configurations in PAM360 Secondary: (PhoneFactor Direct SDK Mode)
If you have configured High Availability in PAM360 and if you have chosen to PhoneFactor Direct SDK mode, perform the following configurations in the PAM360 Secondary server:
- Go to <PAM360-Primary-Installation>/licenses folder.
- Copy the files license.xml and cert.p12.
- Now go to <PAM360-Secondary-Installation>/licenses folder.
- Paste the two files.
3.4 Enforcing TFA for the Required Users
- Once you confirm the PhoneFactor as the second factor of authentication in the previous step, a new window will prompt you to select the users for whom TFA should be enforced.
- Enable or disable TFA for a single user or multiple users in bulk from here. To enable TFA for a single user, click on the Enable button beside their respective username. For multiple users, select the required usernames and click on Enable at the top of the user list. Similarly, you can also Disable TFA from here.
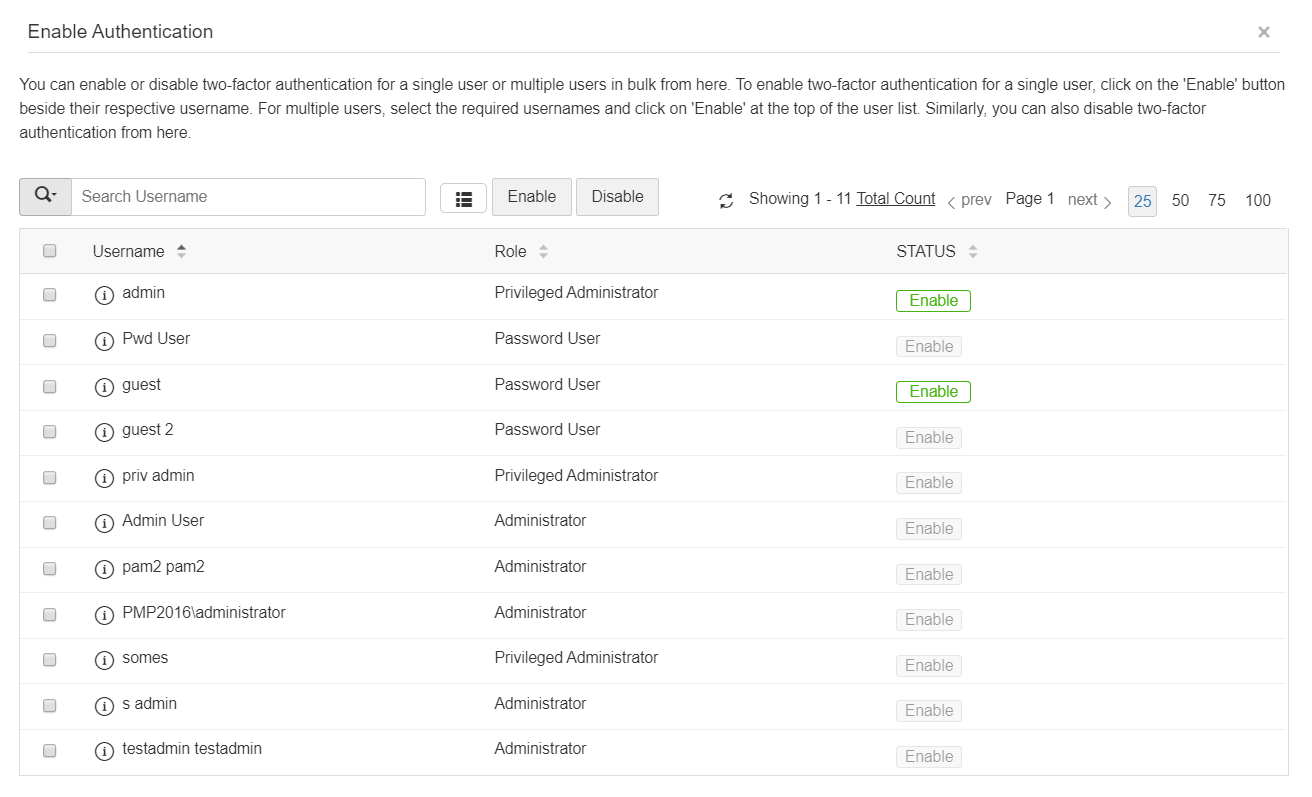
- You can also select the users later by navigating to Users >> More Actions >> Two-Factor Authentication.
4. Connecting to PAM360 Web-Interface when TFA through PhoneFactor is Enabled
- The users for whom TFA is enabled, will have to authenticate twice successively. As explained above, the first level of authentication will be through the usual authentication. That is, the users have to authenticate through PAM360's local authentication or AD/LDAP authentication.
- When TFA is enabled, the login screen will ask for the username alone in the first UI. The users will be prompted to enter the passwords only in the second step.
5. Workflow (TFA using PhoneFactor)
If the administrator has chosen TFA through PhoneFactor, the TFA will happen as detailed below:
- Upon launching the PAM360 web-interface, the user has to enter the username to login to PAM360 and click Login.
- Against the text field Password, the user has to enter the local authentication password or AD/LDAP password as applicable.
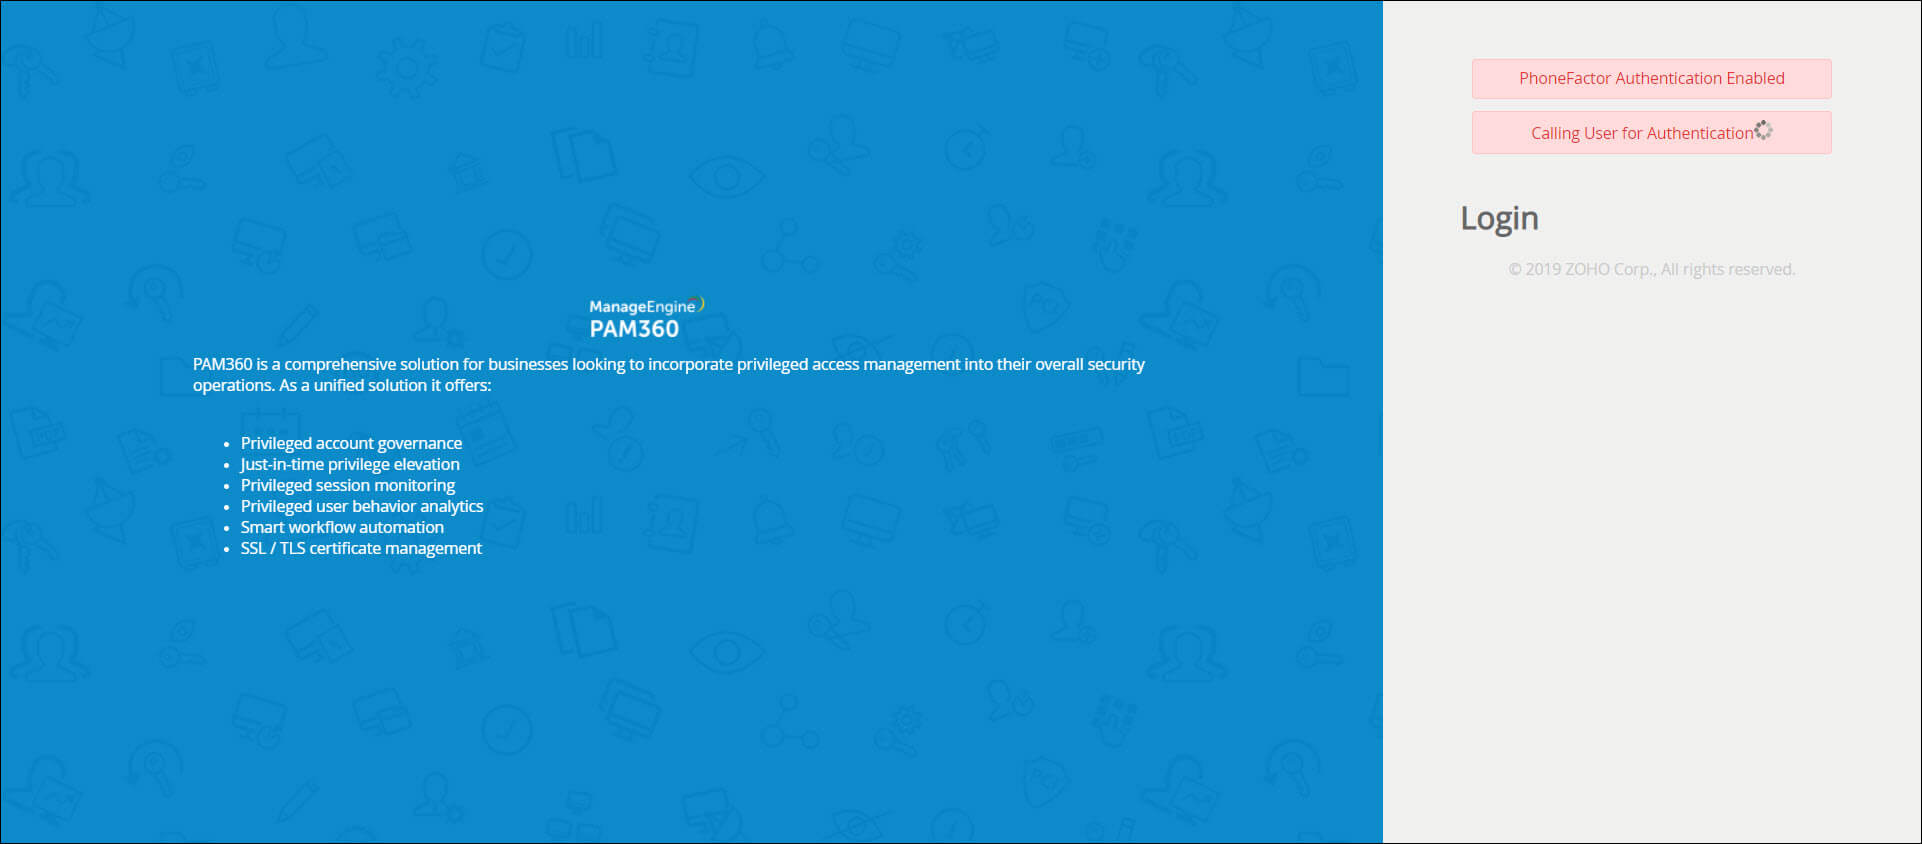
- Once the authentication through the first factor is successful, you need to await a call to your phone from the PhoneFactor
- Answer the call and press # key or enter the PIN as instructed. PhoneFactor will take care of authentication.
If You have Configured High Availability:
Whenever you enable TFA or when you change the TFA type (PhoneFactor or RSA SecurID or One-time password) AND if you have configured high availability, you need to restart the PAM360 secondary server once.