Using MS SQL Cluster as Backend Database
PAM360 allows you to use MS SQL cluster as backend database. The steps to configure PAM360 to use MS SQL cluster as backend are significantly different from using a standalone SQL server as the backend database because PAM360 has been configured to connect to SQL server cluster only through SSL to ensure high level of security.
To use a standalone SQL server as the backend database, the SSL certificate is created with the fully qualified DNS name of the SQL server and it imported in the LOCAL COMPUTER PERSONAL certificate store. In the SQL server configuration manager, the certificates matching the DNS name of the SQL server get listed in the certificate configuration screen. But, this procedure will not work in the case of SQL server cluster setup.
In the case of SQL server cluster, you need to obtain the server certificate with the fully qualified DNS name of the failover clustered instance and install it on all the nodes in the failover cluster. For example, assume that you have a two-node cluster with nodes named test1.yourcompany.com and test2.yourcompany.com and a failover clustered instance of SQL Server named pam360cluster. To use the cluster with PAM360, you need to obtain a certificate for pam360cluster.yourcompany.com and install the certificate on both nodes.
Note: It is recommended to try these steps in a test setup first and verify if everything is working fine. You may download PAM360 and try using MS SQL cluster as backend.
To use MSSQL Always-On failover cluster, you need to add an entry in the pam360_key.key as instructed below:
ENCRYPTIONKEY=n2Z(-*zcPioHfYpmrQwrmICiXmiRUbhQ
MASTERKEY=s4X)6@ajSXCETRC
You can find the master encryption key in masterkey.key file which is placed under <PAM360-Home>\conf directory.
Using MS SQL Cluster as backend database involves the following topics:
- Enable SSL Encryption in SQL Server
1.1 Create an SSL Certificate and Install it in Windows Certificate Store
1.2 Generate the Certificate and get it Signed by a third-party CA (OR)
- Install the Server Certificate in all the Nodes where SQL Server is Running
- Install the CA's Root Certificate/Server Certificate in PAM360
- Enable SSL Encryption in all the Nodes where SQL Server is Running
- Execute ChangeDB.bat
1. Enable SSL Encryption in SQL Server
1.1 Create an SSL Certificate and Install it in Windows Certificate Store (in the machine where SQL server is running)
Prior to trying to connect PAM360 with SQL server, you need to enable SSL encryption in SQL Server. You may create an SSL Certificate and get it signed by a Certificate Authority (CA) OR it could be self-signed.
Note: The SQL certificate used for SQL cluster should contain the following attributes:
CN: cl-sql.example.com
SAN:
<li>sql-node1
sql-node1.example.com
sql-node2
sql-node2.example.com
sqlinstance
sqlinstance.example.com
</li>
1.2 Generate the Certificate and get it Signed by a third-party CA
You can create the certificate using openssl and it involves two steps:
- Generating a private key
- Generating a certificate.
Use the following commands to create the certificate:
Generating a private key:
openssl genrsa -des3 -out server.key 2048
Generating a certificate:
Use the server private key to create a certificate request. Enter the passphrase for the key, Common Name, hostname or IP address when prompted:
openssl req -new -key server.key -out server.csr
Here, in the place of Common Name, specify the FQDN of the SQL Server cluster instance.
- After generating the certificate, you need to get it signed by a third-party CA. Some of the prominent CAs are Verisign, Thawte, RapidSSL. Check their documentation / website for details on submitting CSRs and this will involve a cost to be paid to the CA.
- This process usually takes a few days' time and you will be returned your signed server SSL certificate and the CA's root certificate as .cer files.
- The server certificate has to be installed in all the nodes where SQL server is running. The CA root certificate has to be installed in PAM360 server.
1.3 Create a Self-Signed Certificate
To create a self-signed certificate and use it, carry out the following steps in one of the nodes where SQL server is installed:
1.3.1 Create a self-signed certificate using Powershell:
- Navigate to the SQL Server and open Powershell (run as Administrator).
- Execute the following command:
New-SelfSignedCertificate -DnsName FQDN of the SQL server -CertStoreLocation cert:\LocalMachine\My
- The above command will install and store a self-signed certificate in your local store.
1.3.2 Exporting self-signed .pfx file:
- Click Start >> Run (in the machine where SQL server is running). In the Run dialog box type MMC.
- On the Console menu, click Add/Remove Snap-in. Click Add >> Certificates. Click Add again. You will be prompted to open the snap-in for the current user account, the service account, or for the computer account. Select the Computer Account.
- Select Certificates (Local Computer) >> Personal >> Certificates.
- Locate the self-signed certificate just created, right click and export .pfx file.
1.3.3 Importing self signed .pfx file in all the nodes where SQL server is running:
- Click Start >> Run (in the machine where SQL server is running). In the Run dialog box type MMC.
- On the Console menu, click Add/Remove Snap-in. Click Add >> Certificates. Click Add again. You will be prompted to open the snap-in for the current user account, the service account, or for the computer account. Select the Computer Account.
- Select Certificates (Local Computer) >> Personal >> Certificates.
- Right-click Certificates >> Click All Tasks >> Import.
- Browse select the exported .pfx file certificate to be installed.
1.3.4 Install the server certificate in PAM360:
- Copy the server certificate and paste it under <PAM360 Installation Folder>/bin directory.
- From <PAM360 Installation Folder&/bin directory, execute the following command:
importCert.bat <name of the server certificate> - This adds the certificate to the PAM360 certificate store.
2. Install the Server Certificate in all the Nodes where SQL Server is Running
- Click Start >> Run (in the machine where SQL server is running). In the Run dialog box type MMC.
- On the Console menu, click Add/Remove Snap-in. Click Add >> Certificates. Click Add again. You will be prompted to open the snap-in for the current user account, the service account, or for the computer account.
- Select the Computer Account.
- Select Certificates (Local Computer) >> Personal >> Certificates.
- Right-click Certificates >> Click All Tasks >> Import.
- Browse and select the certificate to be installed.

3. Install the CA's Root Certificate in PAM360
- Copy the CA's root certificate and paste it under <PAM360 Installation Folder >/bin directory.
- From <PAM360 Installation Folder>/bin directory, execute the following command:
importCert.bat <name of the root certificate pasted as explained above> - This adds the certificate to the PAM360 certificate store.
4. Enable SSL Encryption in all the Nodes where SQL Server is Running
- The certificate used by SQL Server to encrypt connections is specified in the following registry key:
HKEY_LOCAL_MACHINE\SOFTWARE\Microsoft\Microsoft SQL Server\MSSQL.x\MSSQLServer\SuperSocketNetLib\Certificate
- This key contains a property of the certificate known as thumbprint that uniquely identifies each certificate in the server.
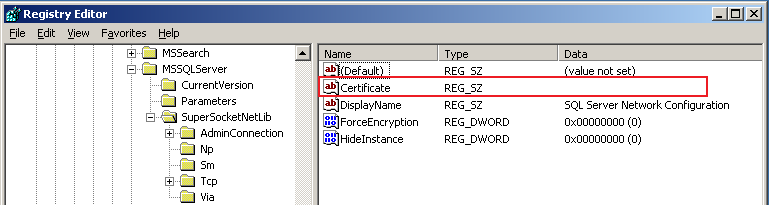
- The Thumbprint value from the certificate which is created using the above steps, should be copied and updated in the registry's certificate property.
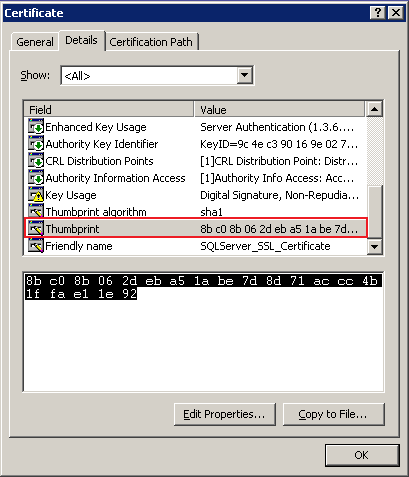
For copying the thumbprint, follow the steps detailed below to copy it properly:
- Eliminate the Unicode character from the thumbprint. You can do this by pasting the thumbprint in a notepad.
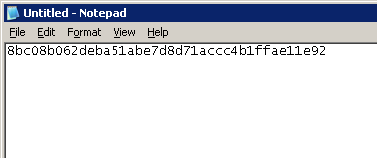
- Save the notepad content as a different file in ANSI format which will prompt the following dialog, click OK and proceed.
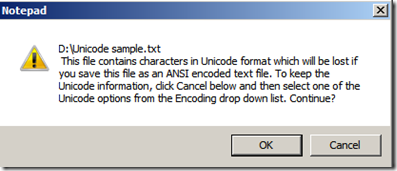
- Then, open the ANSI format file and remove the ? characters from the file.
- Eliminate the spaces between characters in the thumbprint.
- Save this thumbprint to the HKEY_LOCAL_MACHINE\SOFTWARE\Microsoft\Microsoft SQL Server\MSSQL.x\MSSQLServer\Certificate property.
5. Execute ChangeDB.bat
After completing the above steps, you need to execute ChangeDB.bat in PAM360. Refer to Step 4 in this help documentation for details.