Configuring Single Sign-On using SAML 2.0 for AD FS
ManageEngine PAM360 integrates seamlessly with Active Directory Federation Services (AD FS), enabling organizations to leverage AD FS's robust identity and access management capabilities for secure Single Sign-On (SSO). By configuring PAM360 as a Service Provider (SP) and AD FS as an Identity Provider (IdP), users can centralize authentication processes, simplify access management, and enhance security through AD FS's advanced authentication mechanisms.
This integration ensures that users can log in once via AD FS and gain access to PAM360 without repeated authentication, providing a streamlined and secure user experience. Additionally, the integration supports Single Logout (SLO), ensuring that when users log out from one application, they are automatically logged out from all connected applications, promoting efficient and secure session management.
To enable this integration, organizations must configure AD FS with PAM360's SAML metadata, including essential details such as the Assertion Consumer Service (ACS) URL and the Logout URL. This setup ensures accurate communication between the IdP and SP, enabling seamless authentication and session termination workflows.
Additional Details
PAM360 also supports configuring SAML SSO for the Secondary server, allowing users to log in to PAM360 via the Secondary server when the Primary server is down, ensuring continuous access and minimal disruption.
This documents covers the following topics in detail:
- Prerequisites
- Steps to Configure PAM360 as an Relaying Party in AD FS 10.0
- Steps to Configure AD FS as an IdP in PAM360
1. Prerequisites
To integrate PAM360 with AD FS, you need the SP details displayed on the Configuration For Single Sign-On Using SAML page, under the Service Provider Details section. These details are necessary for setting up PAM360 as a relaying party on the AD FS portal, ensuring a seamless integration between PAM360 and AD FS. Explore this link for the detailed steps to obtain the required SP details for configuring PAM360 as as a relaying party.
2. Steps to Configure PAM360 as a Relaying Party in AD FS 10.0
Active Directory Federation Services (AD FS), a Microsoft-developed identity and access management solution, supports SAML integration to deliver secure Single Sign-On (SSO) services across various systems and applications in an organization. PAM360 leverages this capability to streamline authentication processes and enhance user experience. To successfully integrate PAM360 and AD FS, you must configure PAM360 as a Relaying Party in AD FS 10.0.
- Navigate to Start >> All Programs >> Administrative Tools, and open AD FS 10.0 Management.
- The first step is to add Trust Relationships in AD FS 10.0 to add PAM360 details. Under Trust Relationships, right-click on Relying Party Trusts and select Add Relying Party Trust from the drop-down menu. This action will open the Add Relying Party Trust Wizard.
- On the Add Relying Party Trust Wizard, Click Start and click the Select Data Source option from the left pane.

- To upload data about the relying party, select the Import data about the relying party from a file option.

- Click Browse to import the metadata.xml file downloaded from PAM360, and click Next.
- On the subsequent window, enter a name for the relying party in the Display name field, for example, PAM360. This name helps you uniquely identify PAM360 in the AD FS portal. If you wish to add any additional details about the relying party, add these details in the Notes field and click Next.

- Select the Permit everyone policy in the Choose Access Control Policy window and click Next.

- Skip the Ready to Add Trust step by clicking Next and then Close.
- On the Add Relying Party Trust Wizard, Click Start and click the Select Data Source option from the left pane.
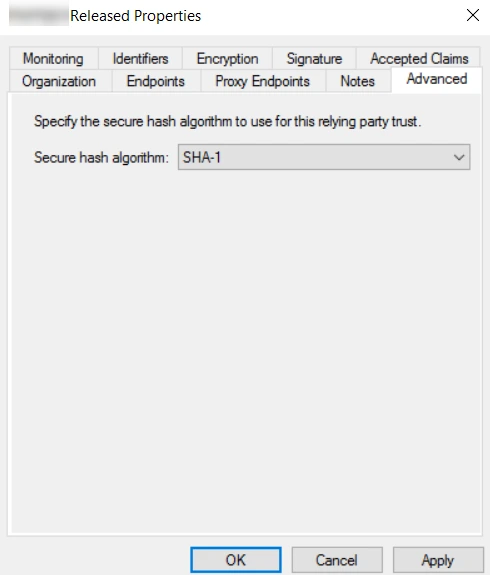
- PAM360 will be listed under Relying Party Trusts. Right-click on the same and select Properties from the drop-down menu.

- In the Properties dialog box, switch to the Advanced tab and select SHA 1/SHA256 as the secure hash algorithm. Apply the changes and click OK.
- Right-click on PAM360 again and select the Edit Claim Insurance Policy from the drop-down menu.
- In the dialog box that appears,
- Click Add Rule under Issuance Transform Rules.
- Select Transform an Incoming Claim as the Claim rule template and click Next.
- Under Configure Claim Rule,
- Enter NameID as the Claim rule name.
- Select the Windows account name as the Incoming claim type.
- Select Name ID as the Outgoing claim type.
- Select Transient Identifier for Outgoing name ID format.
- Click Finish.

- Click Apply to save the changes, and close the Edit Claim Rules window by clicking OK.
You have configured PAM360 as a Relying Party (RP) in AD FS. Proceed to the PAM360 window in your browser to continue with the IdP configuration starting from Step 2 - Configure Identity Provider Details.
Caution
For users imported to PAM360 from AD, the usernames will be in the Domain\username format. By default, setting the Windows account name as the incoming claim type will match this format. However, if you have created PAM360 local accounts for your AD users by importing them via a CSV file, you should select a different claim type that matches the username format in PAM360.
3. Steps to Configure AD FS as an IdP in PAM360
After setting up PAM360 as a Relying Party (RP) in AD FS, you must configure AD FS as an IdP in PAM360 to establish it as a trusted entity. Access the PAM360 browser window and proceed with the IdP configuration starting from Step 2 - Configure Identity Provider Details. Explore this link for the detailed IdP configuration steps. Based on the provided steps, configure AD FS as an IdP and enable SAML Single Sign On on the PAM360 interface.