Managing User Roles and Permissions
PAM360 serves as a repository for sensitive accounts and passwords, ensuring preliminary access control through user roles. Access to the PAM360 application is contingent upon possessing a specific role, which dictates the scope of privileged operations a user can perform. This fine-grained access control mechanism safeguards data from unauthorized access directly through the PAM360 interface, facilitated by role-based access control.
User roles within PAM360 delineate the operations permissible for each user. Regardless of the role assigned, managing personal passwords in PAM360 remains exclusive to individual users, subject to administrator-enabled settings, with other users having no authority over them.
At the end of this help document, you will learn about the following topics relevant PAM360 user roles.
1. PAM360 User Roles
The various user roles in PAM360 dictate the extent of operations a user can undertake:
- Privileged Administrator: Users with the role have the authority to configure, customize, and oversee the PAM360 application comprehensively. They can configure privacy and security controls, including settings related to IP restrictions and emergency measures. Additionally, they possess visibility into resources and accounts they create or those shared with them by other users, enabling them to conduct all operations pertaining to resources, accounts, and connections. Moreover, they can elevate other administrators to the status of Super Administrators, thereby granting them full management authority over all server resources.
- Cloud Administrator: The Cloud Administrator role is designed specifically to manage PAM360's Cloud Entitlements feature. Users with this role have privileges similar to Privileged Administrators but are restricted from configuring privacy and security controls. Cloud Administrators can manage the supported cloud accounts, identify and remediate identity risks, and audit identity-related activities within PAM360, ensuring effective and secure management of cloud entitlements.
- Administrator: Administrators share similar privileges with Privileged Administrators, albeit with the exception of configuring certain privacy and security controls.
- Password Administrator: This role encompasses individuals in executing all configurations and operations related to accounts and password management. Like administrators, they possess the complete management of resources and accounts created by them or those shared with them by other users, with no access to User Management, Audits, Reports, and Dashboards.
- Password User: Users with this role can only access accounts shared with them by Administrators, Password Administrators, or Privileged Administrators, as per the permissions granted. They can make modifications to accounts if permitted by the sharing settings.
- Password Auditor: This role shares privileges with Password Users and additionally grants access to dashboards, audit records, and reports of all resources within PAM360.
- Connection User: Individuals with this role have similar privileges to Password Users, with the added capability to establish HTTPS gateway connections, RemoteApp connections (for resources associated with RemoteApp), and perform secure file transfers.
PAM360 User Roles | User Operations in PAM360 | ||||||||
Manage Users | Manage Resources and Accounts | Access Account Passwords and Manage Personal Passwords | Access Audit and Reports | Privacy and Security Controls | Remote Access | Secure File Transfer, HTTPS Gateway Server, and RemoteApp Access | Cloud Entitlements Management | ||
Privileged Administrator | |||||||||
Cloud Administrator | |||||||||
Administrator | |||||||||
Password Administrator | |||||||||
Password Auditor | |||||||||
Password User | |||||||||
Connection User | |||||||||
The allocation of these roles to the users ensures that access to sensitive data within PAM360 is tightly controlled, minimizing the risk of unauthorized access or misuse.
Additional Details
An Administrator/Password Administrator/Privileged Administrator can be made as a Super Administrator. A super administrator will have the privilege to manage all the resources stored in PAM360, irrespective of the resource owner. For security reasons, a user with the administrator privilege can be made a super administrator only by other PAM360 administrators. For steps on how to create a super administrator role, click here.
2. Creating a Custom Role
Apart from the above-predefined roles in PAM360, administrators have the flexibility to create custom roles tailored to their organization's specific requirements. This customization feature empowers administrators to design roles from scratch, selecting from over 100+ available operations within PAM360. To ensure an added layer of security, the creation of custom roles follows a dual-control mechanism, mandating approval from another administrator. Follow these steps to add a new custom role:
- Navigate to Admin >> Customization >> Roles.
- Click Add Role in the Roles window. This prompts a new window to appear.
- Here, provide a Name and Description for the new role as per your organizational needs.
- Use an Existing Role as Template to base the new role on an existing template, either from PAM360's predefined roles or previously created custom roles. This facilitates to preset the permission levels for the new role.
- Define the scope for the role under the desired PAM360 modules, such as Password, Users, Organization, etc., and by selecting the operations from the categorized list of available options under each module to meet the enterprise-specific needs. Refer to this document to know more about privileges in detail.

Caution
While creating a custom user role, ensure that you select the operations for the role as required. The operations with the magic wand icon beside is of administrator privilege. Selecting those operations for a custom role consider it in the administrator category and creating the user accounts with this user role might affect your PAM360 license counts.
For example,
1. If you like to create a role for the sole purpose of user administration, such as new user addition in PAM360, edit/delete user profiles, change roles, and transfer resources between users, here are the basic operations that should be selected from the User module:
Users | User Authentication Protocols | User Groups |
|
|
|
2. If you like to create a role for a junior technicians who maintains a handful of resources in your organization, a role with the following operations is required:
Resource | Accounts | Password Reset | |
Users |
|
|
|
Remote Access |
| ||
Custom Settings |
| ||
Follow these steps to edit a custom role:
To edit a custom role, click the Edit icon next to the respective role, make necessary modifications, and click Preview and Save. Verify the modifications once and click Save. The edits undergo an approval process by another administrator before implementation. Edits pending for approval will be shown with the status [Waiting for approval] beside the specific role. In the below image, red denotes operations that have been removed in the edit, and blue denotes operations that have been added to the role.
Follow these steps to delete a custom role:
Click the Delete icon beside the respective role and Delete the custom role. If you have users mapped with the custom role, the dialogue-box which opens prompts to transfer associated users to another role before deletion. Once users are mapped to a new role, click Transfer users and delete role to proceed with the role deletion.
This meticulous approach to role management in PAM360 ensures tailored access control aligned with organizational needs, maintaining security and operational efficiency.
3. Role Filter
The role filter feature enables administrators to streamline role assignment by specifying which roles should be visible under the Role field in the Add User window. To enable role filtering:
- Go to Admin >> Customization >> Roles >> Role Filter.
- Enable the Enable Role Filter box.


- Organize and enable/disable roles as needed, ensuring only enabled roles appear during user addition or role changes. Save the configured settings to apply the role filter.
4. Changing User Roles
Administrators can efficiently update roles for individual users or multiple users in bulk. To do so,
- Navigate to Admin >> Customization >> Roles >> Change Roles.
- Utilize the filter above the table to display users associated with a specific role.
- To change the role of an individual user, click the Change Role button beside the user and assign the desired role as needed.
- To change the role for a group of users, select the users requiring role changes and click the Change Role button from the top pane to assign them with the desired role from the available options.

5. Frequently Asked Questions
1. What does the magic wand icon signify next to certain operations?
Operations accompanied by a magic wand icon indicate Administrator-level operations. If a custom role includes any of these wand-marked operations, it is treated akin to an Administrator role. You can create multiple custom roles with such operations, but the role only counts towards the license when assigned to a user in PAM360. For example, if your licensing permits 10 administrators and you assign a custom role with wand-marked operations to a user, it consumes one of the 10 allotted licenses.
2. Who has the authority to create custom roles in PAM360?
Creating custom roles is primarily an administrative task. Only Administrators, Privileged Administrators, and Super Administrators (if created) possess the privilege to create custom roles. Additionally, you can authorize a custom role to create future custom roles by enabling the Create Custom Roles option under Custom Settings. Moreover, enabling the Enable Super Admin capabilities for this role checkbox allows users assigned this role to be promoted to Super Administrator during user creation. After configuring the role settings, clicking on Preview and Save initiates a preview listing the chosen operations, and a further Save will create the role and queue it for pending approval from another administrator. Once approved, the role can be assigned to users accordingly.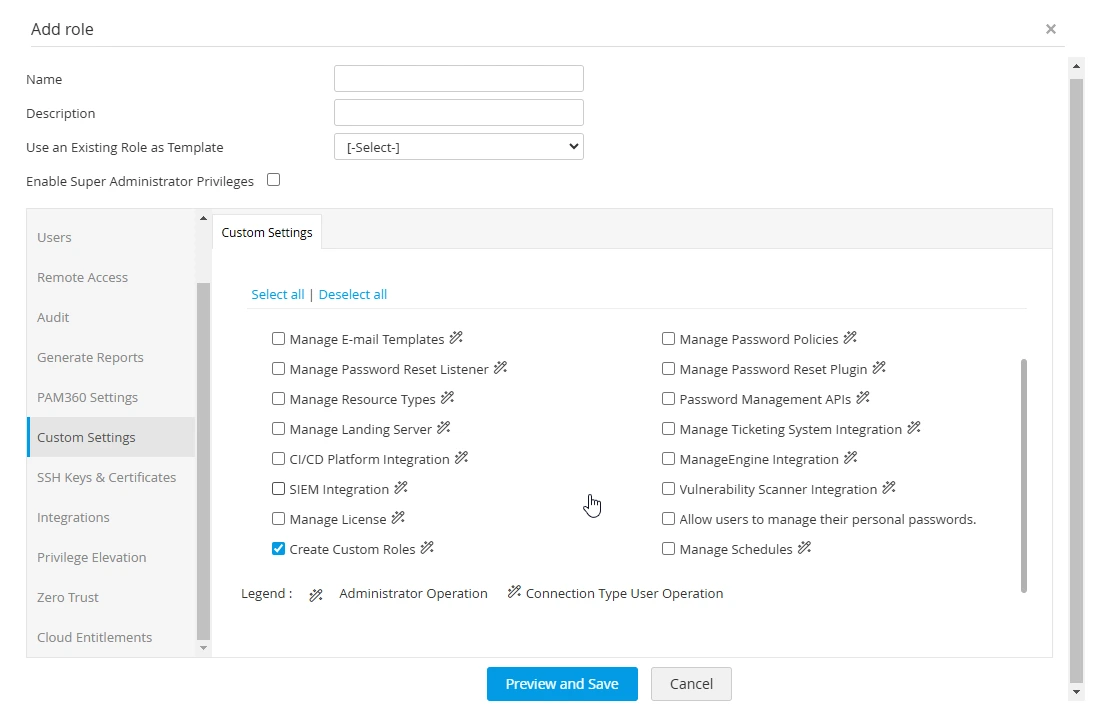
3. Why am I unable to delete a custom role?
There are two scenarios where a role cannot be deleted immediately:
- If attempting to delete a user-type role with associated users, those users must first be transferred to another role. The target role for transfer can be either an end-user-type or administrator-type role, provided sufficient administrator licenses are available. However, if no administrator licenses remain, or if there is no existing user-type role for transfer, deletion is prohibited. In such cases, creating a new user-type custom role or acquiring additional licenses is necessary to delete a custom role.
- Role Filters may also impede deletion. If all end-user-type roles are disabled under the role filter settings, transferring associated users becomes restricted to administrator-type roles only. If no administrator licenses are available for transfer, or if no end-user-type roles are enabled in the filter settings, deletion cannot proceed. To resolve this, enabling at least one end-user-type role under role filter settings or obtaining additional licenses is required.