Configuring Single Sign-on (SSO) using SAML 2.0 for ADFS
Access Manager Plus (AMP) offers support for SAML 2.0, which facilitates integration with Federated Identity Management Solutions for Single Sign-on (SSO). Access Manager Plus acts as the Service Provider (SP) and it integrates with Identity Providers (IdP) using SAML 2.0. The integration basically involves supplying details about SP to IdP and vice-versa. Once you integrate Access Manager Plus with an IdP, the users have to just login to IdP and then, they can automatically login to Access Manager Plus from the respective identity provider's GUI without having to provide credentials again.
Microsoft's Active Directory Federation Services (ADFS) 10.0 supports SAML integration to provide SSO services. If you use ADFS service in your team or organization, you can integrate Access Manager Plus with ADFS to enable SAML SSO for the Access Manager Plus users. To integrate Access Manager Plus with ADFS 10.0, following are the major steps involved:
- Prerequisite steps to carry out in ADFS 10.0
- Providing ADFS 10.0 details in Access Manager Plus to enable SSO services
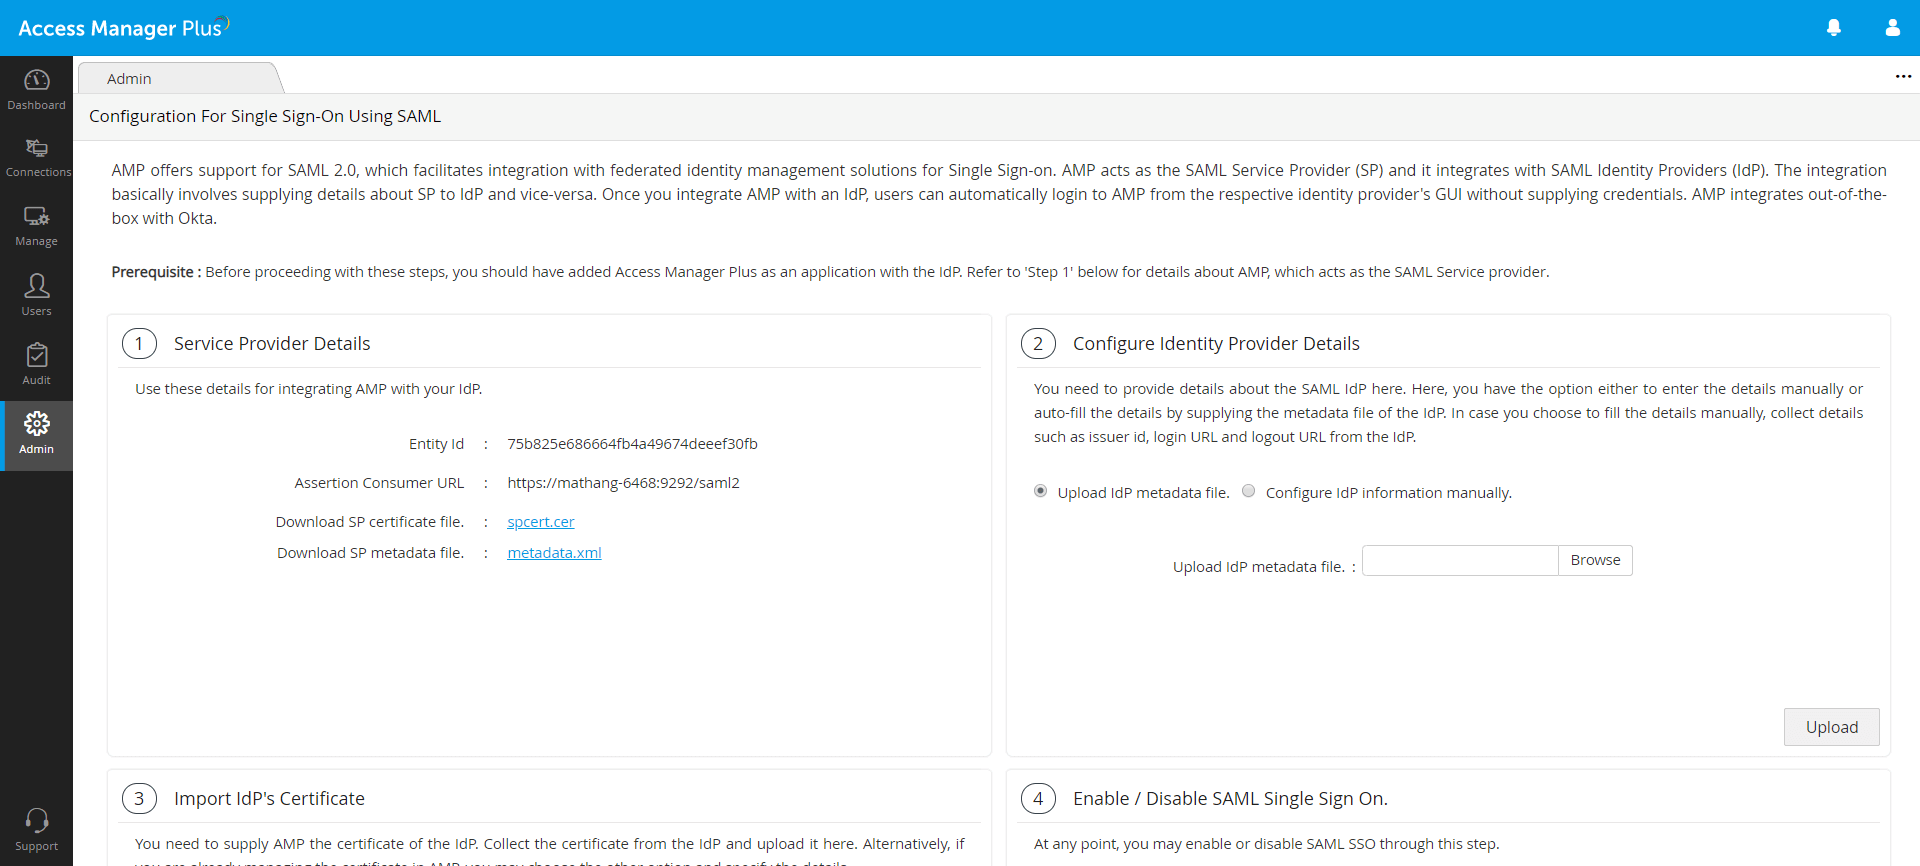
Before you carry out the steps mentioned below, log into Access Manager Plus first and navigate to Admin >> Authentication >> SAML Single Sign On. In the SAML SSO configuration page, download the service provider metadata XML file available under Step 1.
1. Prerequisite Steps to Carry Out in ADFS 10.0
- Navigate to Start >> All Programs >> Administrative Tools, and open ADFS 10.0 Management.
- The first step is to add Trust Relationships in ADFS 10.0, to add Access Manager Plus details. Under Trust Relationships, right-click on Relying Party Trusts and select Add Relying Party Trust from the drop down menu. A wizard window will open up as shown in the image below:
- Click Start and proceed to the next step, Select Data Source. Here, choose the second option, Import data about the relying party from a file. Click Browse, import the metadata file downloaded earlier from Access Manager Plus, and click 'Next'.
- In this step, set a Display name for the relying party, i.e. Access Manager Plus and click Next
- Choose Access Control Policy: Here, select the first option Permit everyone and proceed.
- Skip the Ready to Add Trust step and then click Close.
- Access Manager Plus will now be displayed in the Relying Party Trusts list. Right-click on the same and select 'Properties' from the drop down menu as shown below.
- In the dialog box that opens, switch to the Advanced tab and specify SHA 1 as the secure hash algorithm. Apply changes and close the window.
- Right-click on Access Manager Plus again and now select Edit Claim Insurance Policy.
- In the dialog box that opens, click Add Rule under Issuance Transform Rules.
- Set Transform an Incoming Claim as the claim rule template and click 'Next'.
- Under Configure Claim Rule,
Note: If you have already imported users to Access Manager Plus from AD, then their login names will be stored in the format, "DOMAIN\Loginname". By default, setting 'Windows account name' as the incoming claim type will match this format. However, if you have created Access Manager Plus local accounts for your AD users by importing them via a CSV file, you need to instead select a different claim type that matches the login name format stored in Access Manager Plus.
2. Providing ADFS 10.0 Details in Access Manager Plus to Enable SSO Services
- Open Access Manager Plus again and navigate to the SAML SSO configuration page.
- Under Step 2 in the page, choose the first option Upload IdP metadata file to browse and open ADFS's metadata XML file.
- The XML file can be downloaded from ADFS 10.0 console. In the console's left navigation pane, click on Endpoints and scroll down to the Metadata list. Now, locate the URL Path provided for the Federation Metadata type in this list and open the URL in a new browser tab to download the metadata XML file.
- The uploaded XML file will also populate the certificate details required for Step 3. In case the details aren't auto-filled in upon providing the metadata file, try configuring the Identity Provider details manually in Step 2 & 3. Then, click Save.
- ADFS SSO service is now successfully configured for Access Manager Plus. Click on Enable SAML SSO to activate the service. Try logging out and logging back to Access Manager Plus to test the configuration.