Discovering Connections
Access Manager Plus allows you to automatically discover remote systems in your environment and import them into the Access Manager Plus repository as Connections Access Manager Plus offers automatic discovery mechanism for Windows and Linux machines, helping you enumerate all the Windows and Linux systems residing in the network and import them into the product in bulk.
Access Manager Plus can discover two types of systems and track the discovery status in real time:
1. Discovering Windows Systems
Access Manager Plus automatically discovers and lists all the Windows domains from the Windows domain controller where Access Manager Plus is running. To discover the systems in a domain, simply select the required domain and provide the domain controller credentials.
Windows servers can also be discovered directly from Active Directory. Access Manager Plus uses the Windows Management Instrumentation (WMI) API to connect with the domain controller and fetch the list of all the servers/workstations that are part of the selected Group/OU. Then, the WMI connection is established to reach out to each Windows end-point for device discovery.
Follow the below step to commence with Windows discovery:
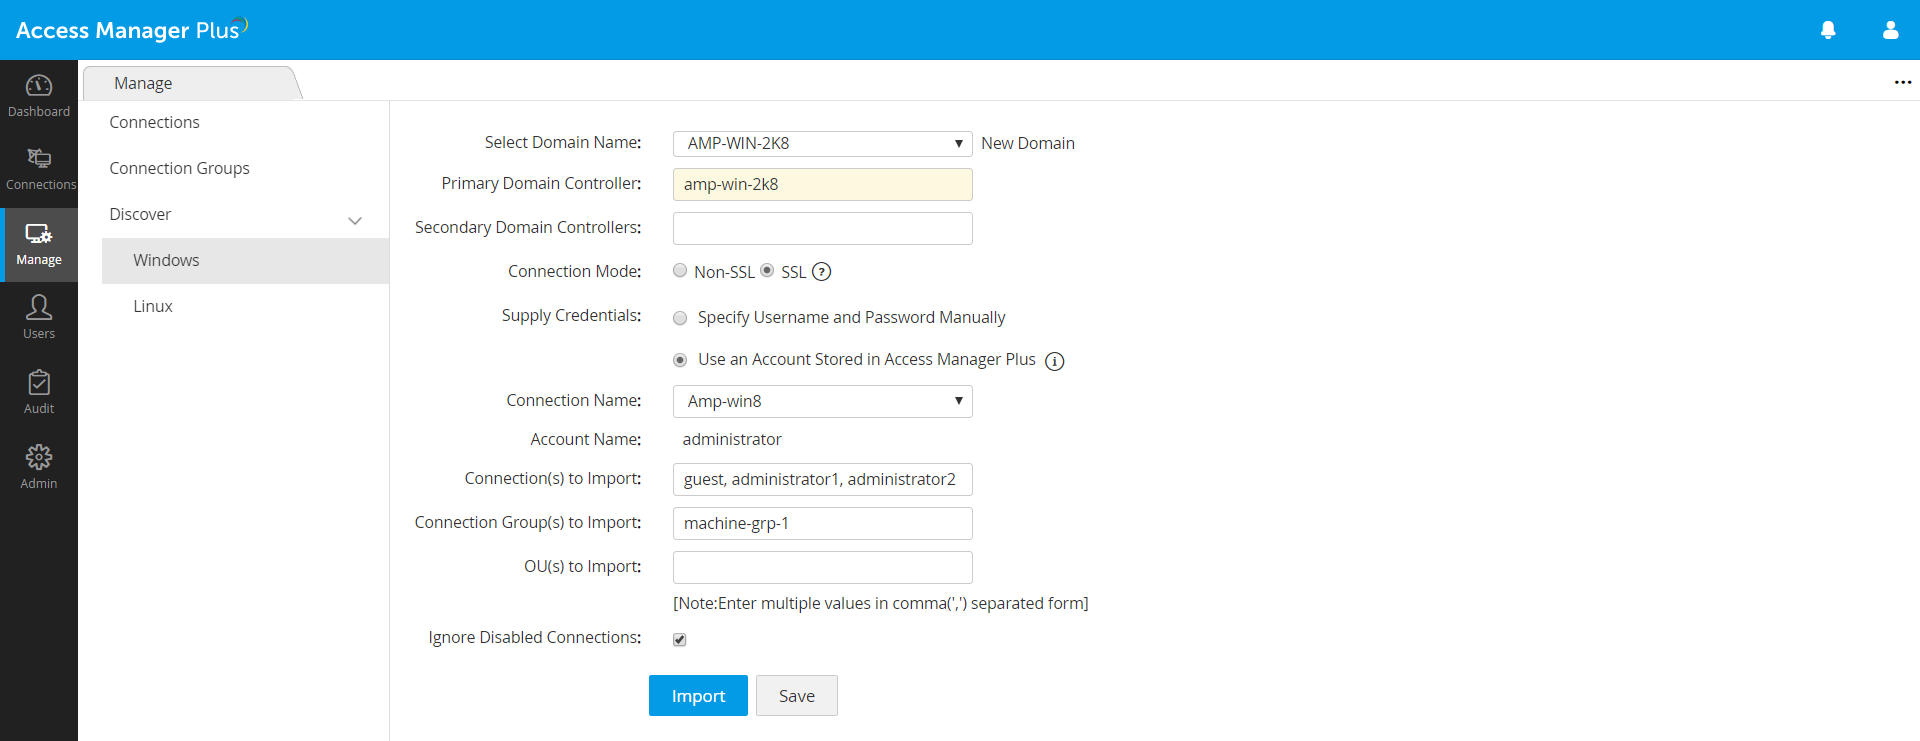
- Navigate to the Manage tab, click Discover from the left pane and click Windows.
- Enter the following details:
- Click New Domain >> Add and enter a new domain name.
- Specify the Primary Domain Controller.
- Specify one or more Secondary Domain Controllers.
- Choose the connection mode as either SSL or Non SSL. For SSL mode, follow the below steps to import local server certificate into Access Manager Plus.
- Supply valid credentials:
- Specify a valid Username/Password manually: Specify the DNS name of the domain controller along with a valid Username and Password which has read permission in that domain controller.
- Use an Account Stored in Access Manager Plus: You can use a user account which is already stored in Access Manager Plus. This step will help Access Manager Plus gain access and fetch the user accounts present under the specified domain name.
- If you want to discover accounts from multiple domains, enter the username as <DomainName >\<username>. For example, if you want to discover accounts of DOMAIN A users by providing DOMAIN B username/password, enter the username as <DOMAIN B>\username. Any procedure that you normally use to import the SSL certificates to the machine's certificate store can also be followed to import the domain controller's certificate into Access Manager Plus's store. Ensure that the certificate is in the base 64 format and it is stored in the <AMP Installation Folder>/bin directory, after which it can be imported to use with Access Manager Plus.
- In the machine where Access Manager Plus is installed, launch Internet Explorer and navigate to Control Panel >> Internet Options >> Content >> Certificates.
Click Import. Browse and locate the root certificate issued by your CA.- Click Next and choose the option Automatically select the certificate store based on the type of certificate and install.
- Again click Import.
- Browse and locate the domain controller certificate.
- Click Next and choose the option Automatically select the certificate store based on the type of certificate and install.
- Apply the changes and close the wizard.
- Repeat the procedure to install other certificates in the root chain.
- In the machine where Access Manager Plus is installed, launch Internet Explorer and navigate to Control Panel >> Internet Options >> Content >> Certificates.
For SSL Mode:
i. Copy the server certificate and paste it under <AMP Installation Folder>/bin directory
ii. Open a command prompt and go to the <AMP Installation Folder>/bin directory
iii. From <AMP Installation Folder>/bin directory, execute the following command: importCert.bat <name of the server certificate>
Note: Mention the DNS names of the secondary domain controllers as comma-separated values. One of the listed controllers will be used when the primary controller is down. If you use SSL mode, make sure the DNS name specified here matches the CN (common name) specified in the SSL certificate for the domain controller.
- Specify Connections, Connection Groups or OU's by specifying their names as comma-separated values in the respective text fields.
- If you want to import only a particular system, enter the required system name(s) in comma-separated form in the Connection(s) to Import field.
- Similarly, you can choose to import only specific connection groups or OUs from the domain. Specify the names in the Connection group(s) to Import or OU(s) to Import fields respectively, in comma-separated form.
- If you have specified a connection, a connection group, or an OU, click Import to initiate the process. If you have left the fields empty, you can click on Fetch Groups and OU's to enumerate all the available to connections from which you can choose and import.
- Select the Ignore Disabled Connections checkbox to avoid importing systems that are disabled or inactive in the AD.
- Click Fetch Groups & OUs.
- On successful discovery of connections, you can add All/Selected Connections into Access Manager Plus.
Note: This option allows the Access Manager Plus server to communicate with this particular domain controller over SSL. Repeat the following steps for all domain controllers to which you want Access Manager Plus to communicate with over SSL. Note that the DNS name you specify for the domain controller should match the CN (common name) specified in the SSL certificate for the domain controller.
When a Group/OU is imported from AD, the Windows devices that are part of the Group/OU will be automatically listed under the Manage tab, from where they can be viewed.
2. Discovering Linux Systems
Access Manager Plus uses SSH as the remote connection mode to discover the SSH-based devices in the network.
Follow the below step to commence with SSH discovery:
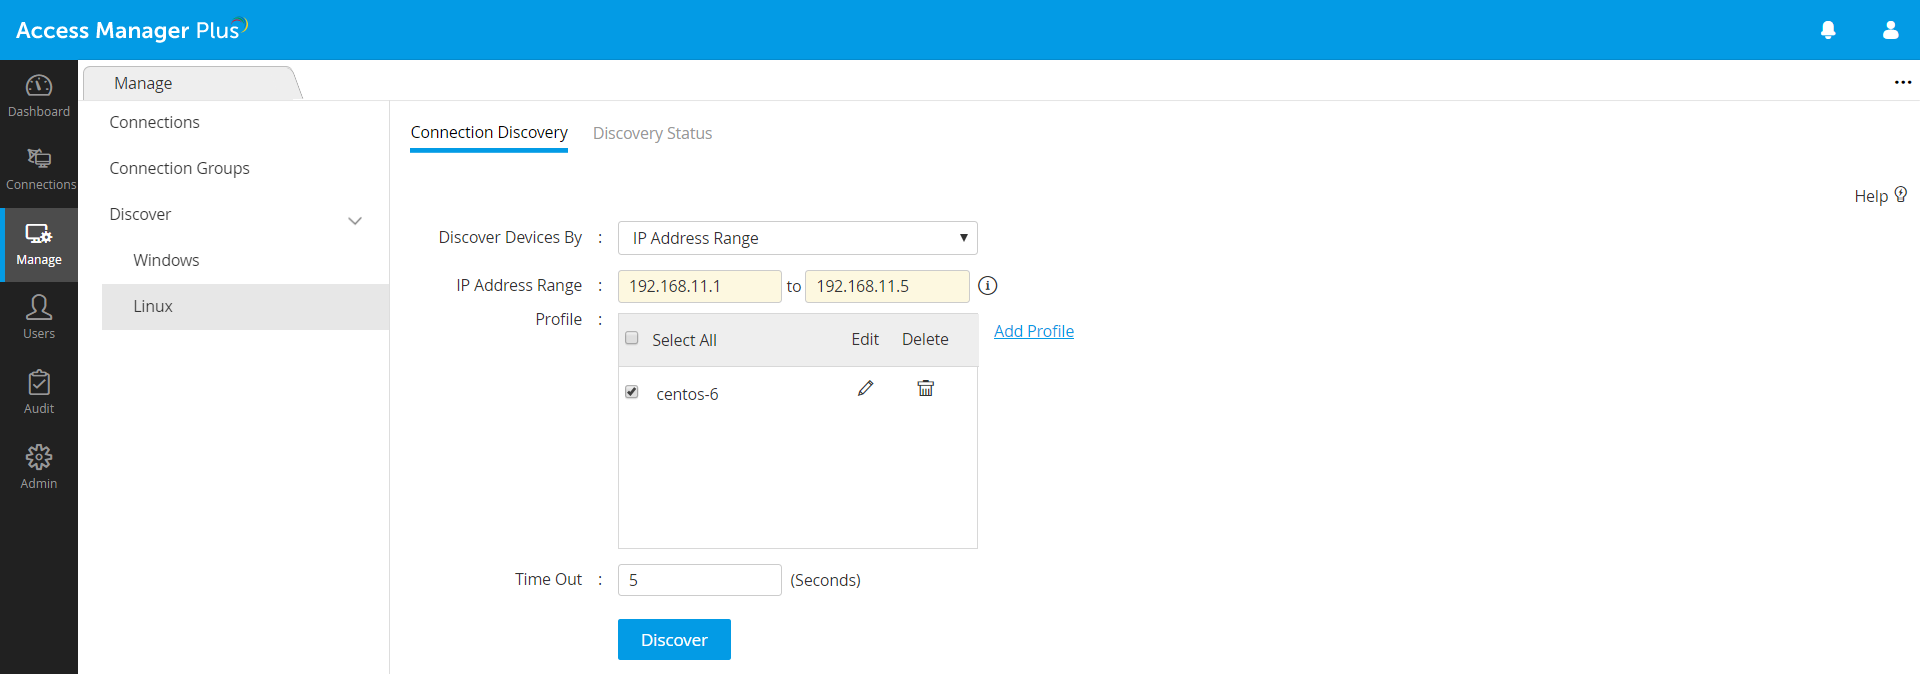
- Navigate to the Manage tab, click Discover from the left pane and click Linux.
- There are three options available for discovery: you can discover a single device by specifying the host name or IP address [OR] multiple devices present in an IP range [OR] discover multiple devices whose details are available in a flat file.
- Choose an existing discovery profile(s) or click Add Profile. The Add New Discovery Profile wizard is displayed
- Fill in details such as Name, Description, SSH Port number and User Prompt.
- Configure credentials in three different ways as mentioned below:
- Specify the password manually: If you choose this option, you need to enter a valid Username and Password.
- Use an Account Stored in Access Manager Plus: If you choose this option, you need to choose a Connection Name from the drop-down
- Choose a privilege elevation method: either 'su' as root: If you choose this option, provide the credentials of a super user only, in the fields that follow [OR] Use 'sudo'.
- Click Save.
Note: If the credentials configured above is of a "sudo" privileged user, then all the connections and the related accounts will be discovered. If the credentials configured above is of a "normal" user, then only the connection will be discovered.
- Set the maximum time limit within which the device discovery is expected to be completed. Specify a Time Out value, in seconds.
- Click Discover. A Discovery Confirmation window pops up. Choose whether to send notifications to "All administrators" or to specific people. If you choose the latter option, specify the email addresses separated by commas. Click Proceed. Now, you will see the Discovery Status page where the discovered device will be added as a task. You will also see other details such as date/time when the discovery was invoked, completed, etc.
For Linux devices, you need to move the discovered connections to the Manage/Connections tab manually. In the Discovery Status window, select the required connections that are discovered and move them to Manage/Connections tab. This operation can also be performed in bulk by selecting multiple connections discovered.
3. Track Discovery Status
- After initiating the discovery operation, Access Manager Plus allows you to track the status of the operation in real-time.
- Click the Discovery Status tab to see the list of discovery operations which are currently running in the background. You can also track down the history of discovery scans which were performed earlier.
- For any discovery operation, you can find details such as the Task name, Time invoked, Completed At and Discovery Status.
- Access Manager Plus also provides an option to stop any discovery operation which is currently in progress.
- Click any Task Name to view the entire list of machines discovered during that particular task.