Configuring Single Sign-On (SSO) using SAML 2.0 for Okta
Access Manager Plus offers support for SAML 2.0, which facilitates integration with Federated Identity Management Solutions for Single Sign-On. Access Manager Plus acts as the Service Provider (SP) and it integrates with Identity Providers (IdP) using SAML 2.0. The integration basically involves supplying details about SP to IdP and vice-versa. Once you integrate Access Manager Plus with an IdP, the users simply have to login to IdP and then, they can automatically login to Access Manager Plus from the respective identity provider's GUI without having to provide credentials again. Access Manager Plus supports out-of-the-box integration with Okta.
Integrating Access Manager Plus with Okta involves four major steps:
- Adding Access Manager Plus as an application on the Okta dashboard
- Configuring Okta details in Access Manager Plus
- Assigning Access Manager Plus Application to Users in Okta
- Enabling SAML Sign On in Access Manager Plus
1. Adding Access Manager Plus as an Application on the Okta Dashboard
- Log in to your Okta Admin account and click Applications tab.
- In the new page that opens up, select Add Application.
- As shown in the image below, click on Create New App.
- Immediately, a window will pop-up asking information about the type of application integration. Choose SAML 2.0 and click Create.
- Enter the name of the app being added (Access Manager Plus) as prompted under General Settings. You can also optionally choose to upload a logo for the app. When you are done, click on Next.
- The second step in configuring SAML integration consists of providing details about the Service Provider (Access Manager Plus) to Okta. To access these details, go to Access Manager Plus Homepage and select Admin >> Authentication >> SAML Single Sign On.
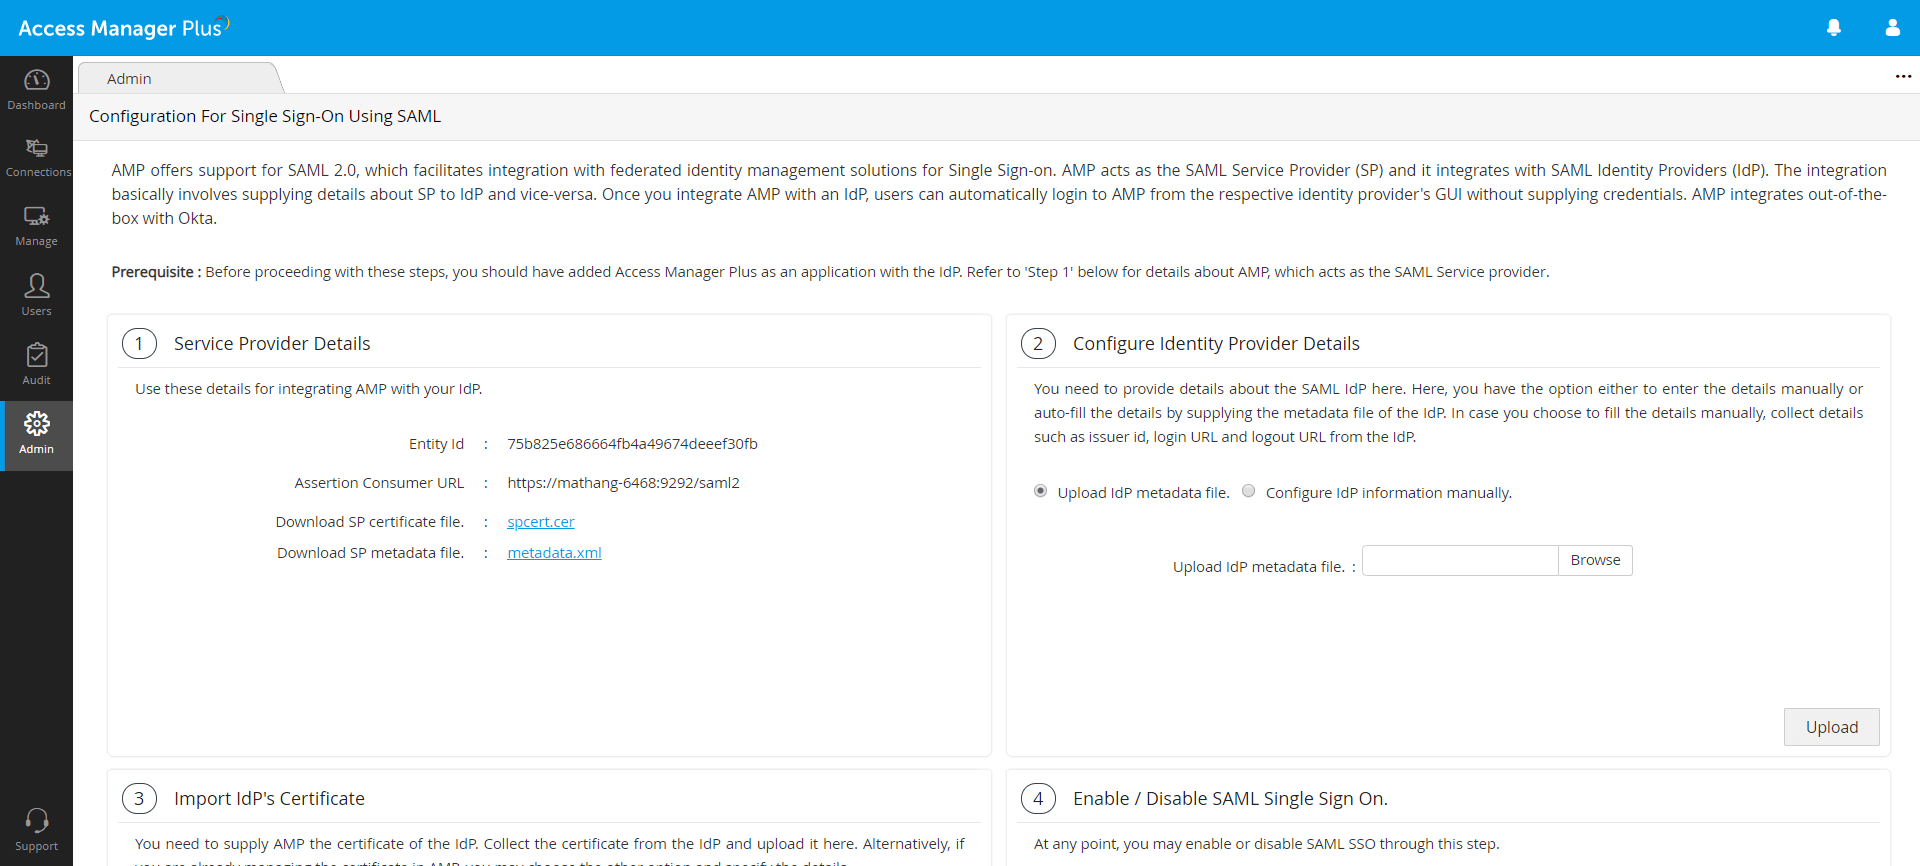
- The area highlighted in red contains the respective details titled as Service Provider Details. Input these in the corresponding fields in Okta's SAML Settings page.
- After filling-in the Single Sign On URL and SP Entity ID (Audience URI) fields, you need to specify how you want Okta to recognize the names of your users in Access Manager Plus. Since the way in which the usernames are displayed in Okta is different from how they are depicted in Access Manager Plus, you have to specify the format. There are two scenarios here:
- Scenario 1: If you have imported users from AD into Access Manager Plus, they would have been imported in the format Domain\Username. For more help on integrating Okta with your on-premise AD, please check the help documentation of Okta available here. In Okta GUI, you need to choose the option "Custom" from the drop-down "Name ID format". Then, you should specify the custom format as given below:
${f:toUpperCase(f:substringBefore(f:substringAfter(user.login, "@"), "."))}${"\\"}${f:substringBefore(user.login, "@")}
- Scenario 2: If you have not used AD integration in Access Manager Plus, you should select the option Okta Username Prefix. This is because in Okta, user profiling is done in the format username@domain.com. But, in Access Manager Plus, user names are depicted only as usernames.
- This step is crucial because, only if you specify the correct Name ID format in Okta, you will be able to assign the application (Access Manager Plus) to other users in Okta.
- Scenario 1: If you have imported users from AD into Access Manager Plus, they would have been imported in the format Domain\Username. For more help on integrating Okta with your on-premise AD, please check the help documentation of Okta available here. In Okta GUI, you need to choose the option "Custom" from the drop-down "Name ID format". Then, you should specify the custom format as given below:
- Once you have filled in the required details as mentioned above, click Finish to add the application. On addition, the application details will be displayed as shown in the image below. Click on Sign On and then select View Setup instructions. A new tab will open containing the details required to configure SAML 2.0 in Access Manager Plus, which is discussed in the next step.
2. Configuring Okta Details in Access Manager Plus
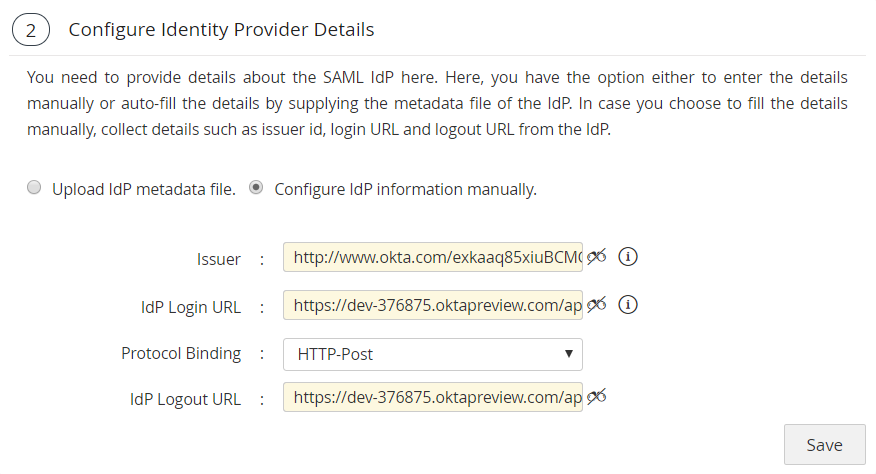
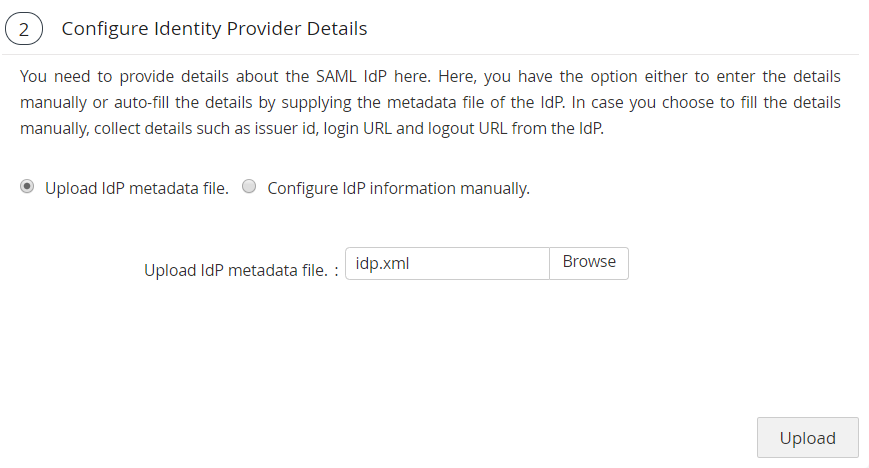
You need to configure IdP details in Access Manager Plus. This is done as part of the second step, Configure Identity Provider Details in Access Manager Plus's SAML Single Sign On page. Here, you have the option either to enter the details manually or auto-fill the same by supplying the metadata file from the IdP.
- Manual Set-up: If you choose to fill the details manually, get the IdP details such as Issuer ID, Login URL, and Logout URL from the Setup Instructions page of Okta. Configure the same in the step 2 given in Access Manager Plus SAML Sign On configuration page. Enter the details in the corresponding fields and also download the Okta certificate and upload onto the Access Manager Plus client (Listed as the 3rd step in the Access Manager Plus GUI). Alternatively, you can also save the certificate file in the Access Manager Plus File Store or Key Store and then use it here.
- Auto-Filling with IdP Metadata File: Scroll down on the SAML 2.0 setup instructions page of Okta and you will find the IdP metadata under Optional. Copy the text and save in a file with .xml extension. Now, upload the same .xml file onto the Access Manager Plus client. In this case, you need not import IdP certificate in Access Manager Plus. It will be updated automatically.
3. Assigning Application to Users in Okta
After completing the configurations in Access Manager Plus, go back to Okta to assign the newly added application to your users.
- Navigate to Applications >> Assign Applications and select the Access Manager Plus app.
- Under People, select the desired users and confirm assignments.
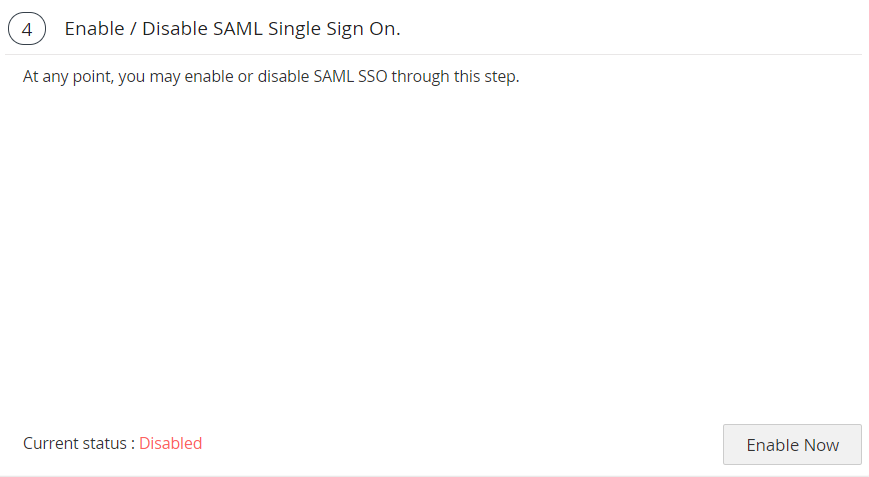
4. Enabling SAML Sign On in Access Manager Plus
The final step of this configuration is enabling SAML Single Sign On in Access Manager Plus. This would be shown as the 4th step in the SAML page in Access Manager Plus GUI. Click Enable shown at the bottom right to begin using this feature.
Note: In case Active Directory authentication is enabled for Access Manager Plus login, SAML SSO cannot be enabled. To disable AD authentication, go to Admin >> Authentication >> Active Directory.