Smart Card/PKI/Certificate-based Authentication
Access Manager Plus provides a wide range of authentication options from which users can choose the ones that suit their environment better. Apart from Access Manager Plus's local authentication, there is provision to leverage the authentication of external identity stores such as Active Directory/Azure AD/LDAP. <link the respective docs>
To bolster the security further, Access Manager Plus offers Smart Card Authentication. Users who possess a smart card must know their personal identification number (PIN) to authenticate their login through the smart card PIN.
Smart Card authentication login serves as the Primary Authentication and bypasses Access Manager Plus's local authentication and all other first factor authentication methods such as AD, Azure AD or LDAP authentication.
How Does Smart Card Authentication Work in Access Manager Plus?
Access Manager Plus's web interface supplements smart card technology with SSL communication. So, the user is prompted to specify their X.509 certificate for gaining access.
A user attempting to access Access Manager Plus's web interface will be allowed to proceed only if they have already completed the smart card authentication in the machine by presenting the card and entering the corresponding PIN.
The users can chose to provide the certificate from the smart card or the local certificate store, in which case Access Manager Plus performs the steps to authenticate the user with the certificate. The users can also choose to decline providing the certificate and Access Manager Plus takes them to the usual login page for authentication.
Here's a breakdown of the Smartcard authentication workflow in Access Manager Plus:
- User tries to connect to the Access Manager Plus web interface.
- The Access Manager Plus server presents its certificate to the client.
- The client verifies the server's certificate through the browser certificate authority.
- If the server certificate verification is successful, the client sends the user's smartcard certificate to the server.
- The server verifies the client certificate with the server's trustStore and then checks the revocation status with the OCSP server (if applicable); finally checks if the user certificate is same as the one in the AD/Azure AD/LDAP or Access Manager Plus user store.
- If the above process also succeeds, the Access Manager Plus server grants the user access to the web interface.
How to Activate Smart Card Authentication in Access Manager Plus?
If you have smart card authentication system in your environment, follow the below steps to configure Access Manager Plus to authenticate users with their smart cards.
- Import the root of CA
- Map user details between the smartcard certificate and Access Manager Plus user store
- Configure status check for user certificates
- Compare user certificates to verify authentication
- Enabling smartcard authentication
- Restart Access Manager Plus server and web browser
1. Import the Root of CA
In case you are using an internal certificate, follow the below steps to import the root of CA. If you are using a certificate signed by third-party CA, you may skip this step.
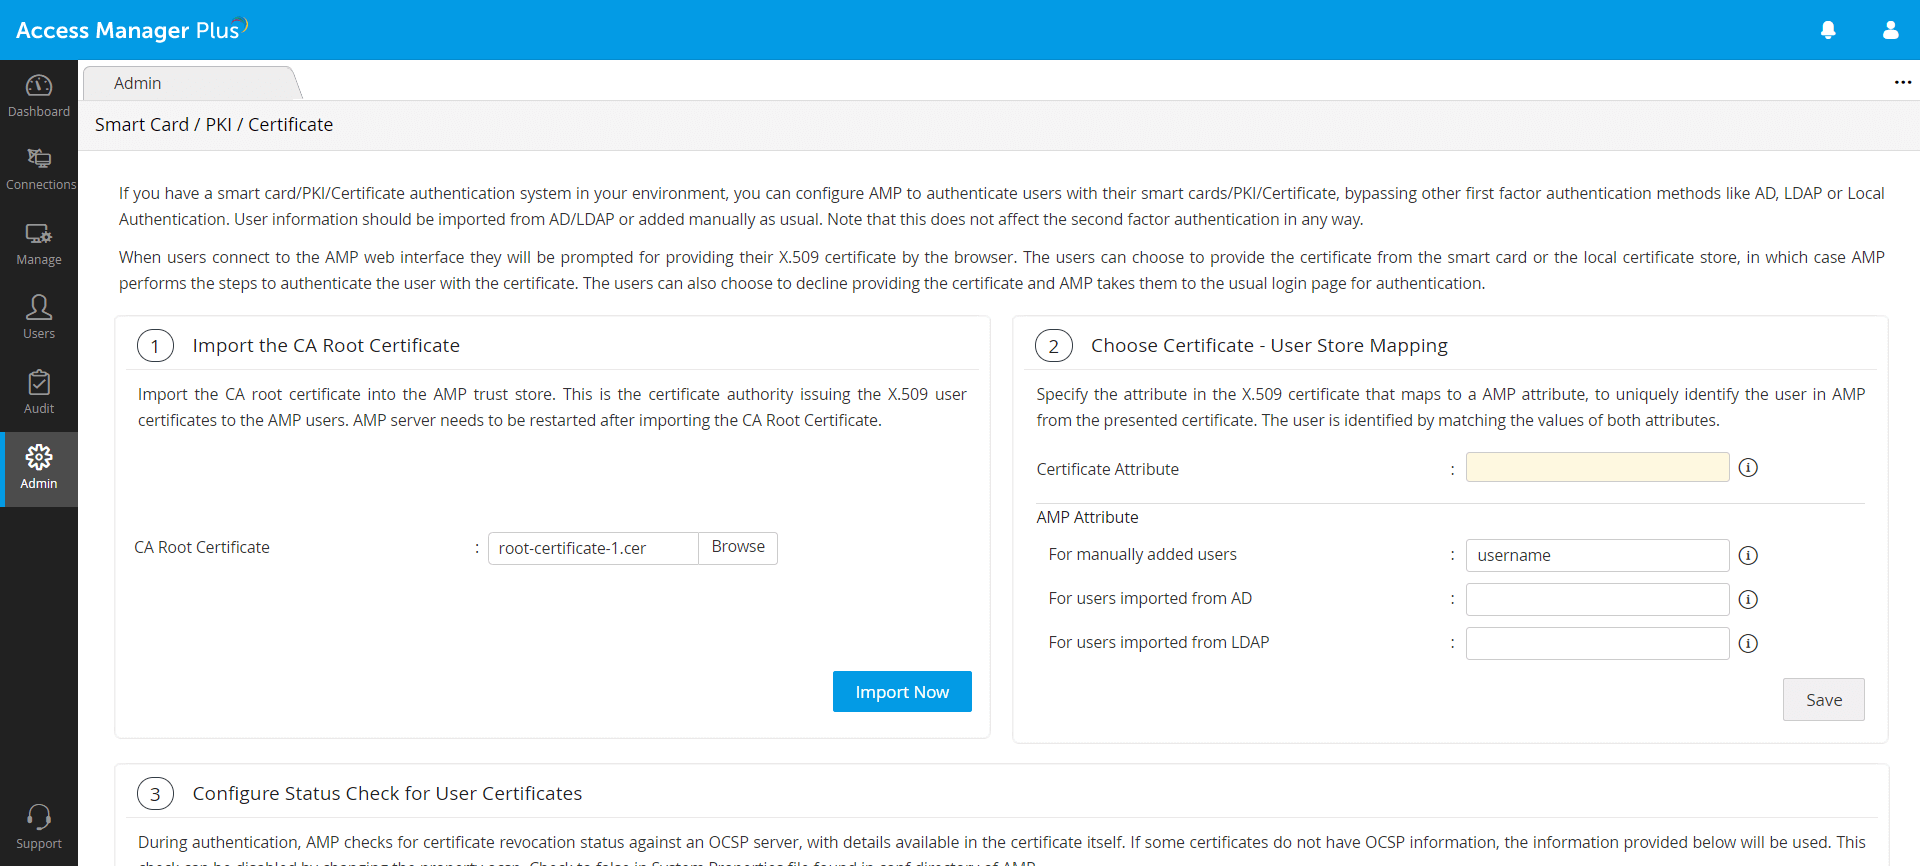
- Navigate to Admin >> Authentication >> Smart card / PKI / Certificate.
- Under 1. Import the CA Root Certificate browse and add the root certificate and click Import Now.
- Restart Access Manager Plus server.
- Once you execute the above, the root of the CA will be recorded in Access Manager Plus. After this, all the certificates signed by the particular CA will be automatically taken.
2. Map User Details between the Smart Card Certificate and Access Manager Plus User Store
The next step is to choose the mapping between the smartcard certificate and the Access Manager Plus user database. That means, the attribute in the smartcard certificate that uniquely identifies the user should match with the corresponding value in the Access Manager Plus user database.
This mapping involves two things:
- Specifying which attribute in certificate should be taken up for comparison.
- Specifying the corresponding matching attribute in Access Manager Plus user store.
2.1 Specifying the Certificate Attribute
- Access Manager Plus provides the flexibility to specify any attribute of the smartcard certificate that you feel uniquely identifies the user in your environment. You may choose any attribute among SAN.OtherName, SAN.RFC822Name, SAN.DirName, SAN.DNSName, SAN.URI and Common Name. During authentication, Access Manager Plus reads the value corresponding to this attribute and compares it with the attribute in Access Manager Plus user store.
- From the drop-down Certificate Attribute, select the desired attribute.
Note: If any other attribute is used to uniquely identify the user in your environment, contact Access Manager Plus support to add that attribute.
2.2 Specifying the Matching Access Manager Plus Username
After specifying the Certificate Attribute, you need to specify the mapping attribute in Access Manager Plus user store. That means, you need to specify the particular attribute that uniquely identifies the user in Access Manager Plus user store. This depends on how the user was added in Access Manager Plus - whether by manual addition or imported from Active Directory / LDAP.
In case the users are added manually: Username in Access Manager Plus is the only attribute that could be taken up for comparison with the corresponding attribute in certificate. So, simply leave this text field with the default value username.
In case the users imported from Active Directory / LDAP/Azure AD: In the case of the users imported from Active Directory/LDAP/Azure AD, normally the attribute 'userPrincipalName' is used to uniquely identify the user. It is possible that in your environment, some other attribute like 'distinguishedName' might uniquely identify the user. So, specify the attribute accordingly.
Click Save to save the settings.
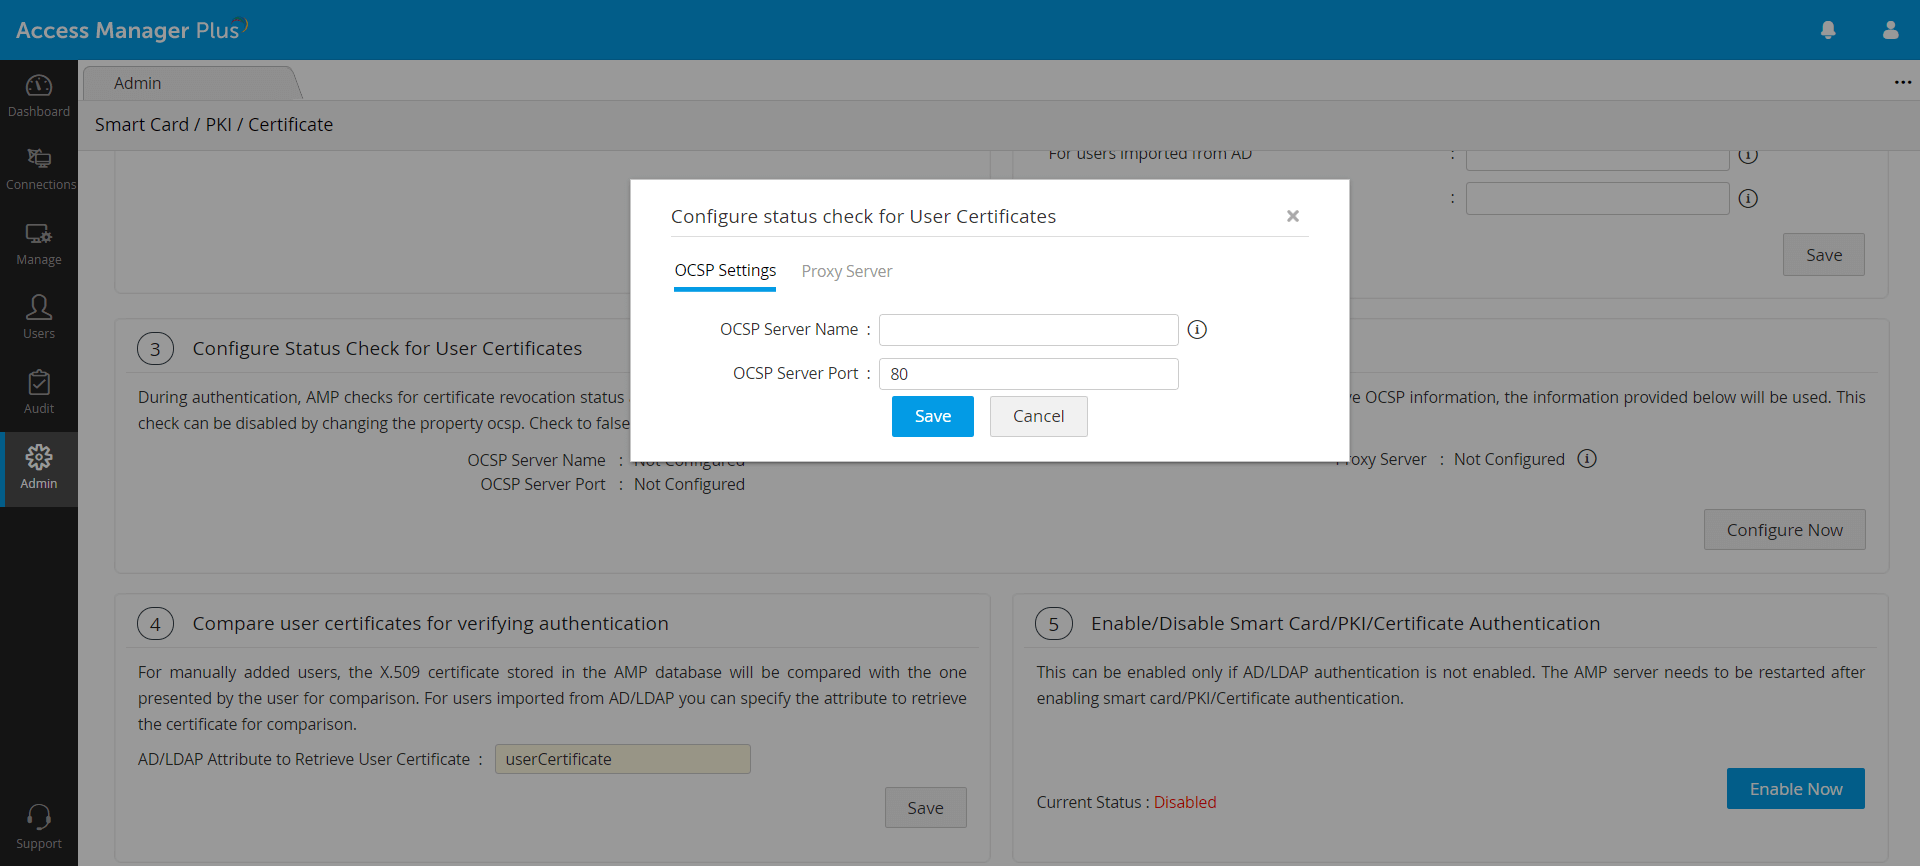
3. Configure Status Check for Certificates
During authentication, Access Manager Plus checks for certificate revocation status against an Online Certificate Status Protocol (OCSP) server, with details available in the certificate itself. If some certificates do not have OCSP information, the information provided in the settings here will be used. This check can be disabled by changing the property ocsp.check to false in 'System Properties' file found in conf directory of Access Manager Plus.
- Click Configure Now.
- In the pop-up form that opens, enter OCSP server details such as OCSP server name and server port. Authentication through OCSP will require access to the internet. In an enterprise network setup, you might need to go through a proxy server to access the internet. Switch to the Proxy Server tab to specify proxy server settings if you have not specified it already. Click Save.
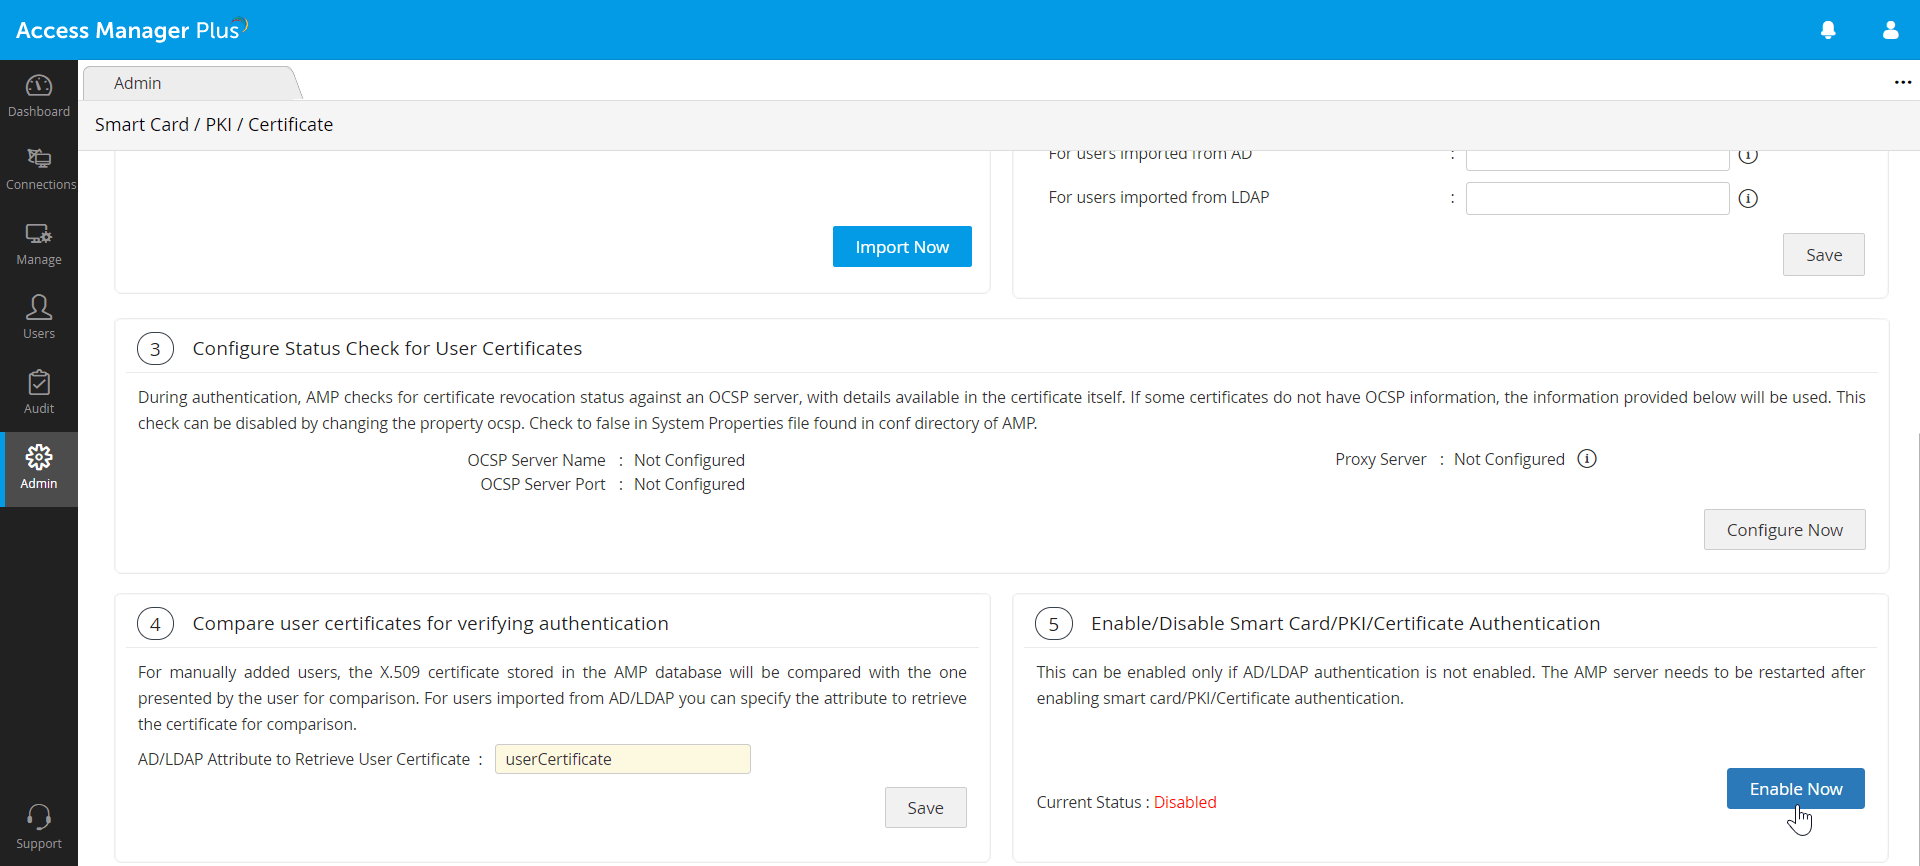
4. Compare User Certificates to Verify Authentication
Another step in the authentication process is comparison of the user certificates presented by the user and the ones stored in the system or Active Directory/LDAP/Azure AD. For the users who were added manually, the X.509 certificate stored in the Access Manager Plus database will be compared with the one presented by the user.
Note: In case, you do not have AD or LDAP in your environment, you need to manually add the x.509 format SSL certificate used for smartcard authentication into Access Manager Plus.
- Navigate to Admin >> Settings >> Change Login Password.
- In the pop-up form that opens, click Browse under User Certificate to add the x.509 format SSL certificate.
- Click Save.
5. Enable Smart Card Authentication
After carrying out the settings, you need to enable Smart Card Authentication. Before enabling this, you need to ensure that AD/LDAP authentication is disabled.
Click Enable to enable smart card authentication.
6. Restart Access Manager Plus Server and Web Browser
After completing aforementioned steps, restart Access Manager Plus server and the web server once to give effect to the settings. Whenever you enable or disable Smart Card authentication in Access Manager Plus, you need to restart the server and the browser to give effect to the change.
Notes:
- Once you enable smart card authentication, it will take effect globally—that means, smart card authentication will be applied to all the users. However, the users for whom smart card authentication is not applicable, will be prompted to use local authentication automatically.
- When smart card authentication is enabled, AD/Azure AD/LDAP authentication will remain suspended for all users.
- In case, you do not get the pop-up that prompts you to select the client certificate during authentication, try again after restarting the browser