- Related Products
- AD360
- Log360
- ADAudit Plus
- ADSelfService Plus
- EventLog Analyzer
- Exchange Reporter Plus

Help Document
What is SSL?
Secure Socket Layer (SSL) is a protocol that encrypts the connection between a client and a server for secure data transfer. To activate SSL on a web server, an SSL certificate is required. This digital certificate verifies the authenticity and integrity of the domain. When SSL is enabled, the URL begins with HTTPS and a padlock symbol appears next to it. Clicking the padlock icon allows you to view the certificate and its details.
To secure the connection between the ADManager Plus server and a web browser, you need to apply an SSL certificate to the product.
Important SSL-related terms
| Term | Description |
| Certificate Signing Request (CSR) | To receive an SSL certificate, a CSR needs to be created and submitted to a Certificate Authority (CA). |
| Certificate Authority (CA) |
The CA, which is of two types—internal and external, is an entity that verifies all the details mentioned in the CSR (e.g., name of the organization and more), and then issues the certificate. An internal CA is used to create and distribute certificates for internal purposes, such as securing communications within an organization's network. Example: A member server or domain controller in a specific domain that has been assigned the role of a CA. External CAs are third-party vendors, like Comodo, Verisign, DigiCert, etc., that issue an SSL certificate for your organization. |
| Keystore | A keystore is a repository that contains the public and private keys required for encryption and decryption of data once a secure connection is established between the client and the server. |
The usual process of obtaining and applying an SSL certificate includes:
- Creating a CSR.
- Submitting the CSR to your CA.
- Binding the CSR with digital signatures provided by the CA.
- Applying the certificates to your domain.
Note:
If you have configured high availability in ADManager Plus, apply the SSL certificate in the primary server, which will be replicated in the secondary server.
If you want to configure load balancing in ADManager Plus, apply the SSL certificate in all the nodes (servers) individually before configuring load balancing.
SSL certificate tool in ADManager Plus
In ADManager Plus, the SSL certificate tool allows you to:
Steps to apply an existing SSL certificate using ADManager Plus
- Log in to ADManager Plus.
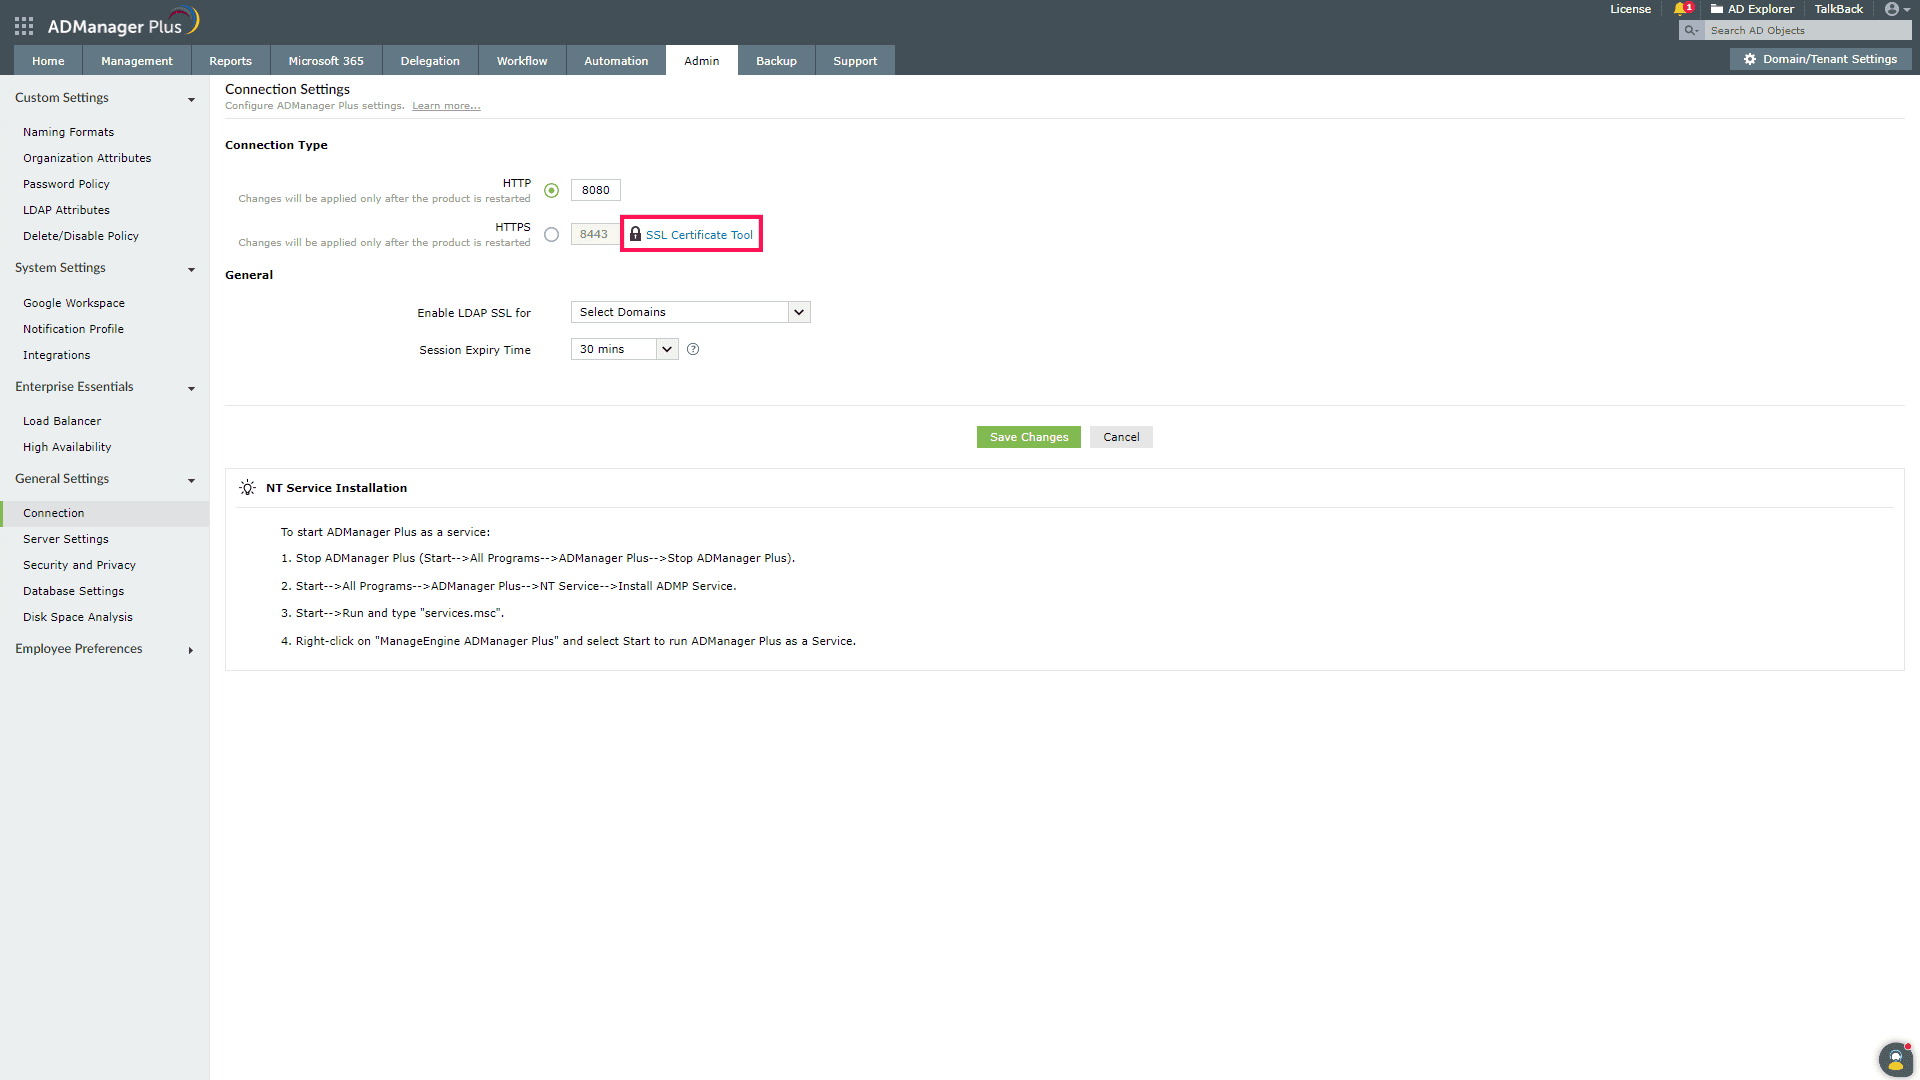
- Navigate to the Admin tab. In the left navigation pane, expand General Settings and click Connection.
- Select the HTTPS radio button to enable HTTPS. The default port number is 8443. You can change the port number, if you wish to use a different port.
- Click the SSL Certificate Tool link.
- Select the Apply Certificate option.
- There are three options to upload the certificate, as shown in the image below. Choose how you would like to import the certificate from the options and fill in the required fields.
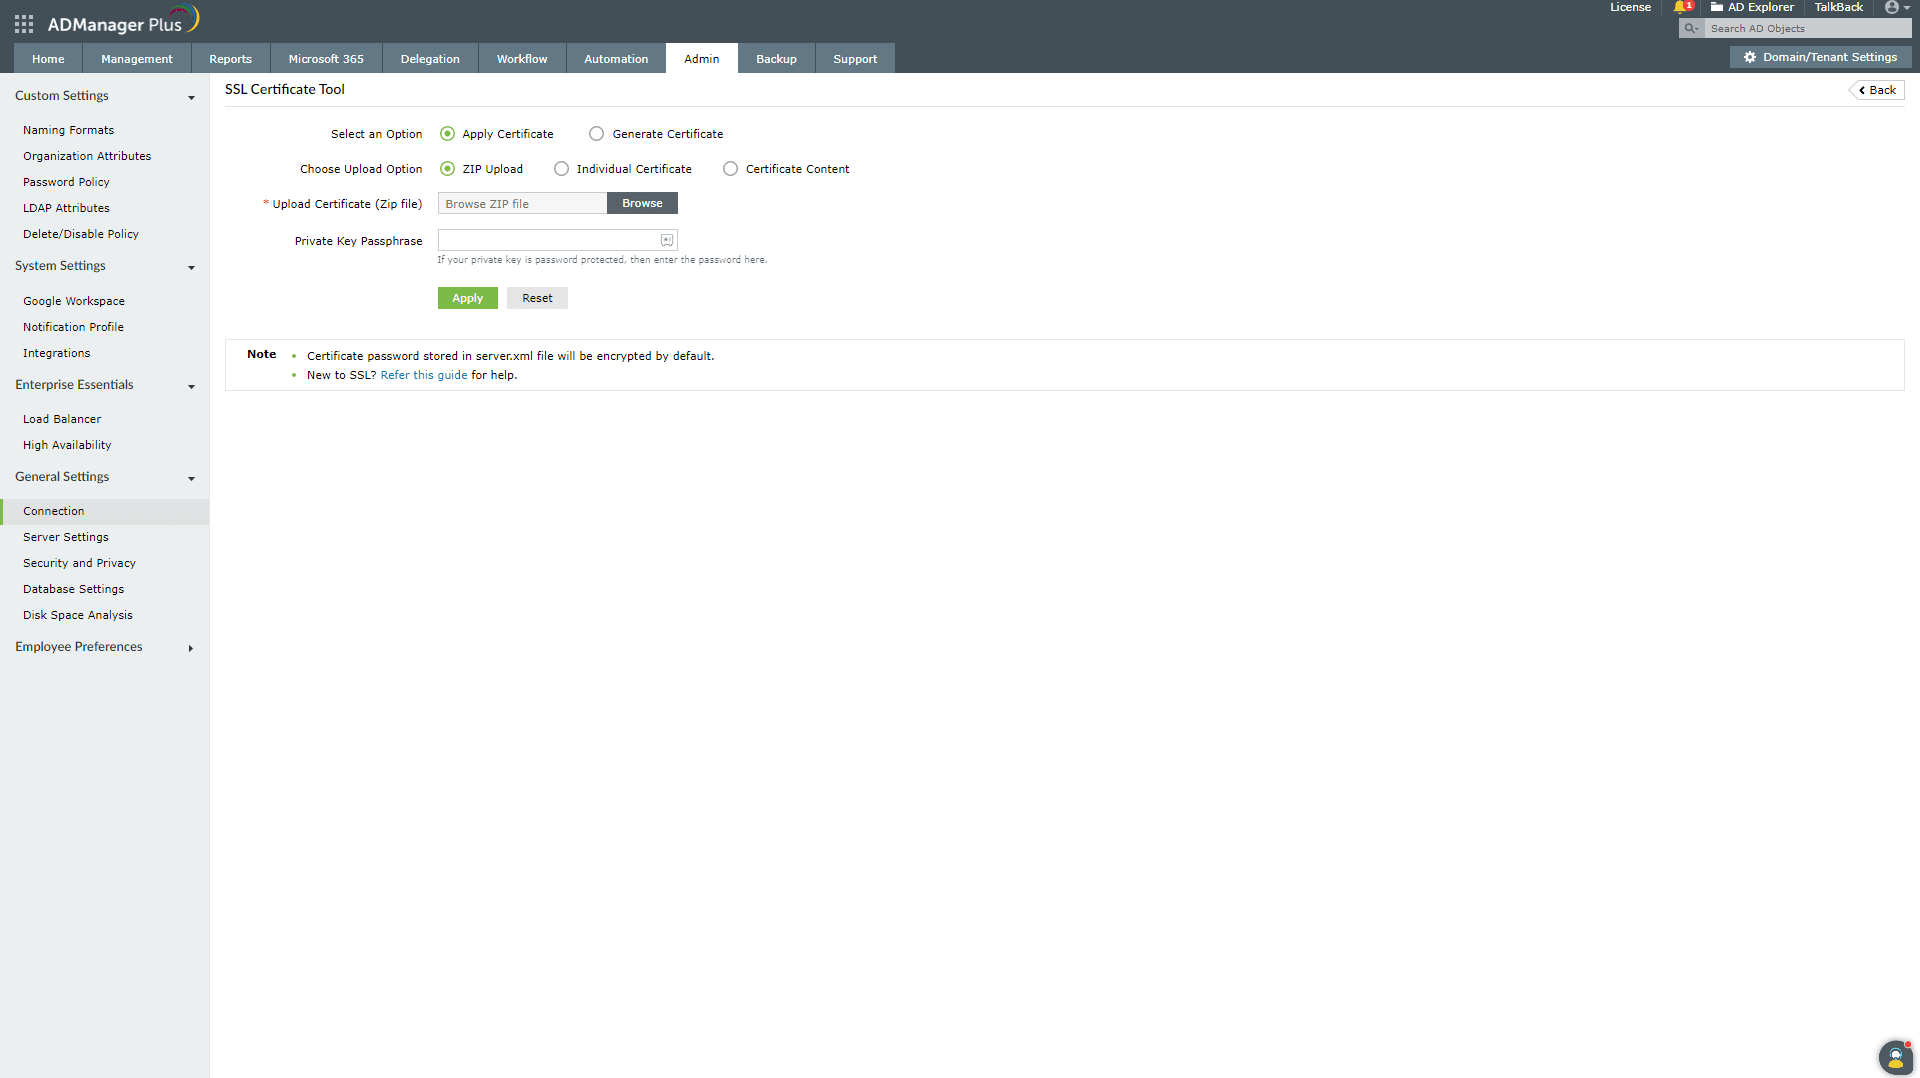
- ZIP Upload: If your CA has given you a ZIP file, then select the ZIP Upload option. If your CA has sent you individual certificate files, such as user, intermediary, and root certificates, then combine all of them in a ZIP file. After selecting this option:
- Browse and upload the ZIP file in the Upload Certificate (Zip file) field.
- If your certificate's private key is password protected, enter its password in the Private Key Passphrase field.
- Click Apply.
Note:- The ZIP file must not include any nested folders.
- The ZIP file should contain both the RSA key and the certificate bundle for it to function properly.
- Individual Certificate: If your CA has given only one certificate in the PFX or PEM format, then select the Individual Certificate option. After selecting this option:
- Browse and upload the certificate in the Upload Certificate field.
- Browse and upload the CA file in the Upload CA Bundle field.
- If the uploaded certificate is password protected, enter the password that must be provided to access it in the Certificate Password field.
- Click Apply.
- Certificate Content: If your CA has sent the certificate content, then paste the content in a text editor, and save the file in a CER, CRT, or PEM format, and upload that file by selecting the Certificate Content option.
- Copy and paste the certificate content in the Paste Certificate Content field.
- If your certificate's private key is password protected, enter its password in the Private Key Passphrase field.
- Click Apply.
- ZIP Upload: If your CA has given you a ZIP file, then select the ZIP Upload option. If your CA has sent you individual certificate files, such as user, intermediary, and root certificates, then combine all of them in a ZIP file. After selecting this option:
- Restart ADManager Plus.
Steps to generate a CSR in ADManager Plus and apply the certificate
Note: Follow the steps 1 to 4 given in the section above and then proceed with the steps provided below.
- Select the Generate Certificate option and fill in the following required fields:
- Common Name: Enter the name of the server where ADManager Plus is running.
- SAN Names: Specify the additional hostnames (e.g., sites, IP addresses, common names) that must be protected by the certificate.
- Organization Unit: Enter the name of the department or the OU that must be specified in the certificate.
- Organization: Enter the legal name of your organization.
- City: Enter the city where your organization is located.
- State/Province: Enter the state and province where your organization is located.
- Country Code: Enter the two-letter code of the country where your organization is located.
- Password: Enter the password that must be used to protect the certificate. The password must be at least 6 characters in length.
- Validity (In Days): Enter the number of days the certificate should be valid. The default value is 90 days.
- Public Key Length (In Bits): Enter the public key size in bits. The default key size is 2048 bits.
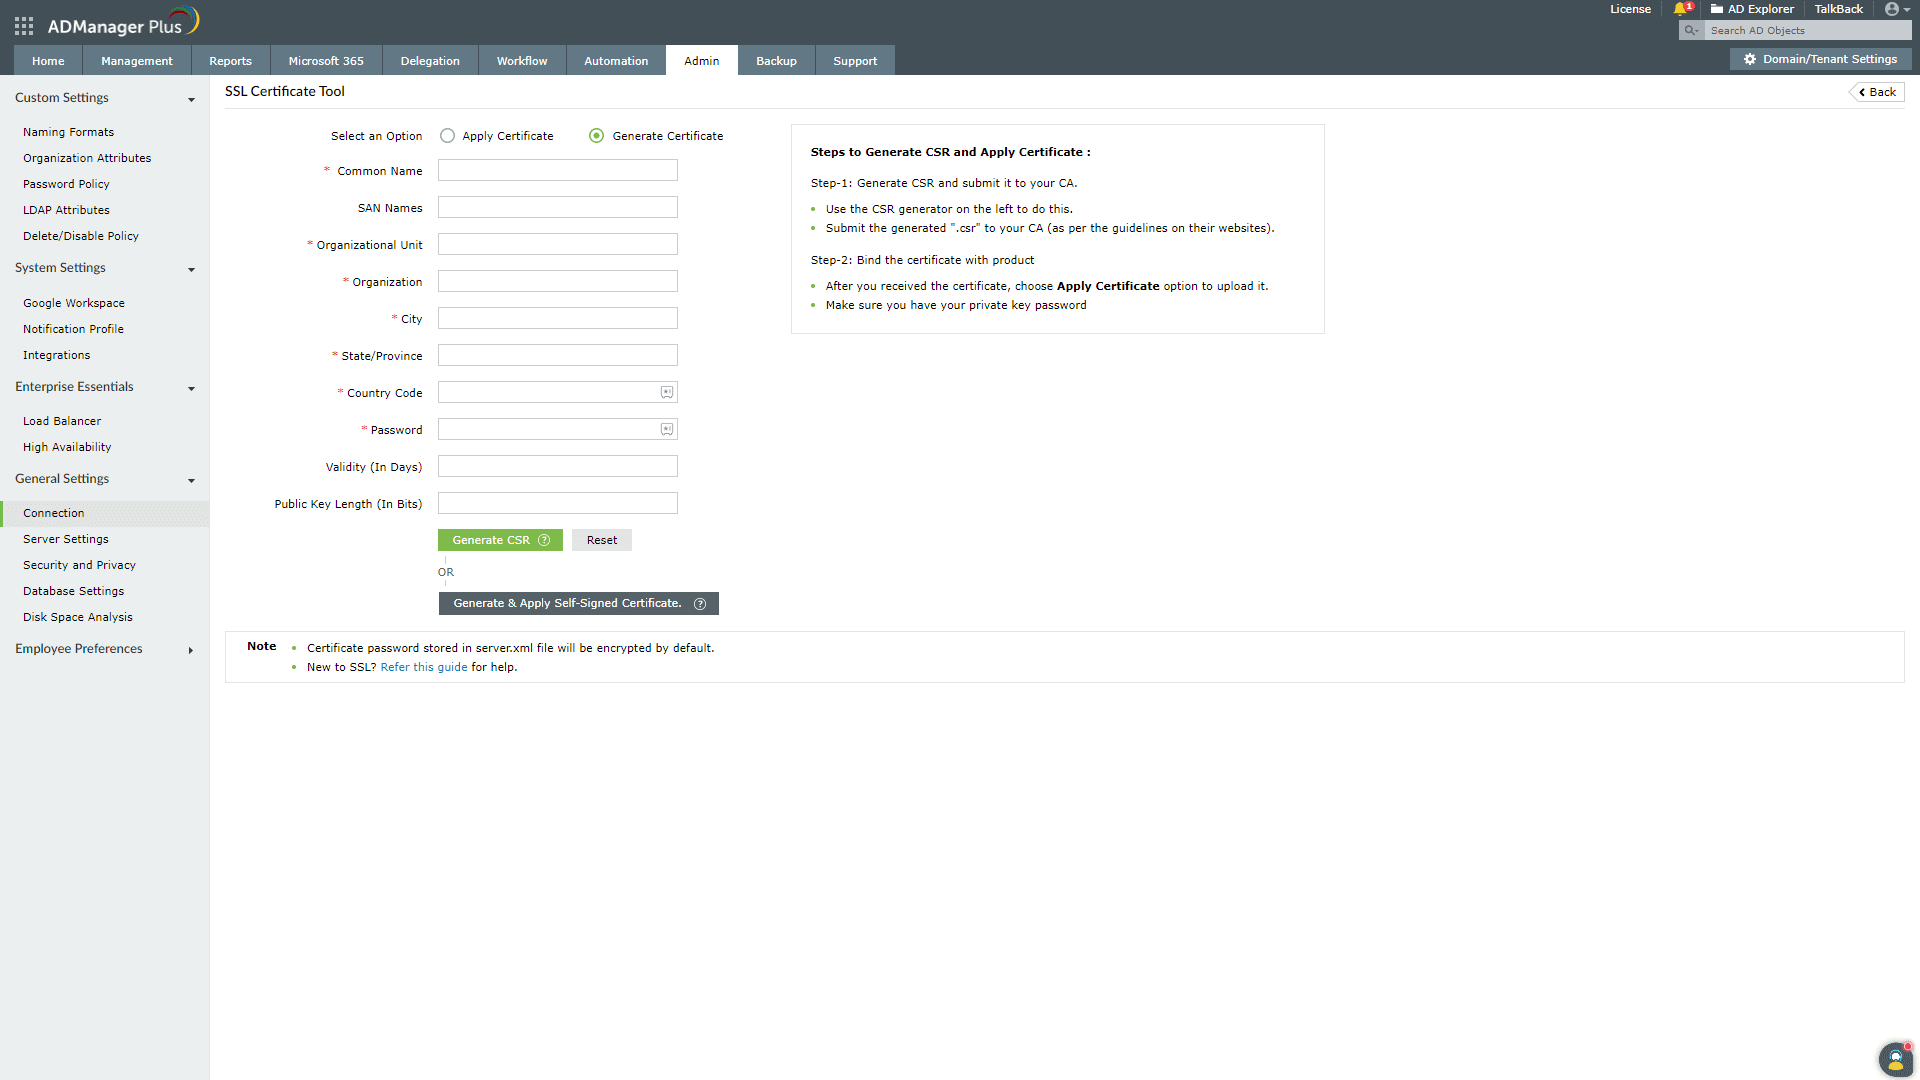
- After filling in the above mentioned fields, you can generate the certificate in the two following ways.
- Generate CSR: Click the Generate CSR button to generate a CSR certificate and submit it to your CA. Once this is done, get the CA-signed certificate and apply it to ADManager Plus. To do this:
- Click Download CSR or manually get it from the <Install_dir>\Certificates folder. Send the downloaded CSR to your CA and get it signed.
- Once you have received the certificate files from your CA, follow the steps outlined here.
- Generate & Apply Self-Signed Certificate: If you'd like to generate a self-signed certificate, click the Generate & Apply Self-Signed Certificate button. The certificate will be automatically applied and to reflect the changes, restart ADManager Plus.
- Generate CSR: Click the Generate CSR button to generate a CSR certificate and submit it to your CA. Once this is done, get the CA-signed certificate and apply it to ADManager Plus. To do this: