- Related Products
- AD360
- Log360
- ADAudit Plus
- ADSelfService Plus
- EventLog Analyzer
- Exchange Reporter Plus

Help Document
Configuring Microsoft 365 REST API
Configuring the REST API is a crucial step for generating reports and managing data within your Microsoft 365 environment. The REST API enables seamless integration between ADManager Plus and Microsoft 365, enabling you to automate tasks such as user management, reporting, and more.
You can either configure the REST API manually by entering the necessary credentials and settings, or automate the process to simplify configuration and ensure a smooth integration. Proper configuration is essential to ensure accurate data retrieval and reporting from your Microsoft 365 account.
Manual configuration
If you encounter any permission issues during automatic configuration or if you want to change the permissions needed by the application, you can configure the Rest API access manually.
Steps to create an Entra ID application
- Log on to the Microsoft Entra ID admin center using the credentials of a Global Administrator or any other user account with permission to create Entra ID applications.
- Navigate to App registration > New registration.
- If you have already created an ADManager Plus application, select the desired application name. Otherwise, in the Name field, enter the desired name of the ADManager Plus application to be created.
- Select a supported account type based on your organizational needs under Supported account types.
- Leave Redirect URI (optional) blank; you will configure it in the next few steps.
- Click Register to complete the initial app registration.
- You will now see the Overview page of the registered application.
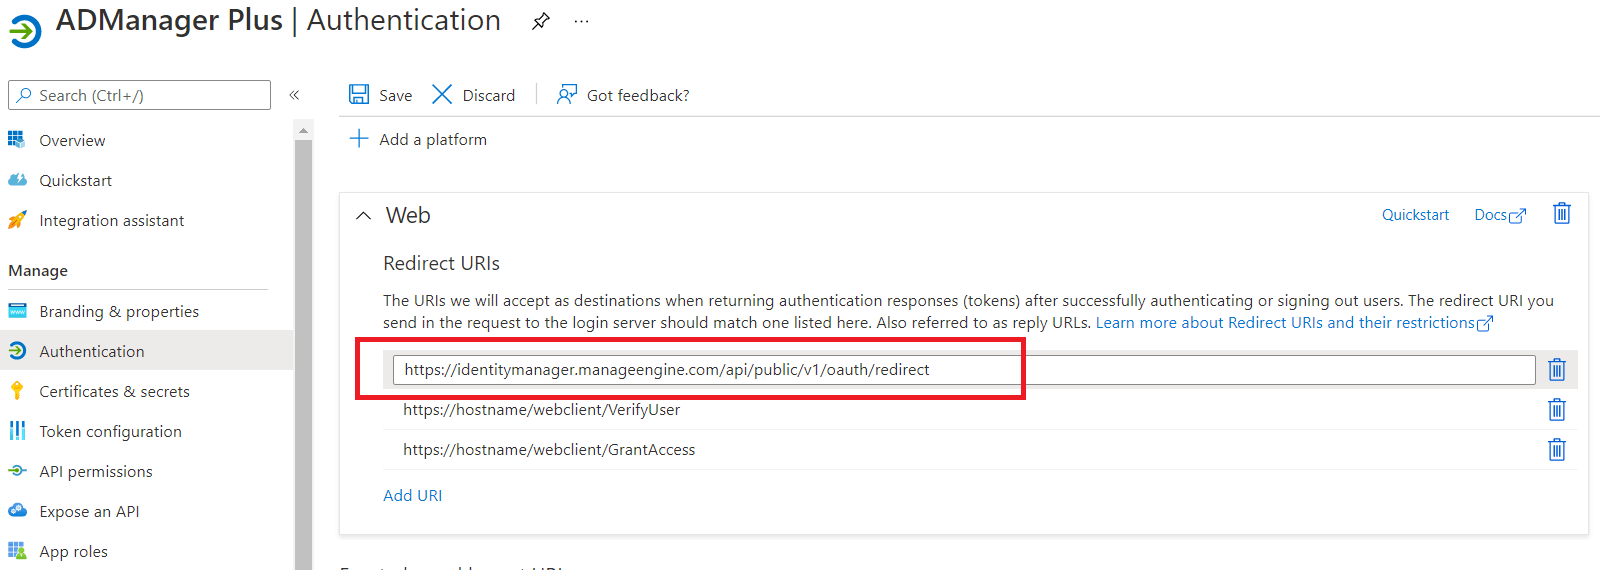
- Navigate to Manage >Authentication in the side pane.
- Click Add a platform under Platform configurations.
- In the Configure platforms pop-up, under Web applications, click Web.
- In the Redirect URIs field, enter the following links. You can enter only one link at a time. After you enter a link, click Configure and repeat the steps until all of the links are configured.
- http://localhost:port_number/webclient/VerifyUser — If ADManager Plus is accessed via localhost, it will set the redirect URI to localhost to receive the authentication tokens from Microsoft instead of the hostname or IP address.
- https://identitymanager.manageengine.com/api/public/v1/oauth/redirect — If ADManager Plus is accessed using the hostname and HTTPS is not enabled, the product cannot receive the authentication tokens by specifying the hostname with the HTTP due to Microsoft's limitations. Hence, identitymanager.manageengine.com will act as a relay server and share the tokens with the product through a secure method.
- https://demo.m365managerplus.com/oauth/redirect — If ADManager Plus is accessed using the hostname and HTTPS is not enabled, the product cannot receive the authentication tokens by specifying the hostname with the HTTP due to Microsoft's limitations. Hence, demo.m365managerplus.com will act as a relay server and share the tokens with the product through a secure method. This relay mechanism is no longer required for new tenant configurations.
- https://manageengine.com/microsoft-365-management-reporting/redirect.html — If ADManager Plus is accessed using the hostname and HTTPS is not enabled, the product cannot receive the authentication tokens by specifying the hostname with the HTTP due to Microsoft's limitations. Hence, manageengine.com will act as a relay server and share the tokens with the product through a secure method. This relay mechanism is no longer required for new tenant configurations.
- It must be fewer than 256 characters in length.
- It should not contain wildcard characters.
- It should not contain query strings.
- It must start with HTTPS or http://localhost.
- It must be a valid and unique URL.
- For HTTP, the URI value is: http://localhost:8080. If HTTP is used, the machine name or IP address cannot be used in the place of localhost.
- For HTTPS, the URI value is: https://192.345.679.345:8080 or https://<testmachine>:8080 (where <testmachine> is the hostname of the machine where ADManager Plus is installed).
- The Redirect URI format varies according to the connection type (HTTP/HTTPS) that has been configured in ADManager Plus.
- Click Save.
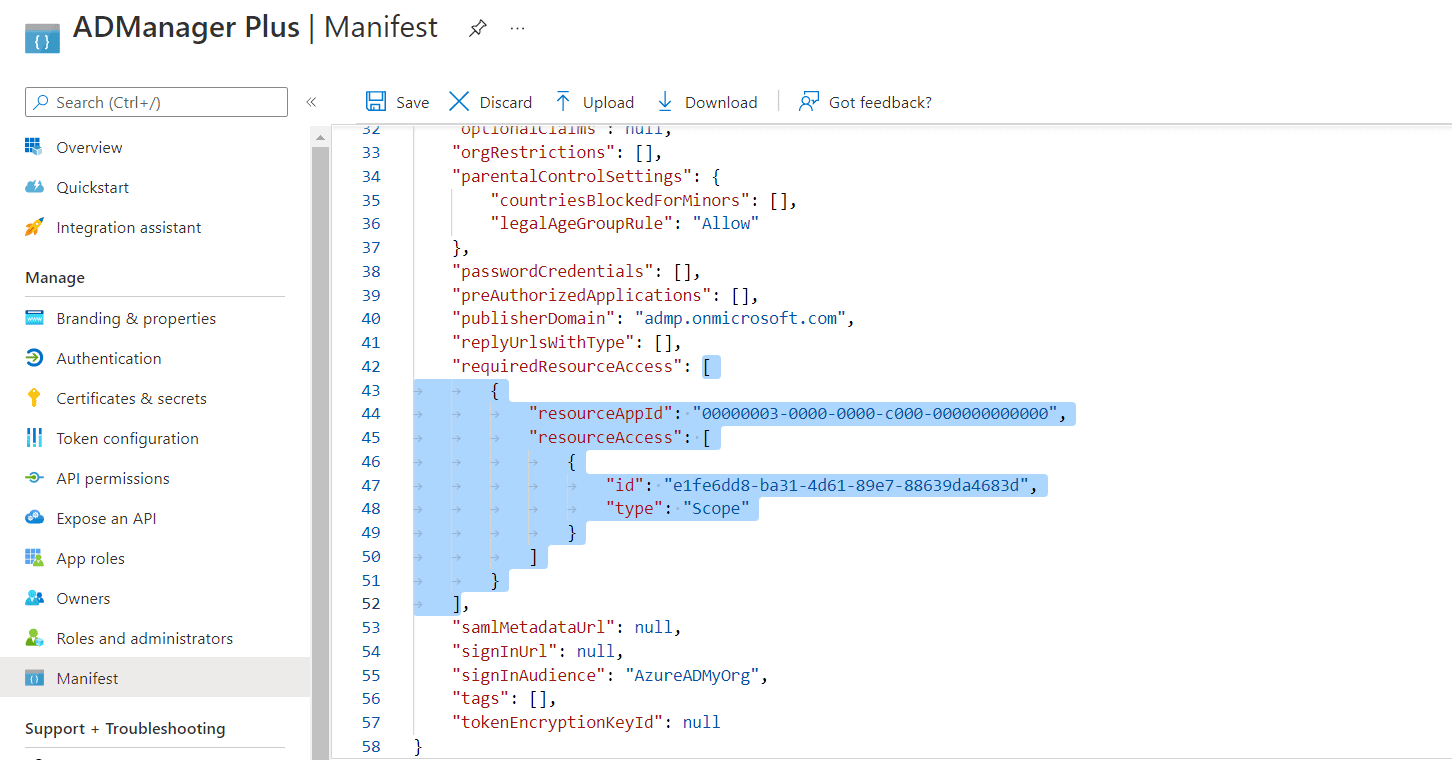
- Click Manifest in the left pane and search for requiredResourceAccess as an array in the code.
- Copy the contents of this file paste them within the code as highlighted in the image below, and click Save. Skip this step if you want to modify the recommended REST API permissions.
Note:
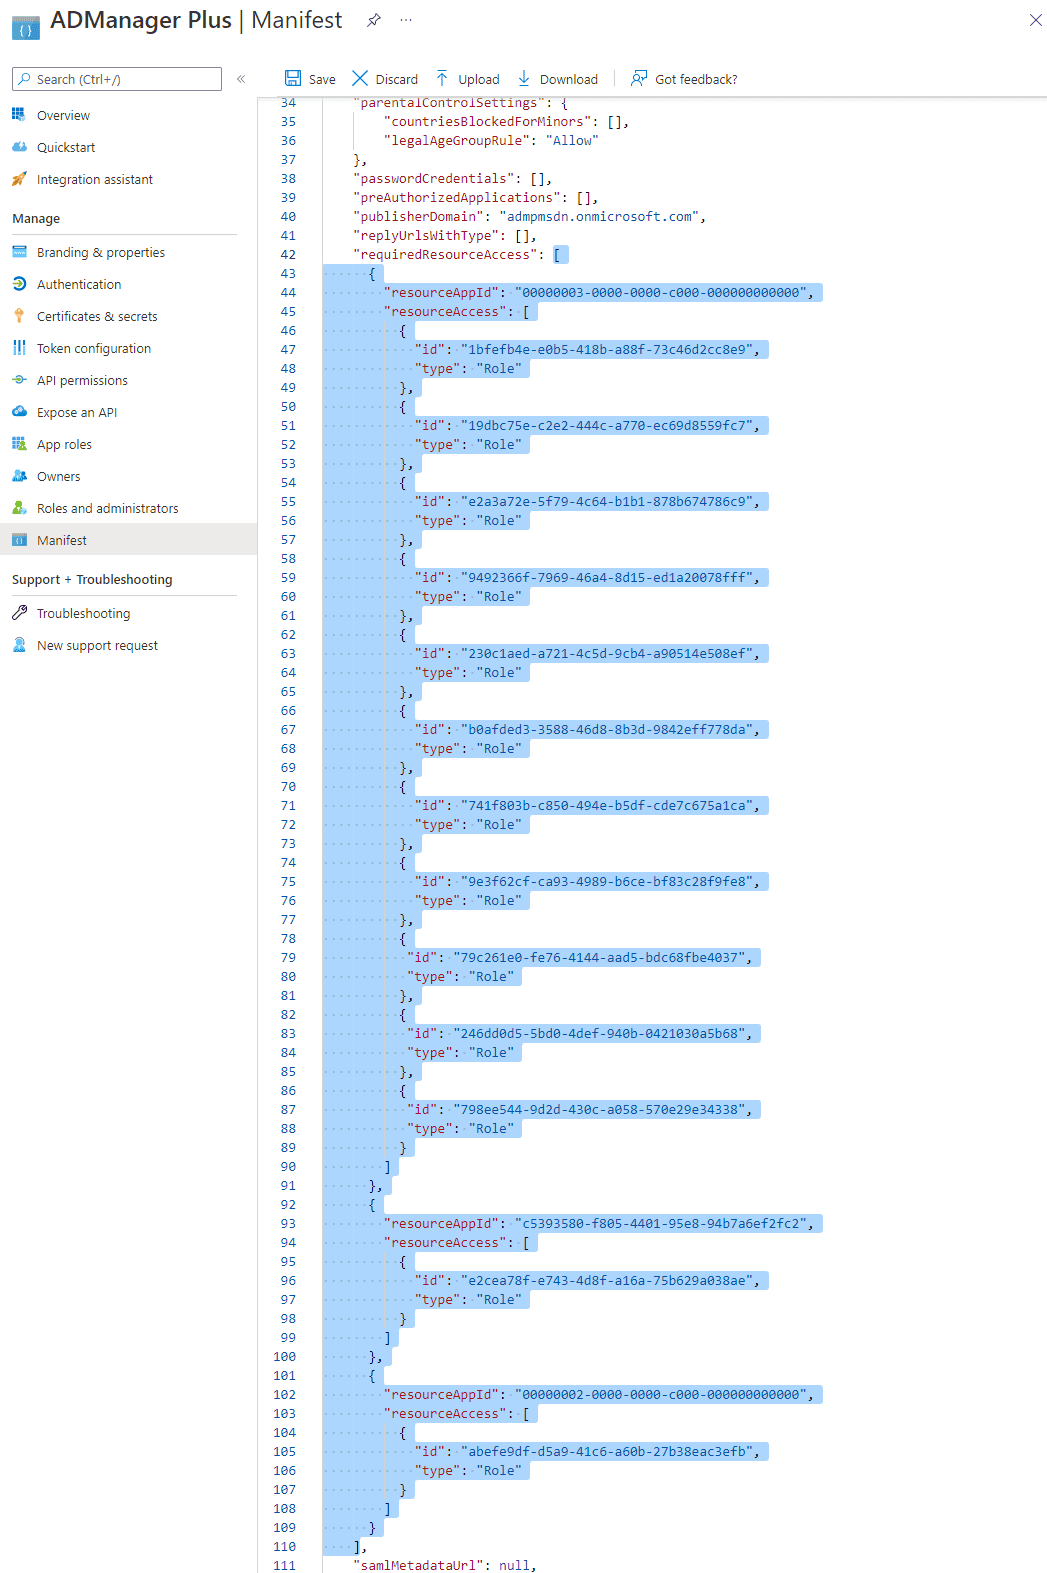
- If your tenant is being created in Azure China, copy the entire content of this file and paste it into the section highlighted in the image below.
Note: Copy-paste content only from the open square bracket to the closed square bracket. Ensure that all punctuation marks are retained correctly. Once you have pasted the contents from the file, it should look like the image below.
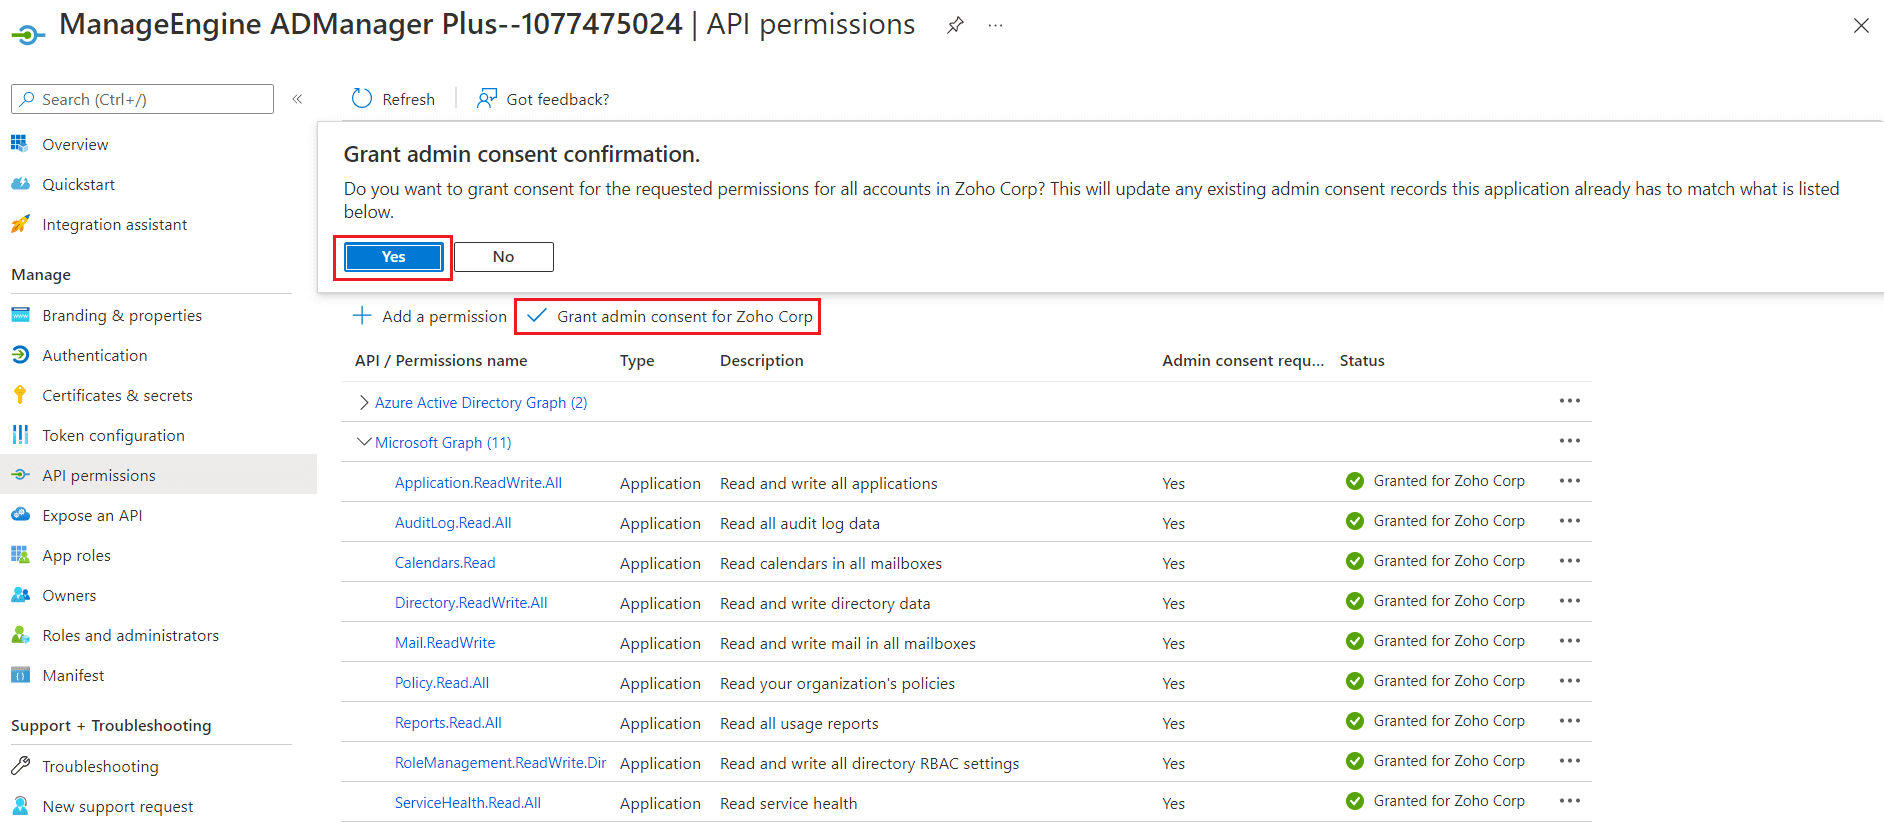
- Click API permissions from the left pane and click the Grant admin consent for <your_company_name> option listed under Configured permissions section. Grant the necessary permissions as required. The API permission and its scope are available in this table.
- Click Yes in the pop-up that appears.
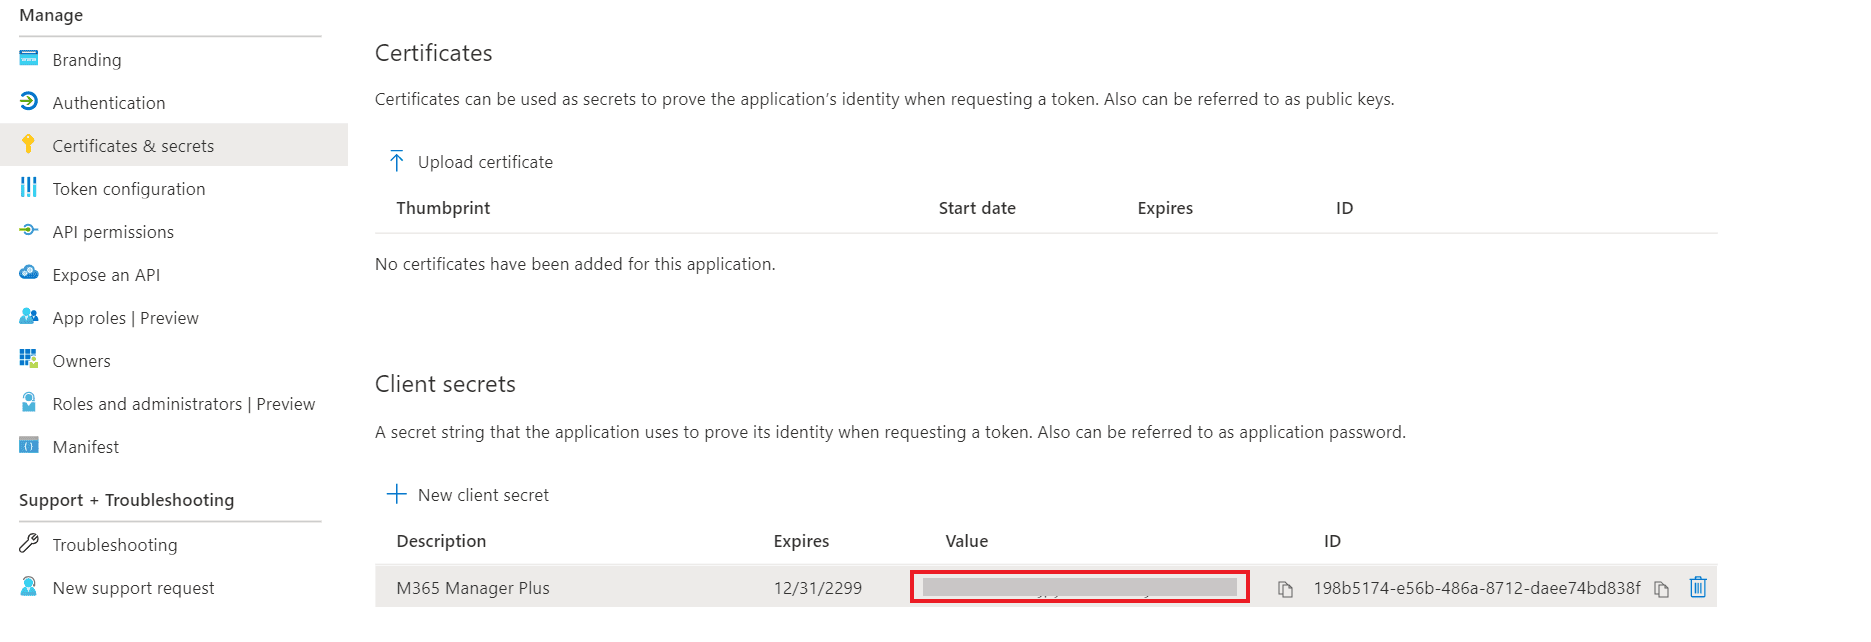
- Click Certificates & secrets under Manage from the left pane.
- Under the Client secrets section, click New client secret.
- This section generates an app password for ADManager Plus. In the Description field of the pop-up, provide a name to identify the app to which the password belongs
- Choose when the password should expire.
- Click Add.
- Copy the string under Value and save it. This is the Application Secret Key which you will require while configuring the Microsoft 365 tenant in ADManager Plus.
- Go to the Certificates section and click Upload certificate. Upload your application certificate as a .cer file. If you have an SSL certificate, the same can be used here. Otherwise, a self-signed certificate must be created in order to proceed.
Note: Certificate-based authentication is used to contact Microsoft 365 securely and fetch data. During manual configuration, you will be asked to enter your application Secret and upload the Application Certificate.
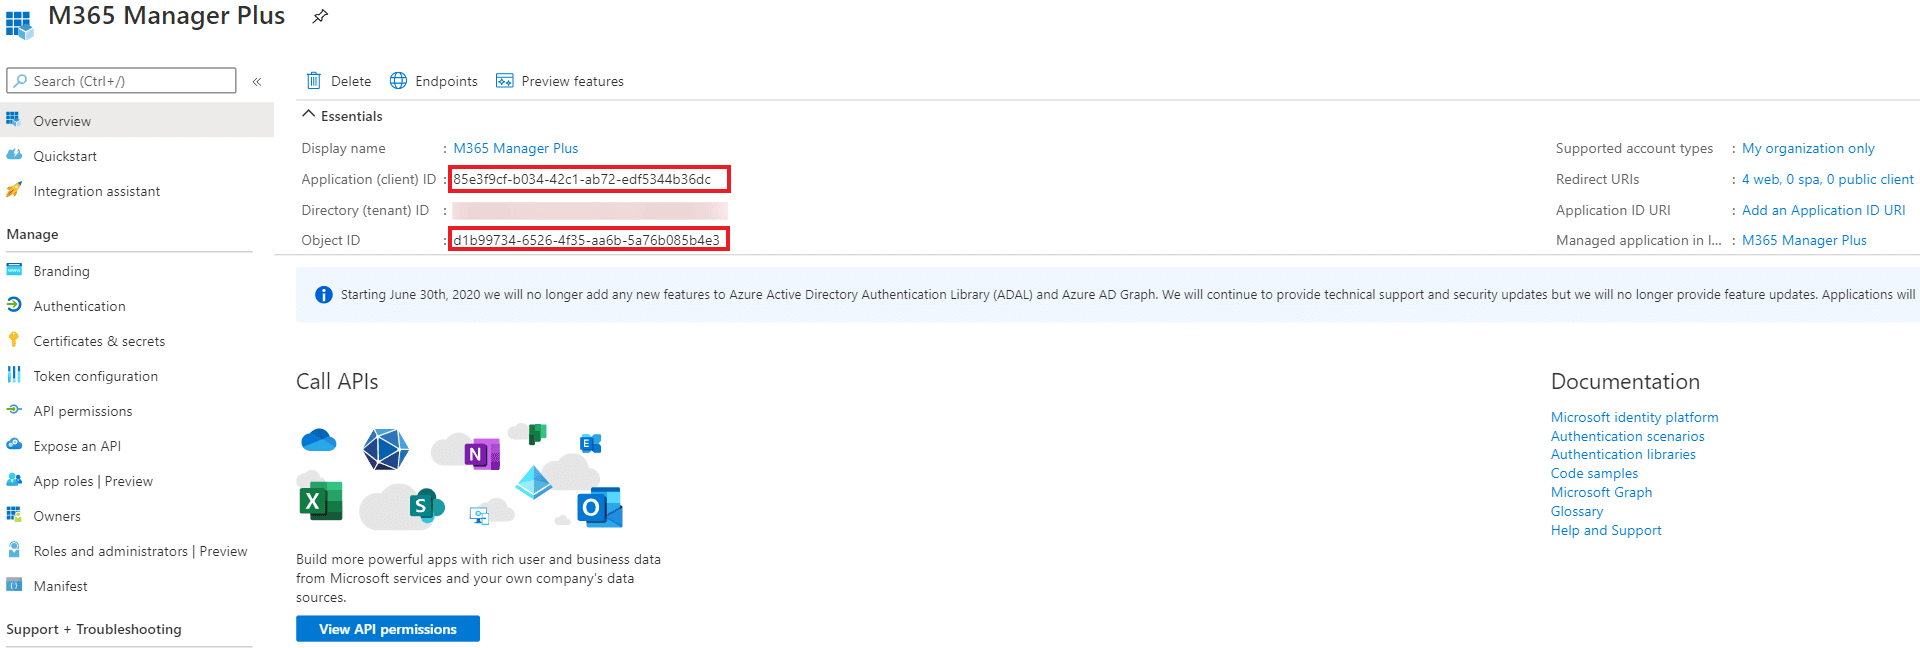
- Now go to the Overview section in the left pane.
- Copy the Application (client) ID and Object ID values and save them. You will need these values to configure your tenant in the ADManager Plus portal.
Note:
The Redirect URI should meet the requirements below:
Steps to create a self-signed certificate
- Run the following command in Windows PowerShell as an administrator:
Set-ExecutionPolicy -ExecutionPolicy RemoteSigned -Force -Scope process
- Navigate to the <Installation Directory>\bin folder and run the Create-selfsignedcertificate.ps1 script as an administrator.
- While running the script, you will be asked to add a common name for the certificate, a start and end date (yyyy-MM-dd) for the certificate's validity, and a private key to protect it.
- Once you enter the values, the script will create a .pfx file (containing both public and private keys) in the bin folder.
- The .pfx file needs to be uploaded in ADManager Plus, while the .cer file should be uploaded in the Application Overview page of your Microsoft Entra ID application.
Roles and permissions
The roles and permissions (minimum scope) required for a service account configured in ADManager Plus are listed below.
| Module | Role name | Scope |
|---|---|---|
| Management | Privileged Authentication Administrator | Modify the MFA settings of your Microsoft 365 users. |
| Reporting | Global Reader | Get the details on the MFA settings of your Microsoft 365 users. |
The roles required for an Microsoft Entra application configured in ADManager Plus are listed below.
| Role name | Scope |
|---|---|
| Privileged Authentication Administrator | Create, manage, and delete users and their authentication methods. |
| Help Desk Administrator | Change passwords, invalidate refresh tokens, and monitor service health |
| Exchange Administrator | Create, manage, and delete Exchange Online mailboxes. |
The permissions required for a Microsoft Entra application configured in ADManager Plus are listed below.
| Module | API name | Permission | Scope |
|---|---|---|---|
| Management | Microsoft Graph | User.ReadWrite.All | User creation, modification, deletion, and restoration. |
| Group.ReadWrite.All Calendars.ReadWrite | Group creation, modification, deletion, and restoration; adding or removing members and owners | ||
| AdminsitrativeUnit.ReadWrite.All | Add members to administrative units | ||
| RoleManagement.ReadWrite.Directory | Add directory roles to users | ||
| ChannelMember.ReadWrite.All | Add and remove members from all channel | ||
| UserAuthenticationMethod.ReadWrite.All | Read and write all users' authentication methods | ||
| ProfilePhoto.ReadWrite.All | Read and write a profile photo of a user or group | ||
| Policy.ReadWrite.AuthenticationMethod | Read and write all authentication method policies | ||
| Policy.Read.All | Read all conditional access policies | ||
| Policy.ReadWrite.ConditionalAccess | Read and modify all conditional access policies | ||
| Exchange Online | Exchange.ManageAsApp | Execute Exchange Online PowerShell cmdlets via the configured Entra application | |
| Reporting | Microsoft Graph | User.Read.All | Reports on users and group members |
| Group.Read.All | Group reports | ||
| Contacts.Read | Contact reports | ||
| Files.Read.All | Get OneDrive for business reports | ||
| Reports.Read.All | Usage reports | ||
| Organization.Read.All | License detail reports | ||
| ChannelMember.Read.All | Get Microsoft Teams channel member reports. | ||
| Application.Read.All | Get Entra application details. | ||
| Policy.Read.All | Configure conditional access policy details. | ||
| ReportSettings.Read.All | Enables the configured Entra application to retrieve tenant-level settings from the tenant where it is configured. | ||
| Exchange Online | Exchange.ManageAsApp | Execute Exchange Online PowerShell cmdlets via the configured Entra application |
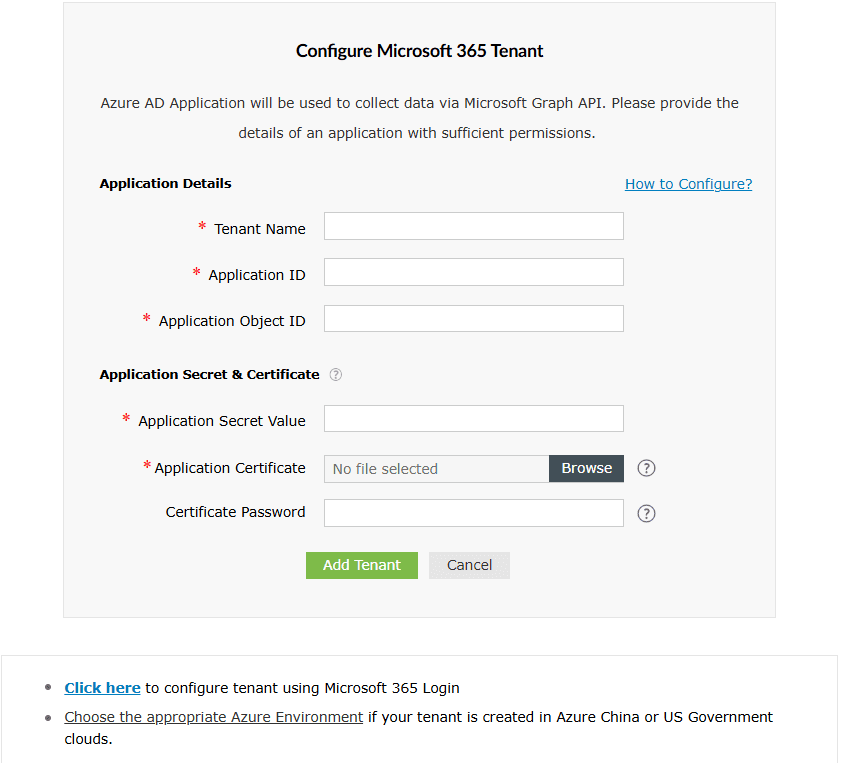
ADManager Plus portal
- Open the ADManager Plus portal from the pop-up below.
- Enter your Tenant Name. For example, test.onmicrosoft.com
- Paste the Application (Client) ID and Object ID, saved earlier in Step 26 under the steps to create an Entra ID application section, into their respective fields.
- Enter the Application Secret Value that was saved earlier in Step 22 under the steps to create an Entra ID application section. Upload the Application Certificate and provide the Certificate Password.
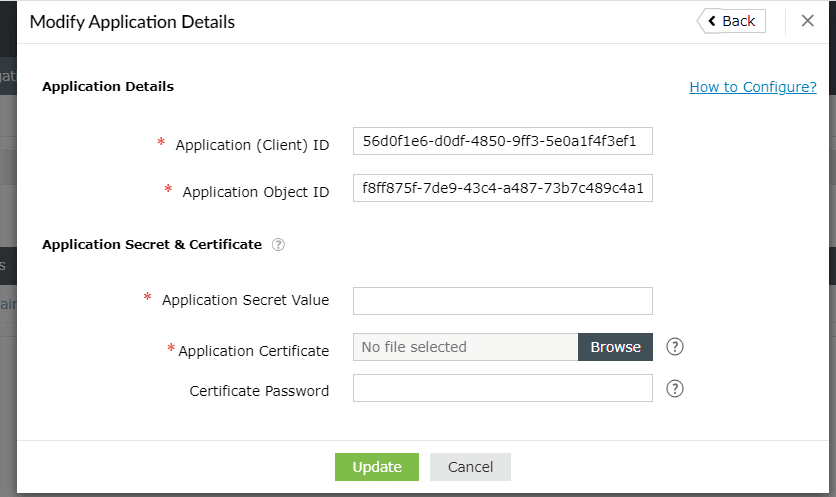
- Click Add Tenant. The tenant will be added in ADManager Plus. If you wish to modify the details in it, click the Edit option once the configuration is listed and proceed to make the changes.
- Click Update once the necessary modifications are done. The REST API access should now be enabled for the configured account.