- Related Products
- AD360
- Log360
- ADAudit Plus
- ADSelfService Plus
- EventLog Analyzer
- Exchange Reporter Plus

Help Document
Manage GPOs
The steps given here will help you perform various GPO management related tasks like creating, editing, and deleting GPOs along with managing the GPOs' scope and delegation.
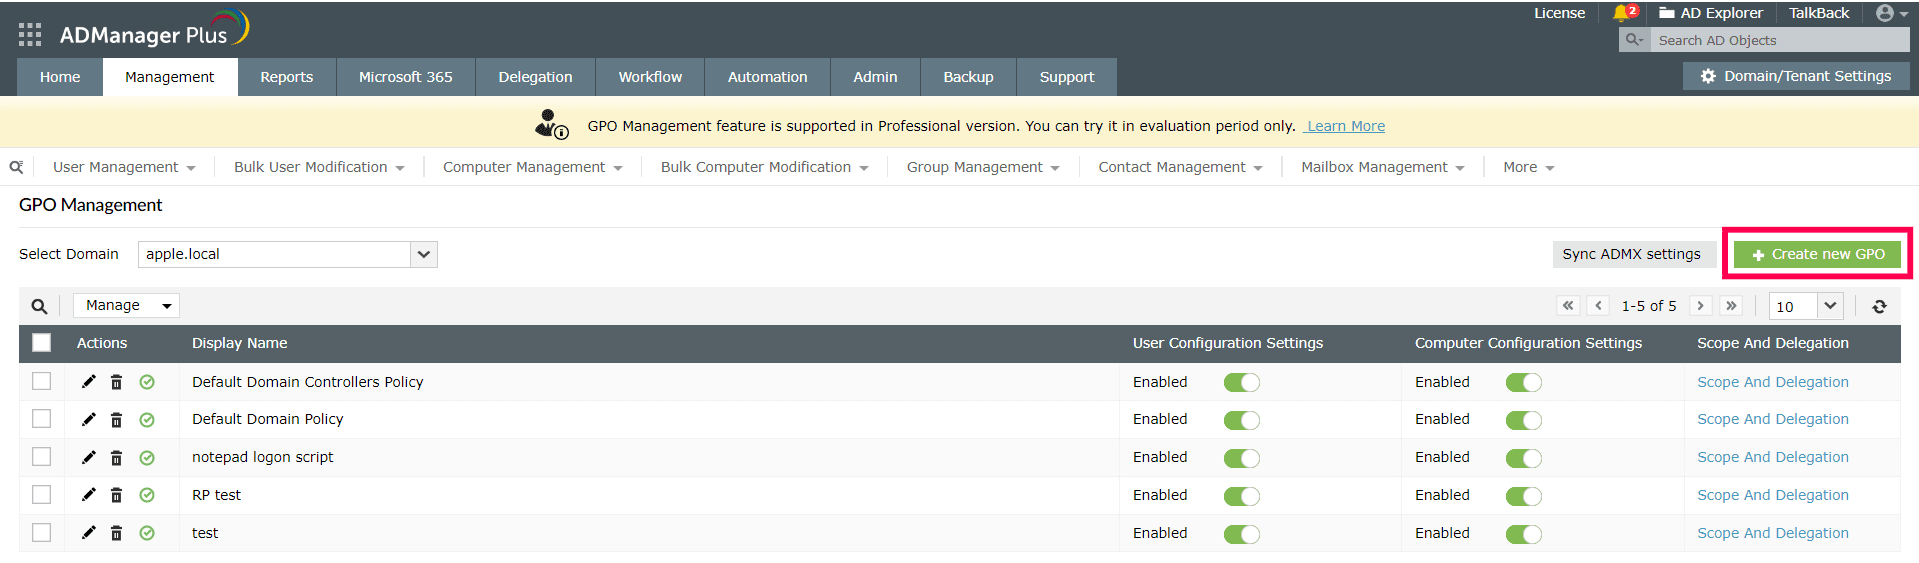
View GPOs
ADManager Plus offers different ways to view GPOs, and an administrator can choose how to view a GPO depending on the requirement. Using Manage GPOs options users can
View all available GPOs in a domain
Administrators can view a list of all the available GPOs in a domain using this option.
Steps to view all the GPO(s) available in a domain
- Log in to ADManager Plus
- Click the Management tab.
- In the left pane, navigate to GPO Management and click Manage GPOs.
- Choose the domain from the Select Domain drop-down.
- Toggle the button on or off under the User Configuration Settings and Computer Configuration settings to enable or disable the user and computer configuration for a GPO.
- To remove the existing ADManager Plus's administrative template settings and sync the latest settings, click Sync ADMX settings.

View all the domains, sites and OU linked to a GPO
Within the Manage GPO window itself, the Scope And Delegation option corresponding to a GPO allows you to view the domains, sites and OU linked to it.
Steps to view all the domains, sites and OU linked to a GPO
- Log in to ADManager Plus
- Go to Management > GPO Management > Manage GPOs
- Select the domain using the Select Domain drop-down.
- Click the Scope And Delegation corresponding to the GPO for which you wish to view the linked domains, sites and OUs.
- Under the Scope tab the list of domains, sites and OUs linked to it will be displayed
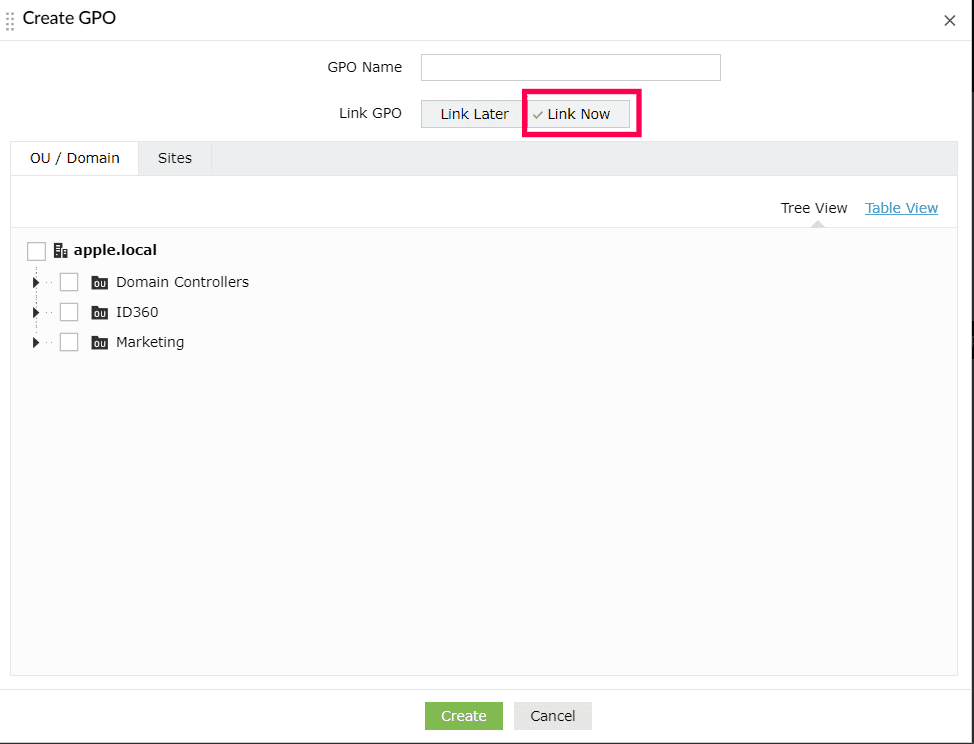
Create New GPO
To create a new GPO, follow the steps given below.
- Click the Create new GPO button
- Provide a name for the GPO and choose when to link it. If you select the Link Now option, you have to specify the OU and sites to which the GPO has to be linked. Once this is done, click Create. A new GPO will be created and listed.
Edit a GPO
The administrative template settings of both user and computer configurations that includes important security settings like account policies, local policies, event log, restricted groups, system services, registry, and file system of computer configuration can be edited using ADManager Plus. GPO preference items such as environmental variables, files, folders, and Ini files, and their target filters of both user and computer configurations, can also be managed.
Steps to edit GPO settings
- Log in to ADManager Plus
- Navigate to Management > GPO Management > Manage GPOs.
- You can edit the GPO's settings in two different ways as given below.
- Use the Edit GPO Settings option found in the Actions column beside each GPO in the Manage GPO window.
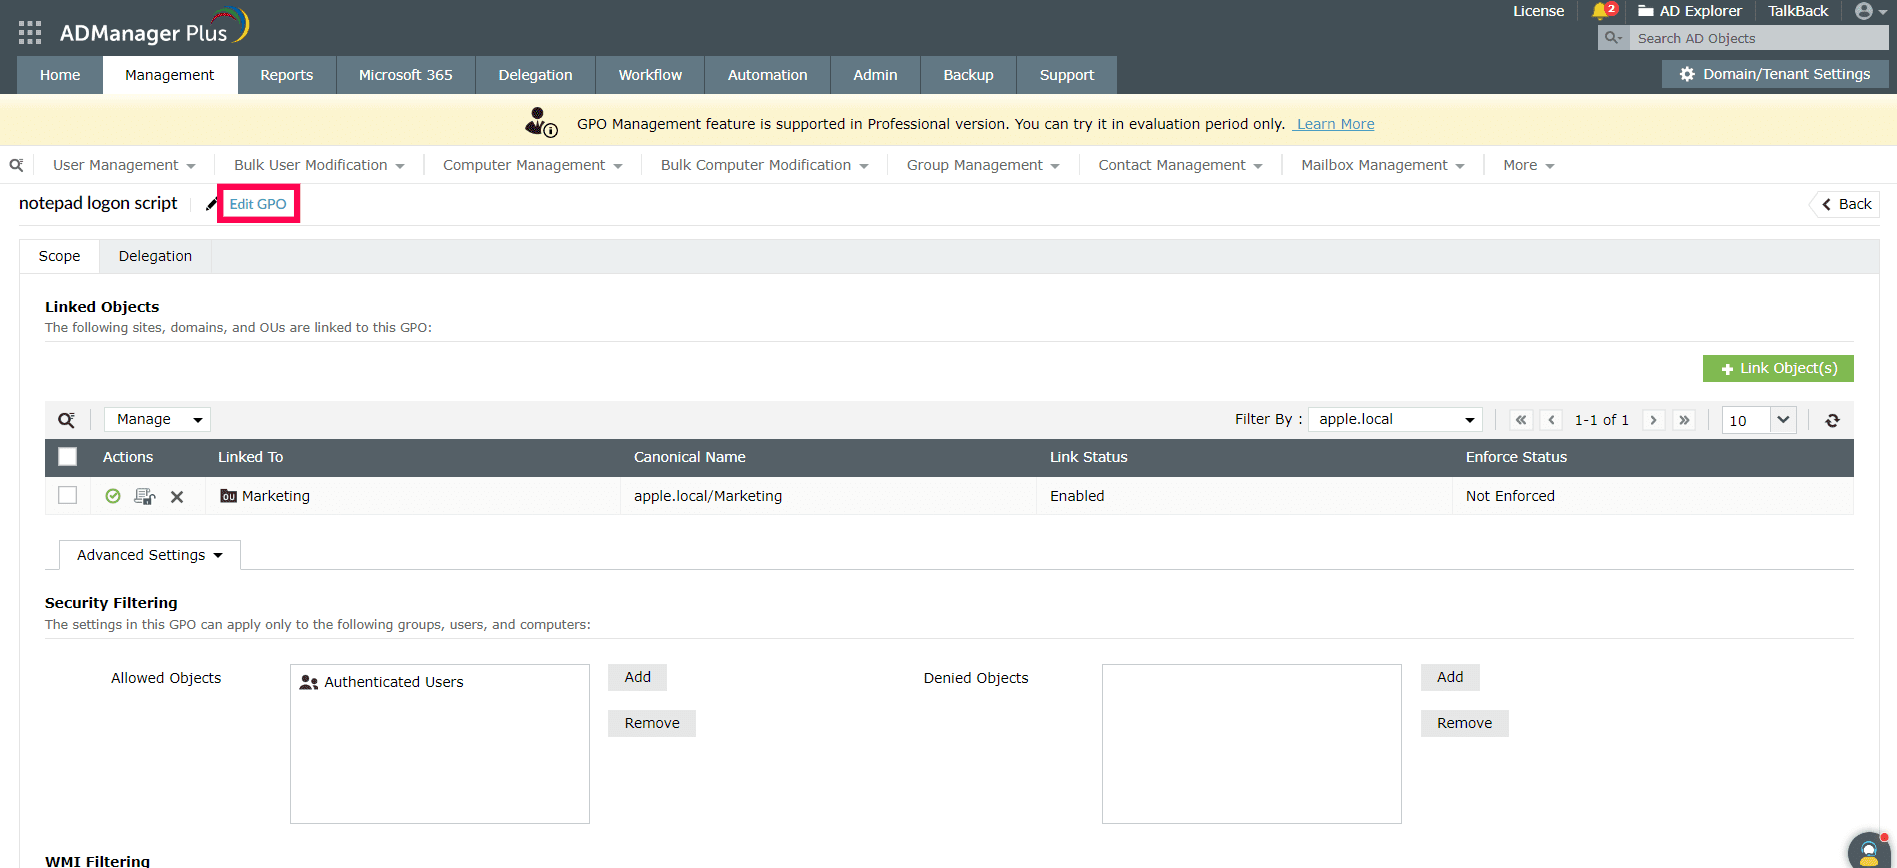
- Click the Edit GPO option located at the top left corner in the window that opens when you click the Scope and Delegation link corresponding to a GPO.
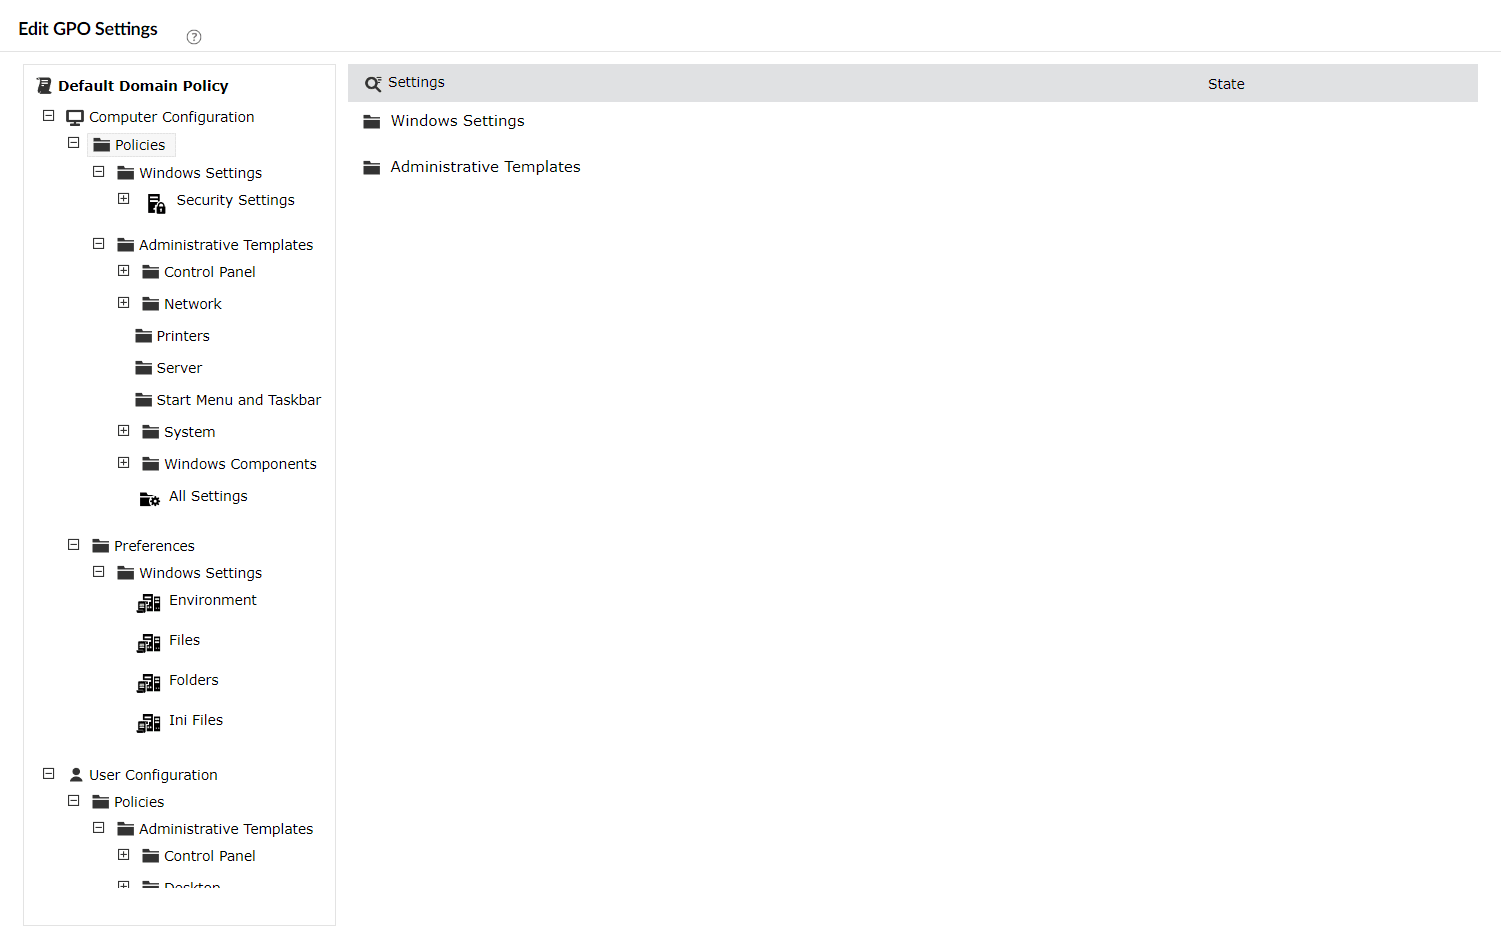
- Once the Edit GPO Settings window opens, in the left pane, click the User or Computer Configuration to modify.
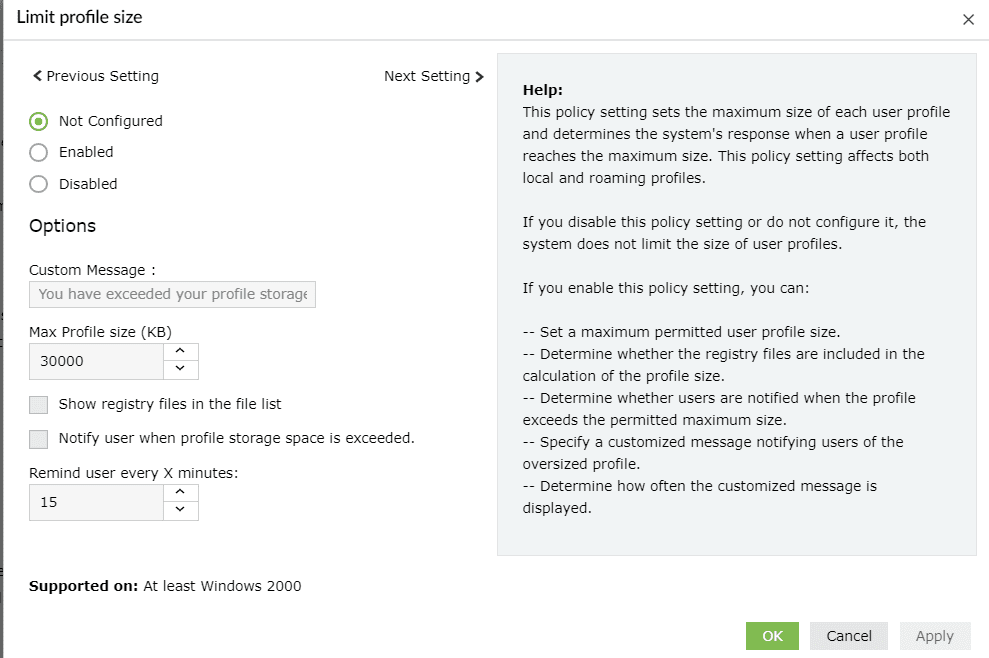
- Now, in the Administrative Templates policy settings (Configuration > Policies > Administrative Templates) or in the Security Settings page (Computer Configuration> Policies> Windows Settings> Security Settings), select the setting that you'd like to modify and perform the desired action
- After you've made the changes, click OK to save and close the pop-up, or click Apply and make further modifications, or click Next Settings to go to the next setting.
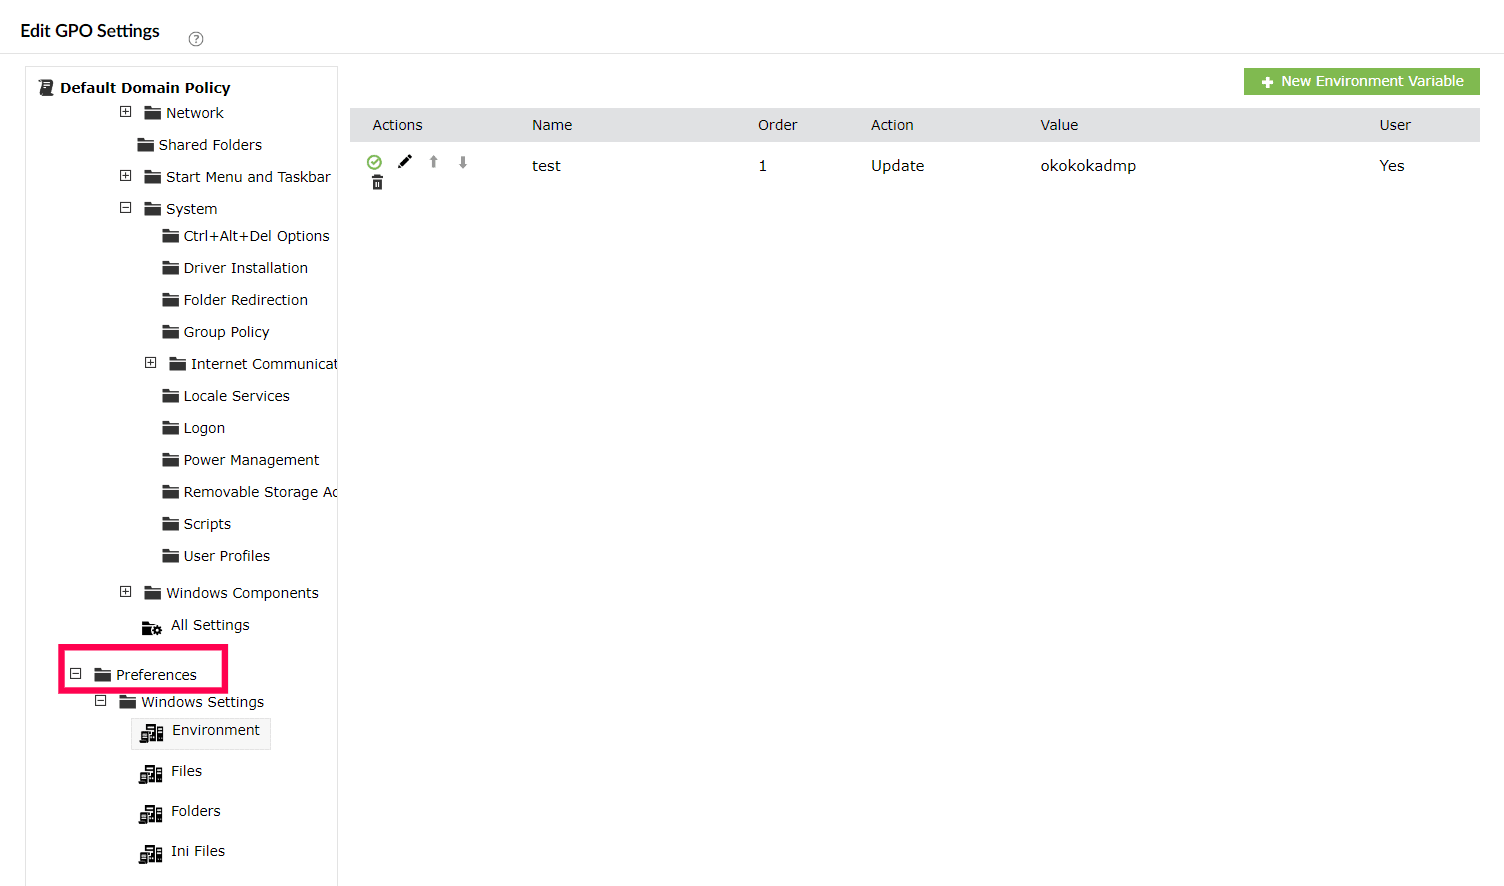
- To edit the Preferences,
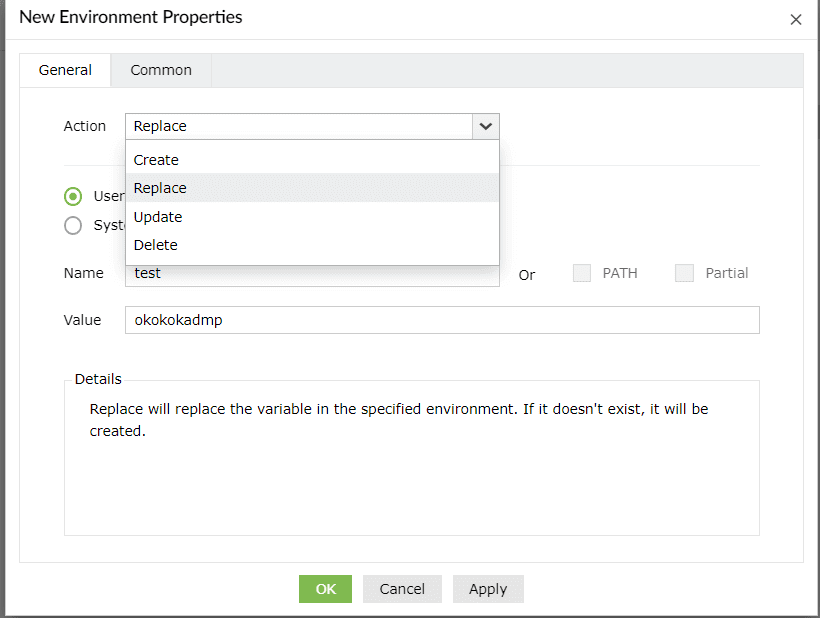
- Expand the desired configuration, click Preferences, and select the preference item that you would like to manage.The available preference items under Windows Settings are:
- Environment
- Files
- Folders
- Ini files
- You can create a new preference setting in the selected preference item, or you can choose to edit, reorder, delete, enable, or disable an existing preference setting by clicking the appropriate option in the Actions column.
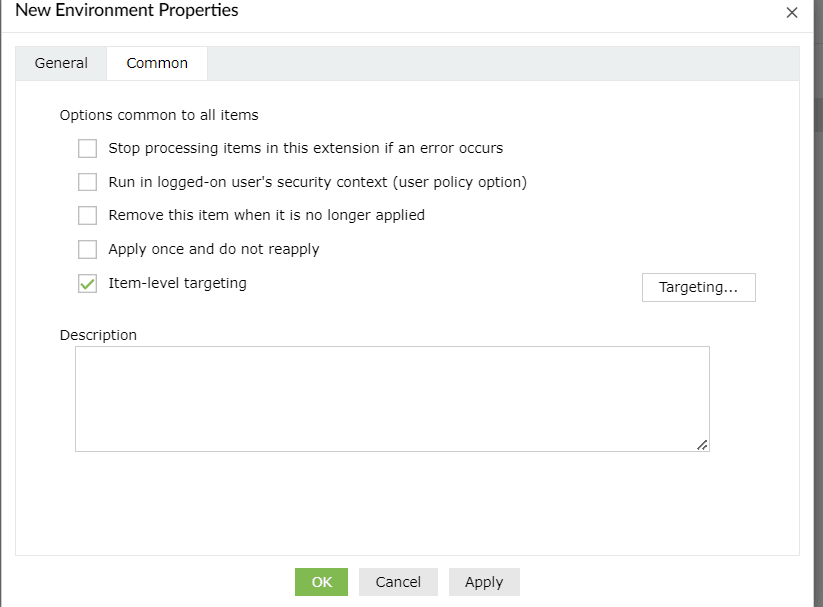
- Click the edit option next to an item to change its settings through the General tab or Common tab.
- To modify the item-level targeting filters of a preference setting, navigate to the Common tab and click the Targeting Editor button. You can add, remove, or edit the targeting filters.
- Click OK to save and close the popup or Apply to save and make further modifications.

Note: You can also locate the desired policy settings using the Search option.
Known limitation: While configuring the MSI Query targeting filter, Product Code has to be manually entered when Patch or Component is selected as the Target Type
Enable or Disable a GPO
With ADManager Plus GPO Management, administrators can enable or disable, multiple GPOs at one go in the required domains. They can also choose to enable or disable the GPOs completely or partially (either the user configuration or computer configuration settings), as needed.Administrators can also enable/ disable a single GPO or GPOs in bulk.
- Log in to ADManager Plus
- Navigate to Management > GPO Management > Manage GPOs
- Select the domain where the GPO(s) are located using the Select Domain drop-down.
- Check the GPO for which the action has to be performed. To modify all the GPOs in a domain you can check the box below the search button.
- GPO(s) can be enabled and disabled completely or partially as follows:
- To enable or disable GPO(s) completely: Select Enable from the Manage option located above the GPO list to fully enable the GPO(s), or enable both User Configuration Settings and Computer Configuration Settings using the toggle buttons located beside each GPO. You can disable the GPOs by directly selecting Disable from the Manage drop-down or by toggling the User Configuration and Computer Configuration Settings buttons off.
- To enable or disable only the user configuration: Select the Enable User Configuration Only option from the Manage drop-down located above the GPO list, or enable the User Configuration Settings and disable the Computer Configuration Settings using the toggle buttons located next to each GPO. In the same manner, you can disable user configurations by toggling only the User Configuration Settings button off.
- To enable only the computer configuration: Select Enable Computer Configuration from the Manage option located above the GPO list, or enable the Computer Configuration Settings and disable the User Configuration Settings using the toggle buttons located next to each GPO. Disabling the Computer Configuration Settings can be done similarly using the toggle buttons.
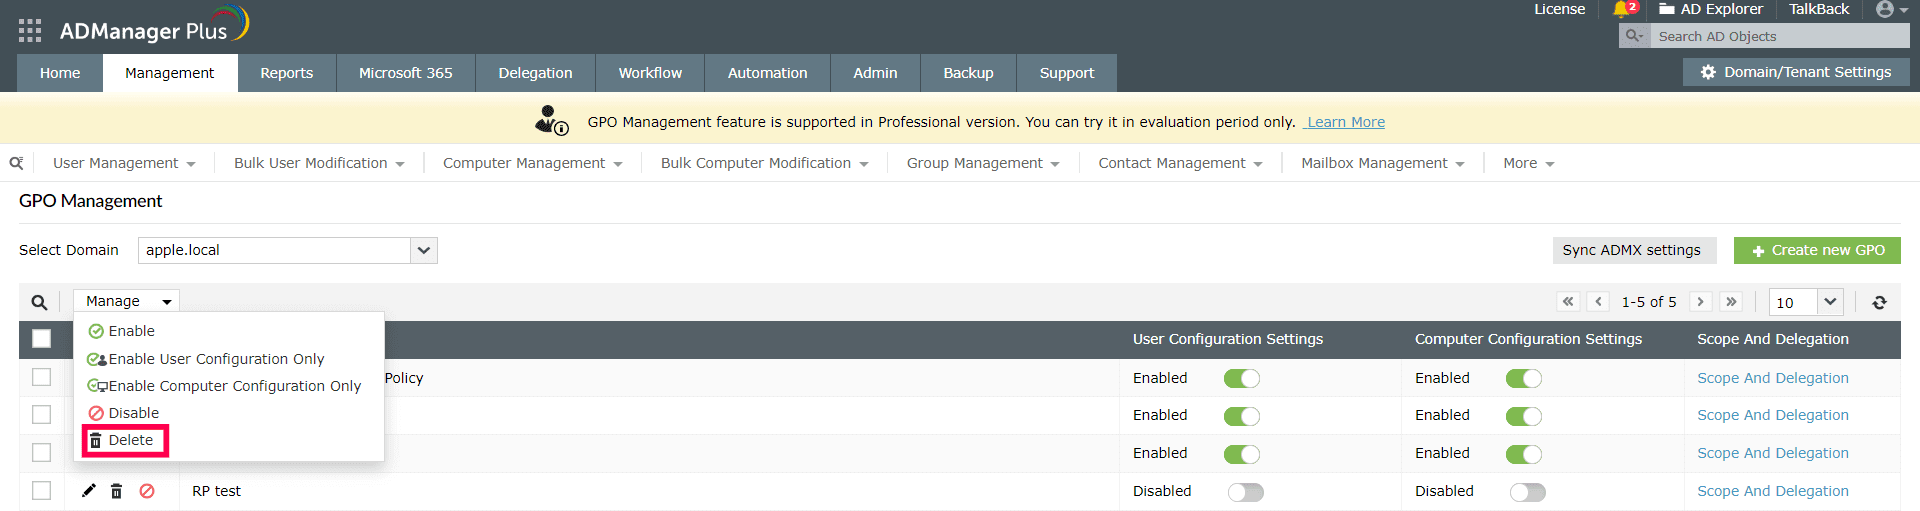
Delete GPOs
Administrators can delete those GPOs which are no longer required using the Delete option available in ADManager Plus.
Steps to delete a GPO
- Log in to ADManager Plus
- Go to Management > GPO Management > Manage GPOs.
- Select the domain where the GPO(s) that you want to delete are located.
- Check the GPO(s) that has to be deleted and click the Delete option from the Manage drop-down box
GPO scope
The scope of a GPO can be defined by linking it to a site or a domain or an OU. By default, a GPO will be applied throughout the linked object unless it is narrowed down. One of the common ways to narrow down GPO scope is using filters like Security or WMI filtering.
Steps to configure GPO Scopes
- Log in to ADManager Plus.
- Navigate to Management tab > GPO Management > Manage GPOs.
- Select the domain to which the GPO belongs.
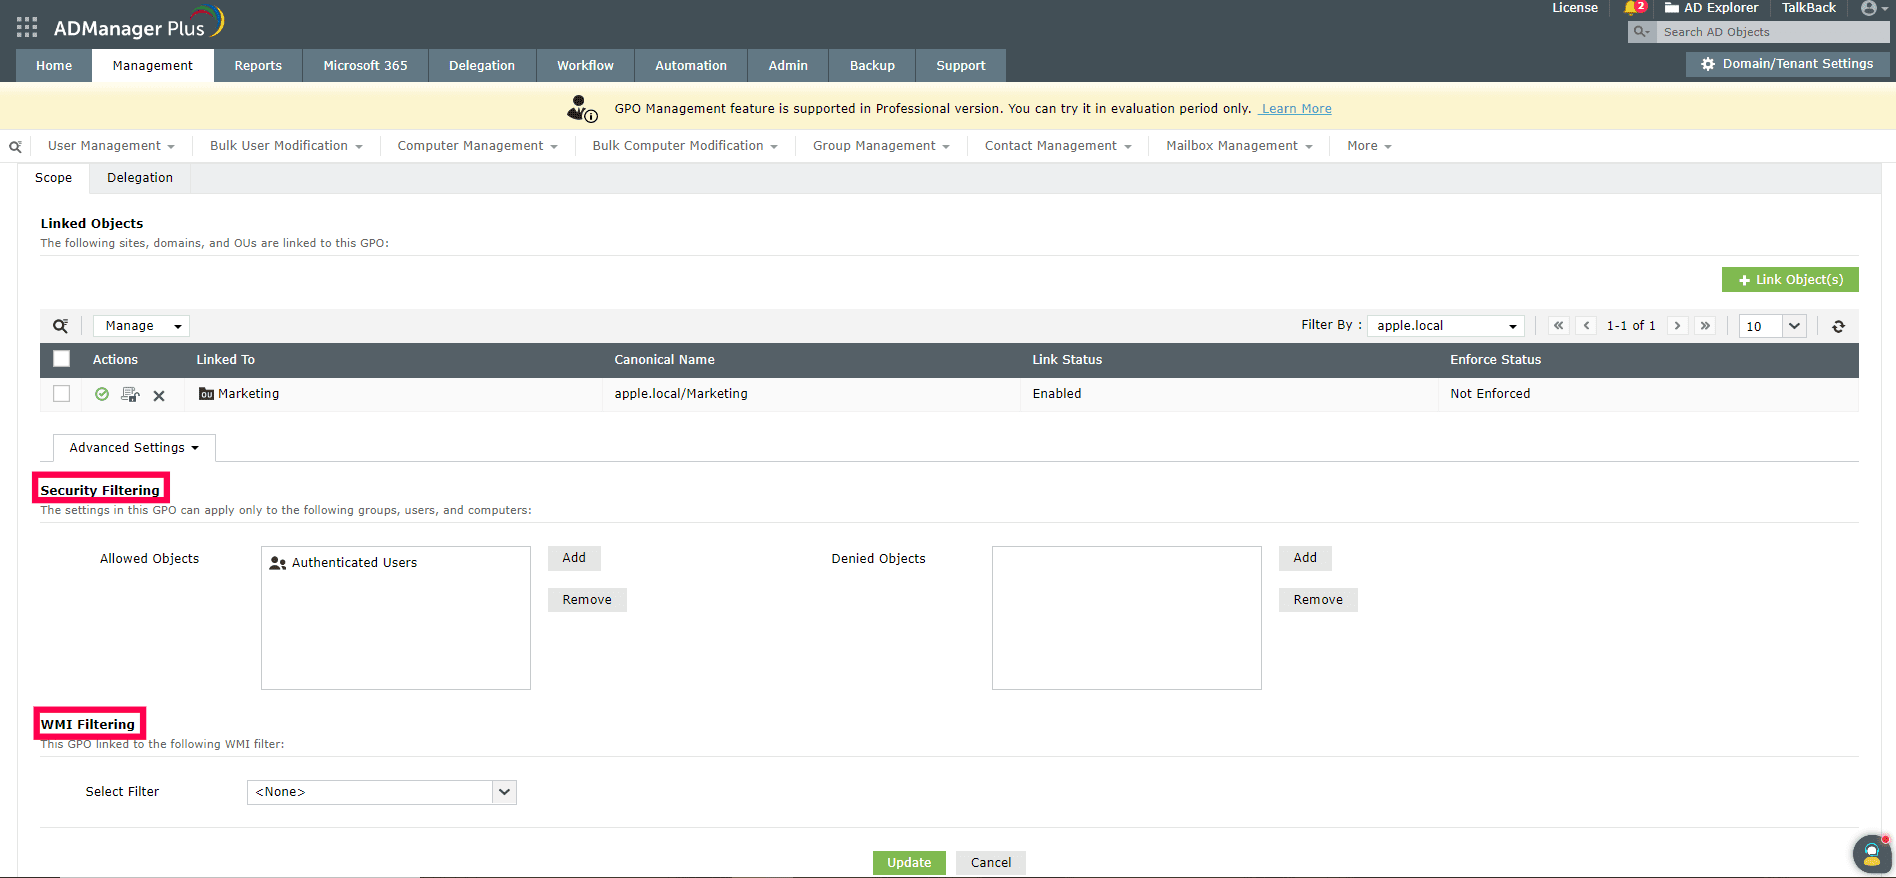
- Click the Scope And Delegation link corresponding to the desired GPO and navigate to Advanced Settings located at the bottom of the Linked Objects table
- Under the Security Filtering section
- Allowed Objects: Add or remove the objects (users, groups, or computers) to which the GPO is to be applied.
- Denied Objects: Add or remove the objects (users, groups, or computers) to which the GPO is to be denied.
- Example: If Group1 is listed in Allowed Objects and you need to deny applying the GPO to a specific security principal (such as User1) within Group1, User1 must be added to Denied Objects.
- A security principal can either be added to Allowed Objects or Denied Objects. It cannot exist in both simultaneously.
- If you remove the Authenticated Users group from Allowed Objects, only the Apply Group policy permission will be removed.
Note: - Under the WMI Filtering section, you can choose the desired WMI filter from the drop-down menu.
- You can link a new object to the GPO from the any domain, OU or site by clicking the Link Object(s) button above the Linked Objects table
- You can enable GPO links, disable GPO links, or remove enforcement of GPO links using the Manage drop-down
- Finally, click Update to save the changes.
Note:
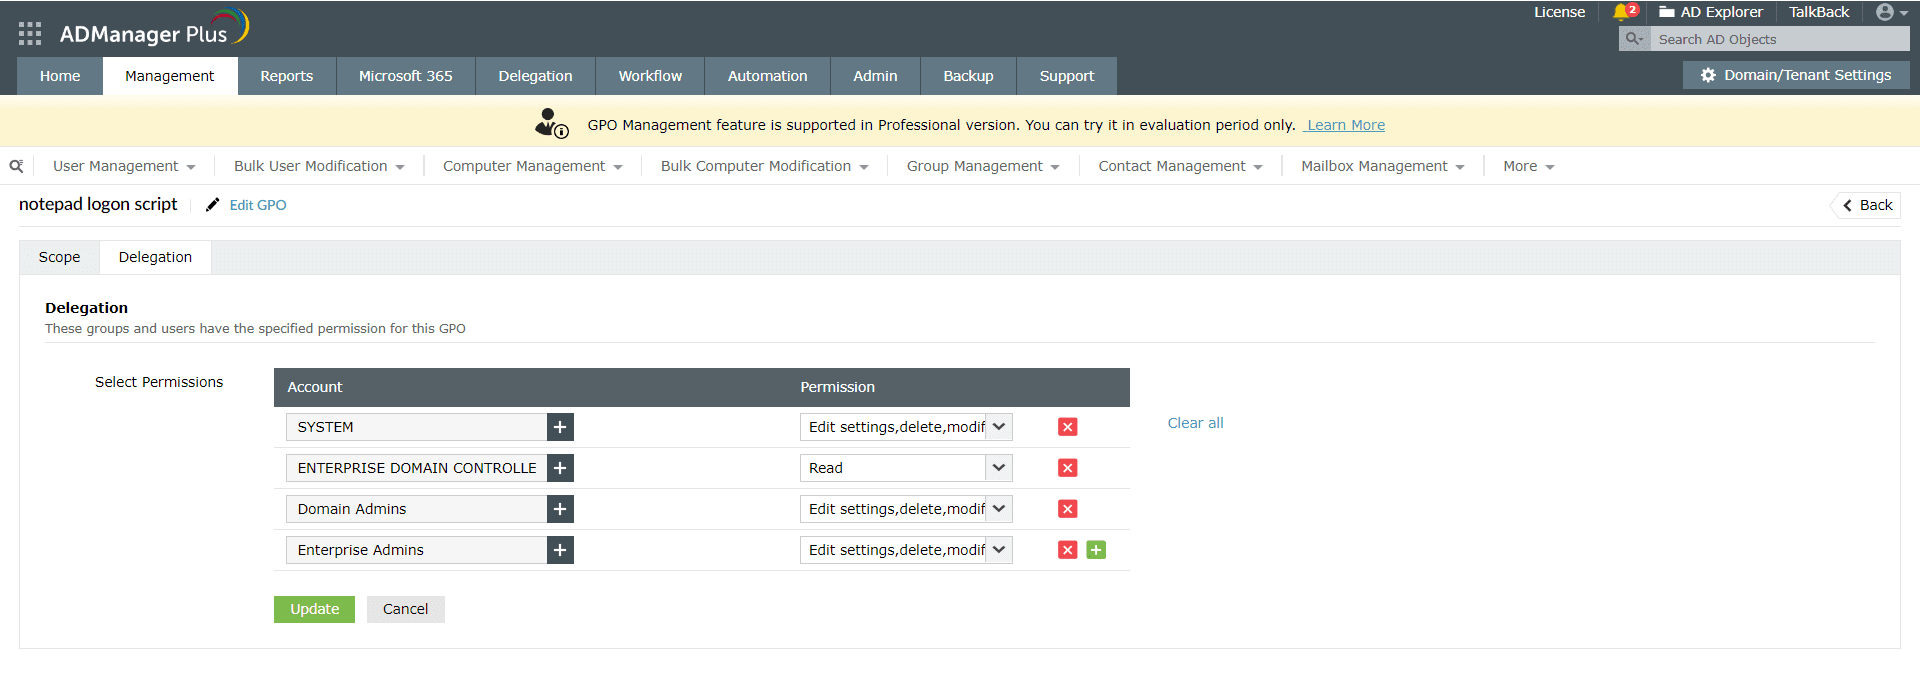
GPO Delegation
You can view or configure GPO permissions for desired security principals by following the steps below.
Steps to configure GPO delegation permissions
- Log in to ADManager Plus.
- Navigate to Management tab > GPO Management > Manage GPOs.
- Select the domain to which the GPO belongs from the Select Domain drop-down box.
- From the list of GPOs in the selected domain, click the Scope And Delegation link next to the GPO to be modified.
- Click the Delegation tab.
- From the Select Permissions section, select the desired accounts and choose the appropriate permissions from the drop-down menu,
- Edit Settings - Allows you to edit the GPO settings
- Modify Security - Allows you to modify the security permissions for GPOs
- Read - Allows you to view the GPO
- Delete - Allows you to delete the GPO
- Click Update to save the changes.