- Related Products
- AD360
- Log360
- ADAudit Plus
- ADSelfService Plus
- EventLog Analyzer
- Exchange Reporter Plus

Help Document
Creating shared mailboxes in bulk in Exchange Server and Microsoft 365
Administrators often find it tedious to create shared mailboxes in bulk for users. The native Active Directory (AD) tools do not have an option for creating multiple shared mailboxes in Exchange server and Microsoft 365 environments for all users at once. Therefore, admins have to use complex PowerShell scripts or VBScripts, or run batch files from the Windows command line to get this done. With ADManager Plus, bulk shared mailbox creation becomes simpler, faster, and a completely script-free activity.
Steps to create shared mailboxes in bulk
- Click the Management tab > Mailbox Management.
- Click the Create Bulk Shared Mailbox link under Shared Mailbox Creation.
- Select the domain of your choice from the Selected Domain drop-down box.
- By default the system template will be applied to create the shared mailbox. But if you wish to change the template, select a previously created Shared Mailbox Creation Template from the Selected Template drop-down menu.
- You can use any one of the following options to create shared mailboxes:
- Click the Add Mailbox button and fill in the required details that appear when you select the Active Directory or Microsoft 365 checkbox. Follow the below steps to specify the mailbox attributes to add the shared mailbox manually in AD, Microsoft 365, or both.
- Click the General tab and enter the appropriate values for all the fields. Display Name, E-mail, and Container are mandatory attributes for creating a shared mailbox. All mandatory attributes will be highlighted in red.
- Click the Contact tab and enter relevant values for all the telephone, organization and address fields.
- Select the Exchange tab and enter relevant values for all the fields. You must specify values for the Mailbox server, mailbox store and mail alias attributes which are mandatory for creating a shared mailbox.
- In the Remote Mailbox tab, check the Enable remote mailbox option and fill in all the required fields to create a remote shared mailbox.
- In the Delegation tab, select the desired users for the send on behalf, send as, and full access rights options for this shared mailbox.
- In the Custom attributes tab, select the custom attributes (configured in the schema) that you wish to add in ADManager Plus. To add a custom attribute permanently in the tool, click the Configure custom attribute link, then use the Add additional attribute link to add a custom attribute for only a specific operation.
- In the Microsoft 365 tab, select the appropriate option from the ones listed to specify whether a shared mailbox has to be created in Microsoft 365 as well, and also whether the DirSync option has to be enabled or disabled during mailbox creation.
- In this tab you can assign specific permissions to the Microsoft 365 users such as to select the desired users and grant 'send on behalf', 'send as', and 'full access' rights in this shared mailbox.
- You can continue to add more mailboxes by clicking the Add Mailbox button
- Click the Import button to import the mailbox details from a CSV file.
Note: You cannot enable a remote shared mailbox and Exchange mailbox simultaneously.
Note: When you use a combination of Shared Mailbox Creation Template and CSV file, the attribute values specified in the CSV file takes precedence.
- After adding all the mailboxes, click Next and select the container where the shared mailboxes have to be created. You can also create a new container by selecting the Create New OU option.
- Click Create Mailbox to create the shared mailboxes in bulk in the selected container.
- If you cancel the creation of a shared mailbox, you can still view that by clicking the View Uncreated Mailbox.
Importing data from CSV files
ADManager Plus provides you the flexibility to import mailbox details from a CSV file. The first line in the CSV file should contain the attribute names as defined in AD. The givenName attribute is a mandatory field in the CSV file. An example entry is given below:
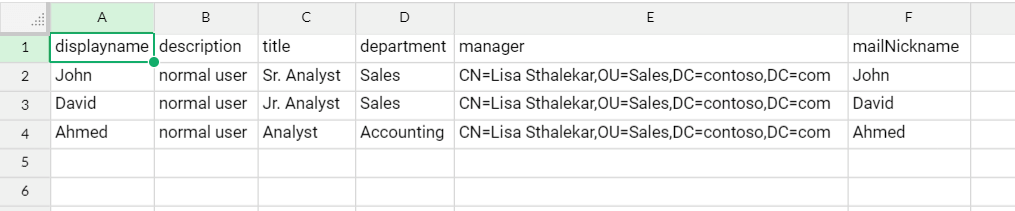
You can view a sample CSV file here. (Sample CSV file - Need to be added as downloadable link in the webpage)
Hints:
- While adding multiple shared mailboxes with the same permissions, you can create a Shared Mailbox Creation Template with the required permissions and a CSV file containing the names of the mailboxes and other details. You can then import the CSV file and apply the template to create shared mailboxes in bulk.
- If you have to create multiple shared mailboxes with different permissions, you can include the attributes that have different values for different users in the CSV file along with their names and can still have a base template for common attributes.