- Overview
- Configuration
Jumpcloud
Reduce administrators' workload and data entry errors by automating employee life cycle management.
The ADManager Plus - JumpCloud integration enables seamless synchronization of user data, allowing IT teams to automate provisioning, deprovisioning, and management of users across systems. This integration optimizes employee lifecycle management, improves security by reducing the risk of outdated access, and minimizes the dependency on HR and IT for manual updates.
Automated user provisioning and deprovisioning
The integration allows IT teams to automate the provisioning and deprovisioning of user accounts across Active Directory, JumpCloud, and other connected systems. This eliminates manual tasks and reduces the risk of errors in user management processes.
Active directory synchronization
The integration ensures seamless synchronization of user data between JumpCloud and Active Directory, ensuring that changes made in JumpCloud are reflected across other IT systems, including Exchange, Microsoft 365, and other business-critical applications.
Centralized user access control
IT administrators can manage and enforce user access policies centrally, ensuring that users have appropriate access to resources across AD, JumpCloud, and other systems based on their roles and responsibilities. This reduces security risks and strengthens compliance.
Steps to configure JumpCloud settings in ADManager Plus
- Go to the Automation tab.
- Click HCM Integrations under Automation in the left pane.
- Under the HCM applications section, click the Custom HCM tile.
- In the Custom HCM Integration window that pops up, enter a suitable Name, Description and upload a Logo of JumpCloud and hit Save.
- Click the JumpCloud Integration tile added in the previous step to configure the API authorization methods, endpoints, and LDAP data mapping.
- Click Authorization and select the Authorization Type as API Key.
After selecting the API key as the authorization type:
- Enter the key name and value obtained from the above steps in the Key and Value fields, respectively.
- Associate the key to a header or query parameter using the Add To drop-down menu and click Configure.
- In the JumpCloud Endpoint Configuration section, click Add API Endpoint and add the following:
- In the Endpoint URL field, enter
https://console.JumpCloud.com/api/systemusers
- Click Advanced Options to add headers and parameters.
- Choose Get in the Method section.
- In the Endpoint URL field, enter
- Headers: Click and configure the respective headers.
- Parameters: Click and configure the query parameters.
- Message type: Select the data type as JSON.
- Select the Repeat calling this Endpoint option to repeatedly call the API until you get the required response. From the drop-down menu, select the parameter and specify the increment value. You can also set a condition. When it's satisfied, the endpoint will be called repeatedly.
- Once done, click Test & Save. A response window will display all the requested elements.
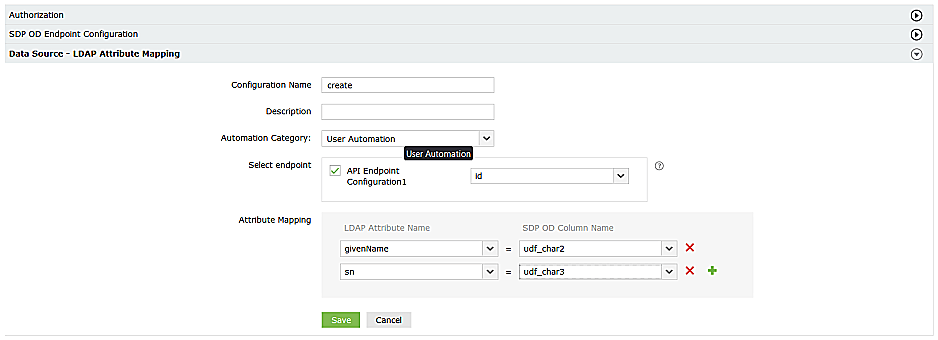
- Click Data Source - LDAP Attribute Mapping to map endpoints and AD LDAP attributes with the respective attributes in the HCM solution.
- Enter the Configuration Name, Description and select a category from the Automation Category drop-down.
- In the Select Endpoint field, select those columns that are unique to users (employeeIdenifier, username, etc.) but hold the same value in all the endpoints.
- In the Attribute Mapping field, select the attribute from the LDAP Attribute Name drop- down menu and map it with the respective column in the HCM solution.
For example:
- Select the endpoint created and select the attribute id from the drop-down.
- Map the AD LDAP attributes with the corresponding JumpCloud additional field which will be created in AD.
- Click Save.
Refer to this link to find the details about the headers, parameters, and message type.
Configure the below parameters accordingly:
Note: You can configure multiple endpoints for a HCM solution.

Steps to automate user provisioning in ADManager Plus
ADManager Plus' Automation feature simplifies the process of configuring and scheduling user provisioning, deprovisioning, and reprovisioning from JumpCloud, allowing you to automatically perform the task without the need for manual labor.
Follow the below steps to automate user provisioning effortlessly:
- Click the Automation tab.
- From the left pane, click Automation.
- Click Create New Automation in the top-right corner.
- Enter a suitable automation name and description.
- Select User Automation from the Automation Category drop-down list.
- Choose a domain and OU.
- In the Automation Task/Policy section, choose the desired task (Create Users, Modify User Attributes) or an automation policy from the drop-down list.
- In the Select objects section, select Data from JumpCloud.
- Set your execution date and time.
- Click Save.