- Overview
- Configuration
ServiceDesk Plus Ondemand
Accelerate IT Services with ADManager Plus Integrated into ServiceDesk Plus On-Demand
ServiceDesk Plus On-Demand is a help desk and asset management software that integrates trouble ticketing, asset tracking, purchasing, contract management and knowledge base. Integrating ServiceDesk Plus On-Demand with ADManager Plus enhances IT service management by simplifying AD user and group management tasks and improving overall efficiency in handling IT service requests and incidents.
Efficient user provisioning
Seamlessly create or modify user accounts in Active Directory directly from ServiceDesk Plus On-Demand. This ensures that new employees have the necessary AD access as part of the onboarding process.
Enhanced services
Reduce the manual effort required to enable user access and other AD-related tasks. This minimizes the risk of errors and speeds service delivery.
How to integrate ADManager Plus and ServiceDesk Plus On-Demand
- In ADManager Plus, navigate to the Automation tab and click HCM Integrations.
- Under HCM applications, click the Custom HCM tile to integrate a new custom HCM solution.
- In the Custom HCM Integration window that pops up, enter a suitable Name and Description, upload a Logo of ServiceDesk Plus On-Demand, then click Save.
- Click the ServiceDesk Plus On-Demand tile added in the previous step to configure the API authorization methods, endpoints, and LDAP data mapping.
- In the Authorization section, select OAuth 2.0 as the Authorization Type.
- Header Prefix: Zoho-Oauthtoken
- OAuth 2.0 Grant Type: Authorization code is the default grant type.
- Callback URL: The Callback URL is where you will be redirected to after authentication. This should be registered with the API provider.
- Auth URL: https://accounts.zoho.in/oauth/v2/auth?access_type=offline
- Access Token URL: https://accounts.zoho.in/oauth/v2/token
Note:
The Accounts URL used for generating the Access Token and Authorization URL varies based on your data center (region). Please ensure you use the correct domain corresponding to your region.
Examples:
- Client ID and Client Secret: Enter a valid ID and its secret key. Refer below to learn how to generate the ClientID and Client Secret.
- Scope: SDPOnDemand.requests.ALL.
- Click Advanced Options and choose the headers/query parameters from the Add To drop-down menu.
- In the API Endpoint Configuration section, add the following:
- Endpoint URL:
- https://<SDP_SERVER>/api/v3/requests?input_data=<URL encoded input params>
- Replace <SDP_SERVER> with your ServiceDesk Plus On-Demand instance.
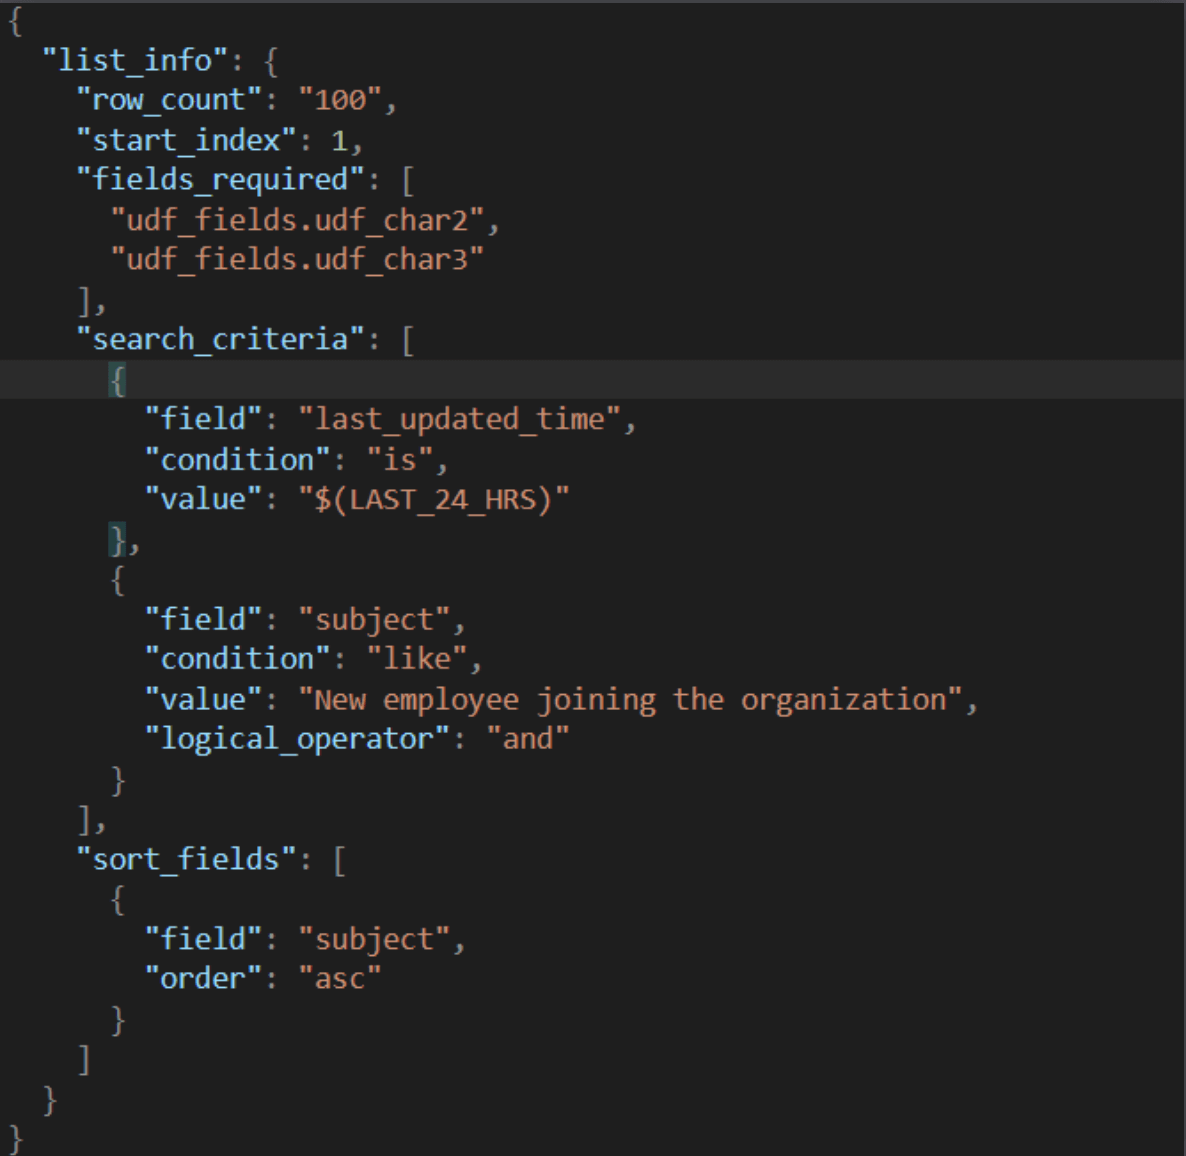
- To create the URL encoded input params, construct the JSON input with the below format.
- {"list_info":{"row_count":"100","start_index":1,"fields_required":["udf_fields.udf_char2","udf_fields.udf_char3"],"search_criteria":[{"field":"last_updated_time","condition":"is","value":"$(LAST_24_HRS)"},{"field":"subject","condition":"like","value":"New employee joining the organization","logical_operator":"and"}],"sort_fields":[{"field":"subject","order":"asc"}]}}
- In the above JSON, replace the value for "fields_required" json array with the custom attributes created in ServiceDesk Plus On-Demand Request template for user creation.
- Encode the input using an URL encoder and replace in the Endpoint URL instead of ""<URL encoded input params>". You can use any online tool to url encode the input_params like https://www.urlencoder.org/https://<SDP_SERVER>/api/v3/requests?input_data=<URL encoded input params>
- Click Advanced Options to add headers and parameters.
- Method: Choose Get.
- Headers: Configure the respective HTTP headers and their values.
- Accept: application/vnd.manageengine.sdp.v3+json
- Content type: application/x-www-form-urlencoded
- Host: Enter your ServiceDesk Plus On-Demand instance URL
- Parameters: Add the query parameters needed for endpoint configuration.
- Message type: Select None.
Sample filter:
Sample Request:
https://<sdp_server>/api/v3/requests?input_data=%7B%22list_info%22%3A%7B%22row_count%22%3A%22100%22%2C%22start_index%22%3A1%2C%22fields_required%22%3A%5B%22udf_fields.udf_char2%22%2C%22udf_fields.udf_char3%22%5D%2C%22search_criteria%22%3A%5B%7B%22field%22%3A%22last_updated_time%22%2C%22condition%22%3A%22is%22%2C%22value%22%3A%22%24(LAST_24_HRS)%22%7D%2C%7B%22field%22%3A%22subject%22%2C%22condition%22%3A%22like%22%2C%22value%22%3A%22New%20employee%20joining%20the%20organization%22%2C%22logical_operator%22%3A%22and%22%7D%5D%2C%22sort_fields%22%3A%5B%7B%22field%22%3A%22subject%22%2C%22order%22%3A%22asc%22%7D%5D%7D%7Dinput_data before encoded:
{"list_info":{"row_count":"100","start_index":1,"fields_required":["udf_fields.udf_char2","udf_fields.udf_char3"],"search_criteria":[{"field":"last_updated_time","condition":"is","value":"$(LAST_24_HRS)"},{"field":"subject","condition":"like","value":"New employee joining the organization","logical_operator":"and"}],"sort_fields":[{"field":"subject","order":"asc"}]}}NOTE: "udf_fields.udf_char2","udf_fields.udf_char3" are the AD attributes created as additional fields and added in SDP template. - Check the Repeat calling this Endpoint option to repeatedly call the API until you get the required response. From the drop-down menu, select the parameter and specify the increment value. You can also set a condition, which, when satisfied, calls the endpoint repeatedly.
- Endpoint URL:
- Once done, click Test & Save. A response window will display all the requested elements.
- Click Data Source - LDAP Attribute Mapping to match endpoints and to map AD LDAP attributes with the respective attributes in the HCM solution.
- Enter the Configuration Name and Description, then select the Automation Category from the drop-down menu.
- In the Select Endpoint field, select those columns that are unique to users (such as employeeIdenifier and username) but hold the same value in all the endpoints.
- In the Attribute Mapping field, select the attribute from the LDAP Attribute Name drop-down menu, and map it with the respective column in the HCM solution.
- Click Save.
Steps to generate Client ID and Client Secret:
- Navigate to the API console (https://api-console.zoho.com/).
- Click Add client and choose the client type as Server Based Applications.
- Enter a desired Client Name.
- Enter the Homepage URI as ADManager Plus URL (for example: http://<hostname>:<portNumber>).
- Enter the Authorized Redirect URIs as (HomePage URL//OAuthCode.do).
- Enter a valid JavaScript Domain URI.
- Click Create to generate Client ID and Client Secret.
Actions supported:
Upon integration of ADManager Plus with ServiceDesk Plus On-Demand, the following actions can be executed:
- Create user accounts
- Add users to groups
- Modify user attributes
- Remove users from groups
- Modify user accounts by template
- Create mailbox
- Reset passwords
- Disable or delete mailbox
- Unlock user accounts
- Move home folder
- Enable user accounts
- Delete home folder
- Disable user accounts
- Revoke Microsoft 365 licenses
- Delete user accounts
- Manage users' photos
- Run custom scripts
- Move users across groups
- Auto-reply settings
- Disable Skype for Business accounts